2. Digital bodi-odi-odies*
*pronounce in Australian accent, quote by drag performer Courtney Act
 Final result, Loes Bogers
For this weeks' assignment, I've done the research and practice work without separating them, to see if I can keep the thinking and doing more connected. I loved the week's theme of not thinking of the body as a white canvas, but instead understand how any perception of, or idea about bodies is already cultural and, if I may add: implicated in body politics. It resulted in three experiments and a realized physical model made out of paper. In summary I have:
- Generated a 3D mesh of a body using MakeHuman
- Generated a 3D mesh of a body by scanning, using SizeStream and Capture app for iOS
- Manipulated a 3D mesh (using Rhinoceros)
- by chopping limbs using the MeshBoolean commands
- by rotating and making repetitions
- by adding a platform using the MeshBooleanUnion command
- by reducing the amount of faces and vertices of the mesh
- etc etc
- Translating the design into flat pieces using Slicer
- Cut the designs using a laser cutter and assembled a paper model.
Inspiration: 3D representations of the body I enjoy the art works below because they somehow ask critical questions by what they embody: e.g. what is the relationship between enlightenment, consumerism and pollution? Do we treat our bodies with respect or as a tool? What is expected of women? What is our relationship to sexuality?
More sources of inspiration (more conceptual) are found throughout the research below.
 * Top left: Nick van Woert, bottom left: Dongwook Lee, center: Iris van Herpen en Studio Drift, and on the right: Charles Ray (2x)*
About my model the rolemodel
I decided quite quickly who I wanted to be the model for my mannequin. It is modeled on a scan of Mixen: a super bright and wonderful person, friend and parent. I've known them for almost a long time. I love talked about topics relating to the body, gender, politics with them. Especially over a bowl of porridge, which they serve with peanut butter or apples caramelized in butter. I would love to dedicate this assignment to them and hope I won't disappoint.
The way I've come to know Mixen: the will only wear one label: that of feminist killjoy and they wear it with pride. I learn from them every day. They're able to create a welcoming space for everyone without making themselves smaller for anyone, and I love that about them. That is why I want to model a torso based on their 3D scan that is fully lifesize, and not a mm smaller.
I would like to capture what I perceive to be the essence of Mixen, how they stand, carry their body, the volume of it, its strength as a whole, without necessarily replicating them exactly.
Research 1: Are digital bodies standardized bodies?

The mannequin at Nike's London flagship store that sparked outrage earlier this year. Image by Nike.
Let's start here: How is it possible, that in 2019, a sports wear brand like Nike manages to spark a total online outrage by introducing bigger mannequins at their London flagship store? The consumerist glamour fantasy hasn't been real for a long time now! Walk out of the Nike store, onto the highstreet where it's located and you might see that actually, it is pretty common to have a body like this. Western European and Nothern American norms and culture tells us it's ok to judge a big body, mercilessly. Wow. Unlike some other commentators, Dr. Nikki Stamp explains this issue very well in The Guardian in her piece "Berating Nike for Plus Size Mannequin is no War on Obesity, It's just War on Bigger Bodies".
How did we get here? And more importantly, how do move on?
Albrecht Dürer's synthesized ideal nudes
In the 15th and 16th century, Albrecht Dürer investigated Renaissance concepts of perspective and the right proportions of the human (nude) figure in his Four Books on Human Perception. Dürer's work is considered seminal in the field of art and foundational for the practice of life or figure drawing. His development of the “ideal nude” is the result of calculating the average of many bodies and synthesizing them into one body. John Berger explains in Ways of Seeing:
Dürer believed that the ideal nude ought to be constructed by taking the face of one body, the breasts of another, the legs of a third, the shoulders of a fourth, the hands of a fifth - and so on […T]he exercise presumed a remarkable indifference to who any one person really was. In the art-form of the European nude the painters and spectator-owners were usually men and the persons treated as objects, usually women (Berger 2008, p. 56-57).
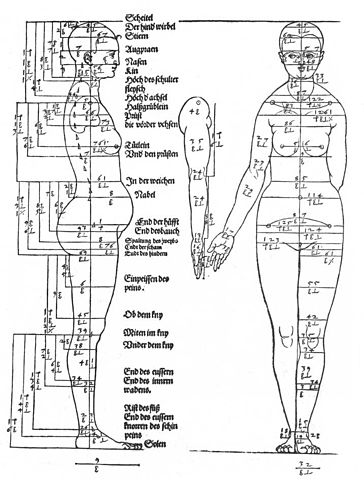
Studies on the Proportions of the Female Body by Albrecht Dürer, 1528. Bamberg State Library. Image taken from Wikimedia commons.
That's not a far cry from standardized sizing systems and even big data around the body. To measure = to know = to control. I don't want to take this direction even though I'll be using tools that allow me to take and use measurements of a 3D body scan immediately.
Standards and Deviants: the Measure of Man and Woman
The average woman stands 160.5 cm tall and weighs 62.5 kg. The average man is 175.5 cm and weighs 78.4 kg. If these standards do not apply to you, you are not normal by design standards. (Pater in The Politics of Design, p. 181).
In his book The Politics of Design, Pater discusses designer Henry Dreyfuss's implementation of body measurements in product design on a large scale, which increased usability and safety of designed objects. His The Measure of Man and Woman (1959) is still a go-to textbook for design students, apparently. However, the data Dreyfus used was based on a dataset with measurements of young military men: quite a specific slice of the population.
Ruben Pater describes standards and standardized models of human bodies as being useful for mass production, but as also creating a false sense of truth: such as projecting only a binary view on gender (i.e. man or woman), ignoring other gender types suh as genderqueer, androgynous, transgender, agender and other gender identities. Often these models can be seen to be biased towards West European body types (Pater mentions e.g. average height of Bolivian females being 142.2cm compared to Dreyfus' standard of 160.5cm) or conversely, they are based on stereotypical and racialized representations.
Data Bias in a World Designed for Men
In her book Invisible Women: Exposing Data Bias in a World Designed for Men, that came out in 2019, Criado-Perez describes an overload of design problems due to gender bias in the design world, from toilets to clothing to urban planning. Amazing book. Watch the video for a teaser relating to women's clothing and toilet use, then go buy the book.
Experiment 1: MakeHuman - an interface critique
Sexualized and racialized bodily stereotypes still abound and not only in fashion and product design. The world of technology and software development echoes many of the stale ideas around the female bodies, able bodies and bodies of color.
I did not go into history there, but started exploring this week's tools. I figured that asking some critical questions about the imagery in splash screens, and labels and classification systems used to structure and add meaning to interfaces of the software is worth mentioning as part of the research. Interfaces have politics too? I'd say they do, yes! And it's quite interesting to unravel. If you want to try it out: helpful list of prompts and provocations to confront an interface with is listed in Hangar's Interface Manifesto. I created a powerful fictitious person named MakeHumanAngry with MakeHuman, and they proudly wear a women's sports wear crop top, but they aren't amused...

GIF by Loes Bogers via GIPHY, using screenshots of MakeHuman software
Imaginaries of the virtual
The splash screen of the MakeHuman software is a typical "virtual" fantasy of three fit and slender human figures, bodies that I would associate with my own 14-year old body. They are in an embrace where the arms of the left and right figure covers that of the middle one's breasts, who is facing the camera. They don't have any primary sex organs however. Which aligns with the fact that after the splash screen, a trigger warning appears: be cautious as you might see bodies. And they might be..... NUDE! We would not want to offend anyone with unsollicited anatomical truthfulness. A correctness that the interface doesn't care so much about effectively as you will later have the option to blow up your avatars genitals as big as your fantasy requires.
Blumenbach's racial classification system, still here today
The interface also uses biological theorist Johann Friedrich Blumenbach's outdated and very problematic racial classification system from the 18th century. It's the one with categories like like "caucasian", and also the one underpinning the later eugenics, a branch of pseudoscience that was used to justify the Holocaust. News flash: they're not real. They signify nothing besides an imagined superiority of Western European/American white folks: it's a construct created to divide. As an interface design alternative, one might just observe and describe the features themselves, rather than grouping them according to a system that perpetuates racial stereotypes. Find out more about it in this nice article: Why Do We Keep Using the Word "Caucasian?" by Jolanda Moses
Your weight/body fat/breast size might be deemed off the charts
Each bodily feature can be adjusted with a scale (size of arms, proportions, muscle mass, facial recognition, body fat etc). It's worth considering where these extremes stop. There's a limit to how fat or skinny a body may be apparently, even in 3D virtual world.
Gender stereotypes in avatar's outfits
Yup, they're there too. Go pick "women's sports outfit" and your avatar will be sporting the cropped top (a top that leaves the stomach bare) you see on the avatar below. Then go and look at the men's ones.
Download MakeHumanAngry (made with MakeHuman) here:
Get The Body You Want!: Creating a 3D mesh of someone's body by scanning it
Capture app for iOS
I used this app for iOS, that creates a point cloud from a scene you capture by slowly moving your phone. It didn't work on my good ol' iPhone SE, so I used my sister's newer model, thanks sis. I made a capture of myself and my sister's child on my lap. Of course they didn't really want to sit still (11 months old). But you still get the idea. The .usdz file was a little hard to manipulate or even view. There's not so many tools yet for this Apple-native 3D file format, so it's still a bit hardcore. This tutorial explained a bit more about the filetype... I managed to view it by opening it with TouchDesigner though, it looks like this:

3D scan of myself and my sister's child made with Capture for iOS, Loes Bogers
SizeStream More useful to me was the SizeStream SS20 body scanner and software we have at work. Colleagues at the Fashion Research and Technology group use this machine to create a database of measurements to optimize e.g. the design of uniforms. The process of scanning is so straightforward, it's a bit silly to document, but here are the steps and below is a video that shows how it's done. Even the voice instruction and music you hear is really how the interface guides you lol.
- Step 0: find a model and ask for permission to use their data. Specify how you'll use it.
- Step 1: ask them to step into the scanner and hold handle bars,
- Step 2: open the software
- Step 3: press the big button to start scanning
- Step 4: wait until the lady sings and download your files in the program folder
A scanner that takes your measurements
You get a 3D file and a textfile that holds the measurements defined in this particular software. The file is often not perfect, e.g. when somebody is moving during scanning or when they are wearing loosefitting clothes, or when they have a atypical body that is not delimited in the software's classification system. It will literally not recognize the person if they are not standard enough. Not much has changed since white privileged males their pencil-drawn studies of the human form: they are still preferred (near)-nude, as passive as possible and to not deviate from the norm. Unruly bodies ~~not welcome~~ I mean not accounted for.
Fortunately things like the file can still be repaired. A far cry from healing from centuries of patriarchy, sexism and body shaming under the guise of building generalizable knowledge but hey.
Body language of the SizeStream What is kind of nice I think, is that it requires you to grab the handlebars next to your hips. I think it's a nice and strong position to take, not taking any notice of the kind of desirable positioning that for example a male gaze might require, lol. This position also suits the personality and body language of my model quite well.
Repairing the 3D file I repaired my file using the Netfabb Service where you can upload your .obj or .stl and it tracks down naked edges and messy meshes and repairs them so you can print your 3D file nicely if you wanted to. And we're ready to go! My model is ready to be boxed in:

A Screenshot of the 3D scan
Research 2: What is accuracy beyond inert matter?
What I personally find more interesting are studies that also acknowledge the fact that bodies act, they move, they morph, they change, they have agency. They're not passive things that exist in a void. Capturing that can also tell us a lot about the body but asks us to think more flexibly about accuracy and ways of representing the body.
Étienne-Jules Marey and Eadward Muybridge's movement studies
I immediately think of Marey and Muybridge's movement studies from the early 19th century. Their research and methodologies are still so current. They were the first to study movement with the use of the then novel technology of photography. They studied for example the precise movements of birds in flight and horses galloping, that are hard to study with the human eye alone. Their images are famous and both actually also invented their own tools to do their studies, such as the sphygmograph (pulse meter wearable from 1863) and the chronophotographic gun, a high-speed camera from 1882.

Muybridge's Boys Playing Leapfrog 1883-1886, Wikimedia Commons
What these two do quite interestingly is adding the factors of time and space to the capture of a body, rather than abstracting and decontextualizing it as if it existed in a vacuum. This is however still a rather positivist approach to understanding the body, that separates what can be known about the body from the experience of it. It also assumes that there is something of a god's perspective: an eye that can see at all times at ones, from all perspectives at once.
Experiment 2: Time and Space in Rhino?
To try out some of these ideas, I went into Rhino to refamiliarize myself with this lovely toolbox. With which commands do I command my model into shape? Or rather, with which commands do I allow myself to see them anew?
The lovely person who modeled for my model cultivates 1001 angles on themselves on a daily basis, to create a space to work and to enjoy and make life manageable by lubricating intercultural communication, and (project a suggestion of) meeting the standards of themselves, family, housemates, friends, supervisor(s), neighbours, school staff and so on.
Outcome: you get a statue! You get a statue!
It sounds like this person deserves a statue for this. Here's what the object ended up looking like:
Manipulating the scan in Rhinoceros
The process was something as follows. I started by boxing in the body, in order to "chop" off the body parts I imagined not needing (this changed later on). For this I used the Box command, combined with Rotation, Move, Mirror, Scale1D (for stretching the box longer for example) and some other basics. I use "ortho" or hold shift for most commands, to work in straight lines. It gives me more control. When the model is finally boxed in, I could cut the body parts in the boxes using MeshBooleanIntersect.
Note to self: what I forgot about is that you can turn a Mesh into a NURBS object (a solid again) and then manipulating the 3D model with Boolean commands is easier and gives more options. Remember to group the objects. Thanks @Cecilia.
GIF by Loes Bogers
What you see in the GIF below is part of the process where I thought it would be a good idea to chop the head and arms off. Totally changed my mind on that. It actually takes away a lot of the interesting details in the body language doing that, so I went back to an earlier model :)
I used the rotation command to rotate the 3D model with small increments. Keeping the copy box ticked allows you to replicate as you go. You can see I tried some different versions.
 Screenshot by Loes Bogers
After playing around quite a bit I ended up with this marble-ous torso figure ready to be printed to life and handed out. It's quite interesting how adding a socle or supporting base and rendering in pure white immediatly gives this classical statuesque feel. Maybe it's the regal hairdo, I'm not sure.

Research 3: Cultural Representations in Numbers: What is a Measuring System Made of?
Also, the way the body - and how it is captured and measured - is inscribed with culture is not addressed in Marey and Muybridge's work. For that we look elsewhere, such as in....
Virtual Drag by Alison Bennett, Megan Beck & Mark Payne
This project is a virtual reality experience featuring 3d scans of drag queens & kings, set in really crazy fantasy environments. We see once again that so much can be queered in the virtual. I would love to finish this week by showcasing all these experiments in an environment created in Unity. For the wishlist.
Orlan's MesuRAGEs
This artist does amazing work using her body as a material. In this series of art work, the artist measures streets or buildings using her own body physically and literally as a unit of measure: the ORLAN-corps, whilst raging against the male power that is represented in the way big institutions such as museums are built.
Lucas Maassen's - Meten is Weten
Somewhat related is designer Lucas Maassen's workshop Meten is Weten at Nieuwe Instituut in Rotterdam in 2016 (I did not attend!), where he questions measuring systems with kids. A lot of measuring systems are historically based on the body (e.g. the measurement in feet), but where do they come from, and whose bodies are they based on?

Photo by Petra van Ree
Experiment 3: Beyond Numerical or Cartesian Accuracy, toward Material Truthfulness?
To allow them to be unruly, I thought to think of a technique that prevents them from being captured with standardized measuring systems with any precision. How could I abstract Mixen in a truthful way, without re-presenting her with the kind of razorblade precision that measure-controls her down to the mm? In the time I have left, with the limited skills I have, can I find a way of re-presenting a body by rendering it in a way that is clearly not meant to be realistic or truthful? Render the body in a way that points to its inherent artificiality, and showing the digital material it is made of?
There's a nice challenge in finding some abstraction without losing all the personality. It's also somewhat convenient, because the scan was taken while wearing clothes and suspenders, which adds some details that are hard to recognize and therefor a bit distracting. What I ended up creating is a render of my 3D model that magnifies the fact that it is made up of connecting vertices at a resolution that may or may not trick the eye. This is the 3D design I ended the week on:
Design process: abstracting the model in Rhinoceros
So how do I go about reducing this model. I started browsing the Mesh menu and indeed found some interesting tools, like Mesh edit tools and within that Reduce mesh, our winner!
It lets you reduce the amount of polygons in the mesh by specifying an absolute number, or by putting in a percentage. So I played around with it until I found a sweet spot.
What I realized is that my mesh was huge. I was trying to import it into Sculptris earlier, (I had an idea to "clean" up the scan) but it was way too big. It was originally 29952 faces! That's a lot. For reference: in the overview image, the first gray picture on the left is the model reduced to 80% of the faces (5990 in total) and the loss of detail was hardly visible to the naked eye looking onscreen. Good to know for the future.
At 95% I started losing details in the face. And at 99% (300 faces) it started getting interesting and abstract. I also lost the - already "damaged" - foot though. But this is kind of what I was going for. So I changed to absolute numbers. The top right 2 gray images show 300 faces (left) and 100 faces (right). In purple is what I consider to be the sweet spot of 200 faces.

Playing around with reducing the number of polygons, in the end I reduced the model to 200 faces (in purple)
Material choices before fabrication design
I'd prefer not to go overboard on material use in creating this assignment, as I have no idea whether I'll be using the mannequin intensively at all. So I'll try to reduce the amount of materials required to produce the torso while still making a full-sized torso that hopefully comes out nicely. The default material provided by is 4-8 sheets of corrugated cardboard, with dimensions of 1160 X 960 mm and a thickness of 3mm.
Stacking slices makes for a nice solid mannequin with a lot of detail but easily eats up more than 20 cardboard sheets. So you will see I've opted for the folded panels technique using Slicer (see below), and estimated I'd get better results using 300gms colored paper because it allows me to fold the vertices using tongue connections (see below). I got my go-to heavy duty paper: Florentino 300gms at Van der Linde in Amsterdam.
Translating 3D model into flat design plans with Slicer
I installed Slicer for Mac and imported my .STL file. The orientation was wrong so I changed the up-axis to the Z-axis (not Y) on import and then clicked the rounded arrow button a few times to get the thing up straight.
I played around with the different techniques and settled on the folded panels technique and made some decisions about my material (see above). Then I put in the dimensions of my material and looked at the plans and the errors. My pieces were way too big for the material so I had to add a lot of seams.
There's quite a nice basic tutorial written by Fabian Morón Zirfas & University of Applied Sciences Potsdam that I looked over here

the amount of space piece 1 would need (see dark gray reference box for size of the material I'm able to buy, woops haha)
Cutting the design plans
After I ran a test it became clear that the slots I had for my design were not going to be big enough to give the structure any integrity and would only work as orientation markers. I tried getting the design sliced with bigger slots but the very narrow vertices cannot accommodate tabs or slots well. I spent the whole morning but was unable to resolve the issues using this technique. So was ready to opt for taping down the seams on the inside, using the slots as a guide.
 Cut test for slots (see size of glasses for reference)
Paulina who was cutting before me had some issues with the machine so I didn't get a chance to cut on Monday. This turned out to be a blessing in disguise! In the evening I stubbornly tried to optimize the designs by using tabs instead of tongues, and also enlarging the tabs. For some reason the software wouldn't let me do it earlier today or kept complaining about model issues. This time around I was able to make a cutting layout that could actually work! OMG yes! I think the trick was to just start all over and import the .stl file again. For some weird reason Slicer just seemed to need a fresh start.
 put it on the tab please
How to Use the BRM Laser at Fablab WAAG
This is the same laser I'm used to at work but an older model so some stuff is different. For example, I need to use much higher settings to cut this paper than I would at work (Speed 100/Power 20, compared to 16 or so). NOTE: I only did a test here, because of some issues with someone else's assignment I decided to cut my assignment at work where we have the same laser, just a newer version.
 untick all boxes and get less headache later...
Cutting at WAAG: step by step:
- Export design to Illustrator 2, and untick all the boxes
- Or use a .dxf
- Copy the file to the desktop or the LaserCut program will crash
- Import the file (not open)
- On machine: 1) turn power knob to the right, 2) turn power button on, and 3) turn on the water cooler and 4) switch on laser head (just before you start cutting, because: noisy).
- Calibrate the height of the laser head using wooden block provided
- Position material, and set origin or anchor (hit esc if machine doesn't respond)
- Delete double lines Go to Tools - Unite Lines
- On laser software: put in settings (do test first!) I tested for 300 grams paper on speed 100, power 16, 18 and 20 and settled on the latter.
- Download file: del all to delete old file, download new file to machine.
- Run a test, check check check, turn on the laser head and GO! Stay with the machine.
Problems
The laser software didn't recognize the colors in my design, so I had to redo my designs before taking them to the laser. I usually like working with the pure RGB colors to specify cut jobs (cut, engrave or ignore). I didn't manage that today, but will see if the laser I use at work will recognize the layers.
I saved a copy with all data in Illustrator, then I deleted the annotations layer (I will mark them in pencil after cutting so I can recognize which is which). Then put all the lines on one layer, and saved another copy for cutting.
Eliminating double lines in Illustrator - THIS WORKS!
I got a lot of double lines when cutting tests. Even though the laser software can reduce some. I couldn't resolve it completely. So tried to anticipate it in the Illustrator files. I found this tutorial, and it works! Zero double lines after doing this. Just remember to ungroup the vectors after because the laser software does not like...
The Final Cut
So in the end: I will cut only the outlines and the fold lines and kept the canvas frame for reference because the measurements can get messed up when taking the design into the laser software. It's easier to compare when including the canvas edge, rather than selecting only the elements. Recipe for the ultimate ;-P cutfile:
- Space elements away from edge if needed
- Save a reference copy with all data
- Delete annotations layer (unless you want to cut the numbers on the pieces, but I don't).
- Cut everything
- Delete all layers beside one (doesn't matter which)
- Paste in place
- Select an outline (blue), go to the "Select" menu, then "Same", then
- Group the elements
- Open "Pathfinder" tools under "Window", and press "Outline", reset the stroke in a pure RGB color
- Ungroup the elements again (this is important!)
- Repeat step 7-10 for the other colors in the drawing that need different kind of cutting job. Separate e.g. scoring/dotted lines from engraving or cutting.
- Save as Illustrator 2 file (or Illustrator 8, or other, as your machine requires).
- You should now have a cutfile with one layer and only ungrouped elements, and a reference file that still has all layers separated and still has the annotations layer so you can find out what's what.
Change of plan, cutting at work
I had to do another cuttest because I changed to the different machine and ended up cutting at speed 400 power 22. Some of the element curled up so I had to be smart about layering and order of cutting, because once they curl up the focal length changes so you will not get nice cuts anymore. I made sure the machine cut the insides and then outsides by separating the layers and ordering them, and changing these settings:
 Be smart about settings loesy goosey
Assembling the model
Ohm this process was crazy. It already was intimate to make this 3D model of a friend, but it got real intimate right about now! Cutting took an hour, but assembling took me the whole rest of the day, another 8 hours.
Armed with sticky notes, painting tape, duct tape, a ruler and a pen, I set off to assemble this design using the slicer app for reference to see where the panels were. When I got further into the assembling process I found myself also writing which body parts they belonged to because it was getting really confusing really quick! I taped down all the little splices because they were easily damaged. I started with painting tape, because I wanted to be able to fix mistakes, but in the end duct tape was much better for this.
The tabs give guidance and hold the mannequin together to some extent, but they're always located in the middle giving little support to the edges. They were quite strong though as the tab is made slightly bigger than the hole, but it's also very easy to manipulate the paper too much (ugly!) because you have to pull at it a lot. So I ended up trimming them with tiny scissors.

Order of assembly
I made the separate limbs first and then put it together. The size of the mannequin was a little too big for the strength the paper could give. A smaller model would have been much sturdier. But in the end I filled it up with the left over paper from cutting and it's standing firmly now! Probably not fit to travel though. It was quite amazing how it went from very floppy (in the middle of the process) and feeling it gain coherence and structure as I advanced. It also reminded me a lot of how confused I can get while sewing when you have to keep pulling things inside out. I find it easy to get confused about what body part I'm working on haha. I assembled in this order, constantly referring to the slicer 3D model to see which parts should connect:
- Left arm: 19, 20, 23, 24 and 25
- Right side of belly: 1,3,14,21 and 21
- Chest/belly: 4, 5 and 12
- Head: 13, 31 and 32
- Back: 6, 7, 10, 11, 15 and 17
- Right arm: 27, 28 and 29
- Last bits:
- 9 = near left shoulder
- 8 = near chest (left)
- 2 = underneath bottocks (I didn't use this)
- 16 = near right shoulder
- 30 = near chin/shoulder (I didn't use this)
- Connect the above elements starting from the head down

Entirely consentual assembling going on
An ikea moment
And..... done! With I had to stuff the mannequin a little with the left-over paper, but here they are. Gorrrrrgeous. And surely there had to be some mystery leftover pieces! They can be placed at the head and neck but it doesn't really help. The slicer made some sub-optimal constructions for the neck. And there's also a hole in the back (which can be fixed easily by designing another vertex for it). I missed that when working on the flat designs.

Files
A zip with all the files for cutting and assembling can be downloaded here
References
Berger, John. Ways of Seeing, London: Penguin Books, Penguin Modern Classics, 2008 edition.
Criado-Perez, Caroline. Invisible Women: Exposing Data Bias in a World Designed for Men. Vintage Publishing, 2019.
"Interface Manifesto", Hangar, 2015: https://interfacemanifesto.hangar.org/index.php/Main_Page
Moses, Yolanda. "Why Do We Keep Using the Word 'Caucasian?', Sapiens, 1 February 2017: https://www.sapiens.org/column/race/caucasian-terminology-origin/
Pater, Ruben. The Politics of Design, Amsterdam: BIS Publishers, 2016.
Stamp, Nikki. "Berating Nike for plus-size mannequins is no war on obesity – it's just war on bigger bodies", The Guardian, 12 June 2019: https://www.theguardian.com/commentisfree/2019/jun/12/berating-nike-for-plus-size-mannequins-is-no-war-on-obesity-its-just-war-on-bigger-bodies