8. Computational couture
This week I produced some printed results, but I mainly spent a lot of time documenting what I learned from the Grasshopper tutorials I did, to build up a vocabulary or archive of useful clusters that represent a functionality or method. A bit like a function in programming I guess? Once I have a good overview of these it will be a bit easier to start doing my own designs/scripts by using them as building blocks. Screenshots of these annotated blocks allow me to quickly look at how stuff is done without having to go all the way into Rhino & Grasshopper (it gets a bit slow :D)
"Tangible" Results
Besides the documentation below, I also tried out some designs by printing them on textile. I worked with the image sampler to create some shallow surfaces consisting of separate geometries. They would fall apart if printed in the usual way, but printing them on textile holds them together. Sizing is a bit of a trial and error still. These samples are useful to try out how small you can go without elements just falling off. I printed these with an Ultimaker 3, using PLA, and Cura as a slicer.
 First test on organza looking promising at first, Loes Bogers, 2019
 3D texture on velour/velveteen, Loes Bogers, 2019
 Some truchettiles on velour/velveteen (right) and lycra (left), a bit too thick for my taste, Loes Bogers, 2019
Things I can think now that I've tried making a few of these
- Thin, single layer lines on velour/velveteen are so nice! Go nozzlesize (0.4mm) in the design and extrude the minimum (0.1mm) for standard setting print in Ultimaker.
 Not stretching the fabric out is a mess (left), single thin lines on velour/velveteen are beautiful though! (right), Loes Bogers, 2019
- Very small dots jump off like crazy! Don't do very small single dots
- One layer of PLA is flexible, but it gets rigid after that real quick. If you design a relatively dense patterns I'd probably not make it higher than 1 mm for big chunks at a time.
- Could you print interlocking elements onto textile to sculpt garments?
- Grid-like structures give interesting rigid parts but need to have a function, otherwise it's just, well, hard.
- Covering the print bed with double sided tape helps prevent the textile from moving around and being dragged by the nozzle.
 Double sided tape on the bed, to keep the textiles from moving around, Tesa tape, Loes Bogers, 2019
- Lycra needs to be fully tensed (stretched as for as possible), or the printer nozzle goes on a date with the textile. We do not want.
- Single lines on thin stretchy lycra are a bit ugly in my sample but I think they could potentially be interesting to give textures/frills.
- Organza is amazing, pink is amazing. You're perfect, never change.
- It would be nice to be able to turn off the skirt line (outside design, the printer adds this). Check out how.
- Printers just don't do small intricate objects all too well, so be aware.
 These came jumping off, too small, I kind of like what the white line is doing curling up the lycra on the left though, Loes Bogers, 2019
- Stopping a print halfway sounds like a good idea, but you don't get a full shell unless it runs until the end. You don't really want to see infill I suppose. Unless you do, of course.
- Scaling after the fact in the slicer software seems like a good idea too. But thin lines will get thick if you scale up and vice versa. Your working parametric now, Lucy goosey, just push a few sliders and do things at their proper size ;-)
- The Ultimaker 3 does an automatic leveling sequence to check if the bed is level and even. It does not want to have textile stuck on top of the bed. Luckily, the PRUSA printer, the ultimaker 2+ and 2+ extended can be fooled.
- Slowing down the print speed to 50% helps create better adhesion to the fabric, and make nicer lines with less dragging.
 Trying out the grid deformation designs (with tensors technique, see below), slowing down the speed of the printer gave much better adhesion (right), only printing one layer keeps the textile very flexible, Loes Bogers, 2019
Tutorial time
Designing parametrically takes quite a different shift in thinking about shapes and designing. I have done simple parametric design using Eagle (for electronics production), Processing and very basic parametric 3D design using Fusion360. Rhino+Grasshopper definitely allows for super beautiful architectural forms and patterns. But I found out quickly that it's quite hard because it takes quite an abstract mathematical approach to shapes and relationships. This doesn't come naturally per se, so I decided to do loads of tutorials to get a grip on it and maybe tweak a few to understand the design to fabrication process.
Plug-ins and user objects
Get your plugin on here: Food4Rhino I used bifocals as recommended by Eugenio.
And also used the remap+ user object that is used a lot by the Parametric House guy.
Tutorials with Eugenio Bettucchi (Noumena)
Eugenio guided us through some basics in Grasshopper, such as the interface, using fields with attractors and repulsors and all sorts of components and useful methods to link things together.
Tutorials by Parametric House
I also enjoyed a lot the tutorials by Parametric House! They don't just show how to build up a design, but also explain the logics behind it, which is reaaaally helpful at this beginners stage. I saved them in a Youtube Playlist for later reference.
Rotating curve
Pretty nice beginner tutorial this one here.
 Rotating curves, step one, Loes Bogers, 2019
 Rotating curves, step two, Loes Bogers, 2019
 Rotating curves, step three, Loes Bogers, 2019
 Rotating curves, step four: an important one! Offset, merge, loft, extrude, Loes Bogers, 2019
And the tutorial in action on my laptop! Loes Bogers, 2019
Geometric Pattern
This tutorial was great for creating tile-like patterns like the one I made below. I was not successfull in creating a printable design yet! I have to study the parameters a little better to understand how I can avoid making crazy intersecting lines and end up with curves that an be offset and extruded. But good start and lots of playing around.
 Some other examples I made. Looking really cool, but Prusa slicer says no. Loes Bogers, 2019
Truchet tiles
This Truchet Tiles tutorial was also a super nice one.
 Loes Bogers, 2019
 Cluster to create a random pattern in a grid, Loes Bogers, 2019
 Producing a pattern that can be created for each cell, Loes Bogers, 2019
 Switching between modes, Loes Bogers, 2020
 Exploding cells and using the segments to define parameters for curves, Loes Bogers, 2019
 And another version of join curves offset, loft, extrude, Loes Bogers, 2019
Pattern using Booleans & Dispatch
This one here explains an easy way to generate patterns using dispatch and booleans. Here's the overview, and below a video of some slider action:
 Studying and annotating the dispatch tutorial by Parametric House on Youtube, Loes Bogers, 2019
Graft, Flatten, Simplify, Parametrize
You have to do quite some data management to organize and merge lists and groups of data well in a way that can be translated to geometry but this is so abstract, it's not easy to understand the why and how. This video does a great job at exaplaining why and when you should use these.
Here it is also explained in a tutorial file I made following the lecture by Eugenio, that shows the difference in a different way.
MD Slider
I find the MD slider very useful! You can use it to represent an area or surface in percentages (x: 0 to 1 and y: 0 to 1), which is also referred to as UV values. Oki cool. Some components only take UV values like that (so not absolute points relative to an origin, but points relative to the size of an area expressed in percentage. The image sampler also uses UV values for example.
Image sampler
This is an image sampler tutorial that allows you to use simple images to create geometry. I used this to print some of my samples.
 Part 1 of the clusters used for image sampling: using Reparametrize, UV Values, MD slider, and custom preview and remap+, Loes Bogers, 2019
 And this is part 2, Loes Bogers, 2019
 Using the grayscale image to make a 3D shape, Loes Bogers, 2019
 Trying out a different image, and this time making cones, part one, Loes Bogers, 2019
 and part two, Loes Bogers, 2019
 Creating a pattern of truncated cones, Loes Bogers, 2019
Substrate
I made some architectural shapes on a surface following this tutorial: https://www.youtube.com/watch?v=hlRgjS7R8pg
 The clusters, note the one on the bottom right, to select elements from a large group, Loes Bogers, 2019
Tensors
I also did a mute tutorial (much less informative for sure!) but still got some interesting results and prints out of this one. [Grid Distortion in Grasshopper using Tensors] (https://www.youtube.com/watch?v=PY4Byucrcpw) by Geometry Overload on Youtube.
 Loes Bogers, 2019
 Loes Bogers, 2019
 Loes Bogers, 2019
 Loes Bogers, 2019
Designing for the 3D printer
The main techniques I see coming back in most tutorials. For future reference. I see different things happening with the data management so have to study that a bit more.
 A way to create solids from curves, Loes Bogers, 2019
There's many more techniques to do it depending on how you're constructing it I think. But this works, also the one below. Sometimes capping surfaces helps. Sometimes it gets real messy with offsets though...
 And another way to create solids from curves, Loes Bogers, 2019
Inspiration
https://youreshape.io/fold-the-interfashionality/
https://www.youtube.com/results?search_query=paneling+tools+grasshopper
https://discourse.mcneel.com/t/new-quadremesh-command/85601
http://www.iaacblog.com/programs/fabricflation-_-structuring-textile-techniques/
http://www.co-de-it.com/wordpress/informed-flexible-matter.html
https://vimeo.com/299603461?fbclid=IwAR3DAIucdoxKruKTUdKozmeb14g2tdqWu2RUyt8FYzi2Z6O4GVDm0NtQGTM
Auxetic structures and metastructures
You can cleverly engineer materials so the change states in a way. Oh that is so cool! Bea found a file somewhere from somebody who made them. I'd like to explore this further. Especially for textiles it's interesting because they can really shift shape and SIZE!
This article describes some of the process behind developing the designs for these, and the theory. A bit dense but very interesting ideas there. I wish I had spent more time studying math and physics though, if only then I'd known how interesting the applications of such knowledge would be!
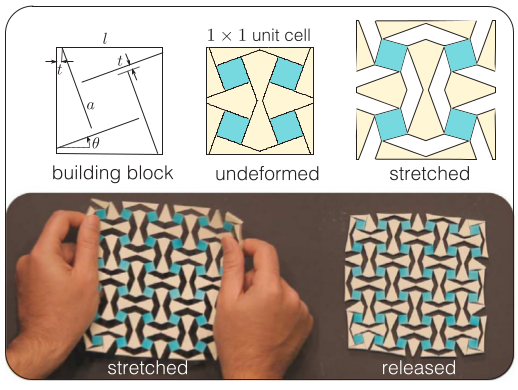 Bistable auxetics - squared building block and unit cell in the undeformed and stretched state. Rafsanjani, Extreme Mechanics Letters, 2016.
Amazing work done last year at Fabricademy here:
Lecture notes
What is computational design? A series of [automated] instruction carried out in a specific order (also definition of scripting). Hmmm this is debatable if you ask somebody with a humanities background.
Alberti: instructions for a building. Forms into numbers and instructions forfabrication.
Deleuze describes Cache's objectile ranks. See also, Mario Carpo's "The Alphabet and the Algorithm".
The capacity to produce variety.
Workflows
- design through parameters.
- loops and recursivity: output is result of a number of iterations over a duration of time
- agent based design
- CFD,eg Wearpure.tech, co2 absorbing garment
- physics simulation
- structural analysis: knowing where tension etc is will affect aesthetics and form
- optimization of materials
- evolutionary solver
Sectors of application
- fashion
- architecture
- interior design
- installations
integration of machine protocol AND design actions. Like the dress that is printed in one piece in a fold, but that unfolds into a large dress once it's produced.
Anywhere where it's nice to produce variety by controlling parameters. Connection between form and function gets a whole new dimension here. Whoa.
Inspiration
Nervous System
Conditional design - Luna Maurer etc
marey'S studies (time)
Wearpure project from WAAG: adding powder to material so it absorbs co2. Optimized to increase absorbtion of air by simulating. Then 3D printing filament onto textile.
Behnaz Farahi - http://behnazfarahi.com/caress-of-the-gaze/
Why Grasshopper?
Because it doesn't require programming or scripting knowledge to make generative algorithms. Allows designers to do it.