7. BioFabricating Materials
This week in biomaterials was a total game-changer! We kicked things off with some fun group experiments mixing up recipes like mad scientists and testing what these materials can really do. It was a creative, eco-friendly frenzy! It’s been an eye opener, showing me that sustainable design doesn’t have to be boring.
Nature's Got Your Back in Design
So, imagine if Mother Nature teamed up with a bunch of scientists to create the ultimate solution to plastic and waste voila! Biomaterials. These aren’t your average materials. We're talking about things like starch, agar-agar, kombucha (yes, the drink!), and even cardboard waste. These babies are biodegradable, eco-friendly, and the perfect antidote to the never-ending plastic crisis. No more guilt for using stuff that sits in landfills forever. Biomaterials are here to save the day.
This video explores the role of biomaterials in sustainable architecture and how they are reshaping the construction industry.
A deep dive into the latest innovations in biomaterials research and how these materials are being applied to advanced scientific projects.
A discussion on how biomaterials are being integrated into design, with an emphasis on innovation and sustainability in the field.
What the Heck Are Biomaterials?
Alright, let’s break it down. Biomaterials are magical substances that come straight from nature's toolbox—plants, algae, or even animal leftovers. And the cool part? They’re totally customizable! You want something as flexible as rubber, tough as plastic, or sleek like leather? With biomaterials, you can have it all. Depending on how you cook them up (yes, there’s a recipe!), you can get materials that behave just like the plastics or rubbers you know, but way more Earth-friendly.
Why Should We Care About Biomaterials?
Here’s the kicker: the world is drowning in pollution, and we need better alternatives. Biomaterials are here to save us from the plastic apocalypse. Not only are they biodegradable (they break down without leaving any toxic mess), but they’re also compostable! That means no more toxic gunk hanging around for centuries. Industries are already switching gears—biomaterials are being tested as replacements for single-use plastics, and designers like us are sneaking them into furniture, fashion, and even tech. Basically, biomaterials are like the cool kids who know how to keep it green and still look good doing it.
Why Designers Should Jump on the Biomaterial Train
As designers, biomaterials are like a blank canvas—but with way cooler textures and better karma. They open up a whole new world of creative possibilities and give us a way to design without adding to the planet’s pile of junk. Plus, using them can help support local economies and reduce waste, all while making our work stand out with fresh, eco-friendly vibes.
Group Work: Biomaterials, The Fun Lab Edition!
Overview of Our Lab Chaos
This week, we had a blast experimenting with gelatin and agar agar, diving into how these magical biomaterials can work for real-world projects. We went wild testing everything from flexibility to durability and transparency. Spoiler: We made some cool things but also learned there’s still room for improvement. Let’s dive into the details of our chaotic but fun experiments! Our team, made up of Naim Al-Haj Ali, Omar Otuom, and Dima Hejap, worked together to experiment and share our findings. Naim, a mechatronics engineer and digital fabrication enthusiast, Omar, a creative fashion designer, and Dima, a passionate visual designer, have been blending different aspects of design and engineering to test these materials.
Tools
Agar Agar Flexible Biofoil
Ingredients:
| Polymer | Plasticizer | Solvent | Additive | ||
|---|---|---|---|---|---|
| 5g (agar agar) | 15g (glycerine) | 250g (water) | 1g (food coloring) |
| Ingredient | Procedure | Results | Comments | Images |
|---|---|---|---|---|
| Agar agar powder, glycerine, water | Mix the ingredients in a pot, heat gently, pour into a mold, let set at room temperature or in a dehydrator. | Smooth, flexible, bends easily without cracking, but gets brittle when over-dried. | Great for food wraps but needs to be more resistant to moisture. |  |


Gelatine BioResin
*Ingredients:
| Polymer | Plasticizer | Solvent | Additive | ||
|---|---|---|---|---|---|
| 48g (gelatine) | 8g (glycerine) | 240g (water) |
| Ingredient | Procedure | Results | Comments |
|---|---|---|---|
| Gelatine, water, glycerine | Dissolve gelatine in warm water, add glycerine, heat gently until fully dissolved, pour into mold or spread thinly to dry. | Glossy, transparent, firm texture, but can be brittle if proportions aren’t right. | Great for decorative coatings, but needs better balance to avoid brittleness. |


Gelatine BioSilicone
| Ingredient | Procedure | Results | Comments |
|---|---|---|---|
| Gelatine, glycerine, water | Mix ingredients in specified proportions, heat gently, pour into molds, let set and dry. | Elastic, smooth, silicone-like texture but lacks durability compared to real silicone. | Promising alternative for soft components or prototypes; needs refinement for better strength. |


Alginate Threads
Alginate is made by combining sodium alginate, water, glycerine and a curing agent: Calcium chloride.
Ingredients
| Alginate | Glycerin | Water | Sodium chloride | ||
|---|---|---|---|---|---|
| 12g | 40g | 400ml | 10g (dissolved in 100ml water as a curing solution) |
Alginate Bio-material Process
| Step | Procedure | Details | Comments |
|---|---|---|---|
| 1. Mix the Ingredients | Pour 400ml of water into a blender, then add glycerin. Gradually add alginate powder to prevent clumping. Blend until smooth and uniform. Add food coloring for a vibrant look. | This creates a smooth, uniform alginate mixture. | The glycerin helps with flexibility, and the food coloring adds a fun touch! |
| 2. Refrigerate Overnight | Transfer the mixture into a container and refrigerate overnight. | This allows air bubbles to rise and disappear, ensuring a strong, bubble-free bio-sheet. | Refrigeration is key to eliminating air bubbles that could create weak spots. |
| 3. Sodium Chloride Curing Solution | Dissolve 10g of sodium chloride in 100ml of water and stir well. This solution helps cure the alginate material. | Essential for setting the alginate and allowing it to solidify. | Be sure to mix well to ensure even curing throughout the material. |
| 4. Shrinking During Drying | Alginate materials shrink as they dry. | Expect the material to contract and become more compact as it dries. | It's important to consider the shrinkage when planning the final size and shape. |

General Observations:
| Aspect | Agar Agar | Gelatine | Comments |
|---|---|---|---|
| Flexibility | Less flexible, more rigid | More flexible but can be brittle | Agar agar works best for packaging, while gelatine is better for applications requiring flexibility. |
| Moisture Sensitivity | More sensitive to moisture | Less sensitive but can break easily | Agar agar needs protection from moisture, while gelatine can be more forgiving if handled properly. |
| Shrinkage | Shrinks more during drying | Shrinks but seems to have more flexibility in the drying process | Both materials shrink, but gelatine appears to handle it better without losing its form too quickly. |
| Plasticizer Role | Glycerine helps in creating a firmer texture, but too much makes it too soft | Glycerine makes the material more bendable but can make it squishy if overused | Glycerine is crucial for flexibility, but balance is key for the ideal texture and strength. |
Making My Own Bio Materials Recipes Yay
Sage Sheet Gelatine Bioresin
Ingredients:
| Polymer | Plasticizer | Solvent | Additive | ||
|---|---|---|---|---|---|
| 84g (gelatin) | 8.4g (glycerine) | 240g (water) | — |


Laser Settings for Gelatin Bioresin Sheet
| Operation | Speed | Power | Mode |
|---|---|---|---|
| Engrave | 200 mm/s | 30% | Engrave |


Sage foam Gelatine Bioresin
Ingredients:
| Polymer | Plasticizer | Solvent | Additive | ||
|---|---|---|---|---|---|
| 84 g (gelatin) | 8.4 g (glycerine) | 240 g (water) | — | ||
| + 1 tablespoon dishwashing liquid |


EUCALIPTUS Gelatine Bioplastic
Ingredients:
| Polymer | Plasticizer | Solvent | Additive | ||
|---|---|---|---|---|---|
| 8.4g (gelatin) | 14.9g (glycerine) | 176.2g (water) | — |


Laser Settings
| Operation | Speed | Power | Mode |
|---|---|---|---|
| Cut | 10 mm/s | 70% | Cut |


EUCALIPTUS Macca Bioplastic Chrome
Ingredients:
| Polymer | Plasticizer | Solvent | Additive | ||
|---|---|---|---|---|---|
| 60g (corn starch) | 15g (glycerine) | 300g (water) | 1 tbsp dishwashing liquid, chrome powder |

Laser Settings
| Operation | Speed | Power | Mode |
|---|---|---|---|
| Cut | 10 mm/s | 70% | Cut |


2D Designing
I designed these laser-cut bioplastics using a mix of my own tweaks and some free resources.
I found some cool geometric patterns on Freepik, turned them into outlines, and saved them as .DXF or Rhino files to prepare them for laser cutting.
For the laser cutter settings:
- Use red hairline for cutting
- Use blue or black for engraving (depending on your machine’s requirements)
Here are the patterns I used as a base:
- Abstract Halftone Pattern Background (Free)
- Abstract Black & White Background (Premium)
- Black & White Optical Illusion Lines (Premium)
Feel free to download the files (I'll link mine soon), remix them, and shape them your own way.
Have fun experimenting and customizing!
🧅 Red Onion Biomaterials – A Journey in Color, Texture & Glam
A little drama, a lot of dye, and golden flakes of glam._
🧪 Act I — The Gentle Brew
I started just like in BioChromes week — by extracting a natural dye bath from red onion peels.
- 🍵 Base: Red onion dye bath (boiled peels in water)
- 💧 Plasticizer: Glycerine
- ✨ Additive: Crushed gold leaves
- 🩵 Method: Mixed everything together and poured it into a flat mold to set and dry
Result:
A soft, jelly-like translucent sheet with subtle shimmer and a rich purple-pink tone.
🧪 Act II — The Bold Blend
This time, I wanted to use the actual onion scraps to create a more textured, fiber-filled material.
- 🧅 Base: Blended red onion peels (pulp form)
- ✨ Additive: Gold leaf (because glam is now a theme)
- 🌀 Blend: Until a thick paste formed
- 🧼 Pour: Into a new mold for a different form
Result:
A textured, fibrous bio-sheet with a stronger presence, matte surface, and a rustic, natural look.
🧪 Act III — Mold Moments
For the final round, I played with form.
- Same blend as Act II
- Different molds: round, rectangle, shallow, deep
Result:
The same material took on entirely new personalities — proving that shape and drying depth affect flexibility, opacity, and final texture.
🧠 Reflections
- 🌈 The dye bath alone gives elegance and translucency
- 🌾 The onion pulp adds structure and tactility
- ✨ The gold leaf ties everything together with glam and glow
Each version taught me something new about natural materials, layering, and how playful design can get — even with onions.


Red Onions + Gold leaves Agar Gelatine Bioplastic
Ingredients:
| Polymer | Plasticizer | Solvent | Additive | ||
|---|---|---|---|---|---|
| 8.4g (gelatin) | 14.9g (glycerine) | 176.2g (water) | — |


Red Onions scartches + Gold Leaves Gelatine Bioplastic
Ingredients:
| Polymer | Plasticizer | Solvent | Additive | ||
|---|---|---|---|---|---|
| 8.4g (gelatin) | 14.9g (glycerine) | 176.2g (water) | — |


Red Onions Gelatine Biosilicone
Ingredients:
| Polymer | Plasticizer | Solvent | Additive | ||
|---|---|---|---|---|---|
| 43.5g (gelatin) | 14.3g (glycerine) | 250g (water) | — |


Laser Settings
| Operation | Speed | Power | Mode |
|---|---|---|---|
| Cut | 10 mm/s | 70% | Cut |


KAOMBUCHA
Bacteria Cellulose known as SCOBY (Symbiotic Culture of Bacteria and Yeast) leather, is created by fermenting tea with a symbiotic culture. This process produces a cellulose-based material that is flexible, strong, and completely biodegradable
Ingredients
| Ingredient | Amount | Notes |
|---|---|---|
| Water | 1 L | |
| Tea | 1.5–3 g | Use a mix of green and red tea for color. |
| Sugar | 100 g | Fully dissolved in brewed tea. |
| Vinegar | 0–100 ml | Adjust based on pH (ideal range: 3–4). |
| SCOBY Mother | About 8 cm in diameter | Ensure it’s healthy and active. |
| SCOBY Solution | A splash | Helps kick-start fermentation. |

Kombucha Fabric Creation Process
| Step | Procedure | Details | Comments | Images |
|---|---|---|---|---|
| 1. Brew the Tea | Boil 1 liter of water. Add 1.5–3 grams of tea (depending on color intensity). Let steep for 10–15 minutes. Remove tea leaves or bags. Stir in 100 grams of sugar until dissolved. Optional: Filter the tea. | Creates a sweetened tea base for fermentation. | Important to monitor tea strength for desired color outcome. Optional filtering helps with smoother texture. | 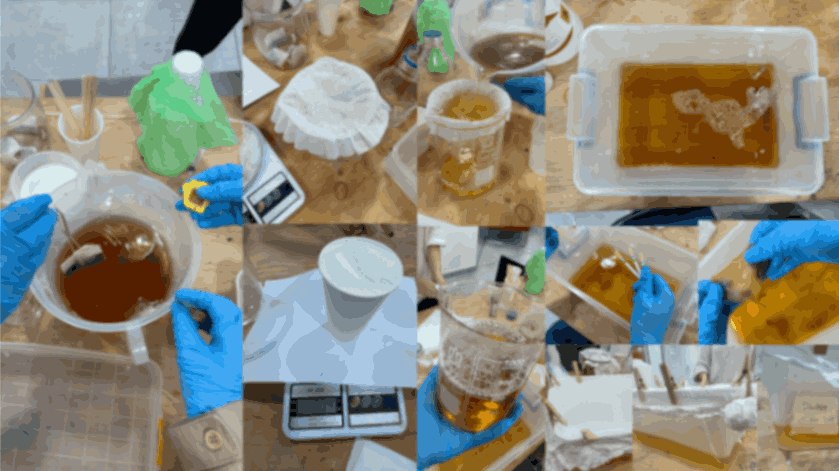 |
| 2. Adjust the pH | Gradually add vinegar while monitoring pH. Stop when pH reaches 3 to 4. | Ensures an acidic environment for fermentation and prevents mold. | Critical to maintain correct pH for optimal bacterial growth. |  |
| 3. Cool the Mixture | Allow the tea to cool to lukewarm temperature before proceeding. | Prevents damage to the SCOBY from hot tea. | Let the tea cool down to around 25°C–30°C (77°F–86°F) for best results. |  |
| 4. Add SCOBY and Start Fermentation | Gently place the SCOBY into the cooled tea. Add a splash of SCOBY solution to boost fermentation. Cover with a clean cloth and secure with a rubber band. | SCOBY is added to initiate the fermentation process. | The SCOBY kick-starts the fermentation, leading to cellulose formation. |  |
| 5. Fermentation Process | Store in a warm, dark place (25°C–30°C or 77°F–86°F). After about a week, layers of cellulose will form. Allow to ferment until the sheet reaches the desired thickness. | Fermentation process for kombucha fabric creation. | The fermentation continues until desired thickness of the cellulose is reached. |  |
I got 2 layers Yayyy


Look how Thick this layer is yay

Now lets Rinse it so kill all the the living things inside this layers, in fabricademy we dont wash dishes anymore we wash kamboucha :'D

let the sun do its magic and Voila we have an absoulute sucesseful Kamboucha

Tips for Success
| Step | Tip |
|---|---|
| pH Adjustment | Use a pH meter or strips for accuracy. |
| Temperature Control | Keep the fermentation environment warm to speed up the process. |
| Avoid Contamination | Ensure all tools and containers are clean to prevent mold growth. |