10. Textile Scaffold
Week 10 | We explored using textiles as structures to hold new forms or meaning that we haven't explored before through moulding and crystallisation.
• • •
Introduction
Assignment
- Document the concept, sketches, references also to artistic and scientific publications
- Produce 2 techniques of textile scaffold choosing from the following: fabric formwork with casting/crystallization/wood-textiles composite/resin & bioresin/textiles composite/leather molding
- Document the process including the step-by-step instructions on software, machine, mold making, vaccum forming and textile composites
- Upload your design and fabrication files, including the 3D model and CAM file when possible
- Document at least 2 processes from design to prototyping, fabrication, materials used, document your achievements and unexpected outcomes
- Make a stop motion of your crystal growth or use 3D modeling software to simulate your design (extra credit)
I had no idea what to expect from this week and I have finished it feeling really happy as I learnt new Rhino skills, how to use pineapple as a bio-leather and how to macrame a bag along with all the assignments :).
Inspiration
★࿐࿔The Wider World!: ★࿐࿔
My Pinterest board contains alot of parametric designs, disorderly shapes and an almost punky, futuristic aesthetic in both crystallisation and moulding.
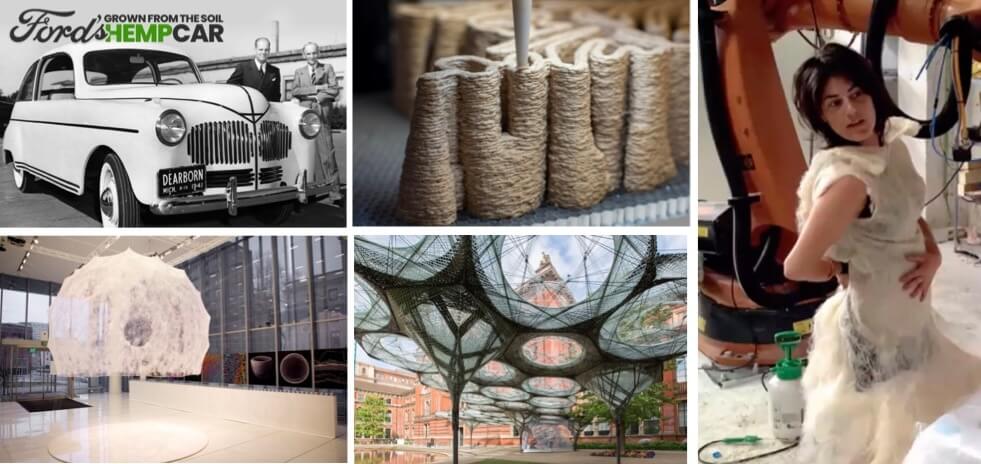
1Photo by Ford's Hemp Car on "Benzinga" | 2Photo by Future Materials Bank on "Mycelium - 10" | 3Photo by OXMAN on "Silk Pavilion" | 4Photo by Inhabitat on "Carbon Fibre Forest" | 5Photo by E-Textile Summer Camp on "Fibre Dress by Anastasia Pistofidou"
Henry Ford built a car out of hemp-plastic that ran on hemp fuel. The composition of the car made it lighter than fibre glass and ten times tougher than steel.
The composite material represents alternative construction materials that are biodegradable and do not rely on the extraction of finite resources or energy-intensive production. These are self-supporting, are good thermal and acoustic insulators and are simultaneously hydrophobic and hygroscopic.
Exploring how humans can collaborate with other species to create new materials and structures without depleting natural materials. OXMAN was inspired by the silkworm’s ability to generate a three-dimensional cocoon out of a single silk thread. Silk Pavilion took form as a three-meter wide dome, constructed over three weeks with a flock of 6,500 live silkworms assisted by a robotic arm.
Each unique hexagonal component weighs 45kg and is made from transparent glass fibre and black carbon fibre. An on-site robot that can determine where to install a new funnel shape leg weaves a canopy around a metal formwork that’s then cured into its hexagonal shape.
• • •
Tools
-
RhinoCam (doesn't work on mac)
-
Rhino3D
-
Raptor X-SL CNC Milling Machine
• • •
CNC Milling
Buidling 3D Model on Rhino
I really wanted to learn how to create topography in Rhino this week so that I could map my favourite landscapes onto a mould to be cast. I originally was looking for contour line and topographic digital maps for my favourite volcanoes that I have traveled to: Volcan de Fuego, Guatemala; Lake Atitlan (Super Volcano), Guatemala; Asahi-dake, Japan and Mt. Yotei, Japan. All these landscapes hold insane memories for me as I lived and worked in these countries - I now have an obsession with volcanoesss :). Annoyingly though I searched everywhere for the correct format of topographic map which I could upload to Rhino but I couldn't find a way apart from the really long method of hand drawing each line from a 2D contour map.. If there's a quick way let me know! Instead I followed these tutorials on Youtube to learn how to randomly generate a topography!
Here are some photos of these volcanoes so you understand my obsession :) ˗ˏˋ ★ ˎˊ˗
Grasshopper Code
Here is the overall Grasshopper code which surprisingly didn't destroy my mac this time woooo!

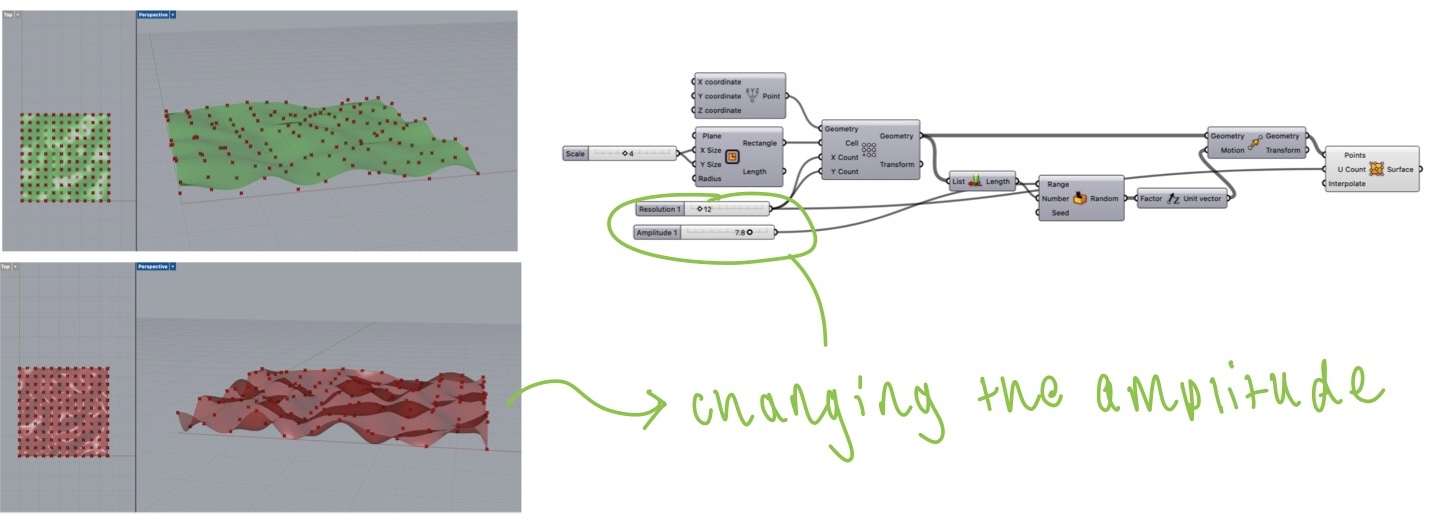

The above photos show the first few steps in creating the random terrain using Points Surface and altering the dimensions with number sliders which refer to the amplitude, resolution and scale.
The photo below was creating ...

This was the final step of creating a second Point Surface before 'baking' the terrain.
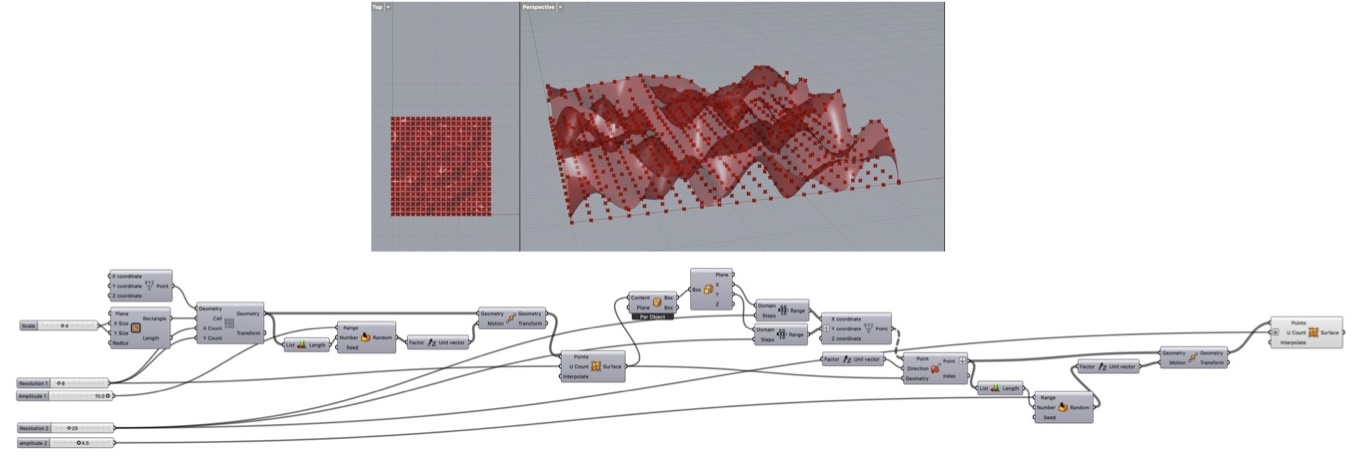
I played around with the amplitude and resolution sliders and found that...
-
Res 1: pretty much increases the scale
-
Amp 1: changes the height of the whole 'mountain'
-
Res 2: changes the number of 'mountains'
-
Amp 2: changes the height of the tops of the 'mountains' more drastically
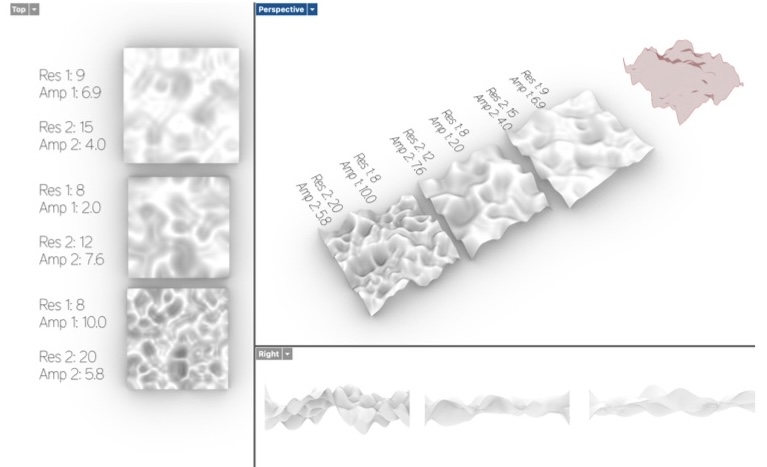
I then watched the second youtube video to learn how to change the model into a 3D mesh shape. The first step was to 'drape' the model. Below shows the rendered viewport of the each model I created.
The Drape command creates a surface through points defined at the intersection of objects and points projected toward the construction plane in the current viewport.
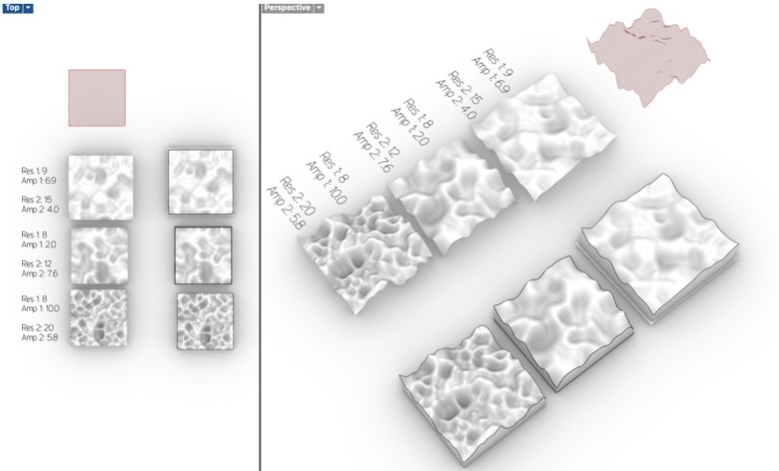
This video shows how to perform the draping task:
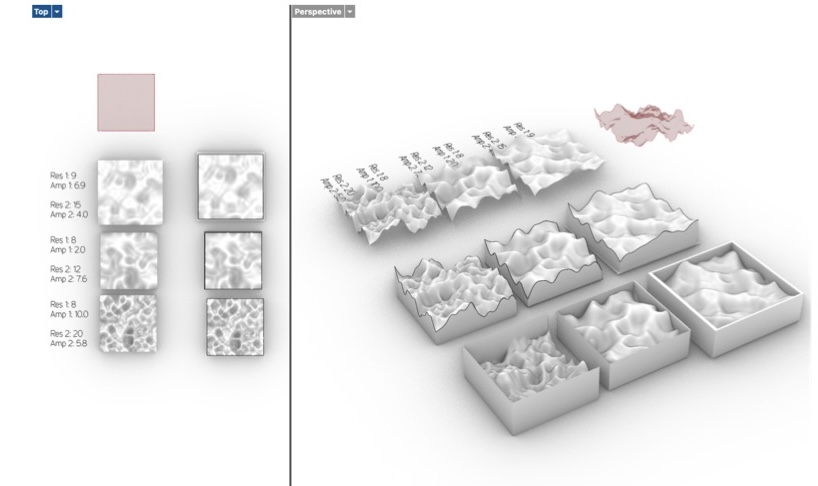
The next step was to create a 'bounding box' and use 'boolean split' to create the negative of the model. I realised later this wasn't necessary as I wanted to mould a bio-leather material instead of real leather so I didn't need the negative.
• • •
RhinoCam
I decided to use the first model I created as I had no idea how it would turn out or how long it would take! I think on review I would have chosen the third model due to the larger differences in geometry.
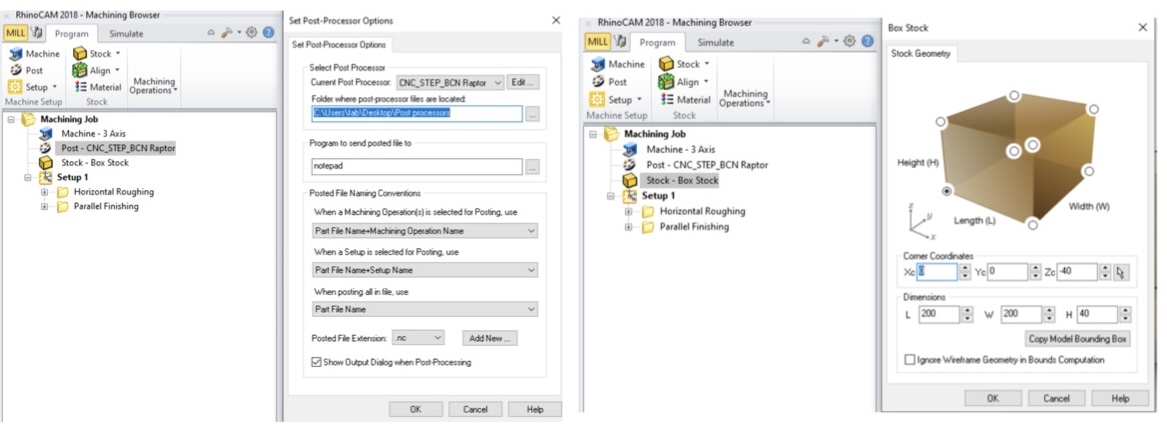
We used Josep's file with all the saved values for Rhino Cam and copied them into our file.
Machining Job
Set up the Machining Job section like below:

Setup - Horizontal Roughing
The below image shows the movement of the mill for Horizontal Roughing.
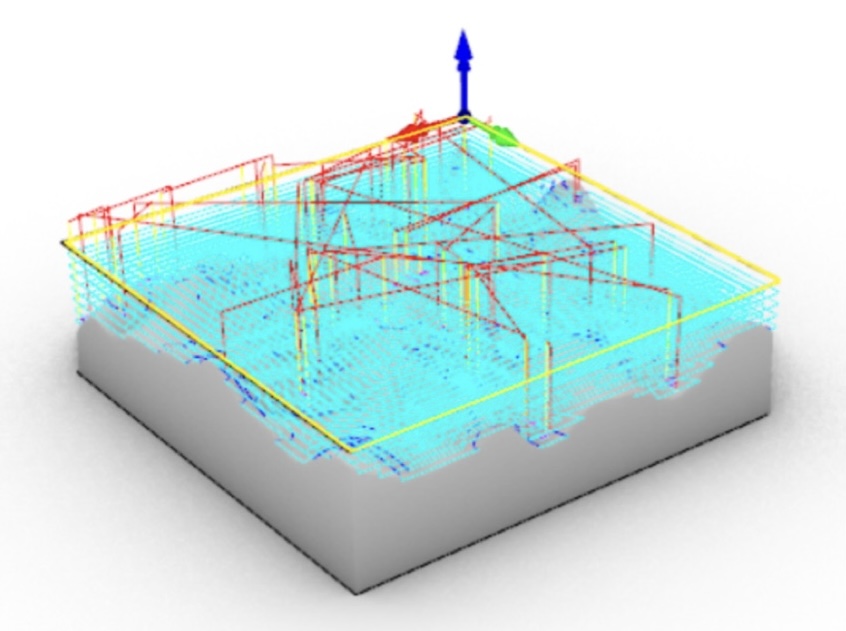
The Horizontal Roughing values are shown below:
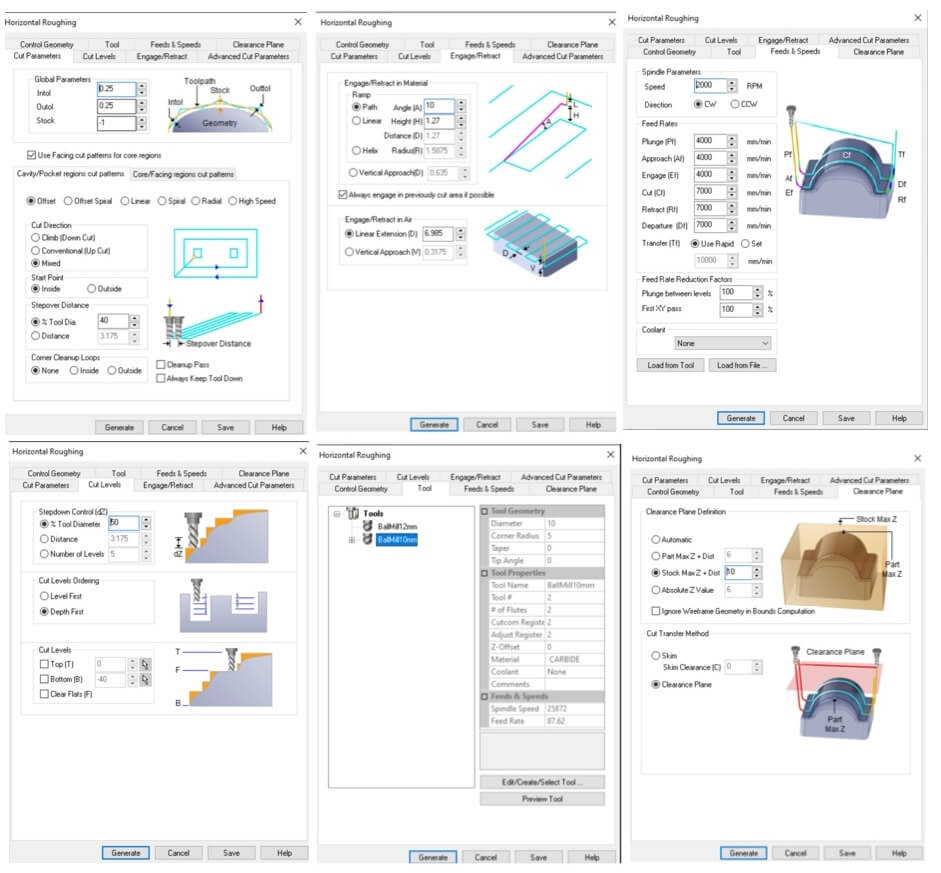
Setup - Parallel Finishing
The below image shows the movement of the mill for Parallel Finishing.
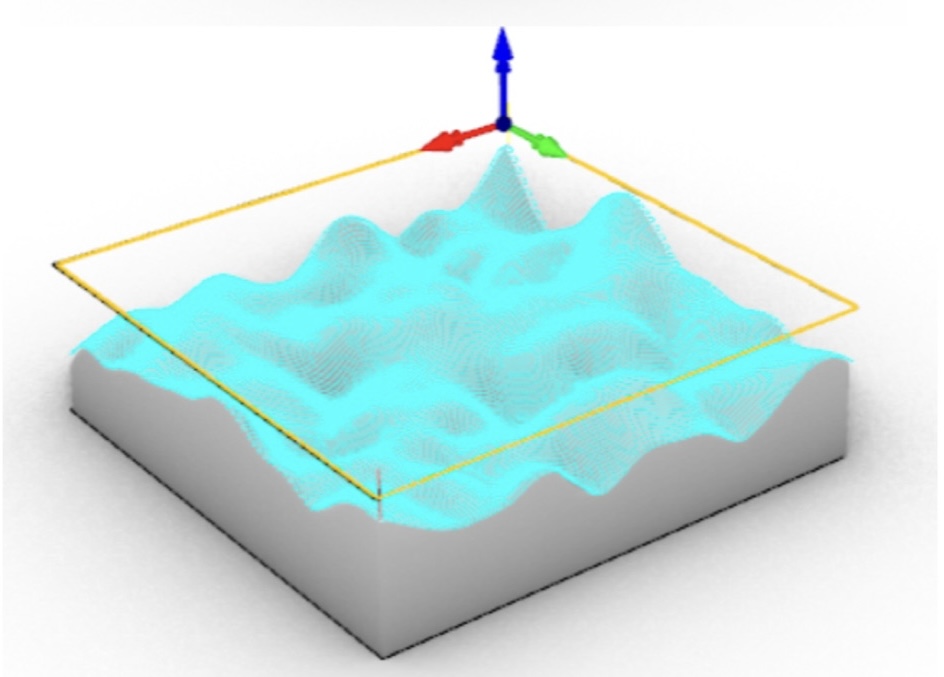
The Parallel Finishing values are shown below:
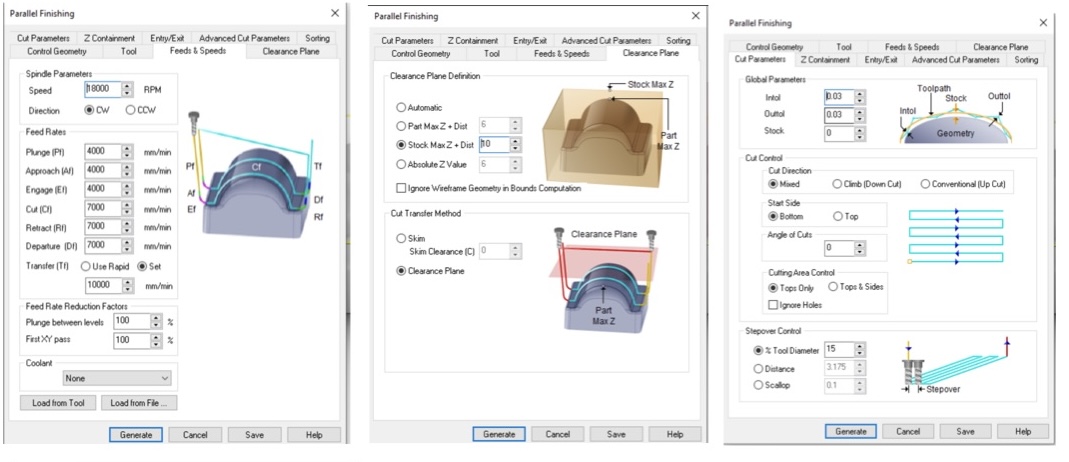
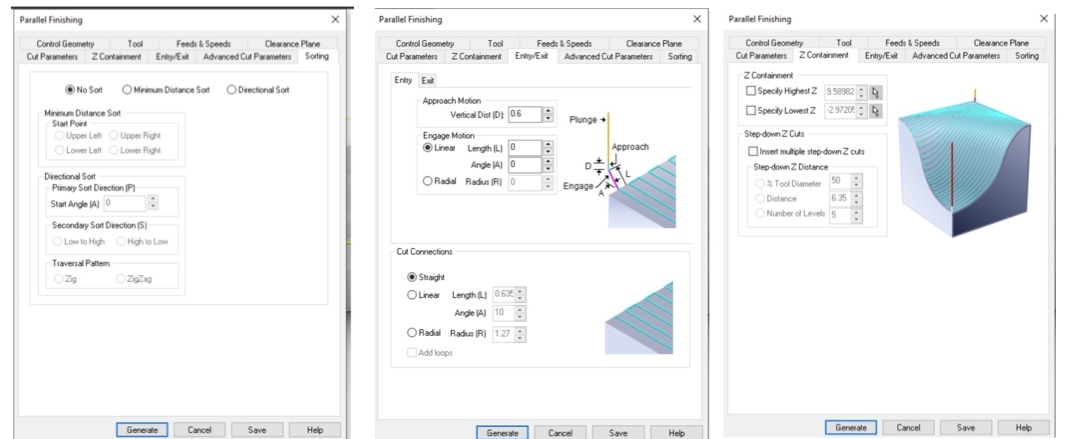
Click generate and send the gcode files as a .np to a memory stick for the CNC Machine.
• • •
CNC Milling
Setup
To set the CNC up you have to calibrate the axes by moving the mill to the desired starting spot on the foam, making sure the z axis is touching the top of the foam enough so that the mill-bit can still freely rotate. Then press 0, 0, 0 on the computer screen - calibrated!
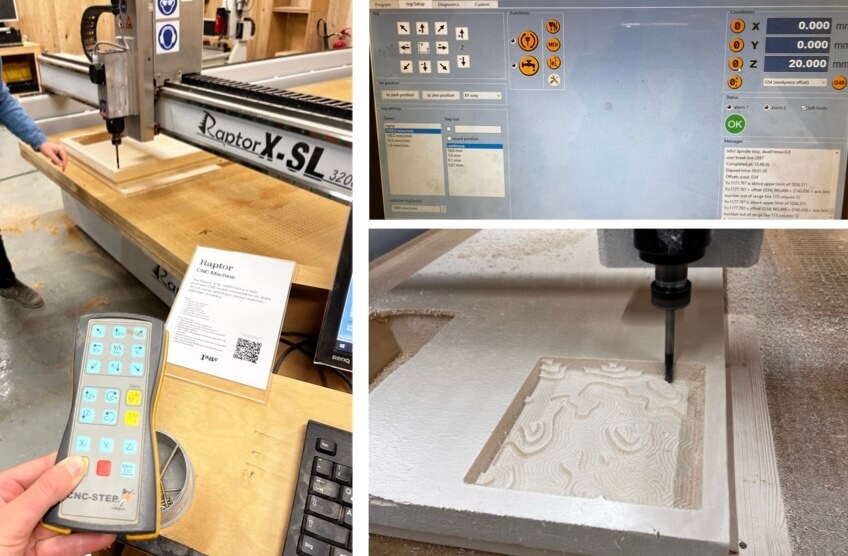
Left and Top Right: Callibrating, Bottom Right: Horizontal Roughing
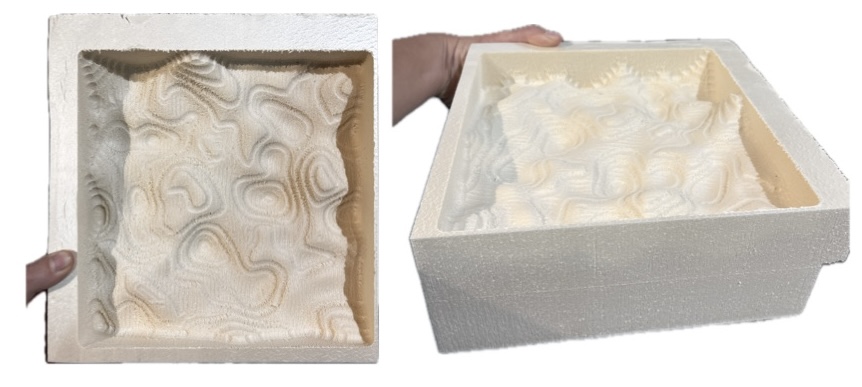
My file took around 20 minutes to mill on foam with a size of 200mm x 200mm x 40mm. I really like the design but I would have preferred to have a larger difference in geometry but I was excited to use it :)
• • •
Pineapple Bio-Leather Moulding
I didn't fancy using animal leather so I made some bio-leather out of pineapple skin and leaves.
* Pineapple Skin
* Pineapple Leaves
* Pineapple Skin and Leaf Juice

Basic Recipe:
* 4g Sodium Algenate
* 30g Glycerol
* 200ml Water

* 30g Calcium Chloride
* 300ml Water
* Pan/ bowl
* Electric blender
* Hand blender
* Wooden spoon
* Muslin
* 2 Measuring cylinder
* Mould
* Vaseline
* Spray bottle
Preparing the Pineapple:

* Blender the skin and leaves separately in a blender. Add tiny amounts of water if it is too dry and won't blend.

* Strain the skin and leaves separatly through muslin cloths over two measuring cylinders.

* Weigh the strained skin and leaf fibre.

Preparing the Bio-Leather:

* Vaseline the lining of the mould.

* Measure the water and sodium algenate and blend thoroughly using the hand blender, trying not to create too many air bubbles. Leave overnight in the fridge to remove the airbubbles.

* Measure the glycerine and stir into the mixture.

* Add the pineapple fiber either keeping the skin and leaves separate or together depending on your desired colour/test. I added all the fibre as recommended by Petra.

* Spray the bottom of the mould with the Calcium Chloride solution.

* Pour the bio-leather into the mould, bursting any bubbles with a pin. Spray the top with Calcium Chloride solution. Leave to dry for a few days with a fan blowing over the mould.

1 standard sized Pineapple bought from Aldi gave me:
- 181g Skin fibre strained through muslin
-
400ml Skin Juice
-
22g Leaf fibre strained through muslin
- 200ml Leaf Juice
Since I had my mould, I filled it with water to measure how much it could hold and adjusted the ratio of the recipe below to account for this.
Total water contents of mould: 900ml
So the overall change in ratios were (x 4.5):
- 600 ml Skin and Leaf Juice
- 300 ml Water
- 18g Sodium Algenate
- 135g Glycerine
Results
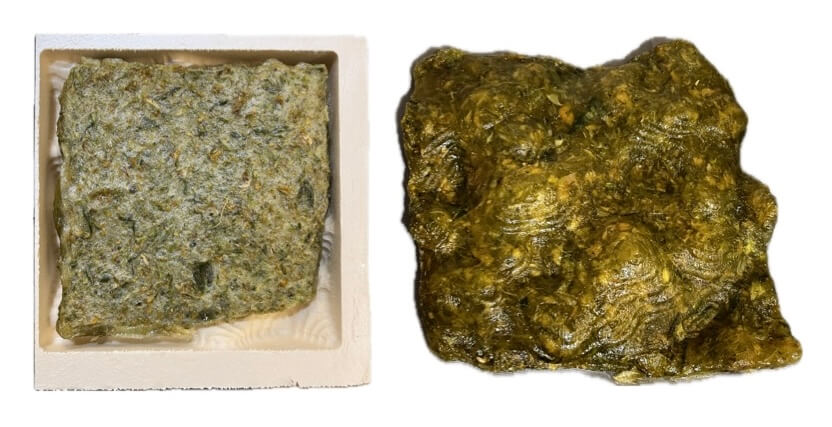
Unfortunately the end result was just a big blob of jelly that was taking a long time to dry because it was so thick, it had also shrunk quite alot and the imprinted shapes weren't that obvious.
• • •
Leather Moulding
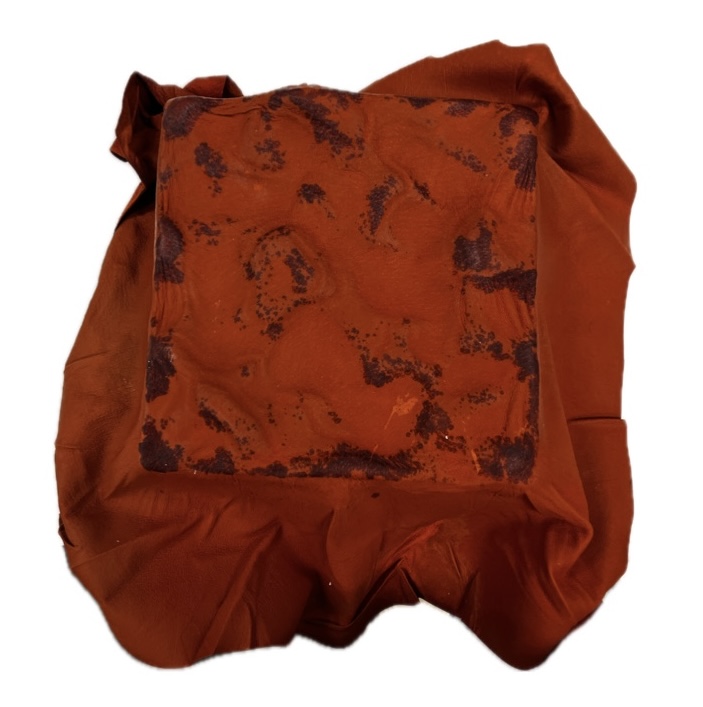
Since the bio-leather didn't really work I decided to try the leather moulding with the original mould and the vacuum press. I didn't expect this to work too well though as I really needed the negative of the mould which I hadn't CNC-ed.
I cut the edges off my mould to make it usable for leather moulding.
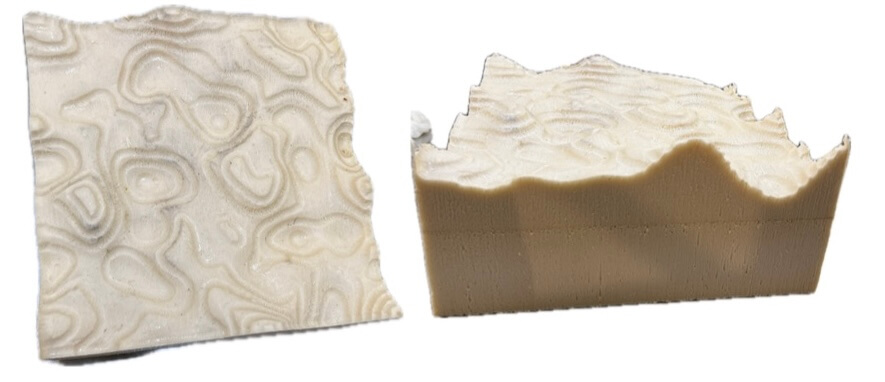
The leather was soaked for a couple of hours in cold water and then put in warm water for 5-10 minutes before stretching onto the mould. I then placed it in a bag in the vacuum press so that water wouldn't get everywhere, and left it overnight.

• • •
Results
As I expected the leather didn't take the shape, Cora suggested that I should put a hole through the foam if I am vacuuming so that the air can be sucked out and it can properly dry.
• • •
Crystallisation
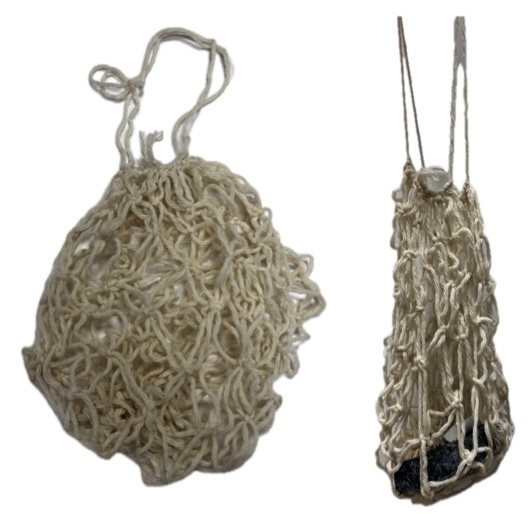
I wanted to create my own bag to be crystallised so I watched this tutorial on how to make your own macrame bag which I had never done before. This was just a test bag using yarn, but I hope to find the correct type of rope for future crystal bags ✶⋆.˚.
We had the option of making crystals out of Borax, Copper Sulphate or Alum. Borax is the least sustainable and Alum is the most. The recipe is the same whichever base salt you choose. I used Alum!
Borax
* 150g Borax Powder
* 400ml Water

Copper Sulphate
* 200g Copper Suphate
* 200ml Water

Alum
* 60g Alum Powder
* 500ml Water
* Pan and lid
* Heat stove
* Wooden spoon
* Measuring cylinder
* Filter paper
* Fabric
* Digital weighing scale
* Casting mold
* Measure the water to the height you want it to submerge your fabric and adjust the ingredient ratios. Filter it and bring it to the boil.

* Measure the salt and add it to the boiling water, continuously stirring.

* Add more salt to the solution if the measured quantity has not oversaturated the water. You want the salt to not be able to dissolve anymore.

* Place the fabric into the solution. Cover the lid of the pan to keep the heat in.

* Leave the pan in a dark space for at least 2-3 days.
TIP!
When placing your fabric in the pot, make sure that it is evenly spread out and not touching the sides or the bottom as the crystals could form making it difficult to remove. In the case of a bag, make sure that the sides aren't touching eachother as this could mean they bind during the crystal formation.

I added food colour to the boiling water to create an aquamarine colour and then added the salt.
After adjusting the ratios my final measurements using Alum were:
- 5L water
- 700g Alum
Results
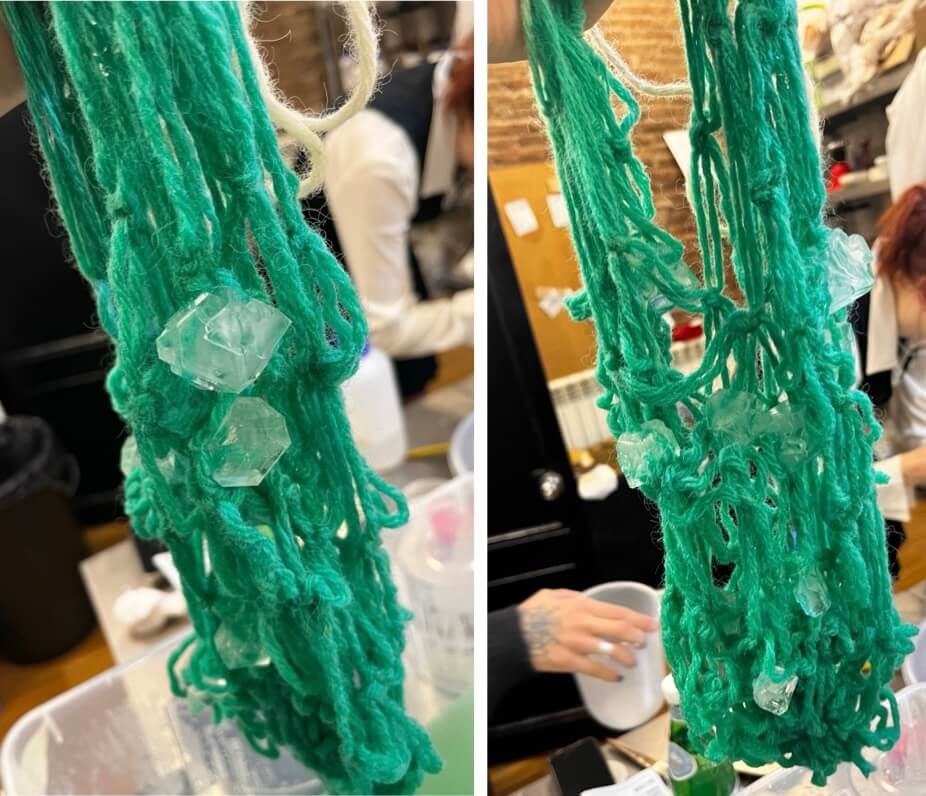
After 3 days I came back to the lab and nothing had grown on my fabric :( . I reboiled the water and added another 400g of Alum and left it for a couple more days.
When I checked again it still hadn't worked! Petra suggested it was because I was trying to crystallise in a metal pan so I should redo it in a plastic tub. So I reheated the liquid and put it in a plastic tub and left it again for another few days!
A few days later.... and it finally kindof worked, but the crystals were way too big for my liking. I will have to try this experiment again another time.
• • •
Digital Embroidery
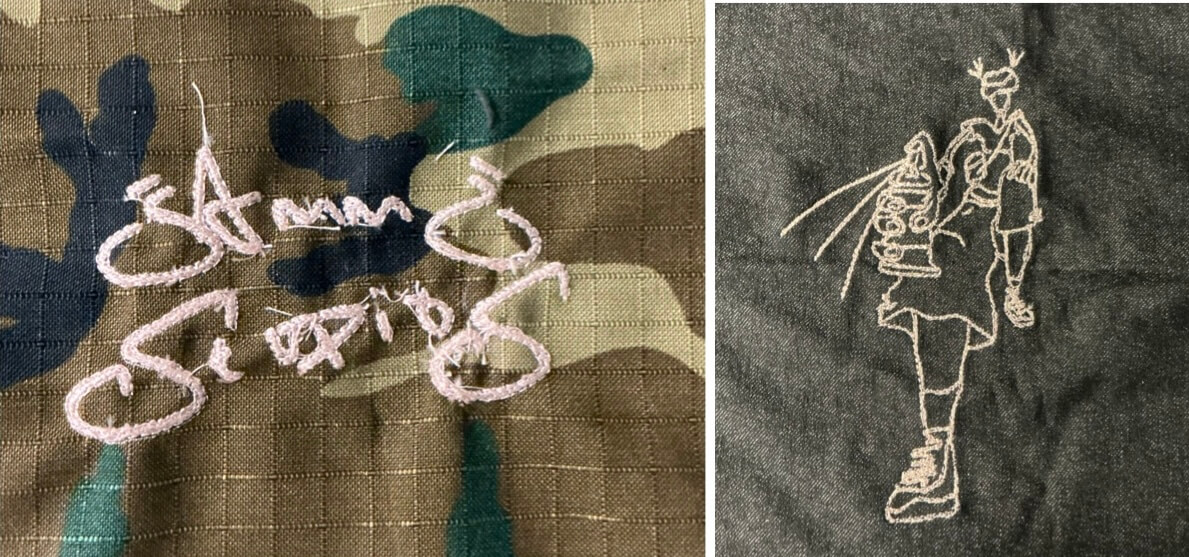
As a personal project, I wanted to start embroidering my logo 'Jammi Studios' onto some clothes.
Creating The .pes File
Jammi Studios Logo
For my first attempt, I imported a vectorized version of my logo using Vectorizer, into Rhino and exported it as an .svg file. Using InkScape I imported the .svg and scaled it appropriately.
TIP!
Use the command 'hatch' in Rhino to make the vector a solid shape.
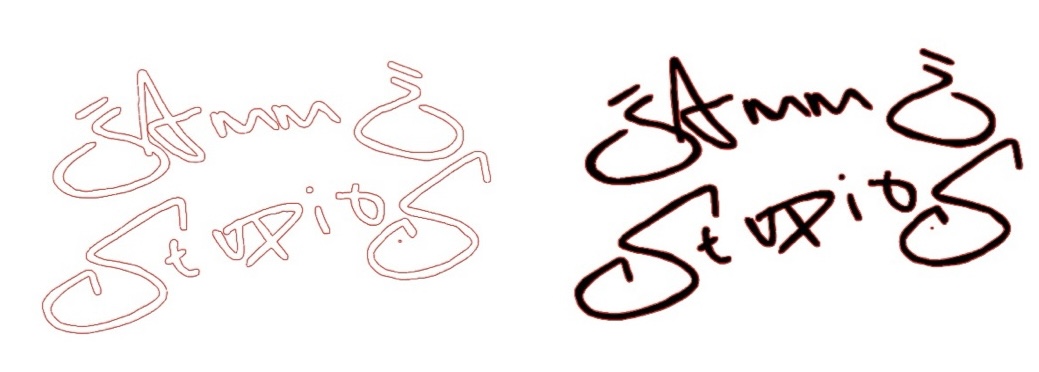
Left: vectorized logo, Right: hatched logo
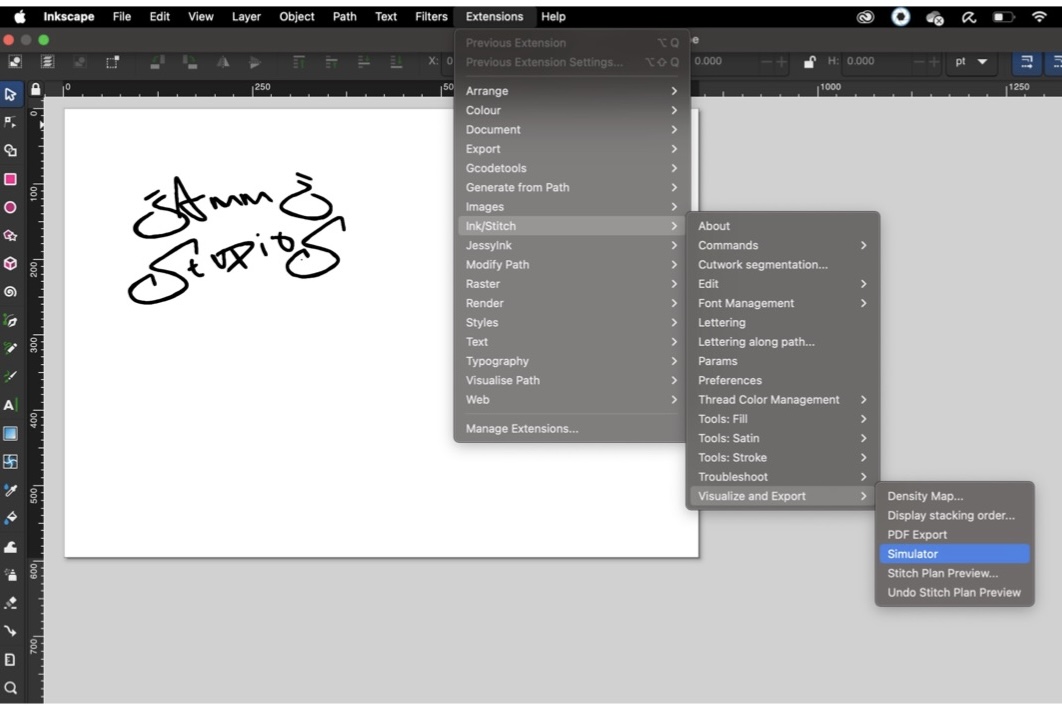
To view the simulation for the emboridery machine, click on:
Extensions > Ink/Stitch > Visualise and Export > Simulator
★࿐࿔
Next:
-
Save the file as: Ink/Stitch: Brother Embroidery Format (.pes)
-
Transfer the .pes file onto a memory stick for the embroidery machine
Spraypainter
My second attempt used my drawing of a spraypainter which I have previously screenprinted onto clothes.
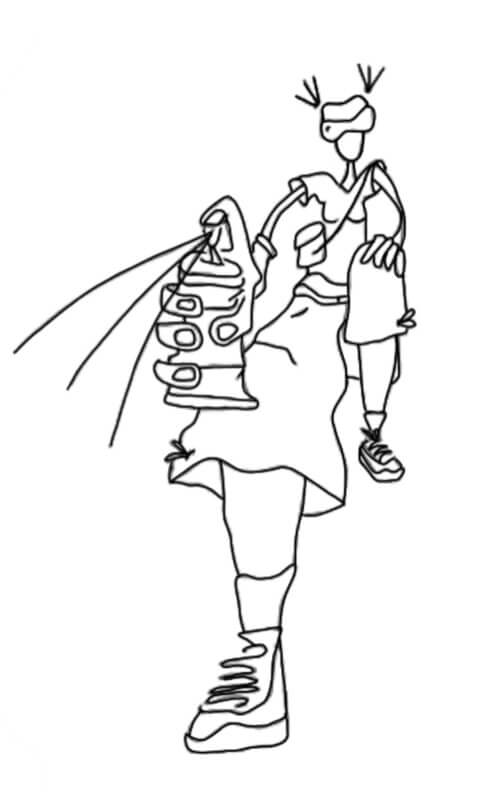
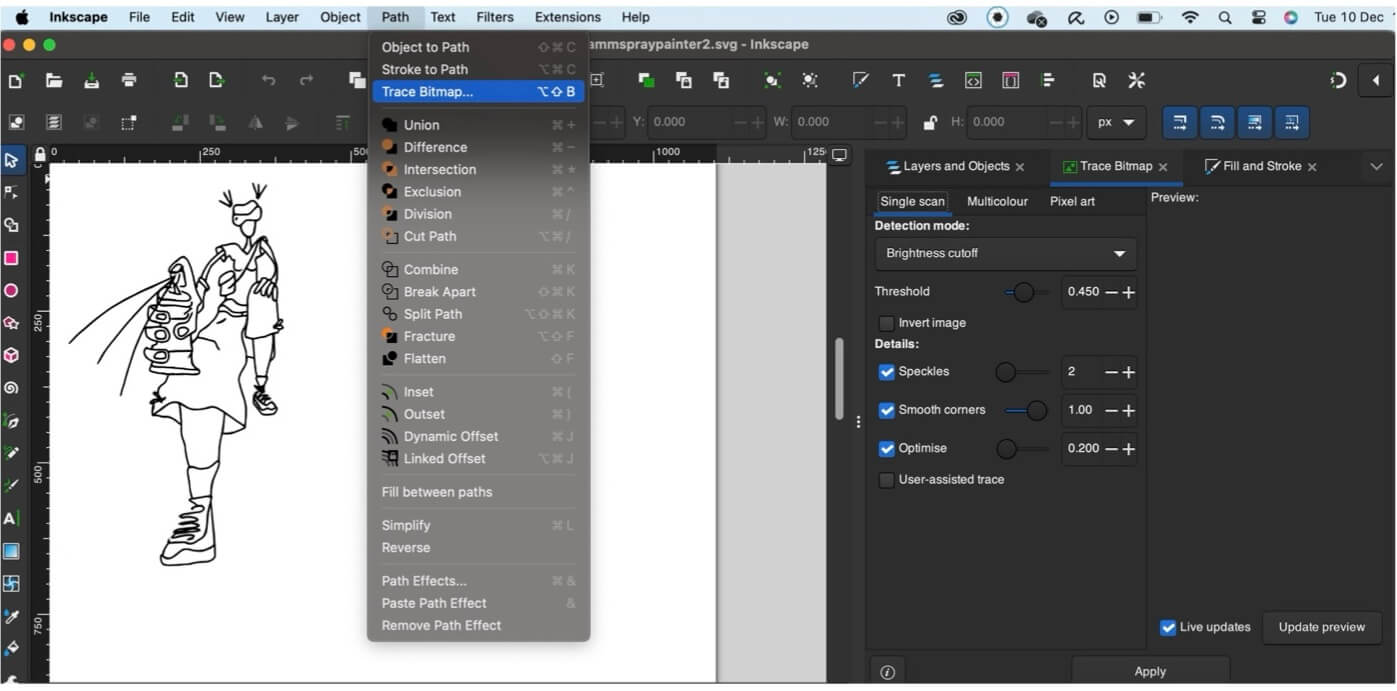
Instead of importing it into Rhino, I learnt that I could vectorise the image in InkScape directly which saved alot of time.
Path > Trace Bitmap > Apply
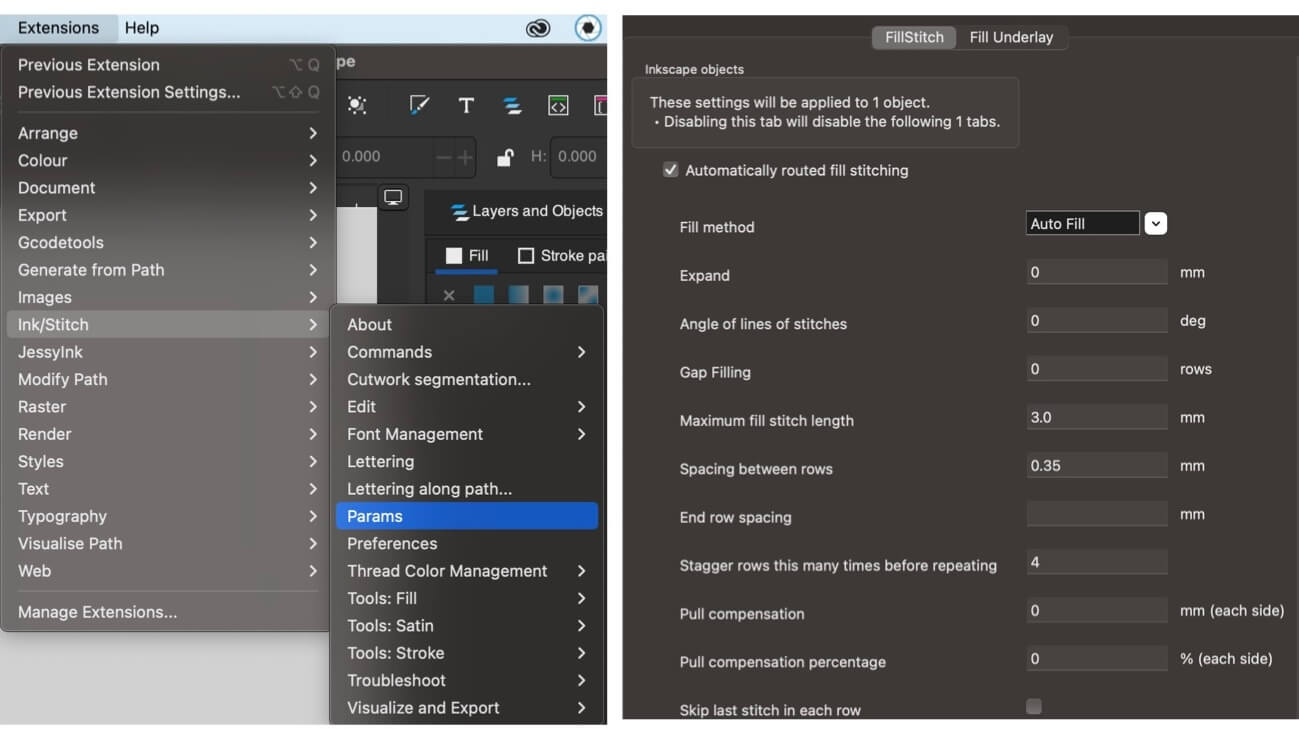
When I embroidered the Jammi logo it seemed to take a long time so I asked Josep, he showed me how to decrease the number of stitches in the design. He suggested increasing the spacing between rows from 0.25 to 0.35, and increasing the needle speed on the machine to around 600 or 700.
Extensions > Ink/Stitch > Params > Spacing Between Rows
Again, I exported this file as a .pes into the memory stick.
Using The Machine
In the FabLab we have the Brother Innovis Machine, you can watch this tutorial on how to set it up. The threading is very similar to setting up a standard sewing machine.
Insert the memory stick, choose the correct file and follow the steps in the tutorial to start the embroidery.
• • •