04. Material Fabrication
Terracotta Clay
Using Terracotta clay was advised to me by RRReefs as it is the material that they are working with. Apparently the colour of the clay makes a difference with artificial reefs as the red tone is better suited to the environment. Terracotta meaning 'baked-earth' is also 100% natural with great porosity and a 95% recyclability rate 1.
To make the clay viable for 3D bioprinting was a lot of trial and error however, each time I aimed to create a 'tooth-paste' consistency. This meant that when the clay was squeezed from your hand it would behave in the same manner that toothpaste does. Another trick I learnt was to tap a ball of clay onto your skin, ensuring that it only leaves a colour stain and no clay. If some clay comes off it probably means the mixture is too wet.
After quite a few experiements I realised I was still making it too dry - Cecil taught me that I needed to aim for around 6% of water content within each mixture of clay i.e. for 1kg of clay add 60g water.
Waste Oyster Shell Composite
Oyster shells are a great source of Calcium Carbonate (CaCO3) with a content up to 95%. I would love to combine this waste material into my structure to enhance the strength, porosity and durability and also provide a simliar skeleton to coral reefs for polyps to attach onto.
The Eggshell Project crafted a 3D printed bioceramic made from waste eggshells and sustainable aggregates. With the bio-binders, the material is able to solidify without the need of firing
Oyster Matter experimented with ground shells and natural binders. The resulting mixture of 70% ground oyster shells and 30% river clay worked well for 3D printing. However the article also mentioned that for 380g of oyster shells, use 246g of clay and 124g of water.
Marine Eco Bricks 3D printed with a composite cement and utilise recycled oyster shell powder as a subsitute for sand and gravel, reducing cement consumption and lowering carbon emissions. This project was designed to enhance shoreline protection.
The research highlighted in this article "Oyster Shell Waste as Reinforcement for Clay" that compared to pure clay samples, the oyster shell reinforcement enhances the compressive and flexural strength of the composite by 26.5% and 34%, respectively at 1150˚C sintering temperature. This specific 3D printer could print with overhanging angles of 32˚, and bridging length of 8 mm without any support requirement.
Oyster Shell & Sodium Alginate
Alginate is a natural polysaccharide distributed in the cell walls of brown algae, which is harvested to be processed and converted into sodium alginate. It is used in many industries as a thickener or emulsifier such as in the manufacture of paper, textiles, food, fertilisers and pharmaceuticals. Alginate is hydrophilic and forms a viscous gel when hydrated. When combined with oyster shells, it bonds and reacts to form a strong natural ceramic-like material which can be used in many ways, including 3D printing 2.
This recipe on Materiom - Oyster Shell Composite provided another method for creating the material which involved submerging the structure in the calcium chloride solution. This recipe involved using a mold instead of 3D printing so I adapted it.
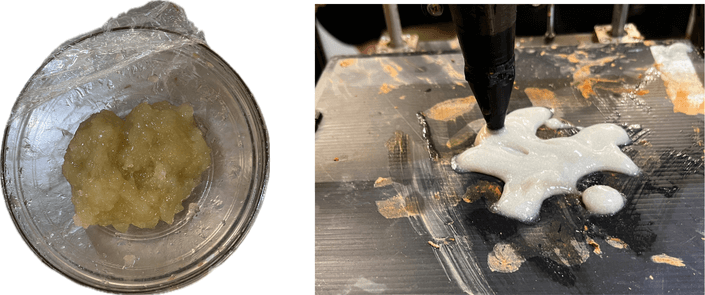
I initially tried this recipe however the consistency of the material was too sticky and solid for the printer. I adapted the recipe abit adding more water however this made it too runny and had no structure when printing.
* 15g Sodium Alginate
* 66ml Water
* 60g Oyster Shell Powder

* 20g Calcium Chloride
* Hand blender
* Oven
* Hotplate
* Digital Scale
* Mix the alginate powder with hot water above 90°C and stir well, let it stand for 24 hours and keep moisture to reduce lumping, so that it forms a uniform gel-like substance.

* Mix the oyster shell powder with sodium alginate gel well.

* Knead the mixture into a dough to form a dough-like texture.

* Fill the bioprinting cartridge with the dough, ensuring no air bubbles are trapped inside and print the structure!

* Place the samples into a blast drying oven and dry below 35°C for more than 24 hours, paying attention to turning during this time to ensure that the moisture is thoroughly dried.

* Prepare 2% calcium chloride solution: mix anhydrous calcium chloride and pure water in a beaker according to the ratio, stir well.

* Put the dried oyster shell-sodium alginate composite into the solution and submerge it completely for about 1 hour.

* Take the sample out of the solution and put it into a blast drying oven and dry it below 35°C for more than 24 hours until the moisture is completely dry.
FabLab BCN have a 3D bioprinting research document which contains a recipe for a sodium alginate and calcium carbonate composite.
* 2g Sodium Alginate
* 93ml Water
* 280g Oyster Shell Powder
* 8g Guar Gum
* 20g Honey
* Hand blender
* Spoon
* Bowls
* Spatula
* Digital Scale
* Pour water into a plastic cup and add sodium alginate and guar gum.

* Blend them properly using a hand blender.

* During the blending process you can add honey and blend them all together again.

* Replace the jelly mixture into a bowl and under the mechanical blender.

* Spoon by spoon start adding oyster shell powder until it will create a consistent mixture.

* Take the mixture and fill in the cartridge avoiding any air gaps.
I initially made a samll prototype using this recipe, after drying for 3 days the structure had shrunk a lot yet it was very strong. When I tried to scale this mixture it did not work well and I didn't believe that it would work well with my gyroid structure or in the 3D printer.

Although I would love to explore this route further for this application, I don't have enough time to experiment with this material before the deadine. I've decided to go ahead with using a clay and oyster shell composite to make the process a bit easier for me.
UPDATE: The clay and oyster shell composite disintegrated after kilning so I will only be printing with clay for the final structure.