05. 3D Prototyping
Introduction
I started experimenting with the 3D Bioprinter to test the correct flow and consistency of the material, along with the behaviour when overhangs are introduced. I also wanted to design an efficient surface which allowed for larvae to attach to, however I wasn't too sure yet if incorporating a surface design would work with the deformed gyroid structure.
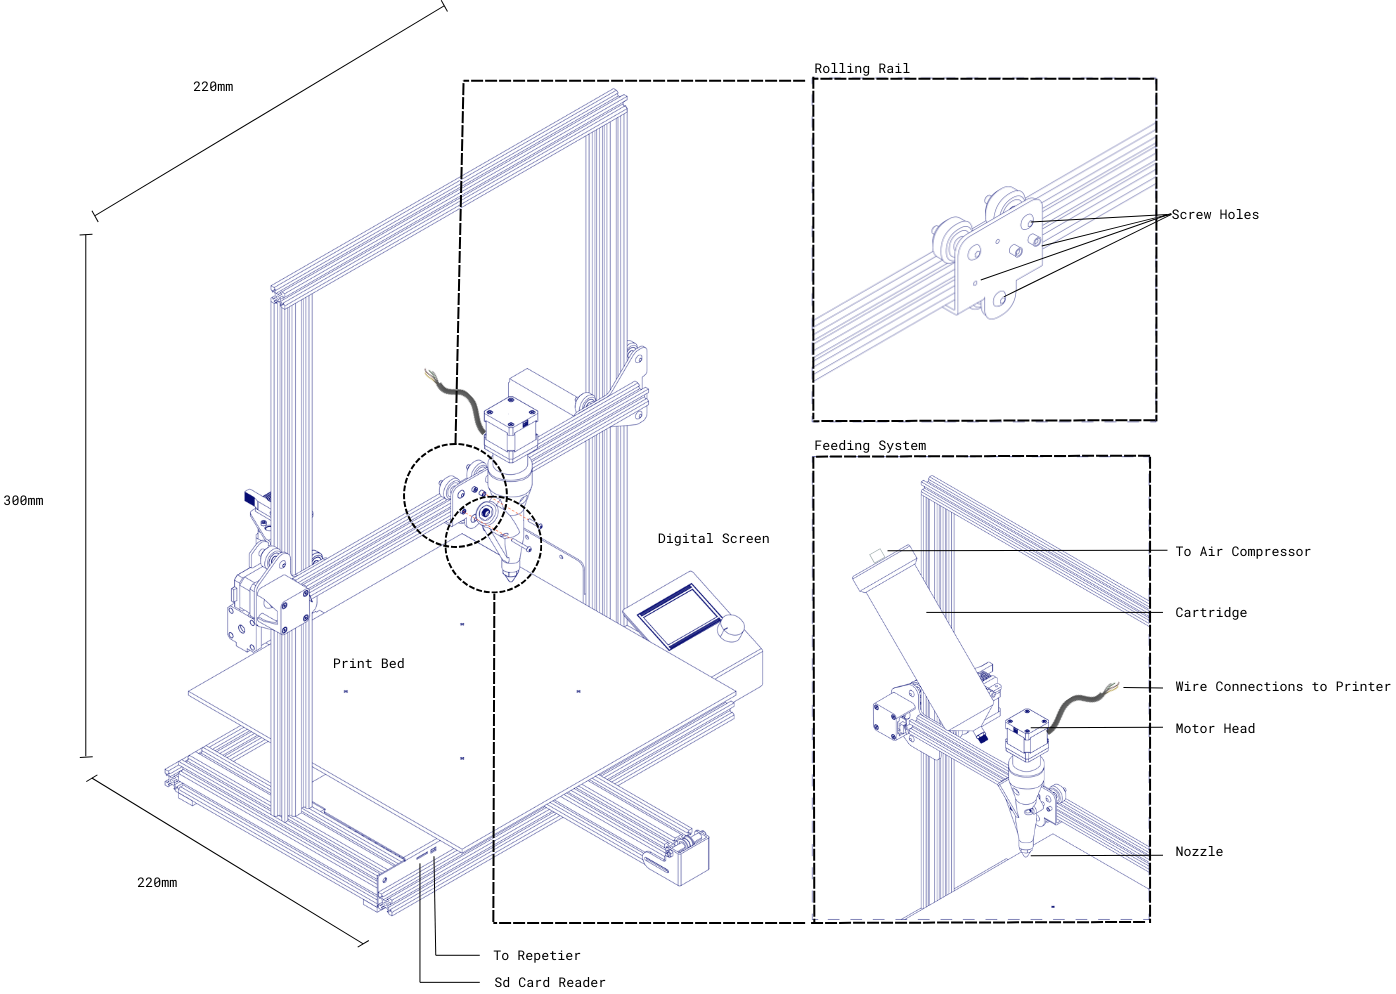
3D BioPrinter (Paste Printer)
The paste printer available to me at IAAC/Fab Lab BCN is the Creality Ender 5, which has the following characteristics.
-
Cartesian machine with an exterior footprint of 440 x 410 x 465 mm and a print build volume 220 x 220 x 300 mm which offers a larger print volume.
-
The box-like frame offers better stability during printing.
-
The bed only moves vertically (Z-axis), reducing potential print errors tied to Y-axis movement. Due to improvements in stability and Y-axis design, it can print faster without sacrificing quality.
-
Resume printing function (in case of accidental unplugging).
-
24V-350w branded power supply to stand future modifications/upgrades.
Clay Extruding Kit:
The system works with air pressure for the feeding system and a motorized controlled extruder head. The feeding system part is connected to the rolling raile with 5 screws which makes it easier and faster to clean during disassembly. The cartridges are industry-graded HDPE pressurized (300cc-500cc) and safe up to 100PSI 6.9 bar (normal working pressure is 2-4 bars). A silent air compressor of ~55 db with a rating up to 6 bar and 3l deposit with regulating valve and safe release is also used.
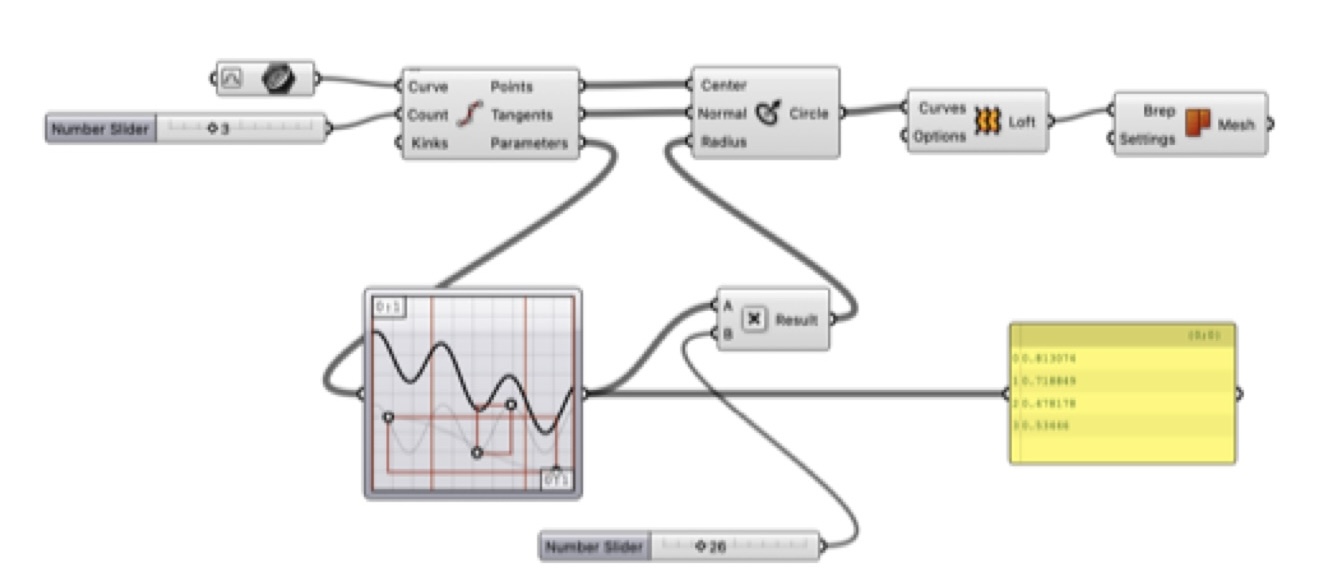
Printer Settings
Using Ultimaker Cura and Repetier to assist with changing the parameters whilst printing is essential for bioprinting. The method for initiating the file is as follows:
-
Upload the .stl file to Cura, ensuring the 'Paste Printer' is selected along with the correct parameters. Edit the model if necessary
-
Save the file as .gcode and load it into Repetier
-
Connect Repetier to the 3D Bioprinter ensuring the correct Port and Baud Rate (115200) are selected
-
Press the 'home' button to home the nozzle in all 3 axis
-
Initiate the print and adjust the Feedrate or Flowrate if necessary
Within Repetier, I found that a Feedrate of ~40 and Flowrate of around ~180 worked well. The air pressure machine was always set to around 2-3 Bars. Another key value was the layer height which I set to 1.5mm in Cura, with an initial layer height of 2mm.
3D Printing
Clay Overhangs
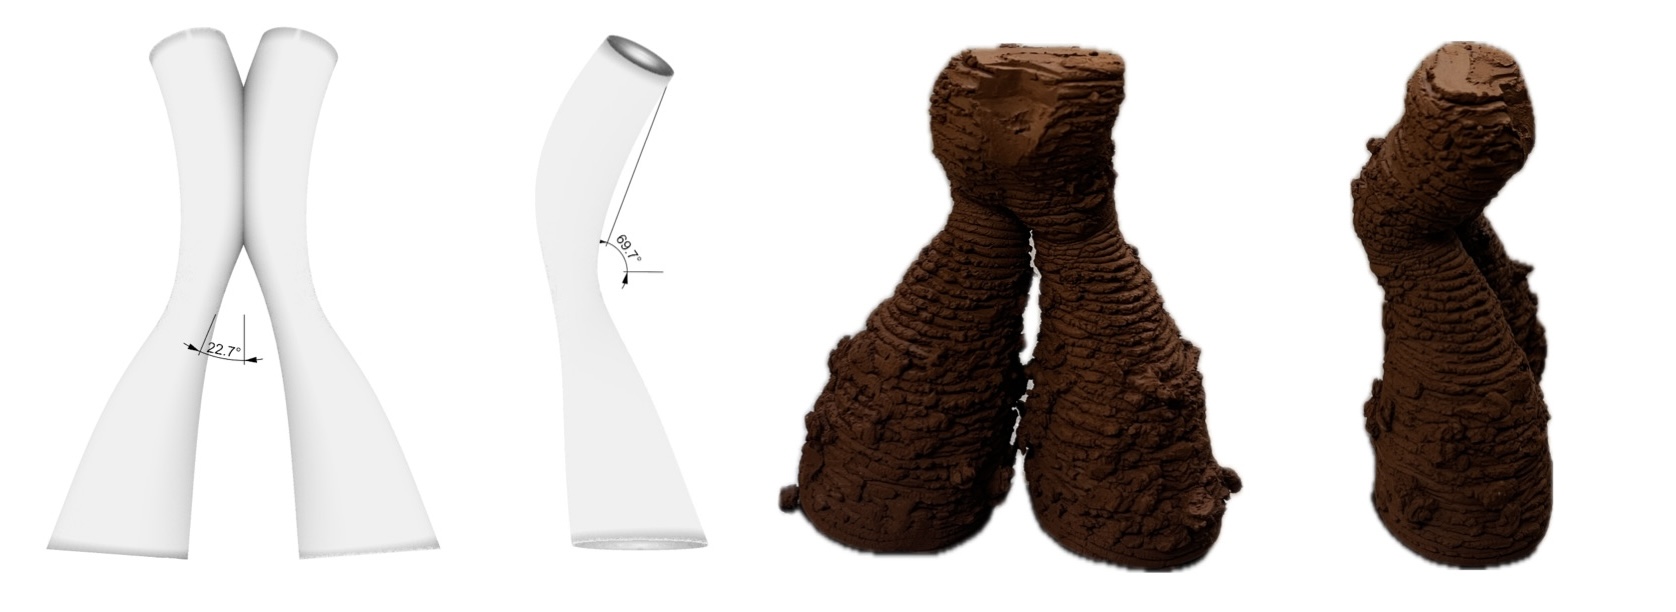
From my contact with RRReefs and the instructors at IAAC I learnt that the maximum overhang that a clay structure can have is 30°. With this in mind I started designing some prototypes to understand the behaviour abit more when holes and overhangs are introduced.
Following this Rhino Pipe tutorial, I generated some structures using the Sine Summation Graph Mapper.
I first wanted to understand how joins and angles interacted together. With this model I deliberately designed a top overhang of >30° to assess at what point the structure failed (which was around 3/4 of the way). Another reason why this part began to collapse was because the join was too narrow for the weight and height involved. It is also clear to suggest that a wider base offers a stronger support for the rest of the structure.
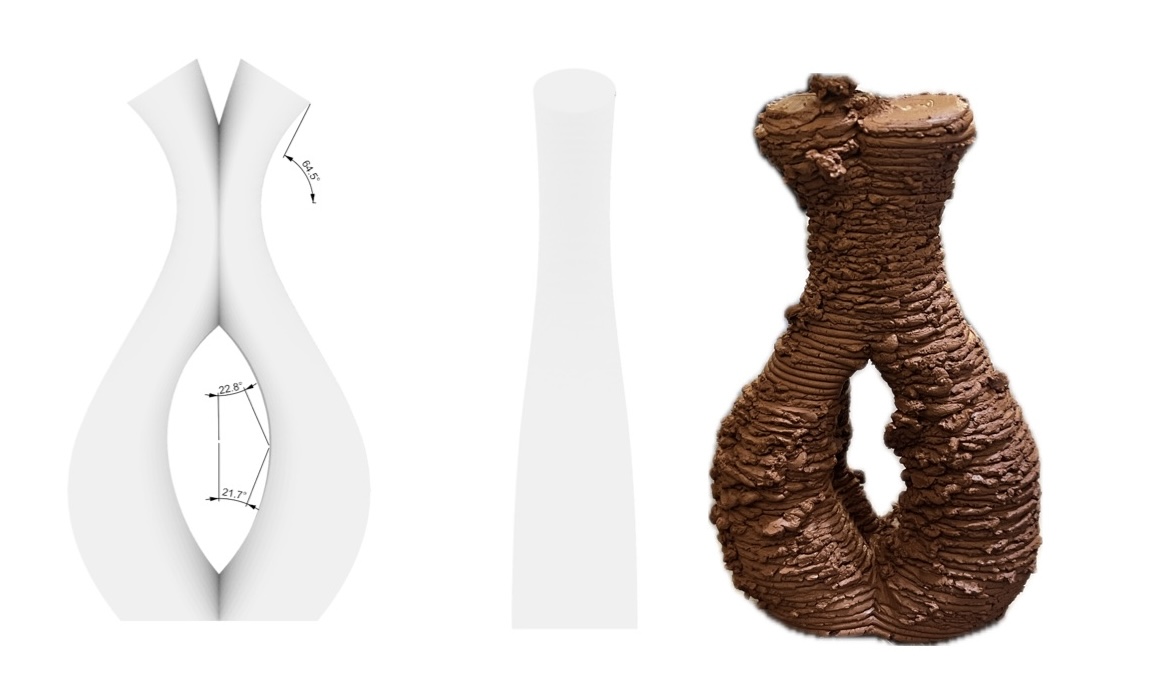
The next test involved exploring how a hole in the centre affected the strength of the structure. Here, I ensured that the central hole did not exceed a 30° angle. The resulting structure was very supported and stable.
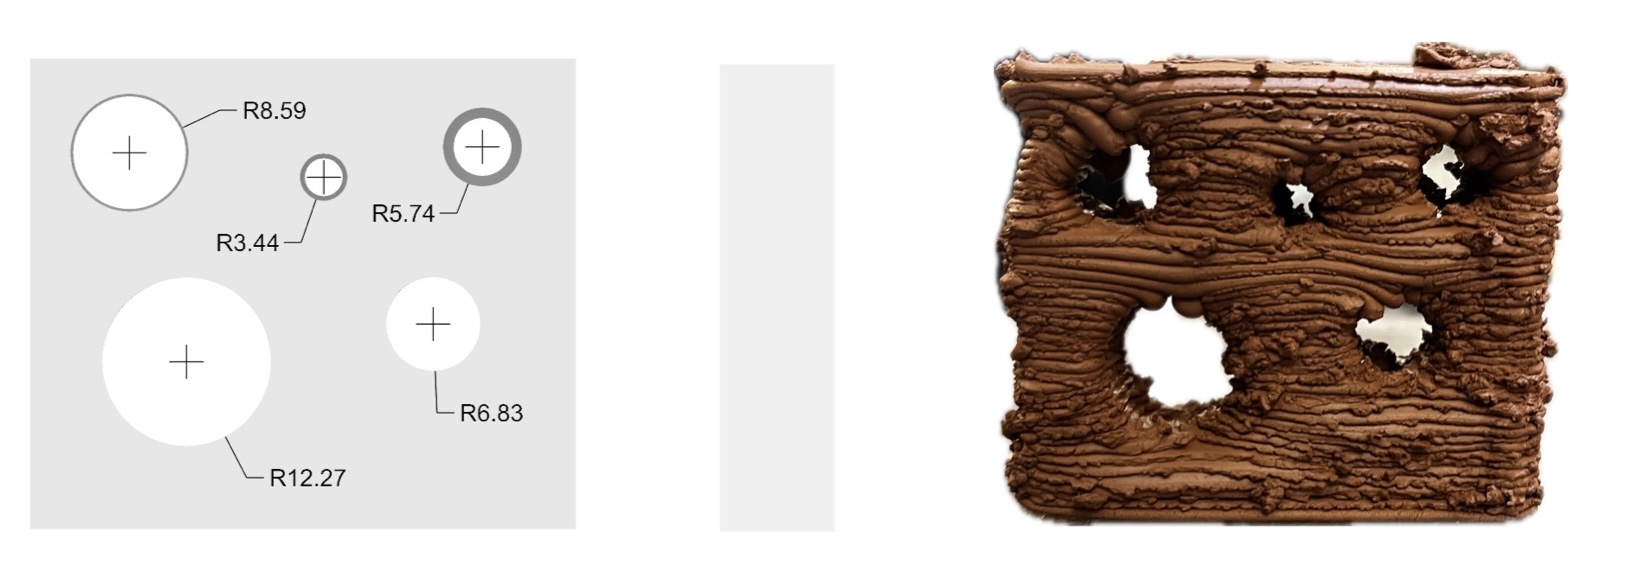
The following test aimed to understand whether the size of a circular hole created an unstable structure or affected the formation of other holes. I was surprised here as each hole maintained a good structure throughout printing apart from the top left one. The reason this hole collapsed was due to the wall to the left of it being too thin to support the increasing load above it.
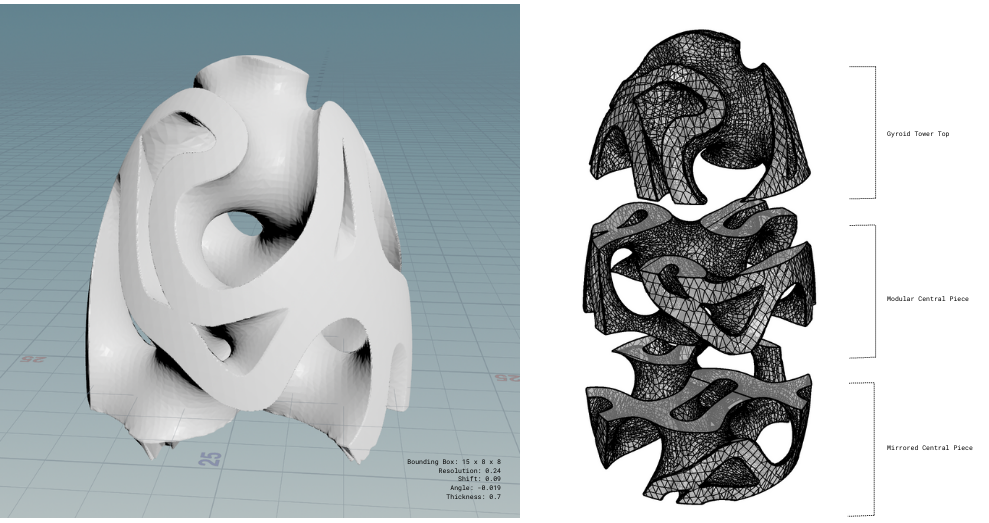
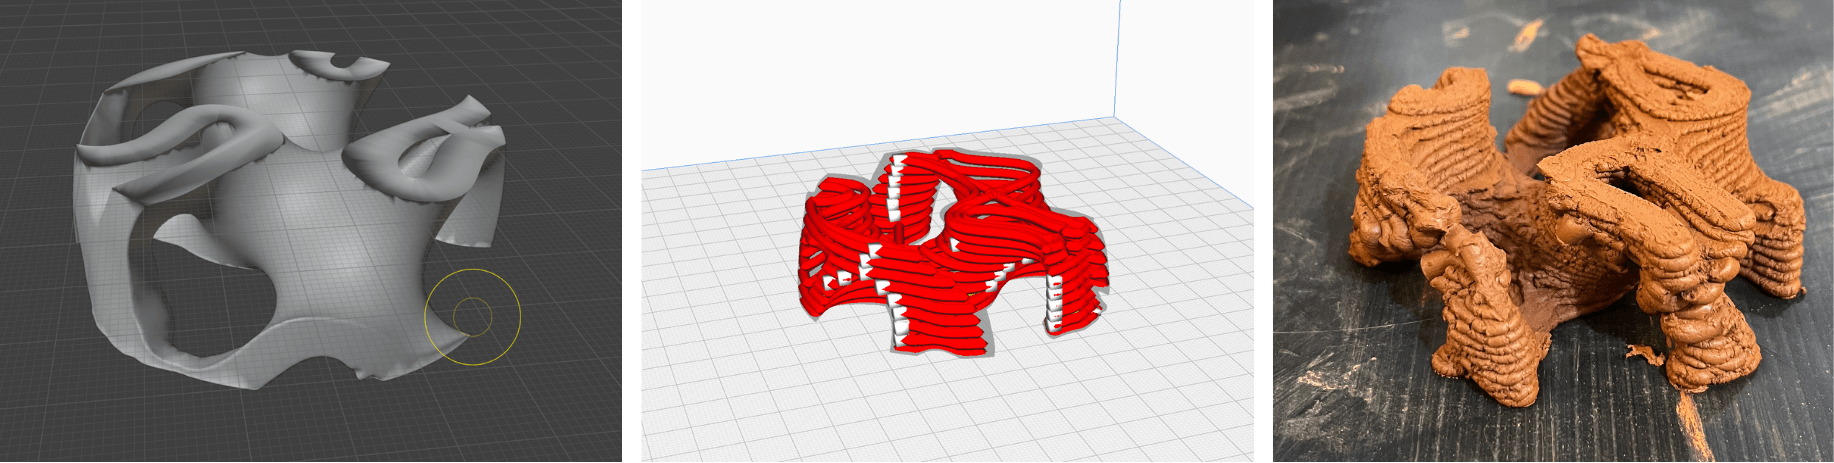
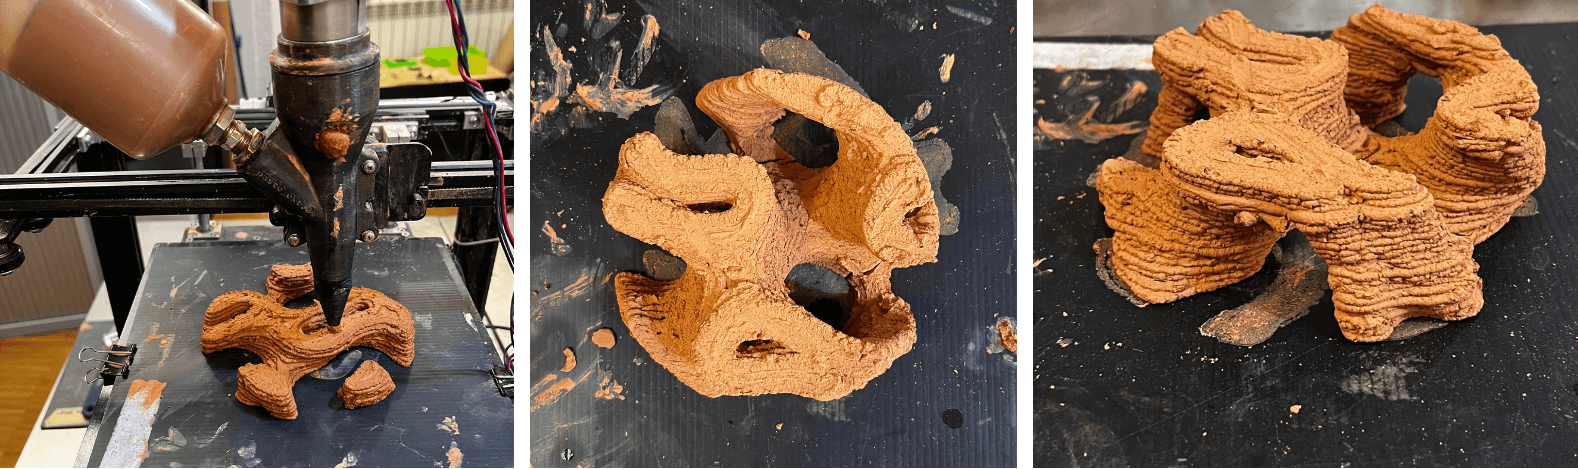
Gyroid Structures
My process for refining my 3D model for printing was as follows:
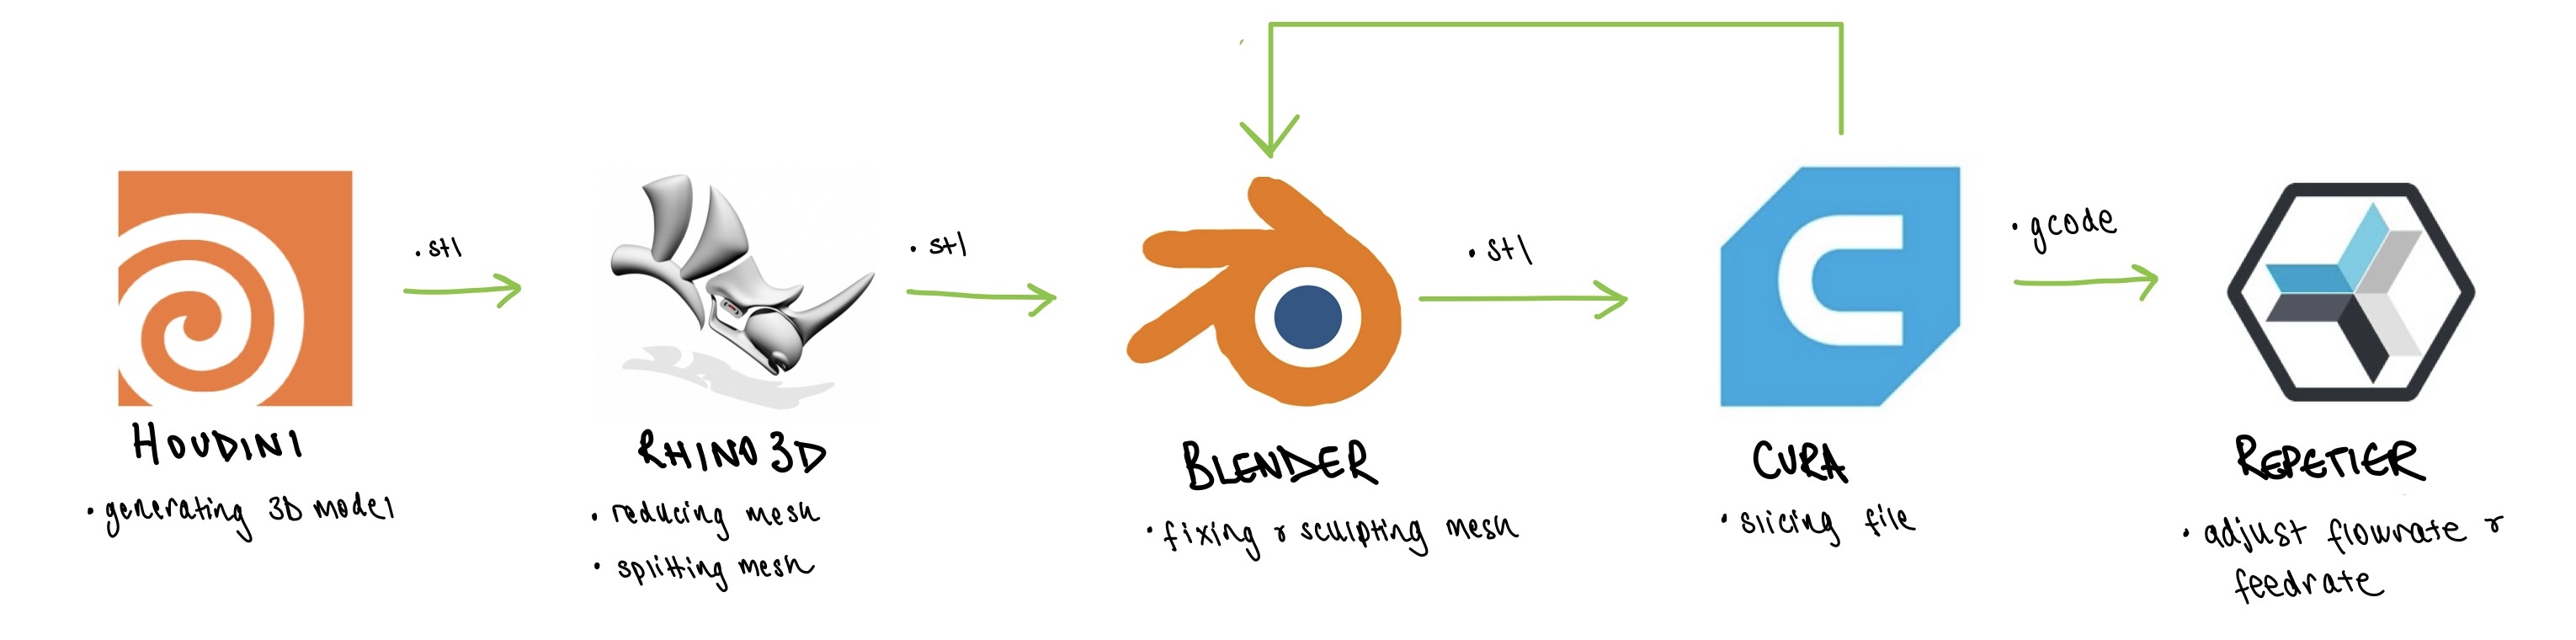
Often I had to export my file from Blender back to Rhino so that I could level the bases. Using the command mesh boolean difference allowed this to be a very simple process. After each action I double checked that the final mesh was a closed mesh.
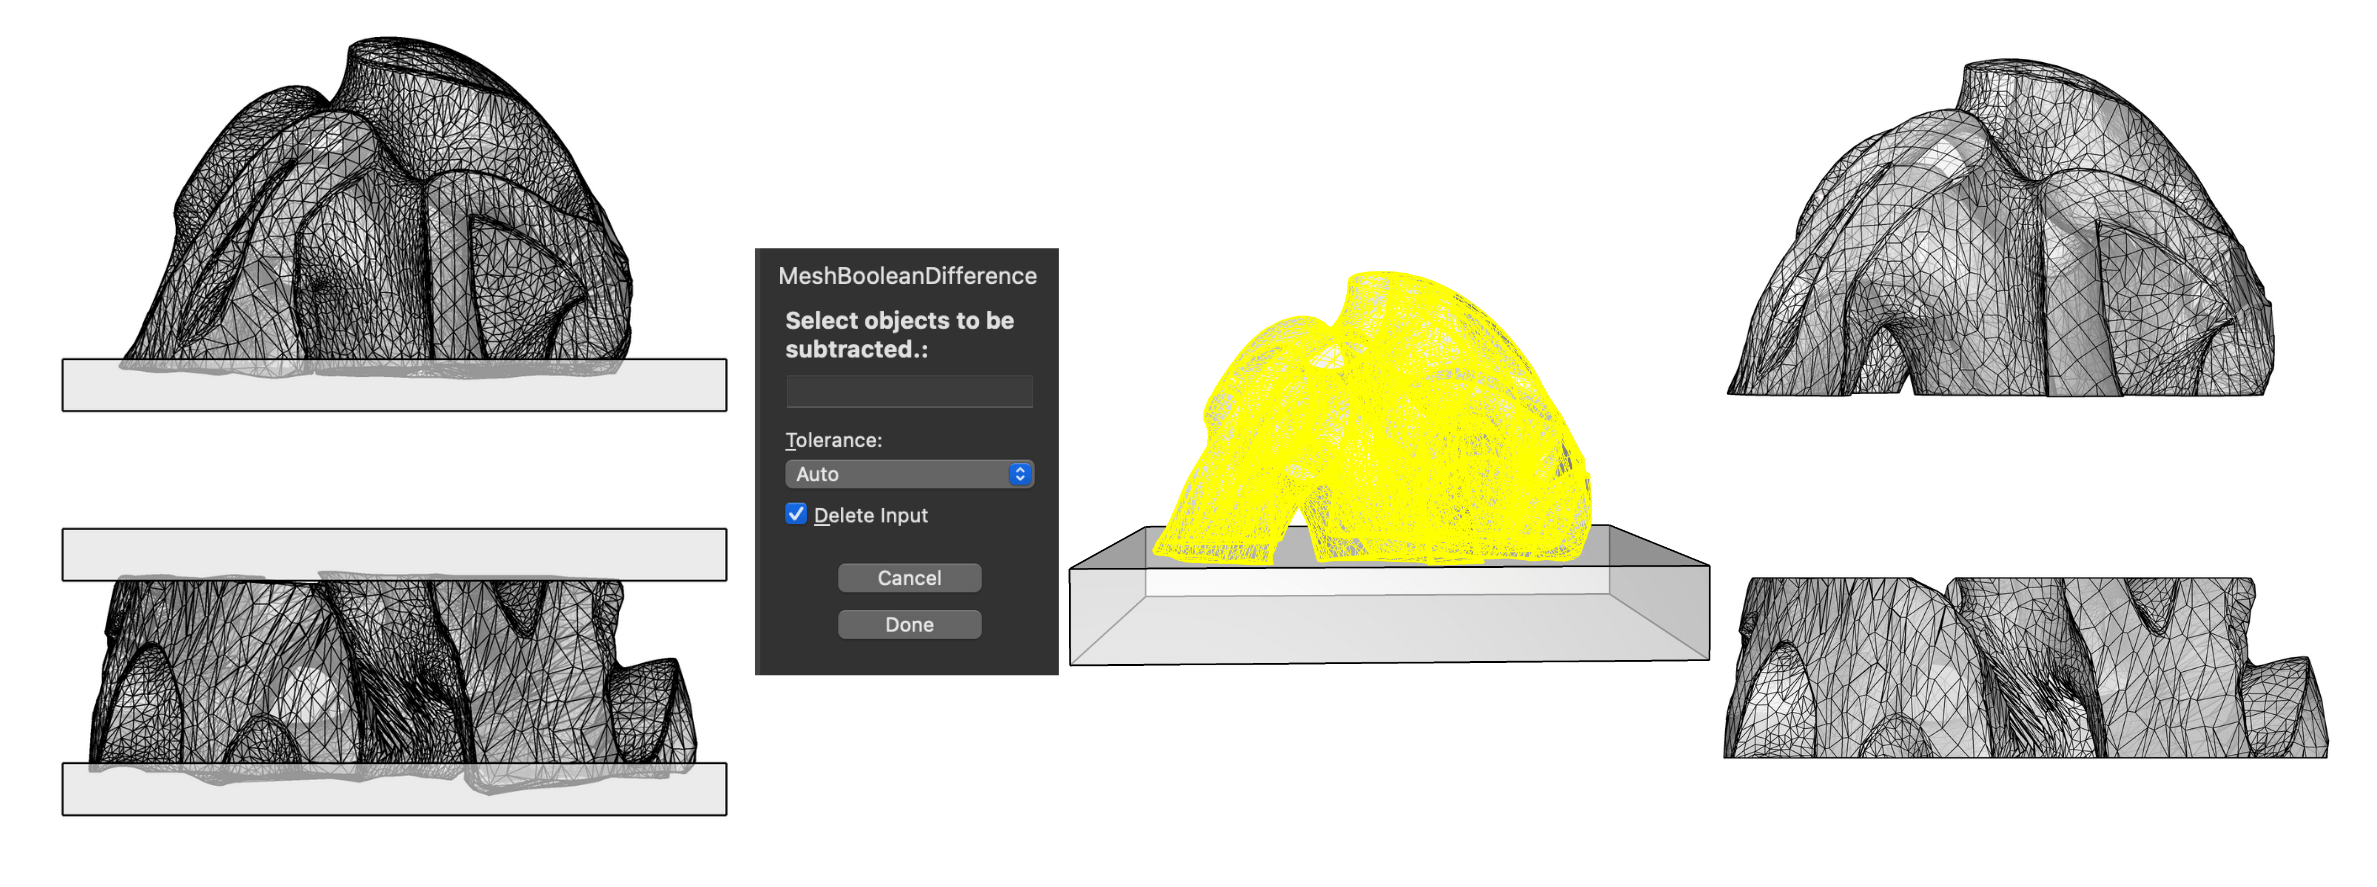
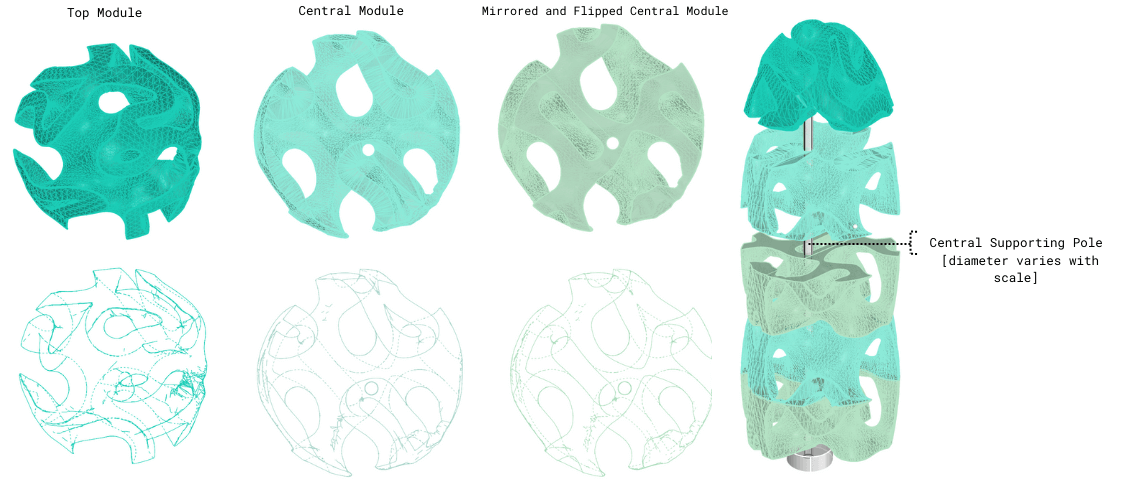
I also had to remove a hole in each module for the central support rod to be inserted through. To do this I placed a cylinder through the points that I thought worked best and used mesh boolean difference again. The placement is shown in the diagram below.
Clay
I had not yet realised I should use Blender when generating the prototypes below, so some of the walls were too unstable and collapsed during printing. I also realised quickly that the thickness of the walls in the first prototypes were way too thin, I adjusted this in Houdini and generated a new model to experiment with (the final test in the picture below). Decreasing the layer height was another parameter which increased the structural integrity of the model.
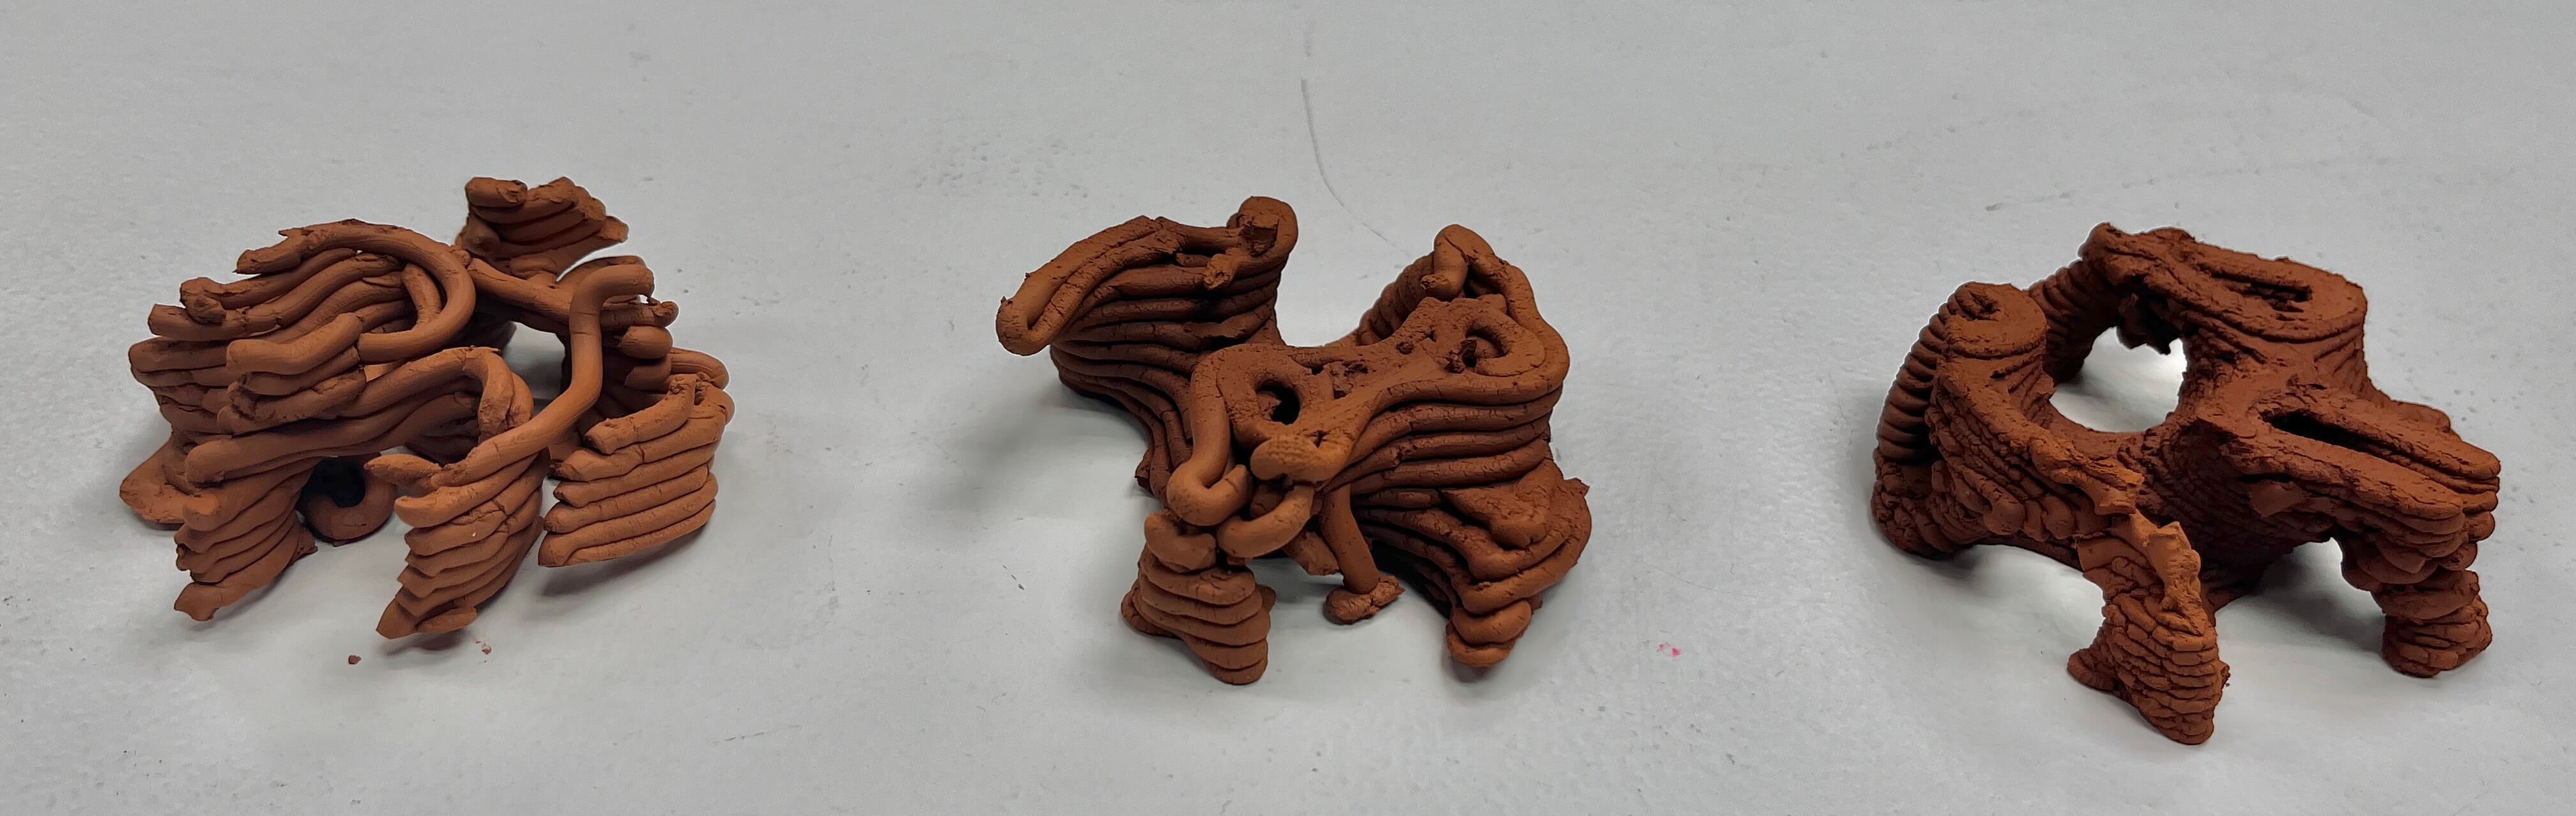
After a lot of help from Adai, I managed to refine my model in Blender and understood the parameters needed in Cura and Repetier which took many trials and errors.
The clay mixture in this model still seemed abit dry as it wasn't flowing too smoothly.
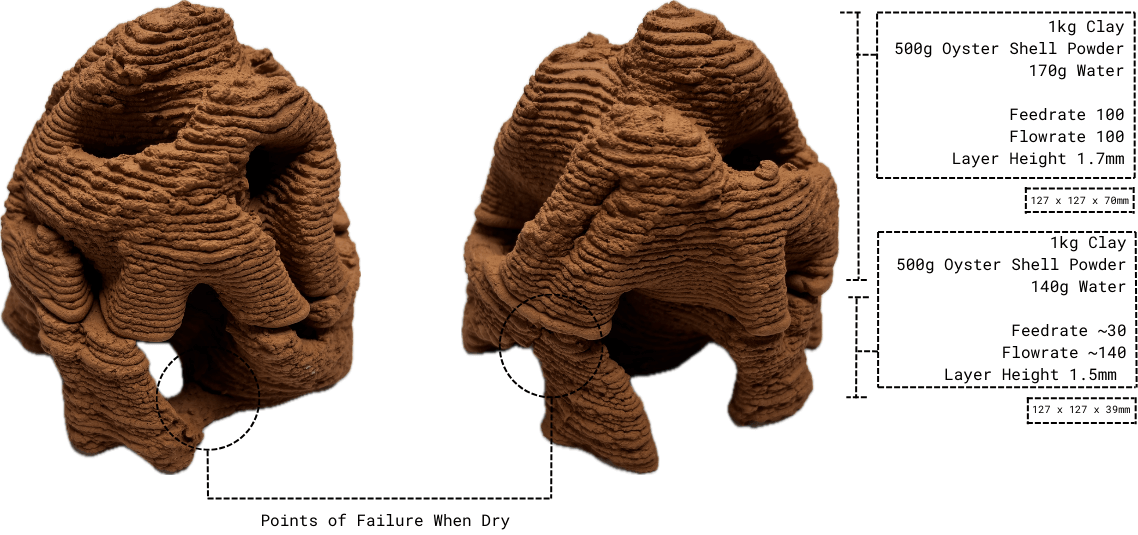
Clay and Oyster Shells
Using the same 3D model as above I created another prototype below, and experimented with the following ratios and parameters:
-
1kg Clay
-
500g Oyster Shell Powder
-
140g Water
Feedrate: ~40 | Flowrate: ~180 | Air Pressure: 2-3Bars | Layer Height: 1.5mm | Initial Layer Height: 2mm | Scale: 15% (127 x 127 x 39mm) | Print Time: 2 hours
This scaled version of the 3D model worked really well, however I think the mixture may have still been too dry and thin in some places as it cracked after a few days of air drying. I noticed that some overhangs were going to fail if I scaled the model any more.
After adjusting some settings and adding more water to the mixture, I printed the top of the tower. With these parameters, the structure printed much more smoothly and faster (40 minutes) with no noticeable points of failure.
Mentoring Notes
From RRReefs Collaboration
-
Since I am printing with clay and in a complex geometry, I need to ensure that the .gcode path is printing in a continuous line to ensure that the nozzle doesn't pick up and drag any material. A potential solution is to look into the Ovenbird Plugin for Grasshopper which was created for shell printing. I should also print slow enough for the clay to have time to set a little.
-
The print bed at the RRReefs Lab is 35 x 35 x 60 cm.
-
In order to start testing the material in an 'aquarium' tank, it is as simple as looking up on an aquarist's website to purchase the correct nutrients for the solution. However this will only test the structure in a salty water solution - which we know will work as it is clay. RRReefs sent their prototypes to Fauna Marin Lab in Germany for the pH and toxicity to be tested, which is making me wonder how I will test my structure's properties in the time frame.