Deliverables
Slide show
Story telling script

- slide 1 Presentation: “My name is María, I´m from Mexico and this is my mind term presentation”
- slide 2 "I would like to start with the question: What does it mean to be human?. Please responde de QR code. +Pause briefly after screening". Give the audience time to reflect before they participate in the Mentimeter."For me, being human is about passion, about the things that drive us. But let's see what you think..."
.jpg)
- slide 3 "At first, my project was completely different. I thought I had a clear idea... but as I worked on it, something felt off. It didn’t excite me, it didn’t represent me. So I paused and asked myself: Why did I join Fabricademy in the first place? What do I love? What do I dream of creating? And suddenly, it hit me—the question of all questions: What does it mean to be human?"
- slide 4 Let's review some of the most common answers, some answers are in Spanish, others in English, but without a doubt: love, empathy, passion, are some of the most frequent words.
- slide 5 "We wake up, choose what to wear, eat, work, fulfill our responsibilities... We live fast, we live stressed. But is that all that defines us as humans?
- slide 6 I wanted to explore beyond that. I wanted to capture the invisible aspects of my daily life—the emotions, the microbes, the traces of my existence—and transform them into a tangible structure."
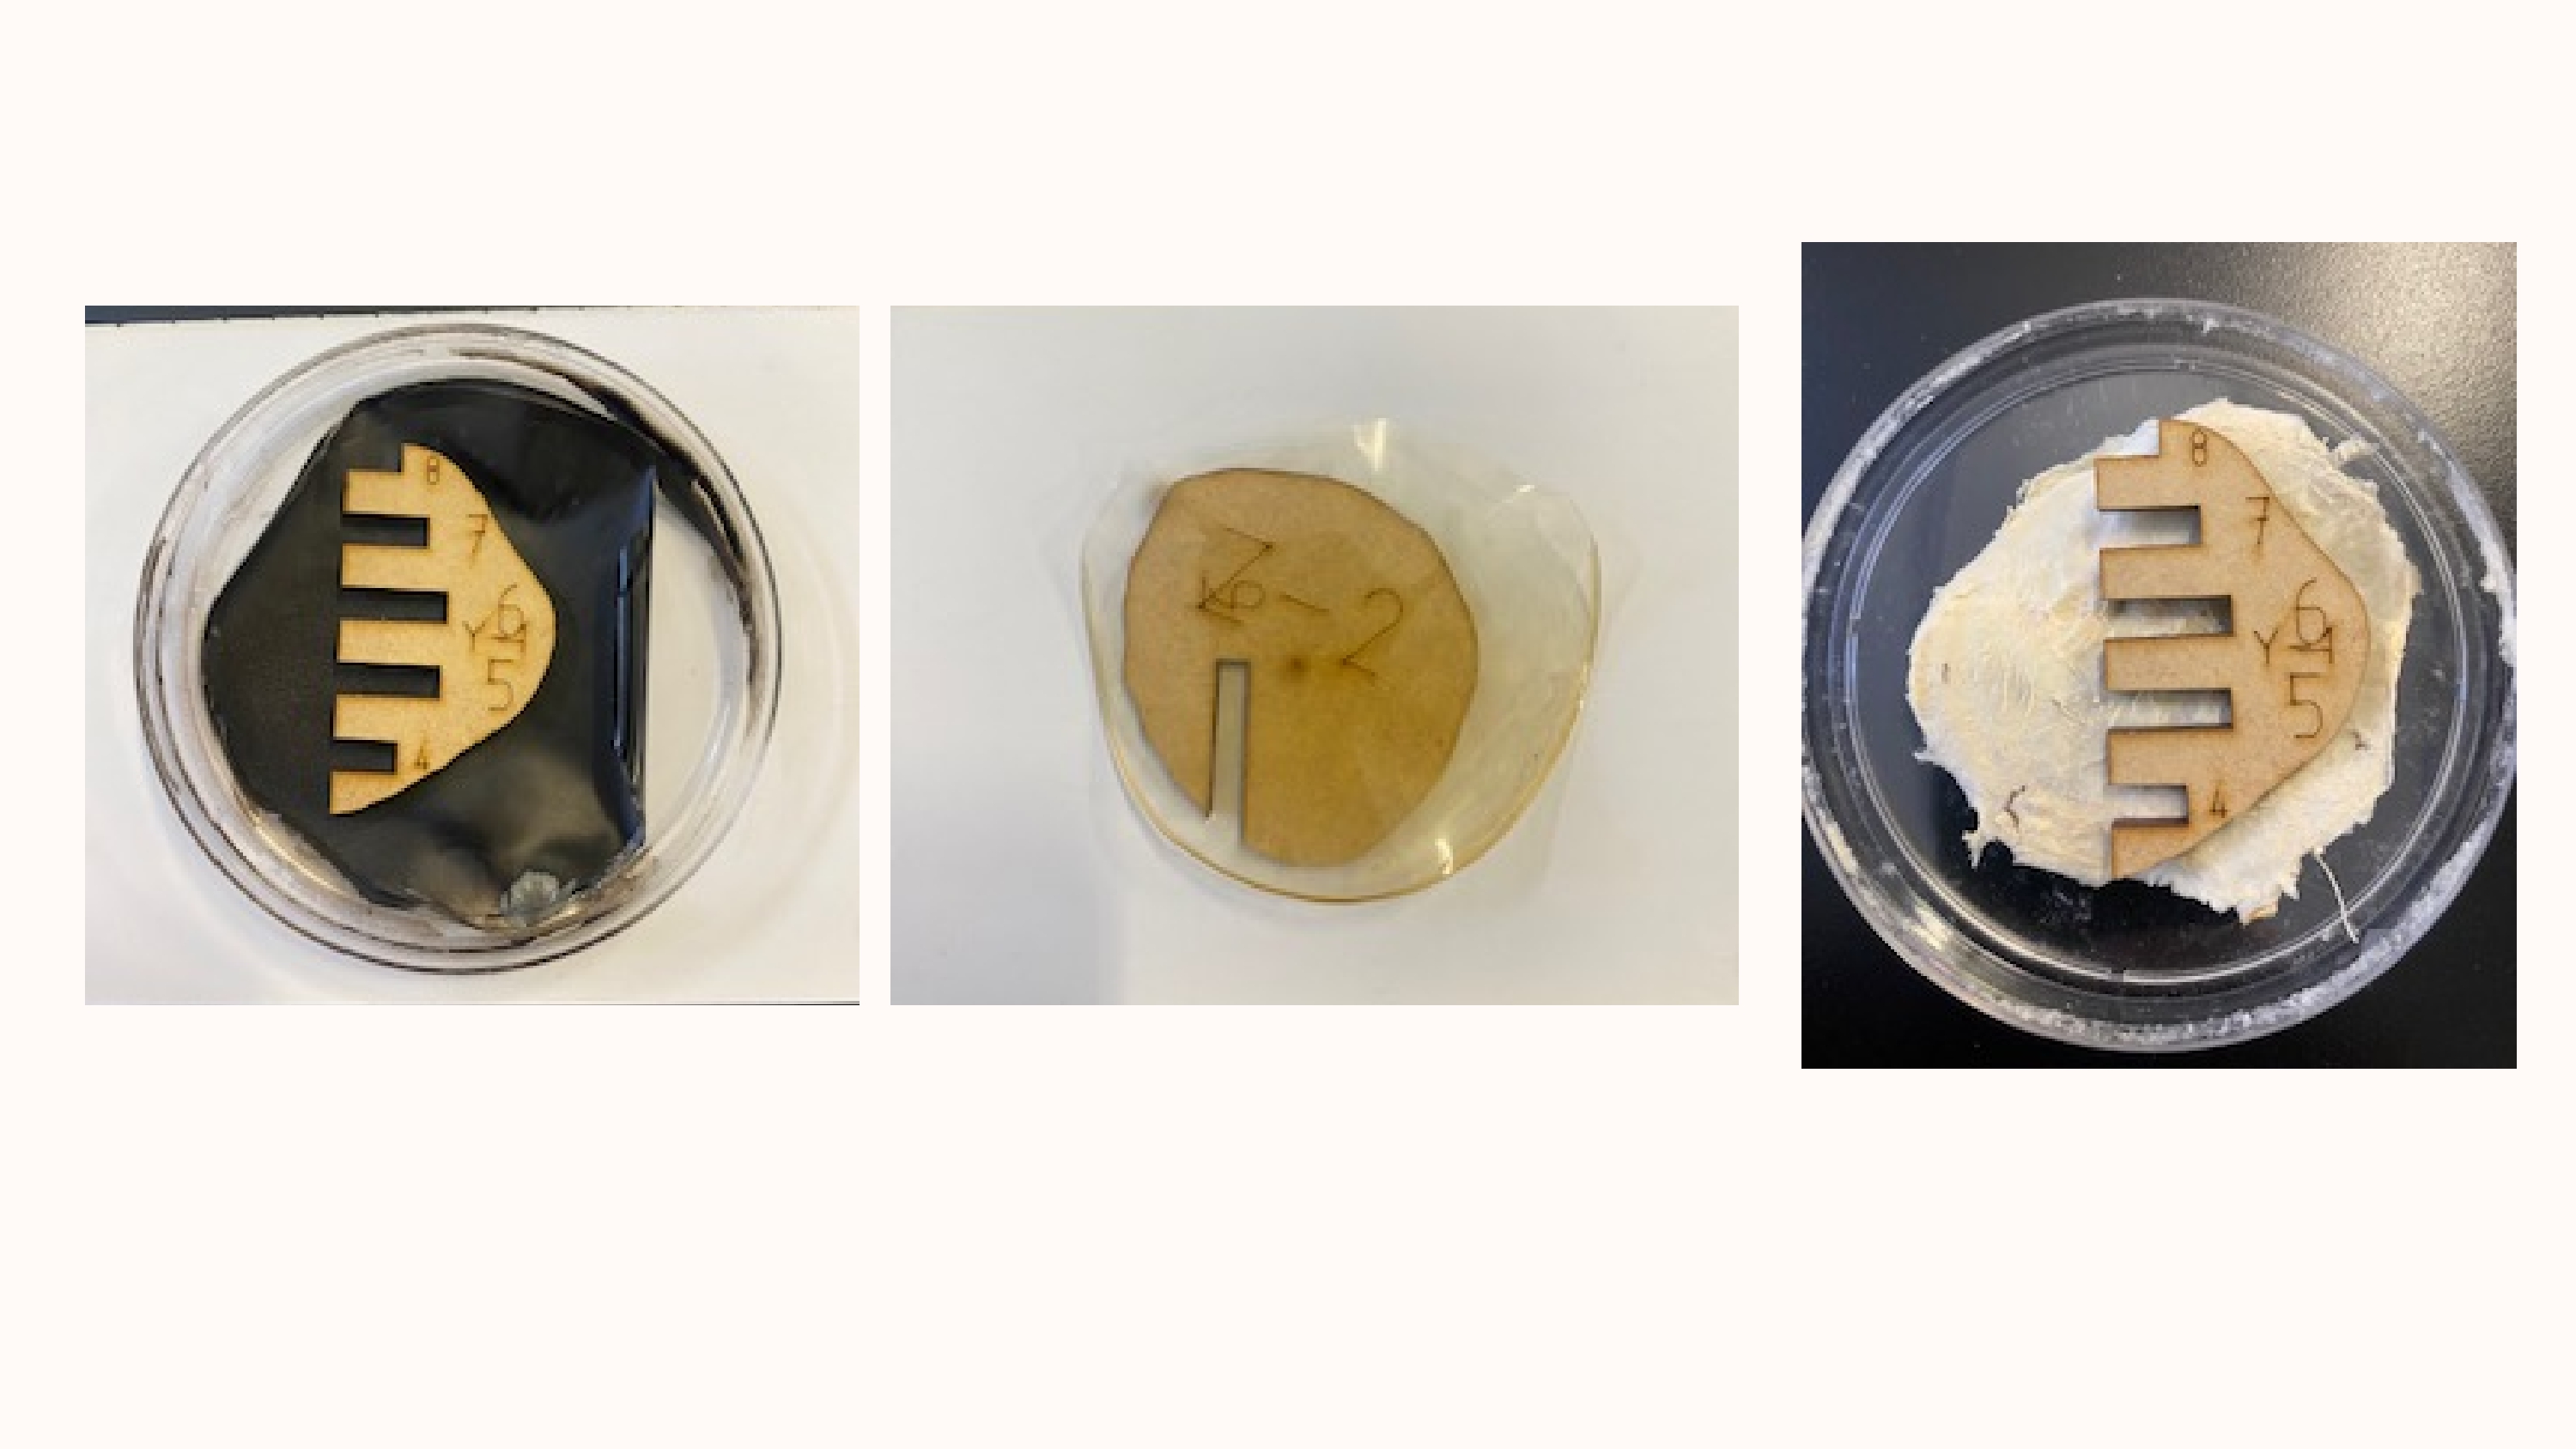
- slide 7 The first thing I did was collect samples from the places I visit, my food, the objects I use, and I even took samples of my cat's hair.
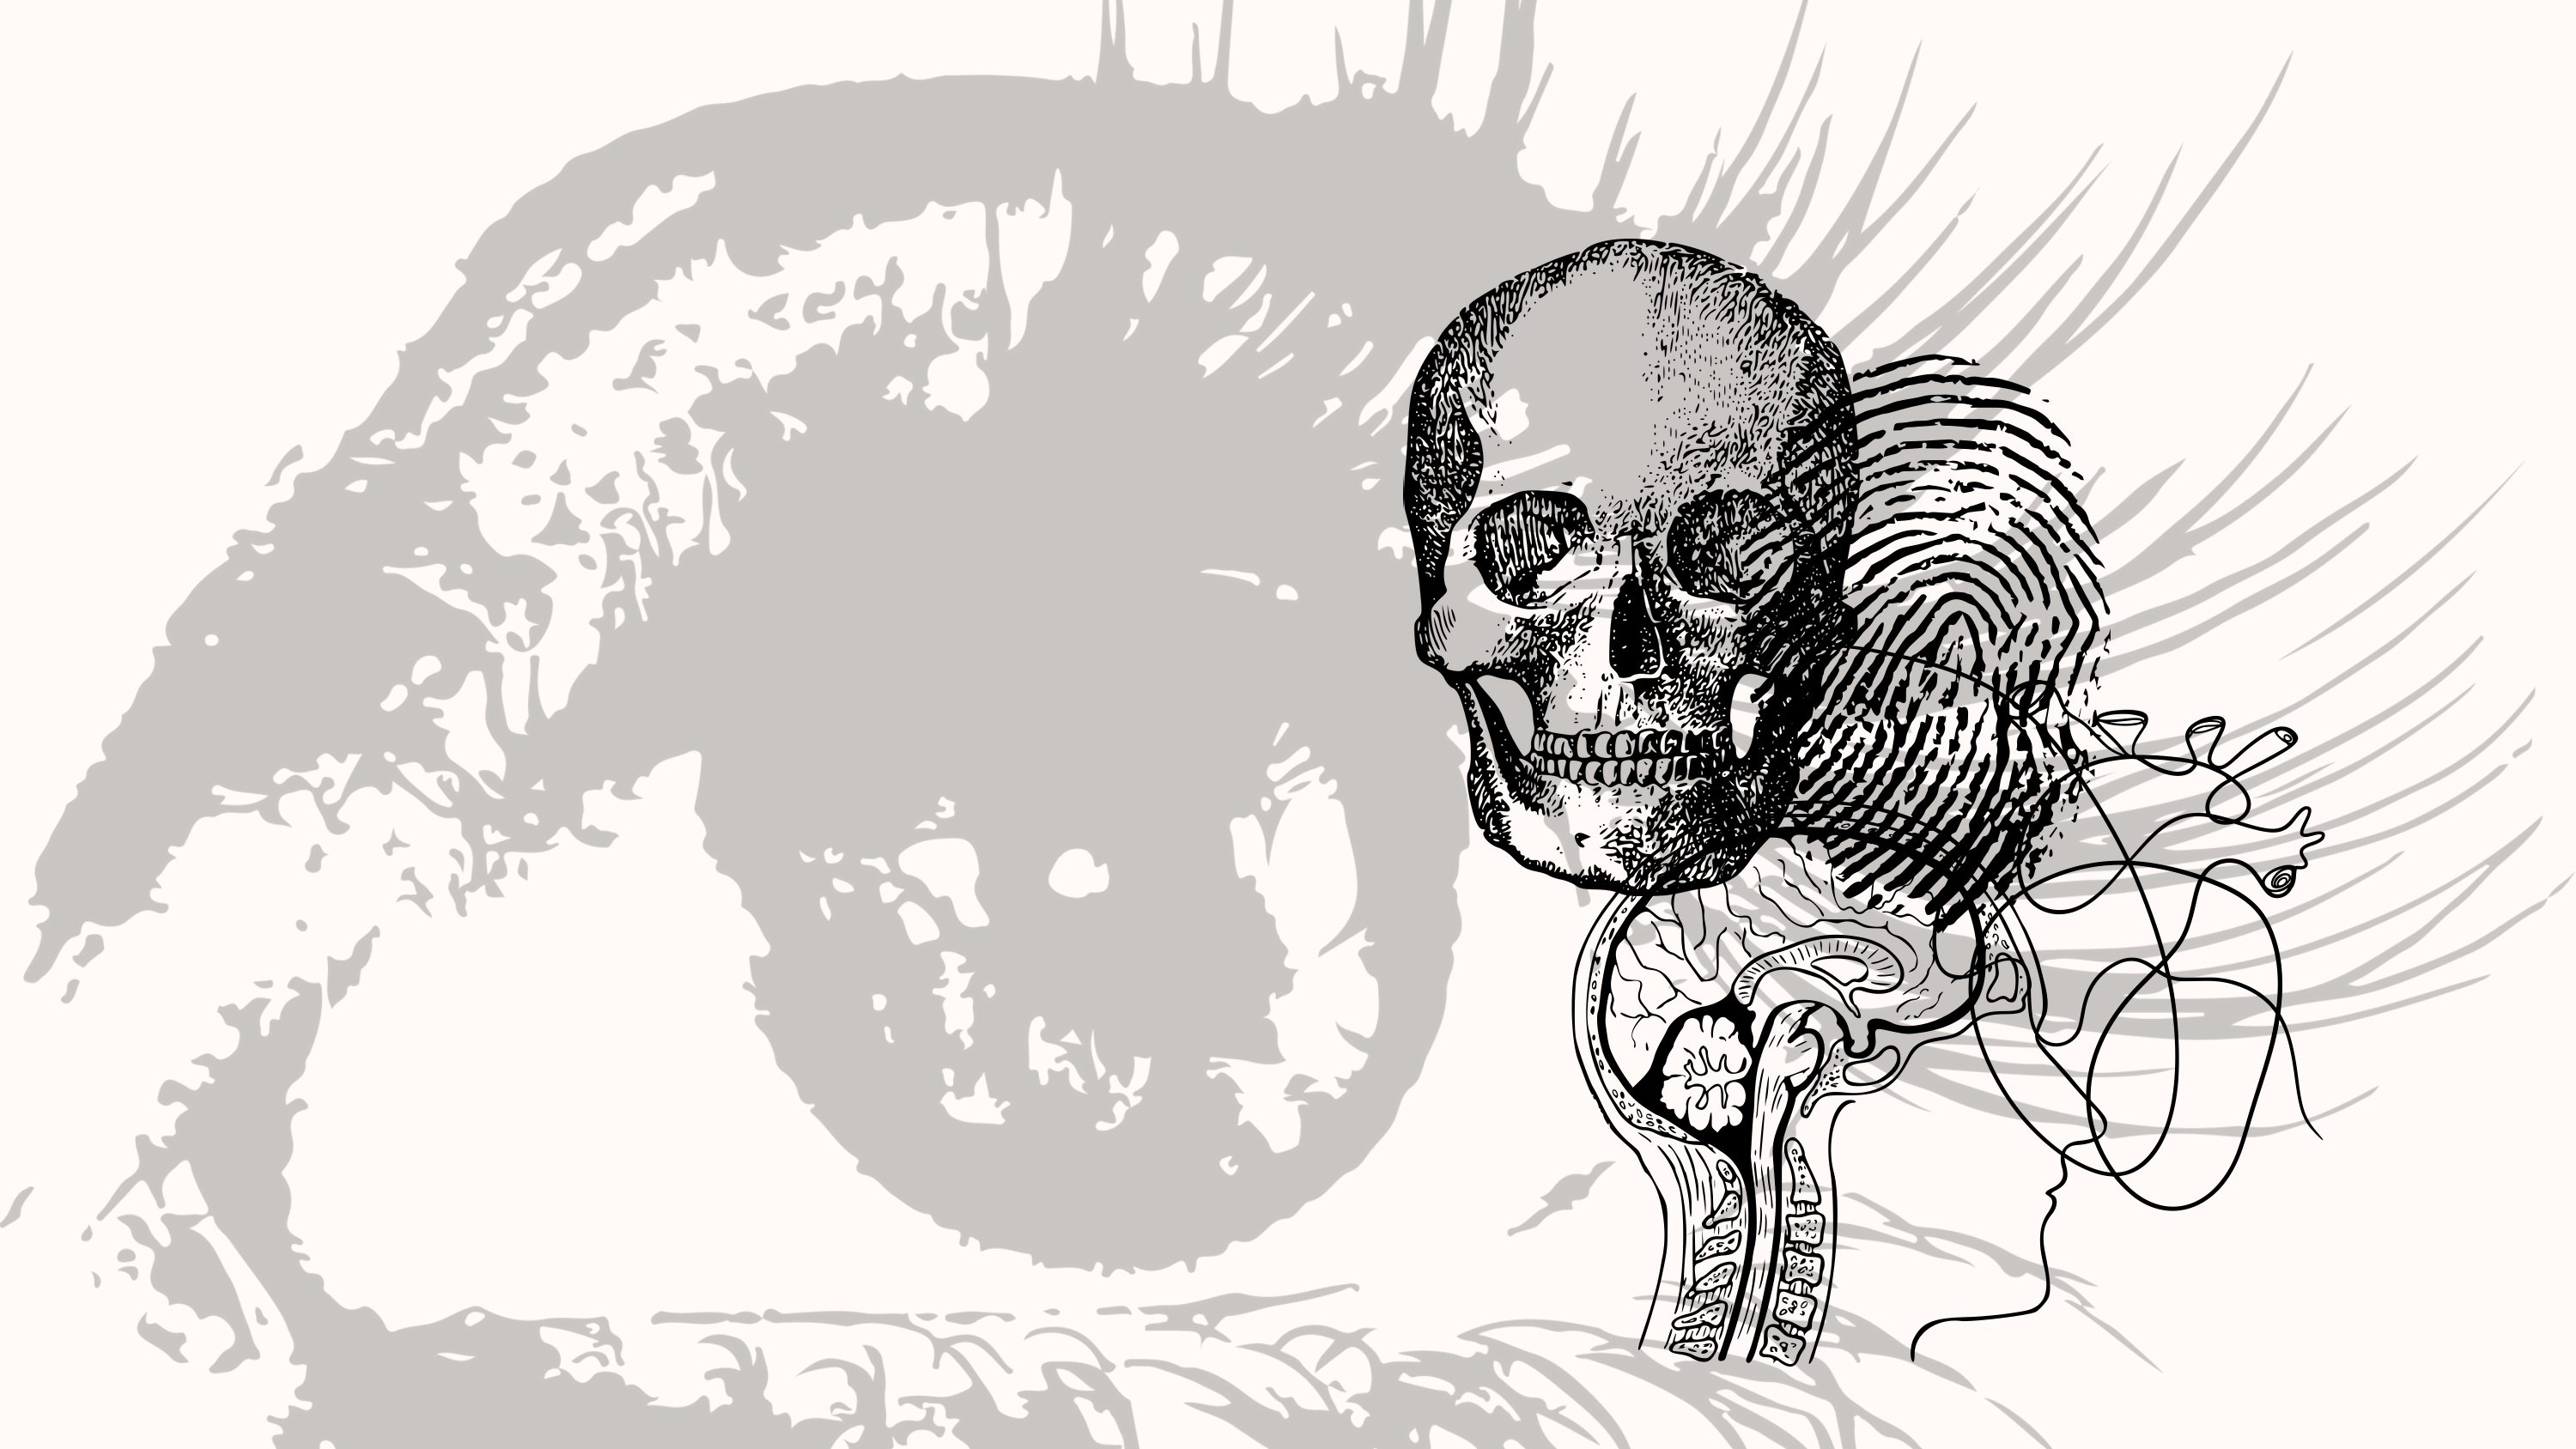
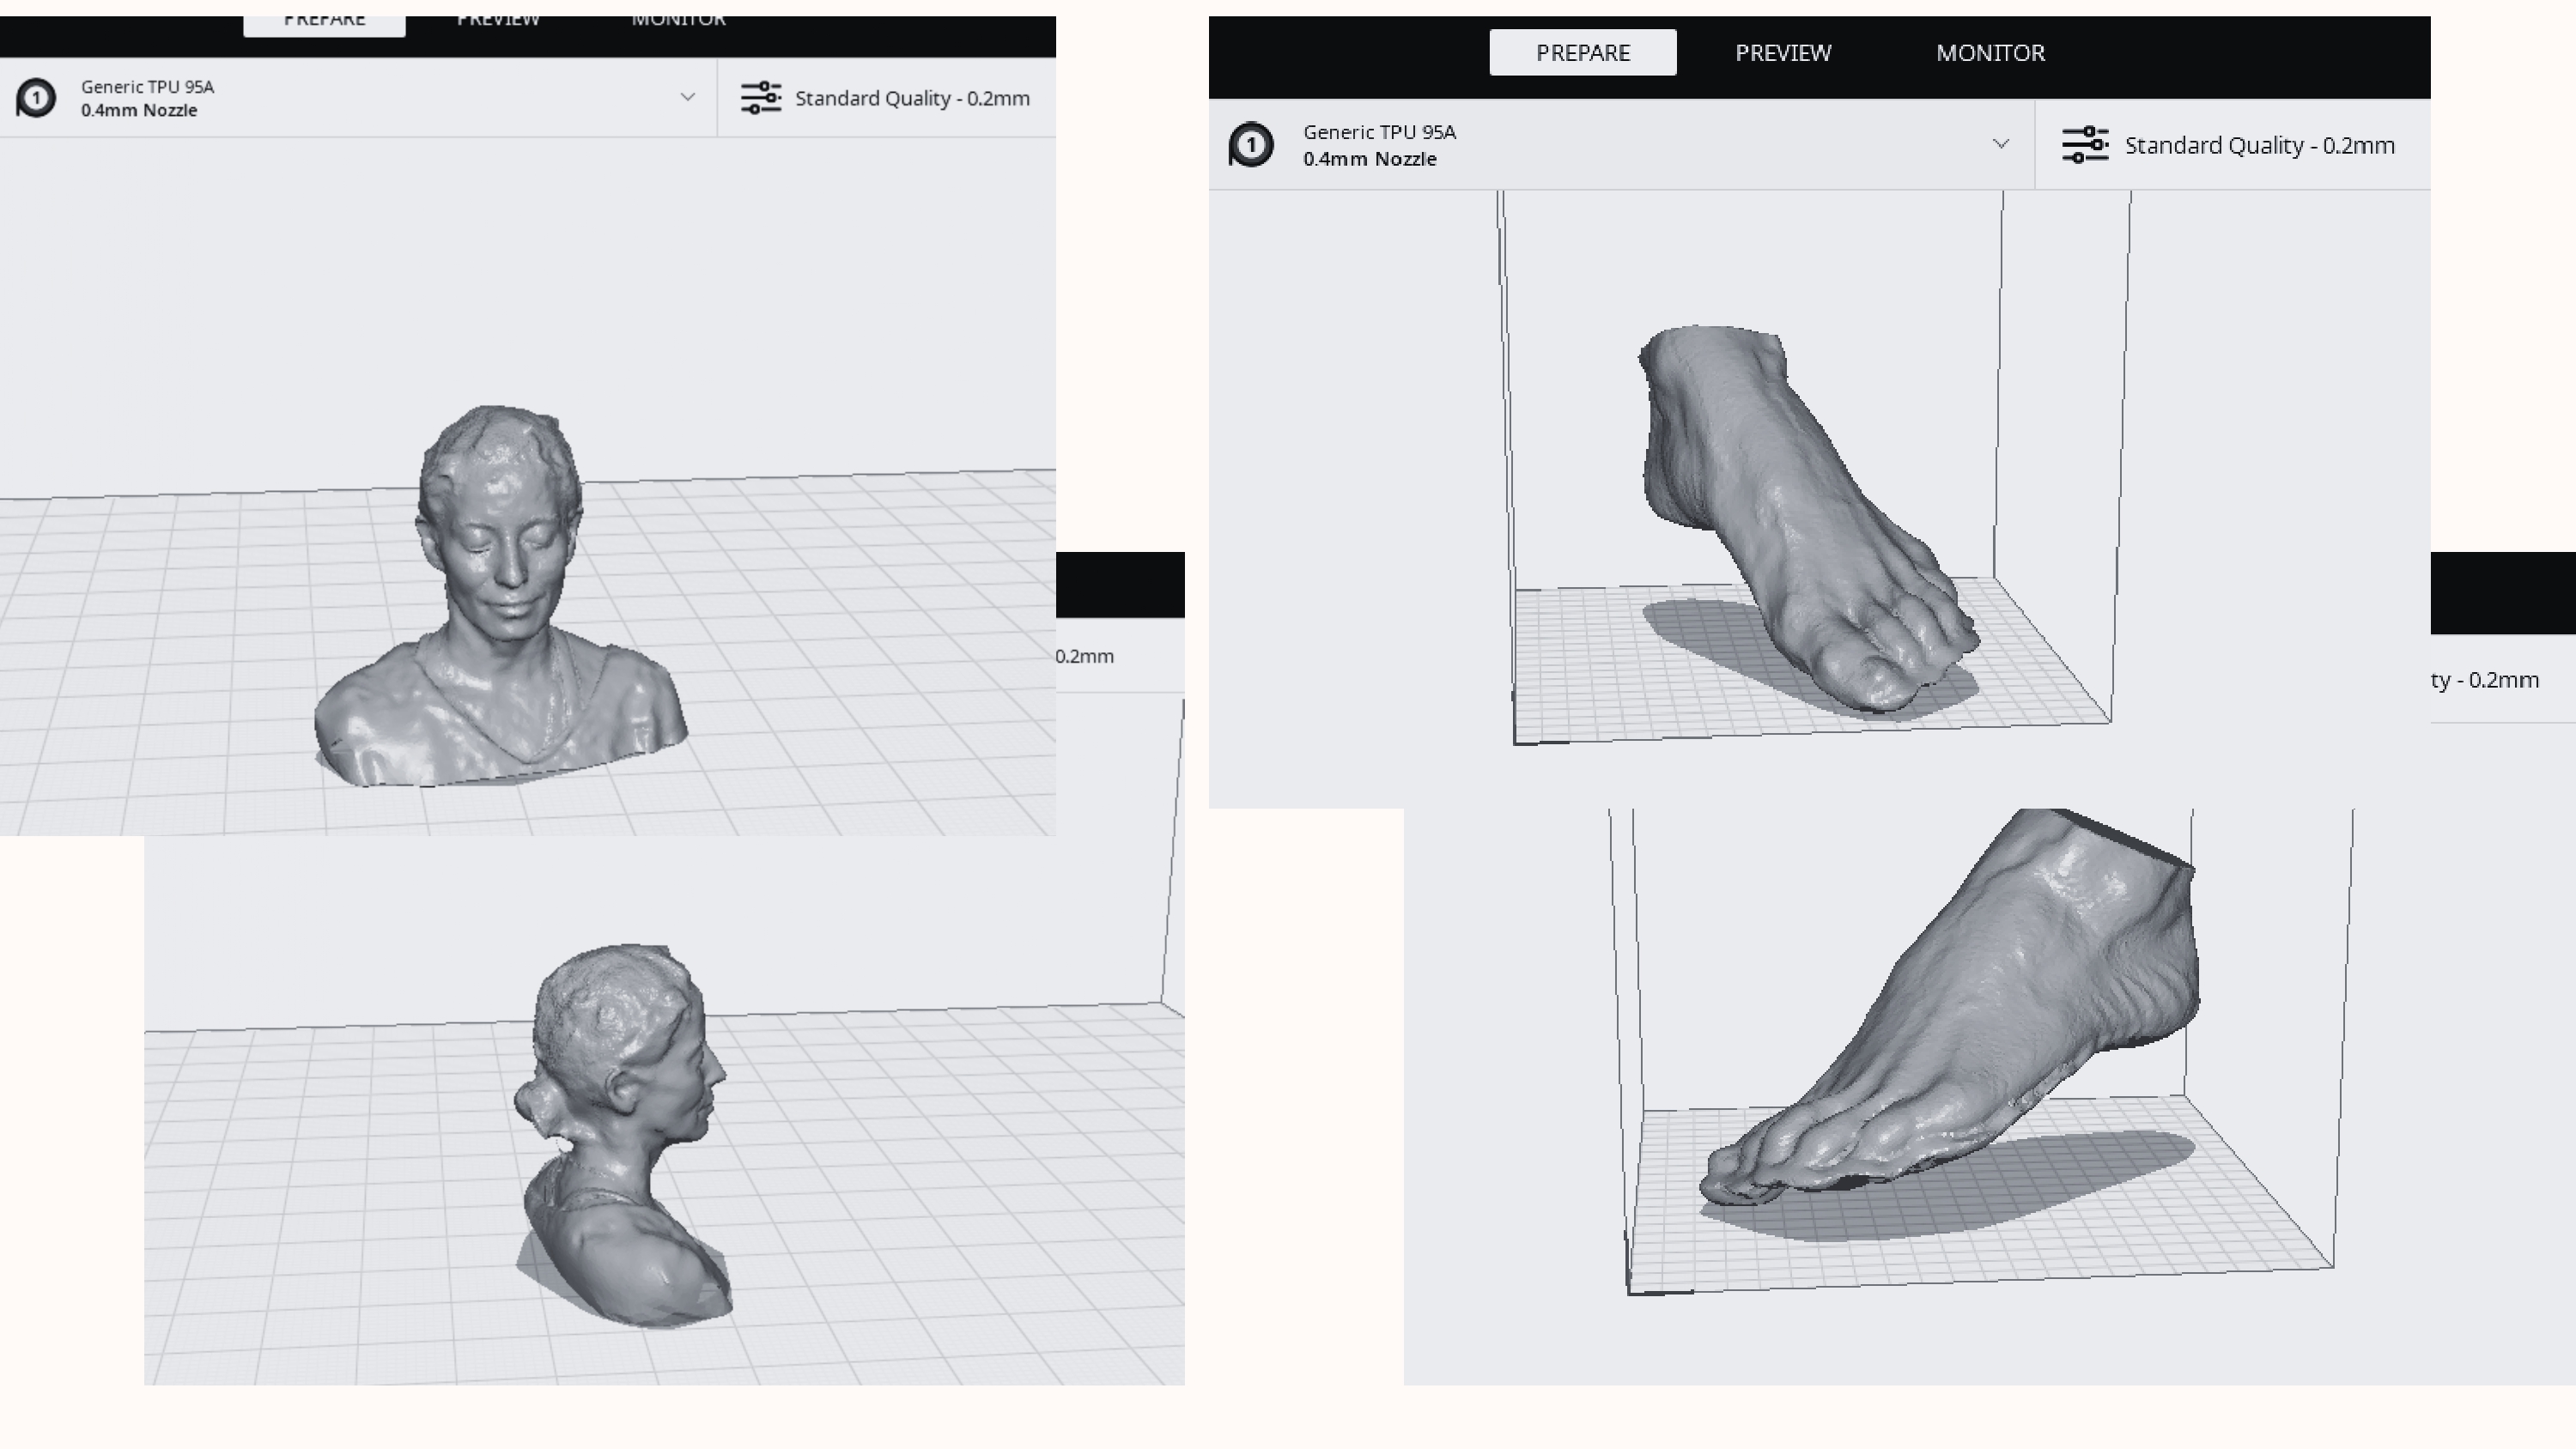
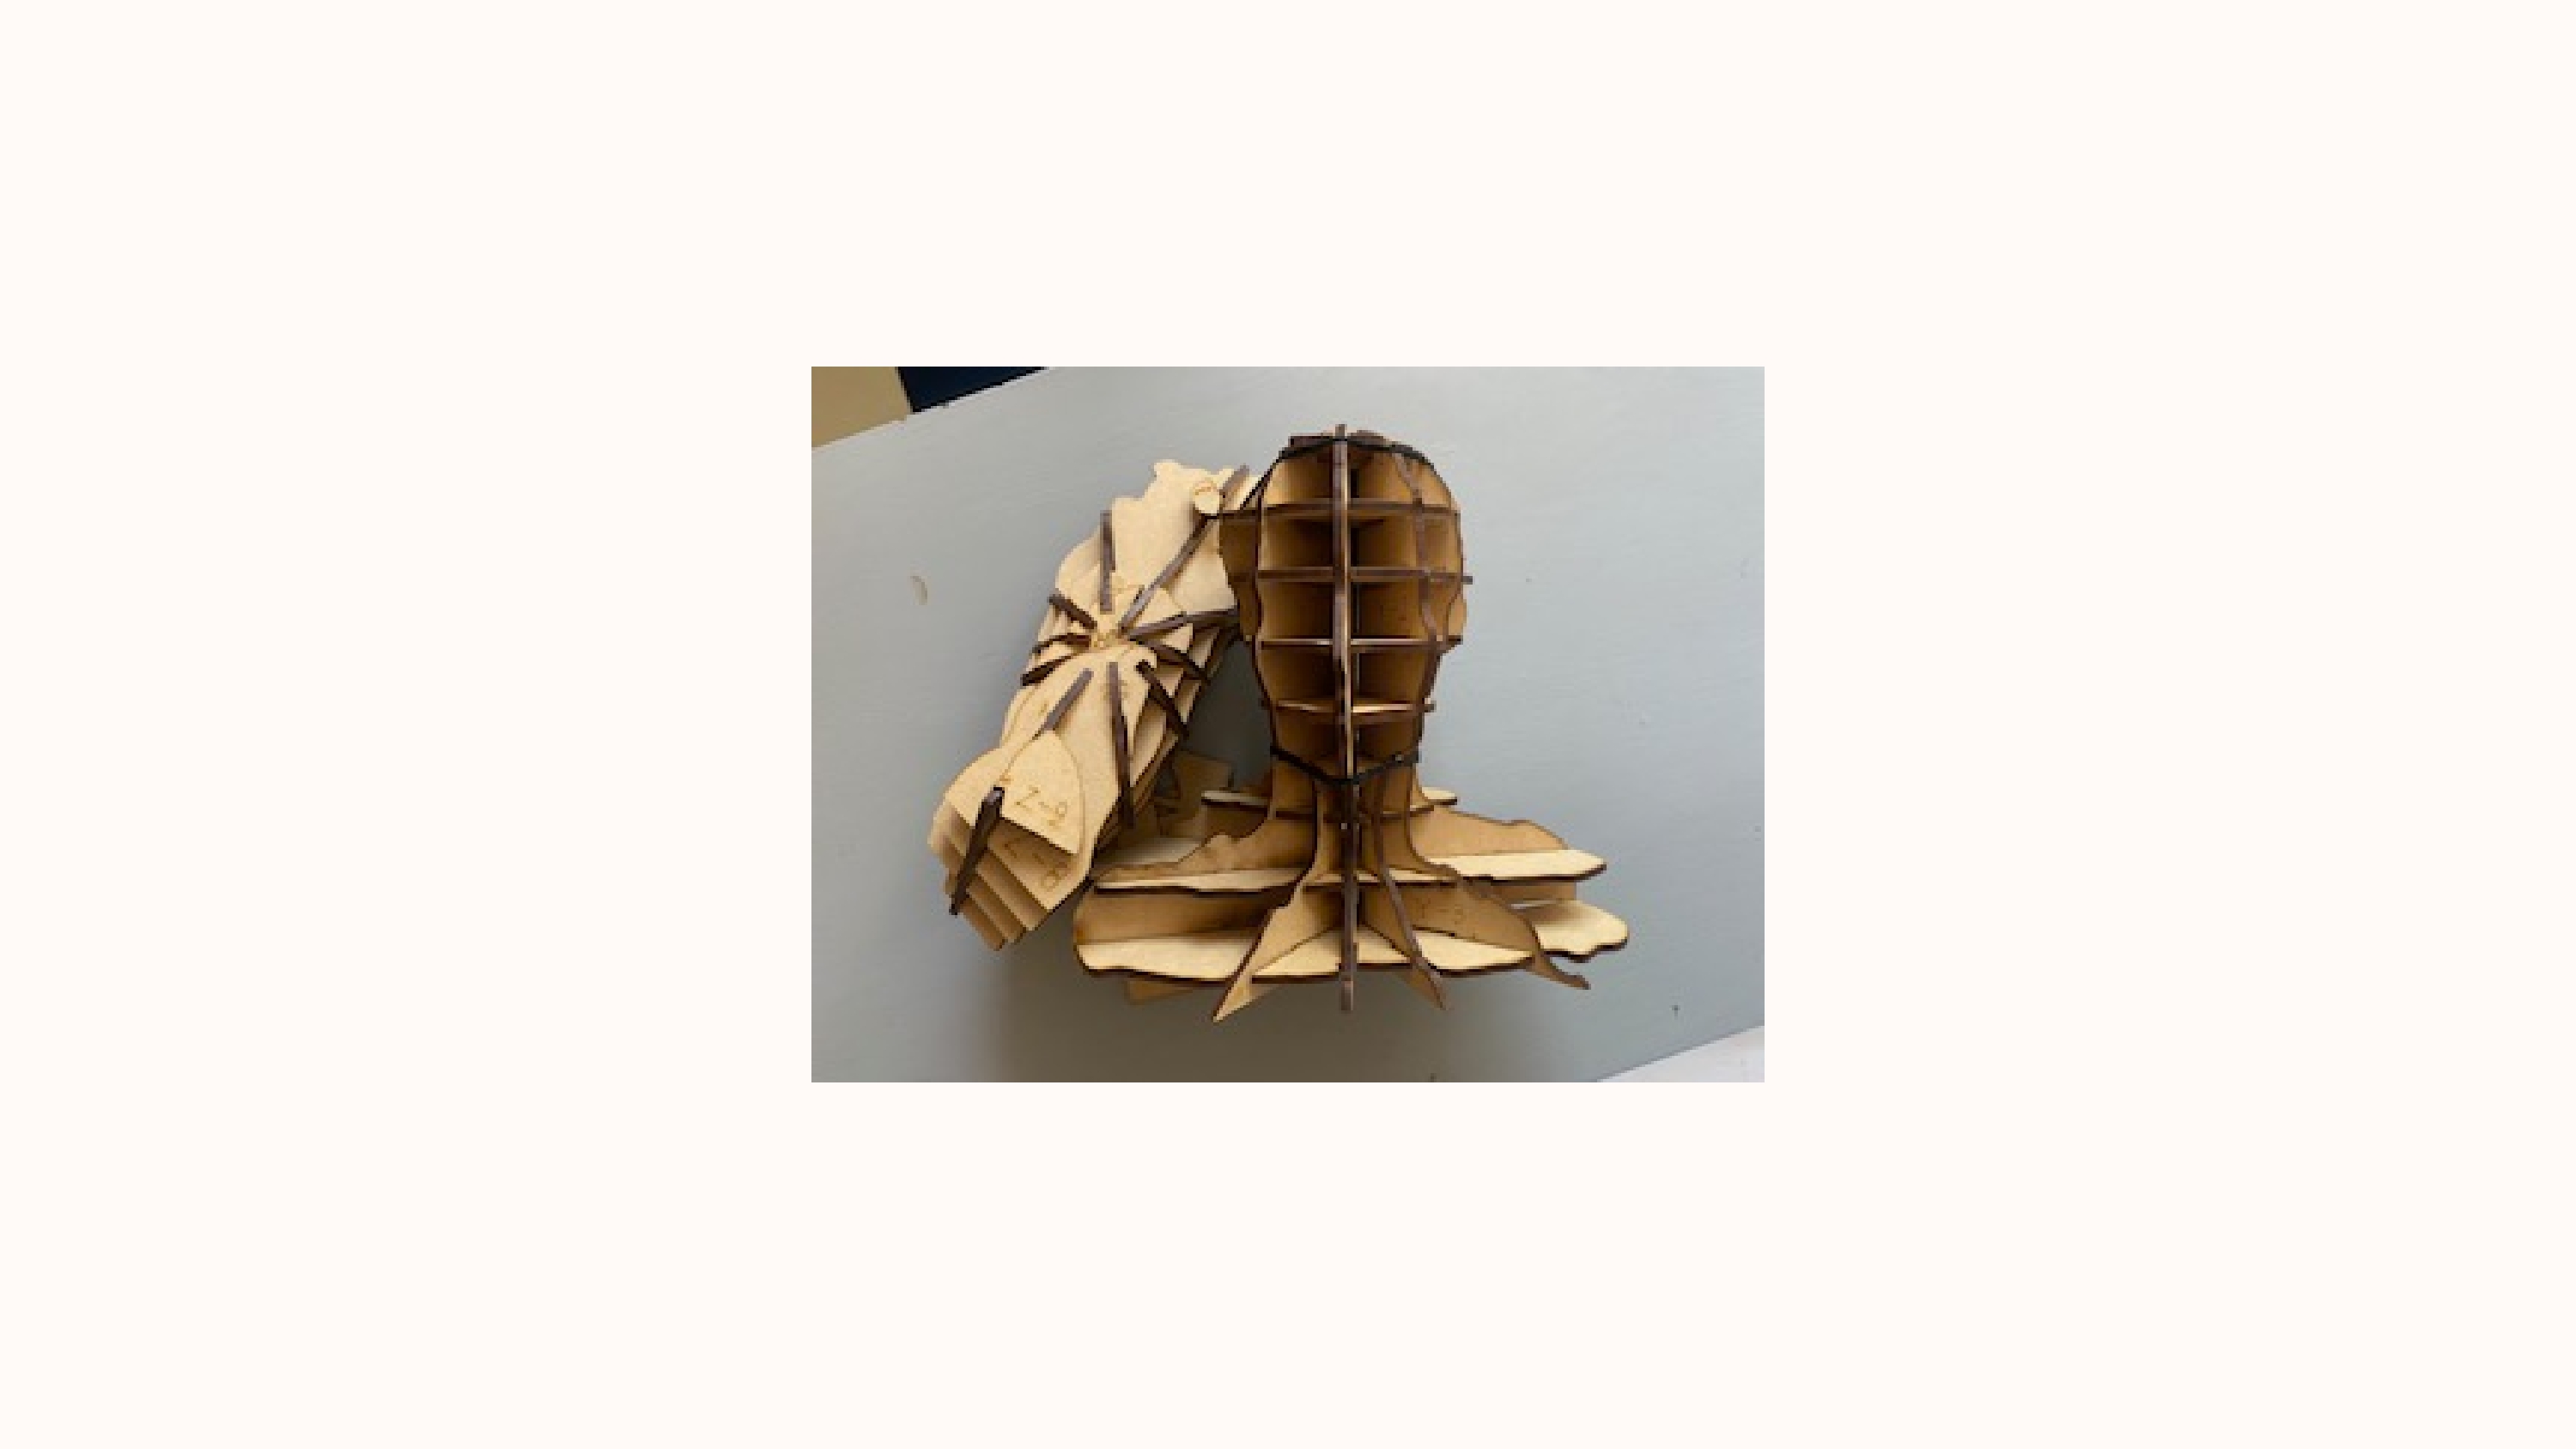
- slide 8 Then I scanned my head: "Our mind is where reason and creativity collide. It shapes our thoughts, memories, and identity. But what if we could see that complexity? I scanned my head to represent this duality—the logical and the artistic sides of who I am. I also scanned my left foot: We are not just minds; we are bodies that move, feel, and connect with the world. My left foot is my anchor, my connection to the earth, and it also represents my passions—ballet, yoga, running, aerial dance. These movements make me feel alive, reminding me that humanity is not just about thinking, but also about experiencing and feeling."

- slide 9 I used the 'Slicer' program because we are not made of one piece. We are the result of multiple layers of experiences, emotions and learnings that have shaped us over time. We don't always show our inner selves easily, but every fragment of us tells a story about who we are and how we got here.
- slides 10-12 RESULTS

- slide 13 "After all this, I believe you now understand that I am not just María from Mexico… I am the sum of moments, emotions, and stories that live within me. Because being human is much more than just existing—it is feeling, connecting, and constantly transforming."
- slide 14 Thank you
- slide 15 Comments
How-Tos & Tutorials
Survey A survey was conducted using mentimeter, and distributed through social media. The only question to answer was "What does it mean to be human?" and each person could enter up to three words: I am developing a project where I explore the essence of being human through biomaterials and microorganisms. I want to collect words that represent what you believe defines a human being. These words can be actions, emotions, thoughts, or physical elements. Thank you for participating!
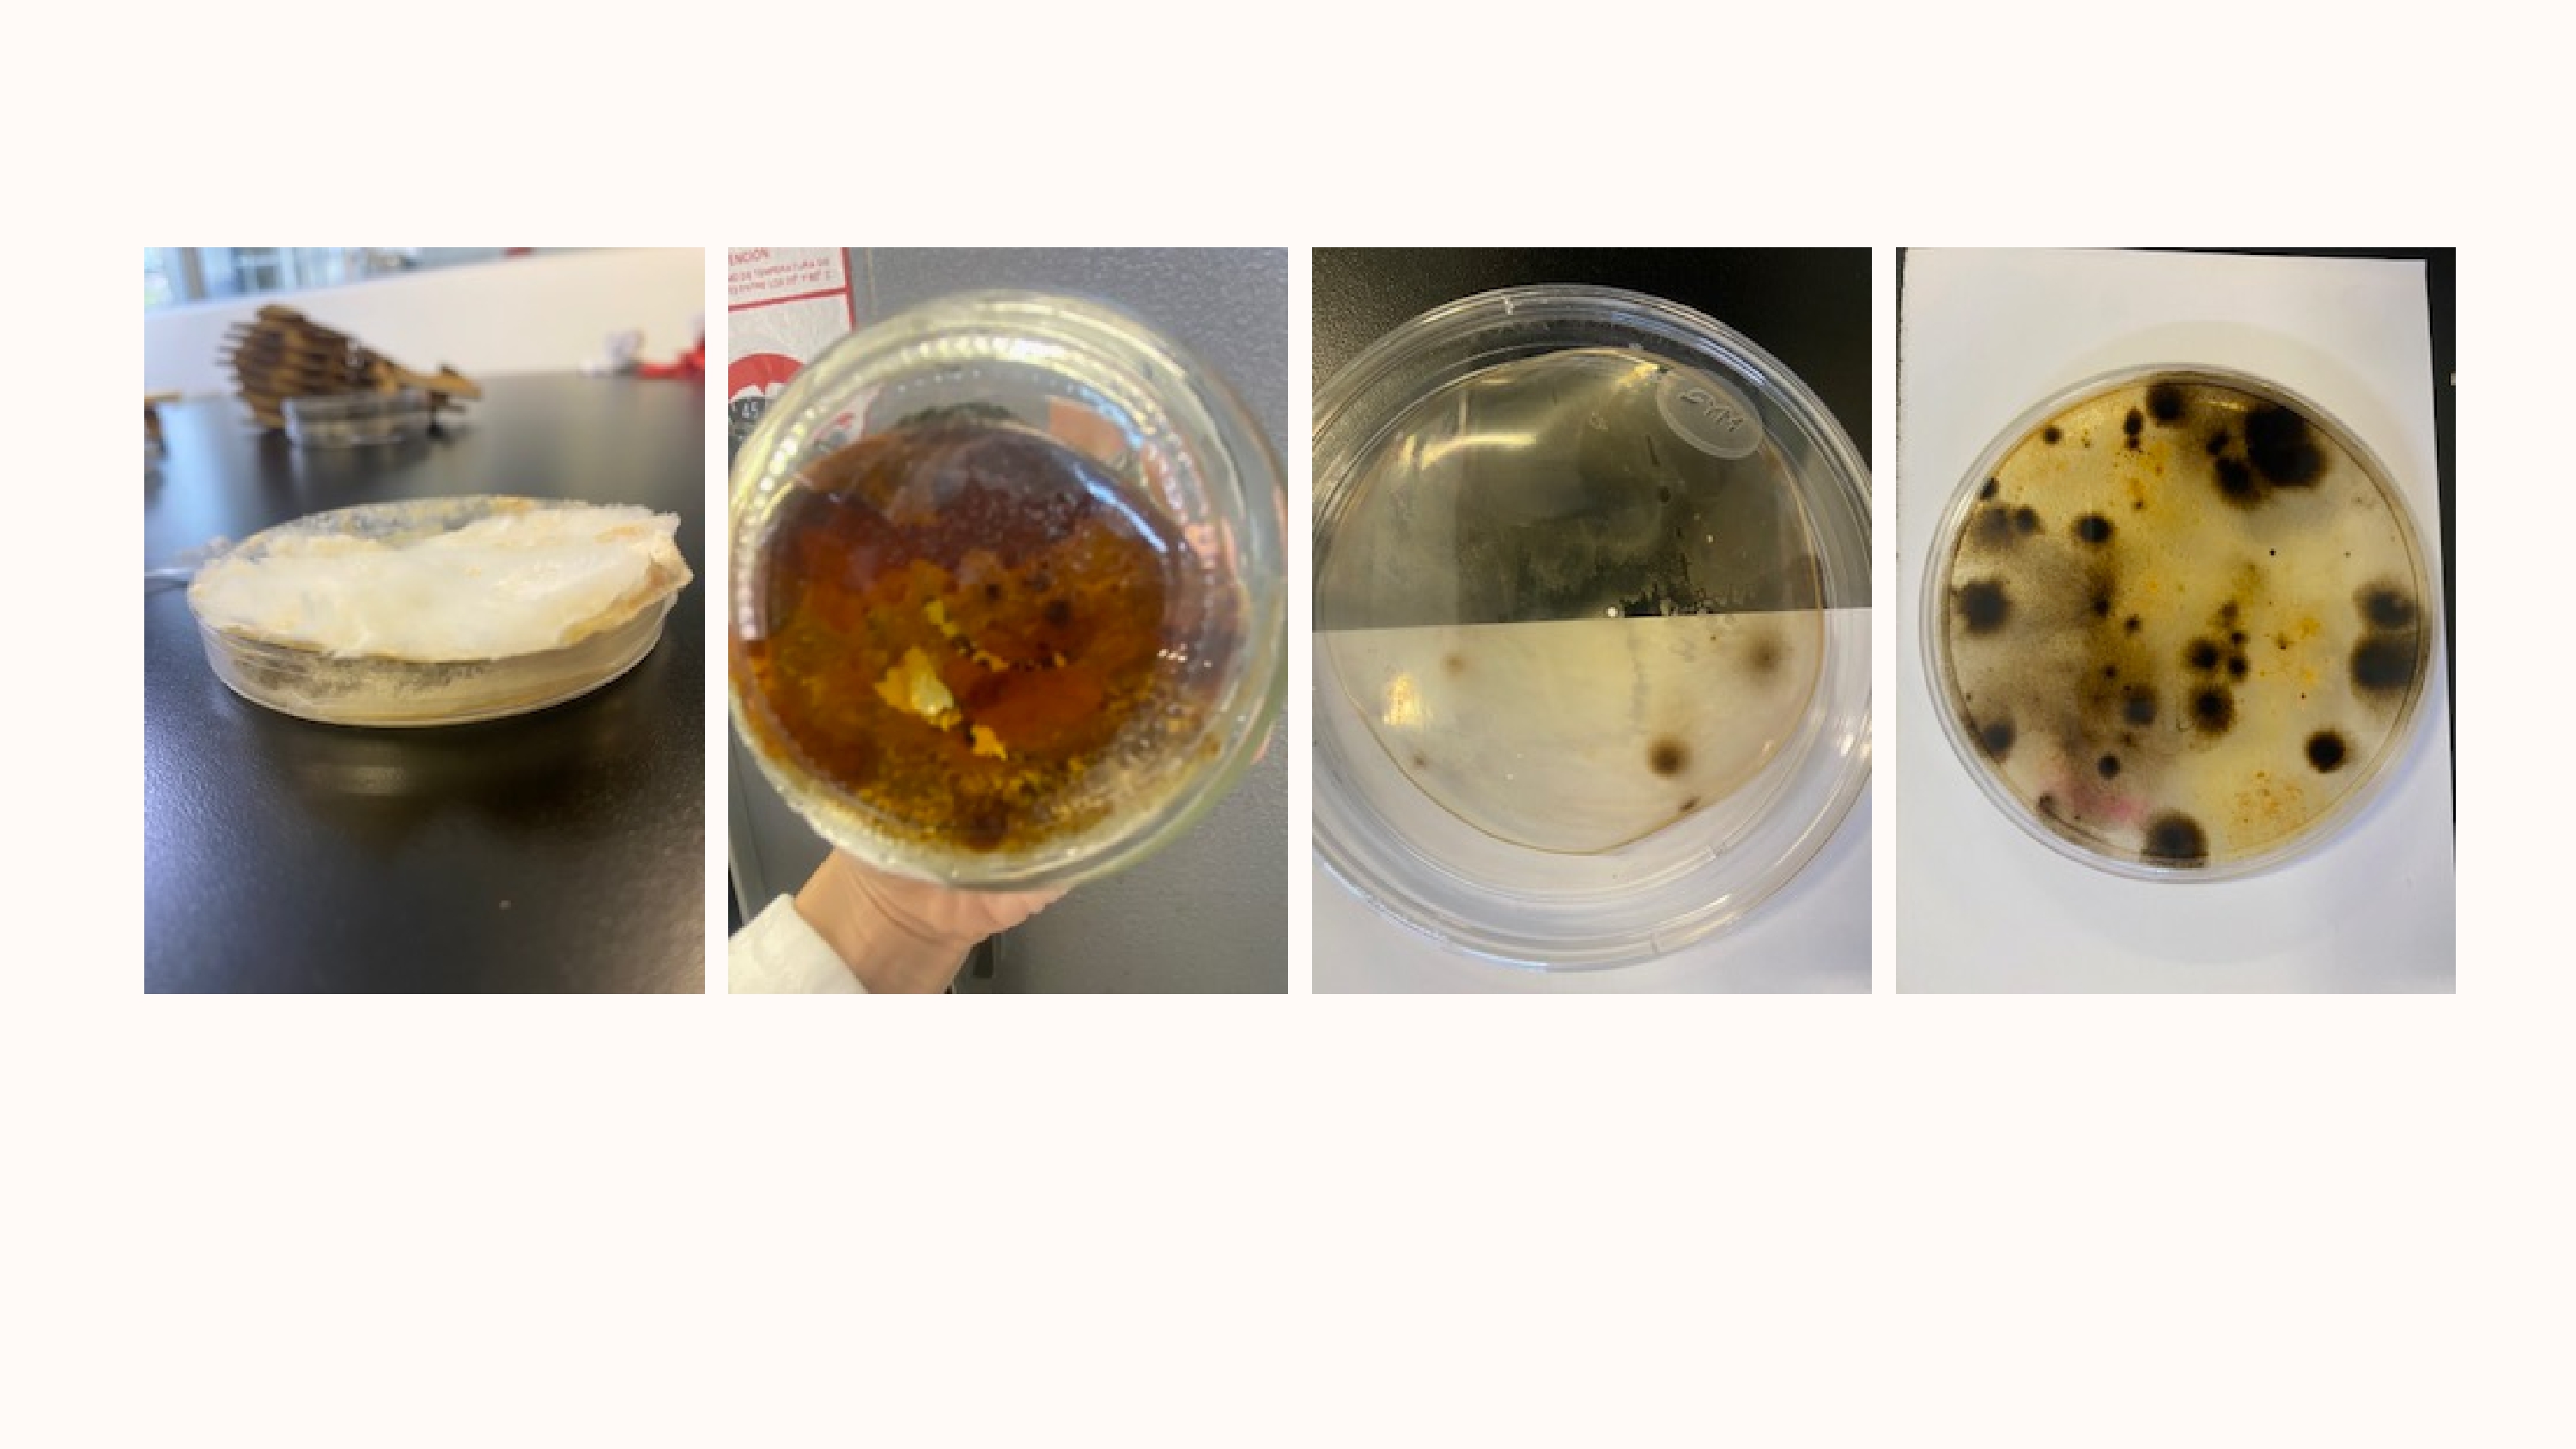
Culture media Materials & Reagents + Tryptone: 10 g + Yeast Extract: 5 g + NaCl (sodium chloride): 10 g + Agar powder: 15 g – 20 g (depending on desired firmness) + Distilled water: 1 L + Magnetic stirrer & stir bar + 1 L Erlenmeyer flask or media bottle + Autoclave or pressure cooker + Bunsen burner or sterile hood (for pouring) + 100 mm sterile petri dishes (approx. 40–50 plates for 1 L)
Procedure 1. Weigh and Mix Add 10 g tryptone, 5 g yeast extract, 10 g NaCl, and 15–20 g agar into a 1 L flask. Add ~900 mL of distilled water. Stir using a magnetic stirrer until the powders are dissolved. 2. Adjust Volume: Add distilled water to make the final volume up to 1000 mL (1 L). 3. Sterilization: Loosely cap the bottle and autoclave at 121 °C for 15–20 minutes (or use a pressure cooker if needed). 4. Cooling: Allow the media to cool to ~50–55 °C (warm but not hot to the touch). 5. Pouring Plates: In a sterile environment (e.g., laminar flow hood), pour ~20–25 mL of LB agar into each 100 mm petri dish. Leave lids ajar for 10–15 minutes so the agar can solidify and excess moisture evaporates. 6. Storage: Once solidified, stack the plates upside down (lid down) to prevent condensation from dripping onto the agar. Store in a plastic bag or sealed container at 4 °C for up to 1 month.
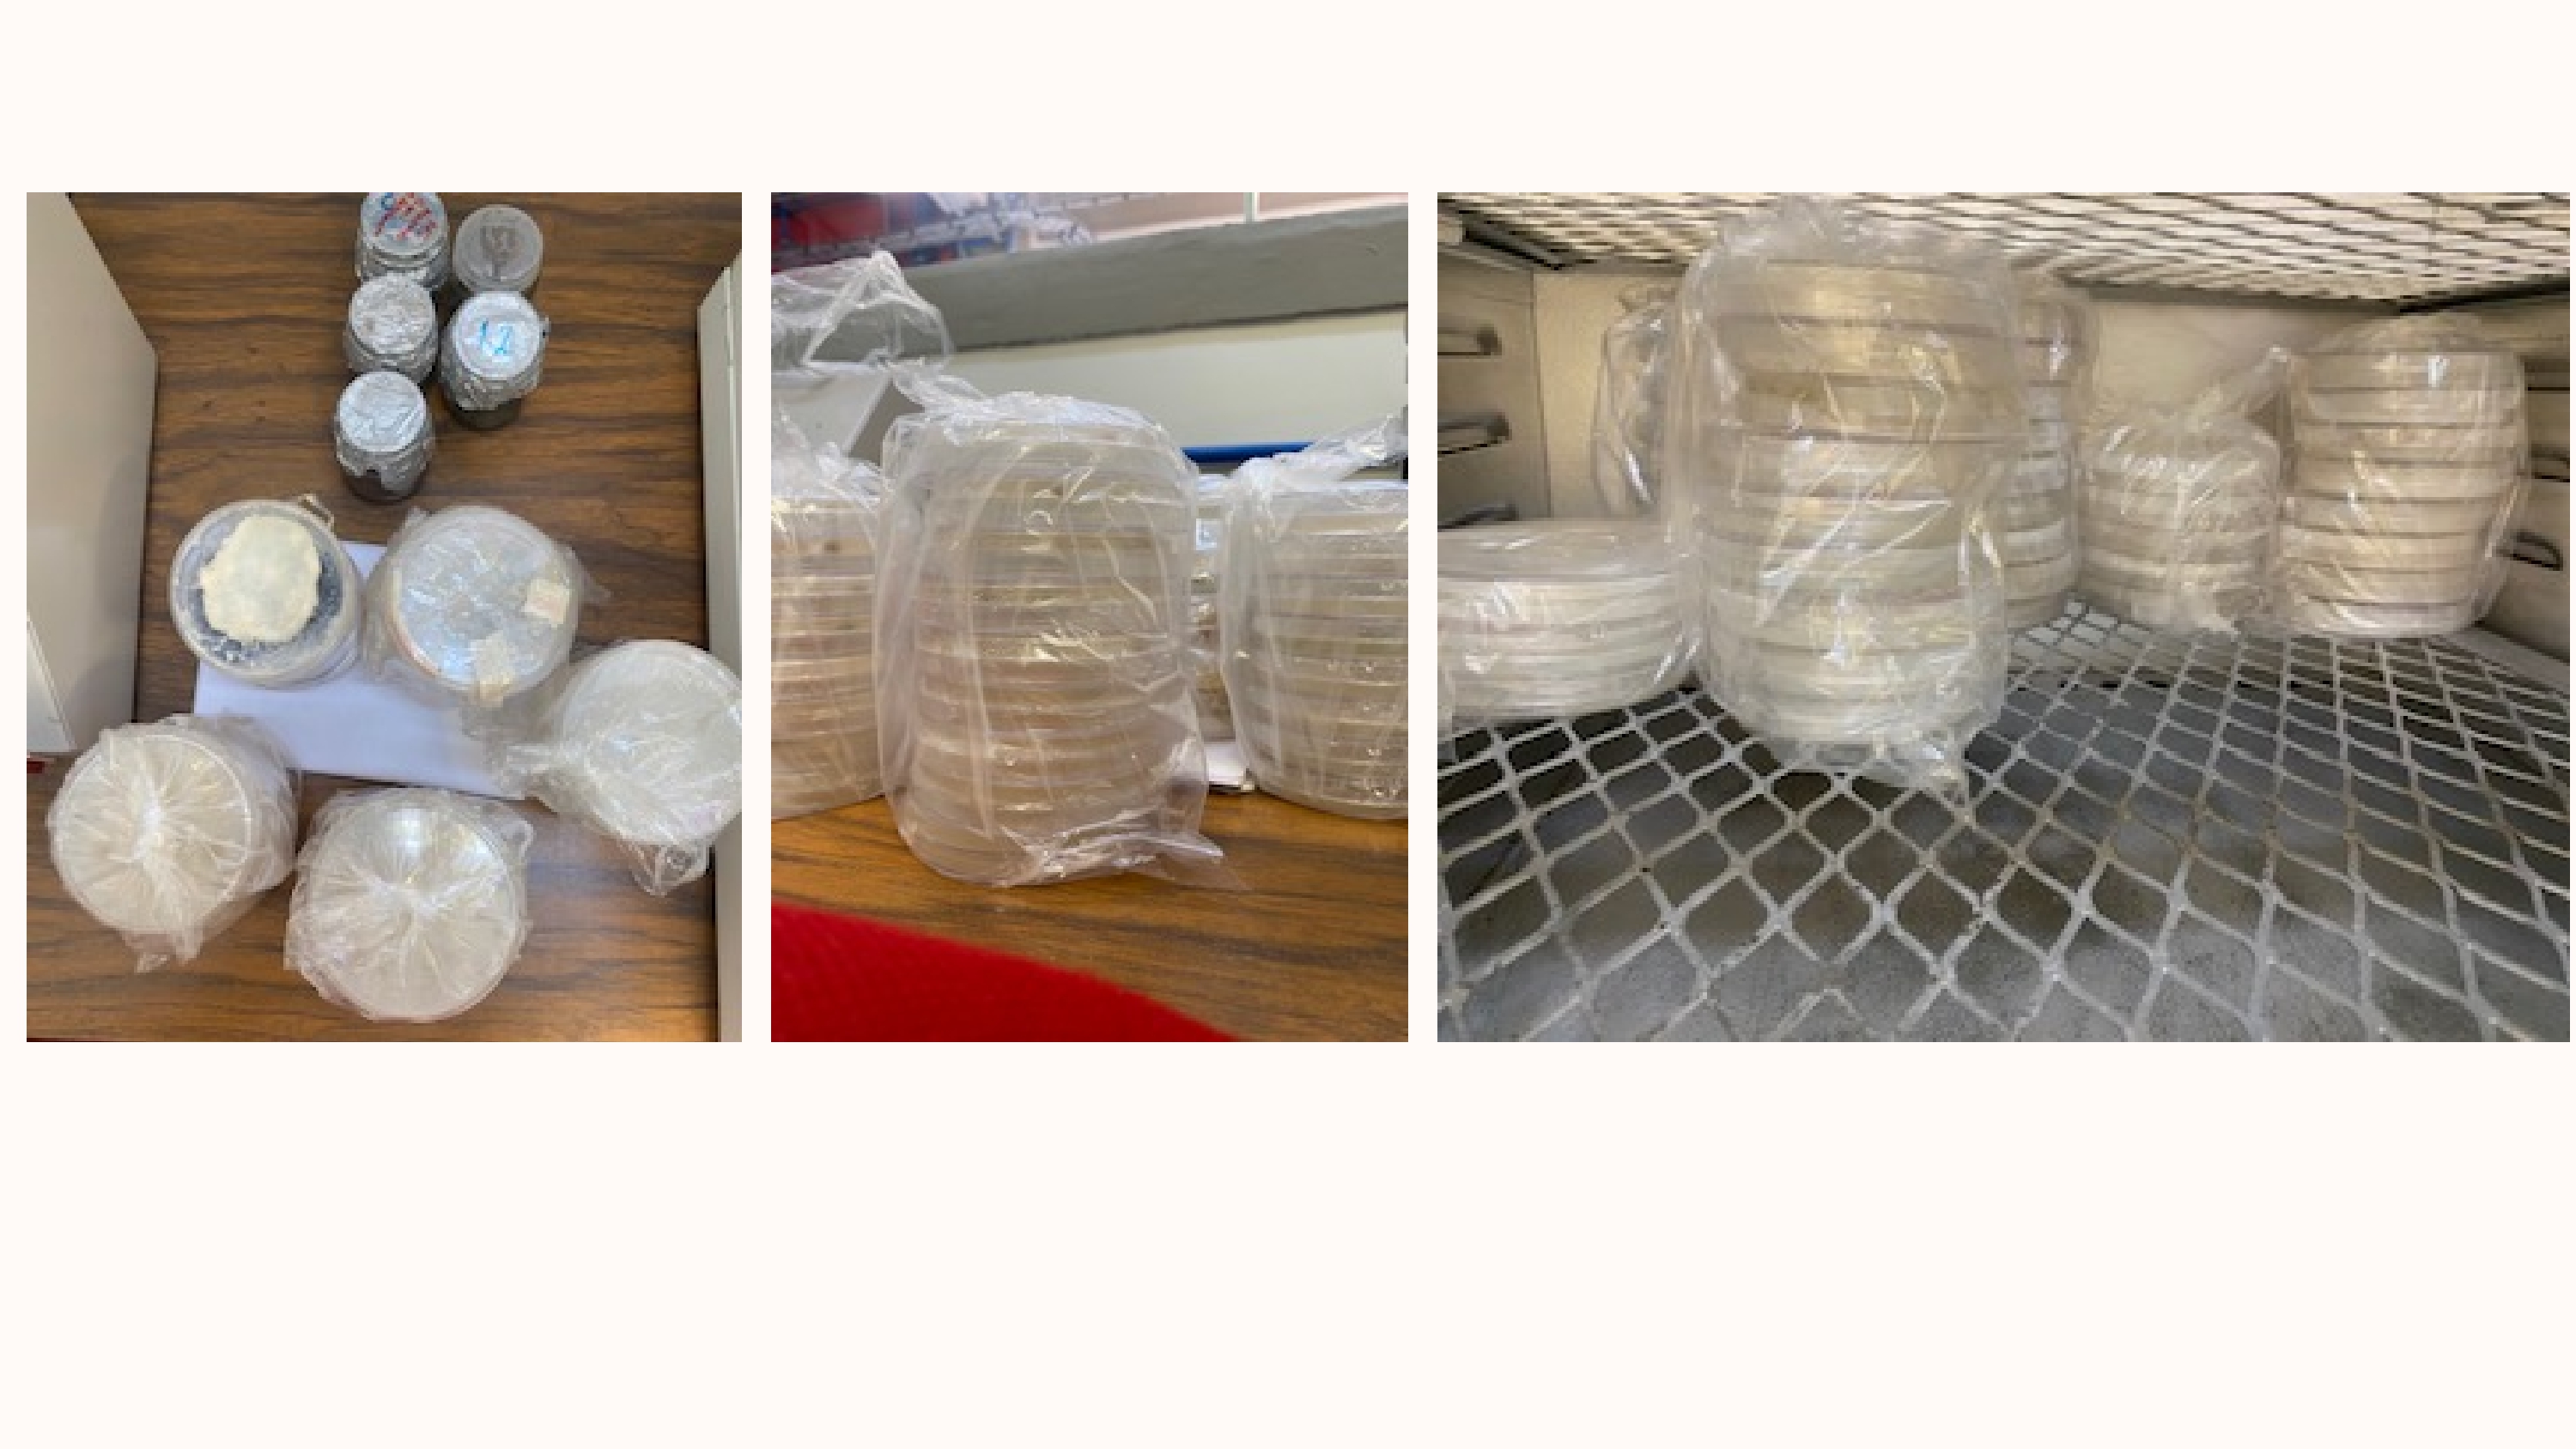
Sampling 1. A swab is used to wipe the surface of the object for which the microorganisms are to be identified. 2. The swab is stored in a sterile bag until it reaches the laboratory. 3. In a biosafety cabinet or sterile environment, the swab is removed and wiped with sterile LB medium in a Petri dish. 4. The plates are sealed and placed in a 25°C incubator. Culture development is monitored every three days.
3D Scanning
Materials
+ Smartphone, tablet, or any device with a good camera
+ Polycam app (installed and logged in)
+ Good lighting conditions
+ Stable surface (for small object scanning)
Procedure 1. Select Scan Mode: Open Polycam.
-
Choose between: LiDAR Scan (iPhone/iPad Pro only) for fast, accurate room/object scanning. Photo Scan (Photogrammetry) for higher-quality models using images (available on all devices).
-
Prepare Object: Ensure the object is clean and well-lit from all angles. Avoid reflective or transparent surfaces. Place the object on a plain, contrasting background if possible.
-
Capture the Scan:
A. LiDAR Scan (for LiDAR-enabled devices): Tap "LiDAR". Slowly move your device around the object, capturing all angles. When done, tap “Done” to process the scan.
B. Photo Scan (Photogrammetry): Tap "Photo". Capture at least 20–30 photos from different angles. Ensure consistent lighting and distance. Tap “Done” and upload the images to process the 3D model (this may take a few minutes).
-
Post-Processing: Once the model is ready, use the built-in tools to: Crop or trim unwanted areas Clean noise or background Adjust mesh resolution or textures
-
Export or Share: Tap Export and choose the format: .glb, .obj, .stl for 3D printing or modeling .usdz or .fbx for AR/VR or animation
You can also generate a shareable link or QR code.
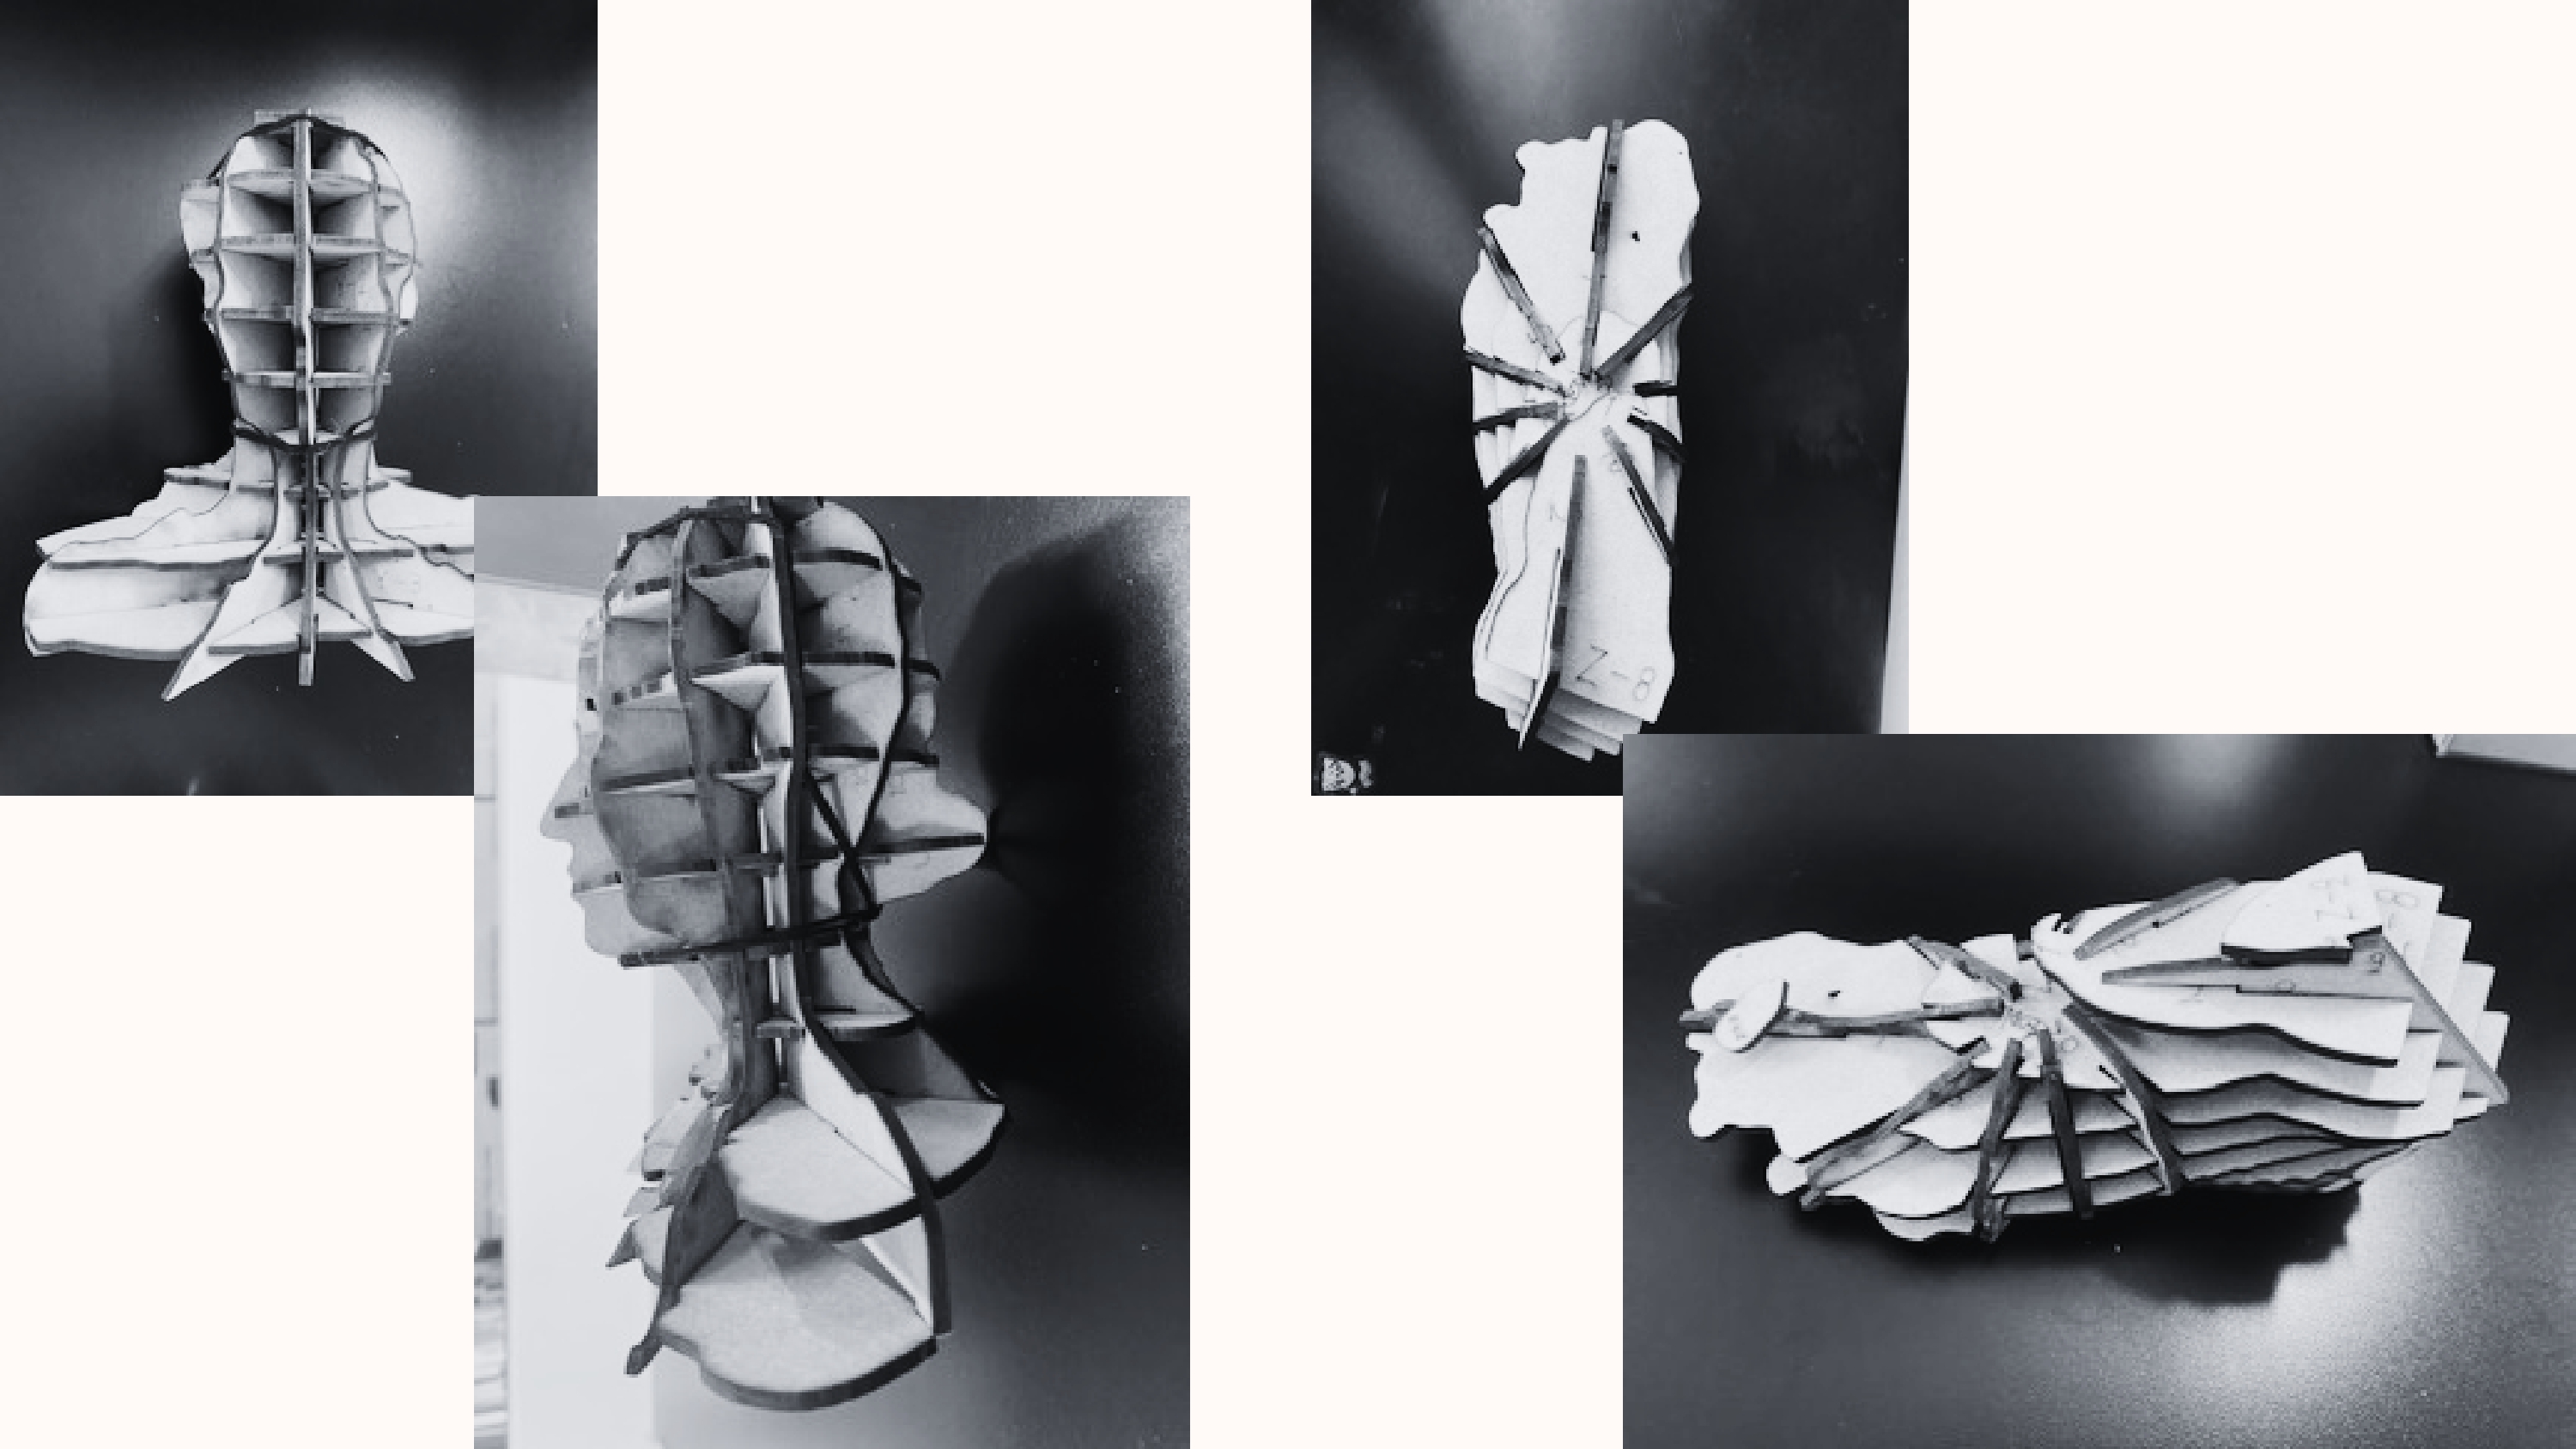
SlicerforFusion360 Materials/Tools + Computer with Fusion 360 installed + Slicer for Fusion 360 add-in (or standalone version if already downloaded) + A 3D model file (.stl, .obj, .3mf, etc.) + Laser cutter or CNC machine (optional, for fabrication) + Plywood, cardboard, acrylic, or selected sheet material for outpu
Procedure 1. Open Slicer for Fusion 360: Launch the Slicer application. If using the plugin inside Fusion 360, go to “MAKE” > “Slicer for Fusion 360” (you may need to install it from the Autodesk App Store).
-
Import Your 3D Model: Click on “Import” and select your 3D file (.stl or .obj). Once loaded, check orientation and scale. You can adjust units if needed (mm, inches, etc.).
-
Set Your Manufacturing Settings: Select the construction technique: Stacked Slices (horizontal/vertical slices) Interlocked Slices Curve (for contouring)
Choose your material dimensions (length, width, thickness) according to the material you'll use for cutting.
- Adjust Slice Settings: Use the sliders or input fields to change: Number of slices in each direction (X, Y, or Z)
Slice direction Joint type and kerf compensation (based on material and cutting method) Preview the sliced model in real-time to visualize the output.
-
Assembly Steps & Layout: Click on the “Assembly Steps” tab to visualize how the parts will come together. Go to the “Get Plans” tab to view and adjust the layout of the 2D slices. You can change the sheet size and see how many sheets are required.
-
Export Files: Click “Get Plans” > “Export”. Choose your desired format: .svg, .dxf (for laser cutting) or .pdf (for printing or preview)
Save the file and transfer it to your fabrication workflow (e.g., laser cutter software).
NOTES: Double-check material thickness matches your real material for accurate joints. Use the “kerf” setting to adjust for material lost in laser cutting. For best results, test with a small model or section before full-scale fabrication.
Laser Cutting Protocol Materials/Equipment + Laser cutter (e.g., Epilog, Trotec, Glowforge, etc.) + Prepared .svg or .dxf files from Slicer for Fusion 360 + Chosen material (e.g., 3mm plywood, cardboard, acrylic) + Computer with vector editing software (e.g., Illustrator, Inkscape, LightBurn, or RDWorks) + Masking tape (optional, for securing material) + Safety glasses (if required by your machine)
Procedure 1. Prepare Your Files: Open the .svg or .dxf file exported from Slicer in your vector editing software. Organize and verify the layout: Group pieces by sheet size to match your material dimensions.
-
Set Up the Laser Cutter: Turn on the laser cutter and connect it to your computer. Place your sheet material on the cutting bed. Use masking tape to secure it if needed. Focus the laser according to your material’s thickness.
-
Configure Cutting Settings: In your software or laser control panel, set the parameters: Speed, power, and frequency (PPI/Hz) depending on your material
Speed: 20% Power: 80% Frequency: 500 Hz
Note: Always perform a test cut on a corner! Assign colors/layers for cutting, scoring, or engraving, if applicable.
-
Perform a Test Cut: Select a small piece from your layout. Run a test to verify cut quality and depth. Adjust settings if needed before cutting the full layout.
-
Cut the Full Design: Send the full file to the laser cutter. Monitor the process closely for safety. Once done, wait until the machine has stopped completely before opening the lid.
-
Post-Cutting: Carefully remove all parts from the cutting bed. Clean any residue or burn marks (if necessary) using fine sandpaper or a damp cloth. Organize the pieces according to the Assembly Steps from Slicer for Fusion 360.
-
Assembly: Use glue, interlocking joints, or connectors depending on the construction technique. Follow the step-by-step model provided by Slicer to reconstruct your 3D form.
NOTES: Label your pieces in the design file if they’re not clearly distinguishable. Always supervise the laser cutter while it's in use. Keep a fire extinguisher nearby just in case. Use scrap material to fine-tune your settings and reduce waste.
Fabric sublimation Materials/Equipment + Sublimation printer + Sublimation paper + Polyester fabric (100% polyester or blends with at least 65% polyester content) + Protective paper (e.g., butcher paper) + Scissors or rotary cutter + Design file (high-resolution image, .PNG or .PDF) + Computer with design software (e.g., Illustrator, Photoshop, Inkscape) + Printing plotter
Procedure 1. Prepare Your Design Open your design in a graphic editing program. Set your canvas size to match your final print. Print the design on sublimation paper using a printer plotter.
-
Prepare the Fabric Cut the fabric to the desired size. Pre-press the fabric in the heat press for 3–5 seconds to eliminate moisture and wrinkles.
-
Align and Secure the Design Place the printed sublimation paper face-down on the fabric where you want the design to transfer. Secure the edges with heat-resistant tape to avoid shifting. Place a protective sheet above the paper to protect the heat press from ink bleed.
-
Heat Press Settings Temperature: 190–200°C (375–400°F) Time: 45–60 seconds
Pressure: Medium–High Note: Adjust according to fabric thickness and press brand
-
Sublimation Process Carefully place the fabric with the design into the press. Close the heat press and apply pressure for the set time. Once the timer ends, open the press carefully and remove the sublimation paper while still warm.
-
Post-Press and Finishing Let the fabric cool completely before touching or stretching. Discard the used sublimation paper. Your sublimated fabric is now ready to be used in wearable or textile-based projects!
Inactive/dry MO Materials/Equipment + Autoclave
Procedure Inactivate microorganism biofilms in an autoclave ( 121°C, 15 Psi, 20 min) and dry in a laminar flow hood for 12 hours.
Encapsulation of biofilms using bioresin Materials/Equipment + Steel pot + Stirrer + Thermometer + Scale + Plastic molds + Screen printing frame 20 X 30 cm
Procedure The ingredients are mixed at 60°C. Once a slightly yellowish, translucent solution is obtained, the mixture is poured into molds covered with the dried biofilms. The pieces are left to dry for 24 hours with constant airflow. They are then removed from the mold.
FABRICATION FILES
- Face_SLT1
- Face_SLT1
- Facesliced1
- Facesliced1
- Facesliced1
- Facesliced1
- Face_Rhino3D model2
- Face_Rhino3D model3
- Face_Rhino3D model5
- Fabric sublimation design 2
- Fabric sublimation design 3
- Fabric sublimation design 4
Results
Mentimeter


Culture media & sampling


3D Scanning
SlicerforFusion360
Laser Cutting


Fabric sublimation & 3D Printing


![]()


Inactive/dry MO


Encapsulation of biofilms using bioresin


Tutorials
- Mentimeter How to create a survey in minutes - [Mentimeter How to create a survey in minutes]
- Synthetic Biology One - [How to Make LB, a Standard Bacterial Growth Medium]
- Nuno Silva - [Create a 3d Model using your Phone! PolyCam 3D Scan Tutorial]
---
Fabrication files
GANTT
BoM bill of materials
Materials
| Qty | Description | Price | Link | Notes |
|---|---|---|---|---|
| 4 | MDF | 2 | https://www.homedepot.com.mx/p/arauco-panel-de-mdf-3-mm-x-061-x-122-m-trupan-120183 | |
| 2 | Corrugated cardboard | 0.8 | https://lumen.com.mx/microcorrugado-natural-sku-13006 | |
| 100 | Petri disches | 5 | https://elcrisol.com.mx/caja-petri-desechable-de-90x15-mm-10-piezas-bioxon.html?srsltid=AfmBOopv0fGorOb_6N9WfuzPjrbmTzMM2f9UhSKV0xoswZZk-pxfhCdw | |
| 1 | Agar | 155 | https://articulo.mercadolibre.com.mx/MLM-1929053259-agar-bacteriologico-450gr-bioxon-_JM?matt_tool=83223050&matt_word=&matt_source=google&matt_campaign_id=22108382379&matt_ad_group_id=170611863822&matt_match_type=&matt_network=g&matt_device=c&matt_creative=729602340219&matt_keyword=&matt_ad_position=&matt_ad_type=pla&matt_merchant_id=707652663&matt_product_id=MLM1929053259&matt_product_partition_id=2417611461324&matt_target_id=aud-1927595154406:pla-2417611461324&cq_src=google_ads&cq_cmp=22108382379&cq_net=g&cq_plt=gp&cq_med=pla&gad_source=1&gclid=CjwKCAjwktO_BhBrEiwAV70jXvpV37qQdzRoxMFDsplYZvOWzeWIIOnChXvOJeWLysJz0Qx2X9OqmxoCc5EQAvD_BwE | BD Bioxon |
| 1 | Culture medium | 190 | https://elcrisol.com.mx/caldo-lb-miller-500g-ibi-scientific.html?srsltid=AfmBOoozAYH6vZqmUoZKy9c3l7pnZQdOuYkqMupRCdrkhMUYDCtnhV-h | |
| 1 | Grenetin | 18 | https://elcrisol.com.mx/caldo-lb-miller-500g-ibi-scientific.html?srsltid=AfmBOoozAYH6vZqmUoZKy9c3l7pnZQdOuYkqMupRCdrkhMUYDCtnhV-h | |
| 1 | Glicerin | 5.4 | https://drogueriatacuba.com/products/glicerinausp-1k?pr_prod_strat=e5_desc&pr_rec_id=01dcf0651&pr_rec_pid=7084531187814&pr_ref_pid=7084533481574&pr_seq=uniform |
NOTE: This work was presented at the IV Colloquium on Applied Technology for Health (IAJES), in which Jesuit universities from around the world participated.