Table of Contents
9. Wearables
References & Inspiration

- Can the Subaltern Speak? by Behnaz Farahi, a project inspired by the historical masks worn by the Bandari women from southern Iran. The two masks begin to develop their own language to communicate with each other, blinking their eyelashes in rapid succession, using AI-generated Morse code
- Caress of the Gaze by Behnaz Farahi, an interactive 3D-printed wearable which can detect other people’s gaze and respond accordingly with life-like behaviour.
- The Crying Dress by KOBAKANT. The gown was worn by the wife of the deceased commissioner in attendance of his funeral, where the dress shed endless tears of mourning.
- Folding Frequencies by EJTECH, a work about the science of enhancing perception via sublimation print on woven light-weight organza, laser cut, hand stitch, Faraday's law, and electro-magnetics
- Reef by Rob Ley is an installation that uses SMAs and light response to create a sophisticated and flexible social space that negotiated between the streetscape and the ground floor exhibition space.
My inspiration for the E-textile Week are also valid for this week.
- Textielorkest, Michelle Vossen ( Seen exhibition De Tunnel at de Nijverheid, Utrecht,2024). Michelle is an interdisciplinary designer and educator whose focus revolves around textiles and technology.
- Sound Like Touch is an organisation that foster the intersection of bodily interaction, technology, and the performing arts.
- Flora MIDI Drum Glove by Becky Stern. She is a maker and teacher and provides many DIY tutorials about everything from microcontrollers to knitting.
- Lilytronica by Afroditi Psarra. Lilytronica is a project inspired by folk tradition, pop culture and DIY electronics. The work is improvised live and uses three embroidered synthesisers with LilyPad Arduino microcontrollers, sensors, and actuators.
- The Embroidered Computer and Knitted Radio by Irene Posch, artist who explores the integration of technological development into art and craft, always considering the social, cultural, technical and aesthetic implications.
Tools
- Arduino UNO
- Arduino IDE
- FabriXiao Board
- Seeed Studio XIAO ESP32S3
- Transistor
- Diode
- Resistors
- Magnets
- Condactive tape
- Neopixels
- Tin
- Soldering station (soldering iron, sponge)
- 9V battery
- Jumper wires
- Breadboard
- Alligator clips
- Magnet wire
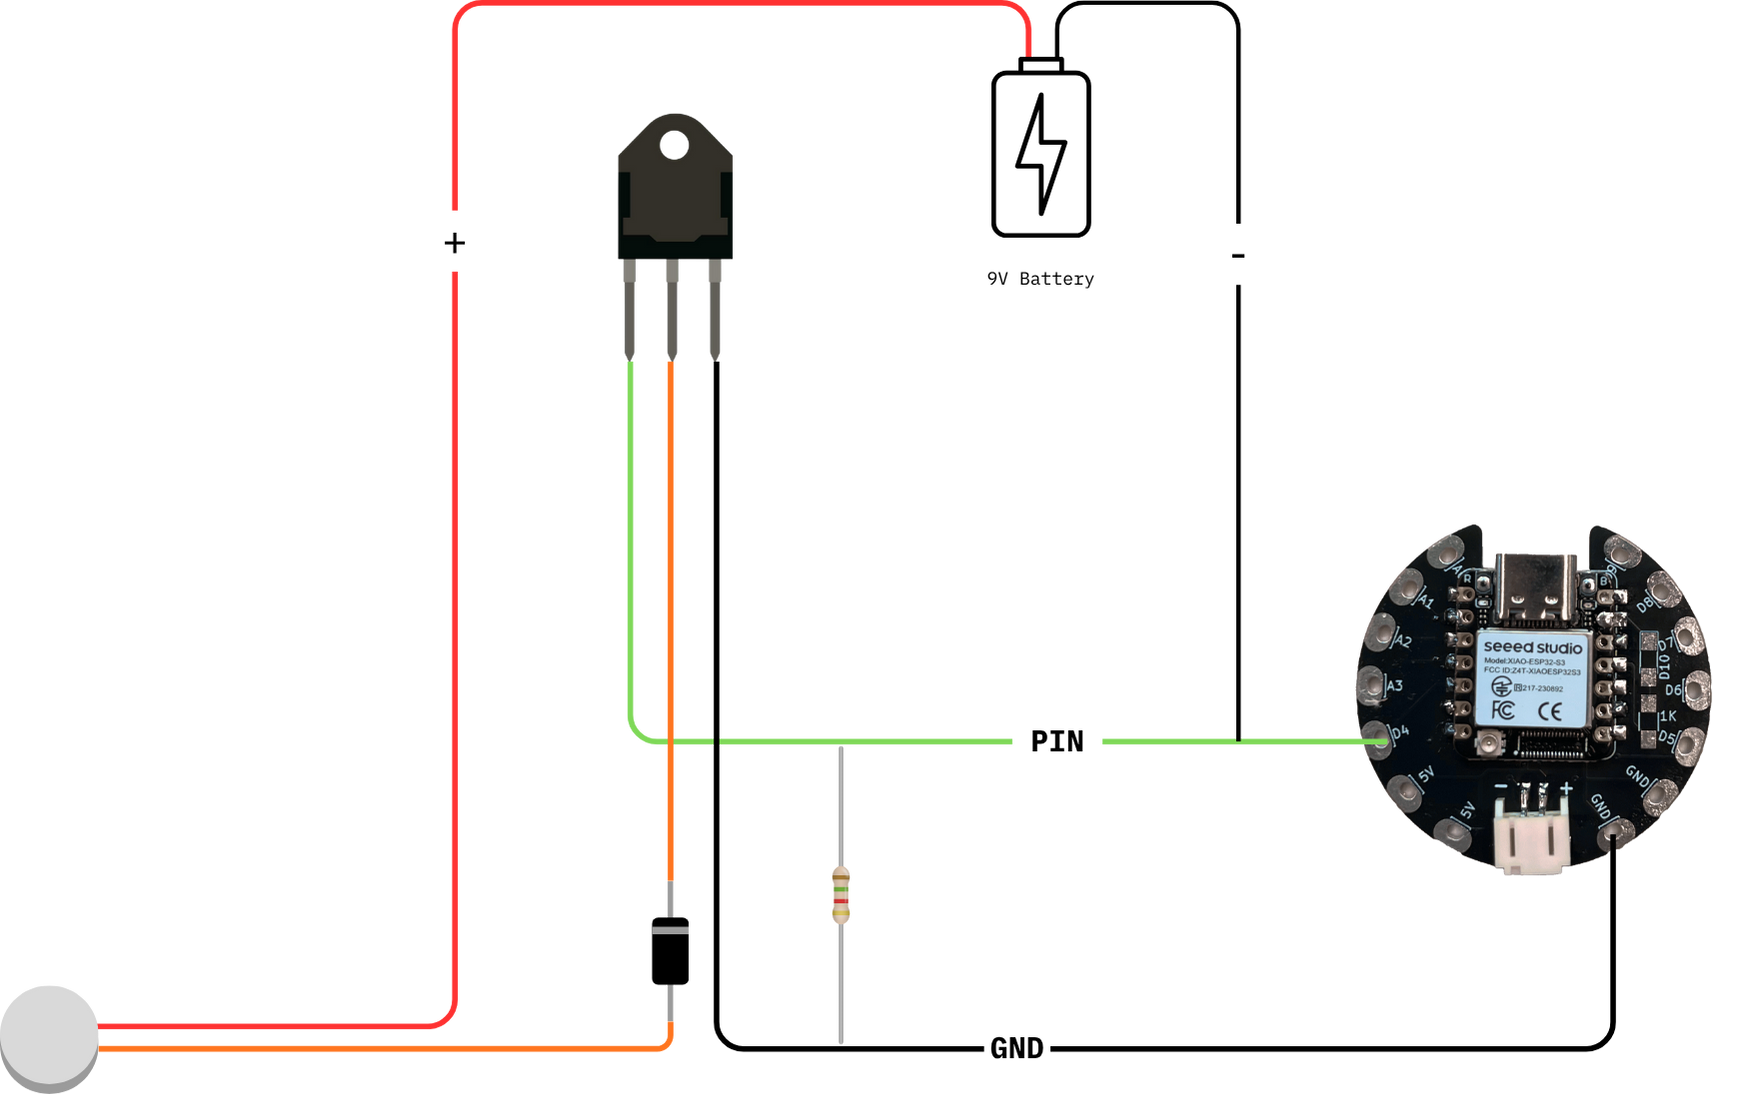
Driver circuit
We started by making our driver circuit1 for the afternoon workshop

Transistor
A transistor is a key component of today's electronic components. It's a semiconductor device that is used to conduct and insulate electric current or voltages. A transistor acts as a switch and as an amplifier.
Diode
A diode is an electronic component that acts as a one-way switch. It conducts electric current in only one direction and restricts current from the opposite direction.
Soldering tips

- For the first leg of the transistor you can melt some tin on top of the copper tape. Just hold your iron for 3 secs and then put the tin, let it melt. Remove the tin first then the iron
- For the next legs, since now the transistor is fixed, you can touch with the iron both the leg and the copper tape and melt the tin on top.
FabriXiao Board
The FabriXiao board was designed to make it eaiser for students to program and asseble their e-textile projects.

Features:
- Small size: 40 mm.
- Programming via USB C.
- Two power connections and two GND connections.
- 4 analogue inputs. 10 digital inputs/outputs.
- Connection via a 3.7 V battery.
- Includes an LED (D10) to test the board (assembly optional).
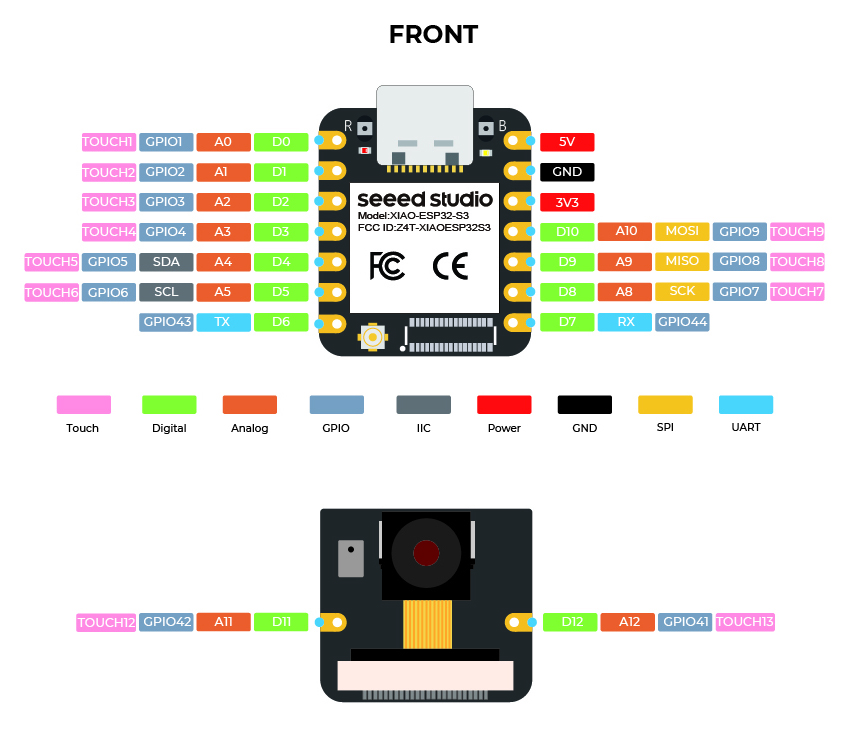
Seeed Studio XIAO ESP32S3
We used The Seeed Studio XIAO ESP32S3, a diminutive development board, that " integrates camera sensor, digital microphone and SD card supporting. Combining embedded ML computing power and photography capability." This website is really useful to know more about the board.
We were encountering some issues with the board, so Jessica found a way to make it work:
- Navigate to Arduino IDE > Preferences, and fill "Additional Boards Manager URLs" with the URL below:
https://raw.githubusercontent.com/espressif/arduino-esp32/gh-pages/package_esp32_index.json

Navigate to Tools > Board > Boards Manager, type "esp32" in the search box, select the latest version of esp32, and install it.

LED blinking
It's always a good idea to test if your board is loading the code with a blinking example
int ledPin = 8;

void setup() {
  // put your setup code here, to run once:
  pinMode(ledPin, OUTPUT);
}

void loop() {
  // put your main code here, to run repeatedly:
  digitalWrite(ledPin, HIGH);
  delay(1000);
  digitalWrite(ledPin, LOW);
  delay(1000);
}
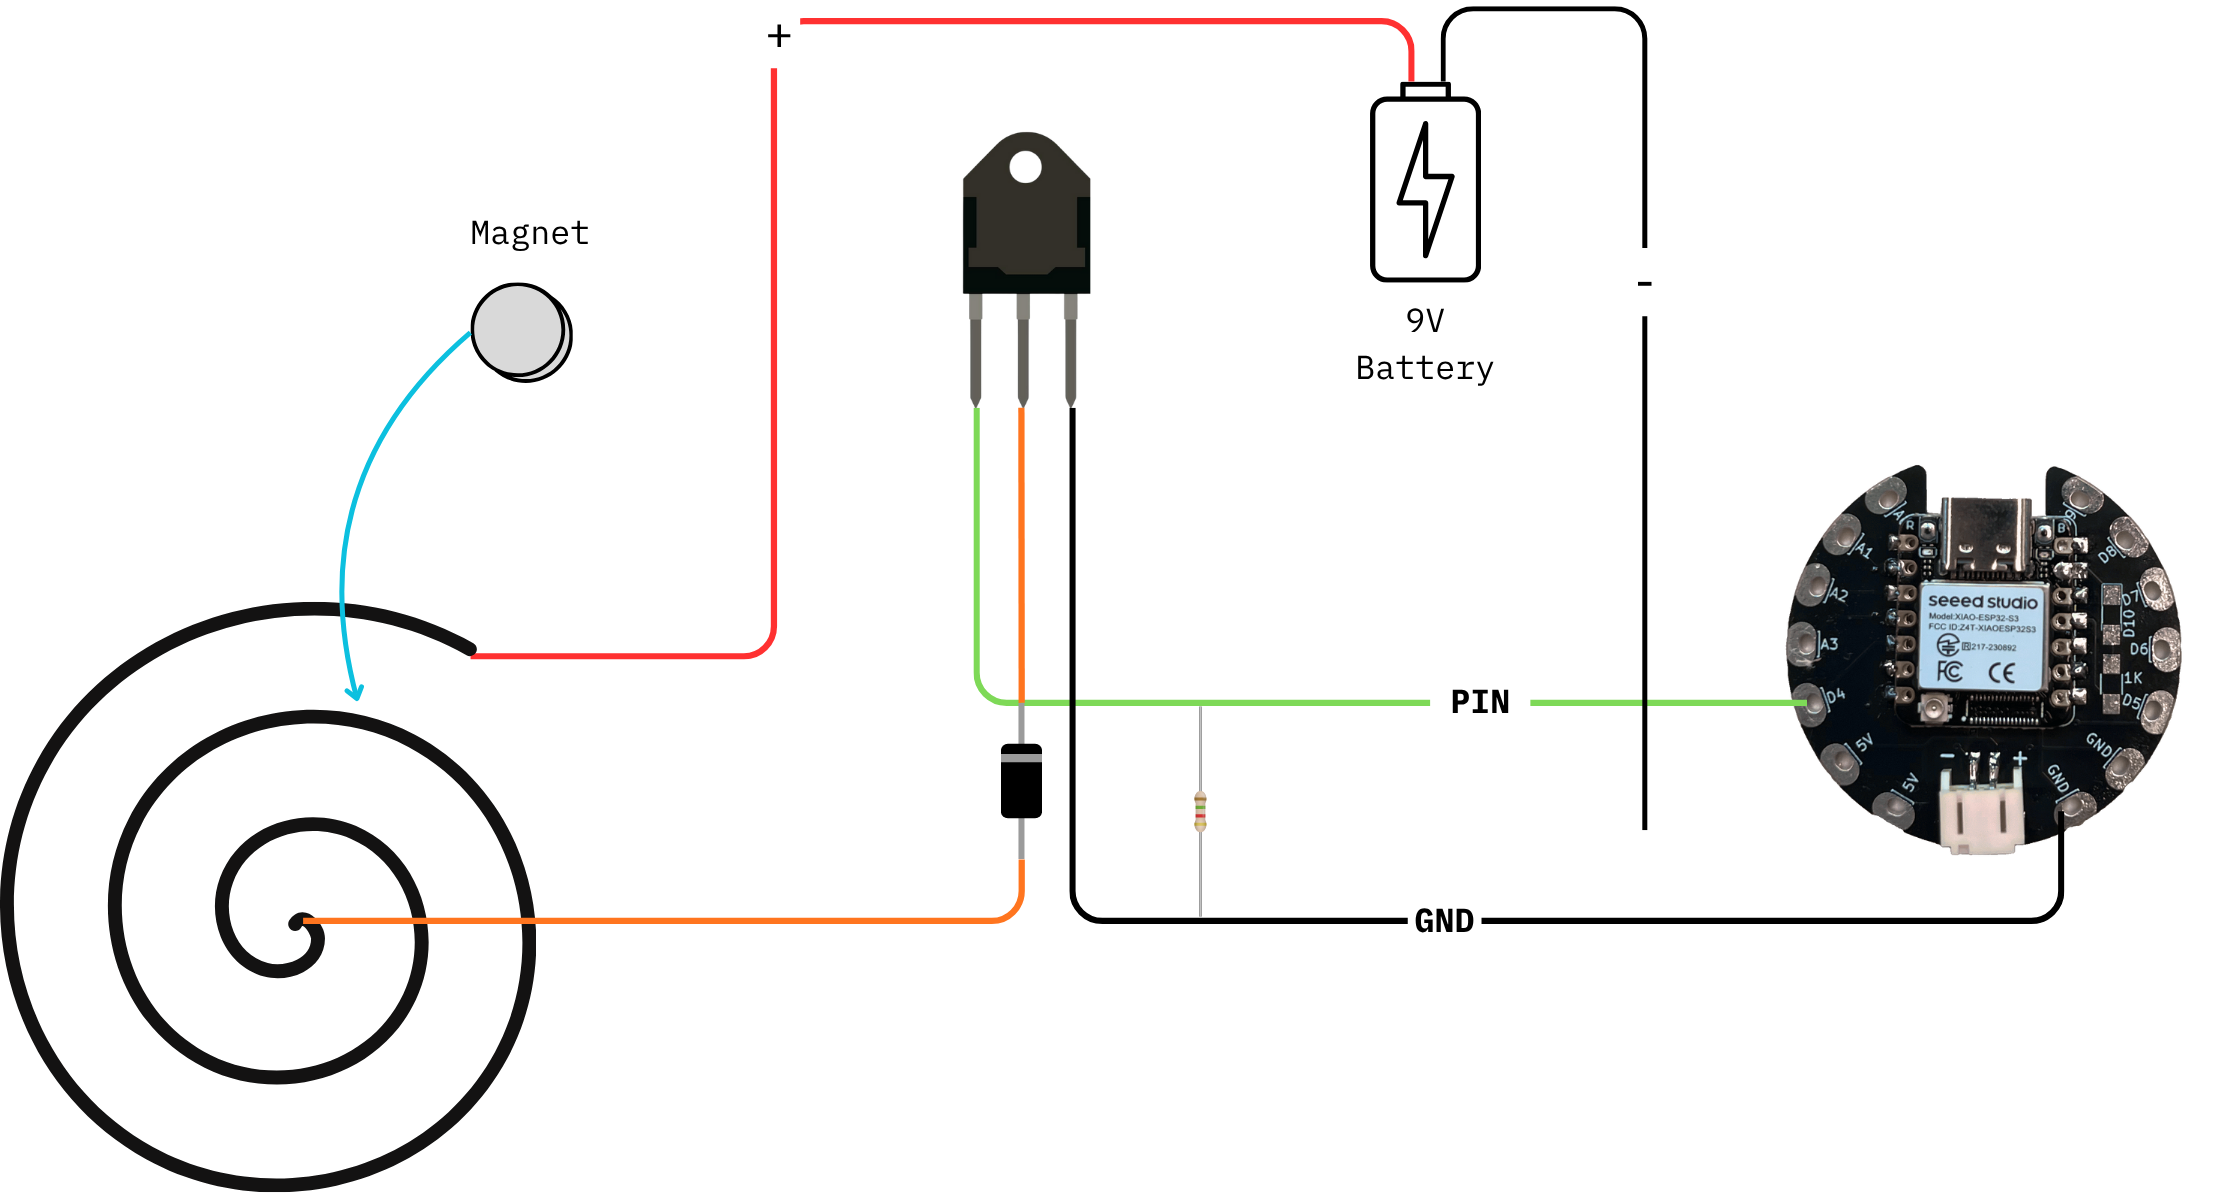
Flip Dots Motion
- Create your coil: wrap the magnet wire around a pen, for example, for 50-100 times. Leave the two ends a little bit longer
- Wrap the ends around the loop to secure the wire in a circle

- Burn and sand the ends. Use the multimeter to ensure there are conductive
- Using an alligator clip, connect the negative side of the battery to one end of the coil
- Touch the other end of the coil with the allegator clip attached to the positive side of the battery
The magnet will flip! and jump!
Viabration Motor
You can test this motor with the Blink or Fade code I coonnect direclty to my board, but if you use a transistor, you get a much stornger vibration2

Blink
// the setup function runs once when you press reset or power the board
void setup() {
  // initialize digital pin LED_BUILTIN as an output.
  pinMode(LED_BUILTIN, OUTPUT);
}

// the loop function runs over and over again forever
void loop() {
  digitalWrite(LED_BUILTIN, HIGH);  // turn the LED on (HIGH is the voltage level)
  delay(1000);                      // wait for a second
  digitalWrite(LED_BUILTIN, LOW);   // turn the LED off by making the voltage LOW
  delay(1000);                      // wait for a second
}
Fade
int led = 9;         // the PWM pin the LED is attached to
int brightness = 0;  // how bright the LED is
int fadeAmount = 5;  // how many points to fade the LED by

// the setup routine runs once when you press reset:
void setup() {
  // declare pin 9 to be an output:
  pinMode(led, OUTPUT);
}

// the loop routine runs over and over again forever:
void loop() {
  // set the brightness of pin 9:
  analogWrite(led, brightness);

  // change the brightness for next time through the loop:
  brightness = brightness + fadeAmount;

  // reverse the direction of the fading at the ends of the fade:
  if (brightness <= 0 || brightness >= 255) {
    fadeAmount = -fadeAmount;
  }
  // wait for 30 milliseconds to see the dimming effect
  delay(30);
}
Speaker3
 By coiling your magnet wire and running current through it, you create an electromagnet. If an audio signal is fed to one end of the coil, if forms a magnetic field.
The magnetic field fluctuates based on the electrical frequqncies of the audio signale. By placing a storng magnet ner the electromagnet, the will attract and repel eachother, causing the air around to move. Our brain interpretes these waves as sound.

As before, burn and sand the ends. Use the multimeter to ensure there are conductive

Simple test
int ledPin = 5;

void setup() {
  pinMode(ledPin, OUTPUT);
}

void loop() {
  tone(ledPin, 400, 400); // 1 kHz tone
  delay(1000);
Super Mario Theme
#define BUZZER_PIN 5

int melody[] = {
  660, 660, 660, 510, 660, 770, 380,
  510, 380, 320, 440, 480, 450, 430, 380,
  660, 760, 860, 700, 760, 660,
  520, 580, 480
};

int durations[] = {
  100, 100, 100, 100, 100, 100, 100,
  100, 100, 100, 100, 100, 100, 100, 100,
  100, 100, 100, 100, 100, 100,
  100, 100, 100
};

void playTone(int freq, int duration) {
  if (freq == 0) {
    noTone(BUZZER_PIN);
    delay(duration);
  } else {
    tone(BUZZER_PIN, freq, duration);
    delay(duration * 1.30);
    noTone(BUZZER_PIN);
  }
}

void setup() {
  // nothing needed
}

void loop() {
  int length = sizeof(melody) / sizeof(int);

  // Play the full sequence
  for (int i = 0; i < length; i++) {
    playTone(melody[i], durations[i]);
  }

  delay(300);  // small pause before repeating
}
Thermochromic Pigment
I am directing you to my classmates' pages because they have more information on the thermochromic pigment. FLora, Amber, Tajah, Kim
Maker Space
On thursday evening, I finally decided to check out the maker space in Den Bosch (where I leave) since I felt like I was understanding a bit more about this topic. During the e-Textile week I started working on a soft keyboard project that I'd like to implement!

Due to the renovaiton of the building and locaiton changing the group is not as present as before, but it was nice to talk with the volunteer, brainstorm ideas and trying some things together.
Photoresistor
1int ledPin = 2;
2
3void setup() {
4    Serial.begin(9600);
5    pinMode(ledPin,  OUTPUT);
6}
7
8void loop() {
9    int value = analogRead(A0);
10
11    Serial.println("Analog  Value: ");
12    Serial.println(value);
13
14    if (value > 450) {
15        digitalWrite(ledPin, LOW);
16    } else {
17        digitalWrite(ledPin,  HIGH);
18    }
19
20    delay(250);
21}
Ultrasonic Sensor

At first I thought I could make a garment with an ultrasonic sensor to detect when people are getting to close, but then I thought it could be used for an art installation to play sound/music when a visitor gets closer. This is something that I'm thinking to explore for my graduation project.
Alarm System
In the video above "// tone(buzzer, distance)" this part of the code was activated.
const int buzzer = 4;
const int trig_pin = 6;
const int echo_pin = 7;
float timing = 0.0;
float distance = 0.0;

void setup()
{
  pinMode(echo_pin, INPUT);
  pinMode(trig_pin, OUTPUT);
  pinMode(buzzer, OUTPUT);

  digitalWrite(trig_pin, LOW);
  digitalWrite(buzzer, LOW);

  Serial.begin(9600);
}

void loop()
{
  digitalWrite(trig_pin, LOW);
  delay(2);

  digitalWrite(trig_pin, HIGH);
  delay(10);
  digitalWrite(trig_pin, LOW);

  timing = pulseIn(echo_pin, HIGH);
  distance = (timing * 0.034) / 2;

  Serial.print("Distance: ");
  Serial.print(distance);
  Serial.print("cm | ");
  Serial.print(distance / 2.54);
  Serial.println("in");

  // tone(buzzer, distance);
  if (distance <= 50) {
  tone(buzzer, 100);
  digitalWrite(LED_BUILTIN, HIGH);
  } else {
  if (distance <= 30) {
  tone(buzzer, 200);
  digitalWrite(LED_BUILTIN, HIGH);
  } else {
    noTone(buzzer);
  digitalWrite(LED_BUILTIN, LOW);
  }

  delay(100);
}
}
Touch Sensor
I've made an embroidery coil with conductive thread (it can also be used as a speaker!)
// Define touch pin and threshold
#define TOUCH_PIN A3      // Connect your touch sensor to this pin
int outputPin = 5;     // Output: actually connect to pin 4
#define TOUCH_THRESHOLD 100000  // Adjust based on your setup: open the serial monitor and see what values it records

void setup() {
  Serial.begin(115200);
  pinMode(outputPin, OUTPUT);
}

void loop() {
  int touchValue = touchRead(TOUCH_PIN);
  Serial.println(touchValue);

  if (touchValue < TOUCH_THRESHOLD) {
    digitalWrite(outputPin, HIGH);  // Touch detected (heater/coil /etc)
    //tone(outputPin,400,400); //uncomment this for speaker
  } else {
    digitalWrite(outputPin, LOW);   // No touch
    //noTone(); //uncomment this for speaker
  }

  delay(100);
}
Machine Embroidery
Jessica showed us Turtle Stitch as a tool to turn coded design into embroidery files
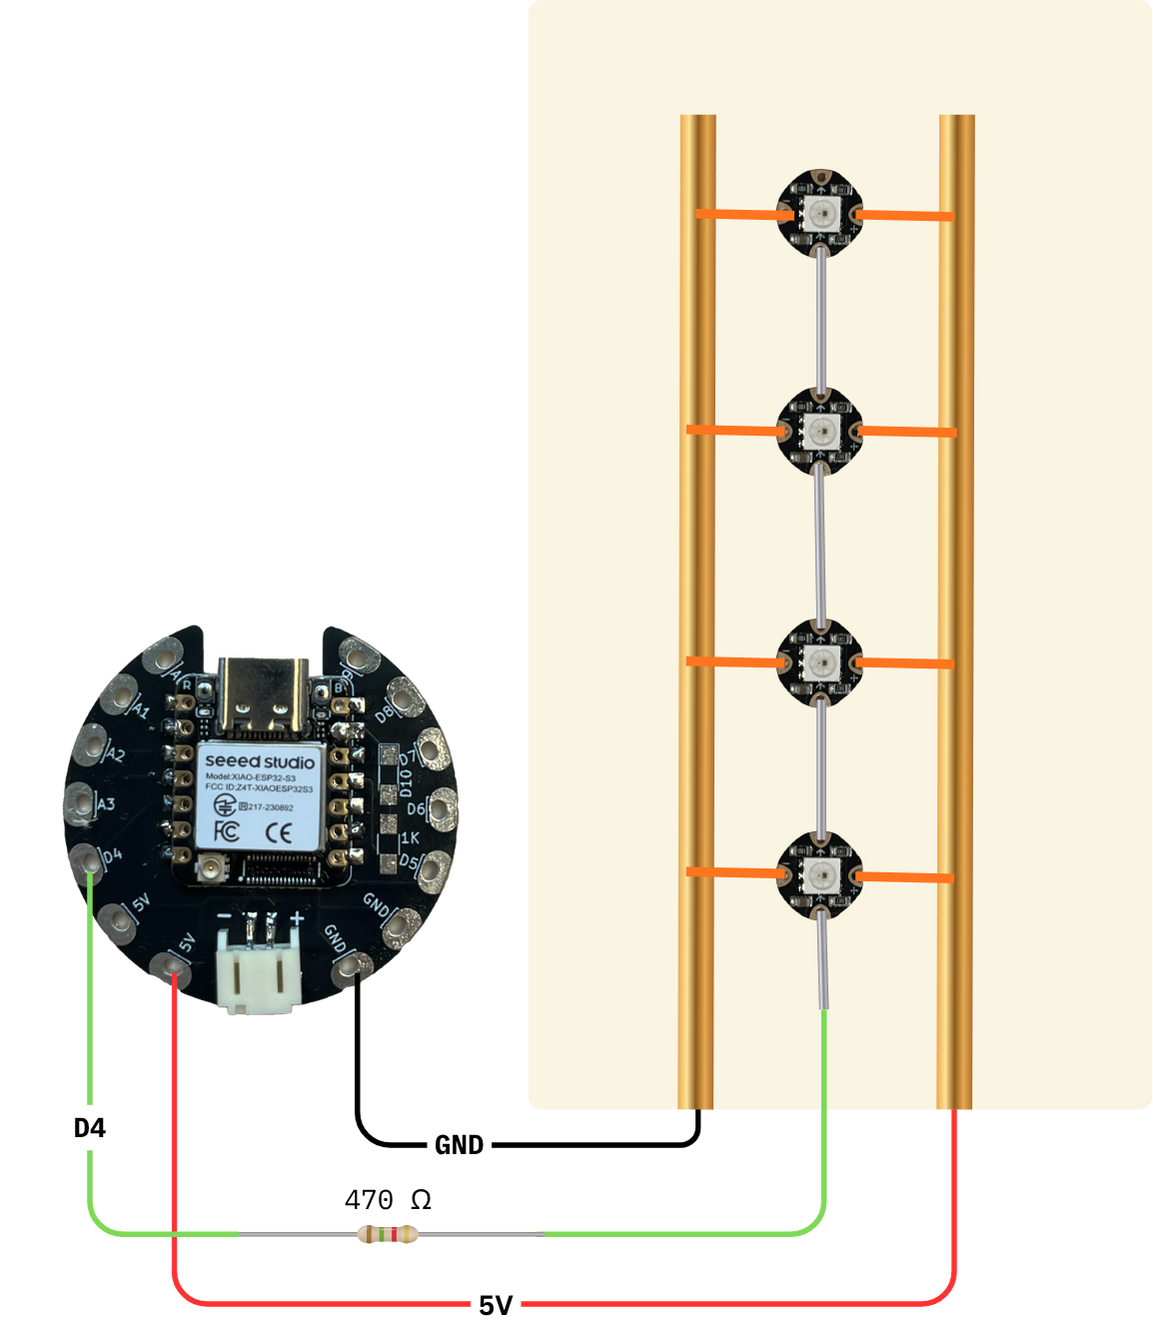
NeoPixels 4
I used this guide Adafruit NeoPixel Überguide to understand a little bit anout Neopixels.
Some FAQs that were helpful for me
Can NeoPixels be powered directly from the Arduino’s 5V pin? Sometimes. The Arduino can continuously supply only about 500 milliamps to the 5V pin. Each NeoPixel can draw up to 60 milliamps at full brightness. So yes, you can skip the separate DC supply and power directly off the Arduino as long as just a few pixels are used, more if the colors and overall brightness are low. When in doubt, give the pixels a separate power supply.
Adding a **300 to 500 Ohm resistor** between your microcontroller's data pin and the data input on the first NeoPixel can help prevent voltage spikes that might otherwise damage your first pixel. Please add one between your micro and NeoPixels!

When connecting NeoPixels to any LIVE power source or microcontroller, **ALWAYS CONNECT GROUND (–) BEFORE ANYTHING ELSE.** Conversely, disconnect ground last when separating.
![]()
Simple
Examples → Adafruit NeoPixel → simple
// NeoPixel Ring simple sketch (c) 2013 Shae Erisson
// Released under the GPLv3 license to match the rest of the
// Adafruit NeoPixel library

#include <Adafruit_NeoPixel.h>
#ifdef __AVR__
 #include <avr/power.h> // Required for 16 MHz Adafruit Trinket
#endif

// Which pin on the Arduino is connected to the NeoPixels?
#define PIN        5 // On Trinket or Gemma, suggest changing this to 1

// How many NeoPixels are attached to the Arduino?
#define NUMPIXELS 4 // Popular NeoPixel ring size

// When setting up the NeoPixel library, we tell it how many pixels,
// and which pin to use to send signals. Note that for older NeoPixel
// strips you might need to change the third parameter -- see the
// strandtest example for more information on possible values.
Adafruit_NeoPixel pixels(NUMPIXELS, PIN, NEO_GRB + NEO_KHZ800);

#define DELAYVAL 500 // Time (in milliseconds) to pause between pixels

void setup() {
  // These lines are specifically to support the Adafruit Trinket 5V 16 MHz.
  // Any other board, you can remove this part (but no harm leaving it):
#if defined(__AVR_ATtiny85__) && (F_CPU == 16000000)
  clock_prescale_set(clock_div_1);
#endif
  // END of Trinket-specific code.

  pixels.begin(); // INITIALIZE NeoPixel strip object (REQUIRED)
}

void loop() {
  pixels.clear(); // Set all pixel colors to 'off'

  // The first NeoPixel in a strand is #0, second is 1, all the way up
  // to the count of pixels minus one.
  for(int i=0; i<NUMPIXELS; i++) { // For each pixel...

    // pixels.Color() takes RGB values, from 0,0,0 up to 255,255,255
    // Here we're using a moderately bright green color:
    pixels.setPixelColor(i, pixels.Color(0, 150, 0));

    pixels.show();   // Send the updated pixel colors to the hardware.

    delay(DELAYVAL); // Pause before next pass through loop
  }
}
Strandtest
Examples → Adafruit NeoPixel → strandtest
#include <Adafruit_NeoPixel.h>
#ifdef __AVR__
 #include <avr/power.h> // Required for 16 MHz Adafruit Trinket
#endif

#define LED_PIN    5

#define LED_COUNT 4

Adafruit_NeoPixel strip(LED_COUNT, LED_PIN, NEO_GRB + NEO_KHZ800);

void setup() {

#if defined(__AVR_ATtiny85__) && (F_CPU == 16000000)
  clock_prescale_set(clock_div_1);
#endif
  // END of Trinket-specific code.

  strip.begin();           // INITIALIZE NeoPixel strip object (REQUIRED)
  strip.show();            // Turn OFF all pixels ASAP
  strip.setBrightness(50); // Set BRIGHTNESS to about 1/5 (max = 255)
}

void loop() {
  // Fill along the length of the strip in various colors...
  colorWipe(strip.Color(255,   0,   0), 50); // Red
  colorWipe(strip.Color(  0, 255,   0), 50); // Green
  colorWipe(strip.Color(  0,   0, 255), 50); // Blue

  // Do a theater marquee effect in various colors...
  theaterChase(strip.Color(127, 127, 127), 50); // White, half brightness
  theaterChase(strip.Color(127,   0,   0), 50); // Red, half brightness
  theaterChase(strip.Color(  0,   0, 127), 50); // Blue, half brightness

  rainbow(10);             // Flowing rainbow cycle along the whole strip
  theaterChaseRainbow(50); // Rainbow-enhanced theaterChase variant
}

void colorWipe(uint32_t color, int wait) {
  for(int i=0; i<strip.numPixels(); i++) { // For each pixel in strip...
    strip.setPixelColor(i, color);         //  Set pixel's color (in RAM)
    strip.show();                          //  Update strip to match
    delay(wait);                           //  Pause for a moment
  }
}

void theaterChase(uint32_t color, int wait) {
  for(int a=0; a<10; a++) {  // Repeat 10 times...
    for(int b=0; b<3; b++) { //  'b' counts from 0 to 2...
      strip.clear();         //   Set all pixels in RAM to 0 (off)
      // 'c' counts up from 'b' to end of strip in steps of 3...
      for(int c=b; c<strip.numPixels(); c += 3) {
        strip.setPixelColor(c, color); // Set pixel 'c' to value 'color'
      }
      strip.show(); // Update strip with new contents
      delay(wait);  // Pause for a moment
    }
  }
}

void rainbow(int wait) {
  for(long firstPixelHue = 0; firstPixelHue < 5*65536; firstPixelHue += 256) {
    strip.rainbow(firstPixelHue);
    strip.show(); // Update strip with new contents
    delay(wait);  // Pause for a moment
  }
}
void theaterChaseRainbow(int wait) {
  int firstPixelHue = 0;     // First pixel starts at red (hue 0)
  for(int a=0; a<30; a++) {  // Repeat 30 times...
    for(int b=0; b<3; b++) { //  'b' counts from 0 to 2...
      strip.clear();         //   Set all pixels in RAM to 0 (off)
      // 'c' counts up from 'b' to end of strip in increments of 3...
      for(int c=b; c<strip.numPixels(); c += 3) {
        int      hue   = firstPixelHue + c * 65536L / strip.numPixels();
        uint32_t color = strip.gamma32(strip.ColorHSV(hue)); // hue -> RGB
        strip.setPixelColor(c, color); // Set pixel 'c' to value 'color'
      }
      strip.show();                // Update strip with new contents
      delay(wait);                 // Pause for a moment
      firstPixelHue += 65536 / 90; // One cycle of color wheel over 90 frames
    }
  }
}
Rainbow
I've found this rainbow code here
#include <Adafruit_NeoPixel.h>

#define LED_COUNT 6
#define LED_PIN    PIN_NEOPIXEL

Adafruit_NeoPixel strip(LED_COUNT, LED_PIN, NEO_GRB + NEO_KHZ800);

void setup() {
  strip.begin();
  strip.show();
  strip.setBrightness(50);
}


void loop() {
  rainbow(10);
}

void rainbow(int wait) {
  for(long firstPixelHue = 0; firstPixelHue < 5*65536; firstPixelHue += 256) {
    for(int i=0; i<strip.numPixels(); i++) {
      int pixelHue = firstPixelHue + (i * 65536L / strip.numPixels());
      strip.setPixelColor(i, strip.gamma32(strip.ColorHSV(pixelHue)));
    }
    strip.show();
    delay(wait);
  }
}
![]()
I'm working on an embroidery project with a new embroidery stitch I just learnt, the woven picot stitch