7. BioFabricating Materials
Research

During my industrial design studies in the 2000s, I was struck by the focus on creating artificial needs and designing products with short, predefined life cycles to sustain sales. My perspective and approach has always been rooted in careful stewardship and preservation—using, maintaining, repair, reusing objects over many years, even decades, and recycling them fully at the end of their life, thus practicing circular, spiral economy principles. The first plastic, Parkesine (by Alexander Parkes 1855) derived from cellulose, as Celluloid, the first thermoplastic (by John Wesley Hyatt 1863), but the Bakelite development, the first synthetic thermosetting plastic, (invented by Leo Baekeland) and the Modern Polymerization in the 1950s have plasticized the world. Although environmental awareness has been present since the 1960s, today, mass production imposes unprecedented environmental burdens. This highlights the urgent need for a paradigm shift in design and production practices, moving from a circular economy toward a regenerative, bio-driven approach that ensures the viability of biobased, biodegradable, and biocompostable materials, fostering sustainability at every stage of a product’s life cycle.
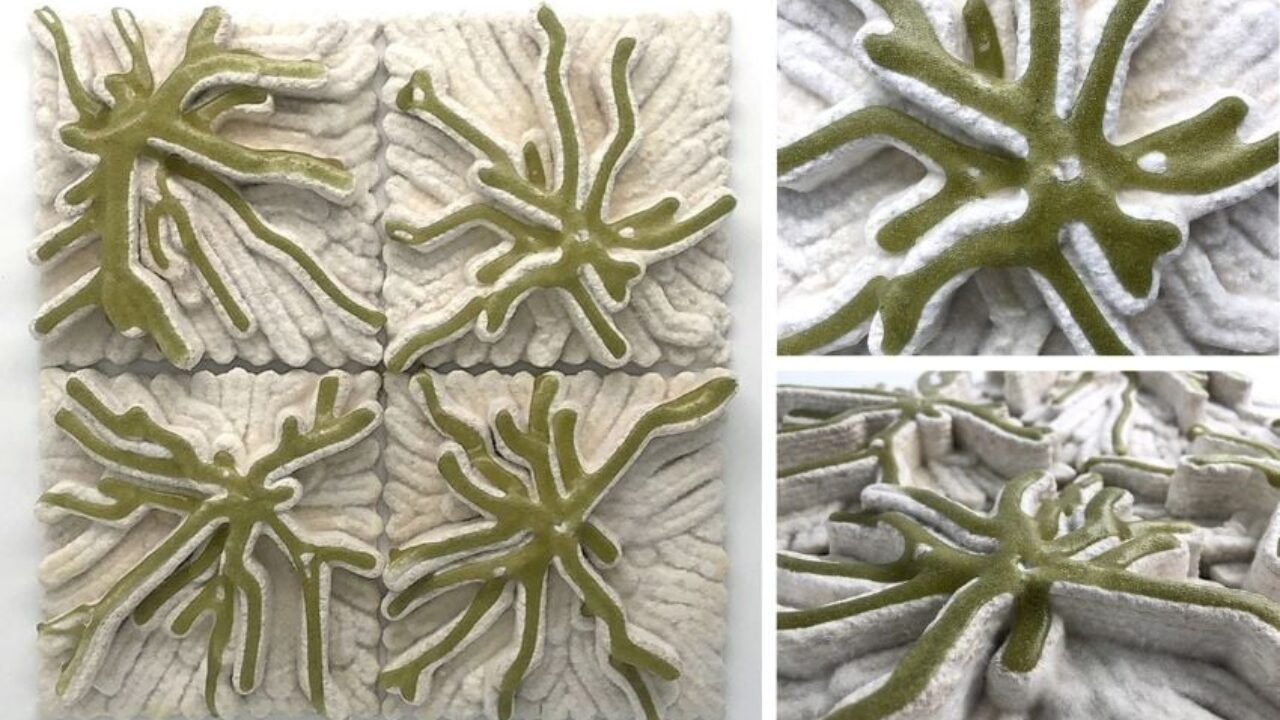
- MYCO ALGA by Biomatters Studio 3dnatives.com
- BIO-ALG-YAR-001 by Carlotta Premazzi, Biolab 2025
Plastic

-
Polymers classification diagram, Carolina Delgado, 2025
-
What are plastic, Cacilia Raspanti, Fabricademy lecture, 2025
Plastic pollution is everywhere—even microplastics have been found in oceans, soil, drinking water, and even human breast milk. These tiny particles, less than 5 mm, come from degraded plastics and synthetic textiles, carrying harmful chemicals that can accumulate in our bodies and in wildlife.
Plastic is a crisis because it never goes away. It was created to last forever, yet most plastic is used once—bottles, bags, straws—and then thrown away. Instead of disappearing, it breaks into smaller and smaller pieces, infiltrating every corner of our planet.
These plastics also affect human health. Toxic chemicals leach out, entering our bodies, our food, and our water. They are linked to cancers, birth defects, impaired immunity, and hormonal disruptions, showing that plastics’ impact on health is serious and widespread.
Beyond our bodies, plastic spoils our groundwater. Landfills leak toxic substances, which seep into rivers, lakes, and aquifers, contaminating ecosystems and drinking water alike. And plastics attract other pollutants: their chemical additives cling to debris, concentrating toxins and amplifying environmental contamination.
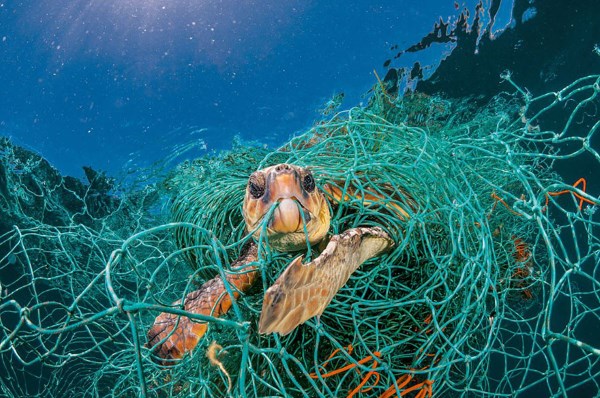
Plastic also threatens wildlife. Animals get entangled, mistake it for food, and even feed it to their young. From oceans to remote landscapes, no corner of the Earth is untouched. Meanwhile, plastic continues to pile up in the environment. Despite recycling efforts, most of it ends up burned, dumped, or abandoned, forming ever-growing mountains of waste.
This pollution poisons our food chains as well. Even plankton consume microplastics, absorbing hazardous chemicals that move up to larger marine life and eventually humans. And all of this comes with a huge cost—it costs billions to abate, affecting tourism, recreation, human health, and wildlife.
Reducing plastic use, improving recycling, and switching to biodegradable alternatives are urgent steps to protect both health and the environment. Plastic promised convenience, but the reality is clear: it leaves us with a material that truly never goes away.
-
Plankton Microplastic Full Width Tall, Richard Kirby inhabitat.com
-
Ocean Polluition by JORDI CHIAS nationalgeographic.com
Bio-Materials
Bio-Materials are substances or mixtures of substances, natural or artificial, that act partially on biological systems or to replace, augment or treat them (e.g. prostheses, implants, contact lenses). A biomaterial is different from a biological material,even if these worlds are often used interchangeably. The word bioterial has been proposed as a potential alternate word for biologically produced materials such as bone, or fungal biocomposites. (Source Wikipedia)
Bio-based Materials
Bio-based Materials are substances derived from biological sources such as plants, animals, fungi, algae, or microbes. These materials can be of organic or inorganic nature, depending on their chemical composition.
-
Organic bio-based materials include polymers and compounds derived from living organisms, such as proteins, polysaccharides (cellulose, chitosan, starch), lipids, and biopolymers. They are carbon-based and are often biodegradable or compostable.
-
Inorganic bio-based materials** are materials that, although derived from biological systems, do not contain carbon-hydrogen structures typical of organic compounds. Examples include bioceramics, calcium phosphates from bones, silica from diatoms, and shells of mollusks.
Bio-based Materials Taxonomy

Biofoam Detail by Carlotta Premazzi
📚 Taxonomy of Bio-based Biomaterials
This taxonomy organizes biomaterials derived from biological sources according to hierarchical and systematic criteria.
It serves to classify, compare, and document materials based on:
- Origin (natural, biofabricated, from waste streams)
- Fabrication Process (biological growth, crafted/artisanal)
- Type and Application (biopolymers, bio-composites, bio-leather, bio-textiles, bio-foam, bio-ceramics)
- Physical, Mechanical, and Sensorial Properties (structural, aesthetic, tactile, chemical)
- Life Cycle and Sustainability (biodegradability, compostability, energy and resources used)
- Techniques and Application Potential (production methods, enhancements, interaction, compatibility)
The hierarchical structure allows each material to be mapped in a replicable, comparable, and documentable way, providing a comprehensive guide for designers, researchers, and makers engaged in biofabrication and sustainable design.
BIO-BASED MATERIALS: Classification, Properties & Documentation Framework
📁 Bio-based Materials Framework
02-11-2025 — by Carlotta Premazzi, Fabricademy
🔧 Description
Comprehensive reference for Bio-based Materials (biobased, biodegradable, biocompostable).
Integrates origin, fabrication process, applications, design properties, sustainability, and documentation practices.
Suitable for education, research, material experimentation, and biofabrication projects.
🧠 What is a Bio-based Material
A material derived partially or fully from renewable biological sources (plants, fungi, algae, bacteria, animals)
that can replace or complement synthetic materials. May be biobased, biodegradable, compostable, or regenerative.
🌿 1. ORIGIN
- Natural: Plant-based, Fungal-based, Algae-based, Insect-based
- Biofabricated: Mycelium, Bacterial Cellulose, Algal/Bacterial Pigments
- From Wasted Stream: Food Waste, Agricultural Waste, Industrial By-products
⚗️ 2. FABRICATION MODE / PROCESS
- Grown: Fermentation, Cultivation, Hybrid Growth Systems
- Crafted: Cooking/Casting, Drying/Molding, 3D Printing/Milling, Dyeing/Pigmentation
🧵 3. BASE TYPE & APPLICATION
- Biopolymer, Bio-composite, Bio-leather, Bio-textile
- Bio-foam / Bio-film / Bio-gel, Bio-ceramic / Bio-resin
- Applications: Foil & Plastic-like Films, Leathers, Yarns & Fabrics, Interactive Media, Packaging, Architecture
♻️ 4. END-OF-LIFE
- Biobased, Biodegradable, Compostable
- Recyclable / Reprocessable
🎨 5. DESIGN & MATERIAL PROPERTIES
- Structural / Functional:
Structural Intuitive Property, Structural Decorative Property, Sensorial Texture, Structural Color, Augmented Property, Adaptive Property
- Aesthetic / Sensory:
Transparency / Opacity, Flexibility / Rigidity, Texture & Surface, Weight / Density, Tactile Comfort, Emotional / Narrative Value, Transformability
🔄 6. SHIFTING APPROACHES
- Linear: resource extraction → production → waste
- Circular & Spiral: reuse, recycling, upcycling of organic streams
- Regenerative Bio-driven: co-design with biological systems, restoring ecosystems
🌍 7. CHANGE OF NARRATIVE
- Extract-driven: efficiency & transformation focus
- Remediative Transition: materials as environmental agents
- Values-driven: materials as cultural, ethical, aesthetic statements
🧪 8. MATERIAL MAKING & DOCUMENTATION
- Recipe: Ingredients, quantities, solvents, additives
- Setting: Temperature, timing, humidity, environment
- Tools: Lab, kitchen, studio, controlled outdoor
- Process Stages: Preparing → Mixing → Making/Casting → Curing → Drying → Finishing
- Reflection: Locally sourced? Waste stream? Recycled? Vegan? Energy intensity?
🔬 9. VISUAL & SENSORIAL QUALITIES
- Dimensions: size + thickness
- Form: sheet, film, yarn, foam, composite, block, fiber
- Color: natural / dyed / pigmented / oxidized
- Gloss/Finish: matte, satin, glossy, iridescent, crystallized
- Surface: smooth, rough, patterned, layered, woven
- Touch: soft, silky, rubbery, powdery, sticky, dry, wet
- Temperature: warm, cold, neutral
- Acoustic Property: absorbent, reflective, soundproof
⚙️ 10. PHYSICAL & MECHANICAL PROPERTIES
- Density, Weight, Porosity, Flexibility, Elasticity, Stretchability, Strength, Hardness, Brittleness
- Tear, Impact, Compression, Tensile Strength, Friction Coefficient, Shrinkage, Water Absorption
- Thermal Conductivity, Fire Resistance, Electrical Conductivity, Magnetic Response
🧪 11. CHEMICAL & ENVIRONMENTAL RESISTANCE
- Water, Humidity, Heat, UV, pH resistance
- Mold / Fungal Growth, Biodegradation rate & conditions
🔧 12. TECHNIQUES & ENHANCEMENTS
- Production: Foil cast, 3D cast, coated, merged, laminated, compressed, extruded
- Enhancement: Sanded, Dyed, Laser-cut, Printed, Engraved, Polished, Waxed
- Structural: Weaved, Braided, Thermoformed, Molded, Pressed, Knitted
- Additive Layers: Coating, resin, mineralization
🏷 13. APPLICATION HYPOTHESIS
- Potential Uses: textile, composite, packaging, surface, bio-leather, structural
- Design Properties: structure, texture, color, transparency, augmented
- Interaction: haptic, visual, olfactory, responsive, sensor-based
- Structural Role: decorative, load-bearing, insulative, flexible
- Compatibility: with other materials or systems
🔄 14. LIFE-CYCLE HYPOTHESIS
- Production impact: low / medium / high
- Use duration & repairability
- End-of-life: compostable, recyclable, reusable, burnable
- Regenerative approach: linear, circular, regenerative, bio-driven
- Degradation & post-use scenario
📝 15. NOTES & OBSERVATIONS
- Unexpected effects: color change, shrinkage, cracking, odor
- Improvements for next iteration
- Documentation media: photo, video, microscope, diagram
- Related experiments: cross-linking, hybridization, bio-doping
🌱 Keywords
Biomaterial, Bio-based, Biodegradable, Biocompostable, Biofabrication, Circular Economy, Regenerative Material, Living Systems, Biodesign
🌱 ADVANCED BIOMATERIAL CLASSIFICATION Template
📁 ADVANCED BIOMATERIAL CLASSIFICATION Template 02-11-2025 — by Carlotta Premazzi, Fabricademy
🔧 Purpose: Provide a structured framework to categorize bio-based materials according to origin, fabrication process, chemical composition, properties, applications, and end-of-life considerations.
| SECTION | FIELD | DESCRIPTION / DATA |
|---|---|---|
| IDENTITY | Photo | Insert image file or link |
| QR Code | Insert QR code linking to data / recipe / video | |
| Material Name | ||
| Code / ID | ||
| Author / Team | ||
| Date / Local | ||
| Version / Iteration | ||
| Origin | Local / Regional / Imported | |
| Category | Crafted / Grown / Hybrid | |
| Source | Animal / Vegetal / Microbial / Fungal / Biomanmade | |
| Type | Biobased / Biodegradable / Biocompostable / Regenerative | |
| Derived From (Waste Stream) | ||
| Visual Reference | Photo / Sketch | |
| RECIPE & PROCESS | Ingredients | Full list |
| Quantities | g / ml / % | |
| Additives / Binders | ||
| Solvents / Liquids | Water / Glycerol / Vinegar / etc. | |
| TEMPERATURE | Cooking °C / Curing °C / Drying °C | |
| TIMING | Cooking min/h / Curing h/days / Drying h/days | |
| pH (Initial → Final) | ||
| Humidity | % | |
| Tools & Equipment | ||
| Setting | Kitchen / Lab / Studio / Outdoor / Controlled Environment | |
| SUSTAINABILITY | Locally Sourced | ✅ / ❌ |
| Waste Stream Origin | ✅ / ❌ | |
| Renewable | ✅ / ❌ | |
| Vegan | ✅ / ❌ | |
| Recycled / Upcycled | ✅ / ❌ | |
| Energy Use | Low / Medium / High | |
| Water Use | Low / Medium / High | |
| Toxicity / Safety | Non-toxic / Mild / Hazardous | |
| Bioremediation | e.g., absorbs CO₂, filters water | |
| MAKING STAGES | 1. Preparing | Description |
| 2. Mixing | Ratio / Technique | |
| 3. Making / Casting | Forming process | |
| 4. Curing | Environment / Duration | |
| 5. Drying | Method / Setup | |
| 6. Finishing | Sanding / Coating / Sealing / Dyeing | |
| VISUAL & SENSORIAL | Dimensions | Size cm / Thickness mm |
| Form | Sheet / Film / Yarn / Foam / Composite / Block / Fiber | |
| Color | Natural / Dyed / Pigmented / Oxidized | |
| Color Stability | Stable / Fades / Changes | |
| Odor | Neutral / Organic / Earthy / Fermented / Chemical | |
| Transparency | Opaque / Translucent / Transparent | |
| Gloss / Finish | Matte / Satin / Glossy / Iridescent / Crystallized | |
| Surface Sight | Smooth / Rough / Patterned / Layered / Woven | |
| Surface Touch | Soft / Silky / Rubbery / Powdery / Sticky / Dry / Wet | |
| Sensorial Temp | Warm / Cold / Neutral | |
| Acoustic | Absorbent / Reflective / Soundproof | |
| Smell Retention | Yes / No | |
| Tactile Memory | Keeps deformation Yes / No | |
| PHYSICAL & MECH | Density | g/cm³ |
| Weight | Light / Medium / Heavy | |
| Porosity | Low / Medium / High | |
| Flexibility | Bendable / Rigid / Elastic | |
| Elasticity | Compressible / Stretchable / Brittle | |
| Stretchability | % elongation before tear | |
| Strength | Fragile / Medium / Strong | |
| Hardness | Soft / Semi-rigid / Hard | |
| Brittleness | Low / Medium / High | |
| Tear Resistance | ||
| Impact Resistance | ||
| Compression Resistance | ||
| Tensile Strength | N/mm² | |
| Shrinkage After Drying | % | |
| Water Absorption | % / qualitative | |
| Thermal Conductivity | Insulating / Conductive | |
| Fire Resistance | Low / Medium / High | |
| Electrical Conductivity | Non-conductive / Semi / Conductive | |
| Magnetic Response | Yes / No | |
| CHEMICAL & ENV | Water | Time to dissolve/deform |
| Humidity | Expansion / mold growth | |
| Heat | Melting / warping temp | |
| UV | Discoloration / degradation | |
| pH Resistance | Acid / Base exposure | |
| Mold / Fungal | Yes / No | |
| Biodegradation | Time / condition | |
| TECHNIQUES | Production | Foil cast / 3D cast / Coated / Merged / Laminated / Compressed / Extruded |
| Enhancement | Sanded / Dyed / Laser-cut / Printed / Engraved / Polished / Waxed | |
| Structural | Weaved / Braided / Thermoformed / Molded / Pressed / Knitted | |
| Additive Layers | Coating / Resin / Mineralization | |
| APPLICATION | Potential Uses | Textile / Composite / Packaging / Surface / Bio-leather / Structural |
| Design Property | Structure / Texture / Color / Transparency / Augmented | |
| Interaction | Haptic / Visual / Olfactory / Responsive / Sensor-based | |
| Structural Role | Decorative / Load-bearing / Insulative / Flexible | |
| Compatibility | With other materials or systems | |
| LIFE-CYCLE | Production Impact | Low / Medium / High |
| Use Duration | Expected lifespan | |
| Repairability | Easy / Moderate / Hard | |
| End-of-Life | Compostable / Recyclable / Reusable / Burnable | |
| Regenerative Approach | Linear / Circular / Regenerative / Biodriven | |
| Degradation Time | In soil / in water / in air | |
| Post-use Scenario | Return to biosphere / Reprocess / Dispose | |
| NOTES | Unexpected Effects | Color changes / Shrinkage / Cracking / Smell |
| Improvements | ||
| Documentation Media | Photo / Video / Microscope / Diagram | |
| Related Experiments | Cross-linking / Hybridization / Bio-doping |
Biomaterial Coding System (BCS)
📁 Biomaterial Coding System (BCS)
02-11-2025 — by Carlotta Premazzi, Fabricademy
The Biomaterial Coding System (BCS) is a cataloging method I developed to classify and document experimental materials. It defines a clear and flexible logic for naming and organizing biomaterials through a simple four-part code
- [Category]–[Base]–[Origin]–[Number]
for example: BIO–ALG–COF–003. This system allows each material to be quickly identified by its function, polymer base, biological origin, and version, creating a consistent language across recipes, samples, and archives.
References & Inspiration
Bio-based materials are a space where science, craft, and imagination meet. Inspiration comes from observing nature’s own systems—how fungi grow, how algae form pigments, how plant fibers create strength and flexibility. Artists, designers, and researchers around the world are exploring these possibilities, transforming local resources, food waste, and biological processes into tangible, functional, and beautiful materials. Particular attention is given to zero-waste strategies and designing materials for an infinite life cycle, emphasizing regeneration, reuse, and integration with living systems. Bio-based materials can continuously re-enter biological or technical cycles: they decompose naturally, can be recycled or upcycled, and even integrate with living systems, creating a regenerative, circular loop that keeps materials in use while nourishing the environment.
-
Bio Iridescent Sequin by Elissa Brunato materially.eu
-
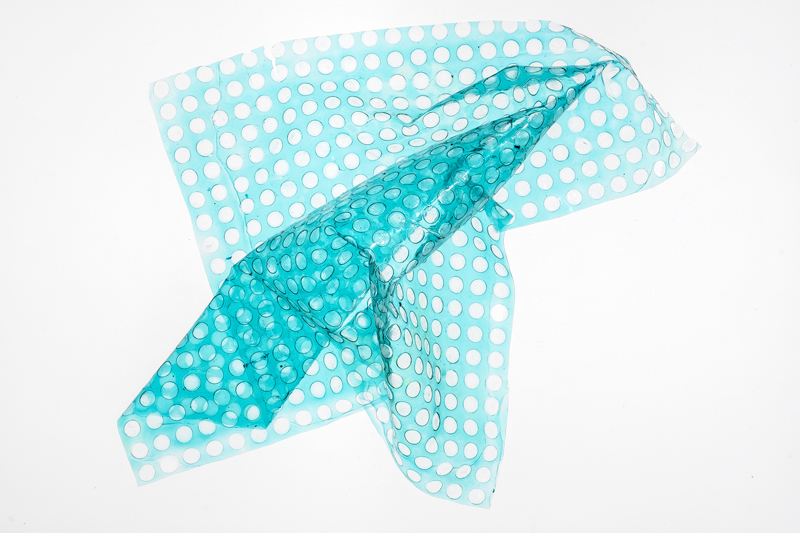
Alginate BioFilm Blue, Carolina Delgado, photo by Luís Silva Campos class.textile-academy.org


- Mogu by Officina Corpuscoli corpuscoli.com
- BioHybrid game controller by Vivien Roussel (image credit: Madalina Nicolae and Vivien Roussel) biodesign.accademy
- Bio-designer Zena Holloway © Andrew Montgomery gardensillustrated.com
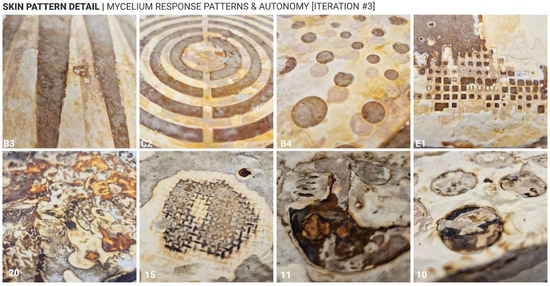
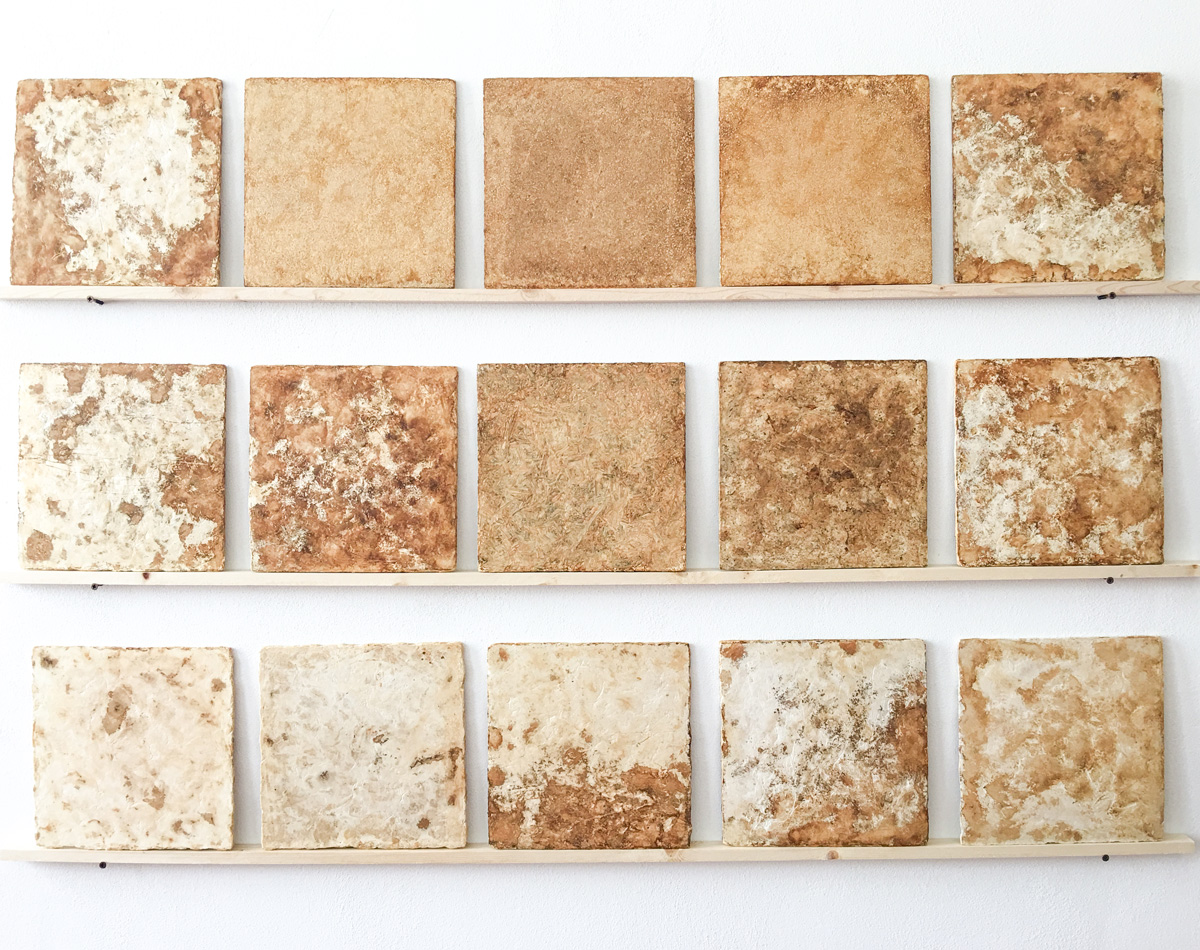
- Living Textures and Mycelium Skin Co-Creation by Anastasia Globa,Eugene Soh, Hortense Le Ferrand Living Textures and Mycelium Skin Co-Creation
References & Inspiration
-
Comparison research - Aslı Aydın Aksan - TextileLab Amsterdam
-
Comparison research - Barbara Rakovska FabLab Bcn
-
Jute research - Julija Karas - FabLab Bcn
-
Polarisation in bioplastics Viviane Labelle - EchoFab
-
Local waste streams - Marieke van Eyndhoven
Laboratory Practices
BioLab Protocol - General Rules
🔧 Purpose: Ensure a safe, clean, and contamination-free environment for all biofabrication work.
🧭 Steps: 1. Wear personal protective equipment (PPE) at all times: - Lab coat - Gloves - Safety glasses
-
Disinfect work surfaces before and after each session:
- Recommended: 70% ethanol or isopropanol
-
Use only sterilized tools, containers, and consumables
-
Minimize airflow and avoid unnecessary movement to reduce contamination risks
-
Dispose of all biological waste in designated biohazard containers
-
Wash hands thoroughly before and after handling materials
💡 Tips:
-
Label all samples clearly with material, date, and batch
-
Keep workspace tidy; avoid clutter to reduce contamination
-
Document all observations, including unexpected results
-
Avoid touching non-sterile surfaces while working
WetLab Protocol - Glovebox / Sterile Work - General Rules
🔧 Purpose: Maintain a sterile environment for inoculation, culture handling, and sensitive bio-based material preparation.
🧭 Steps: 1. Put on full PPE before starting: - Lab coat, gloves, and safety glasses.
- Disinfect the glovebox or wetlab enclosure surfaces:
-
Use 70% ethanol or isopropanol.
-
Work only with sterilized tools and consumables.
-
Insert materials and tools through the airlock or pass-through, following sterile technique.
-
Minimize hand and arm movements inside the glovebox to avoid air disturbances.
-
After work, remove waste carefully and disinfect the interior surfaces again.
-
Wash hands thoroughly after removing gloves and completing the session.
💡 Tips:
-
Always plan steps in advance to reduce time in the sterile area.
-
Keep materials organized inside the enclosure to avoid accidental contamination.
-
Regularly check gloves and seals for cracks or leaks.
- Document each inoculation or culture step for reproducibility.
Tools
Tools for Biofabricating Materials
-
1️⃣ Preparation & Mixing 🌡️ Beakers, flasks, graduated cylinders
🌀 Magnetic stirrers, stir bars
🔹 Glass rods, spatulas, mortar & pestle
🍹 Blenders
🧾 Funnels, sieves -
2️⃣ Heating & Temperature Control 🔥 Hot plates, heating mantles
💧 Water baths
♨️ Ovens / drying cabinets
🌱 Incubators (for fungi, bacteria, algae)
🌡️ Thermometers / thermal probes -
3️⃣ Casting, Molding & Shaping 🍥 Petri dishes, silicone molds
📏 Sheet casting frames
🖨️ 3D printers (bio-based filament)
💉 Extrusion tools / bio-ink syringes
🔨 Rolling pins / pressing plates -
4️⃣ Curing, Fermentation & Growth 🏠 Growth chambers / controlled environment boxes
🌡️ Humidity & temperature sensors
🧪 pH meters, hygrometers
🍶 Fermentation jars / vessels
🔪 Mycelium inoculation tools (scalpels, tweezers, loops) -
5️⃣ Drying & Finishing Drying racks
💨 Vacuum ovens, freeze-dryers
Sanding tools / microplanes
🖌️ Brushes, rollers, sponges (coating/dyeing) -
6️⃣ Testing & Analysis ⚖️ Scales (analytical, balance)
📐 Calipers, micrometers
🧲 Texture analyzers, tensile testers
🔬 Microscopes (optical / stereo / electron)
🌈 Spectrophotometers (color/pigment) -
7️⃣ Enhancing & Decoration 💥 Laser cutters / engravers
🖋️ Stencils, stamps, brushes
💦 Spray bottles (coatings/surface treatments)
🗜️ Presses (hot/cold for laminates) -
8️⃣ Safety & Hygiene 🧤 Gloves, masks, lab coats
🧼 Autoclave / sterilization equipment
🌬️ Fume hoods / biosafety cabinets
🧴 Disinfectants, cleaning supplies
Preparation Protocols
Bain-marie Protocol
🌡️ Bain-marie Protocol Also known as: Water Bath Temperature range: 60°C – 95°C
🔧 Purpose: Gently heat or melt ingredients (e.g., wax, oils, gels, biopolymers) without direct flame contact, preventing burning or overheating.
🧭 Steps:
-
Pour about two fingers of water into a pot.
-
Heat gently until steam starts to rise.
-
Place a heatproof bowl or glass beaker above the water.
-
Stir slowly and continuously during heating.
💡 Tips:
-
Ideal for sensitive or thermoreactive mixtures.
-
Keep temperature constant for even melting.
-
Never allow direct boiling under the container.
Alcohol Percentage Protocol
🍶 Alcohol Percentage Protocol
- 70% Alcohol → dries slower, better for surface disinfection.
- 96% Alcohol → stronger, evaporates faster, may cause cracking or overdrying.
⚗️ Formula: C₁ × V₁ = C₂ × V₂ → V₁ = (C₂ × V₂) / C₁
Where:
-
C₁ = initial alcohol concentration (%)
-
V₁ = volume of alcohol to use (mL)
-
C₂ = desired alcohol concentration (%)
-
V₂ = final solution volume (mL)
🧪 Example: Prepare 100 mL of 70% Alcohol from 96%
-
Measure 73 mL of 96% alcohol.
-
Add 27 mL of distilled or demineralised water.
-
Mix gently in a clean, closed container.
-
Label clearly: “70% Alcohol Solution” + date.
💡 Tips: - Always pour alcohol first, add water slowly.
-
Mix gently to avoid evaporation.
-
Store in a cool, dark place.
Prepare the Moulds Protocol
🧰 Prepare the Moulds Protocol
🔧 Purpose: Cleaning and disinfecting moulds before pouring bio-based materials.
🧼 Steps:
-
Clean the moulds thoroughly (remove dust or residues).
-
Disinfect using:
- 70% Alcohol → slower drying.
- 96% Alcohol → faster, stronger cleaning.
-
Let air dry or use demineralised water + lint-free paper towel.
-
Some moulds can be autoclaved or steamed in a pressure cooker.
💡 Tips: - Always disinfect before use to prevent contamination.
-
Avoid direct flame or heat sources on silicone moulds.
-
Label and store clean moulds in dry, sealed containers.
Calcium Chloride Solution Protocol
🧪 Calcium Chloride Solution Protocol Concentration: 5% CaCl₂ (Calcium Chloride) Solution
⚗️ Materials:
-
380 mL distilled water
-
20 g calcium chloride
-
2 bowls (one for solution, one for rinse)
-
Whisk or stirring rod
🧴 Preparation:
-
Pour 380 mL of distilled water into a beaker.
-
Add 20 g of calcium chloride slowly.
-
Stir until fully dissolved using a whisk.
-
Transfer solution to a labelled container.
-
Fill another bowl with 500 mL of tap water for rinsing.
💡 Tips: - Always wear gloves (CaCl₂ may irritate skin).
-
Store sealed, away from moisture.
-
Mix just before use for best reactivity.
Mycelium growth – procedure
Mycelium Medium Preparation Protocol
🍄 Mycelium Medium Preparation Protocol Types: Liquid (broth) & Solid (agar plates)
🔧 Purpose: Prepare sterile nutrient media to grow and cultivate mycelium under controlled conditions.
⚗️ Liquid Medium (Malt Extract Broth)
-
Malt extract – 2 g
-
Distilled water – 100 mL
→ Mix well, sterilise at 121°C for 40 min, and let cool before inoculation.
⚗️ Liquid Solid (Malt Extract Agar)
- Malt extract – 2 g
_ Agar- 2 g
- Distilled water – 100 mL
→ Dissolve, sterilise for 40 min, pour into Petri dishes, and store at 4°C.
💡 Tips:
-
Agar mix start with high temperature
-
Use sterilization indicator strips/tape to verify that autoclaving or sterilization of media and tools is effective.
-
Label containers with date, medium type, and batch.
-
Store liquid medium at 4°C if not used immediately.
Preparation of the Laminar Flow Hood, Inoculation, Incubation
🔧 Purpose: Ensure sterile work conditions for inoculation and incubation of mycelium.
🧭 Laminar Flow Hood Preparation
-
Turn on and clean the laminar flow hood
-
Switch on the laminar flow hood.
-
Clean inner surfaces with 70% alcohol: side walls, metal work surface, front glass, and under the metal work surface (if needed).
-
If necessary, also clean the outer surfaces with 70% alcohol.
-
Place all necessary materials inside
-
Arrange all sterilised and required materials inside the hood before starting work.
-
Organise items to avoid unnecessary movement during procedures.
-
UV Decontamination
-
Close the hood and run the UV light for 15 minutes to decontaminate the working area.
🧭 Inoculation
- Transfer culture to liquid or solid medium using sterilized tools.
🧭 Incubation
- Place inoculated plates and flasks in incubator at 26°C.
🧭 Post-Work Cleaning
- Clean all internal surfaces of the hood again with 70% alcohol after finishing the session.
💡 Tips:
-
For solid plates, invert during incubation to prevent condensation drops on mycelium.
-
Always wear gloves, lab coat, and safety glasses when working in the hood.
-
Always work in the center of the hood and avoid reaching over materials to prevent contamination.
-
Minimize airflow and movement to reduce contamination risk.
-
Label all plates and flasks clearly with date and culture type.
- Mycelium Medium Preparation and Inoculation by Carlotta Premazzi at Biolab, Lisbon.

- Mycelium Medium Preparation and Inoculation by Carlotta Premazzi at Biolab, Lisbon.
Tips
- Do not wipe the same spot twice; it can spread contaminants instead of removing them.
- Liquis medium can stay in the frige several months.
- Any change in color or texture indicates that the medium has been contaminated.
- Document any anomalies, even subtle ones, for future reference and troubleshooting.
- //rivedere con magda la questione delle varie posizioni dei tappi delle boccette
OBSERVATION
- Medium seemed dissolved, but three small solid pieces remained; after inoculation, a piece of mycelium stuck to the Petri dish.These may affect growth.
Casein Fibres – procedure

- Casein Fibres Preparation by Carlotta Premazzi at Biolab, Lisbon.
Casein Milk Fibre Production
🔧 Purpose:
Transform spoiled or surplus milk into casein fibres for sustainable and biodegradable textile applications.
🧭 Casein Extraction (Precipitation Method)
- Heat the Milk
- Pour 500 mL skimmed milk into a beaker.
-
Stir continuously and heat to 52 °C.
-
Add Acid to Precipitate Casein
- Slowly add 50 mL vinegar while stirring.
-
Observe the formation of a white curd (casein) separating from the whey.
-
Filter and Wash
- Filter the mixture through a fine strainer or cloth.
-
Wash the curd with ~200 mL distilled water to remove sugars and fats.
-
Dry and Store
- Spread the curd on a glass dish.
- Dry overnight at room temperature.
- Store in a sealed container.
🧪 Fibre Preparation
- Prepare the Base Mixture
- Mix 10 mL glycerine + 10 mL distilled water.
-
Stir until homogeneous.
-
Add Casein and Plasticizers
- Add 10 g casein powder gradually while stirring.
-
Optionally add 2.5–5 mL paraffin oil or wax for elasticity.
-
Adjust pH
-
Adjust to pH 6.5 using 0.5 M NaOH, as casein dissolves above pH 6.4.
-
Heat and Form Fibres
- Heat the mix to 65 °C to reduce viscosity.
- Extrude or pull the warm paste into fibres.
💧 Fibre Care
- Hand wash gently with neutral soap.
- ❌ Avoid bleach or high temperatures.
- Handle carefully — casein fibres are delicate.
How to craft BioPlastic
 Cecilia Raspanti, Fabricademy lecture, 2025
Process and workflow


-
Bio Foam by Carlotta Premazzi, photo by Alice Marques, Biolab, Libson 2025
-
Komby, my new kombucha culture, inherited from Alice Marques, Biolab, Libson 2025
-
GELATIN GLYCERIN BIOPLASTICS
- ALGINATE BIOPLASTICS
- SPHERIFICATION Biomaterial Coding System (BCS)
Recipes
GELATIN GLYCERIN BIOPLASTICS
Banana Peel Bio-Leather Recipe


ingredients
* Solvent: 50 ml distilled water
* Polymer: 10 g gelatine
* Plasticizer: 5 g glycerine
* Filler/Fiber: 15 g banana peel (blended or finely ground)
* Catalyst/Acid: 5 ml vinegar
tools
* Glass beaker / lab goblet
* Measuring scale
* Bain-marie setup
* FStirring rod or spatula
* Sanitized moulds
recipe
1. Measure all ingredients accurately and choose a sanitized mould
2. Mix all liquid ingredients in order inside the glass beaker.
3. Cook the mixture in a bain-marie at medium temperature (~80°C) for 10 min, stirring continuously until you notice a change in texture.
4. Add fillers (coffee grounds or additional fruit peels) and stir thoroughly.
5. Add vinegar and mix well.
6. Pour the mixture into the desired moulds and let it set/dry.
7. Observe the texture and color: any unusual change may indicate contamination or improper mixing.
Oyster Bio-Composite Recipe


ingredients
* Solvent: 100 ml distilled water
* Polymer: 38 g gelatine
* Plasticizer: 21 g glycerine (Omit for obtain a more cemented material)
* Filler/Fiber: 170 g oyster shells (cleaned, dried, finely ground)
* Pigment: 2 g cabbage pigment
tools
* Glass beaker / lab goblet
* Measuring scale
* Bain-marie setup
* FStirring rod or spatula
* Sanitized moulds
recipe
1. Measure all ingredients accurately and choose a sanitized mould
2. Finely grind the shells
3. Mix water and gelatine in a glass beaker (lab goblet)
4. Cook in bain-marie – mid temperature (approx. 80ºC) for 10 min, keep stirring until you notice a change in texture
5. Add shells and mix it on heat till totally blended. (For colour mix food spices or terracotta).
7. Pour the mixture into the desired moulds
Potato Starch Bio-Plastic Recipe


ingredients
* Solvent: 100 ml distilled water
* Polymer: 5.43 g potato starch
* Plasticizer: 5 g glycerine
* Catalyst/Acid: 5 ml vinegar
- Pigment: 2 g cabbage pigment (natural pH indicator dye)
tools
* Glass beaker / lab goblet
* Measuring scale
* Bain-marie setup
* Stirring rod or spatula
* Sanitized moulds
recipe
1. Measure all ingredients accurately and choose a sanitized mould
2. Mix all liquid ingredients, by order, together on glass beaker (lab goblet) – (optional colour: hibiscus flowers)
3. Cook in bain-marie – low temperature (approx. 65ºC) for 5 min, keep stirring until you notice a change in texture.
4. Add a food colour and vinegar
5. Keep stirring until the mixture thickens
7. Pour the mixture into the desired moulds
Soap Bio Foam Recipe


ingredients
* Solvent: 120 ml distilled water
* Polymer: 24 g gelatine
* Plasticizer: 6 g glycerine
* Foaming Agent: 5 g natural soap
- Pigment: 3 g cabbage pigment
tools
* Glass beaker / lab goblet
* Measuring scale
* Bain-marie setup
* Stirring rod or spatula
* Sanitized moulds
recipe
1. Measure all ingredients accurately and choose a sanitized mould
2. Mix all liquid ingredients (without the soap), by order, together on glass beaker (lab goblet)
3. Cook in bain-marie – medium temperature (approx. 80ºC) for 10 min, keep stirring until you notice a change in texture.
4. Add food colour (or turmeric, paprika, or spirulina)
5. Turn of the heat and add soap and mix with a whisk
7. When is thickened like syrup gently pour the mixture into the desired moulds
Pine Needles Bio-Composite Recipe


ingredients
* Solvent: 30 ml distilled water
* Polymer: 5 g gelatine
* Filler/Fiber: x g fresh pine needles (not so much ground or finely chopped here)
tools
* Glass beaker / lab goblet
* Measuring scale
* Bain-marie setup
* Stirring rod or spatula
* Sanitized moulds
recipe
1. Measure all ingredients accurately and choose a sanitized mould
2. Finely grind the Pine Needles
3. Mix water and gelatine in a glass beaker (lab goblet).
4. Cook in bain-marie – mid temperature (approx. 80ºC) for 10 min, keep stirring until you notice a change in texture
5. Add Pine Needles and mix it on heat till totally blended.
7. Pour the mixture into the desired moulds
ALGINATE BIOPLASTICS
Seashells Bio-composite Recipe


ingredients
* Solvent: 50 ml distilled water
* Polymer: 2 g sodium alginate
- Plasticizer: 5 ml glycerine
- Filler/Fiber: 100 g seashells (cleaned, dried, finely ground)
- Crosslinking Agent: 10% calcium chloride solution (applied by spray)
tools
* Glass beaker / lab goblet
* Measuring scale
* Bain-marie setup
* Stirring rod or spatula
* Sanitized moulds
recipe
1. Measure the seashells and grain it to powder
2. Measure the remain materials
3. Mix the sodium alginate in the seashells bowl
4. Mix the glycerine with the distilled water
5. Add the water sol. to the bowl slowly, mixing with a spatula
- Spray the moulds with 10% calcium chloride sol.
- Pour the material into the moulds and spray again on top
- Leave to dry
Cofee Bio-Leather

ingredients
* Solvent: 75ml Distilled Water
- Plasticizer: 10 ml glycerine
- Filler/Fiber: 20gr Coffee grains
- Polymer: 5 g sodium alginate
- Crosslinking Agent: 10% calcium chloride solution (or 20 g CaCl₂ + 180 ml water)
tools
* Glass beaker / lab goblet
* Measuring scale
* Bain-marie setup
* Stirring rod or spatula
* Sanitized moulds
- Syringe
recipe
1. Measure the coffee grains and the remain materials
- Mix the coffee with alginate
- Mix water and glycerine in the beaker
- Add the coffee and alginate slowly, mixing with a spatula
- pray the moulds with the sodium chloride solution 6 .Pour into the moulds and spray on top.
- Leave to dry
POTATO TURMERIC STARCH BIO-PLASTIC

Orange Peel Bio-yarn Recipe


ingredients
* Solvent: 200 ml distilled water
- Plasticizer: 10 ml glycerine
- Filler/Fiber: 20 g orange peels (blended or finely ground)
- Polymer: 5 g sodium alginate
- Crosslinking Agent: 10% calcium chloride solution (or 20 g CaCl₂ + 180 ml water)
tools
* Glass beaker / lab goblet
* Measuring scale
* Bain-marie setup
* Stirring rod or spatula
* Sanitized moulds
- Syringe
recipe
1. Measure the peels and grain it to powder
- Measure the remain materials
- Mix the powder with alginate
- Mix water, glycerine and sunflower oil with electric blender
- Add the banana and alginate slowly, mixing with a spatula
- Fill syringe and extrude above cure bath to prevent clogging
- Let bio-yarn harden for 5 minutes
- Remove & wash in a bowl with tap water.
- Leave to dry
OBSERVATION
While mixing the ingredients, the orange peel started expanding more and more — almost like a cake rising — which made extrusion impossible. This reaction likely happened due to trapped air and starch activation. To avoid this, try reducing the blending time, adding the peel gradually, or lowering the temperature to keep the mixture stable before extrusion.
Bio-sheet/yarn Recipe


ingredients
* Solvent: 400 ml distilled water
- Plasticizer: 40 ml glycerine
- Polymer: 12 g sodium alginate
- Pigment: natural or synthetic (quantity as desired)
- Crosslinking Agent: 10% calcium chloride solution (or 10 g CaCl₂ + 90 ml water)
tools
* Glass beaker / lab goblet
* Measuring scale
* Bain-marie setup
* Stirring rod or spatula
* Sanitized moulds
- Syringe
recipe
1. Prepare a cure spray – mix approx. 10gr calcium chloride with 100ml demineralized water, reserve in a spray bottle
- Mix water and glycerine - emulsify with a blender
- Add alginate – emulsify until uniform and add colour (ideally rest 8h to release bubbles)
- Spray the moulds with the sodium chloride solution
- Pour into the moulds and spray on top
- Leave to dry
Agar Spherification (Cold Oil Method)
 * Agar Spherification Adventures by Carlotta Premazzi at Biolab, Lisbon.
Agar Spherification (Cold Oil Method)
🔧 Purpose:
Create solid agar spheres by dripping a hot agar solution into chilled oil, exploiting thermal shock to trigger gelation.
🧪 Materials:
- 1–1.5% (w/v) agar dissolved in the chosen liquid
- 500 mL–1 L neutral oil (sunflower or vegetable), well chilled
- Syringe or dropper bottle
- Ice bath or refrigerator
🧭 Procedure:
- Prepare Agar Solution
- Dissolve 1–1.5% agar in the selected liquid.
-
Heat to boiling, stirring until completely dissolved.
-
Activate Gelation
-
Keep boiling for 1–2 minutes to enhance gelling strength.
-
Form the Spheres
- Quickly transfer the hot agar mixture into a syringe or dropper.
-
Drip it drop by drop into the cold oil — spheres will form instantly.
-
Collect and Clean
- Let the beads rest in the oil for a few minutes to solidify.
- Filter through a sieve and rinse gently with cold water to remove oil residues.
💧 Result:
Firm, uniform agar spheres suitable for decoration, encapsulation, or bio-based material experimentation.
Tips
**Do not use any kind of essential oil**
You can add fragrance — such as essential oils or natural extracts, why not! (I love creating a multisensory experience) — but something didn’t feel right; indeed, it turned out that the essential oil mixed with the agar solution created an unstable emulsion, preventing the gel from forming and stopping the spherification process in the cold oil. So adding more agar, my mixture turned into an ocean-coloured, double-layered sheet.
Documenting and comparing experiments
TEST SERIE
| Material pic | Material name | polymer | plastifier | filler | emulsifier | pigment |
|---|---|---|---|---|---|---|
 |
Banana Peel Bio-Leather | potato starch 5.43 g | glycerol 5 g | banana peel 15 g | vinegar 5 ml | natural |
 |
Oyster Bio-Composite | 38 g gelatine | glycerol 10 ml | oyster shells 20 g | red cabbage pigment 2g | |
 |
Potato Starch Bio-Plastic | potato starch 12 g | glycerol 100 ml | none | vinegar 5 ml | natural |
 |
Soap Bio Foam | soap 50 g | water 50 ml | none | soap a drop | red cabbage pigment 2g |
 |
Pine Needles Bio-Composite | glycerol 5 ml | pine needles 15 g | water 30ml | natural | |
 |
Seashells Bio-Composite | chitosan 10 g | glycerol 5 ml | seashell powder 15 g | green soap a drop | natural |
 |
Coffee Bio-Leather | casein 10 g | glycerol 5 ml | coffee grounds 15 g | vinegar 5 ml | brown |
 |
Potato Turmeric Starch Bio-Plastic | potato starch 12 g | glycerol 100 ml | turmeric 5 g | vinegar 5 ml | yellow |
 |
Orange Peel Bio-Yarn | alginate 10 g | glycerol 5 ml | orange peel 15 g | vinegar 5 ml | orange |
 |
Bio-Sheet 1 | agar 10 g | glycerol 5 ml | starch 20 g | water | 1 drop blue Food color |
|
Bio-Yarn 1 | agar 10 g | glycerol 5 ml | starch 20 g | water | 1 drop blue Food color |
 |
Bio-Sheet 2 | agar 10 g | glycerol 5 ml | starch 20 g | water | 2 drop blue Food color |
 |
Bio-Yarn 2 | agar 10 g | glycerol 5 ml | starch 20 g | water | 2 drop blue Food color |
 |
Bio-Sheet 3 | agar 10 g | glycerol 5 ml | starch 20 g | water | blue + red Food color |
 |
Bio-Yarn 3 | agar 10 g | glycerol 5 ml | starch 20 g | water | blue + red Food color |
RESULTS
* BIO-ALG-YAR-001 and BIO-ALG-YAR-002 by Carlotta Premazzi, Biolab 2025

* BIO-POT-BIOP-001 stretch test by Carlotta Premazzi, Biolab 2025 The very fine sections break under tensile testing.
Lecture on October 28, 2025, Global Instructors: Cecilia Raspanti, Local Instructors: Carolina Delgado, Magda Barreira
- **Workshops
- Local Workshop: GELATIN AND AGAR + CASEIN FIBRES
-
Global Tutorial: MYCELIUM BASICS with Annie Farlette
-
**Workshops
-
Local Workshop: LABORATORIAL PRACTICES + Medium Preparation, MYCELIUM INOCULATION
-
**Workshops
- Local Workshop: ALGINATE BIOCOMPOSITES, ALGINATE BIOPLASTICS – BIOFILM, BIOYARN AND SPHERIFICATION
Student checklist
- [ ] Include some inspiration: research on artists, projects, platforms that work with biomaterials, local ingedients and resources
- [ ] Produce at least one crafted and one grown material:
- [ ] Crafted material - explore the different recipes and understand how to adjust them based on the ingredients:
- [ ] Grown material - explore the different recipes and understand how to adjust them based on the ingredients
- [ ] Document your recipes, the ingredients and process and if there have been changes, document your unexpected discoveries
- [ ] Name your materials, classify them by typology and display them in a systematic order of samples
- [ ] Submit some of your swatches to the analog material library of your lab. (20cm x 20cm approx.)