2. Digital bodies
Weekly Assignment
Learning outcomes
- Research skills: the participant has acquired knowledge through references and Concept development
- Design skills: the participants has acquired knowledge on 3D scanning and modelling, mesh repair or manipulation
- Fabrication skills: the participant is capable of executing from file to production workflow, from slicer to laser cutting
- Process skills: Anyone can go through the workflow, understand it and reproduce it
- Final outcome: The assignment is assembled and either complete or tested
- Originality: Has the design been thought through and elaborated
Student checklist
- Include some inspiration: research on artists or projects that work with the human body
- Document the use of 3D scanner and software to acquire a 3D model
- Document the process of repairing and/or manipulating a 3D mesh and slicing it
- Document the process of file preparation for laser cutting
- Learn how to laser cut, document the workflow including the machine settings, material type and thickness
- Upload your 3D file (STL/OBJ) and your 2D files (DXF/PDF)
- Build and/or assemble a mannequin or body parts
- Create a stop motion or step-by-step assemblying process and upload one picture (HIGH RES) of your mannequin (extra credit)
References and Inspiration
The session was mindblowing ! I am in awe.
I loved the work of several of the artists for their aesthetics as well as technical virtuosity.


 Image Credits : Fabricademy
But let me begin at the beginning before diving in.
Although my instructors had already told me Fabricademy is high on concept, we had also kept talking about this week as "The Lasercutting Week".
But Anastasia's session was opening up dimensions in my head ! These were things I had thought of idly or adjacent to my work, but had never bothered to dig deeper, or execute in any form. One of my more important projects is The Clubfoot Brace, where we literally generated a "body" from data. But I had never thought of it like that, and given how thoroughly we were hooked onto the "problem-solving" aspect, I never went too far beyond adding aesthetic value to the braces. I had never considered how the human body is at once a canvas, a stage, a tool, and so much more.
As Rico has written on his page, I was also realising, now in week 2, that I am carrying a lot of FabAcademy with me here. The Fabacademy program deals with the How and the What - how to do what you want to do, with very little why. My current understanding of Fabricademy is that it is intensely about the Why and the What, and only later the How.
I am looking forward to a lot of deepdives, research, rabbit holes, learning and considering. The explorations will be of various skills, for sure, but also of various concepts, meanings and contexts.
The whole session was very interesting, but what really stayed with me was The Medici Effect, and the series of "body-based" artworks from artists like Antony Gormley and others.
Before that, we saw
- Different grid and proportion systems to define the human body, from ancient Egypt, to the rennaissance, to modern day
- Ergonomics, Anthropometry, and it's extension, Biometry
- Digital fashion, like the Fabricant, DressX and also the world's first digital model
- The different typecasts of bodies, mainly women's bodies, across the past century or so
The Medici Effect, a term coined by author Frans Johannson, states that "Innovation occours at the intersection of multiple fields, disciplines, and cultures." It's named after the Medici family of Florence, who - in their roles as bankers, power brokers, aristocrats, producing several popes and queens of nations, and the defacto rulers of Florence - patronised a range of artists, scientists, architects and philosophers. This resulted in a fertile environment for the mix of talents and idea, leading to the Renaissance and landing Florence at it's centre.
As a student of history with some interest in the Renaissance and medieval europe, I perked up on hearing the Medici name. The theory also makes sense, since I can name several other examples off the cuff. Baghdad's Golden Age as the centre of the arts, sciences, mathematics, astronomy, was due to being at the cross roads of the Silk Road and being a melting pot of Chinese, Indians, Persians, Arabs, Greek and European peoples. Mughal Delhi under Akbar was similar, as were Mumbai and Chicago at the turn of the last century - cosmopolitan melting pots that attracted talent and led to immense changes and advancements in the arts, sciences, philosophy, and way of life.
The core of the session was various artists and works based on the body but distorting it in a myriad of ways.
At the start of the session itself, we were told Michelangelo's David had exaggerated hands and legs, in order to show strength and power.
Here, a number of other artists were playing with similar effects - centred on the human body but using it as a canvas, as data, as input.
I particularly liked Antony Gormley's work, as well as Katie Grinnan's pieces.

Image Credits : Fabricademy
The sculptures by Antony Gormley are a stylisation of the humam form, and I somehow like them for their visual as well as metaphorical aspects. The abstraction forces us to see the body as a form occupying space, shorn of identity and all it markers. It brings to fore the shapes, proportions, and volumes of the human body, which, very often in the modern world, have been hidden, taboo'd, and wholly sanitized out of our general consciousness.
They are also playful, and I am reminded that the animal that is man is a playful, animated, and active creature - aspects again depressed in our modern existence beyond childhood, and often within it as well.


Image Credits : AntonyGormley.com
Katie Grinnan's works are fascinating to me as well.

Image Credits : Fabricademy


Image Credits : CSULB
They are even more visceral as a representation of the human body, and are ever-so-slightly repulsive, to be honest. It is almost a morbid fascination. But what drew me in was the parallels to the work of Étienne-Jules Marey who invented the technique of chronography to capture images of athletes and dancers that managed to capture their motion as a set of multiple exposures.
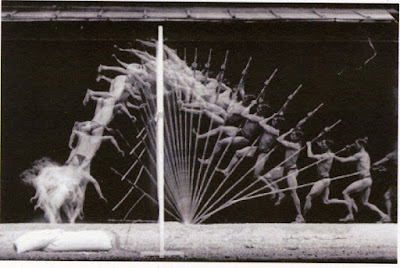
Image Credit : Gurney Journey
These images later inspired works like Marcel Duchamp's Nude Descending a Staircase, as well as the field of animation itself.

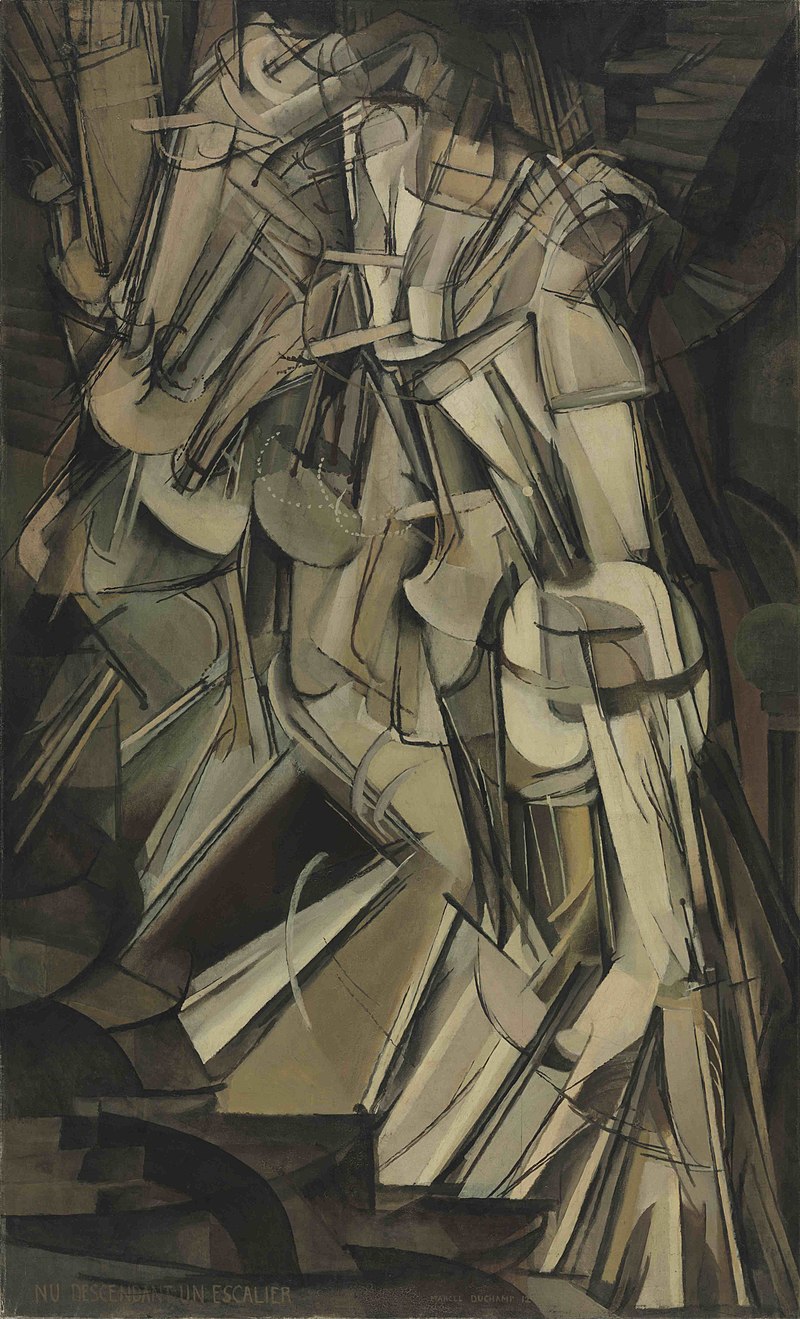
Image Credits : Wikimedia foundation
The field of prosthetics is also fascinating, from rehabilitating amputees, to elevating their experience beyond just function. Body extensions also open up a lot of questions about post-human/cybernetic/bionic/superhuman concepts.


Image Credits : Fabricademy
Tools and Software
The design tools and software used this week
3D scanning :
- Einscan HD pr and it's associated operation software
- KiriEngine for Android
Vector work :
3D CAD work :
Lasercutting :
- SIL CO2 lasercutter
Specs :
- Bed size : 3 x 4 feet
- Power : 110 watts - RDWorks, the associated lasercutter operating software
3D printing :
- Prusa i3 MK3s+
- PrusaSlicer, the associated 3D printing operating software
Ideation

The Primary Question posed in the session as well as from my instructors was, what does the body mean to you ? My inital realisation, after some pondering, was that I treat the body as a vehicle to carry my mind to places. This, when articulated, seemed that I do not do enough justice to the idea of the body or pay attention to my own body.
This whole thought-churn has led me to several concepts to execute.
"Two sided conversation", or "David Decapitated"
When the body is a vehicle for the mind, the mind is primary. The mind is located in the head - metaphorically, as well as physically as the brain. And we are very often having conversations with ourselves. A part of me wants to do something different, while another part of me wants to play safe. A side of me wants to aspire to more and dare greatly, while another side is full of self-doubt. Both sides, all these sides, are in constant conversation, back and forth.


To show the two sides of the conversation, I decided to use 1.2 mm cardstock that was white on one side and black on the other.
I also wanted to show the constant back and forth of the internal conversation, and for that I decided to try an effect of light or the see-throughness going backwards and forward.
I decided I'd use Slicer to make a model of the head. However, the basic stacking build up, as well as the cross-member method, I had done several times in the past. I wanted to push the stacking method differently for this specific effect, something like light passing through narrow canyons, with a moire-like effect when moved. I wanted the stack to be very see through but also directional.
Since this was a day or so before I went for 3D scanning, and having attended Rico's Blender session, I decided to use existing 3D scans to work with, and what better to represent the mind and the head than Michelangelo's David.
So I decapitated the slayer of Goliath in Blender.
Sourcing the model

I have long been a fan of ScanTheWorld, a project located within MyMiniFactory that aims to be a repository of 3d scans of the world's cultural artefacts. MyMiniFactory was also my goto location for a long while for all other 3D printing downloadables. Unfortunately, the ScanTheWorld project, though still alive, seems a little neglected and is suffering currently, while MyMiniFactory seems to have pivoted towards a narrower set of offerings.
Here is a link to ScanTheWorld's Full Collection.
I downloaded Michelangelo's David as an STL file.
Editing
I imported the STL file into Blender and needed to delete the rest of the body. I tried doing two things.


Initially, I tried to manually just do a rectangular select and delete the mesh points that made up the body. However, due to my inexperince with Blender, I did not use the correct selection options, so I ended up selecting only the visible points and deleting them. As a complex and highly detailed scan, the model has a gazillion points. I tried this several times, leading to a rather ragged model, but could not get a clean edit.
Then I decided to just split the body at the neck with a plane. This seemed more sensible than before, but for whatever reasons, it wasn't working.
I decided to give up and imported this setup of David Plane into Rhino. Rhino on it's own, without Grasshopper, is not something I am a big fan of, beyond some very specific functions (looking at you, UnrollSrf :heart: ) However, compared to Blender, I could be faster here. I split the body, closed the gap left behind at the neck, and saved the head as another STL.

Slicing
For the effect I wanted, I would need gaps in the slices. This could be achieved in something like Blender with Geometry Nodes or Rhino + Grasshopper, but that would take up a lot of effort to set up what Slic3r could be hacked to do directly.
I imported the head STL in Slic3r, set the slicing directions and the rotation of the model so that the slicing was parallel to the face profile. Non-perpendicular planes give very interesting results that I usually prefer, but in this case, I wanted the slice plane to be very much in the face profile, so the see-through effect would be most prominent when facing the head.
When I setup the material properties, I used the stock sheet size I had as the dimension. However, since I wanted gaps between the slices, I set thickness to 5 mm, while my material was actually 1.2 mm. This would result in 1.2 mm material + 3.8 mm air gap between consecutive slices.
I also setup the registration points with the diameter of 3 mm since I had long skewers of 3 mm available. The trick is to use the minimum number of reg points, while also making sure that every slice has atleast 2, and maybe 3 holes, so no pieces start rotating around the skewer. Essentially it is constraining the degrees of freedom for each piece.
After all the fine-tuning, I exported the DXF files for lasercutting.


Lasercutting
Once the DXF files are obtained, the usual workflow is as follows
File preparation
This mainly consists of cleanups, adjustments and layout
- open in a vector software to check if it has exported correctly - I prefer CorelDraw, or Inkscape when CorelDraw isn't available
- adjust the layout based on the material stock - size, existing cutouts, damaged corners, squeezing and aligning to avoid waste, etc
- adjustment may also be needed based on your lasercutter - bed warping and leveling issues may mean you need to change origins or move critical parts to more reliable zones, etc
- layer management through colour - RDWorks interprets each colour as a separate layer with individual power settings. This means you can colour different elements in order to eventually assign different power settings and operations to them, like throughcuts, surface markings of various depths/darkness, and scanning/engraving of various depths/darkness.
- even for the same operation settings, you can setup different layers to force the sequence of operations - whether you want to cut outside in or inside out or all the tiny pieces first before an overall outline, etc
- export the final version as a DXF again
However, the files exported from Sli3er were fairly clean and did not need any work. So I moved straight to RDWorks after a quick check. Later, I came back to extract a few slices for a second round of cutting where the first slice got damaged or badly cut with bad edges.
RDWOrks operations
- import the DXF into RDWorks
- for each layer, apply the power and speed settings
- any last adjustments if needed
- check origin location
- finally, for each layer, run the "delete overlaps" command to avoid double-burnt lines
- download to the lasercutter - ours uses a USB connection with the laptop directly, so tweaks and adjustments are rather quick
If you are using a new material, then
- save your prepped file
- open a new file and draw a 10 mm circle (my preferred) or any other small shape
- set approximate power and speed settings and do a test cut
- adjust power and speed
- increase speed if the cut was successful
- decrease power if the cut was successful but burnt
- decrease speed and increas power if the cut was not successful
- once you find the right power-speed combination, restore your prepped file and apply those settings
Settings for the Black + White mountboard
I started with : Power : 60-65 % Speed : 15 mm/s
This was successful, but I suspected it was overkill - too slow for that material. I tested higher speeds to save time, and finally used :
Power : 70-75 % Speed : 25 mm/s
Lasercutting operations
- On the lasercutter control panel, navigate to your file and load it
- Position your material as needed, with respect to the origin, as well as clean/damaged/precut areas present on the stock
- Set the origin; Use Pulse to be sure
- Check framing, make sure the frame falls within available material size
- Check focus
- Start
While usually the process would actually be as simple as outlined above, our lasercutter was acting up. - This was the first time in a long time that nearly the full area of the bed was being utilized - That was leading to previously unknown bed leveling issues now cropping up - About 30% of the cut failed due to the focus being off, due to bad bed levelling
Finally, I did the following
- eyeballed and manually estimated the variation across the bed
- quickly had my lab manager, Shivam, cut a 30 degree block on the mitre saw, and used that to check the beam width at various locations for a more precise understanding of the bed variation in terms of the resulting focal length variation (More on this technique that I figured out and designed a jig for in my Fabacademy page and my Hackaday page)
- we estimated that the focal length needed to be 5.5 mm at the centre of the bed, instead of the 7 mm we'd been using in the upper right region of the bed, due to some corners being higher than other corners and also because the calibration jig told us how forgiving or not the beam width was going to be
Once this was done and implemented, the cuts were beautiful.
Accessories
Apart from the cardstock slices and skewers, I needed spacers that would maintain the 3.2 mm airgap.
I had initially considered lasercutting 3 mm acrylic but I didn't have the right material on hand, so I decided that it's a small part, it can almost as easily be 3D printed. I modelled and printed out about a 100 spacer pieces.


Later, after assembling the first few slices, I realised I would be much better off using a jig to keep all the skewers levelled and aligned. So I extracted the registration holes from one of the slices using CorelDraw and exported that as a DXF. I imported the DXF into Fusion and and modelled a basic holder with enough of a base that it could stand on it's own, and 3D printed that as well. I eventually printed it's mirror image version as well, when I wanted to flip the model and fine tune some smaller layers on the lower side.
Finally, I also printed End Caps for all the skewers that I could fit on the ends on both sides and glue to keep the entire model stable.
Assembly
After some initial struggles with slipping and dropping and moving parts, the assembly was underway.
It went especially easier once the holding jig was in place.
The tiny fragments at the end were a slight problem, and needed to be referred to from the Slic3r file.
I had about 7-8 skewers running through the model. I did not want every skewer to be filled with spacers. This would cause visual blocks in the see-through effect. Initially I tried to have spacers at alternate skewers, maybe in a brick pattern, etc. But due to the skewer holes changing with the contour, as well as realising the visual consistency would be better than scattered spacers, I came up with the following scheme for the spacers : - Spacers at the 3 most extreme skewers available - Additional spacers in the layer if that location was going to have spacers in the layer above, for better load transmission
Assembly timelapse
Conclusion and Reflections
The final model is quite as desired. Over time (by the time I did a second shoot of the head a few weeks later) the layers had distorted a little due to being leaned on by some books. I tried to correct that, but some of it is still there. This has marred the light-bounce effect in the final a little compared to during the assembly.
I would also prefer to use spacers that were either clear acrylic, or if they were to be 3D printed, to be dual coloured, black and white, since some white of the spacers is visible from the black side.
"Becoming" / "Evolution"
The other concept that came from my thoughts of the mind-body relationship, was to represent the process of becoming aware of one's own body, from an abstract idea of the mind-vehicle, to the actual physical form. occupying space, having detail, in all it's unvarnished imprefections and non-idealness.


Process
For this, I decided on using a 3D scan of myself and use some of the mesh processes Rico had shown in the Blender tutorial. It would be a series of "3d selfies" but starting with a highly decimated and polygonized version to having more and more resolution and detail until the last iteration was the complete original 3D scan.
3D Scanning

We have an Einscan HD Pro in an associated lab on campus. I had used this for various objects during my FabAcademy, and I remembered it to be a fast, generally easy and very high resolution scanner.
The manual is accessible on the website, after filling in your data. I had already put it in my FabAcademy repo for ease of access to myself as well as any others (and since it's <2mb), so it is here.


We started the operating software and followed the screens, selecting the required settings. We chose :
- a handheld rapid scan, because that was what it was
- not texture based scan,
- medium resolution (too high would result in very large file sizes and processing time)
- alignemnt by features, because there was enough geometry (not flat, formless) and markers were thus not required.
Then scanning was started.


Image and Video Credit: Mihir Shah
3D scanning objects is fine, not a hassle, compared to 3d scanning a person. I had to stand absolutely still for almost 25 minutes, as Sangram scanned me. It was exhausting, to stand locked in, not moving any joint, unable to mop sweat or adjust hair, or just generally flex.
The 3D selfie folks at the fun-fair events have got it right, a 10 second sweep is all it should take. While the level of resolution that the Einscan gives is unmatched, it is also overkill at this stage, and the length of time will very likely introduce errors anyway due to the person having overall swaying movements or micromovements in various limbs.
The Einscan software processed the point cloud to give a watertight model that was exported as an STL.
Mesh modifications


The default directions the STL was aligned to were obviously not aligned to the principle axes. Since it would be very erratic to keep rotating the model by small increments around multiple axes, I setup a Grasshopper script with 2 rotations linked to a number slider to be able to manually but smoothly rotate the model. I then aligned the 3d scan to the regular front-top-side views.


Once that was done, I used the decimate function to reduce the polygon count of the model. I setup multiple decimate functions, to get multiple versions of increasingly decimated models. I tried two ways to do this - one series took the primary model and each decimate separately decimated it to the required polygon count, while the other series took a previously decimated version and decimated it further to the required polygon count.
The second method responded better since each decimate function had a lesser number of decimations, lesser data to process in order to execute, while the first one would have ot work with the full density of the model for each iteration. I also moved one set of models further away to be able to compare the results of the two methods.

I also added a common base cuboid that unified all the models and gave them a stable base to stand.
This model was then exported as a new STL.
3D printing
I imported the modified STL into PrusaSlic3r to setup the 3D printing.
Settings :
Filament : PLA, 1.75 mm, white
Layer height : 0.2 mm
Infill : 15%
Temperatures : 215 C nozzle, 60 C bed
To save on printing time, I did two things
- scaled the model to be 70 mm height
- exported the 5 "person" model from Rhino instead of the 9 person model


Conclusion and Reflections
- There was a layer shift during the printing (my cat loves the heated bed and must have blocked the bed movement at some point) which ended up fusing the supports to the model, and causing the cleanup to be very annoying and somewhat impossible.
- We have recently (during week 7 of Fabricademy) acquired a new printer in the lab, and it's a faster printer, so I will print the 9-person version now
Much Later :

Image Credit : Smithsonian Magazine
Due to the print issues, I needed another print. At that point, I realised I could rotate the figures to face the right in a callback to the Evolution graphic we are so used to seeing, since that works very well with my concept. In doing so, I chose to not do the 9 figure sequence but continue with 5 instead.
Hence, a few weeks later, I printed that version that is seen at the start.
More explorations
MakeHuman
I used MakeHuman during the tutorial. It was very interesting and I will find use for it later, but I did not use it too much further beyond the tutorial for now.
Blender
Rico's Blender session was a great start to me finally diving into Blender. It is something I have wanted to do for a while but the interface and the sheer number of possibilities kept throwing me off.
Once I knew my way around Blender somewhat, I explored turning David into an "action figure" by separating the limbs into individual bodies.
- Used decimate modifier to produce a low-poly version, since the original would have been too heavy to work with.
- I used the mesh edges to split the model and separate the 2 arms, 2 legs and head
- In many cases, I missed faces and edges so kept having to extract more face-sets from the main body, but eventually unified them into one of the five assets.
- Once this was done, I closed the holes in all the limbs, the neck, and the body from where these parts had been excised


The plan with this is eventually to add magnet holes on the flat interface faces, print them, insert magnets and have a poseable action figure.
Grasshopper
I had imported the 3D scan of myself into Rhino + Grasshopper for "Becoming". Once the mesh was decimated and the number of vertices reduced to a manageable level, I went exploring what Grasshopper could do with this model.

I tried a Many-to-Many lines, from each point of the low-poly mesh to every other point. This resulted in this triangulated nest of lines, but also, at some point, things got too intense to process and the sfotware threatened to give up.

Yikes !
I also used the IsoContour function to create contour lines. Then I tried lofting the lines into an open surface. It does not look like anything in particular from the front, but from the side where the transparency allows it, an abstracted and smoothened contour of the body shows up. It is a very interesting result that I want to deconstruct later.


I also played with having pyramids and other shapes at each meshpoint to give the spiky porcupine-y Spike the X-man character effect.

KiriEngine - Body as Language / Body Language
Hand Mudra

In various Indian classical dances, the motions, gestures and positions of the hand are used to convey moods, emotions, objects, places, etc. It is almost an entire language within the language of the dance. We are sometimes taught this in school - I was - and I have been fascinated with these Mudras - signs or gestures - on and off since then. One of my students, Samiksha, has pursued this over many years and is an acclaimed dancer. I asked her to do hold her hands in a few positions and used KiriEngine to scan the gestures.


Kiri Engine – Photo-to-3D Scan Workflow
-
Shoot photos
- Take 70–150 images, fully around the object
- Keep consistent lighting, avoid glare
- Ensure 30–50% overlap between shots
- Capture multiple orbits (low, mid, high angles)
-
Open Kiri Engine
- Launch app
- Choose Photo Scan
- Choose to Take Photo/Video or ideally Upload from Local
-
Upload images
- Click Upload Photos
- Select all images at once
-
Set project options
- Choose Polygon Count : High/Medium/Low
- Choose Texture resolution
- Choose File format
-
Start reconstruction
- Press Upload
- Once uploaded, wait for it when Processing
- Wait for cloud processing
-
Preview the model
- Inspect mesh + texture
- Check for holes/noise
-
Refine (optional)
- Use Crop tools to cut background
-
Export
- Export as OBJ / GLB / STL
- Save locally or to cloud


Since Kiri uses multiple photographs, it got a little difficult for her as well to keep her hand steady for so long, and to take pictures from directions where her body would block the view.
I would recommend either the Einscan which is faster, or to make an Alginate cast of the hand and scan that cast at leisure instead of the actual hand. However, it is obviously a longer, messier and more resource consuming process.
Running Man

The Somaiya Vidyavihar campus is full of statues and sculptures. There is one we call the Running man beside the track. The sculptor has shown the emotions and the exertion of the runner as he crosses the finish line, with all the strain in his face visible.


This scan was generated from a video instead of pictures. Kiri has a limit on the video length for the free version, it needs to be under 1 min.
Cactus
Because plants have bodies too.
Since I have always been fascinated by Patterns in Nature, and this Cactus is a great example of Differential Growth, so I decided to scan it and use it as a base for other explorations.
Maybe I could add spines to it in Grasshopper !


Katie Grinnan / Étienne-Jules Marey as Inspiration
I really wanted to do something along these lines. I tried using a sketching mannequin and scan it in over various positions. However,
- I could not really set on what action the motion would depict and so never really got clarity on what it would be doing
- it would require 5-8 scans which can get really tedious to do with KiriEngine
- posing and moving the mannequin got tiresome even for a few positions
I have finally decided that I will try this later using the Einscan Scanner, and also, clarity on the motion, I will simply replicate the Nude descending a staircase.
Fabrication files
Drive folder with following files :
- David's Head
- David's head Slicer file
- Becoming/Evolution final file
- KiriScan of Hand Mudra
- KiriScan of Running Man
- Jig and spacers for David's Head slices assembly
Credits and acknowledgements
All images are mine unless mentioned underneath the image.
I would like to thank, beyond my instructors, our lab staff and managers as well as the students who helped me.
Sangram sir was instrumental for the 3D scanning. My students, Mihir, who documented the process of me being 3D scanned, and Samiksha, who was the hand model for the KiriEngine scan, were invaluable.