6. Computational Couture
Research & Inspiration

Source: More Than A Dodo
Ernest Haeckel's seminal work on Radiolaria is both, a favourite art piece, as well as a ground breaking scientific text. The structures that these organisms created ignited bith my interest in Biomimicry as well as Generativity.

Source: Viereck Verlag
This book was released after I was already following and deeply inspired by Tomoko Fuse’s work. I haven’t been able to get my hands on a copy yet, but I’ve been exploring and working out the math behind the spirals nonetheless.
Source: YouTube
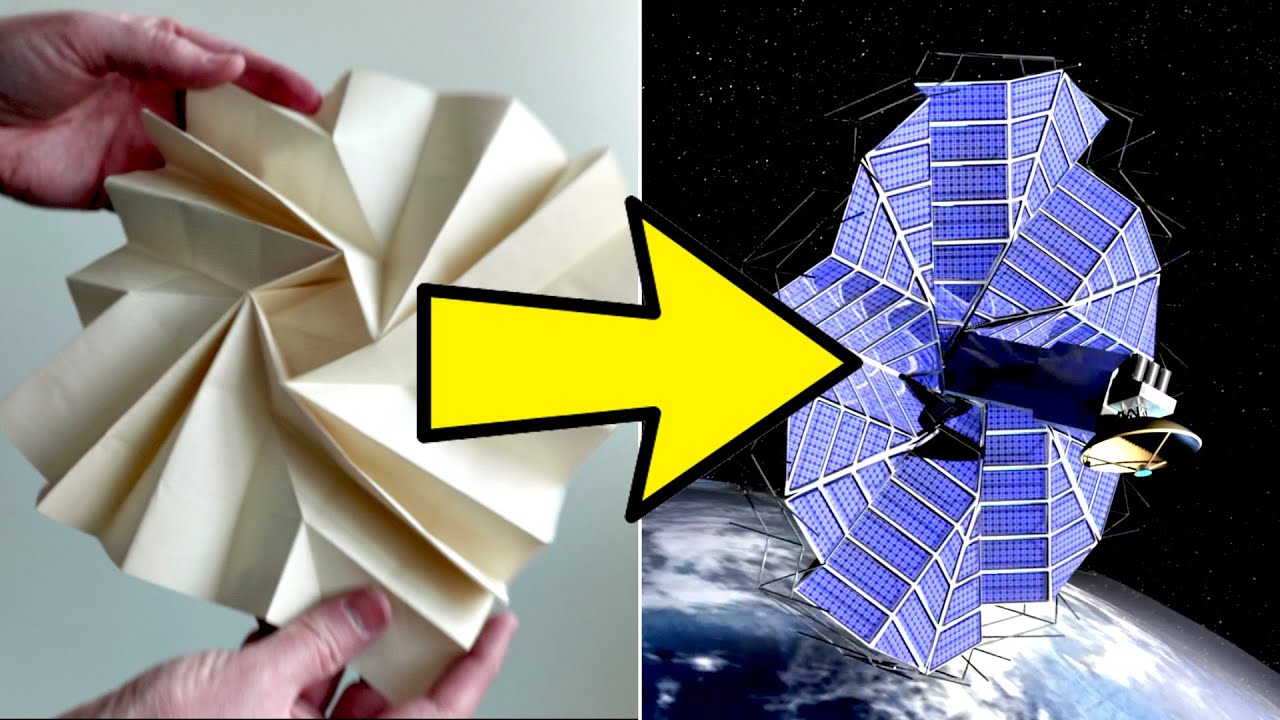
Origami beyond paper - Veritasium This is a video I use to introduce my students to Origami and it's implications beyond paper.
Source: erikdemaine.org
Curve folding by Erik Demaine
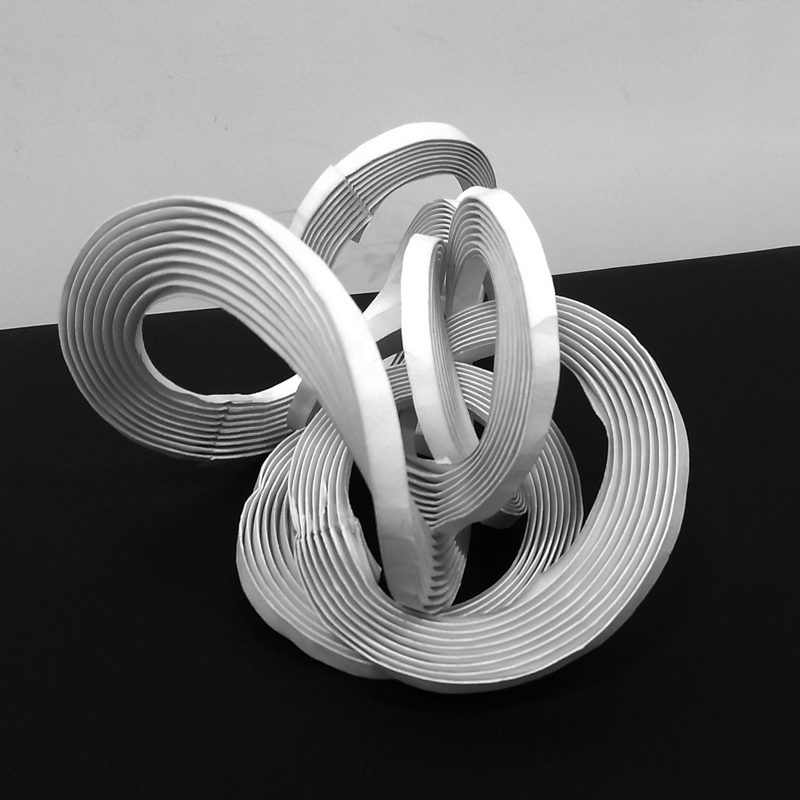
Source: jesalmehta.com
My own curve folding explorations

Source: Goodreads
Philip Ball has a staggering amount of work on patterns in nature, and their process/algortihmic/mathematical analysis. A lot of my understanding if patterns in nature, from Brownian Deposition to Reaction Diffusion, comes from reading his work. I love all three of his books, Shape, Flow, and Branches, but Shape remains a favourite.

Source: Archinect
Julia Koerner's body of work is absolutely inspiring, from the study of traditional patterns, to their Afro-futurism extensions, to the cutting edge technology used to execute it. The entire session last week was a pleasure.
Source: Nervous System
Nervous System’s work on 3D printing — I’m a big fan of their work, but also their Processing OBJ export library (also on their Github page)
Ideation
I’m mostly interested in not just patterns, but patterns that can be generated through algorithms and procedural generation.
I’m also interested in how 3D printing on fabric can play and explore structure, or how the 3D print’s rigidity can give rise to very specific structures.

I had several ideas that I really wanted to try out, and I shall attempt them in the future. For the time being, I have 3 major attempts at swatches.
Tools and Software
Coding
- p5.js | Javascript coding
- python
3D generative
- Grasshopper + Rhino3D
- Blender with Geometry Nodes
CAD with Parametric
- Fusion360
3D Printing
- Prusa Slicer
Printer
- Prusa Mk3s+
Material
- Esun White 1.75 mm PLA
- Esun Black 1.75 mm PLA
- Mesh Fabric
Tools
- Scraper
- Lighter or Hot air desoldering gun with narrow nozzle
- Clippers
- Cutting Mat
- Scissors, cutter
Concept Execution
Origami structures
I have a huge interest in Origami and Folding Structures. I have previously tried to 3D print origami strutures, but that was pure 3D printing, using thickness variations to allow for the fold lines.
With 3D Printing on Fabric, this concept became very much more accessible, since the fabric folds very easily, while the 3D printed sections give it the required stiffness and rigidity.
I chose to try out a 5 sided Whirlpool, one of Tomoko Fuse's Whirlpool models, a series I have been deconstructing and playing with for several years.
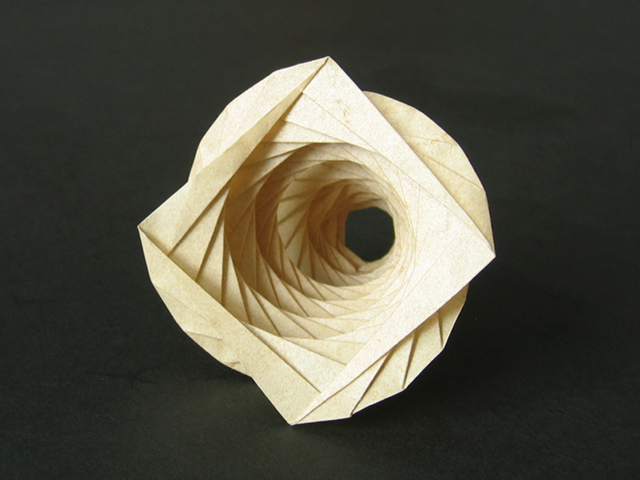
Image: 4-sided whirlpool from HappyFolding.com
Parametric Models
I modelled this in Fusion, and used User Parameters, along with the dimensions and constraints, to create a parametric model. The dimensions, as well as the number of sides, and height of model, can all be controlled using these options.
Clearance between panels to work with different 3d printing settings and fabric properties can also be managed through the parameter.


3D Printing
For this particular object, the pieces were 2 mm tall.
With layer height of 0.2 mm, I added a Pause to the printing at 1 mm height, and used the pause to add the fabric and hold it down with magnets and clips.


Printed Object
The printed swatch shows very interesting properties - it acts like an origami folded object, but much looser and floppier. It does hold shape, but not as well as paper. However, the folds and creases are also much more resilient than a paper version.


Noise directed patterns
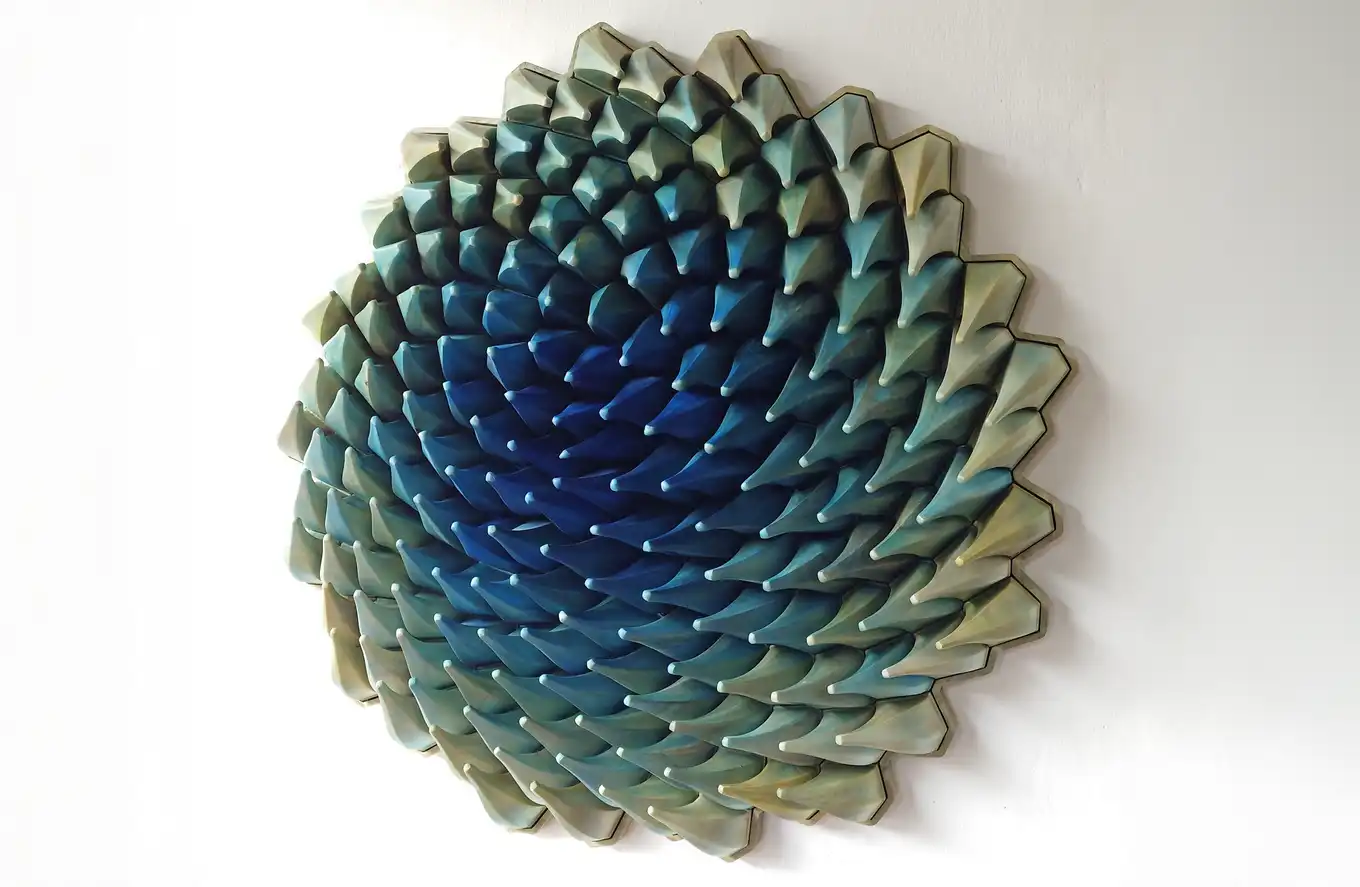

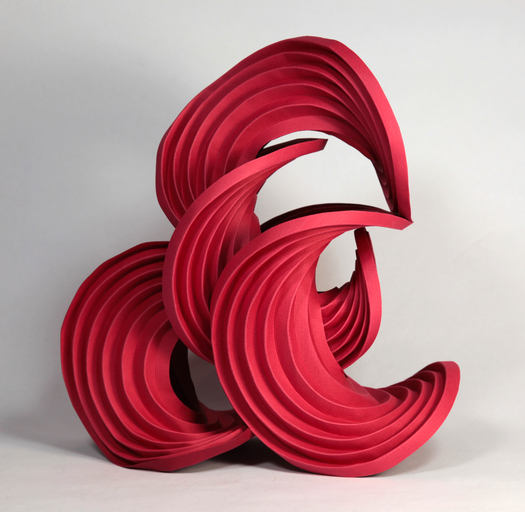
Ocean's Call - Herschel Shapiro
Matt Shlian
I have always admired the work of Matt Shlian, especially his paper installations, as well as the Ocean's Call sculpture by Herschel Shapiro.
So I decided this was the perfect opportunity to try out some Shlian-esque patterns and textures.
Parametric Models
I started by trying to follow the same route in Grasshopper that I would in p5.js, but realised that while the core principle was the same - noise based rotation of a vector - the route to get there would be slightly different.
- Generate a 2D grid of points, within a boundary rectangle
- Generate 2 sets of Perlin noise values using the Graphmapper tool, one each for the x and y axes
- Multiply the two sets to get xy number of values, and remap* them from the 0-1 randomness domain to the 0-360 degrees in an angular domain
- generate a line at every point from the point to some distance in the +x direction
- rotate the line with the point as the centre of rotation using the angles generated


At this point you can visualise the entire noisefield and one can play with the parameters to get a field setup that is pleasing.
I adjusted the angle range to be 0-90 to get more gradual variation, as well as playing with the Graphmapper and other variables.


Proceeding further,
- create a smaller rectangle at the same location to use for lofting
- rotate it using the same angle mapping as used for the lines
- move it by a distance in the Z direction
- organize the tree to transpose the data, so the 1 series of n base squares and the 1 series of n upper rectangles become n groups/series of 1 base square and 1 rectangle
- loft between each pair to get the final outcome


Other Variants
Apart from the above, I tried various additional plays on the pyramids generated, including cutting into them, using their edges or faces, etc, as well as using the same base grid for attractor-based variations and voronoi cell structures.

Complete Grasshopper File with other explorations
Some of these results are interesting, but more a good base for jumping off to other, more complex arrangements, than an end goal in itself.
Others resulted in structures or features that were too tiny/fragile/difficult to support that 3d printing them at that scale would not have been feasible.
Cones based on Point Attractor


Using the same base grid; to give a varying but structured difference in height, as well as make a distance field visual, point or line attractors can be used. The logic is as follows :
- Pick a random point on the base rectangle
- Compute distances of each of the grid points to this point
- generate cones at each base point
- define the height of the cone based on the distance computed, with remappings or scaling if needed
Voronoi Cell based cones


Voronoi cells are also defined as a distance function. However, they are very interesting since they mimic nature in their visual as well as functional principle.
Each Voronoi cell is a set of points on a surface, plane or volume which are closest to a particular sample point. In this, it very often mimics a cell well and nucleus, or any other point and it's range of influence.
Grasshopper has a built-in Voronoi function to use. However, plugging in a regular and evenly spaced grid of points results in cells that are shaped exactly as the cells of the base grid and not very interesting.
To break this grid irregularly while still maintaining an evenly spaced structure in the resuls, each point is moved a random distance within a specified range to shake things up.
- generate the grid of points
- generate a random number for x-offset
- generate a random number for y-offset
- the domains for these random numbers can be constructed using a slider that goes from 0 to max offset d, and a domain constructed from -d to +d for a d chosen on the slider
- a set of vectors or lines is created using the random x- and y-offsets
- each point is moved using the corresponding vector to give the randomly moved set of points that is still inherently a grid
- voronoi cells are generated for this point field
To create the curved cells which are softer looking,
- extract each cell's edge vertices
- use these as control points to create a spline, with Periodic = True to close the spline
- The resulting closed wobbly ellipse-ish shape is a softer voronoi field
To create the texture,
- the randomised grid points (or the original ones) are also moved upwards along Z by a distance
- using Extrude to Point, the voronoi cell based cones are generated
Playing by isolating individual edges and faces
Once the basic Lofted Pyramids were done, I used Brep analysis and list tools to isolate individual edges, faces and points. One of these explorations was to use Pipe to create a structure that followed one or more edges of the pyramid.


Carving out volumes from the pyramids
Another exploration was to create a series of triangular prisms and extrude them beyond the array of pyramids, in both x- and y- directions, and then subtracting them from the pyramids to leave hollow canopy-like structures.
Creating subset volumes
- Individual faces were isolated earlier
- Each face was offset by a distance towards the inside of the pyramid
- A volume was generated by lofting the original and offset faces
- A selection of these lofts were joined to create sub-volumes of the original pyramid with some structure coming through


Scripting in Python in Grasshopper
At one point, I needed to transpose the data at one order of branches, while mantaining the sequence of those branches from a higher order level. After much messing around with list tools, data tree tools, and other options, I consulted ChatGPT. It informed me that this kind of partial reordering would be very difficult and the inbuilt tools would not suffice. I also tried cross-referencing the entire tree; the results would give me the combinations I needed but being a many-to-many multiplication, they would
- give me a lot of redundant combinations, which I could filter out easily enough
- involve a lot of compute time since it would increase by an order of n-squared for n items, and this finally stopped me since things started hanging
Finally, I decided to take up GPT on it's suggestion of using Python and scripting a solution, since this kind of subset combination is very trivial if done with code.
The results seemed to work as far as the computation was concerned, since print messages showed sensible data, but it did not give 3d outputs back to Grasshopper, and I stopped debugging that at some point for a lack of time.

3D Printing
The printing was done using the Sandwich method, with pausing for fabric at about 1 mm height. For the last 2 layers, filament colour was changed to black, to give better contrast against the larger volume.


Printed Object
The final swatch was a good print. It was not displaying any properties that were completely unexpected, since I had played with this idea in my head for a very long time. However, the motion of the swatch when handled is decidedly fun to play with, since it is a mix of rigid cells and flexible margins, and the cells are small and numerous enough to turn it into a material property rather than individual linkages.
Motion also reorients the pyramid apexes, so the distortion then extends to the third dimension as well.
I would love to have further explorations of this concept that include motion, as well as turning the swatches into usable wearable costume bits.
Circular Structures
I wanted to also try the equivalent of Curve-folding using 3D printing in fabric.

Parametric Models
I initially tried to generate the rings based on my sketches in Grasshopper directly, but realised I needed to visualise the joints and movement better.


So I modelled a single ring structure in Fusion. I also applied rotational joints with angle limits to see if I could simulate the movement.
3D Printing
The ring was 5 mm thick, so the sandwich method was used to insert the fabric at 2.5 mm.


Printed Object
The Ring exhibits an extremely large degree of freedom, even if it is so constrained. This is because of the large angular variation I've allowed, as well as the fabric margin between subsequent segments being large enough to wobble.
The next iteration will probably increase the number of cut-plane surfaces while reducing the overall angular range, and tighter fabric tolerances.
Another "problem" I've realised, adjacent to the tighter fabric margins issue, is that the fabric needs to be present in the "bending plane" which varies based on the cutting plane angles, ranging from the top surface to the bottom as the cutting planes range from -45 to 45 degrees. One possible solution is non-planar printing, that I will have to explore later, for now.
Other Concepts
Using Blender and Geometry Nodes
Durig Rico's Blender tutorial for Geometry Nodes, I realised how far Gometry nodes had come since I last tried them out a year or more ago (or I simply never understood the interface well enough to explore them properly)
It's not Grasshopper, but Grasshopper isn't GeoNodes either. I think there are things that Blender+GN can do easier and faster than Rhino+GH, and vice-versa.
I will keep exploring GN after this kick-start.
During and after the session, I tried these basic plays with GN.

Instancing a cube across a mesh
Instancing a powerful tool to replicate any entity at every point of a mesh.

Using Noise to manipulate mesh points
Noise is something I use extensively in p5.js, and almost not at all in Grasshopper. The use of Noise in GN was surprisingly easy.


Instancing Suzanne the Monkey across a plane, using Randomness to rotate them across all directions.
This is an easy one, Randomness is a quick input in p5.js as well as Grasshopper, just as it is here. However, the advantage in GN is that the rotate option is just a quick field entry, rather than the multi-node construction that Grashoppr would need.

Instancing a scaled down monkey on every mesh point of a monkey head
This was just waiting to be done the moment Rico introduced Instancing at Mesh points.
3D Printing
I have used the sandwich method for all the prints. It involves putting down a few layers of the print, then laying down a mesh fabric, and then continuing the print upwards.
Print Setup
-
Import the stl into PrusaSlicer
Settings :
- Material : PLA, 1.75 mm
- Support : None
- Temperature : 210 C nozzle, 60 C bed
-
Add a pause at the required height
- Export the gcode to the printer
Attaching the fabric
-
Cut the fabric to size, either for the full bed or for about 20% excess beyond the model size. Keep this ready beforehand.
For attachment
- Magnets
- Binder clips
- Tape
-
When the print pauses, place the fabric over the print
- Use the magnets or tape to attach the fabric towards the back of the base
- Stretch the fabric gently towards the front and attach
- Then attach the left edge of the fabric to the bed
- Stretch gently to towards the right edge and attach
This ensures that the is a gentle tension across the fabric and no wrinkles or raised bits happen that could catch on the nozzle.
If you are using magnets, you can readjust and reposition the magnets, or add more closer to the print to hold the fabric better.
Post-printing
Use the scraper to gently pry off the print from the base, because there is a chance the fabric will tear since it has many corners.
Trim the fabric around the print to get rid of excess loose fabric.
Use larger pieces for other smaller prints, and small pieces can be used as filler for scaffolding tasks.
Tips and Tricks
- Binder clips for print bed are surefire but you risk scratching the bed or having the clips hit the frame as the bed moves.
- Magnets work better, and are easier if enclosed in tape with a little tab to pull them easily
-
Check your 3d printer accessory addons that you may have added later, they may interfere with these attachments as well.

I had this add-on accessory tray that got in the way during the first print - when using binder clips for the fabric, before switching to magnets - and it couldn't be removed midprint since it would jiggle the SD Card and potentially interrupt the print -
Tighten the fabrics as far as possible
Reflections and Learnings
Each model and exploration has a set of notes with it.
On the whole, however, I'd like to state that while I had attempted 3D printing on Fabric once earlier, I was too scared of messing up the print and printer by some error or the nozzle catching on the fabric and creating issues.
In the course of this week, I have become extremely comfortable with printing on fabric.
This kind of fabrication - with mixed materials at it's core - also allows a lot of play with different properties. The proportion, geometry and other details of the printed and unprinted sections allow us to mix and manipulate rigidity and flexibility, giving rise to various properties in terms of structure, form, linkages and motion, etc.
Update :
I used this technique quite a bit during the textile scaffolding week. Updates to follow.
Files
Find the following files here as well as below :
Origami Structures
Noise Directed Patterns
Circular Structures
Credits and Acknowledgements
All images are mine unless mentioned under the image.