6. BioFabricating Materials

Bio materials ?
Fabricating Bio Materials is another new world for me. So far, I was completely ignorant on that subject, and I discovered how researchers, scientists and artists have already made huge progress and discoveries in this field.
During the presentation of the week, Adele Orcajada presented one of her professionnal journey through Material Driven, a project based in London that she co created, a kind of enormous library dedicated to the MATERIAL. Her presentation was really interesting, and I learnt a lot about the definition of a material, about the way we consider them throughout the evolution of our societies, and pointing on the how Designers are working nowadays. Some words have been strongly enlighted this week, and I'll have to include them in my global reflexion.

Inspiring Artists
Here are some of the Artistic developements that astounded me ...
Cooperation with Nature
As for me, Nature is the major source of inspiration, in terms of colour, design, and it's ability to find solutions to any kind of issue, by exploiting correctly its capacity and ressources.
Carole Collet
She works on the correlation between the design and science, and in particularly on the influence of the designer on the scientist and also the influence of the scientist on the designer.
"Adopting a living systems approach to design as an inquiry into regenerative futures"**

In this video, she speaks about workshops that have been lead around this topics.
Carole Collet. Bio-design, une nouvelle perspective pour le Design écologique ? 2/3 from TRANSPORTS on Vimeo.
Diane Sherer
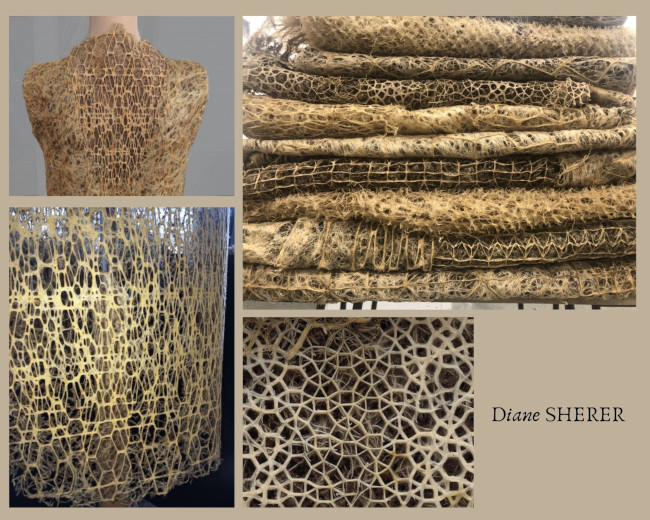

Here is a video (in frenche) about her work :
Miriam Ribul's work is also very intersting. She share's her experience through bio materials in her book recipe Recipes for Material Activism

Kombucha
Suzanne LEE

One of the pioneers of biofabrication, Suzanne Lee is the founder of Biofabricate, a platform for biomaterial innovators and consumer brands growing a sustainable future' and author of the 2005 book Fashioning The Future: Tomorrow’s Wardrobe. Her groundbreaking Biocouture project was a fashion collection created from kombucha bacteria.
Here is a video about Understanding Biomaterial innovation ©Biofabricate
And of course, I'm so happy and honoured to present the work of Surzhana RADNAEVA, who is taking part in our Lyon's Fabricademist crew !!! We're so lucky to have her with us!! she shares her knowledge and experience about bio materials, brought us some of the garments she made and lead the experiment of growing kombucha in Oullins !!
Here are some photos of her work:

@surzhana.radnaeva, Traditional Futures
After few weeks depending on your environment the Kombucha will start growing. In our case after 2 weeks it grew up to 1 cm, so we can wait 1 more week. What is the next procedure when we achieve the desired thickness? (Keep in mind that 1 cm of Kombucha will turn into almost 1mm after drying.)
When Kombucha reached about 1,5 cm (or less or more, depending on your needs) we can take it out with clean medical gloves. We wash it in soapy water to wash away the sticky sugary part and then we rince it in clear water. Now its the creative part - we can dry it on a flat surface or textured or even a specific form as Kombucha will take the form of the surface on which it is drying on. Of course the best if we could turn it every day or few days that it dries equally or to have a breathbale surface, but you can test it around.
And the liquid where the Kombucha was growing can be reused now to make more Kombucha, but we need to add sugar and tea accordingly. Always make sure that you keep all clean disinfecting to not contaminate Kombucha growth.
The Kombucha leather will be ready in about 1 week depending again on your environment.
Algae
Food Wastes
A bag made from Banana peel
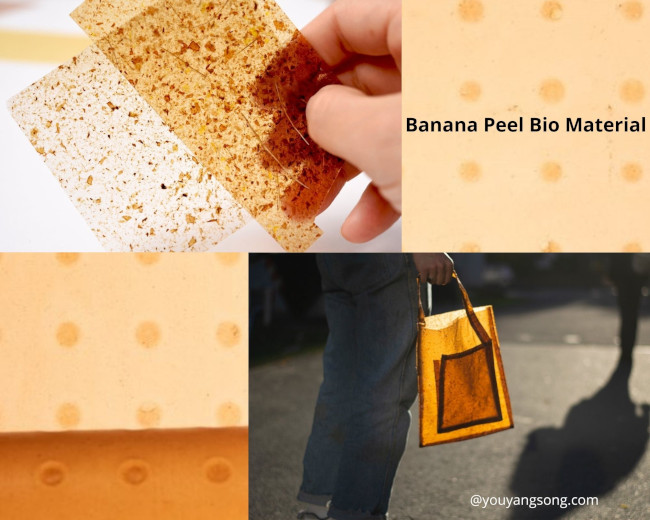
https://youyangsong.com/handbag
To know more about the process of the Bag Sonnet 155
Useful links about designers
Experiments
AGAR
BIO-PLASTIC
The first recipe we tried was a recipe from the Cook Book made by Pauline & Diane from the Textile Lab Lyon. We melted Red Cabbage Bath that we kept from the Bio Chromes'week to water, which gave a really nice violet colour !
Here are the ingredients below :
| Flexible Bio-Foil | |
|---|---|
| Ingredients | Quantities |
| Agar | 5g |
| Glycerine | 15g |
| Water mixed with Red Cabbage Bath | 250mL |
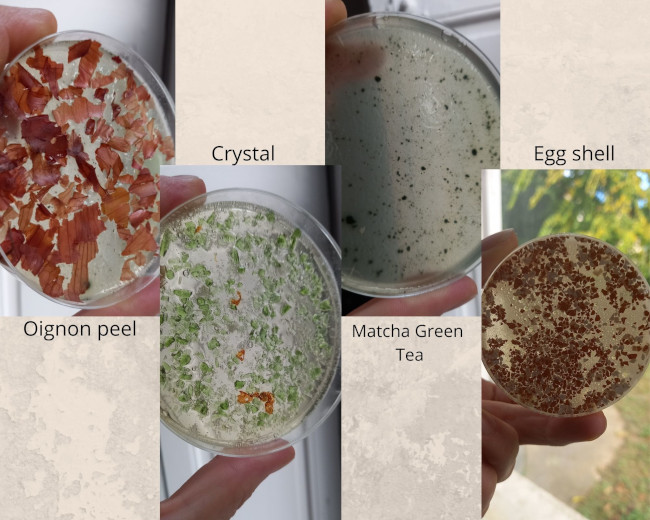
We used different fillers like hibiscus, green tea, coffee grounds :
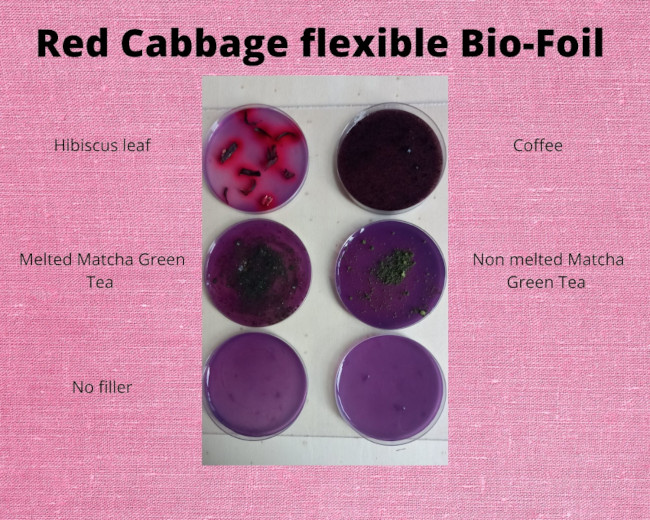
Different molds as well :

Then we tried another recipe, "Bio-Plastic 2" which Cecilia showed us during the class. I guess this recipe has been our favorite since we made plenty of samples with it.
| Bio-Plastic 2 | |
|---|---|
| Ingredients | Quantities |
| Agar | 4g |
| Glycerine | 17mL |
| Water | 200mL |

CONDUCTIVE BIOPLASTICS
| Conductive Bioplastic* | |
|---|---|
| Ingredients | Quantities |
| Agar | 2gr |
| Glycerol | 1mL |
| Salt | 5gr |
| Water | 240mL |
| *Recipe from Conductive Agar Ag03 by Elisabeth Lorenzi, Materiom |
| Conductive Bioplastic 2 | |
|---|---|
| Ingredients | Quantities |
| Agar | 4gr |
| Glycerin | 12gr |
| Salt | 10gr |
| Water | 800mL* |
| *misread the cardboard and put 800mL instead of 200mL but it is drying well so far |
Gelatine
Experimenting Gelatine wasn't the more pleasant smelly experience I've done so far !
It's quite hard to bear with it, alginate is amazing, since you can do really different textures :
Resin, which gives you a tough, smooth and clear material, and Foam, which is opaque and foamy.
Here are the recipes and results for each :
GELATINE RECIPES
| Bio-Resin | |
|---|---|
| Ingredients | Quantities |
| Gelatine | 48g |
| Glycerin | 8g |
| Water | 240mL |
| Bio-Foam | |
|---|---|
| Ingredients | Quantities |
| Gelatine | 48g |
| Glycerin | 12g |
| Water | 240mL |
| Soap | 10mL |


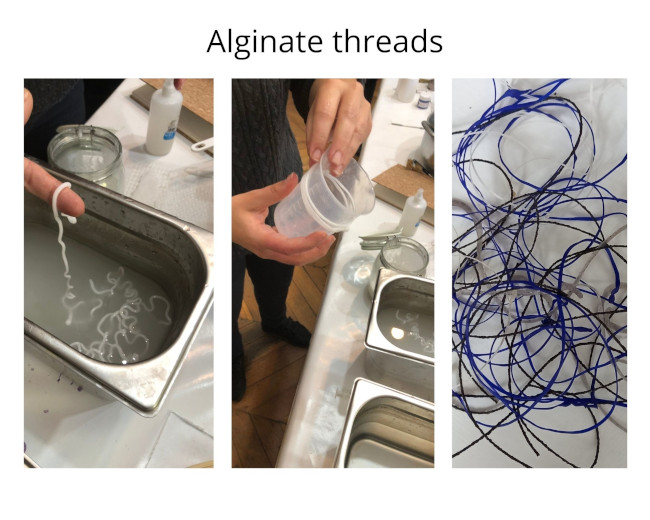
Alginate
ALGINATE RECIPES
| Flexible thin BIO-FOIL | |
|---|---|
| Ingredients | Quantities |
| Alginate | 12gr |
| Glycerol | 20gr |
| Sunflower oil | 10gr |
| Water | 200ml |
| Spread solution for curing | |
|---|---|
| Ingredients | Quantities |
| Sodium chloride hydrate/ Calcium Chlorure | 10ml |
| Water | 100mL |
With Alginate, it is possible to make :
- thin or thick slides, that you can pour on a flat or textured surface, and add the filler of your choice. Some uf us added crystal powder, others wool or pigment.
Don't forget to spread the Calcium Chlorure solution regularly during a few minutes, so that your alginate will dry.
The result is really amazing. Feeling the texture was a real sensitive experience for me !!!

- But also threads: use a syringe to extrude alginate, and put it into theCalcium Chlorure solution for a while. Then take it out, rinse with clear water and put them around a round shape recipient to let it dry.
Kuzu
The recipe we followed was taken on « materiom », from a tapioca starch recipe.
You can find it here : https://materiom.org/recipe/592
What is KUZU ??

Kuzu (Pueraria montana var. lobata) is the Japanese name for the kudzu plant and the starch derived from the kudzu root. Kuzu is native to both China and Japan and is a member of the pea family. Though the vine itself is quite invasive and survives by covering other plants and thus robbing them of a light source, the starch contained in its large roots is valued throughout parts of Asia for its culinary and medicinal properties. Kuzu is unsurpassed as a thickening agent and can produce sparkling sauces, gloss soups, and provide a smooth texture to a wide variety of foods. Kuzu can even be dusted on vegetables or fish prior to frying to provide a light and crisp coating. What's more, kuzu is most often utilized for its ability to help balance the acidity of sweets, and is commonly an ingredient in desserts such as puddings, pies, icing, and atop a variety of cakes. Kuzu’s superior jelling strength, taste, texture and healing attributes make it a great alternative to other natural starches such as arrowroot, and is healthier than processed corn and potato starches.
Experimenting the recipe :
- Since the quantity of water for one recipe seemed really tiny, we doubled the quantity.
- Made the the 28th of October (The recipe advise to wait 7 days before taking it off the surface.)
Ingredients :
Kuzu :60 mg Water : 120 ml Glycerin : 10ml Vinegar : 10 ml
• Take a cooking pot (preferably steel container). Add kuzu and coldwater and stir thoroughly until no lumps are present and kuzu is completely dissolved.
• Add glycerine and vinegar to the kuzu solution and mix well.
• Now, cook the solution under a low flame for five minutes, don't forget to keep stirring (the whisk was a good toll for this step) the solution until it becomes a thick white paste.
• Transfer the compound from the cooking pot and spread it over a butter/ oil coated flat surface.
…Coming soon for the 2 last steps ! • Keep it for air-drying for at least 7 days.
• Once it's completely dried, carefully peel it off from the surface and dip it in water for few minutes and dry it.
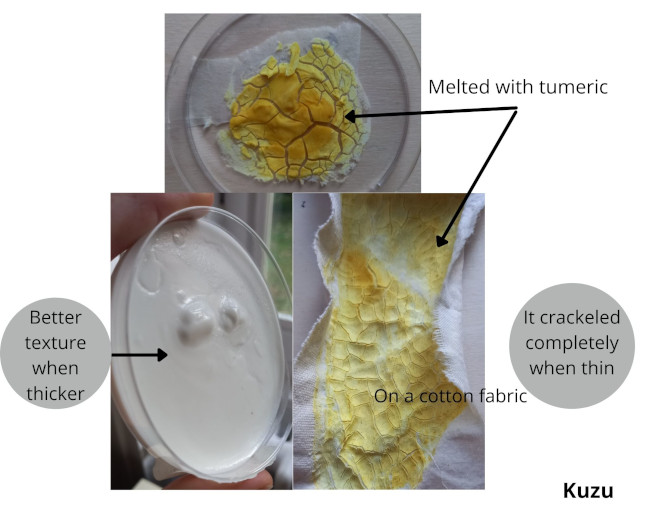
This recipe is as fast as easy to execute. Just be careful to stir enough to avoid lumps ! No awful smells to deal with When the texture is ready to be spread, you’ve got to do it quite quickly before it becomes to solid to be spread !
Pauline's mycellium
Pauline found a box in her kitchen, containing apparently quinoa seeds, which she forgot for several months. And as a good Fabrecademist, she saw this enormous mycellium as a playground, and had the idea to make an experience of this nature's present !!!
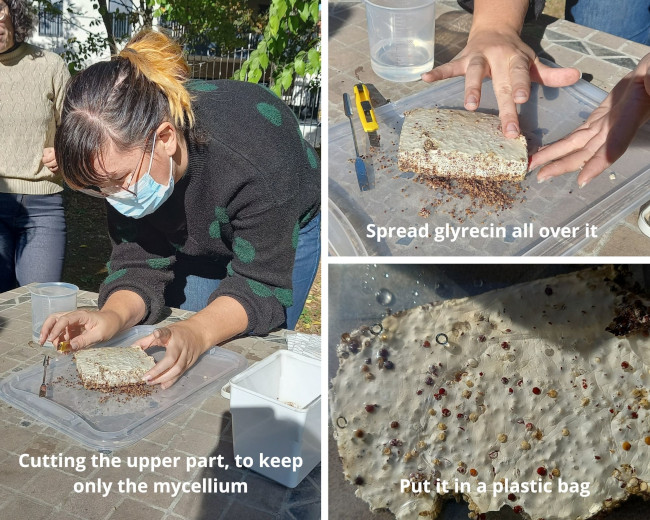
For the moment, the mycellium is quietly waiting in a glytherin bath, waiting to be cooked !
Next steps coming soon !!
Video
Suzanne Lee, presenting Kombucha :