Developing Phase
▪ General Components
| Processing element | Actuators-Outputs | Sensors-Inputs |
|---|---|---|
| Body heat | Petals movement / Illumination | Body heat |
⚠️ I didn't focused on the movement for the petals, that needs more time for the design and development so I left that for future projects. I just tried to get a complete garment using the petals but at the end this was not part of the project.
▪ Prototyping
▪ First Prototype

Useful Links:
▪ Kobakant
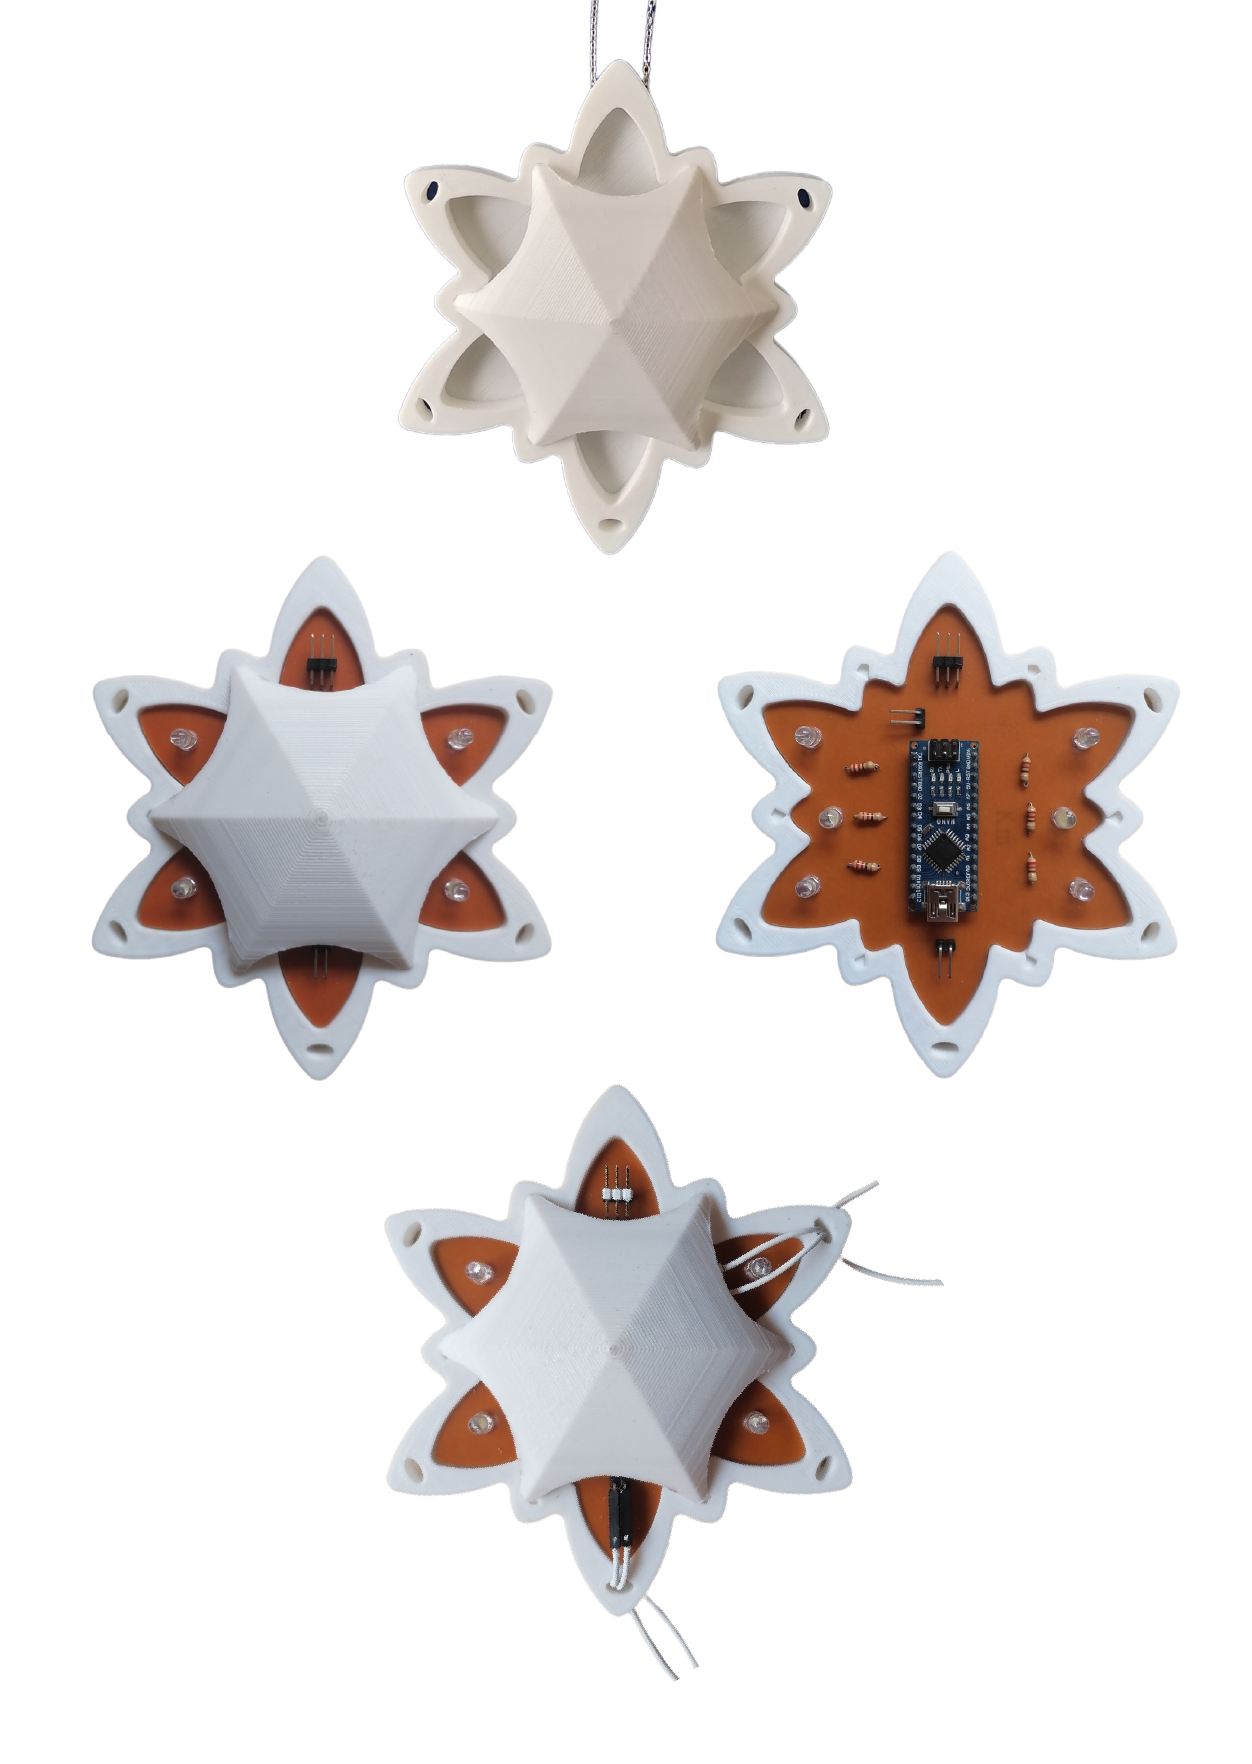
Then I change the principal structure and took the shape of the flower from this instructable because Annouk inspired me with her works since a long time ago, then in Rhino I placed each component from my schematic in that shape. Then I imported the .dxf file in Fusion 350 and made the 3d case. Before printing I wanted to be sure that everything was well dimensioned, so I make a first prototype with cardboard using the laser cutter.

As everything seemed to be okay I started 3d printing both pieces. I used the Ultimaker printer for both pieces because the other printer wasn't working well in that moment.

The parameteres I used:
Part 01
| Filament | Layer height | Infill | Temperature | Printing speed | Adhesion | Printing time | Filament amount |
|---|---|---|---|---|---|---|---|
| PLA | 0.26mm | 20%/grid | 200º | 60mm/s | Skirt | - mins | - m |
Part 02
| Filament | Layer height | Infill | Temperature | Printing speed | Adhesion | Printing time | Filament amount |
|---|---|---|---|---|---|---|---|
| PLA | 0.26mm | 20%/grid | 200º | 60mm/s | Skirt | - mins | - m |

⚠️ Be careful with the lights ⚠️
Anastasia told me that when using lights close to the head/face maybe they need to have on the top a small piece so that the light does not light upwards to the wearer eyes. I didn't think about this before so this is something I'll need to test.
For that I placed the LEDs and they didn't fit perfectly in the hole. I wanted to keep them inside the hole. I used the welding tool to make the hole a little bigger and let the LED go in. Yes, it worked great!

After it I just placed the other components and used copper wire to join the circuit so that it works properly


To check the conections I used the simple code of blinking and connected it to the arduino board. Finally, all the ligths turn on successfully ✨
const int ledPin_1 =  6;// the number of the LED pin
const int ledPin_2 =  7;
const int ledPin_3 =  8;
const int ledPin_4 =  9;
const int ledPin_5 =  10;
const int ledPin_6 =  11;

// the setup function runs once when you press reset or power the board
void setup() {
  // initialize digital pin LED_BUILTIN as an output.
  pinMode(ledPin_1, OUTPUT);
  pinMode(ledPin_2, OUTPUT);
  pinMode(ledPin_3, OUTPUT);
  pinMode(ledPin_4, OUTPUT);
  pinMode(ledPin_5, OUTPUT);
  pinMode(ledPin_6, OUTPUT);
}

// the loop function runs over and over again forever
void loop() {
  digitalWrite(ledPin_1, HIGH);   // turn the LED on (HIGH is the voltage level)
  delay(1000);                       // wait for a second
  digitalWrite(ledPin_1, LOW);    // turn the LED off by making the voltage LOW
  delay(1000);
  digitalWrite(ledPin_2 , HIGH);   // turn the LED on (HIGH is the voltage level)
  delay(1000);                       // wait for a second
  digitalWrite(ledPin_2, LOW);    // turn the LED off by making the voltage LOW
  delay(1000);
  digitalWrite(ledPin_3, HIGH);   // turn the LED on (HIGH is the voltage level)
  delay(1000);                       // wait for a second
  digitalWrite(ledPin_3, LOW);    // turn the LED off by making the voltage LOW
  delay(1000);
  digitalWrite(ledPin_4, HIGH);   // turn the LED on (HIGH is the voltage level)
  delay(1000);                       // wait for a second
  digitalWrite(ledPin_4, LOW);    // turn the LED off by making the voltage LOW
  delay(1000);
  digitalWrite(ledPin_5, HIGH);   // turn the LED on (HIGH is the voltage level)
  delay(1000);                       // wait for a second
  digitalWrite(ledPin_5, LOW);    // turn the LED off by making the voltage LOW
  delay(1000);
  digitalWrite(ledPin_6, HIGH);   // turn the LED on (HIGH is the voltage level)
  delay(1000);                       // wait for a second
  digitalWrite(ledPin_6, LOW);    // turn the LED off by making the voltage LOW
  delay(1000);
}
Now, it was time to check the autonomy of this circuit, I didn't got a LiPo battery so this time I used the power bank from the lab. I set the 3.7 volts and using a loading module I connected it to the arduino. I really didn't know that the code was going to "stay stored" in the arduino, so I was surprised when I connected the battery and it started to work.
Now the challenge is to make it work with the sensor, for that I guess I designed the second piece wrong because I didn't consider the space that was going to take up all those wires that I soldered.
▪ More tests with the sensor
For this test I'm using the code without the toggle button
Testing different lengths
The alligator clips, the copper wire and any material has some instrinsic resistance so they generate a voltage drop, that means that if I connect the sensor with a longer wire, the resistance will increase and the values may change. This won't happen in ideal conditions, that's why I need to make this test, but if I don't see a significant change in the temperature values I won't need to find a thread with low resistance.
I tested with one alligator in each leg and also with two alligators in each leg and the result is the same. Both starts reading the ambient temperature that was about 23.91 degrees and when pressing with my fingers both reached approximately 36 degrees. Then I soldered a copper wire with half of the length of the alligator and the result doesn't change dramatically so I think that's nothing to worry about.
After Midterm
▪ Second Prototype
Designing interaction 👀
How you interact with an object / device and how it responds to you is a big part of how you perceive the object. I consider that at this point I need to analyze the idea of the petals, use them and interact with them to understand how I feel with it.
▪ Challenge 1: Think about the interaction
Getting the shape of the petals
Useful links:
▪ Fusion 360 - Trying a flower

I made this really quick petals with the shape that I liked and and cut it in a colourful papel to check the size of it. I pasted the petals in a piece of fabric and put it around my neck. Here's the video with me using the neck piece and the sensor which is attached to my neck with adhesive tape.
Other designs of petals that I made but didn't used at the end ⬇️
grasshopper file - parametric petals
▪ Challenge 2: What would I make different?
After using the petals and turning on the ligths, I was still focusing more on the ligths. In my mind I just wanted to have a more robust accesory that works really good with the sensor. The petals were a more fancy thing that didn't convince me at all. But I wanted to give it another try and make something different to complete my garment. I decided to change the materials and try something like a second skin with some crystals on it.
I made a biosilicone recipe and put it in a frame that had the shape to cover my shoulder. After pouring the mixture in the frame I inmediately added the crystals that I got from borax. This was an experimentation with this materials but it didn't get so well. The crystals didn't stick well to the silicone and started to melt a little, so the silicone didn't dry properly. The crystals were not dried enough and the biomaterial reacted to them.

▪ Challenge 3: With these interaction, should I add this petals?
I was planning to make again the materials and try to improve it but then I was asking myself if that was realy something I was wanting to wear. I had the idea to make this garment with the petals and so on because I liked the concept of bloming, I think it matches with the glow up I wwas trying to get. But finally I realized that it was just something extra that wasn´t necessary to achieve my goal of the project
▪ Third Prototype


Some issues


Useful Grasshopper tutorials:
▪ How to Make a Parametric Roman Dome
Useful links: