7. Computational Couture#
This week we learned about parametric design using Grasshopper 3D for Rhino, and designed patterns that we 3D printed onto fabric.
What I Made#
I 3D printed a voronoi pattern onto stretched lycra using flexible filament, which created a 3D shape when released.


I also created several more models in Grasshopper that I didn’t have time to print (but hopefully will in the future!)

Voronoi Pattern#
A what now?#
Voronoi diagrams, also called Voronoi Partitions, or Dirichlet Tessellations, are “a partitioning of a plane into regions based on distance to points in a specific subset of the plane”. But if you don’t have a maths background (or maybe even if you do), that’s probably not a helpful explanation.
So, imagine there are five farmers, and there’s a large plot of land they all want to farm on. They decide that to divide it up, they’ll all run into the field, and each will stick a flag into the ground to mark their territory. Then, the parts of the land that are closest to each farmer’s flag, will belong to that farmer. Like this:

This is a Voronoi diagram. You start with a bunch of points, and you divide up the space around that point so that each point is contained in a little area of the space that’s closer to that point than any other point. The shape of the diagram varies greatly depending on the set of points you use, and Grasshopper has a component that lets you generate a Voronoi diagram - cool!
Why did I use a farming analogy? I don’t know either - it’s just the first thing that popped into my head ¯_(ツ)_/¯ It may be because I recently listened to the 99% Invisible episode The Worst Way to Start A City, which is about how the city of Oklahoma literally started with a massive land grab. It’s an interesting story!
Grasshopper code#
My Voronoi diagrams were made by adapting a tutorial in the Mode Lab Grasshopper Primer. The Grasshopper definition generates a series of points in a spiral, and draws a Voronoi diagram using those points. With a lot of help from Cecilia, we added bits to the definition to offset and extrude the diagram, to give the shape some thickness so that it could be printed:

Two number sliders allow you to change the tightness of the spiral, and the total number of points, which allows you to generate lots of different Voronoi diagrams:
Setting the ‘factor’ (tighness of spiral) to 0.635, and the ‘count’ (number of points) to 178 gave me a pattern that I thought would be interesting to 3D print on fabric:

Adjustments in Rhino for 3D printing#
However, once I ‘baked’ the pattern into Rhino form Grasshopper, exported the file to .stl and imported it into Cura for printing, we found out that it still wasn’t quite right for printing. Cura was seeing the design as a bunch of walls with no thickness, that needed to be filled in, so it suggested printing it like this:
.png)
So, what did we do to fix this? Cecilia did some magic in Rhino to draw an outline of the shape around it. Then we used the BooleanUnion command to join the different parts of the shape together in clusters:
.png)
Cura#
Now that the shape was solid and able to be 3D printed, I exported it in .stl format from Rhino, and opened it in Cura. The shape turned out to be way bigger than the print bed of the Ultimaker Original we were using, but that was easily fixed. In the left hand menu we scaled down the x and y size of the shape, and set the z size to 3mm (a good height for printing on textiles).
The speed was set to 80ms, and the other settings as in the image below:

With all the settings entered, we clicked on ‘prepare’ to prepare the file to send to the printer, and then…sent it to the printer via usb (you can also put the file on an sd card and load it directly into the printer)
3D printing on textiles#
Preparing the print bed#
The goal for this project was to print on stretched lycra, as the printed patterns can create interesting 3D shapes in fabric if the fabric is tensioned while printing ☉o☉
Here’s how to do this using an Ultimaker Original. If using a different printer, you’ll likely need to adjust a few steps!
- Remove the print bed from the printer
- Place the print bed on top of the fabric and trace around it with tailor’s chalk
- Cut out the fabric along the traced lines
- Stretch the fabric and secure it onto the build plate using bulldog clips
- Put the print bed back in place, and make sure the bulldog clips are placed in such a way that they’re not going to get in the way of the printer nozzle, or any other moving parts

Printing#
For the Ultimaker Original, we:
- Loaded the filament, by feeding it through the tubes that connect to the print head as far as it would go
- Switched the printer on and preheated to 220C, which was the recommended temperature for the flexible filament we were using - Filaflex.
- Learned that the printer was having trouble with one of its end stops (switches at the sides of the printer that let it know when the print head has one of the sides and shouldn’t go any further), which led to some issues and a lot of loud noises as the printer rammed the print head into the the sides of the printer…but it consented to print a few things anyway!
- Cecilia manually adjusted the height of the print bed so that the first layer extruded would just push thorugh (and stick on properly to) the fabric.
We noticed that the fabric in the centre of the print bed was being pushed out of place a bit by the print head (as it was flexible fabric and the print head was putting pressure on it), which made the centre of the pattern a little messy, but not terribly so.
The print quality started off pretty good, but got a bit messy on the higher layers. Once it was finished, I removed the print bed, released the bulldog clips, and removed the fabric to find out what shape it made!

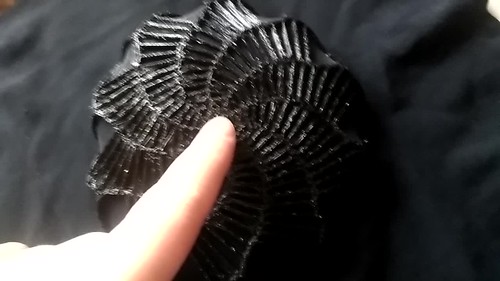
Printing the Voronoi pattern with flexible filament on stretched lycra made a flexible hemispherical (ish) shape. With some adjustments it could be a bra cup (。◕‿◕。)

Bonus Voronoi Diagrams#
After 3D printing my first Voronoi diagram, I went back to Grasshopper and played around with the definition to make some more shapes. I didn’t have time to 3D print these, but hope to be able to do something with them in the future!

The two on the right hand side are almost the same as my original pattern, just with a tighter spiral. The one on the left used the definition below (also linked at the end of this page). All I did was change one of the expression components to compute ‘x’ instead of ‘x*sin(x)’, and got points distributed in a fan shape instead of a spiral!

Miura-Ori Pattern#
For the previous week’s assignment I created a mould for a bioplastic-textile composite in the origami ‘Miura-ori’ pattern, and wanted to try this on textiles as well. the Miura-ori is a super interesting shape that does this:
Designing the pattern in Grasshopper 3D#
For the textile as composite class I made the design for my Miura-ori pattern in Adobe Illustrator, so this week I learned how to do the same thing in Rhino / Grasshopper. I again started from a tutorial in the Mode Lab Grasshopper Primer (specififally the ‘Working with Lists’ tutorial that starts on page 93). This tutorial shows you how to create two squares with different geometry in them, and then make a repeating pattern out of those two squares.

This definition gives you this shape:

From drawing to 3D shapes#
So, what we have now is just a line drawing! For this project I wanted something different - I wanted the faces of the pattern filled in, and gaps left in between. So I added a bit of extra code to the Grasshopper definition to turn the lines into a bunch of 3D parallelograms:

Then I needed to figure out how to move the shapes apart from each other slightly, and after fiddling around with trying to offset things in Grasshopper, I decided to try doing it in Rhino instead. This turned out to be surprisingly easy!
- ‘Bake’ the geometry (just the last extrude component) into Rhino
- Type in ‘Scale’ in the command prompt
- Select the entire pattern, and press Enter
- Click on the ‘Rigid’ option to change it from the default ‘No’ to ‘Yes’. ‘No’ will make the shapes bigger, ‘Yes’ moves them all away from each other by the same distance, which is what we want.
- Enter a number to scale by (I chose 1.2), or scale manually using the cursor.

I then exported the file to .stl, and the result is the 3D model at the start of this section! If I get a chance to 3D print this, I’ll add the details here.
Waterbomb Pattern#
Another origami pattern I’m really interested in is the ‘Waterbomb’ pattern, which forms a 3D tesselation of squares and triangles:

I used the same definition I used for the Miura-ori as the basis for this. The key thing that generates the pattern is this piece of code:

- 0 is the square with the \ line inside it
- 1 is the square with the / line inside it
- The list of numbers we put in the yellow text panel determines the pattern!
The list (1,0) generates the Miura-ori pattern, but to figure out how to generate the Waterbomb tessellation, a bit more work was required. The Waterbomb is composed of three basic elements:

After staring at the Waterbomb pattern for a while, I realised that this is the general formula for the pattern:

And what’s really nice about this is that each line is a permutation of the previous line, with the first two elements moved to the back:

Nice! This means that in the Grasshopper definition, we need to make a list of the form (0,1,1,0,

It’s throwing some errors in the a couple of the components, but it still works:

This is as far as I got with the Waterbomb pattern - I’m hoping to extrude it and then 3D print it at some point!
Useful links#
- Voronoi Diagram Rhino and Grasshopper files. The stl file was too large to upload to gitlab, but you can download it from Sketchfab here
- Moth Wing Voronoi Diagram Files
- Miura-ori files
- Waterbomb files
- Mode Lab Grasshopper Primer