9. Textile as scaffold
📆 2020 - November 17th to 24th
What I did this week
🐄 "Cuir bouilli", or boiled leather, moulded on a shape that I created in 3D.


Here is a video of the process which led to this:
💎 Crystals made from alum powder and cream of tartar

Alum crystals on hemp, and cream of tartar crystals on tulle

A standalone alum crystal, cream of tartar crystals on an LED, copper wire, and hemp
How did I get there?
This week was the one where I had absolutely no idea what I was getting into! But after the lecture, it all made sense and was very interesting!
During the lecture, Anastasia presented different techniques that use textile to obtain various materials. I will present each of them quickly here, with real-world examples, and then go through the experiments I did this week.
Composites
Making a composite is useful to improve the quality of the material, for example so that it can be compressed, or withstand more tension.
One of the oldest composite is adobe, which are bricks made of earth mixed with water and an organic material, for example straw. Different types of composites exist, with different types of fibers and particles.

A slide from the lecture
Here are some examples of composites using textile: cotton bowls from Studio Krupka, and leftover leather composites by Jorge Penadés and Julie Van Den Boorn.


Moulding and casting
There are different techniques and processes to create composites: casting, compression, thermoforming, vaccuum forming...
Gabriella Veszpremi shapes layers of leather and resin to create part of her colourful shoes; UFP Technologies formed the base of a car door out of natural fibers; the studio Aisslinger thermoformed these hemp chairs; and Fab-brick creates bricks out of leftover fabrics, by compressing and glueing them together:


Fabric formwork
Fabric can be used to cast concrete, or architectural components. It is a technique that is clean, inexpensive, and lightweight.
This knitted structure at ETH, with concrete on top of a knitted structure; concrete casted on different materials by Rebecca Fairley, creating various effects; and the crushed wall created by Walter Jack:


Cuir bouilli
Cuir bouilli, or boiled leather, is a technique that was used in the middle ages to make armour parts, small decoration objects or cases. The leather is boiled, then moulded on a shape; it will then become hard and rigid.
Here you can see a collaboration between Anastasia and designer Esther Perbrandt, with moulded leather for her collection, and a project by Wei Li, encased, showing various suitcases with moulded body parts:


Wooden textile
These are made with very light wood, pressed and cut, then stuck onto the fabric to create shapes. Here are two beautiful examples, with Eliza Strozyk's wooden blanket, and the wooden meshes by Diego Vencato:

Crystallization
Crystals are a solid material whose atoms or molecules are arranged in a repeating pattern, in 3D. This "arranged matter" is generally formed by the lowering of the temperature, or the evaporation of a solvent.
Crystallization is quite difficult to control depending on which components are used, but some designers manage to make incredible things with this technique, for example Felipe Fiallo, with these crystal sneakers, or Studio Zorya with this crystalled jewelry.


Experiments
Our assignment this week was to try 2 of these techniques, and to learn how to use the CNC to mill a mold. I wanted to try crystallisation and boiled leather with vacuum aspiration. (Actually I wanted to try all of them, but did not have the time!)
Boiled leather
Designing the mold
At first I wanted to use the 3D model of my head that we had scanned during week 2, and extract the face to mould a mask. I started doing this, but I quickly realised that the quality of the mesh was really low (because we used the free version of the software, the export of the scan was limited in quality), so it would mean mainly moulding my nose... 🤷🏻
So instead I decided to create a 3d surface with Grasshopper, something that looked a bit like the bubbles from Esther Perbrandt's collection.
I started playing with points population and point attractors, and my first rendition was this one :

First bubbles
Creating the block
We had plenty of MDF at the Textile Lab, so I took a piece that I cut in half and glued together to have more depth.

Simulating the design
Our Zmorph multi-function machine has a CNC toolhead, so I learned how to install it and use it. The same software than for 3D printing and laser cutting, Voxelizer, is used for generating the gcode we need for the CNC.
We define the width of our material, the type and size of tool we use, and the path we want the tool to take (parallel, spiral...).

Defining the parameters in Voxelizer
Unfortunately, at the moment we only have one drill bit for the machine, of 1.8mm diameter. This is quite small, especially for a roughing part. So at this point, I realised it was going to take too much time to mill this design (15+ hours), and decided to change it to make it smaller.
Changing the design
Because I created the design with Grasshopper, it was very quick to adapt: I reduced the initial size of the plane surface, to the dimension of a smaler MDF piece we had. I then played with the radius of the attractor point and of the bubbles:
Back to Voxelizer, we can simulate the design, and we see now that it will "only" take 6 hours!
The final Grasshopper definition looks like the screenshot below, and can be downloaded by clicking here.

My Grasshopper definition
Milling
I started milling, and regularly aspirated with a vacuum cleaner to get rid of the residues.
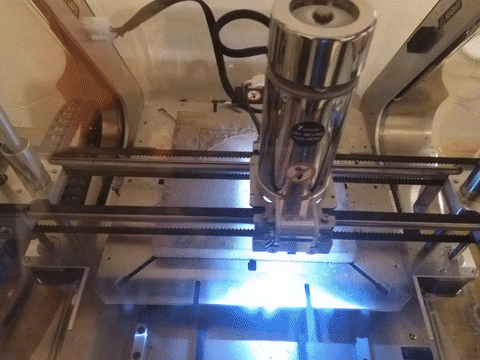

The mold after milling
Cleaning the mold
The final milled product was very textured; MDF might not be the best material for this. I sanded it several times, then drilled holes in it to have a better suction. I varnished it several times, so that it could withstand contact with the soaked leather and not deform.

The mold after sanding, and drilling small holes in it.
I ended up drilling even more holes in it afterwards, because the suction was not enought at first.

The mold after varnishing, and drilling bigger holes.
Moulding
Following Betiana Pavon's steps from 2 years ago, I soaked the leather in cold water for 2 hours, and then put it in hot water (but not boiling!) for 2 minutes. I stretched it a bit after this, and fixed it on a frame.

Preparing the leather for the frame, soaking it and fixing it to the frame
I then used the vacuum box that Pauline built last year, with the help of Pauline and Margaux, the Textile Lab's intern. We massaged the leather onto the mold, and sped up the drying with a heat gun.

Our vacuum box; massaging the leather onto the mold; the leather beginning to dry on the clearer patch
The vacuum box worked really well, it did not take long for the leather to take up the shapes!
Finally, I applied glue on the back of the leather, to see if it would harden it a bit more.

Here is a video of the final leather piece:
Crystallisation
I tried crystallization with two elements: alum and cream of tartar. It was a very fun experience, but also quite difficult to control! It must take a lot of experiments to manage something like Felipe Fiallo or Studio Zorya!
Alum
I did two batches of alum crystals, using the following recipes:
| First batch | Second batch | |
|---|---|---|
| 400ml of distilled water | 600ml of distilled water | |
| 100g of alum | 40g of alum |
And this protocol:
- Put water in the pot to boil
- When water is hot, put alum in the water and stir
- Add until the solution is saturated (= not dissolving anymore)
- Put it in a container, using a coffee filter
- Place the material, without it touching the bottom or sides of the container
- Do not move the container, and wait a few days!
For the first batch, I tried with knotted hemp, and a piece of tulle fabric. The results were not at all like what I had expected, maybe because my solution was too saturated?

The materials I used with alum: hemp, tulle, textured silk and an eggshell
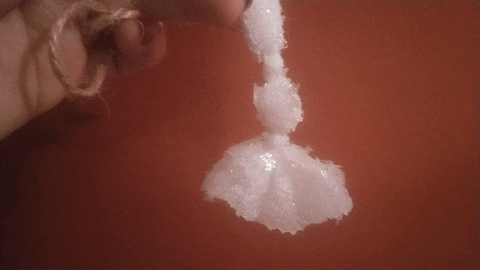
On the hemp, a single, big crystal had formed, well hooked on it. I had a lot of crystals at the bottom of the container, so I took some of them out, microwaved the rest and put the hemp back in it. A few days later, more crystals had formed, smaller ones!

The tulle fabric, on the other hand, did not work out so well. Quite big crystals had formed, but under the fabric, not on it. I took them out, and kept the big one because I liked it. The other ones I put back on the tulle, hoping that small cyrstals would hook onto them. What happened is that a single big crystal formed, this time interlocked with the tulle! Not exactly what I was going for, but interesting anyway!

For the second batch, I experimented with food colouring and conductive ink. I reduced the ratio of alum to water, because all my first solutions were clearly oversaturated, and had lots of crystals at the bottom!


This second batch is not done yet, I will update with more pictures when it is!
Cream of tartar
I was curious to try cream of tartar crystals, because the results seemed quick, and that is a component we have in quantity at the Textile Lab. I followed the recipe from the lecture, which comes from this page.
I tried it with different materials: copper wire (with and without food colouring), an LED, hemp, and tulle fabric with knots. The tulle one had the best result in my opinion:

With the hemp, the food colouring all went into the fibers, not the crystals:


The LED is quite nice I think, however, those crystals are far more fragile than the alum ones: they crumble to the touch. The process was much faster (approximately 1 hour for the crystals to grow), but the end result was a bit disappointing to me!
What's next!
🐄 More leather experiments, maybe with the kombucha I'm trying to grow at the moment. I'd also like to try with deifferent molds, and maybe by compressing the leather between two parts of a mold.
💎 Trying to grow crystals in a more controlled way, for example on a bracelet or for jewellery
🧱 Casting composites with fibers and biomaterials! I did not choose this path for my experiments this week, but I'd really like to try that as well!