04. BioChromes
Week 04 | This week explores natural colour alternatives to current ones in the textile industry. These can range from plant based, insect base and bacteria based dyes, pigments and inks.

• • •
Introduction
Assignment
- Include some inspiration: research on artists or projects that on natural/bacterial dyeing, local ingedients and resources
- Produce at least 1 natural dye with modifiers on fabric
- Produce 1 ink OR 1 pigment
- Document your recipes, the ingredients and process and if there have been changes, document your unexpected discoveries
- Submit some of your swatches to the analog material library of your lab (20cm x 20cm approx)
I have been really looking forward to this week, being able to finally get our hands dirty and kindof doing abit of chemistry. We learnt how to use natural products such as bark, fruits and leaves to create natural dyes, pigments and inks using various processes in the BioLab. It was messy and abit disorganised at first but everyone got into it eventually :).
Inspiration
Previous student's work that inspired me....
-
Elsa Gill - creative documentation
-
Audrey Kalic - Eco Printing techniques!
The Wider World!
★࿐࿔ colour ★࿐࿔
In 2023 I was backpacking through Vietnam and had the chance to learn about their Indigo dyeing culture. In Sapa, the Hmong ethnic group continues to create natural dyes using traditional methods, transforming the indigofera plants into this gorgeous blue. Some tribes value the depth of shade immensly - the deeper the tone, the finer the fabric. The intense blue colour has stained the hands of artisans over time - a symbol of their ancient practice.
Indigofera leaves are harvested twice a year and fermented with additives such as rice, wine, urine or lye. Once fermented the leaves are left out in the open to oxidise. The dried leaves are then ground into a powder or paste to be later used on fabric which is traditionally made from hemp plants. The fabric often has to be dipped twice a day, up to 40 times to achieve the desired blue colour.
The colour, culture, and people are all just as beautiful as eachother.


[1] Photo by Rehahn Photographer on "Indigo Collection"
★࿐࿔ ink ★࿐࿔
I was working in Japan in 2023/24 and explored many untouched areas where tourists didn't go, I came across more indigo dyeing (Aizome 藍染 / Shibori 絞り染) deep in the mountains of Tokushima Island. In amongst waterfalls and lakes I stayed in a homestay where I could follow and see their art and dyeing process. If you are ever in that side of the world please explore here - Hi Color Handworks!
It wasn't just indigo dyeing that I loved though - the use of ink in Japanese calligraphy was so amazing that I sat on the floor of an ancient calligraphy bookshop for hours just looking through every page of text. The inksticks are also stamped in such a beautiful way too. Traditional black inksticks (Sumi 墨) were made by collecting soot from burnt pine branches which is blended with 'animal glue' made from cow skin and kneaded. Fragrance is then added and the sumi is placed into a wooden mold before being transferred to different levels of raw ash to remove the moisture.

[2] Photo by Holly Adams
★࿐࿔ techniques ★࿐࿔
Bacteria Dyeing! New research has found out that we can use bacteria to dye textiles using natural processes. Bacteria are selectively grown where they reproduce and produce pigments. Bacteria produce pigments due to a variety of reasons such as:
- for photosyntesis
- for UV protection
- for defense mechanisms etc.
Fabric that is soaked in the bacteria is placed on an agar plate and incubated so that bacterial colonies grew until they were visible to the naked eye. Unfortunately when we tried a bacterial dye at the FabLab the agar plate had got contaminated and became moldy so we will have to try again! Check out this section on the bioshades website. I'd like to see if I could make a bioluminescent dye!

[3] Photo by Bio Shades on "Textile Dyeing with Bacteria"
• • •
Tools Used
- TinyPNG
- bioshades.bio - textile dyeing with bacteria library
- biochromes.org - colour archive for different biochromes
- mushroomcolouratlas.org - library of the spectrum of colours produced by mushrooms
- Amsterdam Local Colour - for a local colour map of Amsterdam
• • •
Experiencing Colour ★࿐࿔
Key Words
Scouring: Opens up the fabric fibres to allow easier fixation of colour. Sodium Carbonate is usually added to the water with a measure of 2% WoF.
Mordanting: Fixes colour to the fabric and makes the dye bath lighter (Alum based - 12% WoF) or darker (Iron based - 1% WoF).
Tannins: A naturally occuring mordant in plants such as Tara Pods which are found all over barcelona in October!. (Require dissolving in hot water before the plant based fibres are added - then sit for 1-2 hours, **don't rinse**)
PH Modifiers: Can change the brightness, darkness, lightness of the dye- they are typically split into acidic, alklaline, metalic salts. - Acidic (vinegar, lemon/lime juice): shifts reds towards orange/ yellow, purple towards pink and orange towards yellow. - Alkaline (baking soda/powder, wood ash): shifts purples towards blue-greens, yellows/reds to pink. - Metallic Salts (Copper): will brighten the colour, makes colours greener in tone. - Metallic Salts (Iron): dulls the colour, darkens the tone.
WoF: Weight of dried Fabric - In these experiments the WoF was 10g of 15x15cm linen, silk, cotton and viscose 'spring rolls' layered together.
Being in Barcelona I wanted to research what was available and local to us - this includes:
- logwood - deep purple
- madder - scarlet/crimson
- cochineal - bright red
- woad (central europe) - blue
The lecture introduced me to Miriam Rice who was known for creating a library of natural dyes made from mushrooms. She also experimented with turning the mushroom pulp which remained after the dye extraction into paper which I would love to try too as I am obsessed with those natural chunky sketchbooks with all the plant fibres hanging out of them :)
The Fabricademy Digital BioPantone is also very helpful for showing detailed mindmaps of the process, materials, recipes and information on the textiles and fibres!
• • •
Natural Dyes
After some foraging and collecting of various pieces these are materials we used to create the natural dyes and pigments. ♡

All the materials except for the black beans needed to be boiled to extract the colour. The black beans only needed to be soaked.

The weight of all our chosen materials were...
| Material | Weight (g) |
|---|---|
| Rosemary | 12.3 |
| Onion (White) | 9.8 |
| Rose Petals | 12.57 |
| Hibiscus | 7.64 |
| Red Cabbage | 1515.4 |
| Basil | 31.5 |
| Mint | 8.4 |
| Lavender | 1796 |
| Black Beans | 1000 |
| Campeche | 50 |
| Curcurma | 31.7 |
| Coffee Grounds | 307 |
We chose our plant based and animal based fibres as cotton, linen, silk and viscose. Animal based fibres only require to be washed in luke-warm water and soap, then rinsed. The plant based fibres require to be scoured with the sodium carbonate. We decided to cut the material into squares of 15x15cm and place all 4 different fabrics together into a 'spring roll' which we weighed to be 10g.
Therefore we needed:
- Sodium Carbonate - 2% WoF = 0.02g per spring roll
- Iron - 1% WoF = 0.01g
- Alum - 12% WoF = 1.2g
You can then multiply these amounts by the number of spring rolls you are adding to a pot.
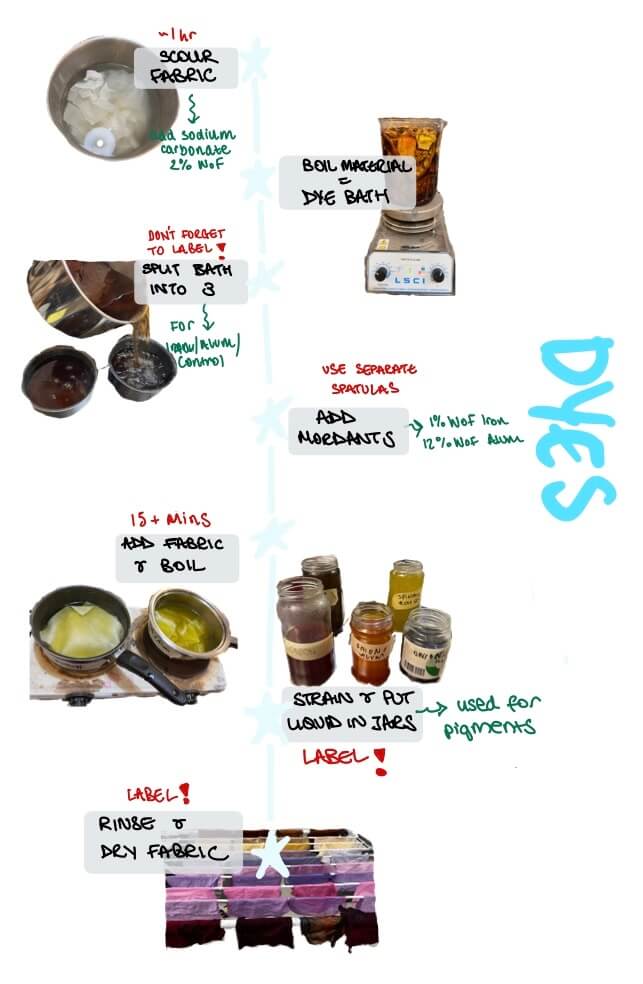
An outline of the dyeing process is below!
* 0.2g Sodium Carbonate
* ~1-2g Alum
* a tiny pinch of Iron
* Pan for scouring
* 'Spring rolls' of fabric ~10g
* 3 x Pans for dye baths
* 3 Jars for strained liquid
* A rack to dry the fabric on
* Spatulas
* Electric cooking stove
• • •
Cabbage Dye Recipe
Recipe on silk, linen, cotton and viscose fibers
- Cut 15x15cm squares of each fabric and layer them on eachother, roll them into a 'spring roll'. Weigh the dried 'spring roll'.
- Boil water and add 2% WoF of Sodium Carbonate. Place the 'spring roll' into the water and boil for around an hour.
- Cut the cabbage into small pieces and boil in water to create the dye bath for at least 15 minutes.
- Remove the dye bath from the heat and strain the cabbage from the liquid (you can now bin the cabbage). Split the dye bath into 3 separate pans.
- Add 1% WoF of Iron to one pan. Add 12% WoF of Alum to another. Keep the last pan as the control variable. Mix each mixture with a different spatula to avoid contamination. Label each pan with the contents of the mixture.
- Place the 3 dye baths back on heat and add a 'spring roll' to each one, making sure to separate the fabrics. Heat for 15 minutes.
- Remove the pans from the heat and allow the dye baths to cool. Strain the mixture, pouring the leftover liquid into a labelled jar to be used for the pigment process.
- Hang the fabrics up to dry and label each one clearly.
We also experimented with adjusting the mordants (Alum, Iron and lemon) and the PH of the dye bath (lemon, vinegar and papaya) - shown below! Under each label the fabrics shown are cotton, viscose, linen, silk from top to bottom.

Results


On the left is silk fabric that has been dyed using Cabbage with a lemon acting as the mordant and PH changer for >24hours. The dye is a bright and light peach pink and evenly spread.
On the right, is silk fabric that has been dyed using Cabbage with 2g of Alum acting as the mordant and no added PH changer for >24hours. The dye is a darker purple tone, but not as evenly spread possibly due to the drying process.
Tie Dye Experiments
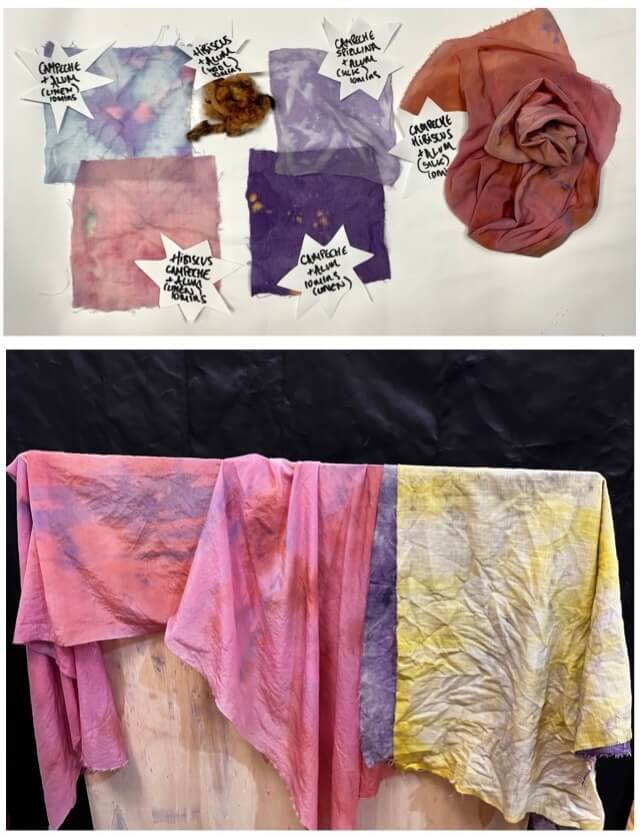
I experimented tie-dying a few larger pieces of silk, linen and wool fabrics using mostly Cabbage, Campeche and Turmeric Dye Baths with Alum mordants.
I particularly liked the campeche and alum fabric that came out light blue and slightly speckled. I experimented with drying the silk and linen campeche fabrics ontop of eachother which resulted in the lovely water like effect on the silk when dried! I also figured out that if I dried the silk fabric on a piece of wood then these blue/purple lines appeared - I'm not sure why!

• • •
Screen Printing Inks
Using some of the leftover dye bath you can create either screen-printing inks by mixing guar gum into the liquid or watercolour inks by mixing arabic gum!
* ~100-150ml Dye Bath
* ~ half a teaspoon Guar Gum
* Pan
* Jar
* Stirring tool
* Preheat 100 - 150ml of dye bath
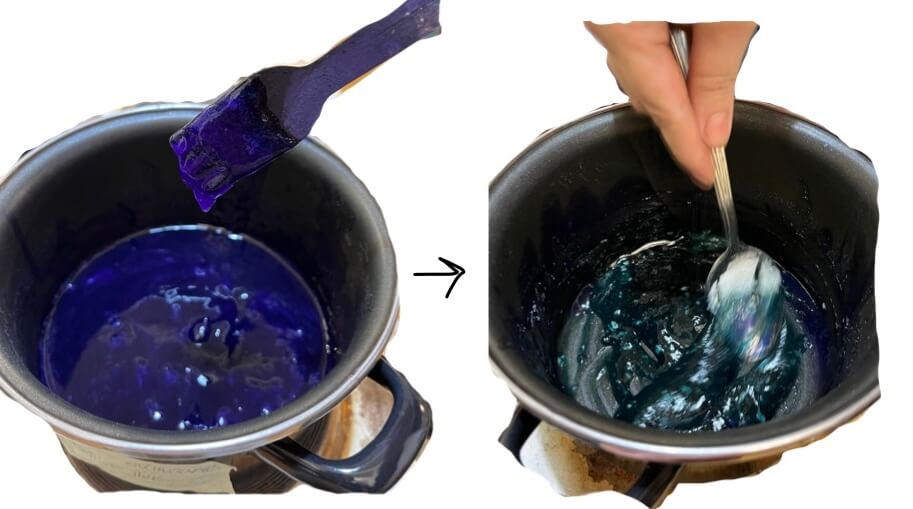
* Mix it with a less than half a teaspoon of Guar Gum and stir until it becomes slightly thicker.
* Transfer to a jar
Results
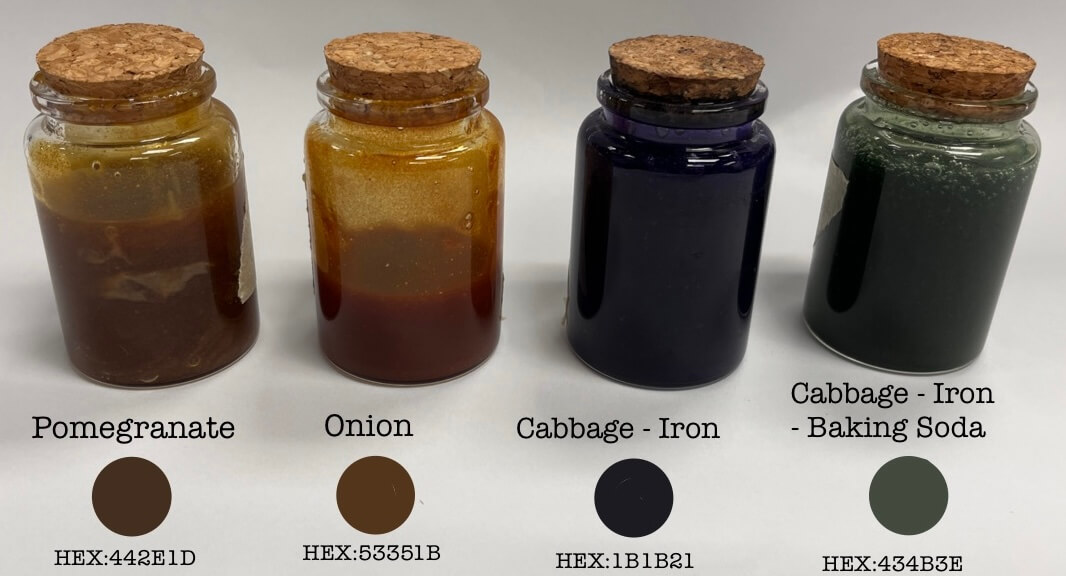
Here is an example of creating the ink with the onion and alum base - it kept its colour pretty well!

We decided to experiment with adding 1 spoon of baking soda to the Cabbage and Guar Gum Dye bath and it turned this beautiful turquoise green colour!
Below are a few of the inks we made!
• • •
Watercolour Inks
* ~100-150ml Dye Bath
* ~6g Arabic Gum
* Pan
* Jar
* Stirring tool
* Preheat 100 - 150ml of dye bath
* Mix it with a less than half a teaspoon of Arabic Gum and stir until it becomes slightly thicker.
* Transfer to a jar
Results
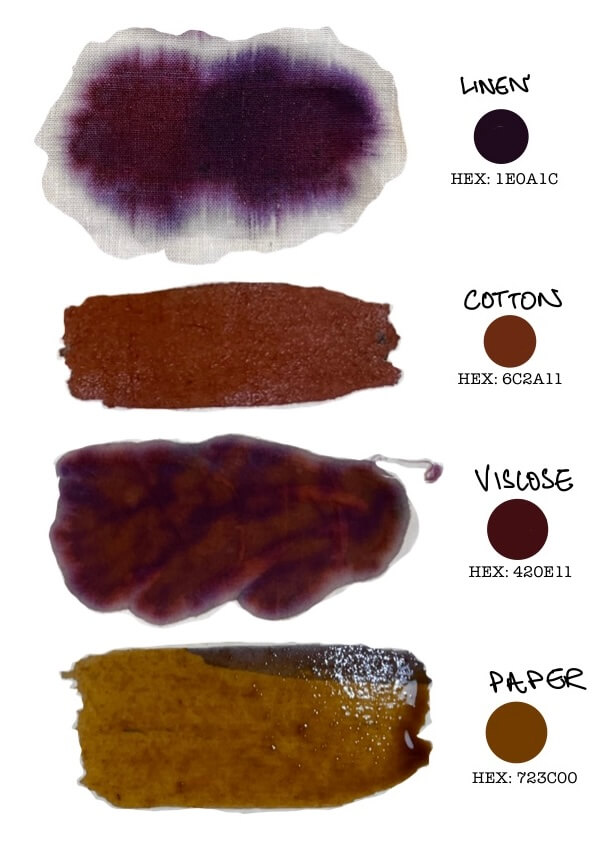
I made one of the watercolours with the Campeche Iron dye bath and tested it on different materials to see how it absorbed and changed colour. As you cna see the linen brings the purple/pink hues out of the colour whereas the other fabrics hold more brown shades.
• • •
Pigments
Using the leftover dye bath again you can create pigments and inks using Alum, baking soda.
* 20g Alum
* 10g Baking Soda
* 3 x Pan per dye bath
* 3 Beakers
* 3 Bowls
* 6 x Coffee filters (2 per beaker)
* Dehydrating oven
* Extra beaker for leftover liquid
* Spatula
* Electric cooking stove
Here are the steps to achieve this:
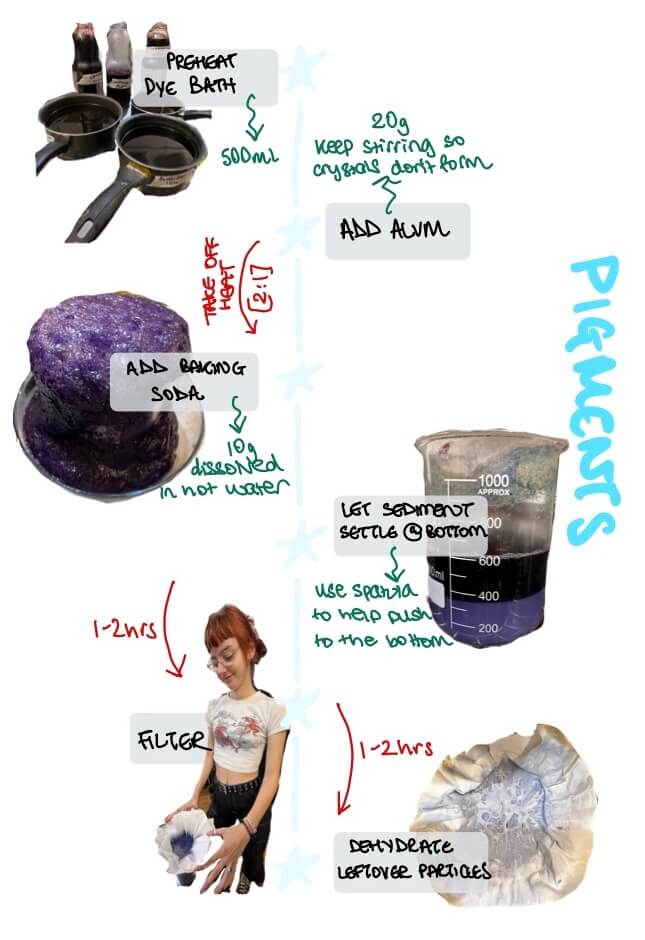
Below is a snippet of the process when the dissolved baking soda is added to the heated alum dye bath.
Cabbage Pigment Recipe
Recipe
- Preheat 500ml of leftover dye bath (remember all 3 pans)
- Measure out 10g of baking soda and dissolve it in hot water - leave it to the side for the moment
- Measure out 20g of Alum and add to each dye bath whilst continuously stirring to avoid crystallisation
- Remove the dye baths from the heat and transfer to 3 separate beakers - remember to label them! It's helpful to also place the beakers in a bowl incase any foam overflows.
- Add the baking soda to each dye bath and watch it foam! Using a spatula carefully push the foam down to help the sediment fall to the bottom. Then let it rest for 1-2hours.
- Pour each sediment mixture over 2 coffee filters that have been placed on a new beaker, this may take a couple of hours for the liquid to drain through
- Dehydrate the leftover particles on the filter for 12 hours.
Results
Below are the results of some pigments created. You would usually make the final product into small powder pieces and then add a hydrater such as oil or water.
