09. Wearables
Week 09 | This week covers a more advanced coverage on soft sensors and actuators.
• • •
Introduction
Assignment
- Document the concept, sketches, references also to artistic and scientific publications
- Create a swatch/sample using an ATTiny/Arduino/Adafruit with one input and one output, using hard-soft connection solutions and battery
- Create 2 actuator swatches and test them with the Arduino or ATTiny
- Learn how to program an Arduino/ATTiny/Adafruit, documenting your process, the libraries added, power requirements and source code
- Document the schematic and circuit
- Upload a small video of your object working
- Integrate it to a project (extra credit)
We explored further into electronics and coding our Adafruit Flora's along with learning some other new skills such as screenprinting with thermochromic ink! We also got introduced to fluorescent powder which I would love to use for some personal screenprinting projects.
Inspiration
I've been most drawn to designs that feature a memory element using SMAs or colour changing properties due to external environmental factors. It would be interesting to create a wearable which only heated up the thermochromic ink when specific data has been read on the Adafruit Flora such as an emotion; or contained an ink that absorbed pollutants from the atmosphere and converted them into some sort of energy on the garment (this Catalytic Converter Air Purifying Dress does similar!). Another interesting concept could be recreating animal motions using biomaterials and SMAs through understanding biomimicry. I am also tempted to continue with developing my e-textile glove from week 5.
★࿐࿔Alumni: ★࿐࿔
★࿐࿔The Wider World!: ★࿐࿔

1Photo by 3D Print on "Anouk Wipprecht - Synapse Dress" | 2Photo by Behnaz Farahi on "Caress of the Gaze" | 3Photo by MIT News on "Moisture Responsive Workout Suit" | 4Photo by Dezeen on "Two Gaze Activated Dress" | 5Photo by Dezeen on "Lauren Bowker" | 6Photo by Design Boom on "Kim Mesches" | 7Photo by MIT News on "Shape Shifting Fiber"
3D printed dress that uses the wearer's own electrical currents that run through the body - creating an immersive experience. Fitted with EKG, proximity sensors, a camera, LED lights and voice activation capabilities.
3D printed gaze actuated wearable behaving as an artificial skin using Shape Memory Alloy actuators that informs the motion of the skin. There is a link to recreate the project on Instructables here.
Using an eye-tracking system, the dress moves using tiny motors when a spectator is staring. The dress is covered in photo-luminescent thread that drape on the fabric
The fibre constricts in response to an increase in temperature, then self-reverses when the temperature decreases without any embedded sensors or hard components. The material is known as liquid crystal elastomer (LCE).
Ventiliating flaps lined with live cells open and close in response to an athlete's sweat.
Garments react to the movement of air, changing colour as environmental conditions shift in varying climates or when people come close/walk past.
Heat-activated technology using thermochromic inks help change the material's colour when they come into contact with heat.
Some Instructable's/Other inspiration:
• • •
Tools
-
Arduino IDE
-
Adafruit Flora
• • •
LED Strips
Actuators convert energy (electric, hydraulic etc) into mechanical energy in such a way that the device can be controlled.
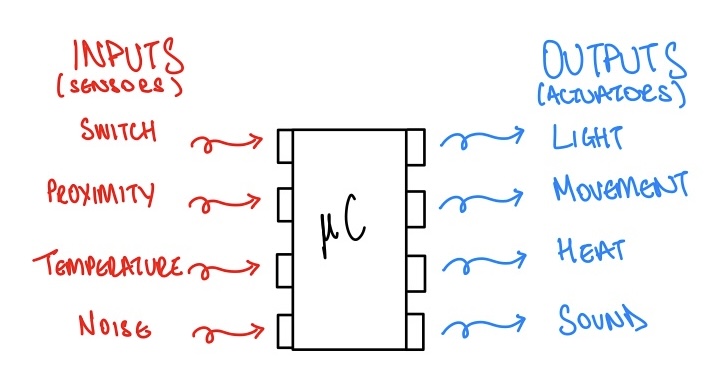
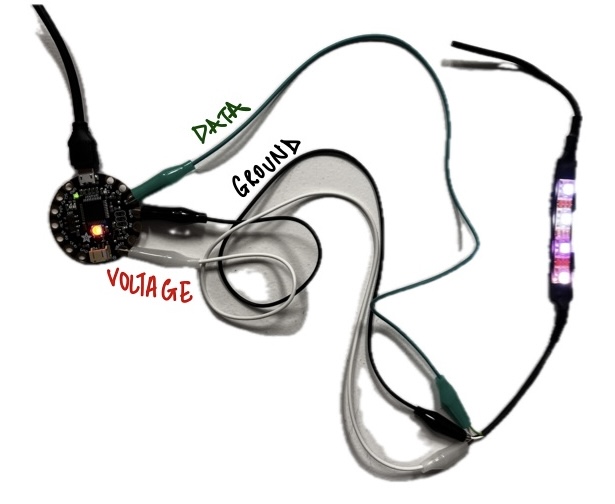
The first actuator we experimented with was light! Using RGB LED strips we connected neopixels to our Adafruit Flora and coded the neopixels to adjust how we wanted them to.
The basic code is below...
-
The LED strip data wire is connected to Pin 9 and consists of 4 neopixels.
-
The LED strip voltage wire is connected to VBatt on the Flora so that the voltage can be controlled better and not be overloaded. You shouldn't ever directly power more than 2 small LEDs on a Flora Pin. One LED consumes 20mA.
-
The LED strip ground wire is connected to the GND Pin on the Flora.
-
The in-built Adafruit FLora LED is on Pin 8.
 #include <Adafruit_NeoPixel.h>

#define ONBOARD_NEOPIXEL 8
#define STRIP_LENGTH 4
#define STRIP_PIN 9

Adafruit_NeoPixel strip = Adafruit_NeoPixel(STRIP_LENGTH, STRIP_PIN, NEO_RGB); // (number of LEDs, pin connected to, type)
Adafruit_NeoPixel onboard = Adafruit_NeoPixel(1, ONBOARD_NEOPIXEL, NEO_GRB); // BGR or RGB etc means the colour order and the order which the hardware is set to

void setup() {
  onboard.begin();
  onboard.setBrightness(30);
  onboard.show();
  strip.begin();
  strip.show();

}

void loop() {
  onboard.setPixelColor(0, onboard.Color(255, 0, 0)); // (which pixel number, what colour:(RED, GREEN, BLUE))
                                                      // so we are telling the onboard pixel that we want to change green to red and onboard.color is always RGB
  onboard.show();

  strip.clear(); clears any previous colours
  strip.setPixelColor(0, strip.Color(146,227,129)); //light green
  strip.show();
  delay(1000); // makes them turn on one by one

  strip.setPixelColor(1, strip.Color(83,195,189)); // turqouise
  strip.show();
  delay(1000);

  strip.setPixelColor(2, strip.Color(255,229,180)); //peach
  strip.show();
  delay(1000);

  strip.setPixelColor(3, strip.Color(173,216,230)); //light blue
  strip.show();
  delay(1000);

}
• • •
Electromagnetism
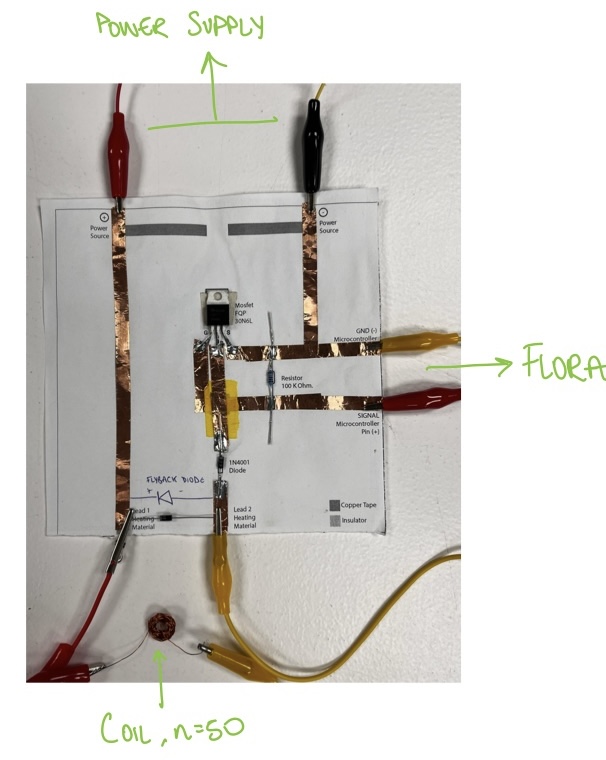
The second actuator we made was using electromagnetism to create movement. Using enameled wire we spun a coil with 50 turns and attached it to the 'heating element' connections in the paper circuit we built last week.
Attaching the coil to the circuit means that we have an inductive load, so we need to add a flyback diode in parallel to the load.
- Flyback Diode: provides an alternative path for the inductor for its current to flow.
• • •
Shape Memory Alloys (SMAs)
Shape memory alloys are metals which exhibit pseudo-elasticity and shape memory properties. They are usually deformed when cold but return to their pre-deformed 'remembered' shape when heated. Nitinol is an example of an SMA
• • •
ThermoChromic Ink
I've never used thermochromic ink before and I loved when Petra showed us a special fluorescent powder that we could use that is light reactive (glow in the dark nail powder!). Our first experiment was using standard thermochromic pigment though with Mila as our model :)

* 75ml Acramina Textil Transparente / Screenprinting Base
* 1 tbsp Thermochromic pigment
* Screen
* Squegee
* Stencil
* Textile
* Mixing pot and spoon
* Mix the screenprinting base with the thermochromic pigment. The more pigment you add, the stronger the heat-reaction effect

* Tape the stencil to the back of the screen frame so that only the gap you want printed is bare.

* Place a line of the mixed pigment ink at the top of the screen and squegee it down at a 45 degree angle to creat the first layer.

* Place the frame on the textile and squegee the ink from the bottom to the top at a 45 degree angle. Remove the frame.

* Leave the textile to dry.
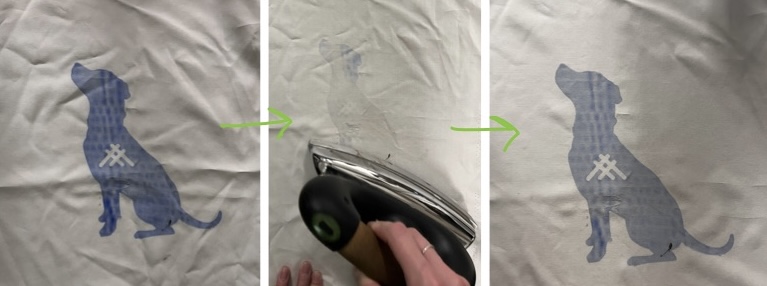
The pictures below show how the thermochromic ink changes when in contact with heat. Just a few seconds with the iron and the image disappeared leaving only the faintest white outline. The image took around an hour to return to the original blue colour.
Below are some of my own samples:
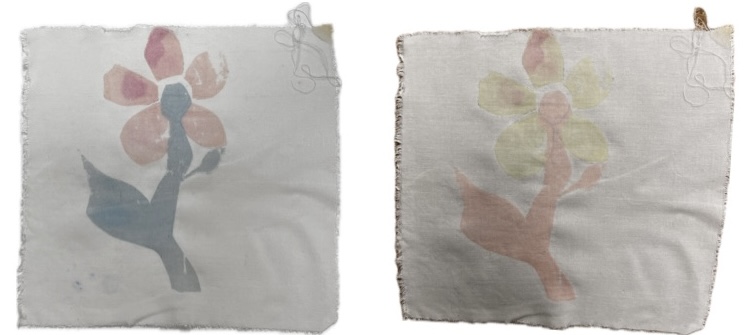
Pink -> Yellow and Blue -> Pink Thermochromic Ink on Cellulose Fabric : No heat, heat in contact with fabric
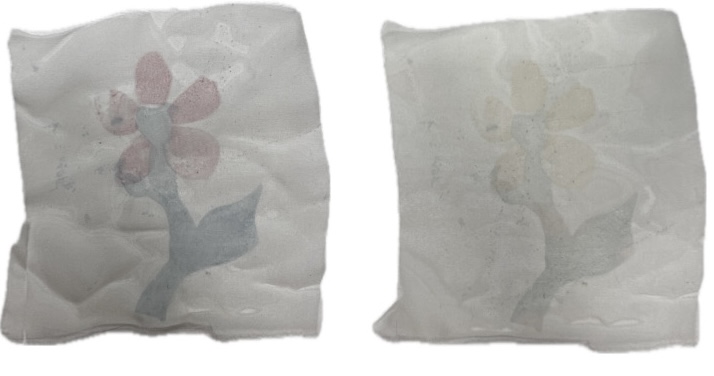
Pink -> Yellow and Blue -> Pink Thermochromic Ink on Silk Fabric : No heat, heat in contact with fabric
I found that this ink changed colour quite quickly when in contact with body heat. The silk fabric also didn't hold the colour very well so would need a few more layers of ink to be effective.
• • •
Proximity Sensing Thermochromic Feather
My idea was to immitate the movement and change of colour of bird feathers when they are approached by a prey or a mate. The proximity sensor would detect the distance which would then trigger the shape memory alloy (Nitinol) to curl a feather shaped fabric that is screenprinted with thermochromic ink. When the Nitinol heats up it should change the thermochromic ink colour aswell.
Equipment
- Adafruit Flora
- Li-Po Battery
- Thermochromic Ink
- Silk Fabric
- 9V Battery
- Crimps
- Nitinol
- Grove Ultrasonic Ranger
- Paper circuit made previously
- Conductive thread
- Plenty of crocodile clips!
- Sewing thread and needles
Using the Grove Ultrasonic Ranger I began to create my proximity sensor. Following this website helped me start my code off:
- Download the Ultrasonic Ranger Library on the Arduino Library Manager Board.
#include "Ultrasonic.h"

Ultrasonic ultrasonic(6); //connected to Pin 6
void setup()
{
 Serial.begin(9600);
}
void loop()
{
 long RangeInCentimeters;

 Serial.println("The distance to obstacles in front is: ");
 RangeInCentimeters = ultrasonic.MeasureInCentimeters(); // two measurements should keep an interval
 Serial.print(RangeInCentimeters);//0~400cm
 Serial.println(" cm");
 delay(250);

}
Testing the Fabric with the Nitinol
I created a few samples of fabric with the thermochromic ink and tested them with the heat from an iron. The below samples have been screenprinted with one layer of ink. I followed Jie Qie's example of a wing with Nitinol here.
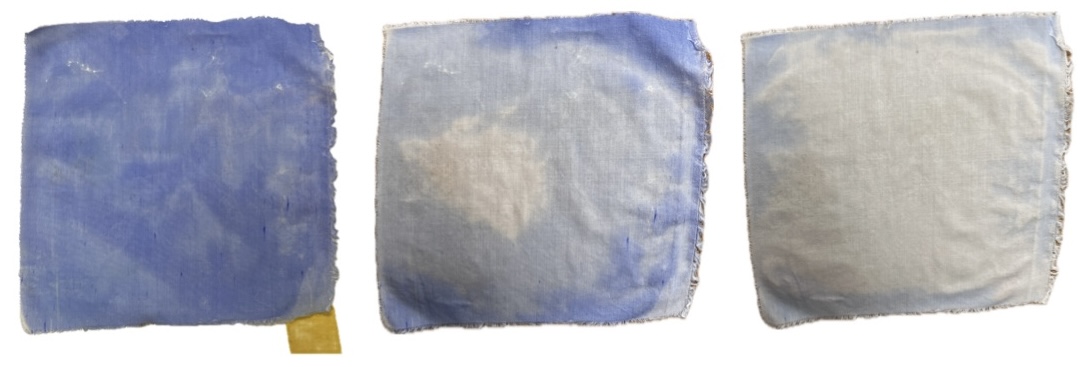
Blue -> White Thermochromic Ink on Cellulose Fabric: No heat, heat from a few cm away, heat in contact with fabric
I found that this ink wasn't that sensitive to body heat (i.e touching the fabric with fingers).
I connected the Nitinol to 5V from the Power Supply and watched it do its magic.. :)
I trialed a few shapes and configurations of the Nitinol and found that it made the fabric curl best when the loop of wire was formed in a tighter curve like the test on the right. This test actually did nearly return back to its original shape too. All the wires had to have tension in them, but also needed some other force to pull them back to the first state i.e being pulled by another fabric.
Creating the Circuit
I connected the proximity sensor to the Flora using the following Pin connections:
-
Red wire (Voltage) -> 3.3 V Pin
-
Black wire (Ground) -> GND Pin
-
White wire -> does not need to be connected
-
Yellow wire (Data) -> Pin 6
As in the previous weeks, the Flora is connected to the paper circuit using the following Pin connections:
-
Positive power source -> VBATT Pin
-
Negative power source -> GND Pin
-
Positive microcontroller signal -> Pin 9
And the Nitinol was connected to the heating element part of the circuit.

Circuit Connections Whilst Connected to Computer
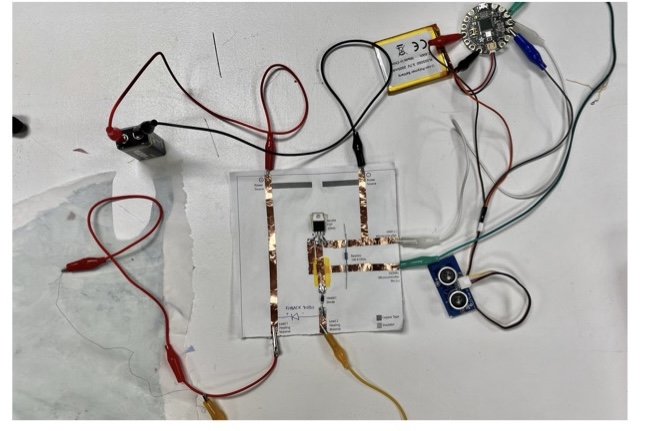
Circuit Connections With Rechargeable Batteries
The next step was to change my Arduino code so that the proximity sensor was connected to the Nitinol via the Flora and paper circuit.
#include "Ultrasonic.h"

#define ULTRASONIC_SENSOR 6
#define ADAFRUIT_FLORA 9

Ultrasonic ultrasonic(6);
void setup() {
  pinMode(ULTRASONIC_SENSOR, INPUT);
  pinMode(ADAFRUIT_FLORA, OUTPUT);
  Serial.begin(9600);
}
void loop() {
  long RangeInCentimeters;

  Serial.println("The distance to obstacles in front is: ");
  RangeInCentimeters = ultrasonic.MeasureInCentimeters();  // two measurements should keep an interval
  Serial.print(RangeInCentimeters);                        //0~400cm
  Serial.println(" cm");
  delay(250);

  if (RangeInCentimeters < 5) {
    Serial.println("HIGH");  // turning the Flora 'on' so that voltage is sent to the Nitinol and heats up
    analogWrite(ADAFRUIT_FLORA, 128); // using a 9V battery this command changes the connections to
                                      //have PWM so the switch is only turned on x / 255 of the time i.e only
                                      //4.5V is transmitted into the circuit and the SMA doesn't overheat
  } else {
    digitalWrite(ADAFRUIT_FLORA, LOW);
    Serial.println("LOW");
  }
}
The Nitinol worked well when powered with between 4.5 - 5V, any more than this it overheated very quickly. Unfortunately we had only a tiny bit of Nitinol in the lab, enough for about two of the feathers I had planned to do. I tried to connect the other feathers to the circuit with conductive thread so at least maybe they could change colour but not move. For some reason though, the thread was not heating up when connected to my circuit.
Here's the full circuit working:
Results
As I only had a tiny bit of Nitinol I could only simulate two feathers to move, I connected them together however if there were move feathers being triggered to move then I would probably connect them in parallel into the circuit. I found that the feathers didn't really return back to the original shape or return back to the same blue colour. If I continued this project I would screenprint the silk with more layers of thermochromic ink and create a larger feather structure which is longer so that they would hopefully curl over more.
• • •