08_WEARABLES
Overview
Wearables are electronic devices or technologies that can be worn on the body, either as accessories or embedded into clothing. These devices are equipped with sensors, processors, and communication capabilities, enabling them to collect data, perform computations, and communicate with other devices or networks. Due to the advancements in miniaturization, sensor technologies, and the growing interest in health and fitness tracking, wearables have become increasingly popular in recent years. The technology is mostly used for/in:
• Health, medical monitoring
• Smart clothing
• Augmented and virtual reality
• Industry logistics and efficiency improvements
• Navigation and location-based services
• Communication
• Payments, transactions
• Gaming
• Space technology
• Speculative technology, technology for future living
• Arts..
References & Inspiration
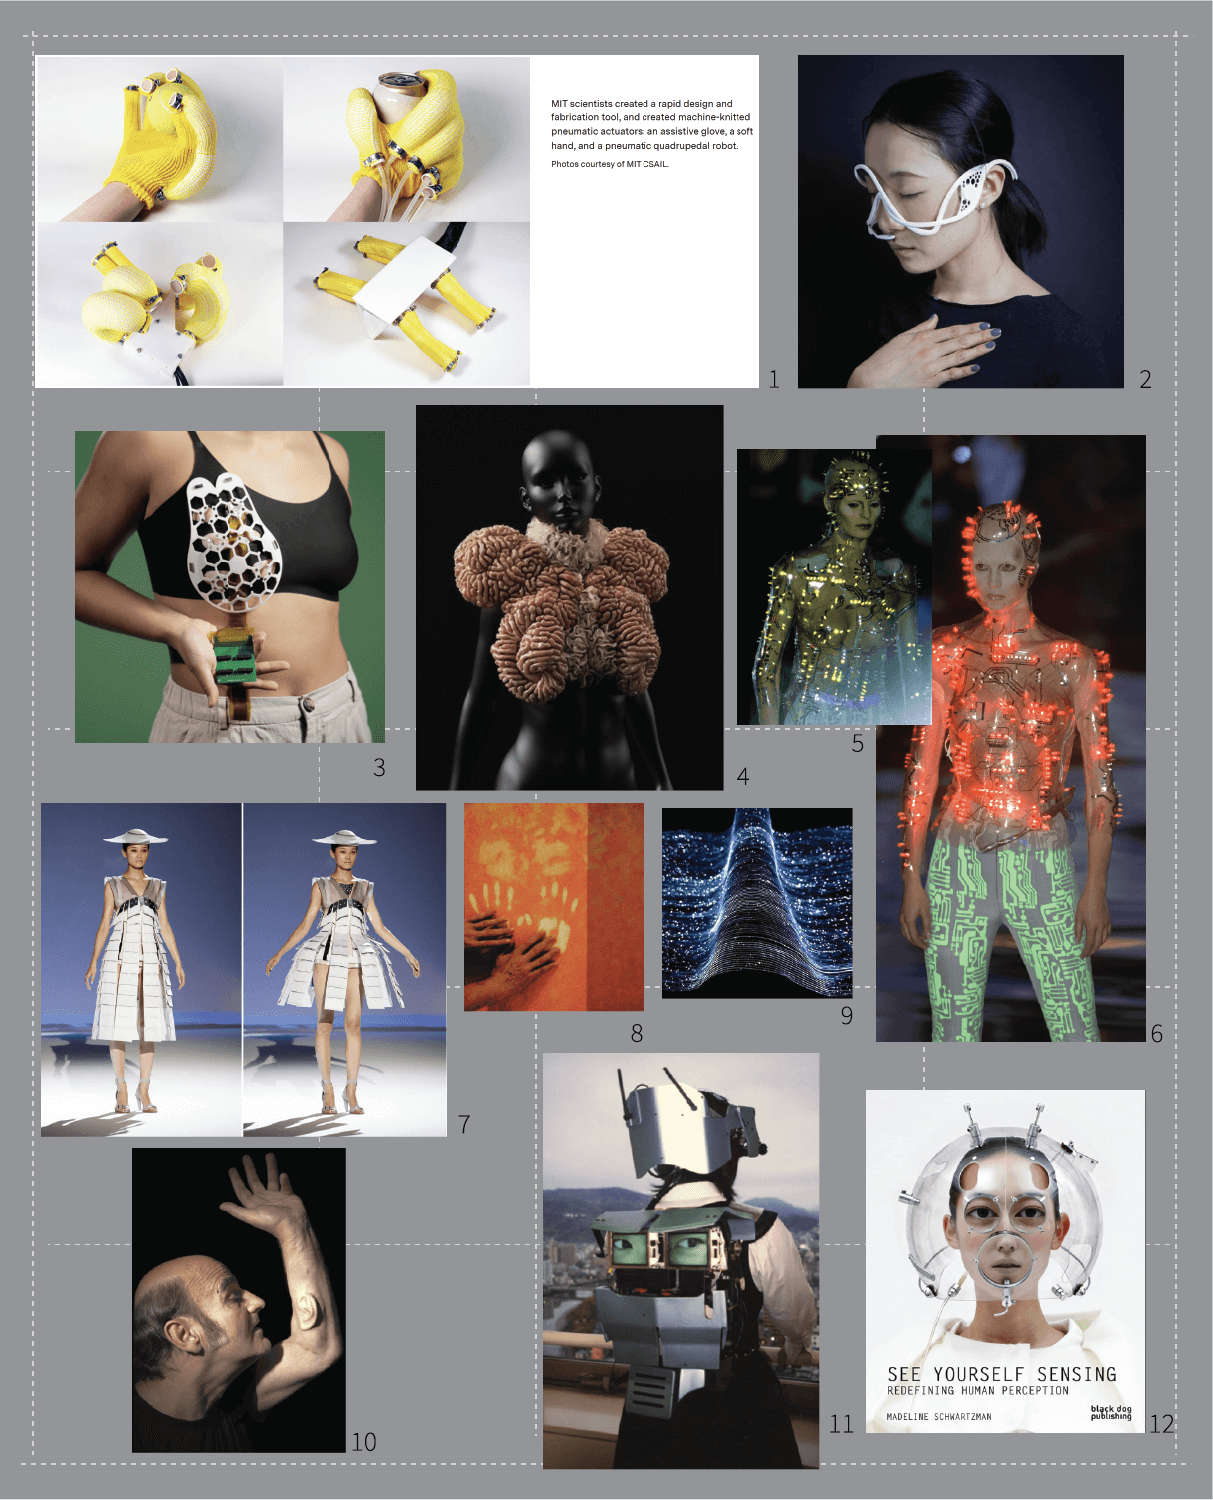
1 - MIT – Wearable Soft Pneumatic Actuator
2 – Masque by Xin Liu, Hongxin Zhang
3 – A wearable ultrasound scanner could detect breast cancer earlier
5 & 6 - Alexander McQueen’s 1999 fall/winter collection for Givenchy
7 - Hussein Chalayan's spring/summer 2000 Remote Control metal dress
8 - Thermochromic ink
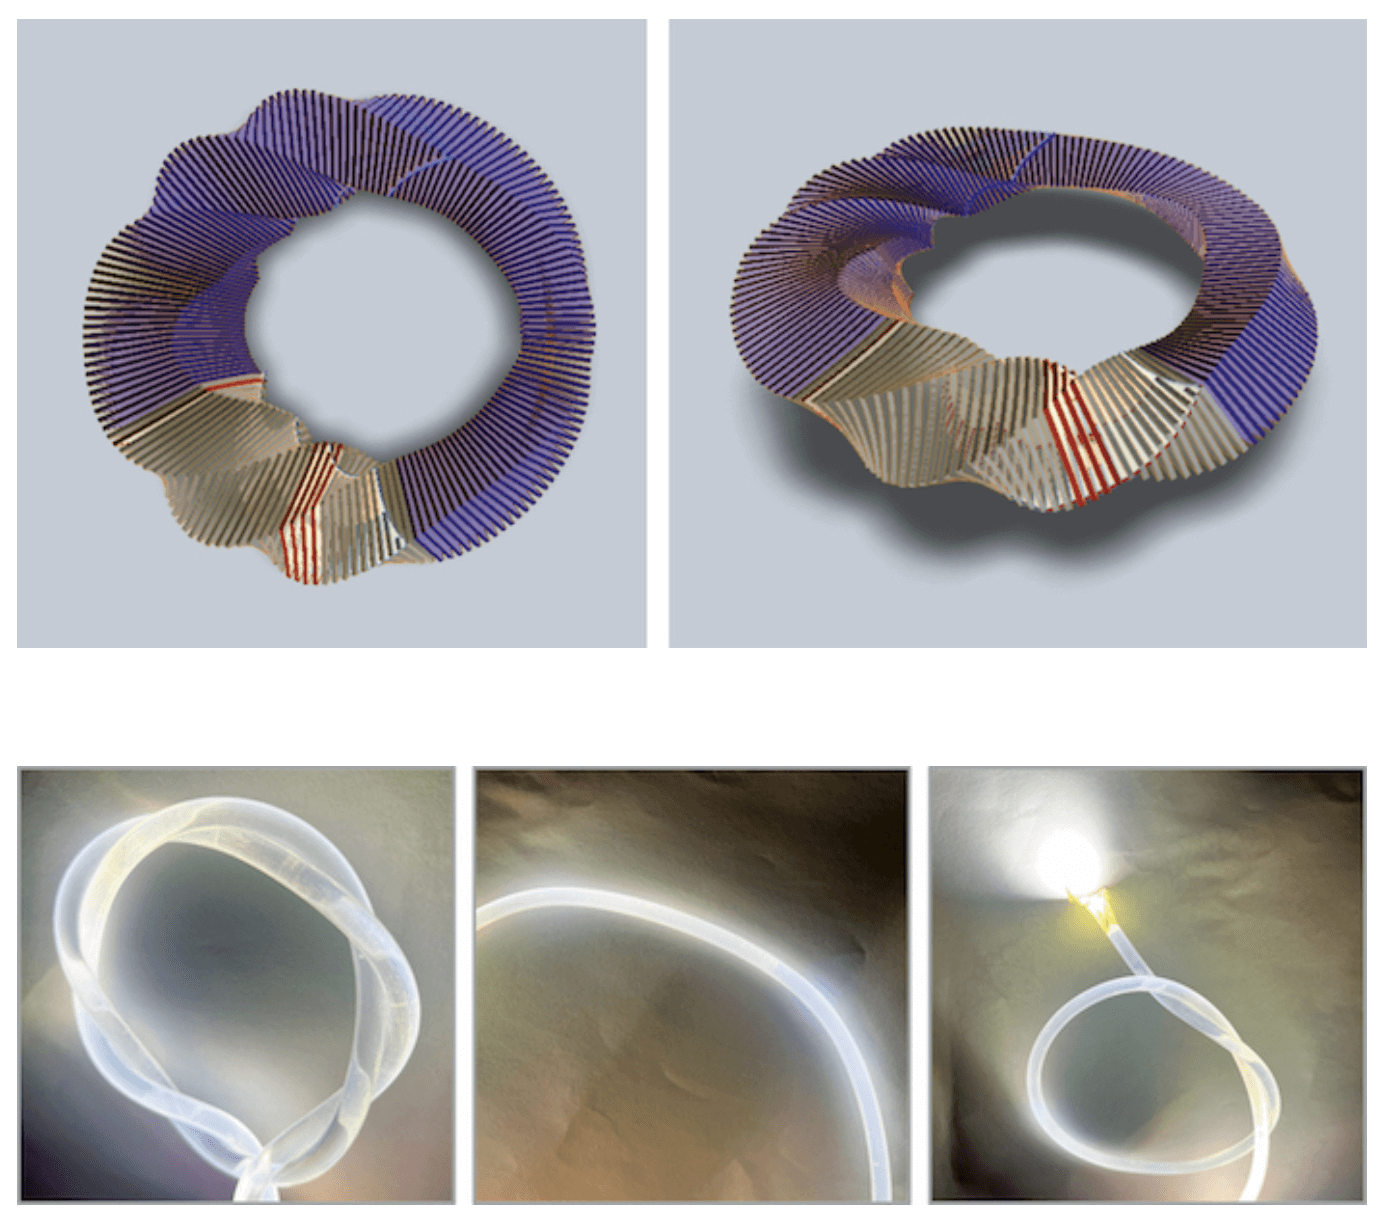
9 - Optic fibers
10 - Krzysztof Wodiczko, Dis-Armor, 1999-2000
11 - STELARC, Ear on Arm, 2006
12 - See Yourself Sensing, Redefining Human Perception, a book by Madeline Schwartzman
Fabricademy participants Inspirations:
This week
The week started with lessons and workshops that were carried out by Gerard Montaño and Citlali Sánchez.
Main tools of this week:
-
Arduino libraries - expanding functions of the software
-
Thermochromic ink
-
RGB LED strip, Neopixles
Lessons with Gerard
With Gerard we navigated through Arduino and worked with capacitive sensor(s) and neopxiles strip.
Capacitive sensor
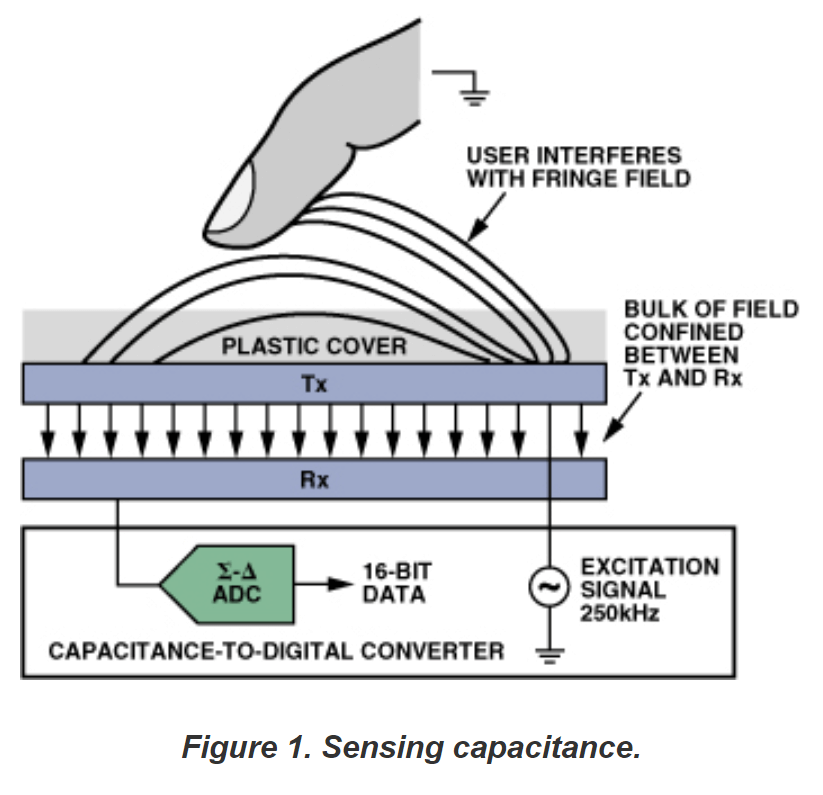
A capacitive sensor is a type of sensor that measures changes in capacitance to detect the presence or proximity of objects, materials, or changes in the environment. Capacitance is the ability of a system to store an electric charge, and in the context of capacitive sensors, changes in capacitance are used to infer the presence or absence of an object.
How does it work?
A capacitor consists of two conductive surfaces separated by an insulating material (dielectric). In the context of capacitive sensors, one of the conductive surfaces is often a sensing electrode, and the other can be a nearby object or a ground plane. When an object is in close proximity to the sensing electrode, it changes the capacitance of the system. The electric field between the electrode and the object is altered, leading to a change in capacitance.
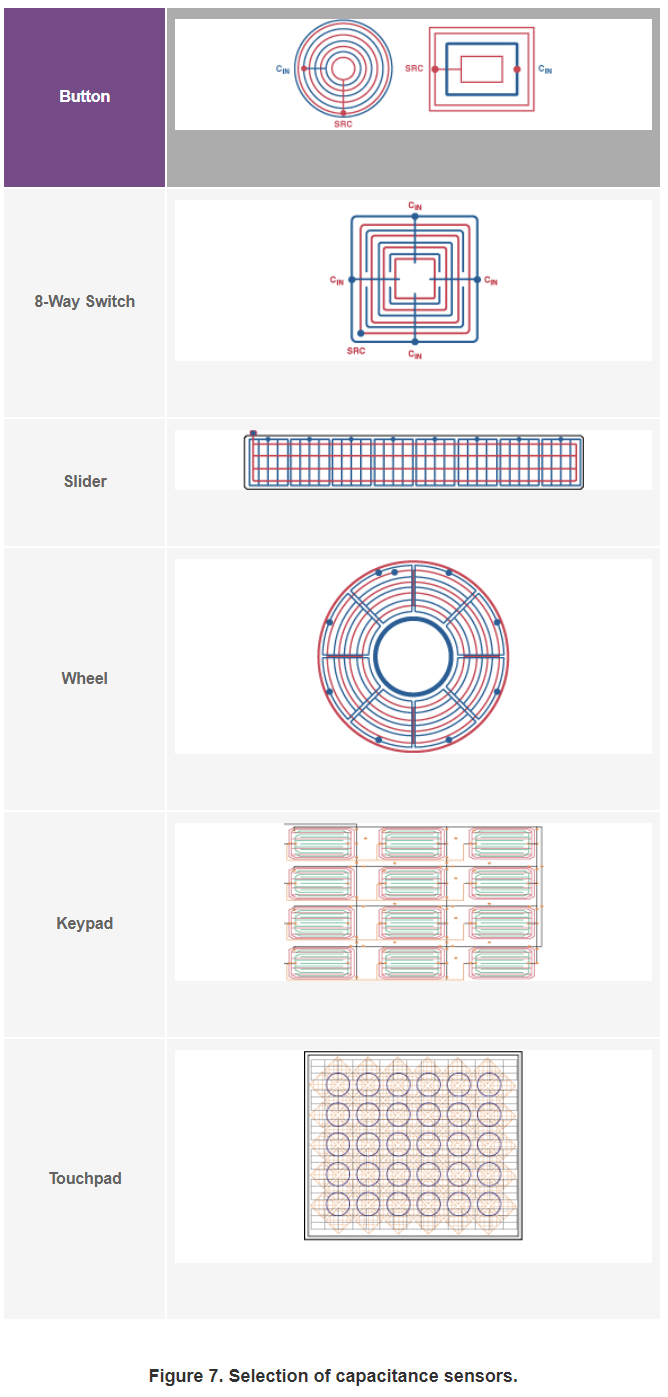
Some common applications:
-
Capacitive sensors are commonly utilized in touchscreens for electronic devices, such as smartphones and tablets. When a user touches the screen, their finger alters the capacitance, allowing the device to detect the touch.
-
Capacitive sensors are also being used to detect objects without contact, for example in automatic faucets, switches, and object detection systems.
More on the capacitance sensors can be found here and here
Materials we used for designing a capacitive sensor:
-
Microcontroller Seed Studio XIAO ESP32C3 + Arduino
-
A conductive material for the sensing electrode – I used a metal ring
-
Copper tape to connect
-
Wire
-
Resistor (depends on the sensing electrode you choose, I used 1M Ohm resistor)
-
Breadboard
Steps on how to make one:
1. Choose a conductive element that will work as a sensor
2. Connect or tape it with a wire
3. If needed for callibration, attach a resistor to the circuit
4. Connect the circuit to breadboard with XIAO ESP32C3 microcontroller
5. Connect the breadboard to Arduine IDE
6. Download the library extension Note: For the capacitive sensor to work, you will need this extension.

Arduino Library
''Libraries are a collection of code that makes it easy for you to connect to a sensor, display, module, etc. For example, the LiquidCrystal library makes it easy to talk to character LCD displays.''
Libraries enhance the capabilities and functionality of software. To connect a sensor with Arduino, we had to upload a new library. However, things got complicated as the library for capacitive sensors didn't work consistently. Gerard informed us about this issue, and unfortunately, we were unable to install it ourselves. Therefore, we had to use Gerard's computer to test the sensors.
More on libraries for Arduino can be found here
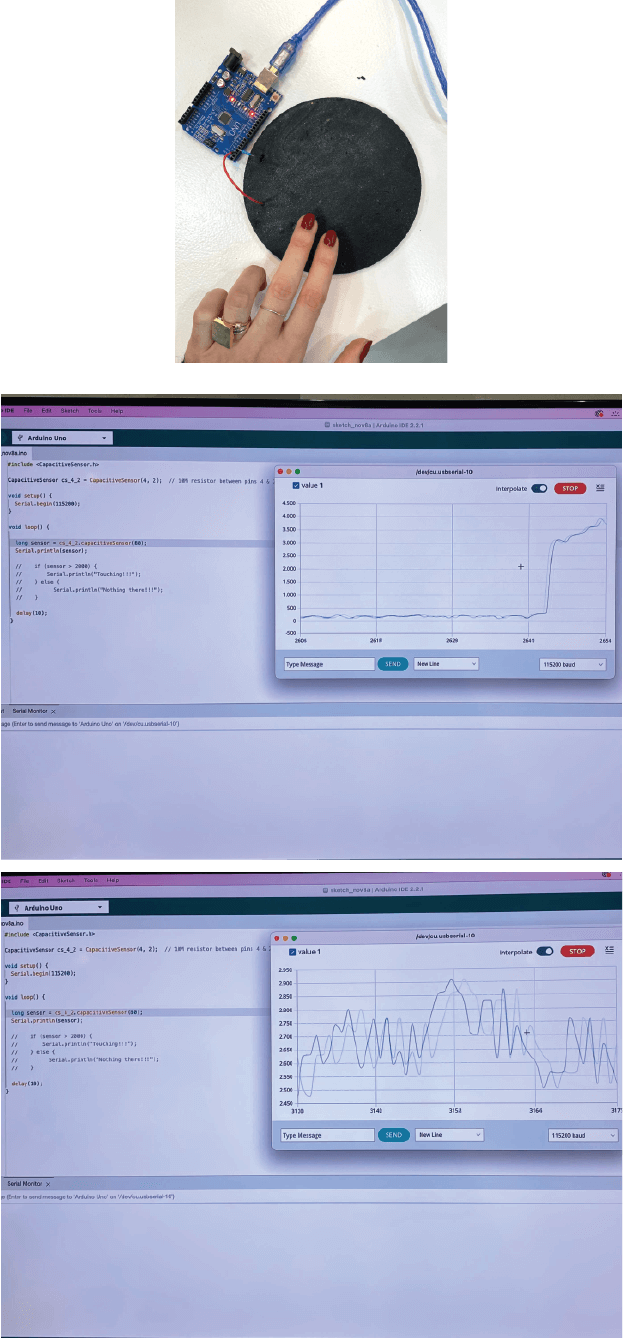
The code needed for the readings
#include <CapacitiveSensor.h>

CapacitiveSensor   cs_4_2 = CapacitiveSensor(4,2);        // 10M resistor between pins 4 & 2, pin 2 is sensor pin, add a wire and or foil if desired

void setup() {
   Serial.begin(115200);
}

void loop() {

    long sensor =  cs_4_2.capacitiveSensor(30);
//     Serial.println(sensor);

    if (sensor > 2250) {
        Serial.println("Touching!!!");
    } else {
        Serial.println("Nothing there!!!");
    }

    delay(10);
}
Note: Due to our library not working, we tested the sensors together as a group. Following readings were made on Gerard's computer.
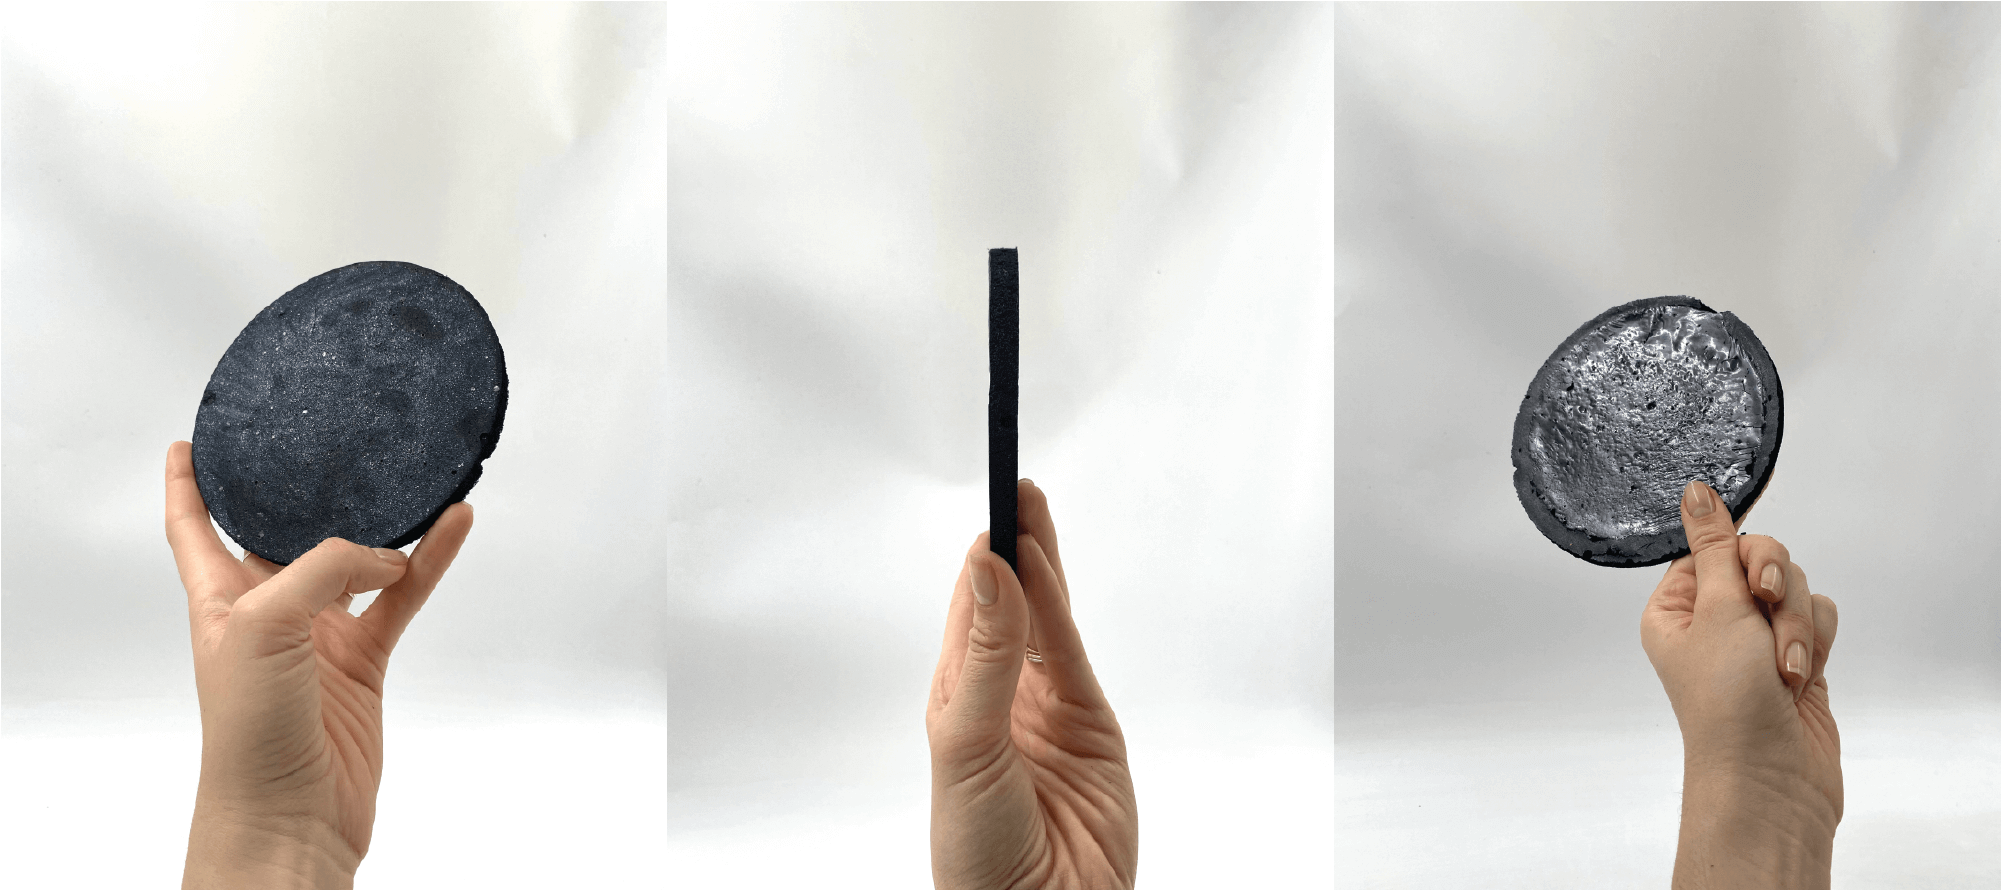
Biofoam as a capacitive sensor, IT WORKS!
For me this week was most interesting from material point of view. During the class, I brought a biofoam made with charcoal powder that I wanted to test it out as a sensor. Charcoal can make a material conductive, but it requires a lot of it to work effectively. After some experiments this one worked good.
Note:Keep in mind that that, when you're checking the circuit using a multimeter, you might not get any readings. This usually happens because certain conductive biomaterials require more voltage to power an LED for example (you can refer to other conductive biomaterial samples in the E-textile assignment documentation).
Here is the recipe I used to make a conductive charcoal biofoam:

| Gelatine | 25g |
| Water | 150ml |
| Soap | 1 tablespoon |
| Charcoal powder | 50g |
RGB LED strip - Neopixels
RGB LED Neopixels refer to a type of individually addressable RGB (Red, Green, Blue) LED lights with a built-in controller chip. This allows you to control individual LED on a longer strip of 60+ LEDs. For this assignemnt we used WS2813 RGB LED Strip.
To work with RGB LED strip you need to download the Adafruit Neopixel, and Adafruit DMA Neopixel libraries, which enables you to program individual LED light.
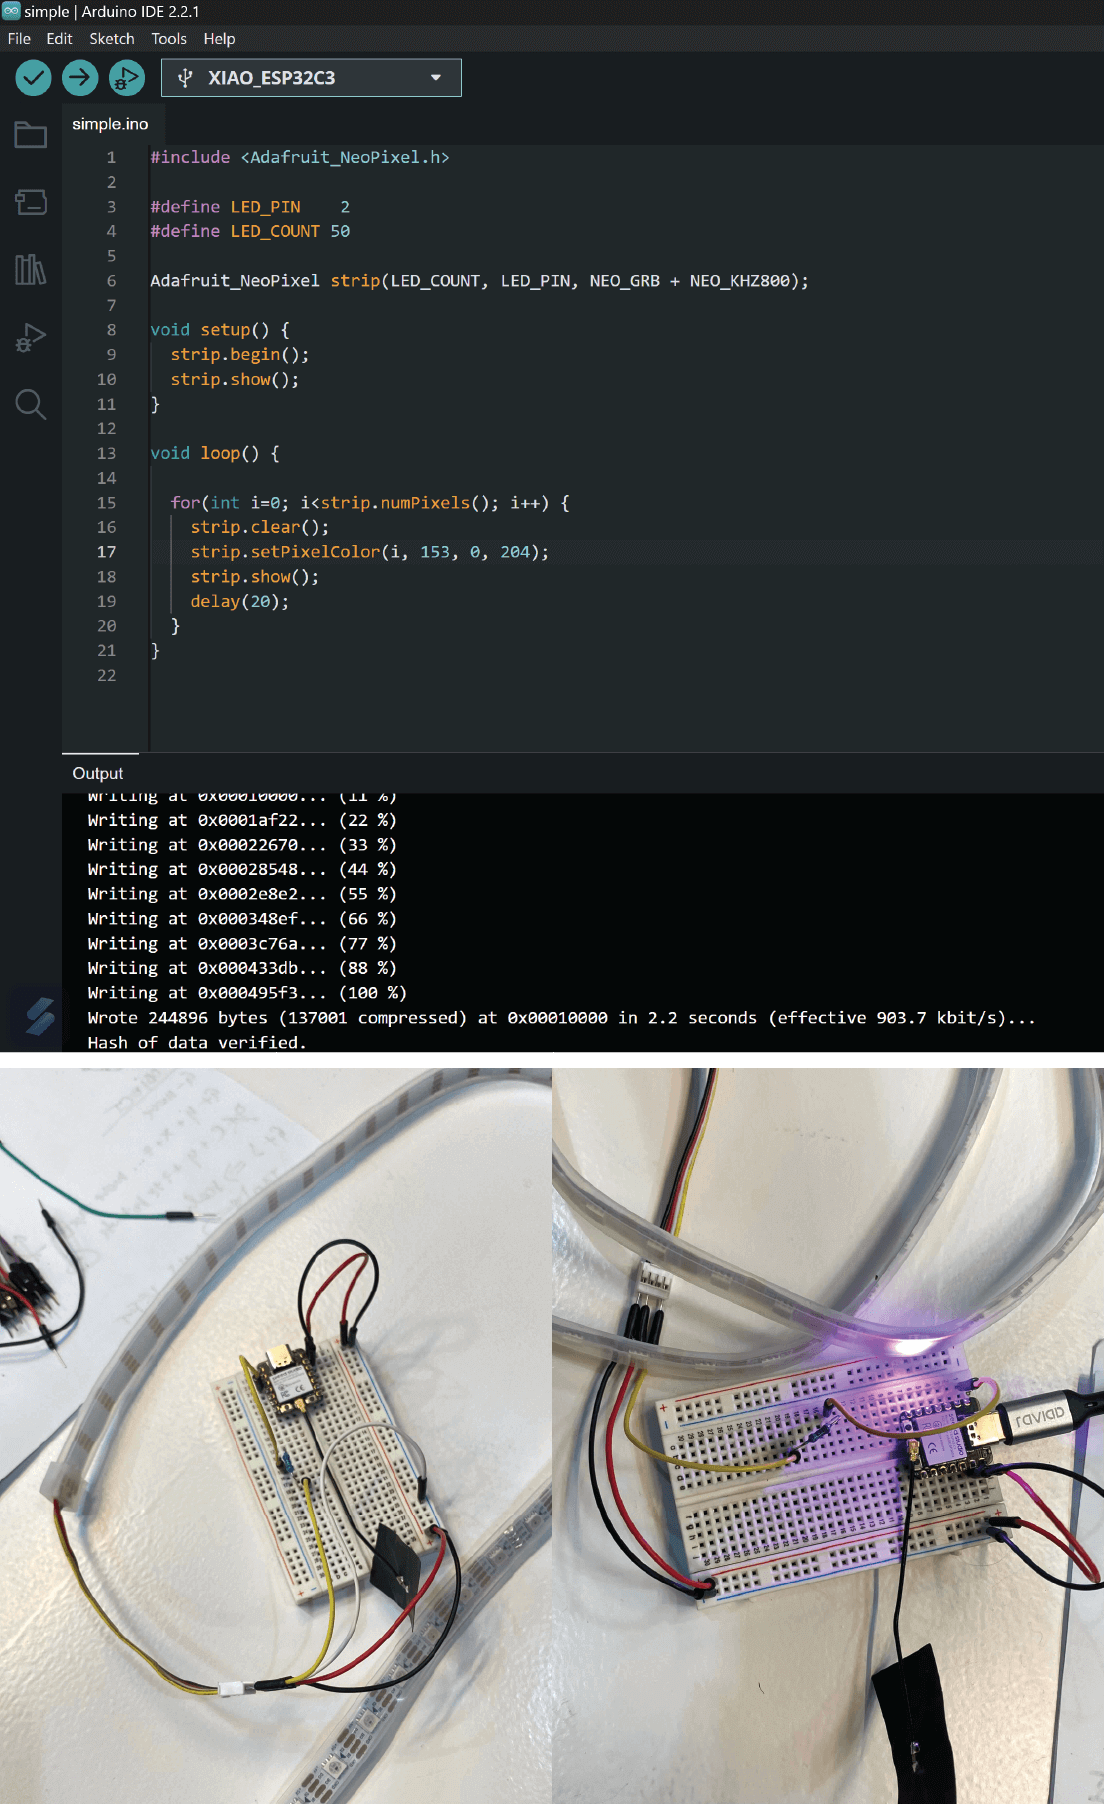
We used the following code to connected the LED strip to Arduino:
#include <Adafruit_NeoPixel.h>

#define LED_PIN    2
#define LED_COUNT 50

Adafruit_NeoPixel strip(LED_COUNT, LED_PIN, NEO_GRB + NEO_KHZ800);

void setup() {
  strip.begin();
  strip.show();
}

void loop() {

  for(int i=0; i<strip.numPixels(); i++) {
    strip.clear();
    strip.setPixelColor(i, 153, 0, 204);
    strip.show();
    delay(20);
  }
}
After that, we changed the colors of each LED diode to create a pattern and a rainbow of different colors. I used this website to generate the RGB colors.

Picking the desired color of each LED diode follows the following code principle:
void loop() {

  strip.setPixelColor(7, 153, 102, 255);
  strip.show();
  delay(60);
}
strip.setPixelColor(7, 153, 102, 255) line is where the LED number (7 on the strip) is selected, following the R(153), G(102) and B(255) color code.
After that, I played around with my 50 LED diode strip, creating a rainbow effect by lighting up pattern on of 20 LEDs. For that I used the following code:
#include <Adafruit_NeoPixel.h>

#define LED_PIN 2
#define LED_COUNT 50

Adafruit_NeoPixel strip(LED_COUNT, LED_PIN, NEO_GRB + NEO_KHZ800);

void setup() {
  strip.begin();
  strip.show();
}

void loop() {

  strip.setPixelColor(1, 255, 255, 255);
  strip.show();
  delay(20);

  strip.setPixelColor(2, 255, 255, 0);
  strip.show();
  delay(20);

  strip.setPixelColor(3, 255, 153, 51);
  strip.show();
  delay(20);

  strip.setPixelColor(4, 255, 0, 0);
  strip.show();
  delay(20);

  strip.setPixelColor(5, 255, 51, 153);
  strip.show();
  delay(20);

  strip.setPixelColor(6, 153, 0, 255);
  strip.show();
  delay(20);

  strip.setPixelColor(7, 51, 51, 255);
  strip.show();
  delay(20);

  strip.setPixelColor(8, 0, 255, 255);
  strip.show();
  delay(20);

  strip.setPixelColor(9, 102, 255, 153);
  strip.show();
  delay(20);

  strip.setPixelColor(10, 153, 255, 51);
  strip.show();
  delay(20);

    strip.setPixelColor(11, 255, 255, 255);
  strip.show();
  delay(20);

  strip.setPixelColor(12, 255, 255, 0);
  strip.show();
  delay(20);

  strip.setPixelColor(13, 255, 153, 51);
  strip.show();
  delay(20);

  strip.setPixelColor(14, 255, 0, 0);
  strip.show();
  delay(20);

  strip.setPixelColor(15, 255, 51, 153);
  strip.show();
  delay(20);

  strip.setPixelColor(16, 153, 0, 255);
  strip.show();
  delay(20);

  strip.setPixelColor(17, 51, 51, 255);
  strip.show();
  delay(20);

  strip.setPixelColor(18, 0, 255, 255);
  strip.show();
  delay(20);

  strip.setPixelColor(19, 102, 255, 153);
  strip.show();
  delay(20);

  strip.setPixelColor(20, 153, 255, 51);
  strip.show();
  delay(20);

  strip.setPixelColor(21, 153, 255, 51);
  strip.show();
  delay(20);

    strip.setPixelColor(22, 255, 255, 255);
  strip.show();
  delay(20);

  strip.setPixelColor(23, 255, 255, 0);
  strip.show();
  delay(20);

  strip.setPixelColor(24, 255, 153, 51);
  strip.show();
  delay(20);

  strip.setPixelColor(25, 255, 0, 0);
  strip.show();
  delay(20);

  strip.setPixelColor(26, 255, 51, 153);
  strip.show();
  delay(20);

  strip.setPixelColor(27, 153, 0, 255);
  strip.show();
  delay(20);

  strip.setPixelColor(28, 51, 51, 255);
  strip.show();
  delay(20);

  strip.setPixelColor(29, 0, 255, 255);
  strip.show();
  delay(20);

  strip.setPixelColor(30, 102, 255, 153);
  strip.show();
  delay(20);

  strip.setPixelColor(31, 153, 255, 51);
  strip.show();
  delay(20);


  strip.setPixelColor(32, 255, 255, 255);
  strip.show();
  delay(20);

  strip.setPixelColor(33, 255, 255, 0);
  strip.show();
  delay(20);

  strip.setPixelColor(34, 255, 153, 51);
  strip.show();
  delay(20);

  strip.setPixelColor(35, 255, 0, 0);
  strip.show();
  delay(20);

  strip.setPixelColor(36, 255, 51, 153);
  strip.show();
  delay(20);

  strip.setPixelColor(37, 153, 0, 255);
  strip.show();
  delay(20);

  strip.setPixelColor(38, 51, 51, 255);
  strip.show();
  delay(20);

  strip.setPixelColor(39, 0, 255, 255);
  strip.show();
  delay(20);

  strip.setPixelColor(40, 102, 255, 153);
  strip.show();
  delay(20);

  strip.setPixelColor(41, 153, 255, 51);
  strip.show();
  delay(20);


}

Lessons with Cit
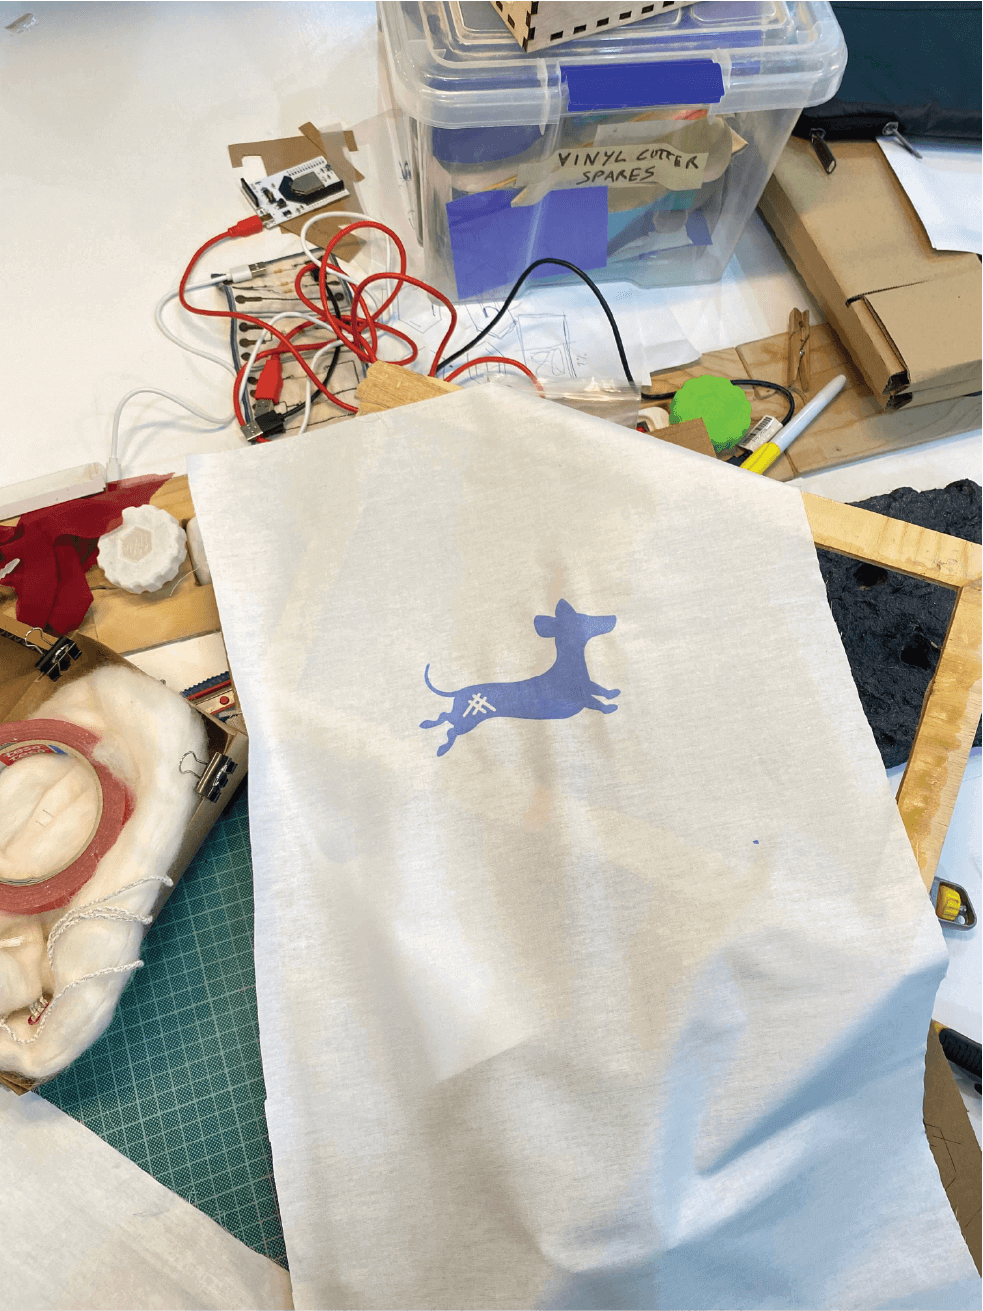
With Citlali we explored some different materials used in the field of wearables, which was super exciting and did screen printing with thermochromic ink.
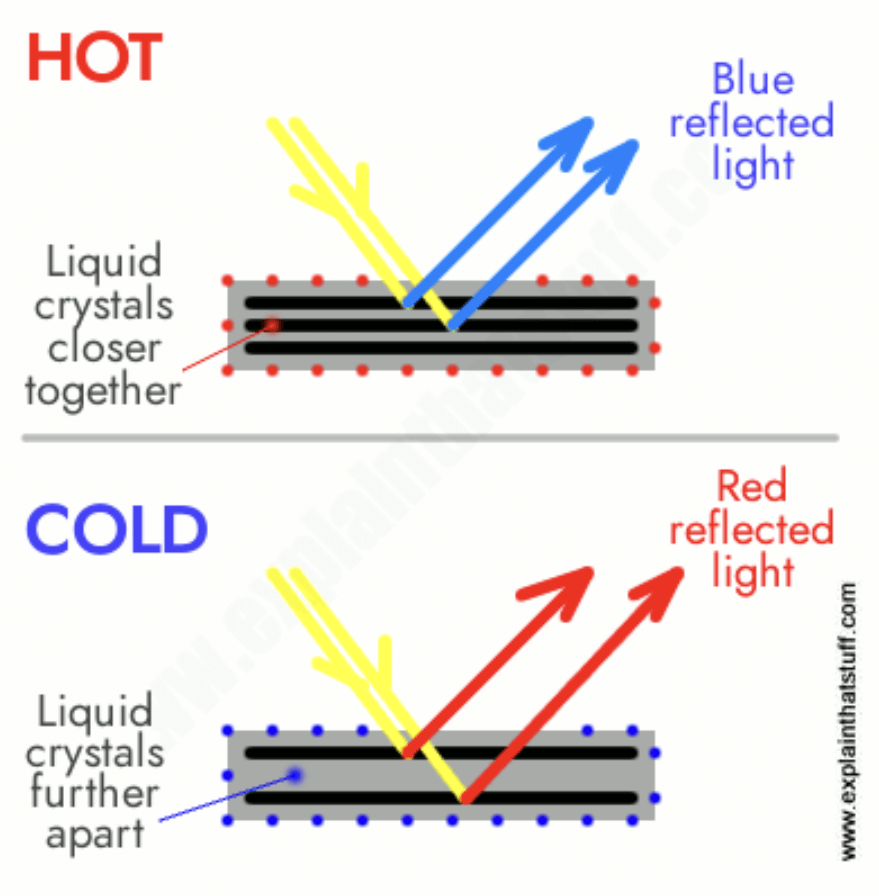
Thermochromic ink
Thermochromic inks are a special type of ink that can alter their color in response to temperature changes. These inks are made using pigments or dyes that are highly sensitive to temperature fluctuations, meaning they can undergo a reversible color change when the temperature crosses a certain threshold. These inks typically contain microcapsules or liquid crystals that react to temperature changes by modifying their molecular structure. This modification results in a change in the absorption or reflection of light, which leads to a change in color.
More on thermochromic inks and how they work in practice can be found here and here.
An interesting site to visit is also Liza Stark's, Thermochromic Tests.
Screen printing
Materials we used:
-
Thermochromic ink
-
Cotton fabric for samples
-
Screen printing set
-
Wooden sticks
Steps we took to make prints:
Preparing the ink:
-
Mix well the thermochromic powder with paint
-
We prepared 3 different hue samples of the blue ink, to test different outcomes

Screen printing process:

-
Create the design of the print – we used vinyl cutter to make ours stickers.
-
Preparation of the screen, includes: setting the area for coloring, make sure the surface is flat and even.
-
Place the screen over the fabric – strtch the fabric to get best results, and align it properly.
-
Apply a thick line of ink on the top of the screen.
-
With a squeegee pull/print the ink. Through the screen mesh, the ink will print onto the fabric beneath it.
-
Run the squeegee for at least 3 times to transfer the ink properlf onto fabric.
-
Carefully lift the wooden screen.
-
Let the designs dry. Depending on the thickness of the ink applied, the drying time depends. Ours were finished in an hour or so.
Mosfet and a paper circuit
While XIAO pins do not provide the necessary power needed to heat up the wire or other conductive material, we neede to design a new circuit using a MOSFET.
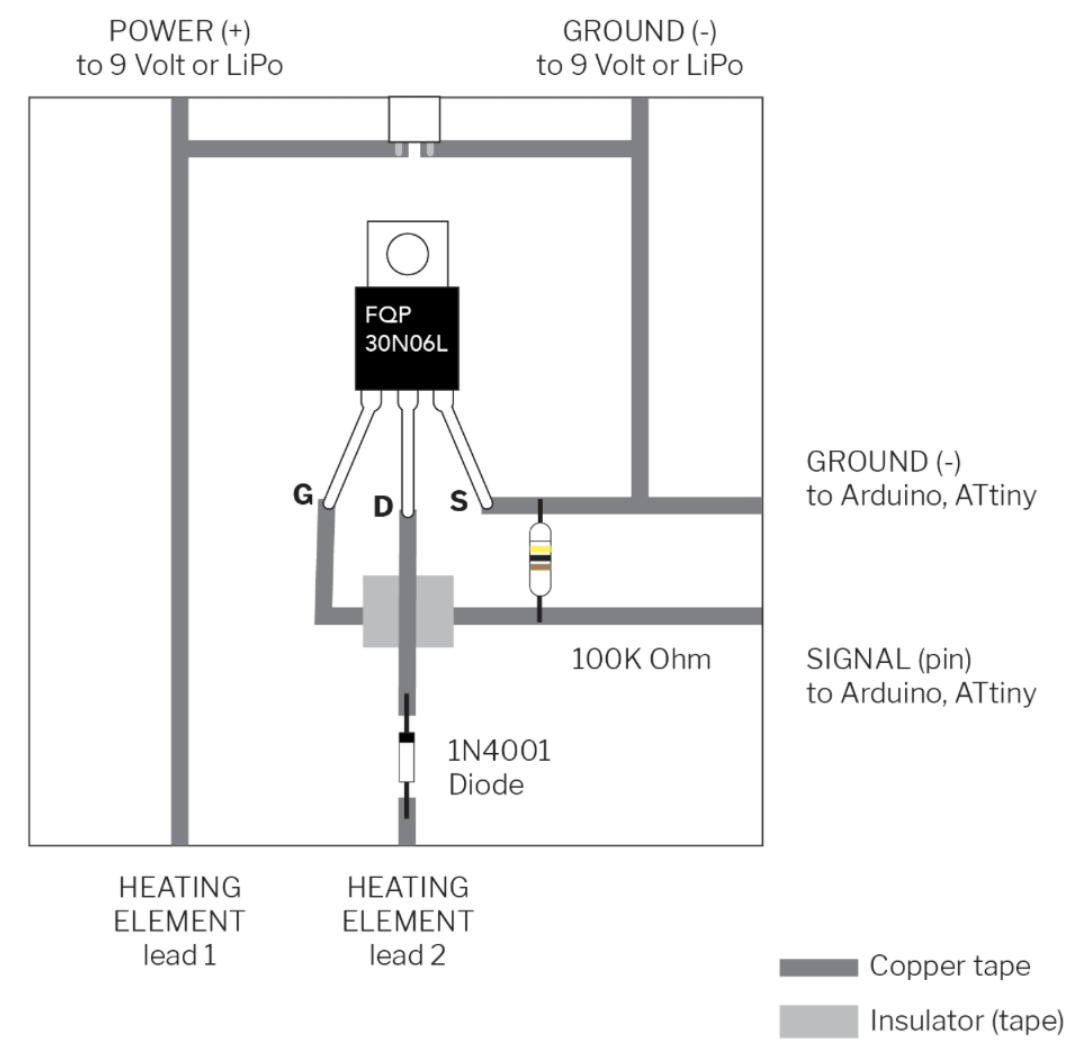
A MOSFET, or Metal-Oxide-Semiconductor Field-Effect Transistor, is a type of transistor used in electronic devices for switching and amplifying electronic signals. MOSFETs are a crucial component in modern electronic circuits and are widely employed in various applications due to their high efficiency and fast switching speeds. For that pruposes we used the 60V LOGIC N-Channel MOSFET. We designed a paper circuit using next materials:
-
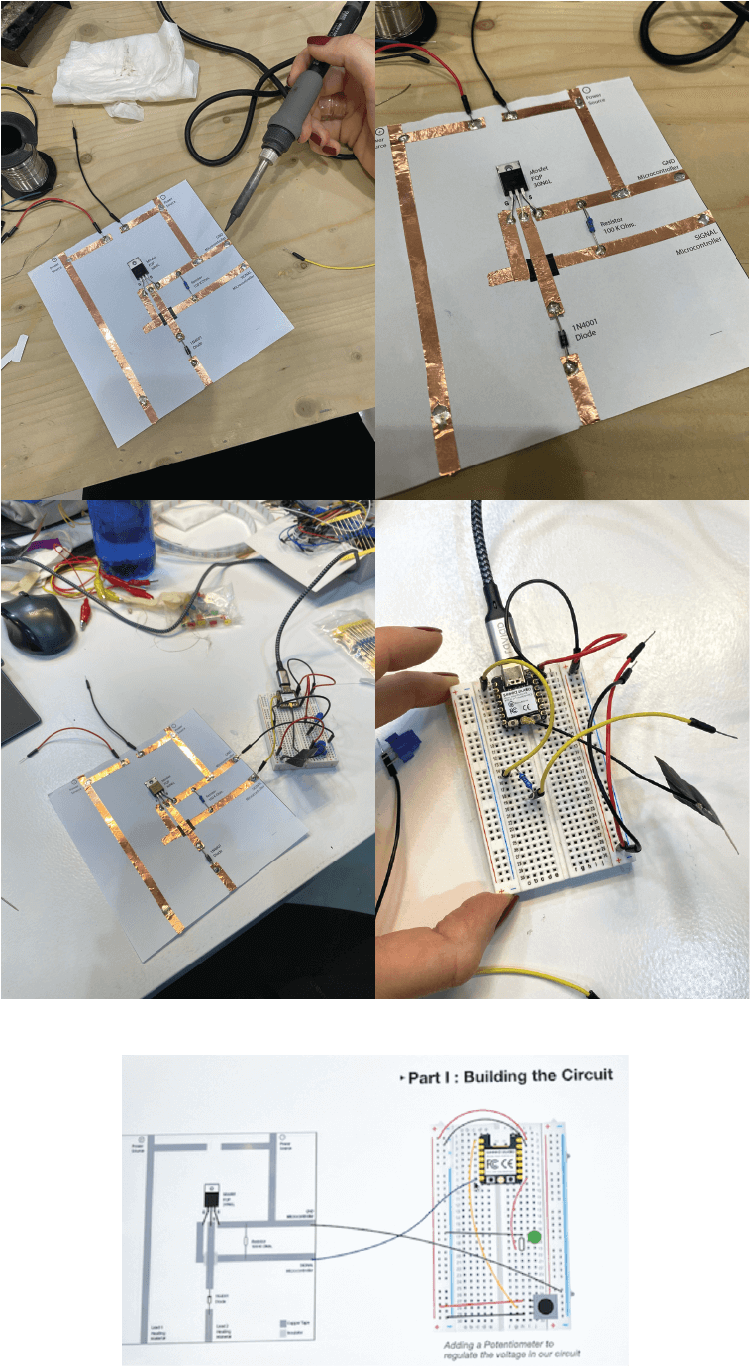
Paper printed circuit by Liza Stark
-
Copper tape
-
Insulation tape
-
MOSFET FQP 30N06L
-
100K Ohm resistor
-
1N4001 Diode
-
Soldering machine
The circuit was created by the following sketch:
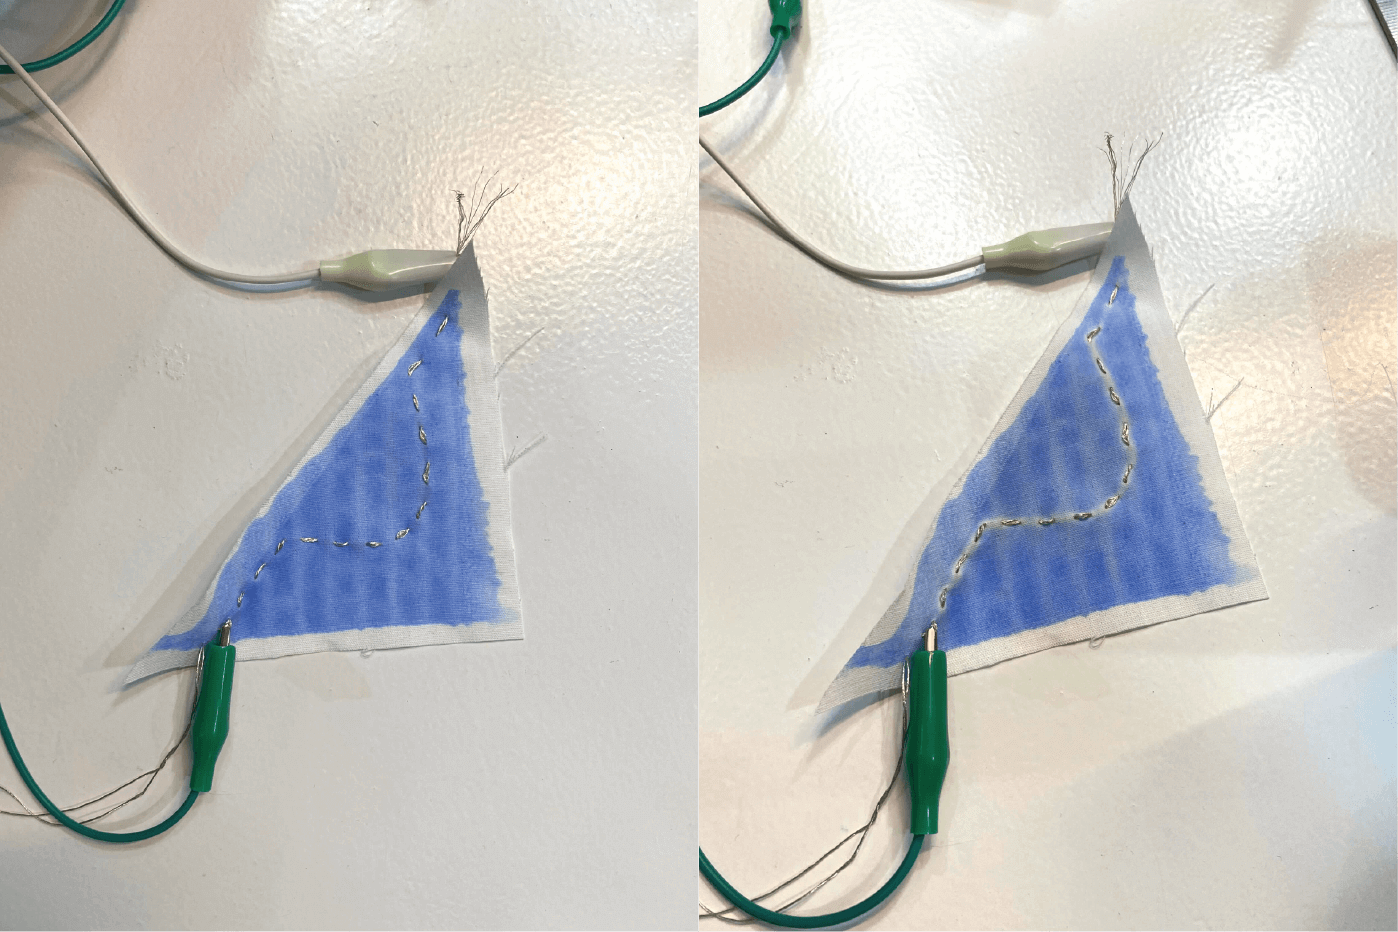
After that, we connected the circuit with the thermochromic ink sample we have made before.

Heating the conductive thread with power creates a white path on the ink. There are multiple ways of playing with design. Ruby Lennox did a great job this week, make sure to check out her page!
More on heat controlling circuits can be found here.
FLEXINOL - The shape memory alloy
Flexinol® is a trade name for shape memory alloy actuator wires. Made of nickel-titanium these small diameter wires contract like muscles when electrically driven. This ability to flex or shorten is characteristic of certain alloys that dynamically change their internal structure at certain temperatures. The idea of reaching higher temperatures electrically came with the light bulb, but instead of producing light these alloys contract by several percent of their length when heated and can then be easily stretched out again as they cool back to room temperature.
Technical Characteristics of Actuator Wires:


In the lab we had a short sample of that wire. It was super exciting to witness how the it works, but we were not able to use it in any of our own experiments due to the lack of the material. Would love to explore more though!

I really liked the project carried out by Anna Cain using this wire for her assignment. Check!
Video on how to make a circuit with flexinol
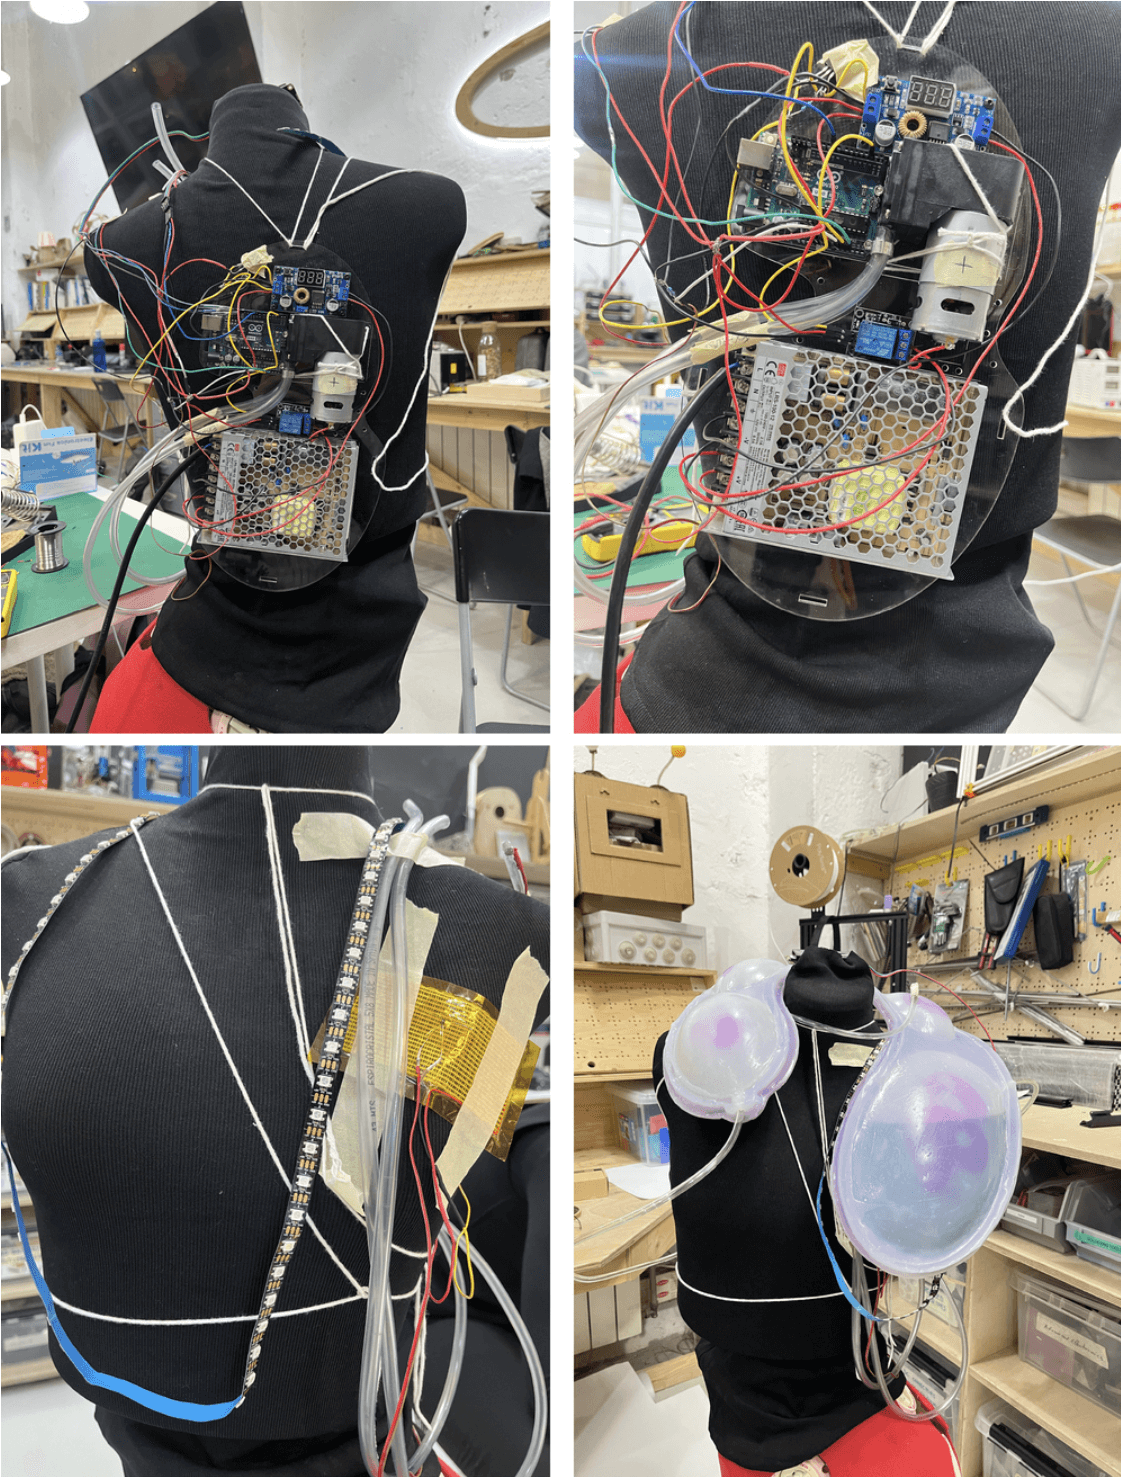
Wearable Photobioreactor
This week was full of different excersises, each of them were interesting, but I think we kind of didn't know quite well how to apply everything that we've learned into the final weekly assignemnt. So I see this one being experimental and getting to know some new stuff, like muscle wire, which was an impressive thing to see. Would love to explore that one more, but we lacked the material in our FabLab and only had a small sample of it.
So for this assignemnt I would like to present the final outcome of the Open-Source Hardware Week, where Hala and I did a wearable photobioreactor. The 10th-week assignment was an exciting one, and it left us both wanting to upgrade the outcome.
We put a lot of work into the project and I think this fits perfectly into this week. It is an object of speculation and a dream of future living, where humans would breathe through algae microorganisms' oxygen synthesis, wearing a photobioreactor on their backs.
Everything in detail is explaind on our pages.
Additional
In this week I also collaborated with Barbara Rakowska. We were working on a necklace design using optic fibers. Due to our laser cutter at the FabLab not working properly this project was not finished, but I hope that in the future we will be able to finish it.