State of the Art, Project Management, and Documentation
Weekly Assignment
- Build a documentation website describing you and your motivation for the textile-academy, including your previous work
- Upload the documentation to your project page on class.textile-academy.org
- Add references and research based on the topic of your interest
- Learn how to upload images, videos, references and how to use Markdown and Gitlab
- Learn about the fab lab processes, booking system, usage, machine demos, tools and safety rules
- Customize your website and document how you did it (extra credit)
What You'll Need
- Computer
- Fabcloud.io login info - For access to gitlab.fabcloud.org
- Patience and undying will
First Week Chronicles
It's week 1 of Fabricademy! First, let's start with my failures.
-
I got too comfortable and ambitious - I thought this would be a piece of cake (pan comido, as my parents would say) and took more time to research how to do this on markdown and how to do that using CSS would be fine timing-wise. It wasn't.
TIP FOR YOU: Approach every challenge like it is the biggest challenge you will ever face. Go one step, one line of code at a time. -
I was afraid to fail - My fear of failure invariably seeped into the week's work which held me back. I was too careful and hoping to make it perfect the first time. So, I worked harder not smarter.
TIP FOR YOU: Follow the format that's already written and start with that. Start writing (no matter what it is), followed by uploading images/videos, and leave customizing to the end. You have the rest of the program to customize. Also, don't be afraid to break shit.
I ended up customizing my website by:
1. Removing the icon next to my name on the top left
2. Removing the gitlab link to the right of the search bar
3. Removing the gitlab revised date displayed at the bottom of every page
4. Changing the color scheme to orange
5. Changing the font scheme
6. Centering headers
I show you how to do 1-3 in Customization, 4-5 in Your Homepage File - index.md File under "docs", and 6 in Common Syntax.
I can't say I really struggled coding or understanding the environment. BUT during the first review with my peers, I saw how stressed others were and so attempted to write documentation specifically for those starting out.
First, where the hell am I?, you ask. Well, I'll show you.
Your Environment
There are 4 main pages or interfaces to keep track of for a smooth workflow.
1. The Gitlab Repository
2. The Gitlab Web IDE
3. The mkdocs.yml Markdown File
4. The index.md file under "docs"
The Gitlab Repository
This space is where you basically see your folders and files in one place online by logging in to gitlab.fabcloud.org. Almost like a Finder or Windows Folder window on your computer, the Gitlab repository is an online receptacle where you can see the documents, downloads, images, etc. associated with your specific project. In this case, every file and folder that makes up your website. You can have multiple projects in your repository!


The Gitlab Web IDE
From the Gitlab Repository, you navigate down to the Gitlab Web IDE. This is where you can more easily edit your code, upload images, upload files, commit changes, and preview what your webpage would look like as you update your code in real-time.


As you can see on the left-hand pane, these folders/files mirror the folders/files in your Gitlab Repository.

Make note of the index.md and mkdocs.yml files circled. More on that later.
Make note of the squiggly line icon with a "1" under it. It's called Source Control. That icon is to commit. Committing changes means whenever you make any change to any file or folder in here you must officially publish those changes online and to your repository. Click on the icon. Write an update if you please. You don't have to but if you've ever looking through your commit history and trying to track down a change you made, you can identify it with your description of it.

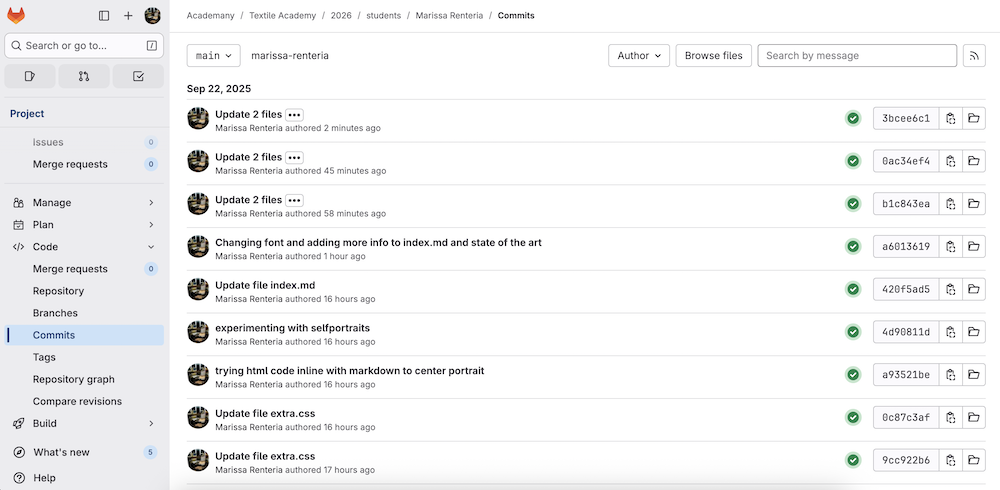
Go over to your Gitlab repository and click on "Commits".

THIS is very important to have open as you work. Whenever you commit, going over to this page to see the status of your commit is essential because it doesn't update right away. So you might refresh your website, hoping to see your changes, and you won't see them and possibly freak out. Not the case! It's just not done updating yet. When it's successful, you'll see a green check mark.

Your Style File - mkdocs.yml Markdown File
This file sets the overall tone for your website: Writes your name, initializes a theme, has a font-style, etc. You're able to customize any one of these fields to your heart's content. That resource commented in the file that starts with squidfunk is basically where you can navigate to and find another color or font that suits your interest. You also have to write that color or font (or whatever it is you want to change) exactly as it's written or it will throw an error and not commit your changes.

Your Homepage File - index.md File under "docs"
THIS is your homepage file - where you introduce yourself, why you're here, you're previous work, your interests, and any other delights you want to share about yourself. Note, you have 2 index.md files but 1 is in "assignments" and the other in "docs". You want the make sure you're in the one under "docs" for your homepage.

Tips of the Trade
If coding is new or intimidating to you, don't worry! We code in Markdown. Markdown is a very light and easy markup language to format text using a plain text editor. There's some syntax to be aware of when we want text formatted in a specific way or inserting images/videos but for the most part it's like typing into a word document.
HTML is also a markup language but with some more capabilities that Markdown may not have. You can use HTML in conjunction with Markdown in these pages if you KNOW or CHOOSE to do it. It has its own syntax.
CSS is a language used to style a webpage. It too has its own syntax, so pursue it if you so know or choose.
Common Syntax
Common Syntax to take note of:


What some of these things mean:
1. Blockquote is an indented paragraph.
2. Code is a line of code you want to format as code.
3. Link is a hyperlink added to a word or phrase.
4. Image is to place an image. Replace image.jpg with a local path like ../images/week01/image.jpg.
5. Fenced Code Block is a block of code you want to format as code without indenting and additional syntax.
6. Heading ID is pretty cool because it hyperlinks text on your page to take you to another heading of the page.
HTML Code (that works in markdown files) to comment out a larger body of text:
<!-- BLOCK
      COMMENT -->
Code for centering images with a caption:
<figure markdown>
<figcaption>Checking the status of your commits</figcaption>
</figure>
Code that acts as an "enter" function:
Ex. One Two
One<br>Two
Two
Styling
So, we talked about your main style file mkdocs.yml. BUT, if you want to further style your documentation, you must use CSS and to use CSS with markdown you have to uncomment it in the mkdocs.yml file. Erase the # symbol in front of the following code:
extra_css:
  - stylesheets/extra.css
Any CSS code you want to add write it in the extra.css file in the "stylesheets" folder.
Customization
These are other ways I chose to customize the website.
Removing Icon Next to Name
By default, it's something that looks like a book of some kind next to your name on the top left corner. For now, I chose to remove it.
I started by writing this new line of code in the mkdocs.yml file.
theme:
  # The name of the theme, needs to match your requirements.txt file
  name: material
  logo: null
  custom-dir: overrides
  # Material theme options:
I then commented out the following in the same file.
  #icon:
    # Read about icons at https://squidfunk.github.io/mkdocs-material/setup/changing-the-logo-and-icons/
    #logo: material/library
    #repo: material/gitlab
I also uncommented:
extra_css:
  - stylesheets/extra.css
In the extra.css file, I wrote the following code:
.md-header__button.md-logo {
    display: none !important;
  }
Removing Icon Next to Name BUT Personalize Icon Displayed on Web Tab
Keep the settings in the previous section.
Just add the line starting with "favicon". Add the path to your own personalized image.
theme:
  # The name of the theme, needs to match your requirements.txt file
  favicon: images/home/fishsmall.png
  name: material
  custom-dir: overrides
  # Material theme options:
Removing Gitlab Link Next to Search Bar
Under site_url I commented out the following lines of code.
#repo_url: https://gitlab.fabcloud.org/academany/fabricademy/2026/students/marissa-renteria
#repo_name: fabricademy/2026/marissa-renteria
No more Gitlab link!
Removing Gitlab Revision Date at Bottom of Pages
Under "Plugins" in the mkdocs.yml file, I commented out the following line of code.
# - git-revision-date:
No more revision date!
Resources
Resources that will help.
- Markdown Guide - This honestly helped me more than anything. Aside from just asking the internet how to do something in particular.
- Mkdocs - This is more codespeak in case you have more experience
- Browse other Fabricademy participant documentation, either by going to their Gitlab repository or reading their findings under their Week 1 page. They have a ton of information and probably information that you have specific questions about.
- I particularly referenced previous Fabricademy participant Diane Wakim's documentation.