12. Skin Electronics#

SKIN ELECTRONICS
My project this week is to create a capactivea touch bracelout out of conductive ink. The concept is to have a trace of condcutive ink painted on my hand that when brushed will reduce/increase the resistance between the battery and LED. As a result of resistance decreasing the LED will light up as a visual representation of reduced resistance. The idea is simply but I think it is a great example of using something the skin as a part of a circuit.

TOOLS USED
- LilyPad
- LED
- Conductive Ink
- Wool
- BARE Condcutive Thread
- CoinCell Battery + Battery Holder
- Copper Tape
Step 1
Preparing The Proximity Area
Using masking tape, I started by taping the proximity area onto my hand. The proximity area was a 1”x2” square at the center of the back of my writst. While tape I also made sure to create 1” strip that runs down my hand to my wrist. This will strip will be the contact point between the conductive in and the bracelet.

Step 2
Preparing The Bracelet
I took a piece of wool and measured out a 3”x12” strip that I cut out. This strip will be used to host the electonics.
Step 3
Creating the Circuit
Using conducutive thread I started sewing the different components to the strip I just cut out. For my circuit layout I used Kobakant’s knitted Capactive Touch schematics as a reference. The main differences I made in mind circuit was that there is only one captacitive touch area and that the power is directly connected to the battery on the bracelet
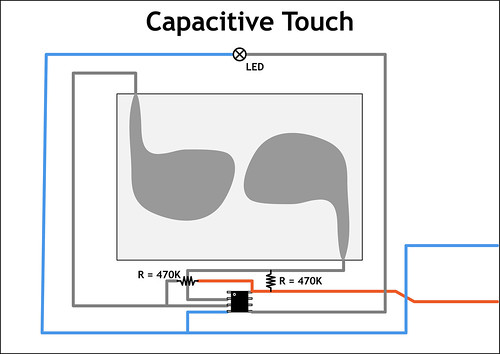
.jpg)

Step 4
Creating the Connection Points (Bracelet)
I used copper tape to creation a secure connection beteween the bracelet and the conductive ink on my skin. I place the tape on the bottom of the bracelet where it will sit directly on top the conductive ink. I then used conductive thread to sew a a connection from the tape to the rest the board.
Step 5
CODE
include
CapacitiveSensor cs_7_8 = CapacitiveSensor(7,8); //10M Resistor between pins 7 and 8, you may also connect an antenna on pin 8
unsigned long csSum;void setup() {
Serial.begin(9600);
}void loop() {
CSread();
}void CSread() {
long cs = cs_7_8.capacitiveSensor(80); //a: Sensor resolution is set to 80
if (cs > 100) { //b: Arbitrary number
csSum += cs;
Serial.println(cs);
if (csSum >= 3800) //c: This value is the threshold, a High value means it takes longer to trigger
{
Serial.print(“Trigger: “);
Serial.println(csSum);
if (csSum > 0) { csSum = 0; } //Reset
cs_7_8.reset_CS_AutoCal(); //Stops readings
}
} else {
csSum = 0; //Timeout caused by bad readings
}
}
Unfortunately at the time I was not able to make this work. From doing some searching online I found out that Arduino’s Capactive Touch Library does not work well with LilyPads.
UPDATE
I did some googling and founds this gem online. This person made a a capactive touch Piano Key swatch that using a different capactivy touch that works will with the Lily Pad. If i was to approach this project again I will use this as a referecne when coding my Lily Pad to work the way I imagined it to.
REFERENCE: Capctive Touch Piano Keys