8. Open source hardware: from fibers to fabric#

Statement#
As a designer with a sustainable perspective, I think that we should get envolved in the whole cycle of production. From fibers to fabrics, from fabrics to garments and from garments to the customers use of them. So it’s about taking care of the whole life cycle of what we produce.
Raw materials its the first step. If we can manage to do it with no chemicals envolved as pesticides, animal or plants suffering, good & healthy working conditions, and without pollution, we can reach a sustainable beggining.
The next step is processing those resources, without polluting the water as well as being concious of the use of energy envolved in the process. The same in the manufacturing processes, where you have to manage energy and waste in a responsible way. If you cannot do it zero waste in terms of materials, but your materials are 100% biodegradable, you can use them for compost, or create another thing with your ‘waste’.
Packaging is another key issue, where the use of paper & plastic, and the short life of them is harming the environment. So you should think about how to manage that too.
Then transportation comes to the picture, where producing locally is the best to avoid contamination.
And at the end of the cycle is the use of them, where washing chemicals should be avoided, as well as being conscious of the amount of water involved. As well as the disposal, reuse or recycle of the garments.
So, getting envolved in the whole process and creating our own materials is the best starting point to control the whole chain. Also, if you create your own material, possibilities are endless, and you can design managing resources to reach whatever you want to create.
Main principles for circular fashion:
• design with a purpose
• design for longevity
• design for resource efficency
• design for biodegradability
• design for reciclability
• source & produce locally
• source & produce without polluting
• source & produce with efficency
• source & produce with renewables
• source & produce with ethics
• collaborate well & widely
• reuse, recycle & compost
• use, wash & repair
• rent, lease, swap & secondhand
By collaborate well & widely I mean to be open source with whatever you are fabricating. I think this is the clue that allows us to produce locally. Producing is good, but serving the community with your idea to produce their own garments is a way of going against fast fashion, and for sure a way to avoid contamination of transportation, and if your creation is sustainable it’s a way of going against fast fashion boundless contamination as well. So, it’s all about SHARING. If you have a good idea that can help other people to produce locally and sustainable, think about sharing it with others!
Main idea#
The idea for this project is to create a fabric, from the starting point of creating the yarn.
To be more specific, the aim is to create a yarn with seeds inside, make a woven surface out of it, and then germinate them to create a growing fabric to say louder: ‘we should be closer nature, let’s sorround ourselves from it’.
I strongly believe we should go step backwards and do it old school, we should use natural resources to create garments and that way live in harmony with the environment.
Open source hardware#
With the help of Studio Hilo, we created our own spinning machine!
Studio Hilo is a duo of nice women, Sara Diaz Rodriguez and Natalija Krasnoperova, that created an open source hardware spinning machine. They came to Barcelona to share with us their machine and gave us a tutorial of how to make it.
Their aim is to simplify yarn production for designers in a sustainable and local way. The Hilo machine is an open shource hardware spinning machine, which allows better management of the qualities of the yarn that’s being produced.
It also allows you to design from the beggining of the cycle, thinking about the yarn you want to create. Also, it implicates a circular production as making customized yarns to create the fabric, means the user is in charge of the amounts needed to produce it and this way you reach the standards of zero waste.
Hilo also offers an open source software that incorporates technology, which produce different patterns and effects on the yarns that can be appreciated in the woven surface. Depening on the size of the surface and the thickness of the yarn, controlled by the amount fibres being selected as the machine spins it.
Building the machine#
To build the machine we worked in pairs. My awsome partner is Catherine Euale
Studio Hilo provided us the files to laser cut the different pieces of the machine.
The settings for laser cutting were: power 80 - speed 0.5 - PPI/Hz 1000.
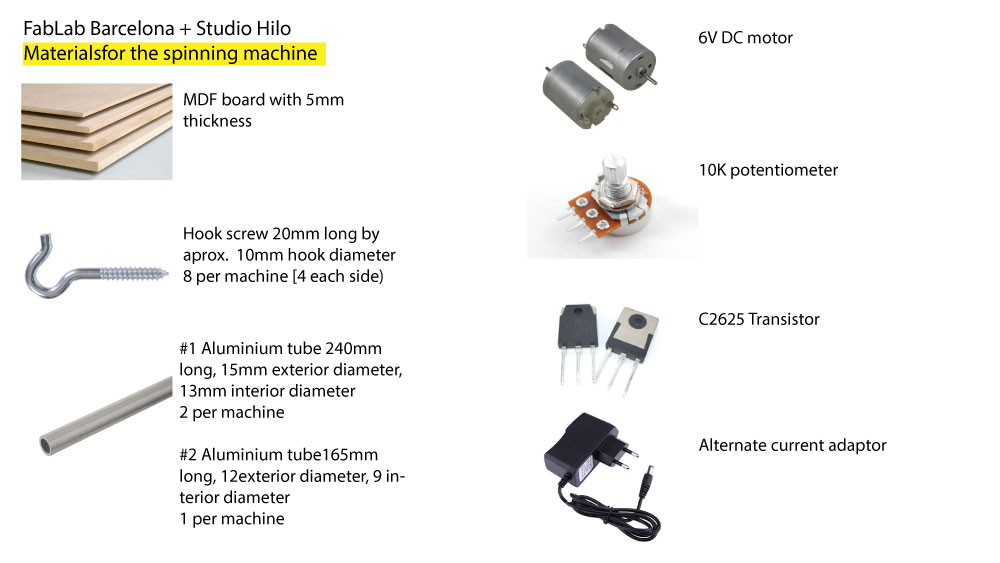
They also provided us with a list of materials we needed.
We also used a breadboard, some wires, a solding kit, glue to stick the pieces and a drill to make some holes.

Once laser cut, we where hands on the assembling of them.

After assembling, it’s time work on its electronics. We needed to connect the 6v motor with the potentiometer, the C2625 transistor and an alternate current adaptor.
This is the circuit!

To connect everything we weld some pieces of the circuit.
Afterwards we plugged it and tested if it works.
Working in groups, collaborating and meanwhile sharing good vibes is very important! Here you can have a glance of the workshop.
Germination#
I wanted to add seeds to the yarn and germinate them once weaven. So the first step was to explore the germinating process.
To do it correctly I did some research to learn how to do it correctly.
It is very important to use seeds from organic farming and good quality, free of manipulations, pesticides and any type of chemicals. They are many germination methods, and the adecuate one depends on the type of seeds you are using. If we don’t use the right method, the seeds don’t have their favorable conditions to grow.
If we germinate mucilaginous seeds, such as arugula, flax, basil, watercress and mustard, we must use a method that allows them to be extended, aerated and moist, as is the case with germination dishes. The seeds are on a grid that allows them to maintain humidity (under the grid there is water) and they do not pile up, because they are well spread. In the other hand non-mucilaginous seeds germinate well in all the germinators: jars, plates or electric germinator.
Light, temperature, air and humidity are important variables to take care of.
If there’s no light, the sprouts will grow but will be a little whitish. So it’s better to germinate them with good light conditions, though not with direct sunlight. Artifical light in a room is more than okay.
Also there must be aeration, constant humidity but not excess of water and warm temperature. If the temperature is cold the seeds won’t grow or they do it very slowly, if it is very hot mushrooms or other microorganisms can proliferate. The temperature of the interior of the house is very suitable for germination.
Before spinning the seeds yarn I did some germination tests with chia seeds to check if they grow and how long it takes.
I put them on top of a flat surface (plate) and put some kitchen paper on top. Then spread the seeds and take care of them adding water every day in small quantities. Between one week and ten days, I’ve got sprouts!

Prepare the yarn#
Now it’s time to spin the seeds yarn! I’ve tried with flax and chia seeds.
• Spread the wool fibers on a flat surface
• Locate carefully the seeds all over the fibers
• Spray some water on it
• Roll them like kneading spaghetti
• Spin your yarn!

Flax seeds yarn from Lara Campos on Vimeo.
Chia seeds yarn from Lara Campos on Vimeo.
Spinning#
To spin the yarn you need some fibers and practice! At first it was quite difficult, the yarn was irregular and sometimes it broke. But once you get it, you can create your customized yarn very fast!
For spinning the yarn you have to ve quick with your hands, with one hand you control the spin as you pres sor release the fibers, while with the other one you stretch and divide the fibers as supplying the other hand of the quantity of fibers you need.
Spinning the flax seeds yarn was quite hard as the machine’s holes are almost the same size of the length of the seeds. So the ones that end up perpendicular to the fibers blow away when they go through this holes.
While chia seeds yarn spinning was way better. After spraying some water on them, the chia seeds release some kind of gel around them that allows them to stick to the fibers. Also, their size is optimum to go through the spining machine holes.

Once you take it from the machine it looks like this!

Weaving#
As I was envolved in the whole process, I wanted to create my own loom. Though it’s roots, it’s perfect for weaving small samples.
To build it I used some wood, nails and a hammer.
Actually I built one at home with a squared piece of wood I found, and another one at the lab which I cut the wood and build it from the start. Once with the wooden rectangle ready, put nails on two of the sides of it by using a hammer, at 1 cm distance from each other. Then I put another nail at one of the sides where I will tie the beggining of the yarn to keep it tight for the weaving.
Both looms are easy to DIY in a moment and to weave. It’s necessary to have a flat long wood or tool to divide the warp and be able to pass the yarn through it.
So, at first you have to tie the warp on all the nails tight enough to create a good weaven piece. For the warp I used wool yarn (I also spinned) for the flax seeds weaving, and paper yarn for the chia seeds weaving. I wanted to try different materials to see which one is better.

Then I tied the beggining of the yarn to the extra nail and started weaving.
For another project I’ve built a more sophisticated loom with rotative edges to weave long pieces. You can check it and download the files here.
Below you can see some pictures and video of the process.

It’s very important to tight the weft, pressing it together. Though not that much because in this case I needed some space for the seeds to grow.
The last step is to cut the warp near the nails and tie every loose end.
Results#

Once woven the samples it’s time to germinate!
I used a flat basin and put some kitchen paper on top of it. Then located the samples and with a sprayer watered them every day. This are the results!


Now it’s time to generate a garment! I will spin more chia seeds yarn and weave a poncho, to say it loud and clear… LET’S GO CLOSER TO NATURE!