4.ELECTRONICS
Sensors
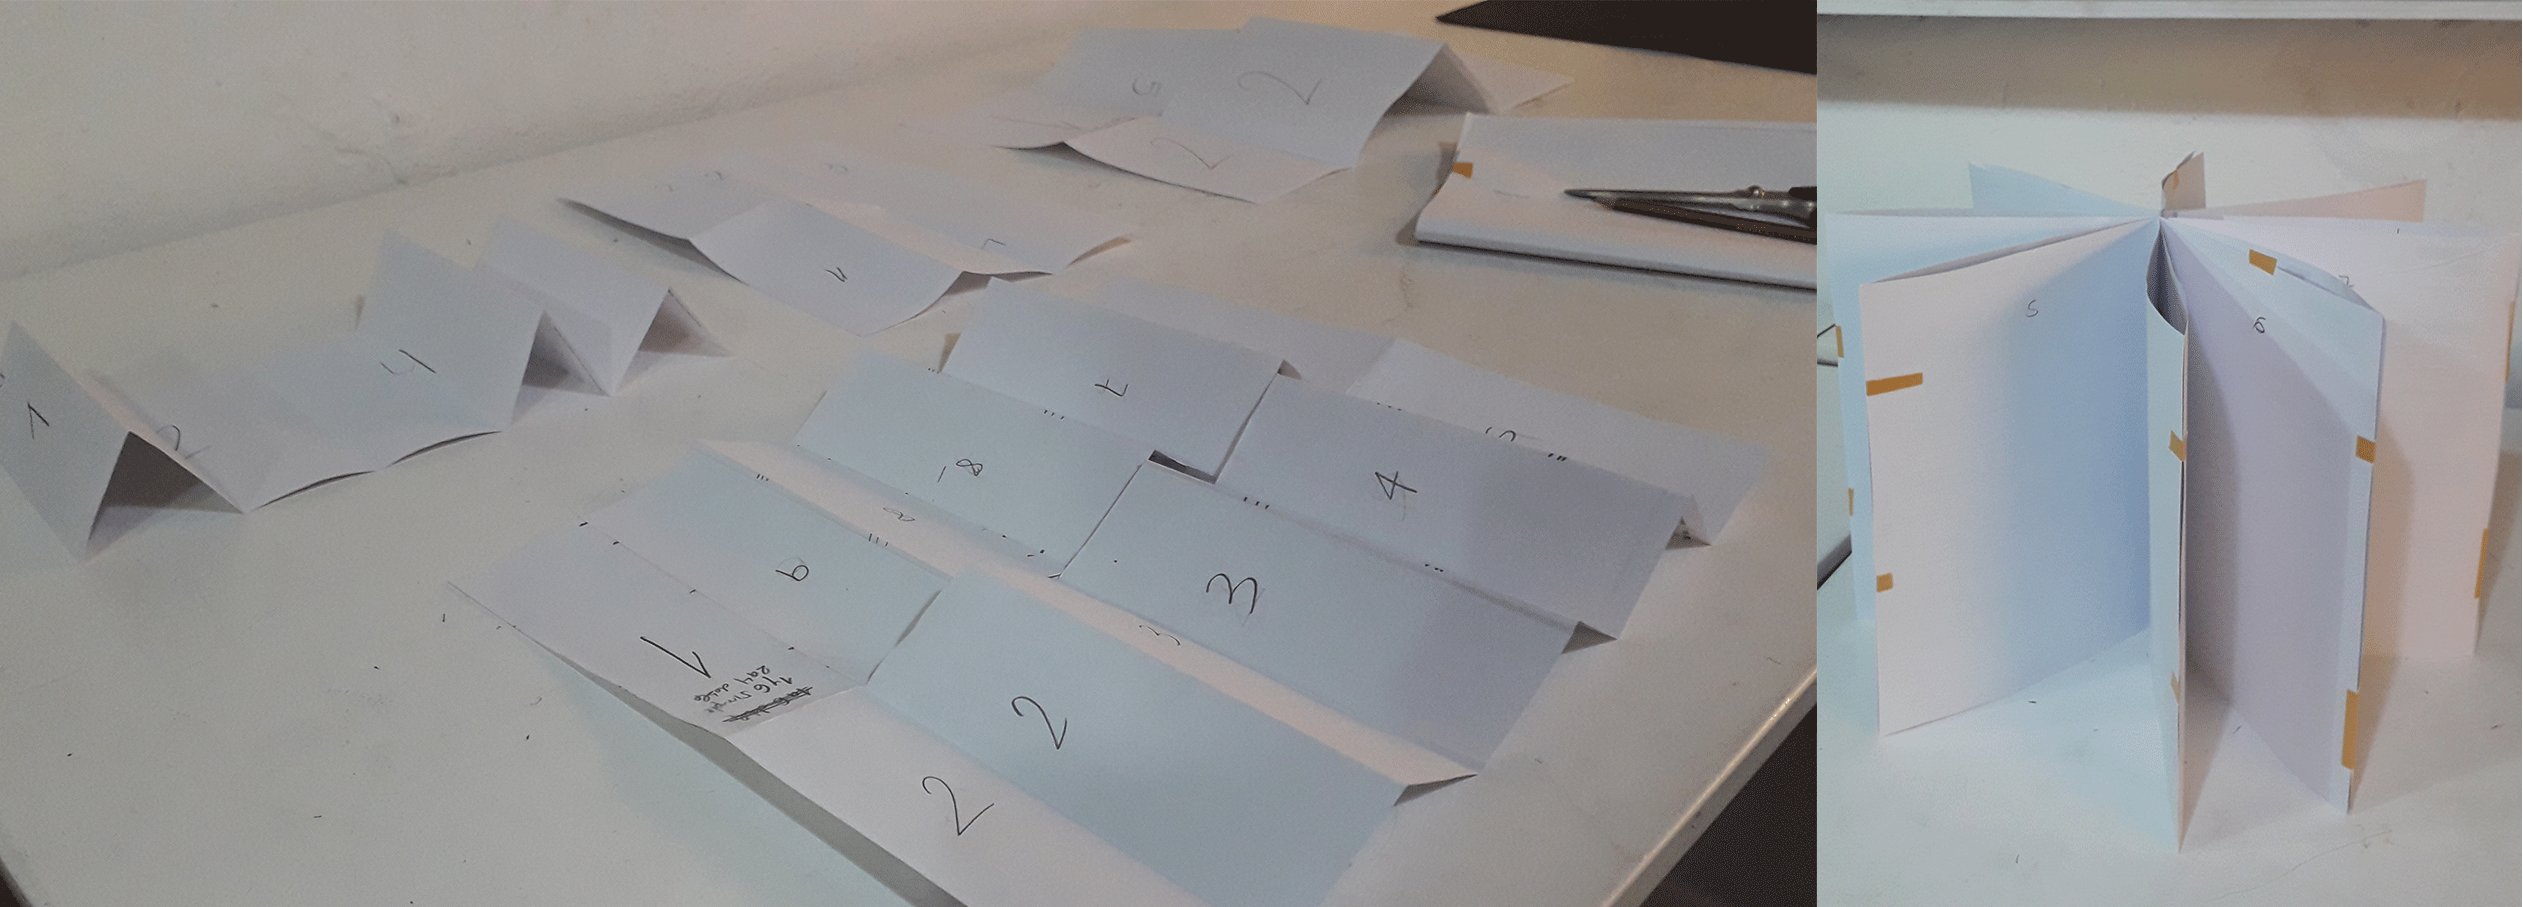
Folding paper
To be able to order the sensors, to know how many I could develop and in what order so that the shape is determined by the function, I made a set of paper folds
Sensor development NEW
Stay at home
Read first!
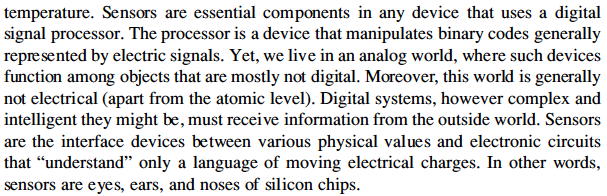
The purpose of a sensor is to respond to some kind of an input physical property (stimulus) and to convert it into an electrical signal that is compatible with electronic circuits
We may say that a sensor is a translator of a generally nonelectrical value into an electrical value.
What is a integrated circuit Silicon chip
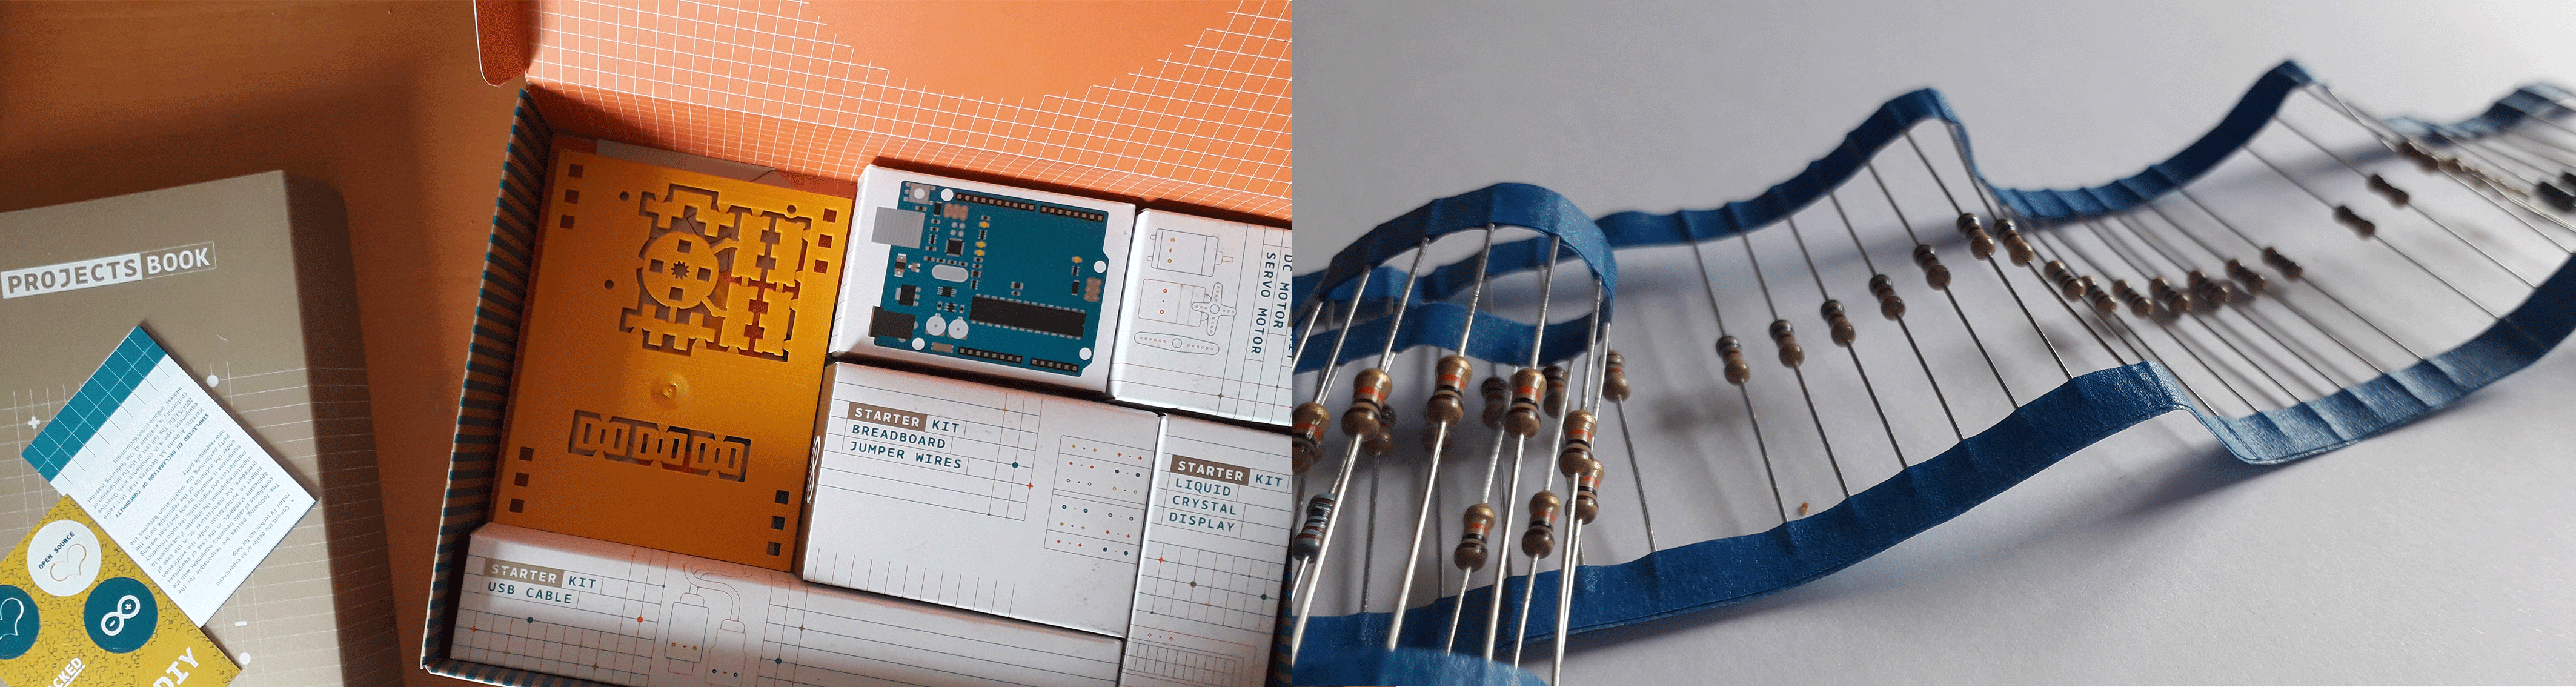
Arduino
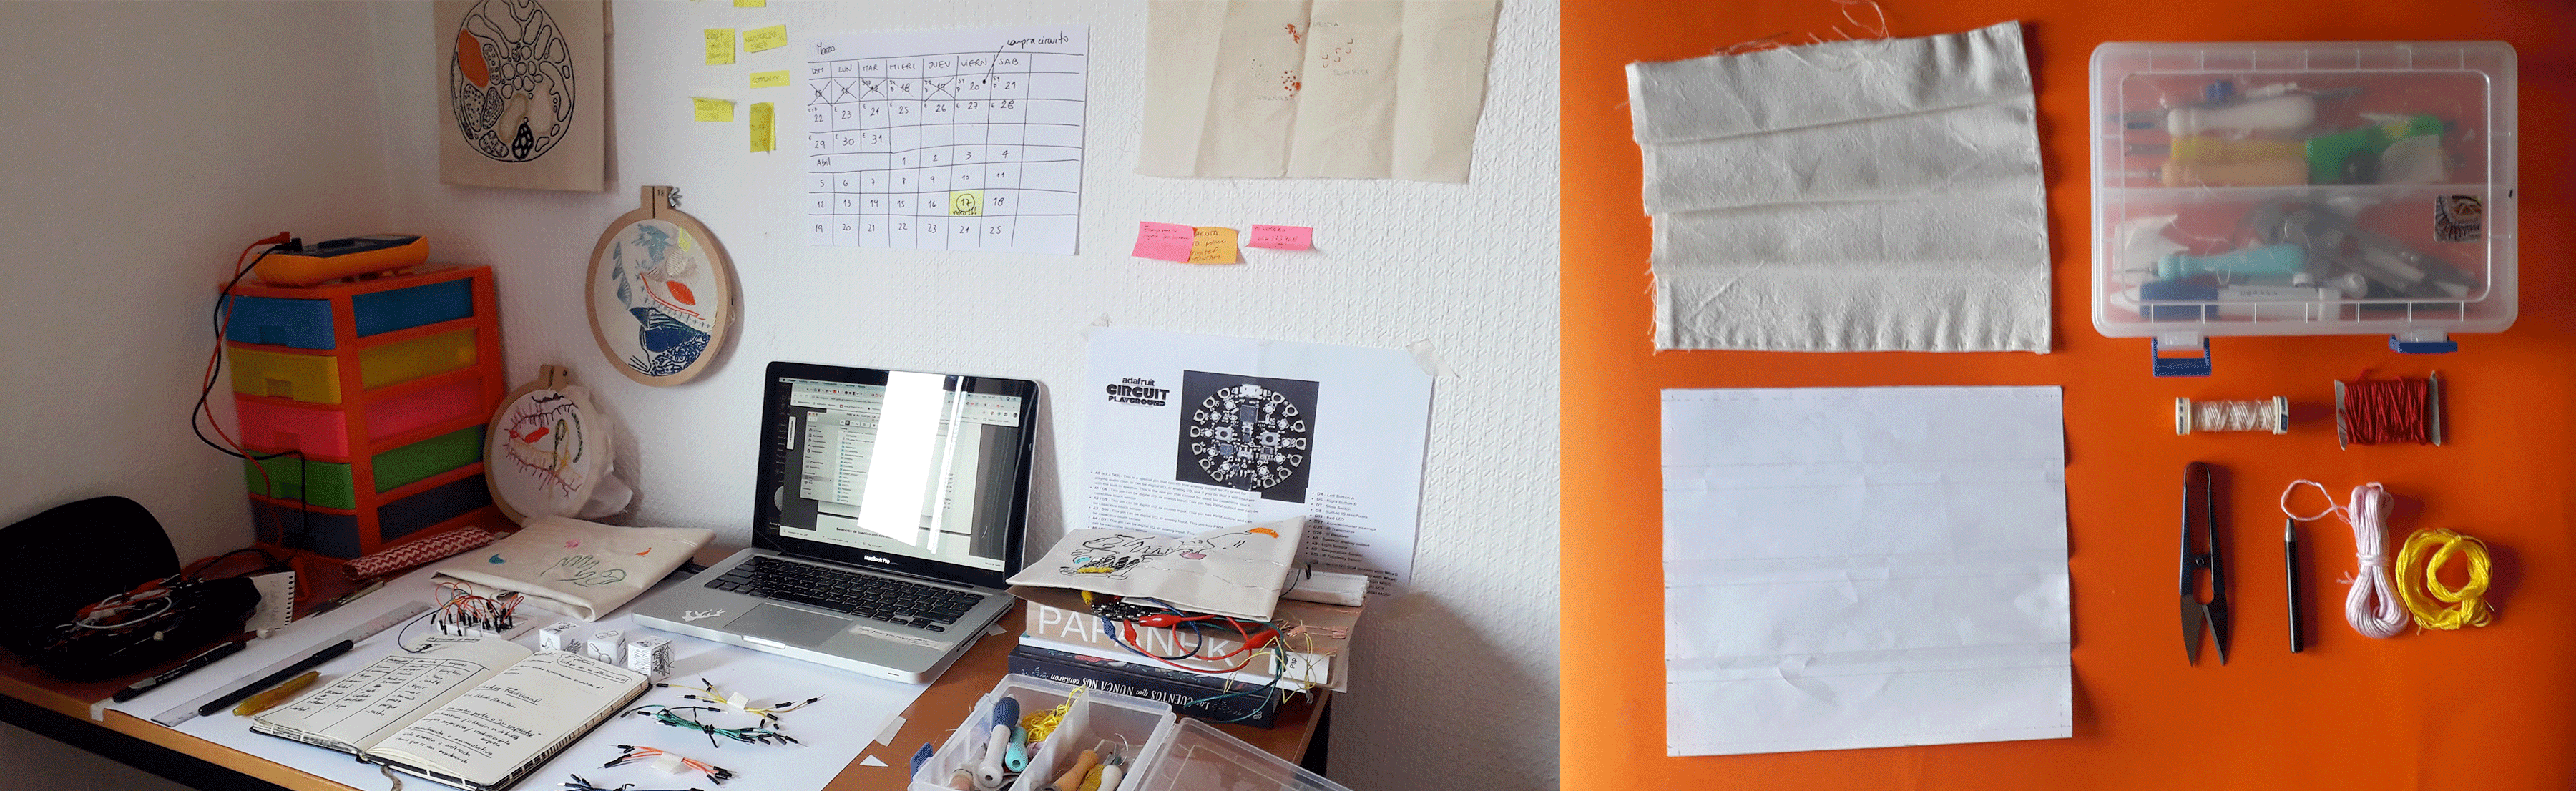
Connecting with arduino again In COVID times I had the opportunity to spend time on mini projects with Arduino!.I explain them here and review the bases that we began to see in the e-textile week
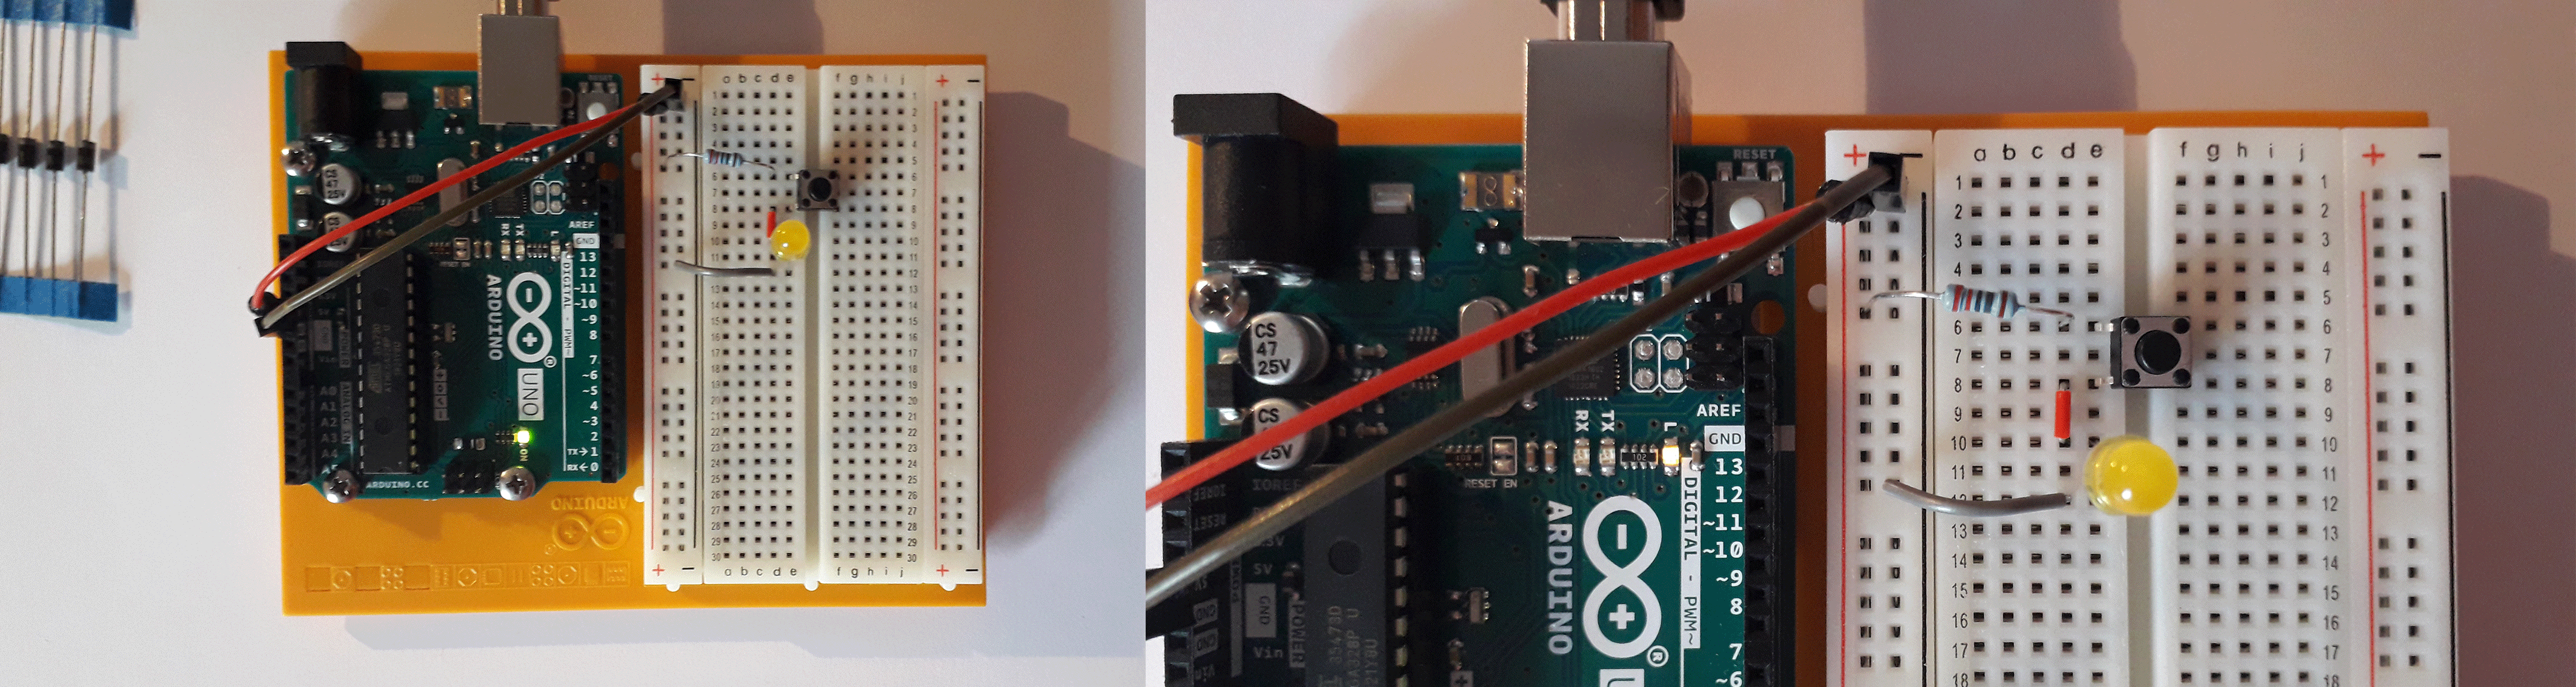
Series switch
& Parallel
Digital input & outputs, Variables
int switchState = 0;
void setup() {
  pinMode(3,OUTPUT);
  pinMode(4,OUTPUT);
  pinMode(5,OUTPUT);
  pinMode(2,OUTPUT);

}

void loop() {
  switchState = digitalRead (2);

  if (switchState==LOW) {
      // the button is not press
    digitalWrite (3, HIGH);//cyan led
    digitalWrite(4,LOW);//yellow led
    digitalWrite(5,LOW);//yellow led
  }
  else{ //thebutton is pressed
    digitalWrite(3,LOW);
    digitalWrite(4,LOW);
    digitalWrite(5,HIGH);
    delay(300); //wait for a quartes second
    digitalWrite (4,HIGH);
    digitalWrite(5,LOW);
    delay (100);//
  }

}//go back to he beginning of the loop
Temperature Sensor

const int sensorPin= A0;
const float baselineTemp= 24.22;
void setup() {
Serial.begin (9600);//open a serial port
for (int pinNumber= 2; pinNumber<5; pinNumber++){
pinMode(pinNumber, OUTPUT);
digitalWrite(pinNumber,LOW);
}
}
void loop() {
int sensorVal= analogRead (sensorPin);
Serial.print("Sensor Value");
Serial.print (sensorVal);
//convert the ADC reading to voltage
float voltage = (sensorVal/1024.0) * 5.0;
Serial.print (",Volts:");
Serial.print(voltage);
//convert the voltage to temperature in degrees
Serial.print("degrees C:");
//convert the voltage to temperature in degrees
float temperature = (voltage-.5) *100;
Serial.println(temperature);
if(temperature<baselineTemp+2){
digitalWrite(2,LOW);
digitalWrite(3,LOW);
digitalWrite(4,LOW);
}else if(temperature>=baselineTemp+2&&
temperature<baselineTemp+4){
digitalWrite(2,HIGH);
digitalWrite(3,LOW);
digitalWrite(4,LOW);
}else if(temperature>=baselineTemp+4&&
temperature<baselineTemp+6){
digitalWrite(2,HIGH);
digitalWrite(3,HIGH);
digitalWrite(4,LOW);
}else if(temperature>=baselineTemp+6){
digitalWrite(2,HIGH);
digitalWrite(3,HIGH);
digitalWrite(4,HIGH);
}
delay(1);
}
```
##Using termoresistors RGB leds & mapping values
FALTA SKETCH
FALTA VIDEO

//constant outputs const int greenLEDPin=9; const int redLEDPin=10; const int blueLEDPin=11;
//constant inputs const int redSensorPin= A0; const int greenSensorPin= A1; const int blueSensorPin= A2;
//variables
int redValue=0; int greenValue=0; int blueValue=0;
int redSensorValue=0; int greenSensorValue=0; int blueSensorValue=0;
void setup() { Serial.begin(9600); pinMode(greenLEDPin,OUTPUT); pinMode(redLEDPin,OUTPUT); pinMode(blueLEDPin,OUTPUT); // put your setup code here, to run once:
}
void loop() { // put your main code here, to run repeatedly:
redSensorValue=analogRead(redSensorPin); delay(5); greenSensorValue=analogRead(greenSensorPin); delay(5);
blueSensorValue=analogRead(blueSensorPin); Serial.print ("Raw Sensor Values\t red;"); Serial.print(redSensorValue); Serial.print("\t green:"); Serial.print(greenSensorValue); Serial.print("\t blue:"); Serial.println(blueSensorValue); redValue=redSensorValue/4; greenValue=greenSensorValue/4; blueValue=blueSensorValue/4;
Serial.print("Mapped Sensor Values\t red:"); Serial.print(redValue); Serial.print("\t green:"); Serial.print(greenValue); Serial.print("\t blue:"); Serial.print(blueValue);
analogWrite(redLEDPin, redValue); analogWrite(greenLEDPin, greenValue); analogWrite(blueLEDPin, blueValue);
} ```
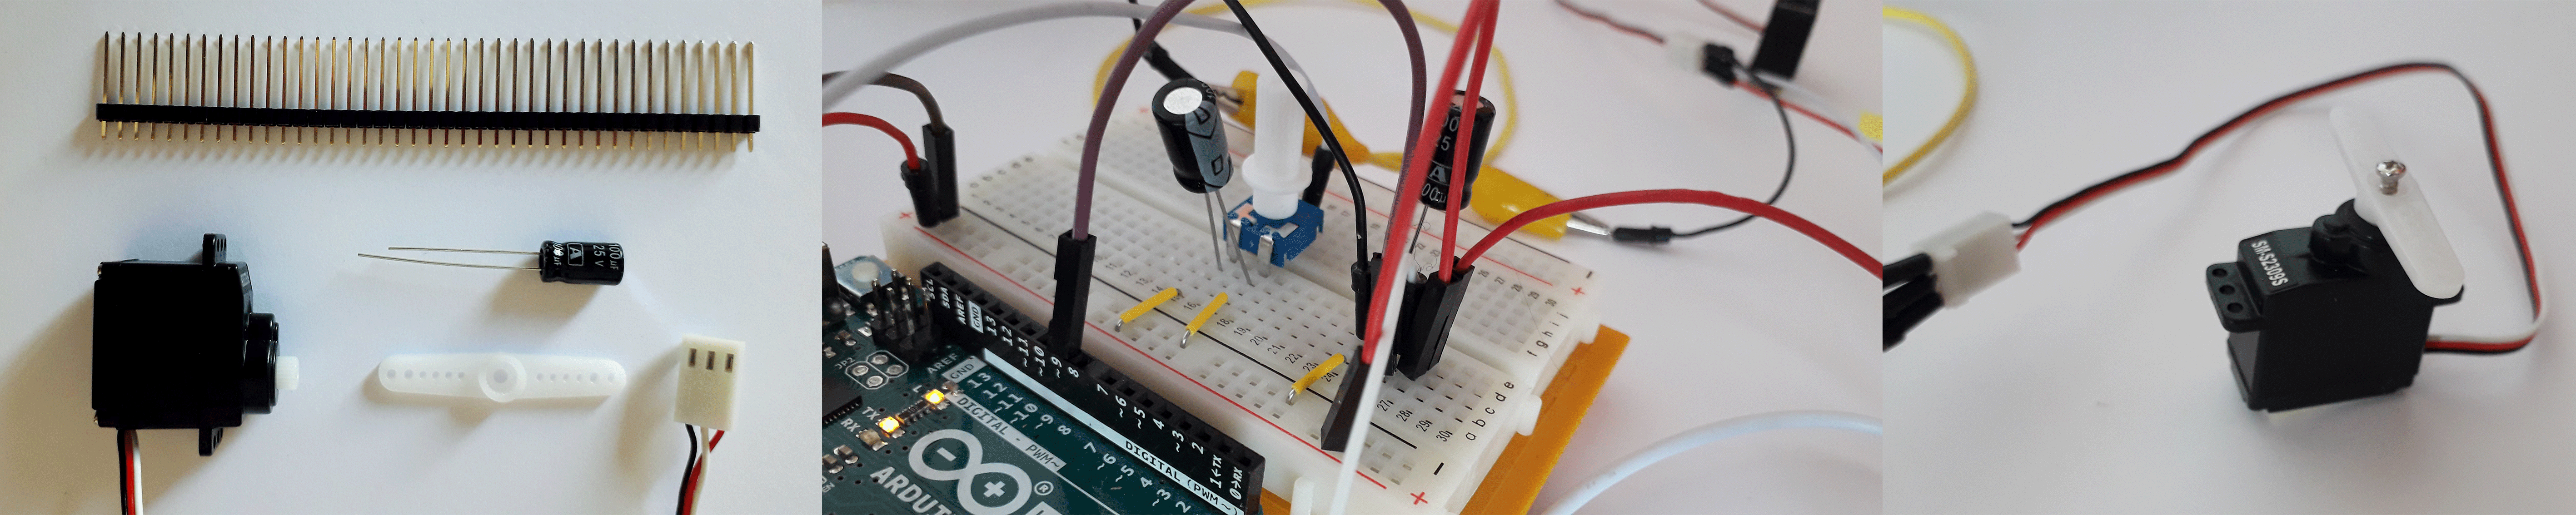
Servo motor
#include <Servo.h>
Servo myServo;
int const potPin = A0;
int potVal;
int angle;

void setup() {
  // put your setup code here, to run once:
 myServo.attach(9);
 Serial.begin(9600);
}

void loop() {
  // put your main code here, to run repeatedly:
potVal=analogRead(potPin);
Serial.print("potVal:");
Serial.print(potVal);
angle= map(potVal,0,1023,0,179);
Serial.print(",angle:");
Serial.println(angle);
myServo.write(angle);
delay(15);
}
Theremin
int sensorvalue;
int sensorLow=1023;
int sensorHigh=0;
const int ledPin=13;


void setup() {
  // put your setup code here, to run once:
pinMode(ledPin,OUTPUT);
digitalWrite(ledPin,HIGH);
while(millis()< 500
){
  sensorvalue= analogRead (A0);
  if (sensorvalue>sensorHigh){
    sensorHigh=sensorvalue;
  }
if (sensorvalue< sensorLow) {
  sensorLow=sensorvalue;
  }
}
 digitalWrite(ledPin,LOW);
}
void loop() {
  // put your main code here, to run repeatedly:
sensorvalue= analogRead(A0);
int pitch=
map(sensorvalue,sensorLow,sensorHigh,50,4000);
tone(8,pitch,20);
delay(10);
}
Keyboard Instrument
int notes []={262,294,330,349};
void setup() {
  // put your setup code here, to run once:
Serial.begin(9600);
}

void loop() {
  // put your main code here, to run repeatedly:
int keyVal=analogRead(A0);
Serial.println(keyVal);
if(keyVal==1023){
  tone(8,notes[0]);
 }
else if(keyVal>=900 && keyVal<= 1010){
  tone(8,notes[1]);
 }
else if(keyVal>=450 && keyVal<= 515){
  tone(8,notes[2]);
 }
  else if(keyVal>=4 && keyVal<= 10){
   tone(8,notes[3]);
  }

  else{
   noTone(8);
  }
}
Investigating capacitive sensor with Adafruit Circuit Playground Classic
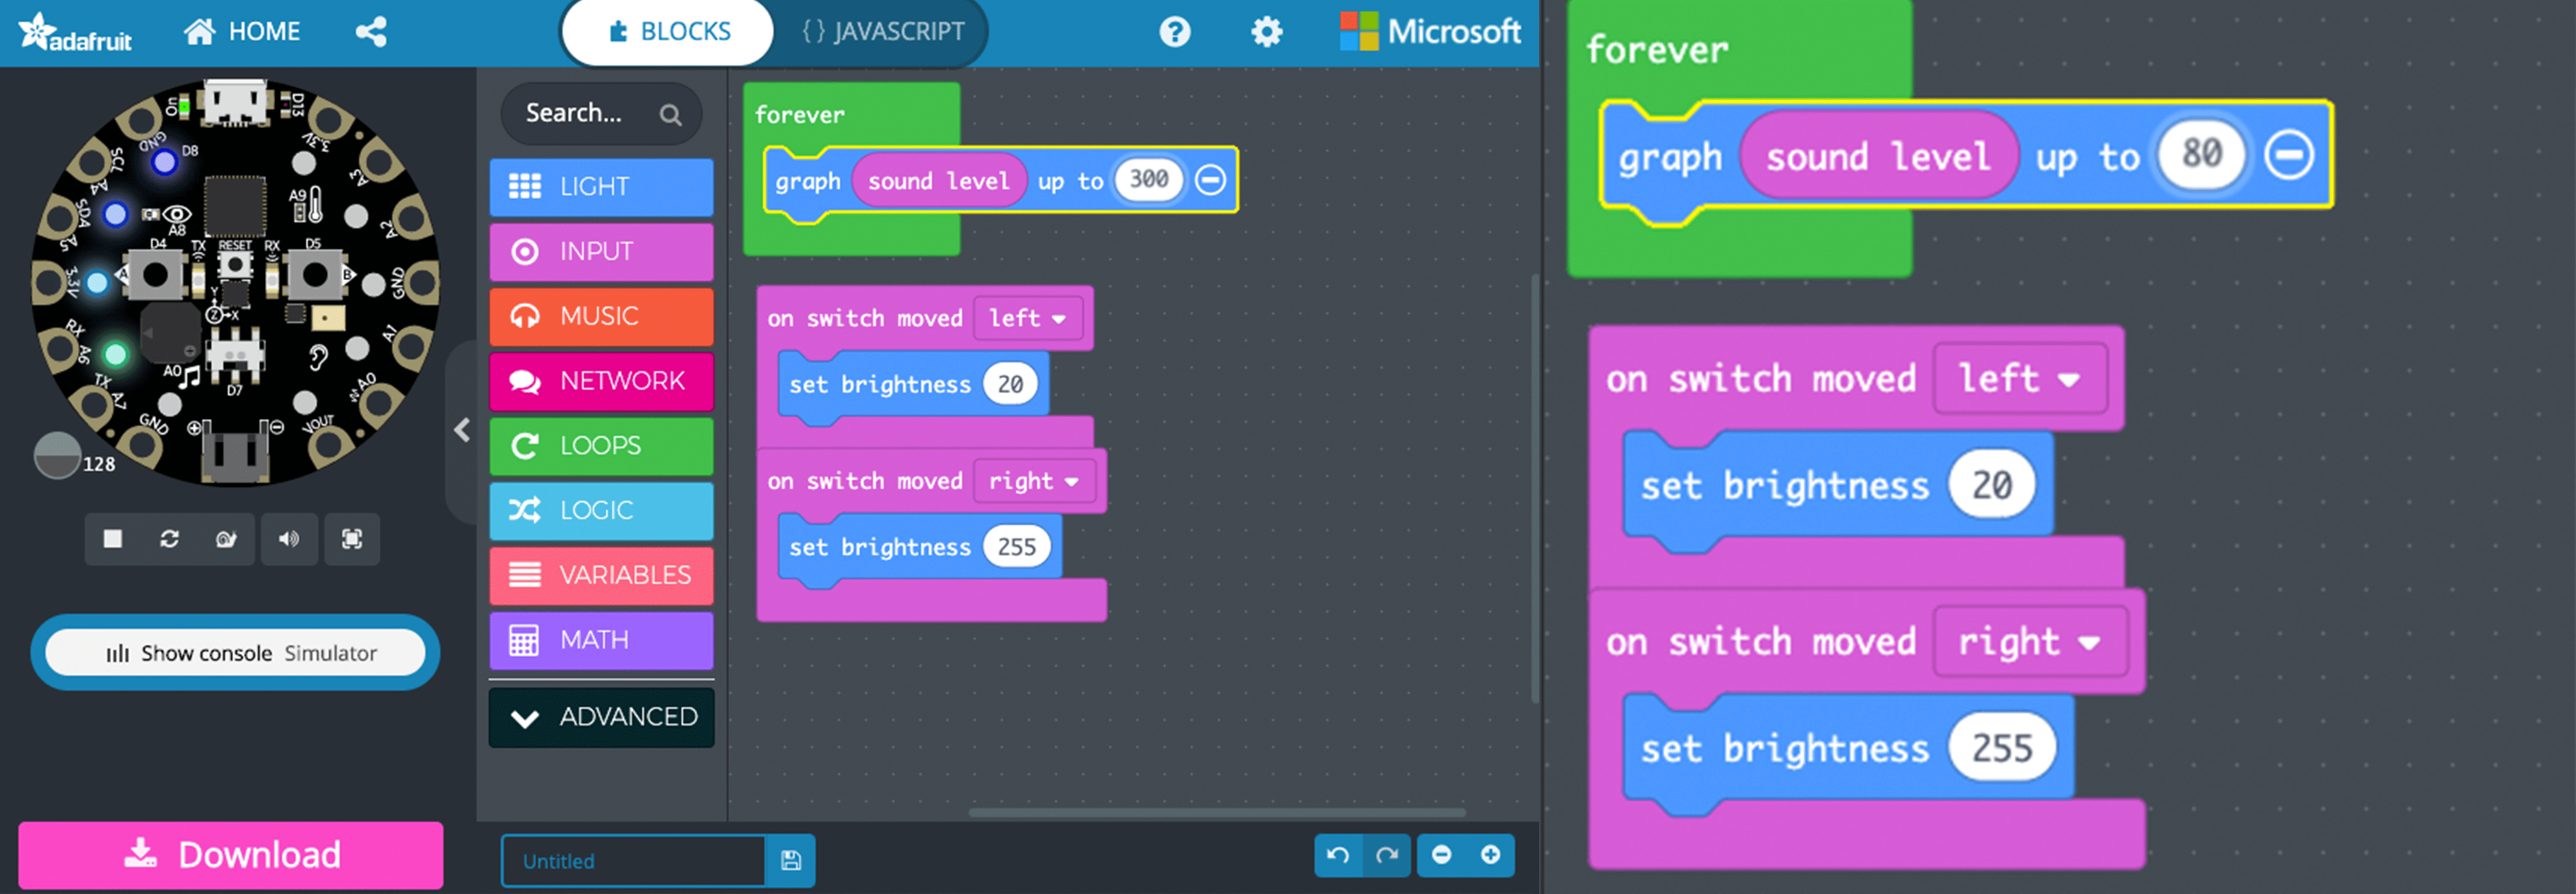
capacitive sensor tutorial with circuit playground
Sound & light
Another example with accelerometer
#include <Adafruit_CircuitPlayground.h>
#include <Wire.h>
#include <SPI.h>
#include <math.h>

float X, Y, Z; // Accelerometers

#define CLICKTHRESHHOLD 80 // Tap Threshold
#define MIC_PIN         A4  // Microphone is attached to this analog pin (A4 for circuit playground)
#define SAMPLE_WINDOW   10  // Sample window for average level
#define PEAK_HANG       24  // Time of pause before peak dot falls
#define PEAK_FALL        4  // Rate of falling peak dot
#define INPUT_FLOOR     10  // Lower range of analogRead input
#define INPUT_CEILING  500  // Max range of analogRead input, the lower the value the more sensitive (1023 = max)


byte peak = 16;        // Peak level of column; used for falling dots
unsigned int sample;
byte dotCount = 0;     //Frame counter for peak dot
byte dotHangCount = 0; //Frame counter for holding peak dot

float fscale(float originalMin, float originalMax, float newBegin, float newEnd, float inputValue, float curve);

void setup(void) {
  while (!Serial);

  Serial.begin(9600);
  CircuitPlayground.begin();

  CircuitPlayground.setAccelRange(LIS3DH_RANGE_8_G);   // TAPS (2/4/8/16)
  CircuitPlayground.setAccelTap(1, CLICKTHRESHHOLD);
  attachInterrupt(digitalPinToInterrupt(CPLAY_LIS3DH_INTERRUPT), tapTime, FALLING);
}

void tapTime(void) {
  // do something :)
   Serial.print(" High ");
   Serial.println(" ");
}

void loop() {

  X = CircuitPlayground.motionX();
  Y = CircuitPlayground.motionY();
  Z = CircuitPlayground.motionZ();


  Serial.print(" ");
  Serial.print(X);
  Serial.print(" ");
  Serial.print(Y);
  Serial.print(" ");
  Serial.println(Z);

  int numPixels = CircuitPlayground.strip.numPixels();
  unsigned long startMillis= millis();  // Start of sample window
  float peakToPeak = 0;   // peak-to-peak level

  unsigned int signalMax = 0;
  unsigned int signalMin = 1023;
  unsigned int c, y;

  // collect data for length of sample window (in mS)
  while (millis() - startMillis < SAMPLE_WINDOW)
  {
    sample = analogRead(MIC_PIN);
    if (sample < 1024)  // toss out spurious readings
    {
      if (sample > signalMax)
      {
        signalMax = sample;  // save just the max levels
      }
      else if (sample < signalMin)
      {
        signalMin = sample;  // save just the min levels
      }
    }
  }
  peakToPeak = signalMax - signalMin;  // max - min = peak-peak amplitude

  // Serial.println(peakToPeak);

  //Fill the strip with rainbow gradient
  for (int i=0;i<=numPixels-1;i++){
    CircuitPlayground.strip.setPixelColor(i,Wheel(map(i,0,numPixels-1,30,150)));
  }

  //Scale the input logarithmically instead of linearly
  c = fscale(INPUT_FLOOR, INPUT_CEILING, numPixels, 0, peakToPeak, 2);

  // Turn off pixels that are below volume threshold.
  if(c < peak) {
    peak = c;        // Keep dot on top
    dotHangCount = 0;    // make the dot hang before falling
  }
  if (c <= numPixels) { // Fill partial column with off pixels
    drawLine(numPixels, numPixels-c, CircuitPlayground.strip.Color(0, 0, 0));
  }

  // Set the peak dot to match the rainbow gradient
  y = numPixels - peak;
  CircuitPlayground.strip.setPixelColor(y-1,Wheel(map(y,0,numPixels-1,30,150)));
  CircuitPlayground.strip.show();

  // Frame based peak dot animation
  if(dotHangCount > PEAK_HANG) { //Peak pause length
    if(++dotCount >= PEAK_FALL) { //Fall rate
      peak++;
      dotCount = 0;
    }
  }
  else {
    dotHangCount++;
  }
}

//Used to draw a line between two points of a given color
void drawLine(uint8_t from, uint8_t to, uint32_t c) {
  uint8_t fromTemp;
  if (from > to) {
    fromTemp = from;
    from = to;
    to = fromTemp;
  }
  for(int i=from; i<=to; i++){
    CircuitPlayground.strip.setPixelColor(i, c);
  }
}


float fscale( float originalMin, float originalMax, float newBegin, float
newEnd, float inputValue, float curve){

  float OriginalRange = 0;
  float NewRange = 0;
  float zeroRefCurVal = 0;
  float normalizedCurVal = 0;
  float rangedValue = 0;
  boolean invFlag = 0;


  // condition curve parameter
  // limit range

  if (curve > 10) curve = 10;
  if (curve < -10) curve = -10;

  curve = (curve * -.1) ; // -
  curve = pow(10, curve); //


  // Check for out of range inputValues
  if (inputValue < originalMin) {
    inputValue = originalMin;
  }
  if (inputValue > originalMax) {
    inputValue = originalMax;
  }

  // Zero Refference the values
  OriginalRange = originalMax - originalMin;

  if (newEnd > newBegin){
    NewRange = newEnd - newBegin;
  }
  else
  {
    NewRange = newBegin - newEnd;
    invFlag = 1;
  }
  zeroRefCurVal = inputValue - originalMin;
  normalizedCurVal  =  zeroRefCurVal / OriginalRange;   // normalize to 0 - 1 float

  // Check for originalMin > originalMax  - the math for all other cases i.e. negative numbers seems to work out fine
  if (originalMin > originalMax ) {
    return 0;
  }
  if (invFlag == 0){
    rangedValue =  (pow(normalizedCurVal, curve) * NewRange) + newBegin;
  }
  else     // invert the ranges
  {
    rangedValue =  newBegin - (pow(normalizedCurVal, curve) * NewRange);
  }
  return rangedValue;
}

uint32_t Wheel(byte WheelPos) {
  if(WheelPos < 85) {
    return CircuitPlayground.strip.Color(WheelPos * 3, 255 - WheelPos * 3, 0);
  }
  else if(WheelPos < 170) {
    WheelPos -= 85;
    return CircuitPlayground.strip.Color(255 - WheelPos * 3, 0, WheelPos * 3);
  }
  else {
    WheelPos -= 170;
    return CircuitPlayground.strip.Color(0, WheelPos * 3, 255 - WheelPos * 3);
  }
  delay(100);

}
Codes together
#include <CapacitiveSensor.h>


CapacitiveSensor   cs_0_1 = CapacitiveSensor(0,1);        // 10M resistor between pins 4 & 2, pin 2 is sensor pin, add a wire and or foil if desired
CapacitiveSensor   cs_0_10 = CapacitiveSensor(0,10);        // 10M resistor between pins 4 & 6, pin 6 is sensor pin, add a wire and or foil
uint32_t Wheel(byte WheelPos);

float fscale( float originalMin, float originalMax, float newBegin, float
newEnd, float inputValue, float curve);

#include <Adafruit_NeoPixel.h>
#include <math.h>

#define N_PIXELS  10  // Number of pixels in strand
#define MIC_PIN   A4  // Microphone is attached to this analog pin
#define LED_PIN    17  // NeoPixel LED strand is connected to this pin
#define SAMPLE_WINDOW   10  // Sample window for average level
#define PEAK_HANG 24 //Time of pause before peak dot falls
#define PEAK_FALL 4 //Rate of falling peak dot
#define INPUT_FLOOR 10 //Lower range of analogRead input
#define INPUT_CEILING 200 //Max range of analogRead input, the lower the value the more sensitive (1023 = max)

byte peak = 16;      // Peak level of column; used for falling dots
unsigned int sample;

byte dotCount = 0;  //Frame counter for peak dot
byte dotHangCount = 0; //Frame counter for holding peak dot

Adafruit_NeoPixel strip = Adafruit_NeoPixel(N_PIXELS, LED_PIN, NEO_GRB + NEO_KHZ800);

void setup()
{
   cs_0_1.set_CS_AutocaL_Millis(0xFFFFFFFF);     // turn off autocalibrate on channel 1 - just as an example
   Serial.begin(9600);
     pinMode(2, OUTPUT);
       pinMode(6, OUTPUT);
strip.begin();
  strip.show(); // Initialize all pixels to 'off'
  }

void loop()
{
    long start = millis();
    long total1 =  cs_0_1.capacitiveSensor(30);
    long total2 =  cs_0_10.capacitiveSensor(30);

if(total1 >= 200){
    digitalWrite(2, HIGH);   // turn the LED on (HIGH is the voltage level)
//  delay(10);                       // wait for a second
  }else{
  digitalWrite(2, LOW);    // turn the LED off by making the voltage LOW
}

if(total2 >= 200){
    digitalWrite(6, HIGH);   // turn the LED on (HIGH is the voltage level)
//  delay(10);                       // wait for a second
  }else{
  digitalWrite(6, LOW);    // turn the LED off by making the voltage LOW
}


//    Serial.print(millis() - start);        // check on performance in milliseconds

//    Serial.print("\t");                    // tab character for debug windown spacing
    Serial.print("CAP1:");       // prints a label
    Serial.print(total1);                  // print sensor output 1
    Serial.print("\t");
    Serial.print("CAP2:");       // prints a label
    Serial.println(total2);                  // print sensor output 2


    delay(100);                             // arbitrary delay to limit data to serial port
unsigned long startMillis= millis();  // Start of sample window
  float peakToPeak = 0;   // peak-to-peak level

  unsigned int signalMax = 0;
  unsigned int signalMin = 1023;
  unsigned int c, y;


  // collect data for length of sample window (in mS)
  while (millis() - startMillis < SAMPLE_WINDOW)
  {
    sample = analogRead(MIC_PIN);
    if (sample < 1024)  // toss out spurious readings
    {
      if (sample > signalMax)
      {
        signalMax = sample;  // save just the max levels
      }
      else if (sample < signalMin)
      {
        signalMin = sample;  // save just the min levels
      }
    }
  }
  peakToPeak = signalMax - signalMin;  // max - min = peak-peak amplitude

  // Serial.println(peakToPeak);


  //Fill the strip with rainbow gradient
  for (int i=0;i<=strip.numPixels()-1;i++){
    strip.setPixelColor(i,Wheel(map(i,0,strip.numPixels()-1,30,150)));
  }


  //Scale the input logarithmically instead of linearly
  c = fscale(INPUT_FLOOR, INPUT_CEILING, strip.numPixels(), 0, peakToPeak, 2);


  if(c < peak) {
    peak = c;        // Keep dot on top
    dotHangCount = 0;    // make the dot hang before falling
  }
  if (c <= strip.numPixels()) { // Fill partial column with off pixels
    drawLine(strip.numPixels(), strip.numPixels()-c, strip.Color(0, 0, 0));
  }

  // Set the peak dot to match the rainbow gradient
  y = strip.numPixels() - peak;

  strip.setPixelColor(y-1,Wheel(map(y,0,strip.numPixels()-1,30,150)));

  strip.show();

  // Frame based peak dot animation
  if(dotHangCount > PEAK_HANG) { //Peak pause length
    if(++dotCount >= PEAK_FALL) { //Fall rate
      peak++;
      dotCount = 0;
    }
  }
  else {
    dotHangCount++;
  }
}

//Used to draw a line between two points of a given color
void drawLine(uint8_t from, uint8_t to, uint32_t c) {
  uint8_t fromTemp;
  if (from > to) {
    fromTemp = from;
    from = to;
    to = fromTemp;
  }
  for(int i=from; i<=to; i++){
    strip.setPixelColor(i, c);
  }
}


float fscale( float originalMin, float originalMax, float newBegin, float
newEnd, float inputValue, float curve){

  float OriginalRange = 0;
  float NewRange = 0;
  float zeroRefCurVal = 0;
  float normalizedCurVal = 0;
  float rangedValue = 0;
  boolean invFlag = 0;


  // condition curve parameter
  // limit range

  if (curve > 10) curve = 10;
  if (curve < -10) curve = -10;

  curve = (curve * -.1) ; // - invert and scale - this seems more intuitive - postive numbers give more weight to high end on output
  curve = pow(10, curve); // convert linear scale into lograthimic exponent for other pow function

  /*
   Serial.println(curve * 100, DEC);   // multply by 100 to preserve resolution
   Serial.println();
   */

  // Check for out of range inputValues
  if (inputValue < originalMin) {
    inputValue = originalMin;
  }
  if (inputValue > originalMax) {
    inputValue = originalMax;
  }

  // Zero Refference the values
  OriginalRange = originalMax - originalMin;

  if (newEnd > newBegin){
    NewRange = newEnd - newBegin;
  }
  else
  {
    NewRange = newBegin - newEnd;
    invFlag = 1;
  }

  zeroRefCurVal = inputValue - originalMin;
  normalizedCurVal  =  zeroRefCurVal / OriginalRange;   // normalize to 0 - 1 float

  // Check for originalMin > originalMax  - the math for all other cases i.e. negative numbers seems to work out fine
  if (originalMin > originalMax ) {
    return 0;
  }

  if (invFlag == 0){
    rangedValue =  (pow(normalizedCurVal, curve) * NewRange) + newBegin;

  }
  else     // invert the ranges
  {
    rangedValue =  newBegin - (pow(normalizedCurVal, curve) * NewRange);
  }

  return rangedValue;
}


// Input a value 0 to 255 to get a color value.
// The colours are a transition r - g - b - back to r.
uint32_t Wheel(byte WheelPos) {
  if(WheelPos < 85) {
    return strip.Color(WheelPos * 3, 255 - WheelPos * 3, 0);
  }
  else if(WheelPos < 170) {
    WheelPos -= 85;
    return strip.Color(255 - WheelPos * 3, 0, WheelPos * 3);
  }
  else {
    WheelPos -= 170;
    return strip.Color(0, WheelPos * 3, 255 - WheelPos * 3);
  }
  }
OLDER SENSORS
Sensor 1 Thermometer
Measuring heart rate
First aproach to the pulse sensor in this instructble
First i found this very easy tutorial with Arduino - Measure Heart Rate and SpO2
I decided to develop this with Adafruit Circuit Playground Classic with this - tutorial The result was a little bit disappointing is not very precise and the tutorial in Adafruit website was not clear.It only function in Express Adafruit CP.So if you are starting with Adafruit it is very useful to know this! The video demonstration
So I jumped into this new tutorial with another component, pulse sensor .It is a very interesting project, its development was from Kickstarter Here the first test, sketch and code below
Some information to understand how to make a new code
int sensor_pin = 0;

int led_pin = 13;

volatile int heart_rate;

volatile int analog_data;
volatile int time_between_beats = 600;

volatile boolean pulse_signal = false;

volatile int beat[10];         //heartbeat values will be sotred in this array

volatile int peak_value = 512;

volatile int trough_value = 512;
volatile int thresh = 525;

volatile int amplitude = 100;

volatile boolean first_heartpulse = true;

volatile boolean second_heartpulse = false;

volatile unsigned long samplecounter = 0;   //This counter will tell us the pulse timing

volatile unsigned long lastBeatTime = 0;


void setup()

{
  pinMode(led_pin,OUTPUT);

  Serial.begin(115200);

  interruptSetup();

}


void loop()

{

      Serial.print("BPM: ");

      Serial.println(heart_rate);

      delay(200); //  take a break

}


void interruptSetup()
{

  TCCR2A = 0x02;  // This will disable the PWM on pin 3 and 11

  OCR2A = 0X7C;   // This will set the top of count to 124 for the 500Hz sample rate

  TCCR2B = 0x06;  // DON'T FORCE COMPARE, 256 PRESCALER

  TIMSK2 = 0x02;  // This will enable interrupt on match between OCR2A and Timer

  sei();          // This will make sure that the global interrupts are enable

}


ISR(TIMER2_COMPA_vect)

{

  cli();
analog_data = analogRead(sensor_pin);

  samplecounter += 2;

  int N = samplecounter - lastBeatTime;


  if(analog_data < thresh && N > (time_between_beats/5)*3)

    {

      if (analog_data < trough_value)

      {

        trough_value = analog_data;

      }

    }
if(analog_data > thresh && analog_data > peak_value)

    {

      peak_value = analog_data;

    }


   if (N > 250)

  {

    if ( (analog_data > thresh) && (pulse_signal == false) && (N > (time_between_beats/5)*3) )

      {

        pulse_signal = true;

        digitalWrite(led_pin,HIGH);


     time_between_beats = samplecounter - lastBeatTime;

        lastBeatTime = samplecounter;


       if(second_heartpulse)

        {

          second_heartpulse = false;

          for(int i=0; i<=9; i++)

          {

            beat[i] = time_between_beats; //Filling the array with the heart beat values

          }

        }


        if(first_heartpulse)

        {

          first_heartpulse = false;

          second_heartpulse = true;

          sei();

          return;

        }


      word runningTotal = 0;


      for(int i=0; i<=8; i++)

        {

          beat[i] = beat[i+1];

          runningTotal += beat[i];

        }


      beat[9] = time_between_beats;

      runningTotal += beat[9];

      runningTotal /= 10;

      heart_rate = 60000/runningTotal;

    }

  }


  if (analog_data < thresh && pulse_signal == true)

    {

      digitalWrite(led_pin,LOW);

      pulse_signal = false;

      amplitude = peak_value - trough_value;

      thresh = amplitude/2 + trough_value;

      peak_value = thresh;

      trough_value = thresh;

    }


  if (N > 2500)

    {

      thresh = 512;

      peak_value = 512;

      trough_value = 512;

      lastBeatTime = samplecounter;

      first_heartpulse = true;

      second_heartpulse = false;

    }


  sei();

}
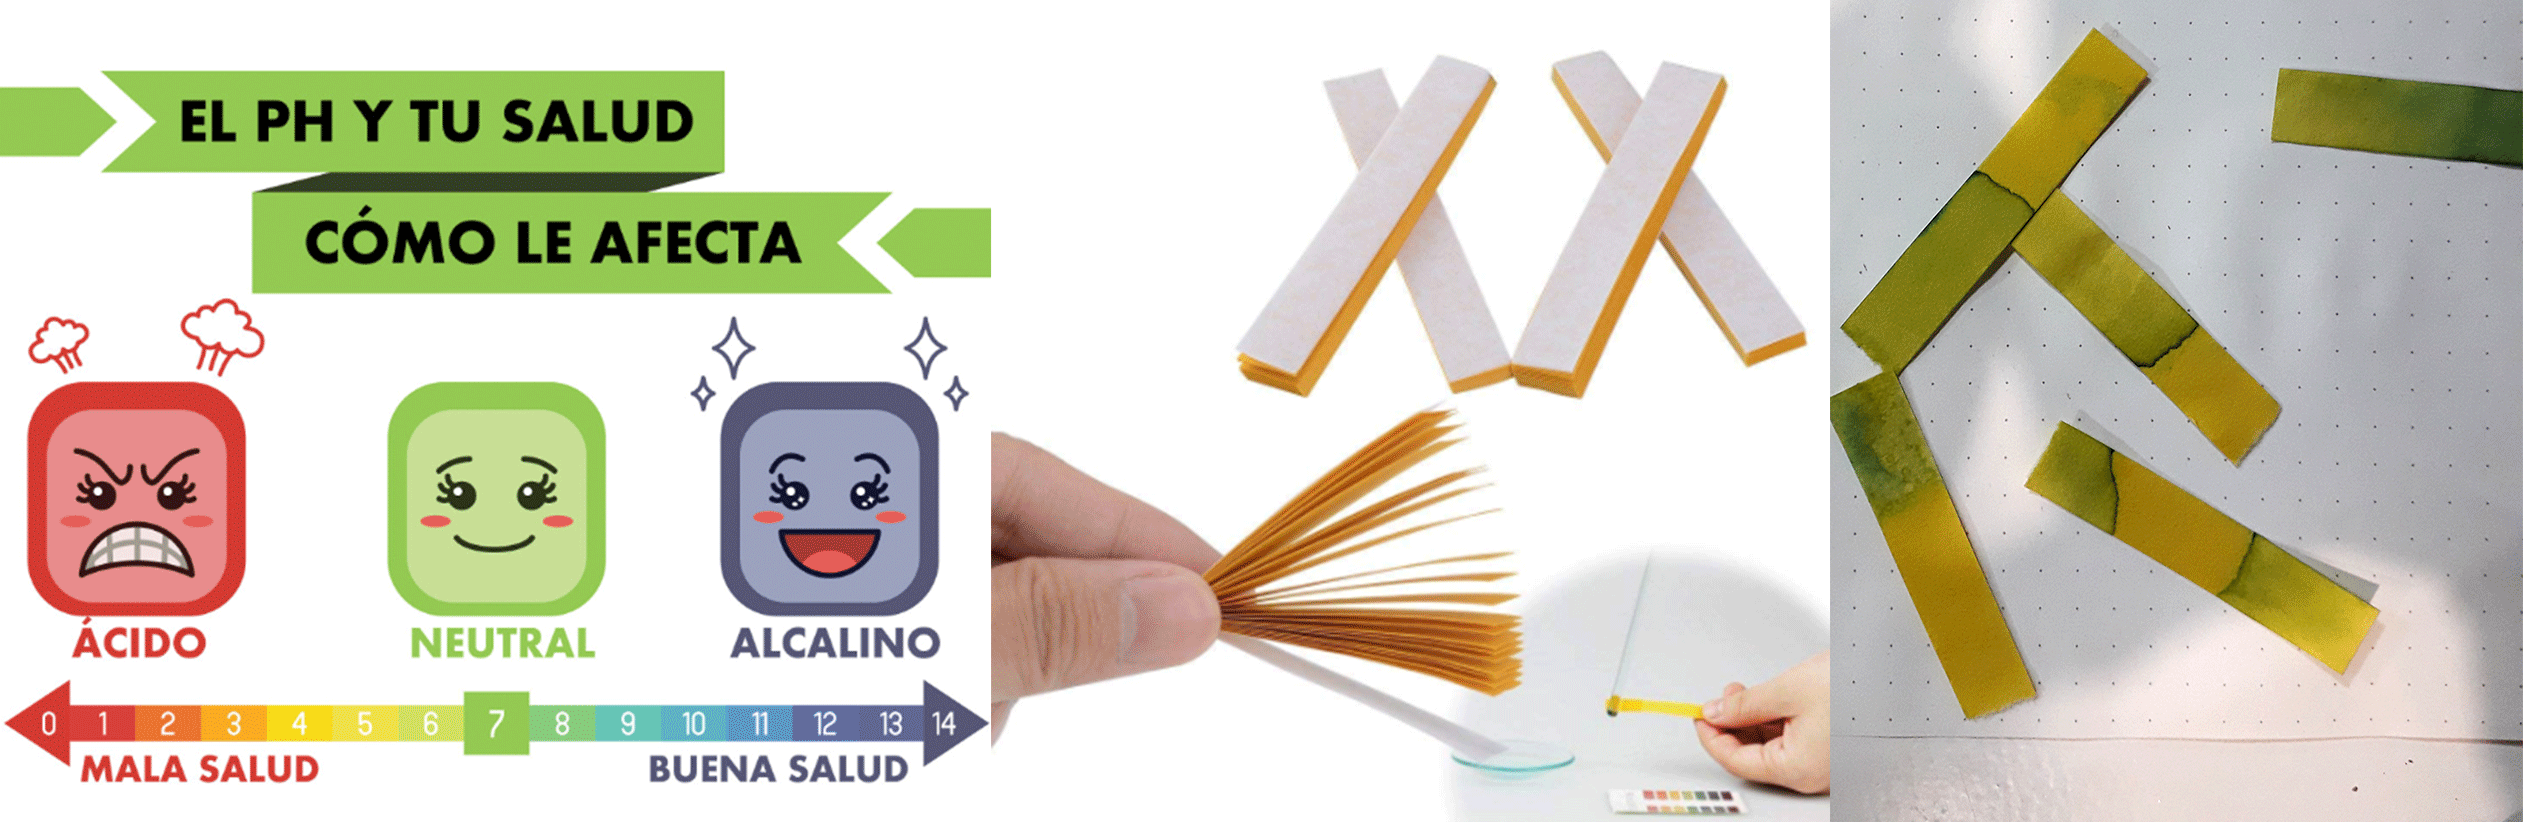
Meassuing PH
Memory ELECTRONIC
I decided to incorporate the sequence game Simon says as a fun way to train memory and explain the different types
Tactile stimulation ELECTRONIC
Capacitive sensor
[Arduino first](https://www.youtube.com/watch?v=7ZM09ARDd44()
Passing the sensor to Circuit Playground
Combining 2 capacitive sensors
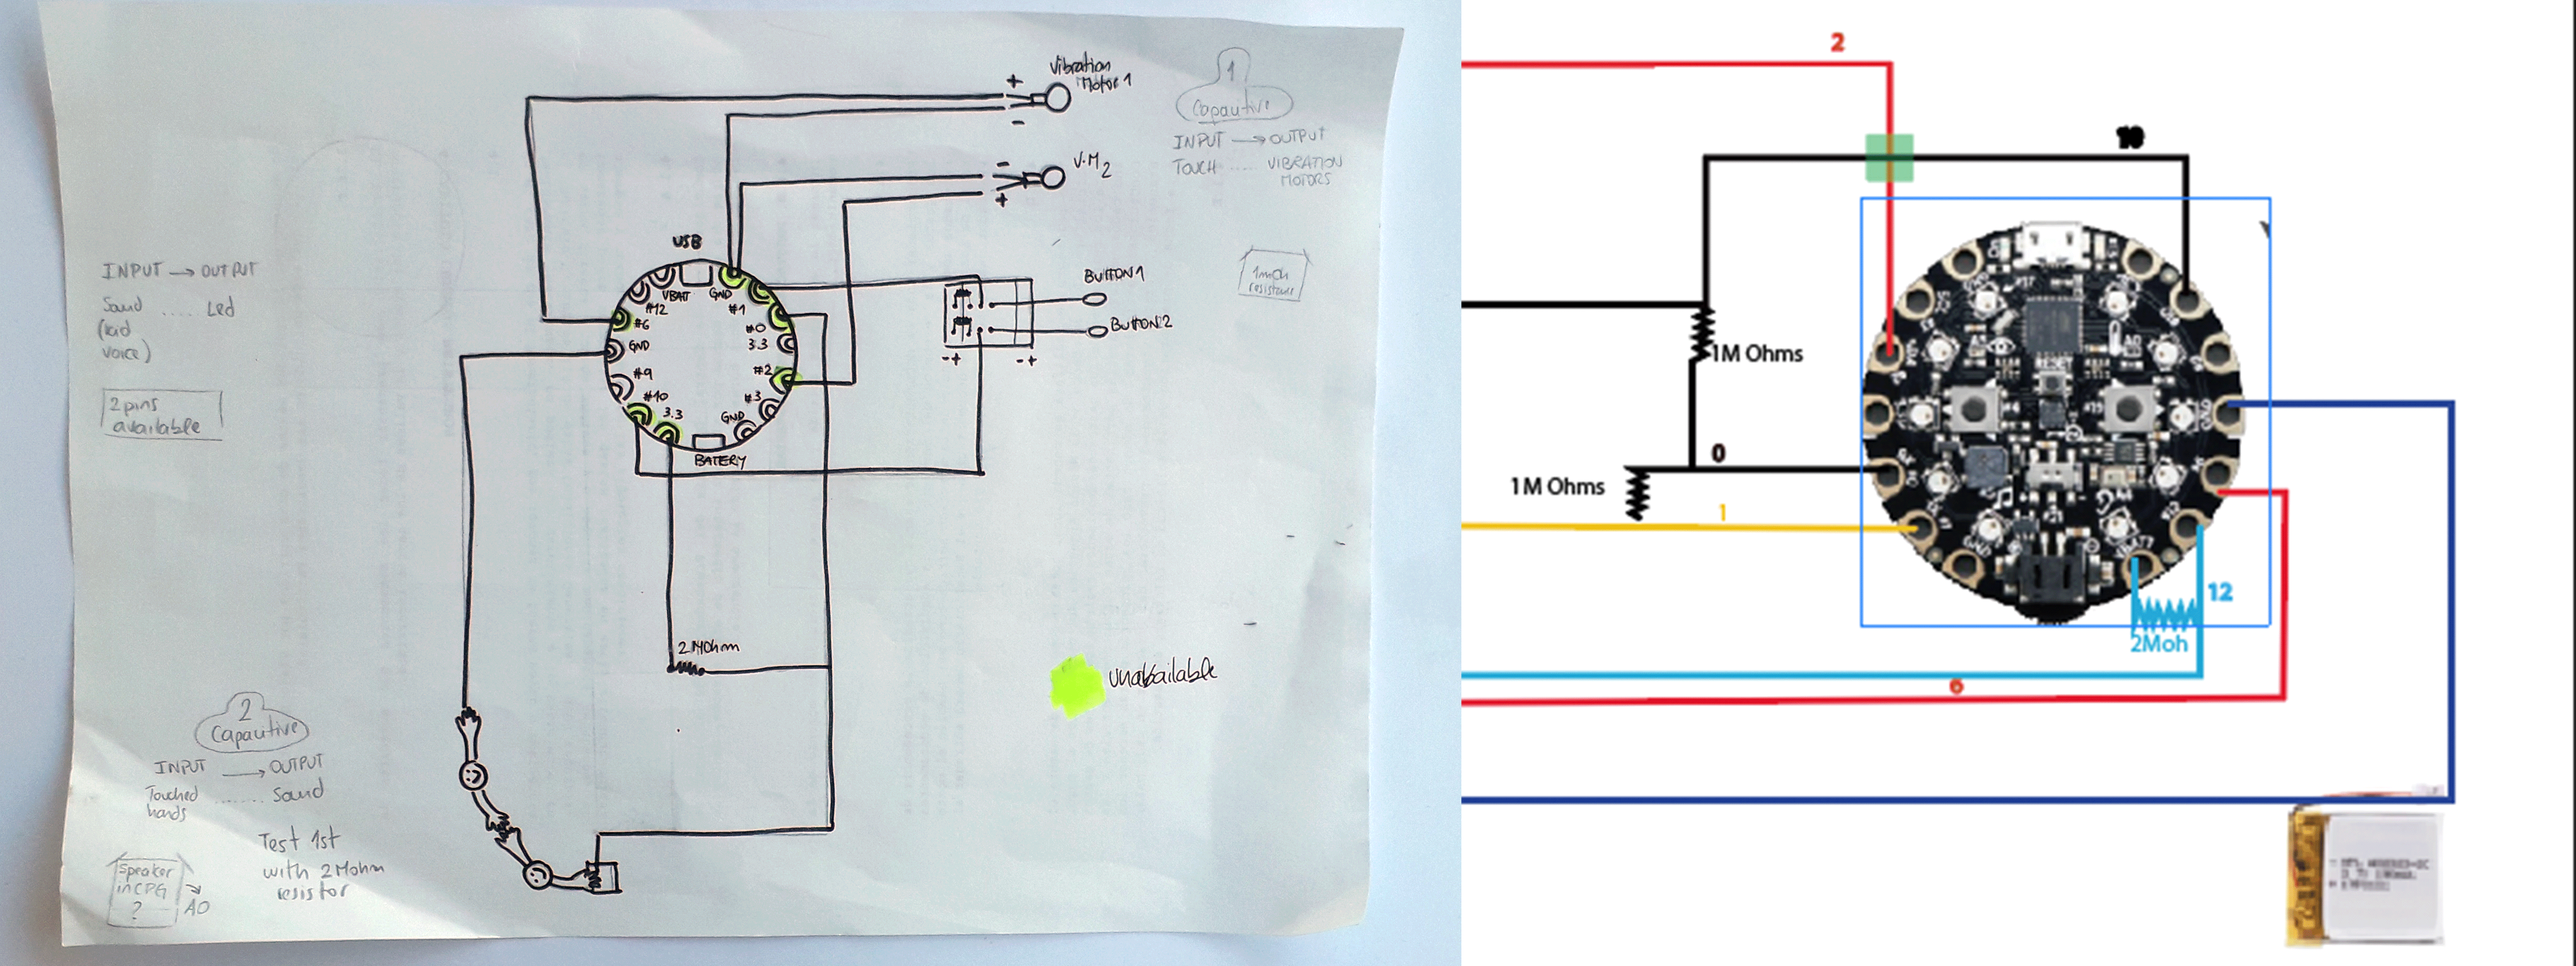
Sckematic
This is the schematic so far .I still have 2 pins to use and i also found that there is a pin extender in case that i need it.
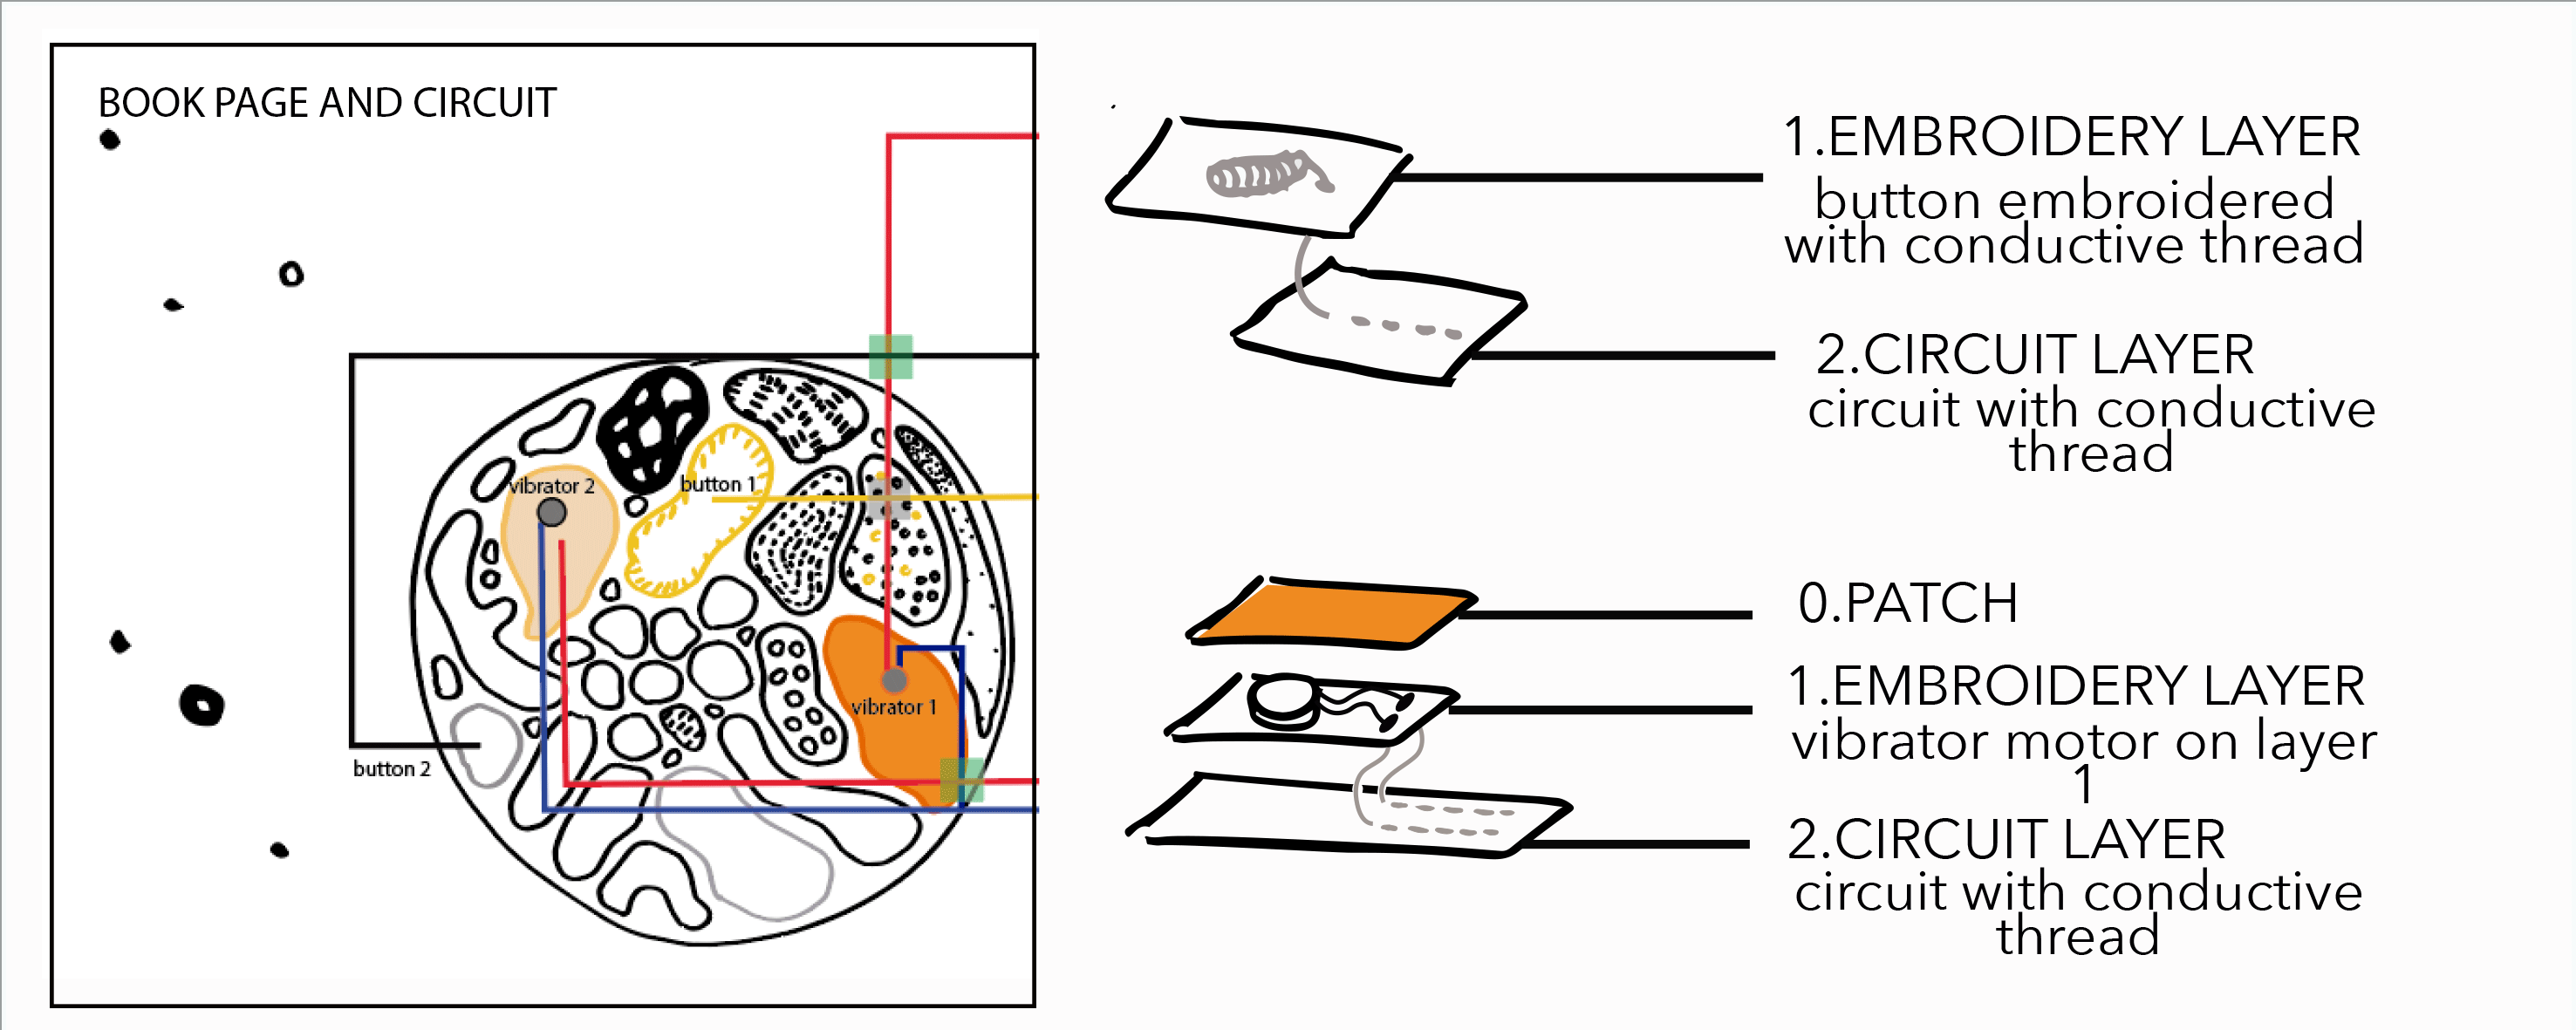
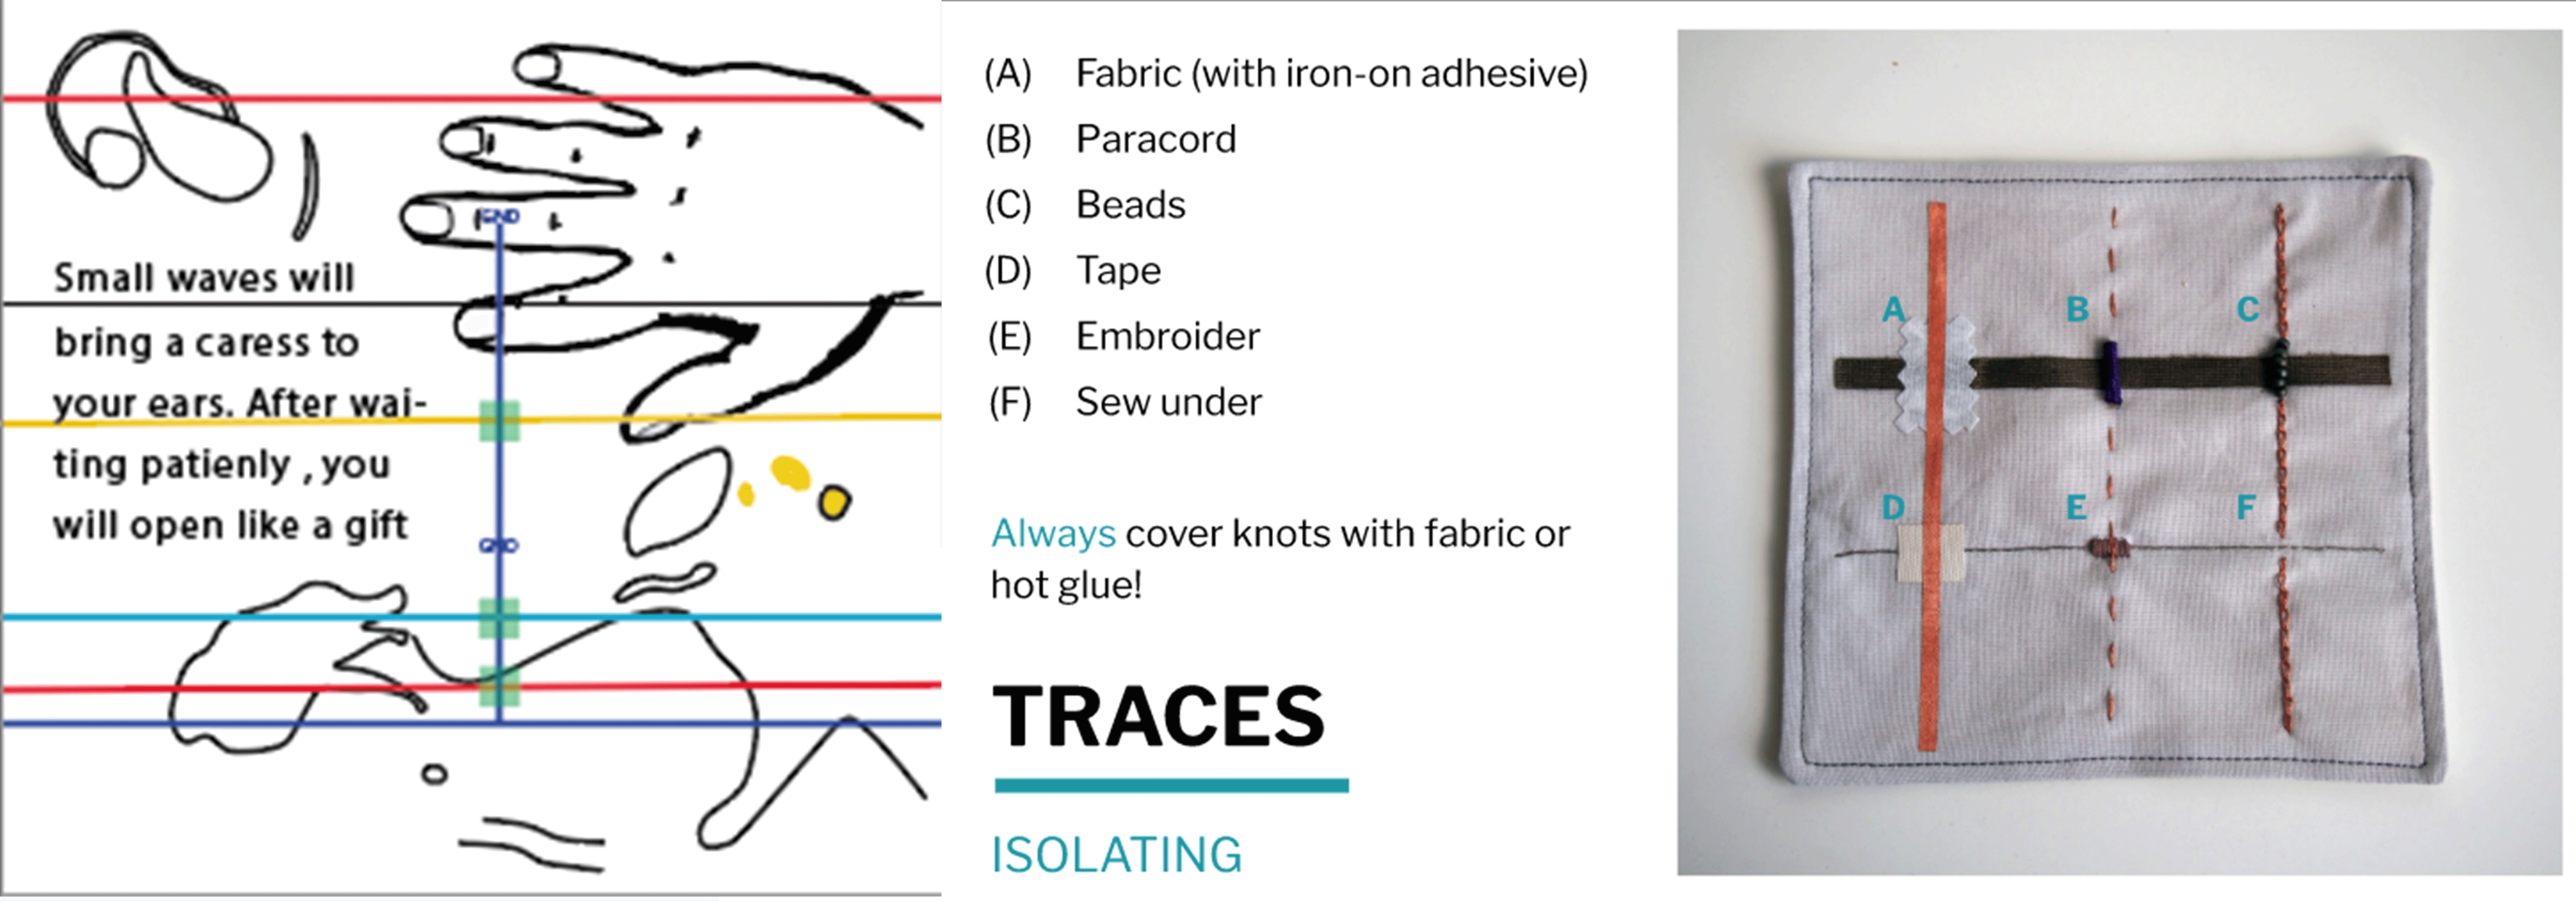
Constructing the book

Here are the layers with which I will build the book. To assemble it, I am investigating different types of binding.
SWITCH
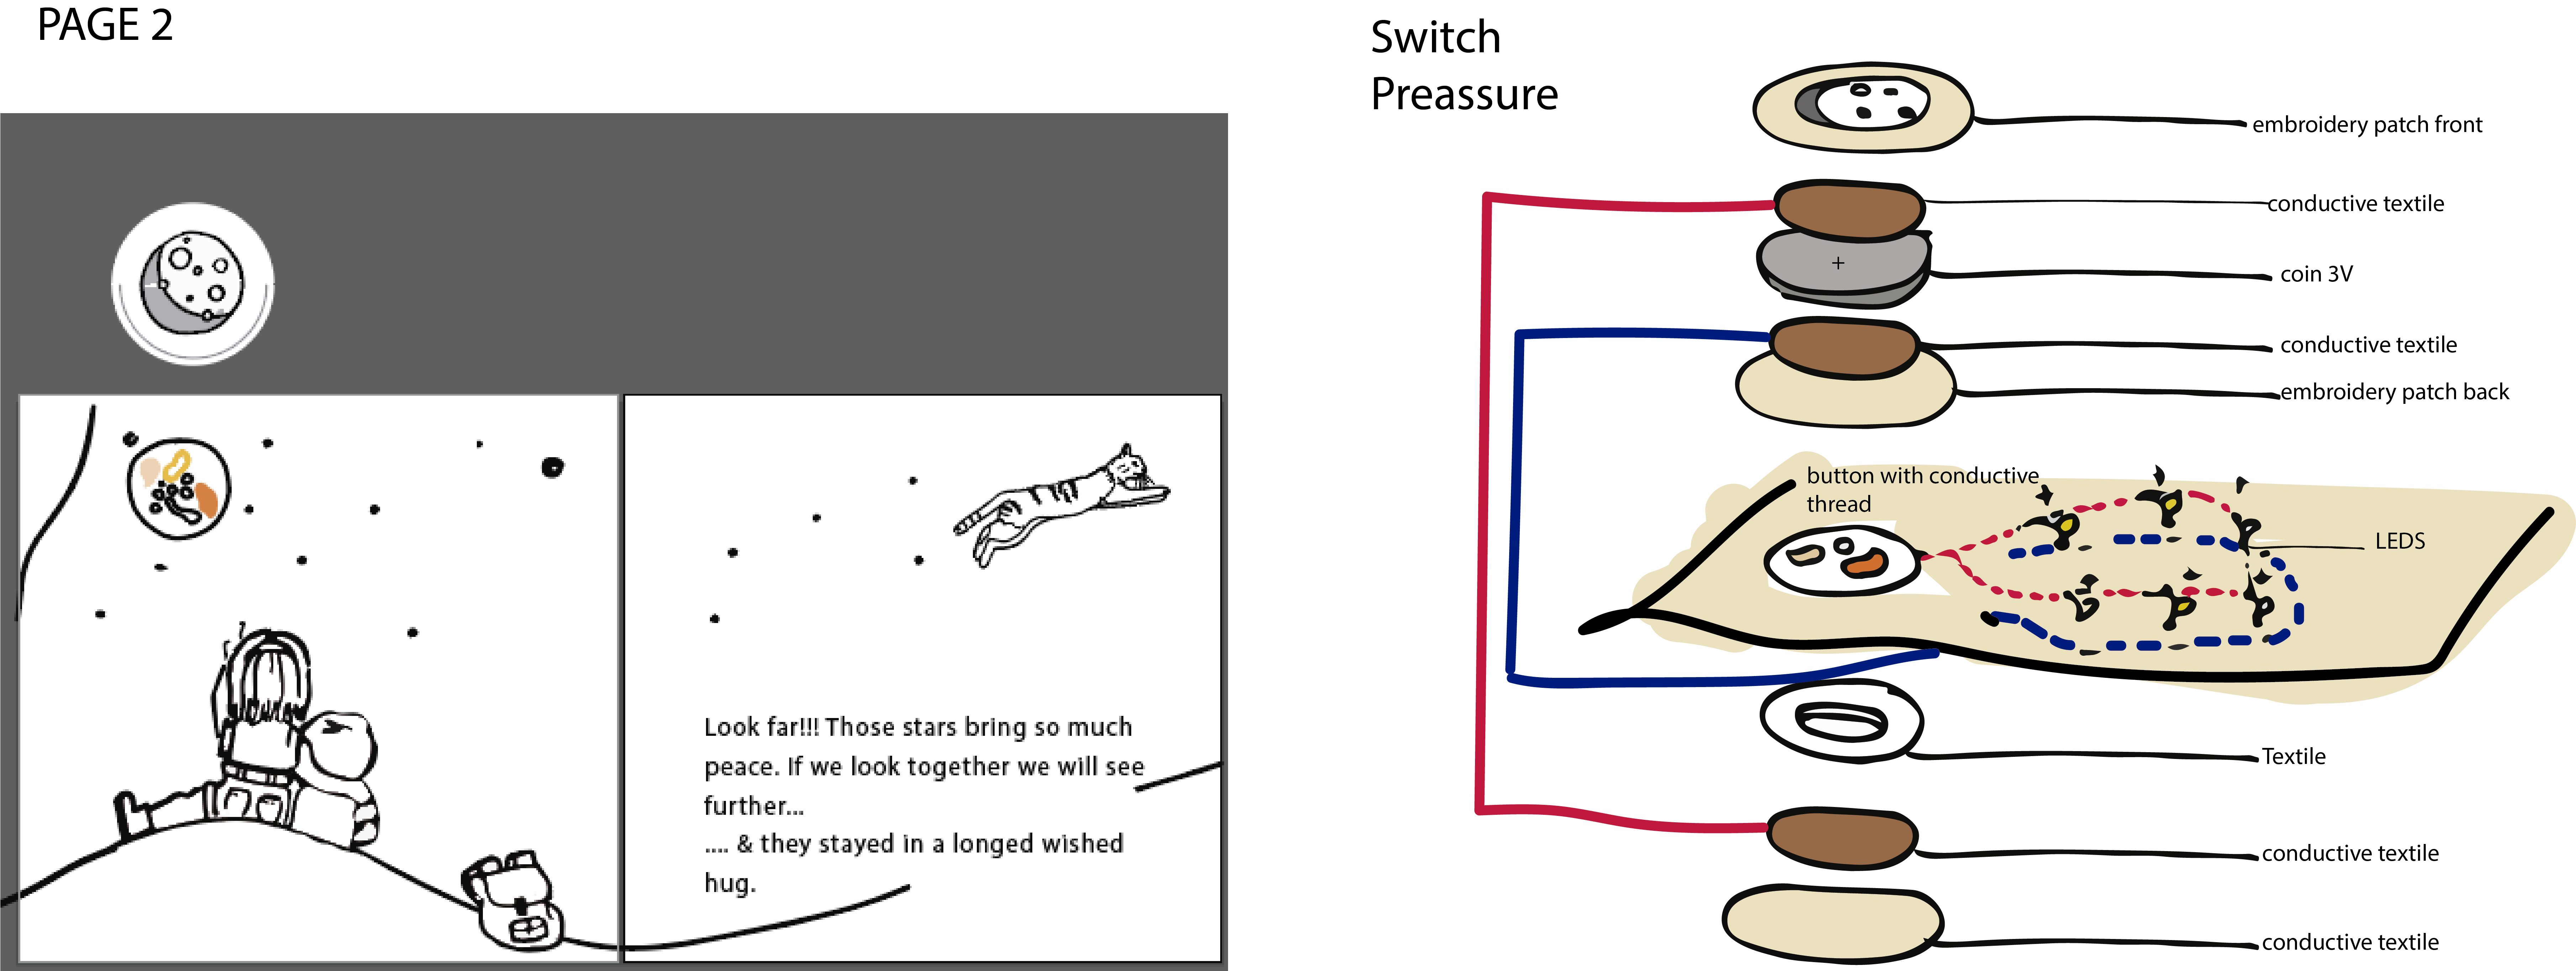
CAPACTIVE SENSOR
Other useful links
Conductive thread CORE ELECTRONICS Circuit playground express