Bio-fabricating materials

Final work of the week
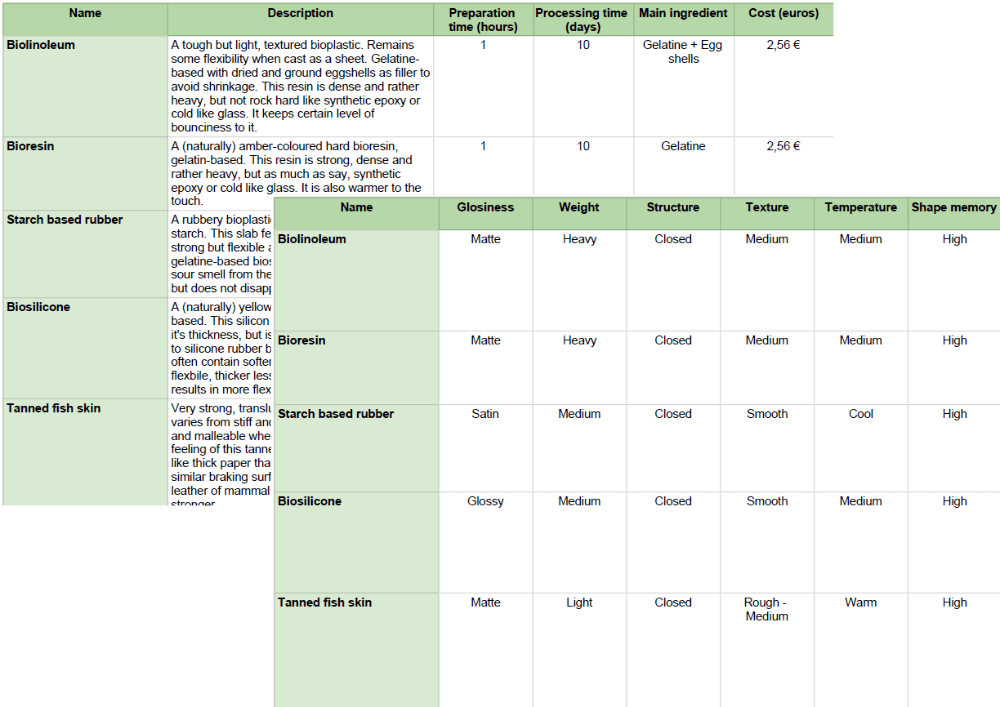
Bio materials database
So many materials!
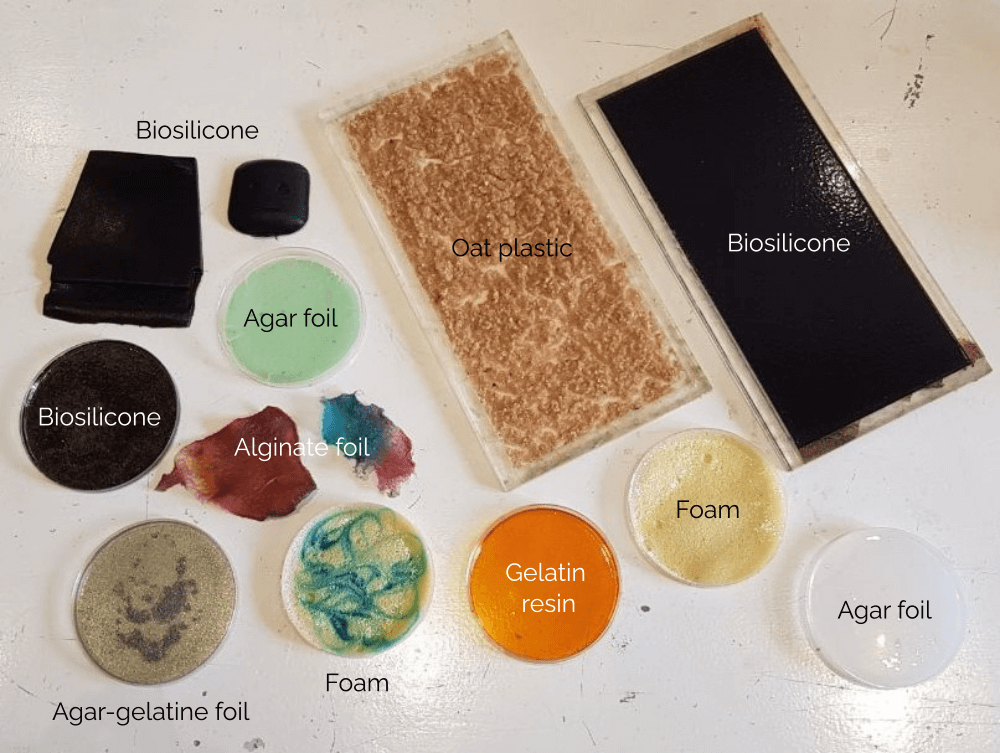
Something happened this week. I wasn't expecting this many material possibilities with just a handful of easy to find ingredients. I think my mind exploded a bit and I was overwhelmed with the amount of available options.
What I was missing was an overview of the available material recipes in which I could select depending on the properties of the final result. So, for instance, if I want to a material that is flexible and heat resistant, I need to go through a lot of recipes and documentation to assess all the different choices available. To facilitate this process, I did what my engineering brain likes to do, which is organize stuff in a database.
Go check the spreadsheet!
I am a huge fan of Loes Bogers' documentation of biomaterial recipes, so I used those as a starting point for the database. Since she already did a great job adding attributes to the material definitions, I just transferred those to a spreadsheet where you can filter for those characteristics.
Alginate foil
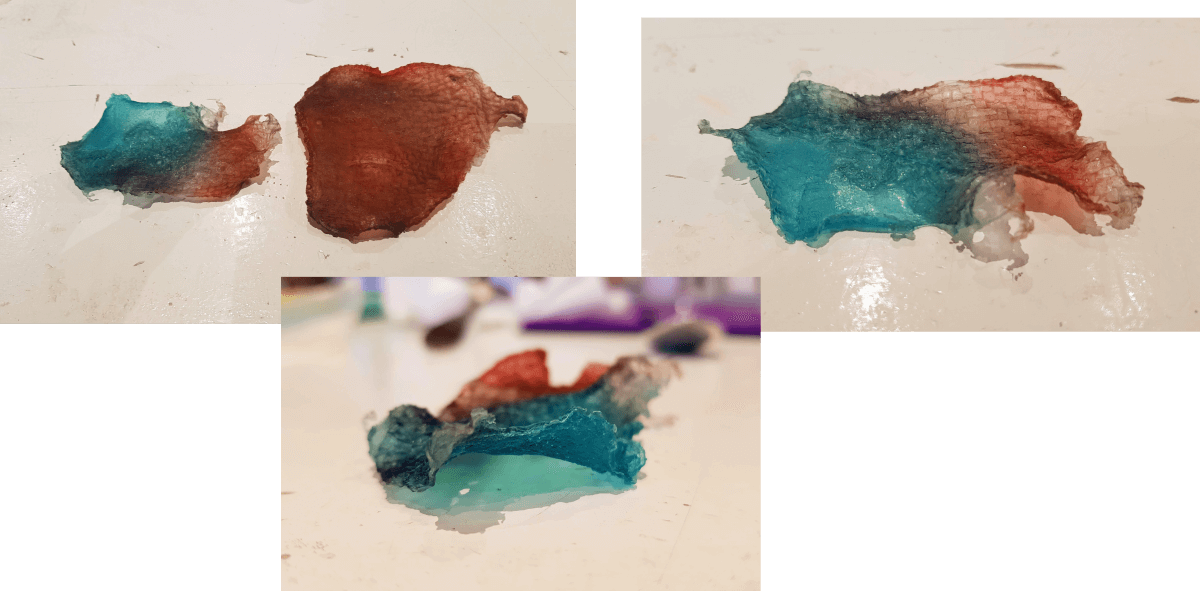
This was the first biomaterial we made in class. It was overall surprsing:
- It surprised me how simple the recipe is.
- It surprised me how quick the material can change from watery to gelatinous to hard-leathery-like.
- It surprised me how different the colors behave when the material dries.
So, in conclusion, alginate is a bit tricky because it seems really easy, but it trasforms so much during the preparation that it is hard to predict the outcome.
However, it has very interesting properties like heat and water resistance, so it deserves to be explored more in the future. Something I would like to explore in the future are casting and drying methods for this material in order to get a more predictable shape.
Some things to keep in mind when working with alginate foil
- The more water the initial mixture has, the more the material will shrink while drying.
- Adding oil to the mixture will make the plastic white and matte. Without it, it is transparent and glossy.
- The alginate can grow mold if there is some contaminationin the recipient where it is stored. Otherwise, it can last a long time.
Recipe for alginate foil
Recipe by Cecilia Raspanti.
| Ingredients | Quantity |
|---|---|
| Alginate | 12 gr |
| Glycerine 85% | 30 gr |
| Water | 400 ml |
| 10% calcium chloride solution | 10 ml |
| Step | Description |
|---|---|
| Mix water and glycerine | The best way of getting a smooth mixture is to use a hand held mixer or blender. If you ar planning to make a batch of multiple colors, prepare your colors in a jar or small container to which you will add the mixture. |
| Let the mix rest overnight | Once the mixture is smooth and completely dissolved, let it sit for several hours so the bubbles leave the mixture. |
| Prepare calcium chloride solution | Prepare a 10% solution, for instance 10 gr of chloride per 100 ml of water. Put the mix in a small spray bottle. |
| Spray calcium chloride in the casting surfaces | Prepare the surfaces and moulds to be filled by spraying the calcium chloride mixture on them. It can be interesting to use waterproof textured fabrics and surfaces. |
| Cast the alginate | Pour the alginate mixture over the casting surfaces or molds. Try to do it slowly to avoid creating bubbles and pour on the liquid itself. |
| Spray calcium chloride on top of the casted alginate | After a couple of minutes, spray calcium chloride to start the curing process. The material will shrink as water is expelled. |
| Let it dry | Leave the resulting material to dry for several hours. once it is cured, it can be rinsed in water to remove any residue of calcium chloride. |
Bio foam
I was particularly interested in biofoam, as I see this kind of material often used around me: shoes, padding on bags and backpacks, packaging...
This was the result:
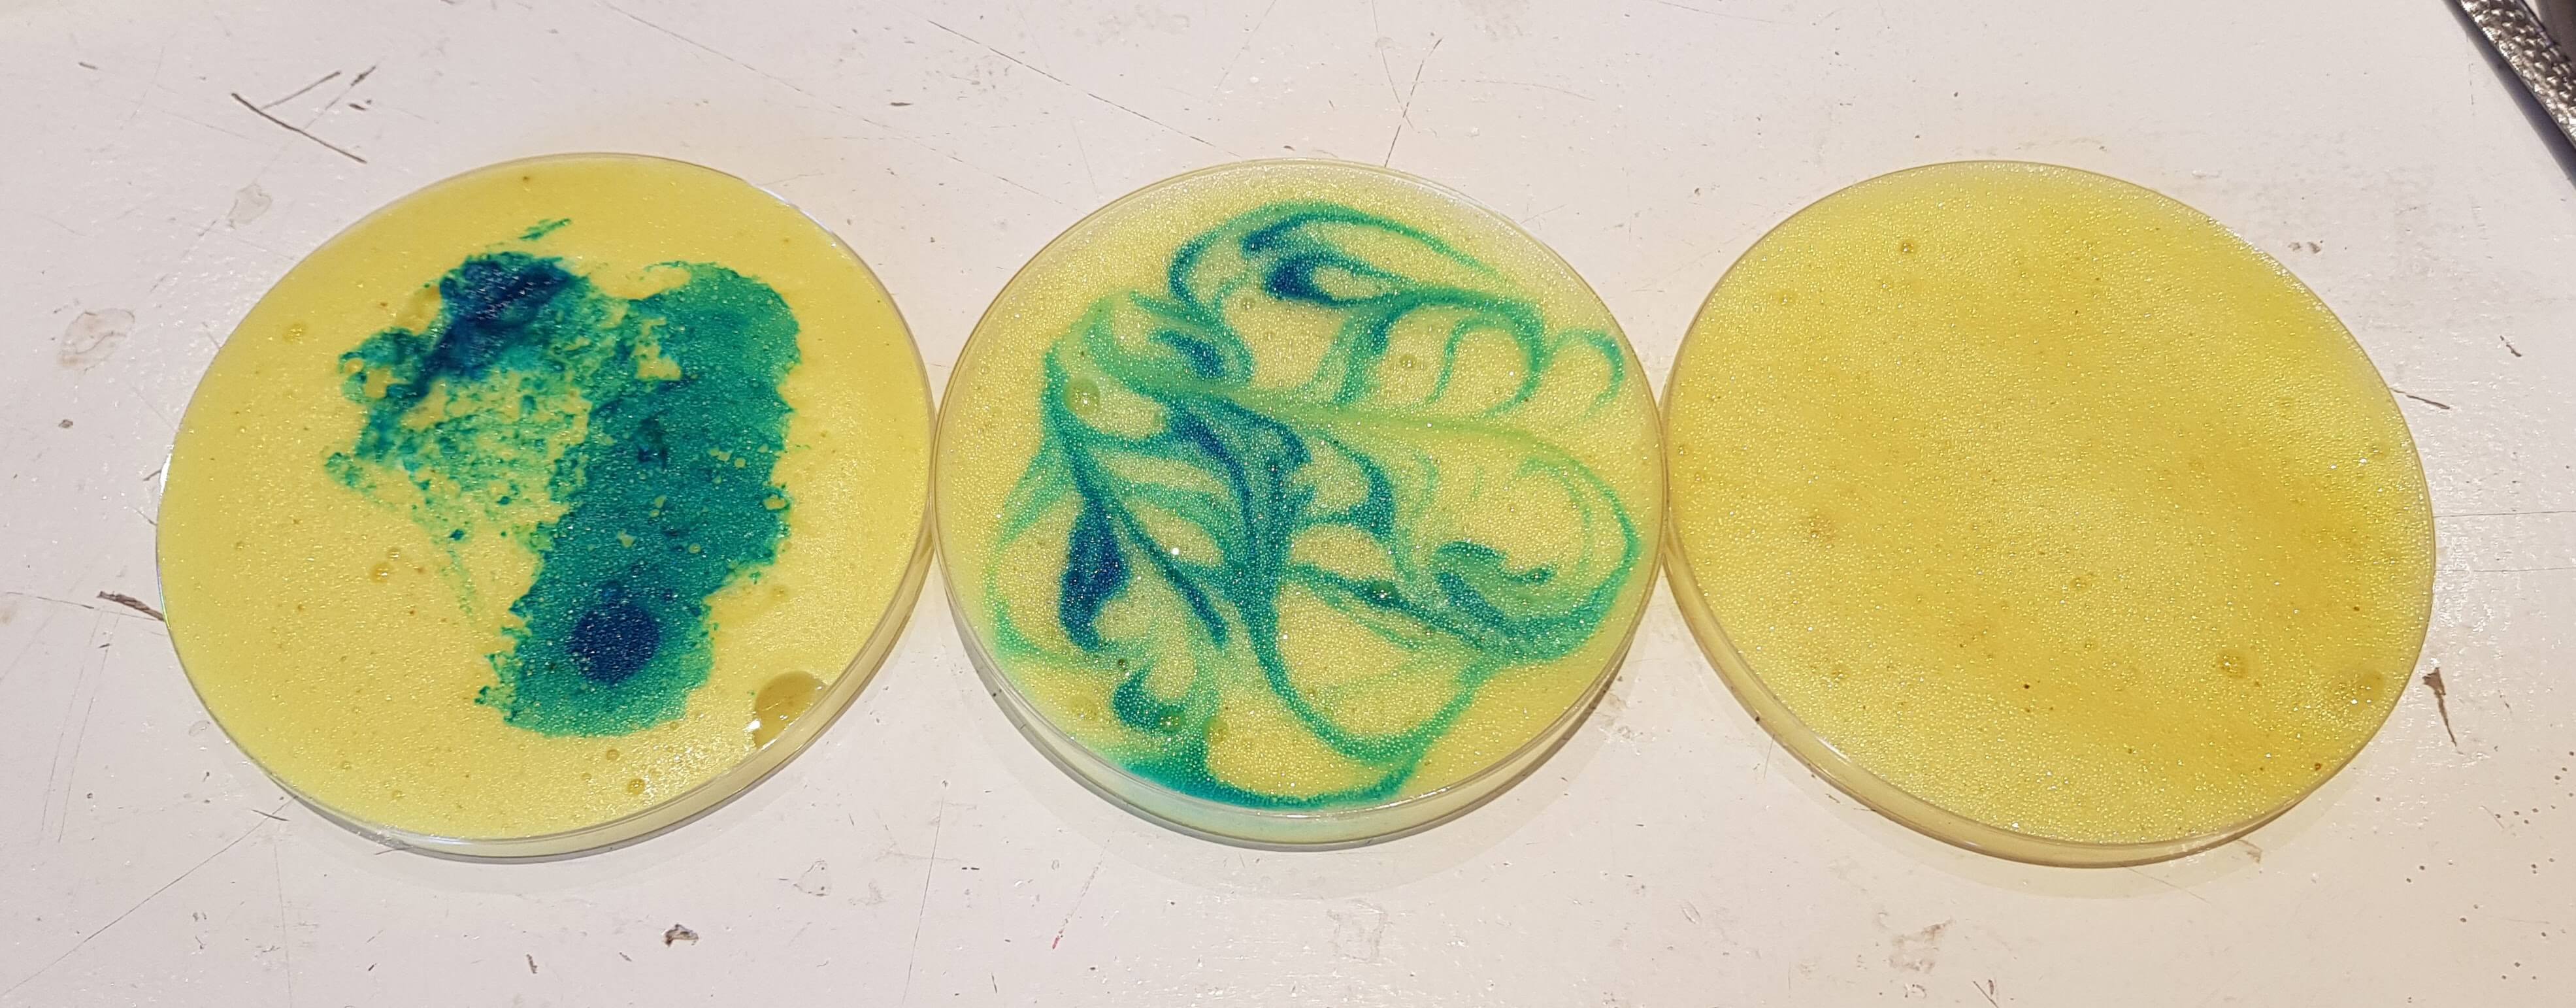
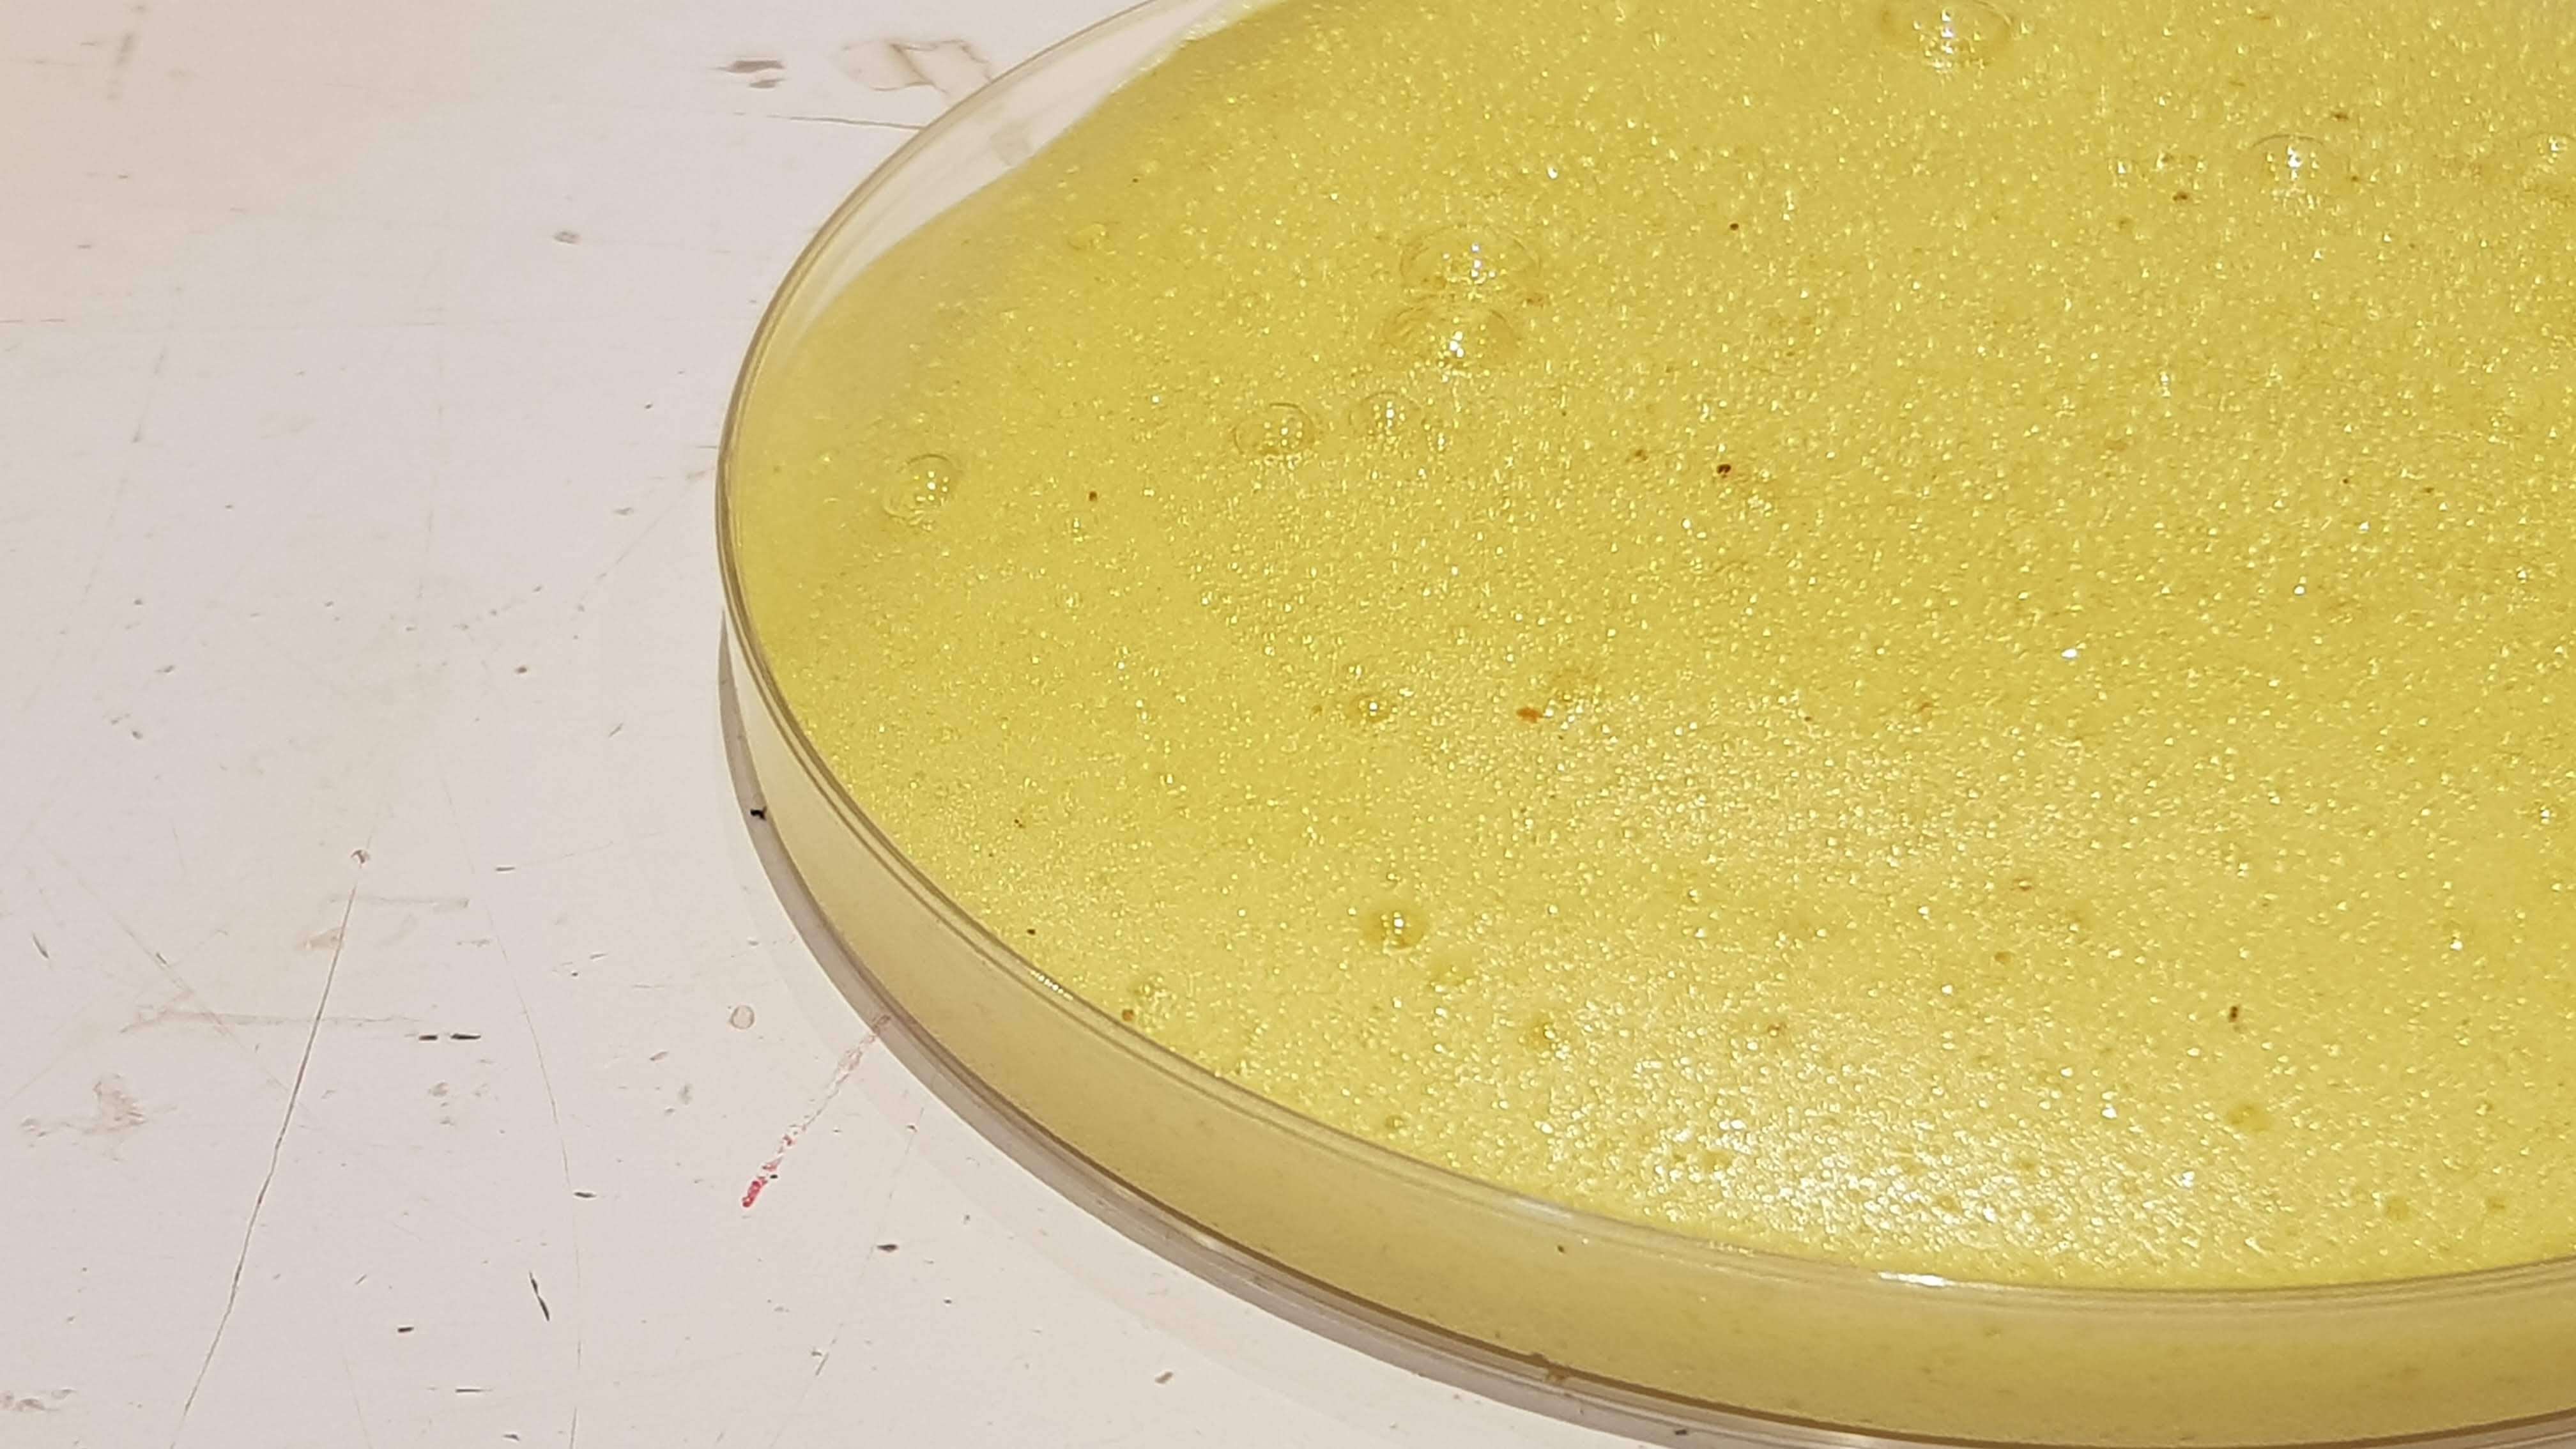
It was quite an easy and satisfying recipe to make. No fuss and really fun to see all the foam growing in the pot. However, the final result isn't like I was expecting: it is rigid! It resulted in something very similar to styrofoam and nothing like the memory foam I had in mind. While discussing in class, we think it may be because we whisked too much and too early for the gelatine to develop properly.
Recipe for bio foam
Listed quantities are for X amount of liquid mixture.
| Material | Quantity |
|---|---|
| Gelatine | 48 gr |
| Glycerine | 8 gr |
| Water | 240 ml |
| Soap | 1 Tablespoon |
| Step | Description |
|---|---|
| Heat water in a pot | Warm up the water in a pot on the stove. The water can be plain or already dyed if you're planning to use one color only. |
| Add glycerine | Add to the water and stir. |
| Add soap | Pour the soap into the mixture. |
| Simmer for 15-20 minutes while whisking | To make the foam, whisk continuesly the mixture while it simmers. |
| Pour the mix in molds | Once the mixture has thickened to a syrup consistency, pour it slowly and always onto the liquid itself. |
| Let it dry | Place it in a ventilated and dry room and wait until it has evaporated most of the water. |
Tea, beer and wine kombucha leather
As for the kombucha leather, we made tea, beer and wine variants in class.
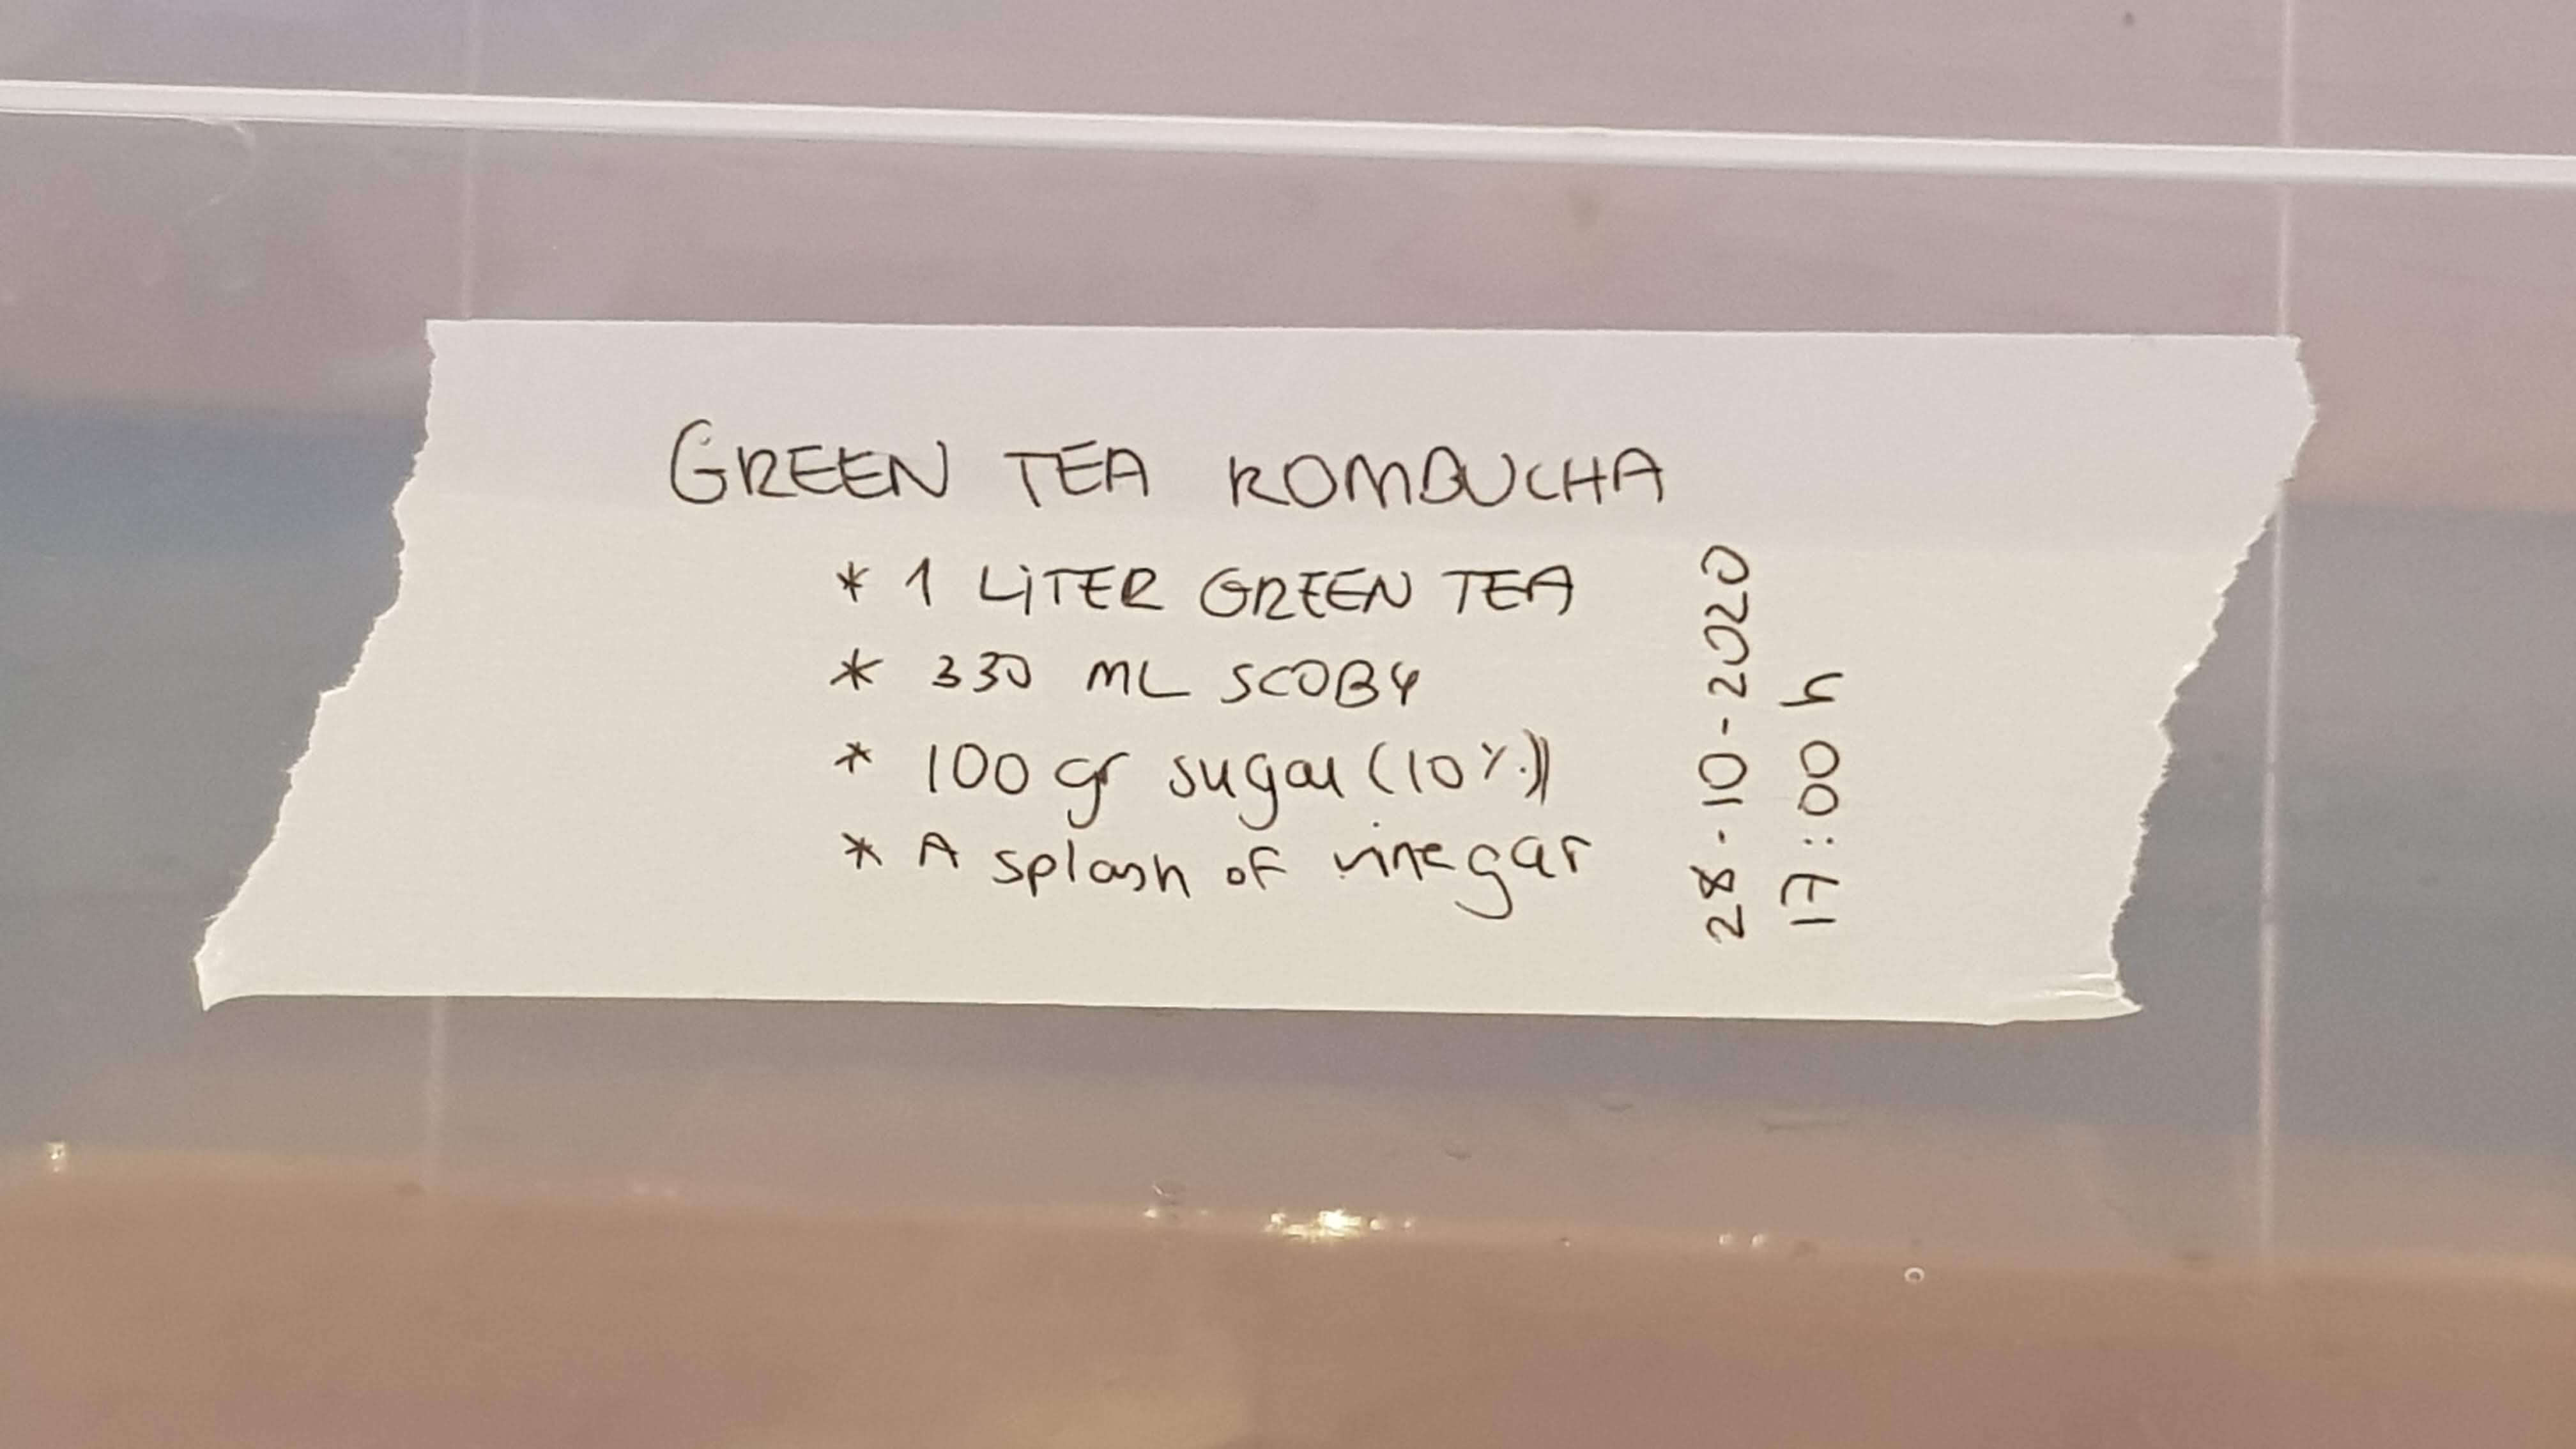
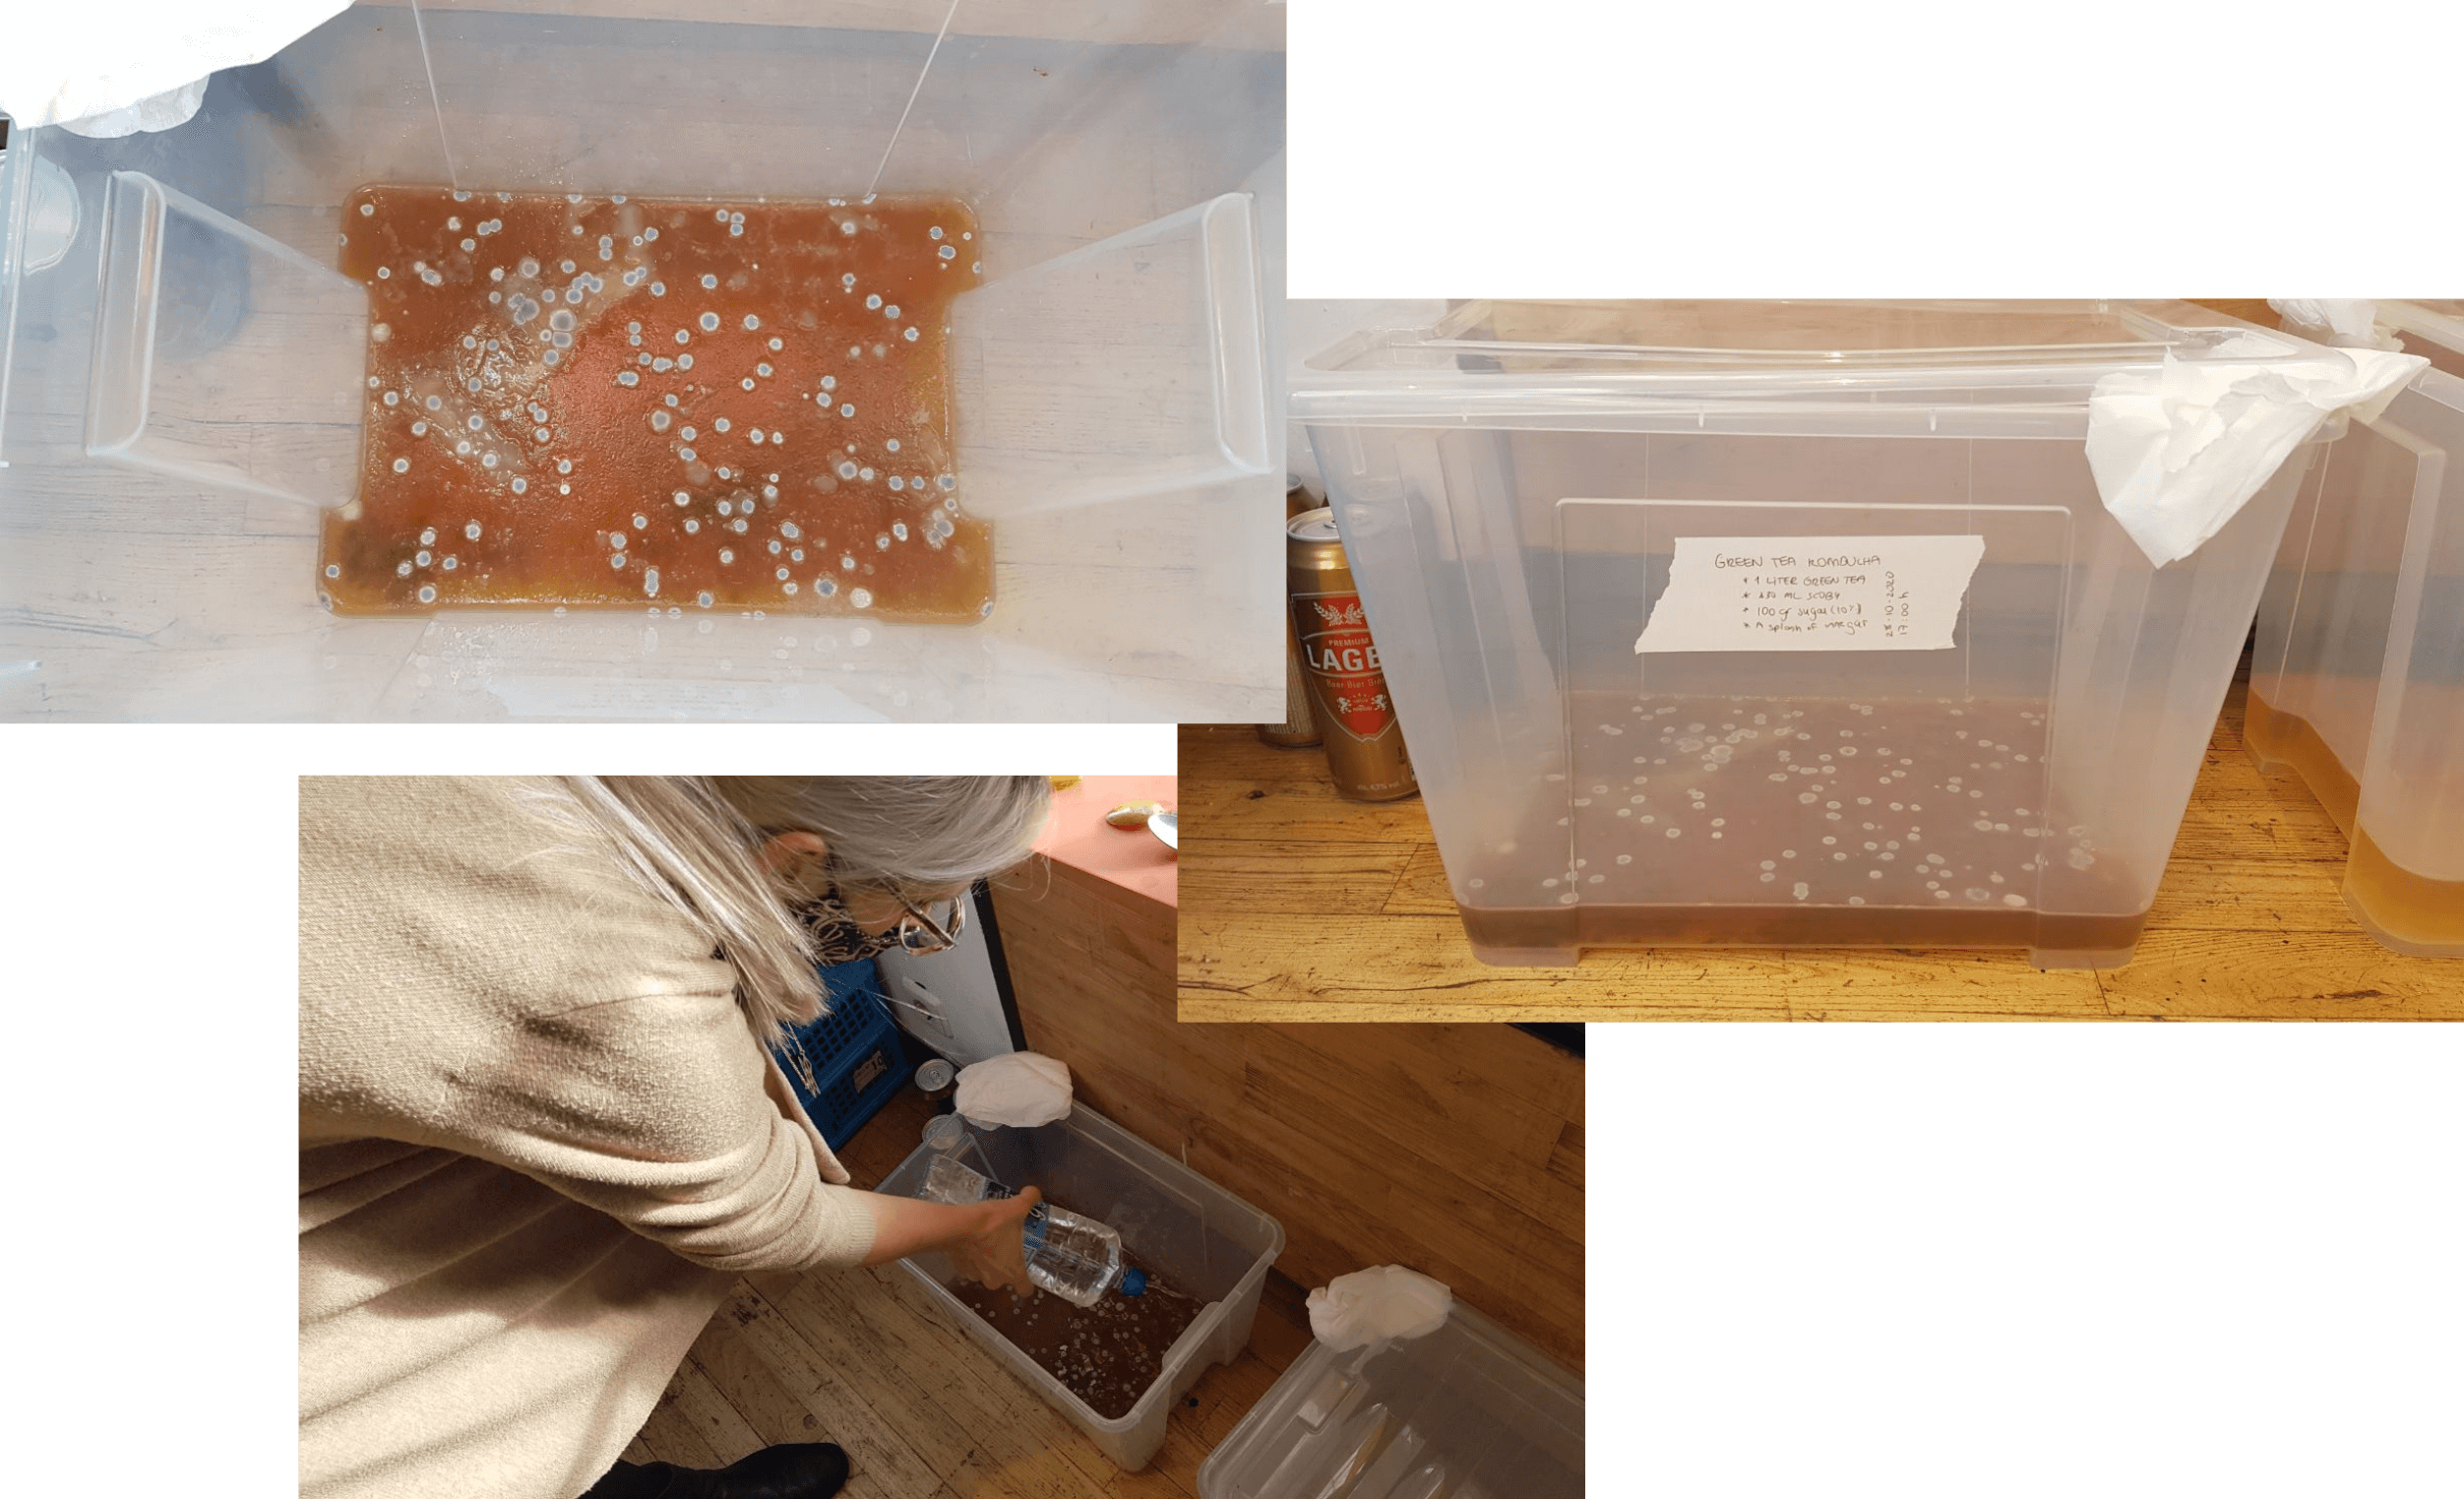
I made the tea one, so I was rooting for it. We put the ingredients together in a nice clean container, let it grow for a week, and... we got mold. Which is unfortunate, because we want the bacteria and yeast to grow! Bea put some vinegar in it to kill the mold. However, that also means that the nice layer of celulose that was starting to form is lost, as it is sinking in the liquid. A new one will hopefully grow on the surface, this time without mold.
Recipe for tea, beer and wine kombucha leather
Listed quantities are for X amount of liquid mixture.
Tea kombucha
| Material | Quantity |
|---|---|
| Green tea, brewed | 1 liter |
| SCOBY | 330 ml |
| Sugar (10% of water amount) | 100 gr |
| Vinegar | A splash |
Beer kombucha
| Material | Quantity |
|---|---|
| Beer | 1 liter |
| Water | 1 liter |
| SCOBY | 750 ml |
| Sugar | 200 gr |
| Vinegar | A splash |
Wine kombucha
| Material | Quantity |
|---|---|
| Wine | 3 liter |
| Water | 1 liter |
| SCOBY | 1120 ml |
| Sugar (10% of water amount) | 400 gr |
| Vinegar | A splash |
Steps to follow
| Step | Description |
|---|---|
| Clean thoroughly the container | To prevent mold from growing, it is a good idea to clean and desinfect the container before using it. |
| Add all ingredients to the container and mix | Make sure to stir to have a more or less even distribution of ingredients. |
| Cover but leave some gaps for airflow | Cover the mix with a lid, but not completely sealed so there is some airflow. |
| Place in a warm place and wait | Let the kombucha grow for weeks to get a nice and thick layer of celulose. It needs to be monitored as it could grow mold. In that case, splash some vinegar on top to make it a hostile enviroment for mold to grow. |
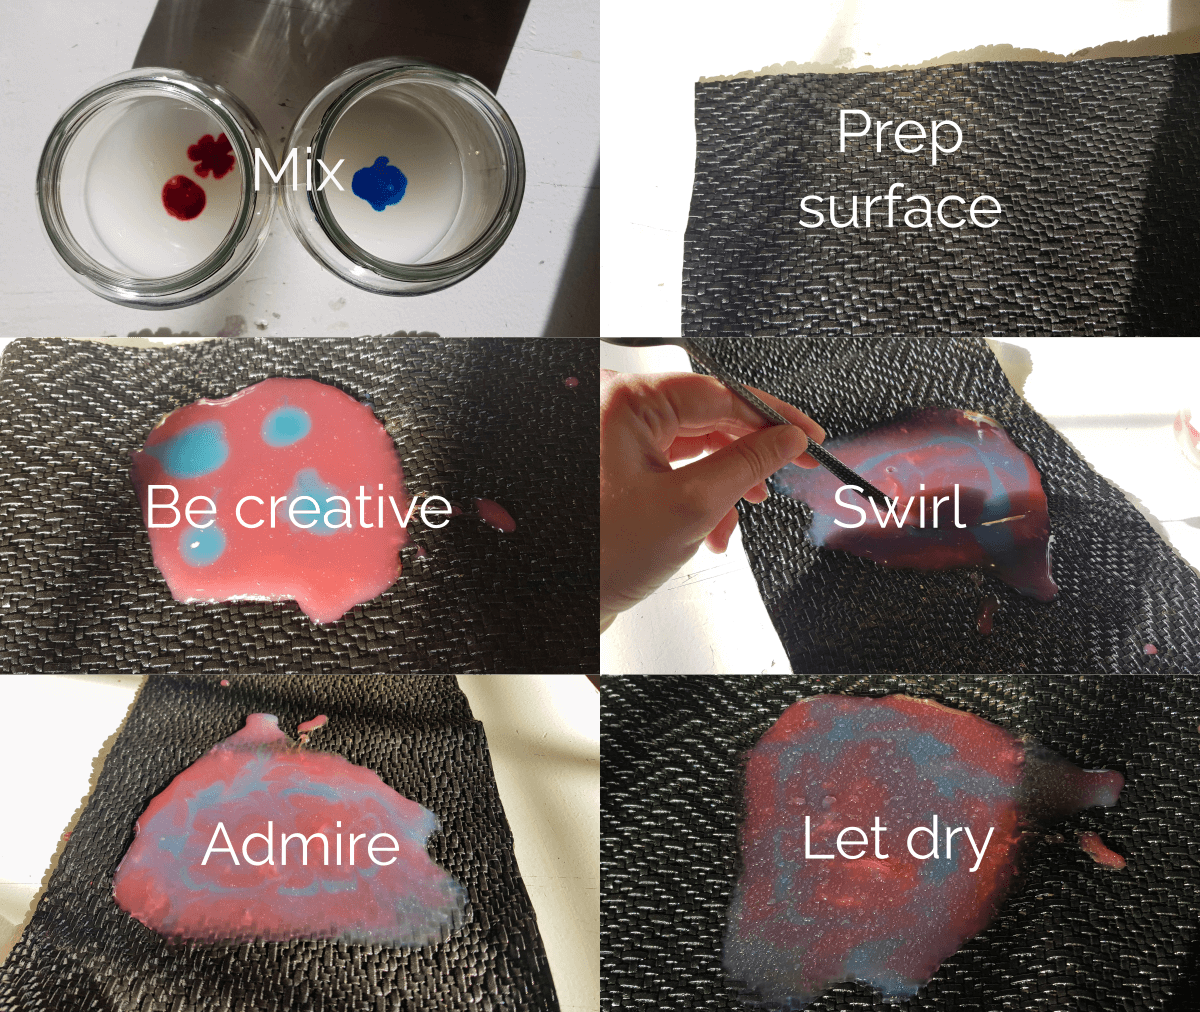
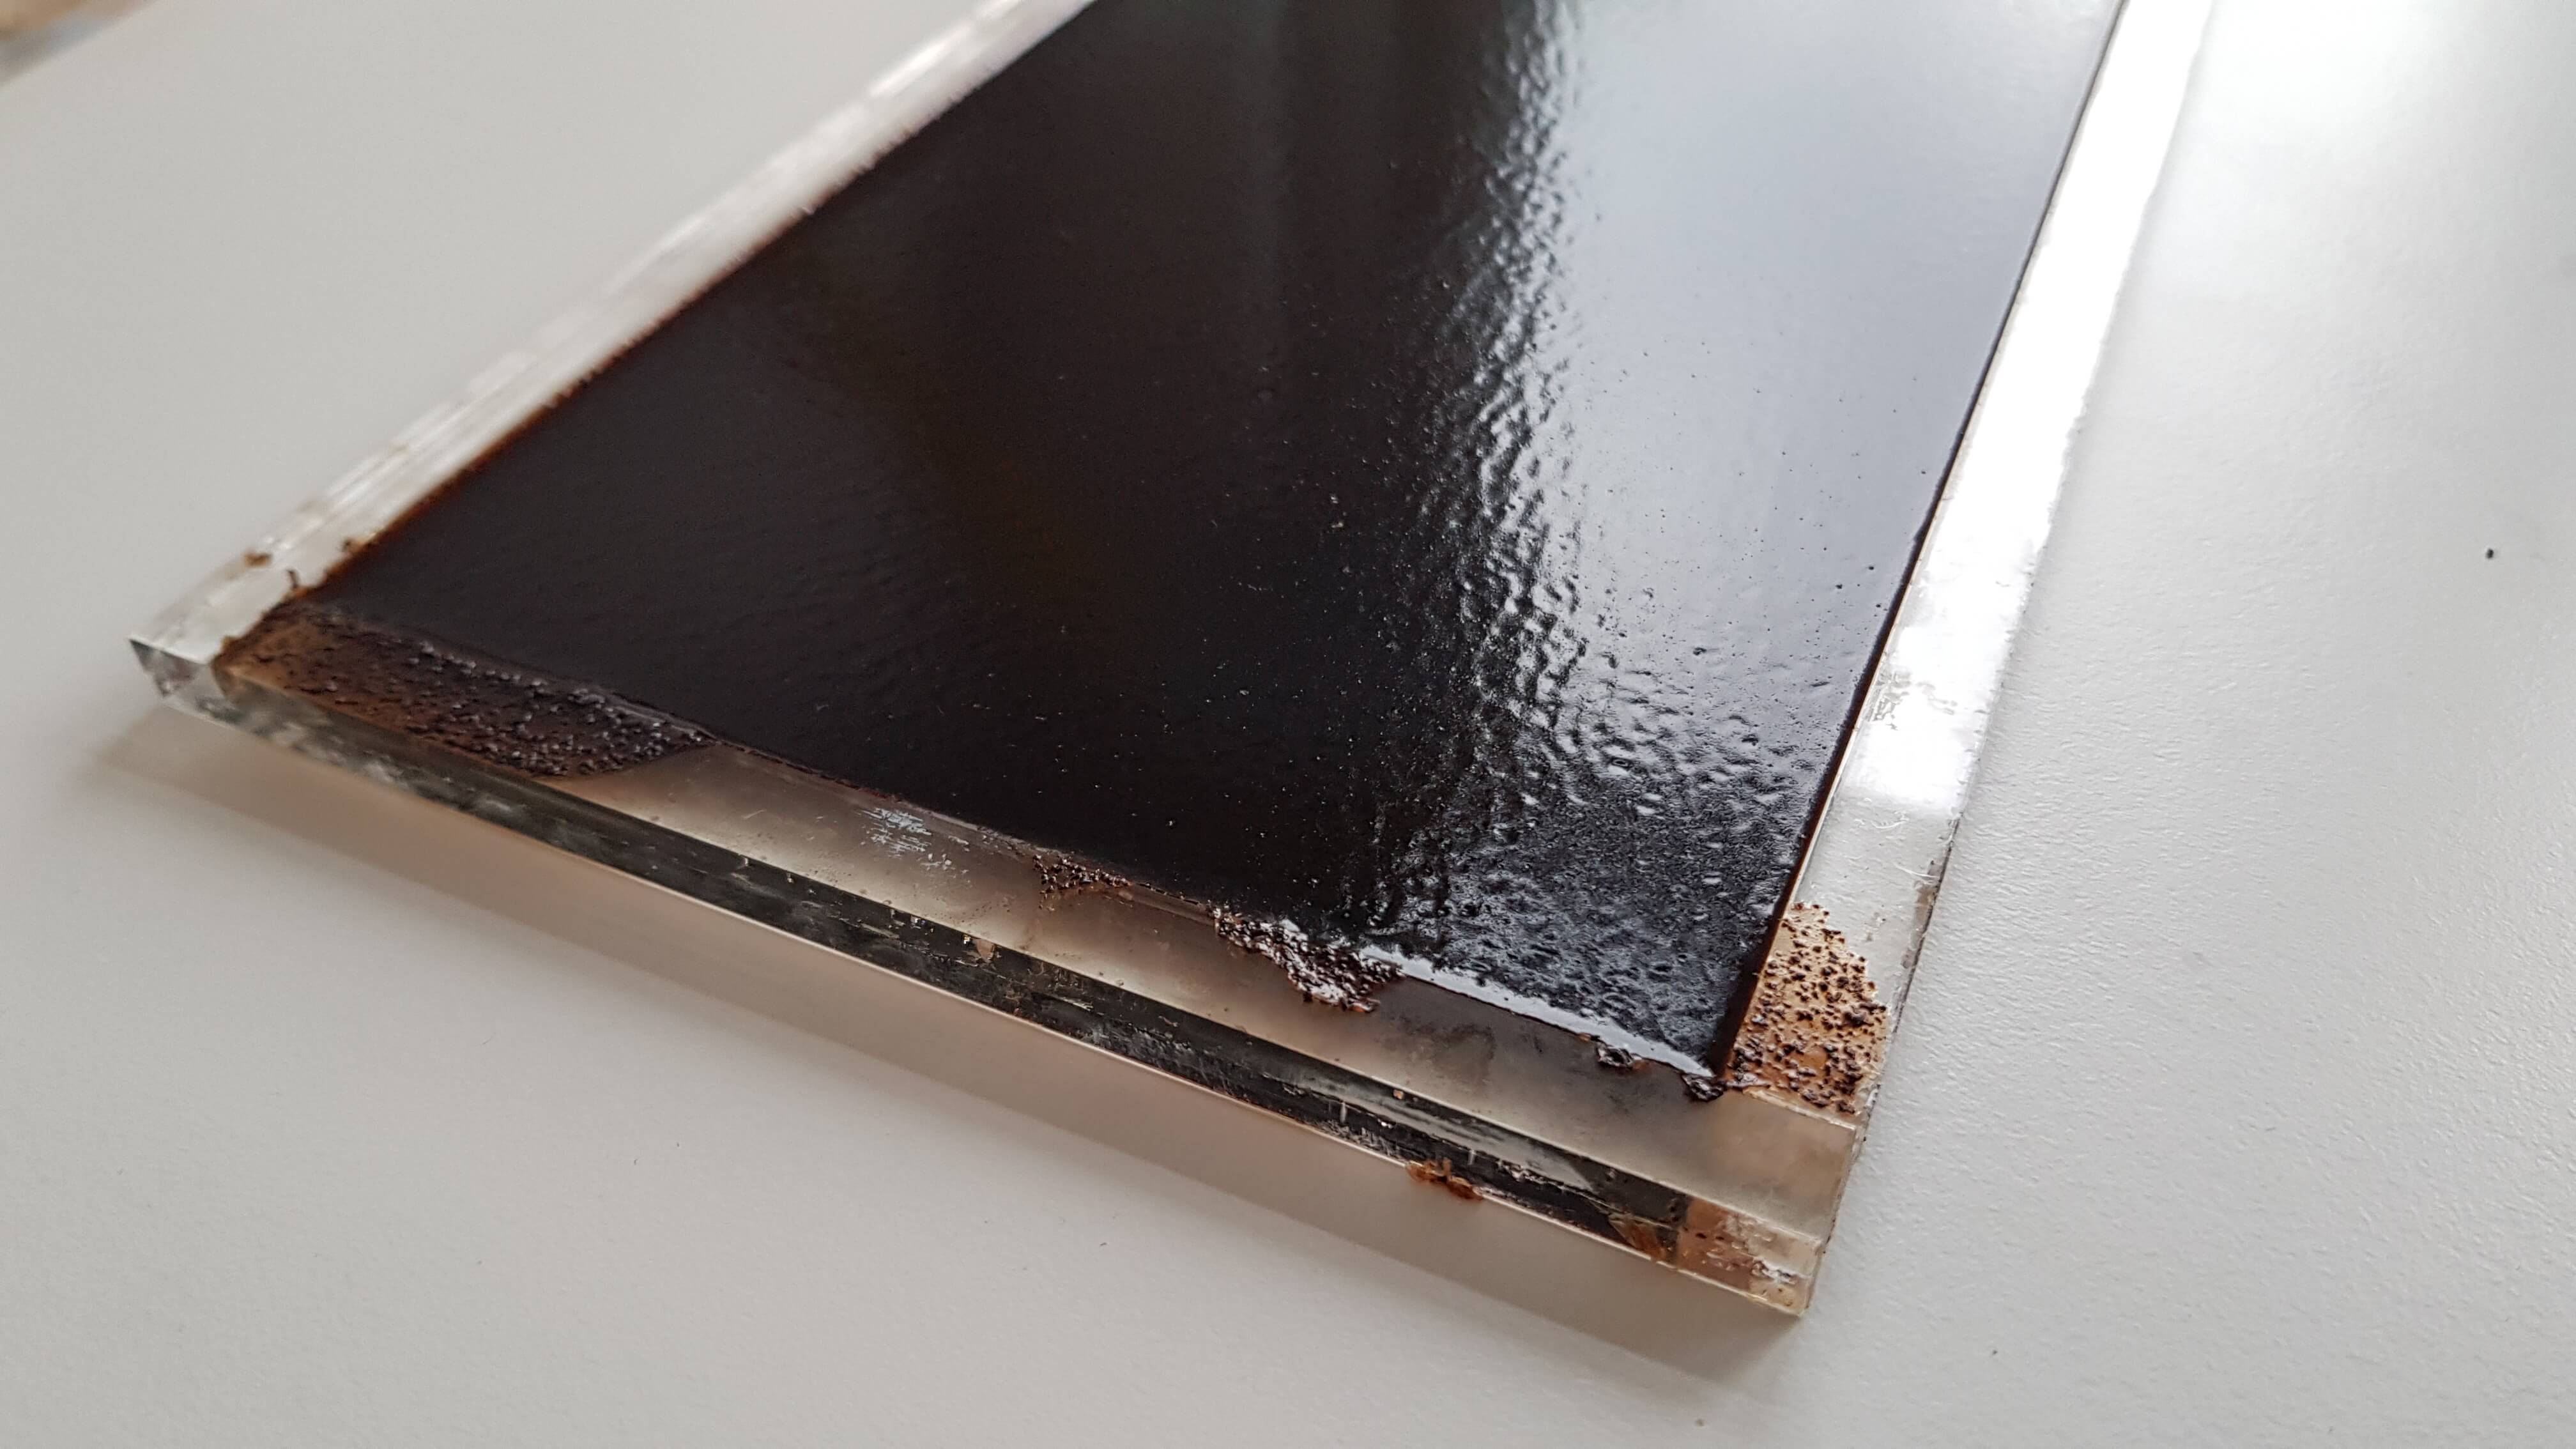
Coffee infused bio silicone
As practice at home I decided to make biosilicone based in gelatine. To make it more fun, I added ground coffee leftovers to the mix to add structure, color and smell. The result is still drying, but it looks quite thick and stable. And it has a nice coffee aroma. I wonder if it will grow mold though.
For fun I also poured it in a lego cake mould, which made it into a very cute silicone face. The interesting thing I could notice with the lego mold is that as the water dries, the texture becomes more grainy since the coffee becomes more visible on the surface.
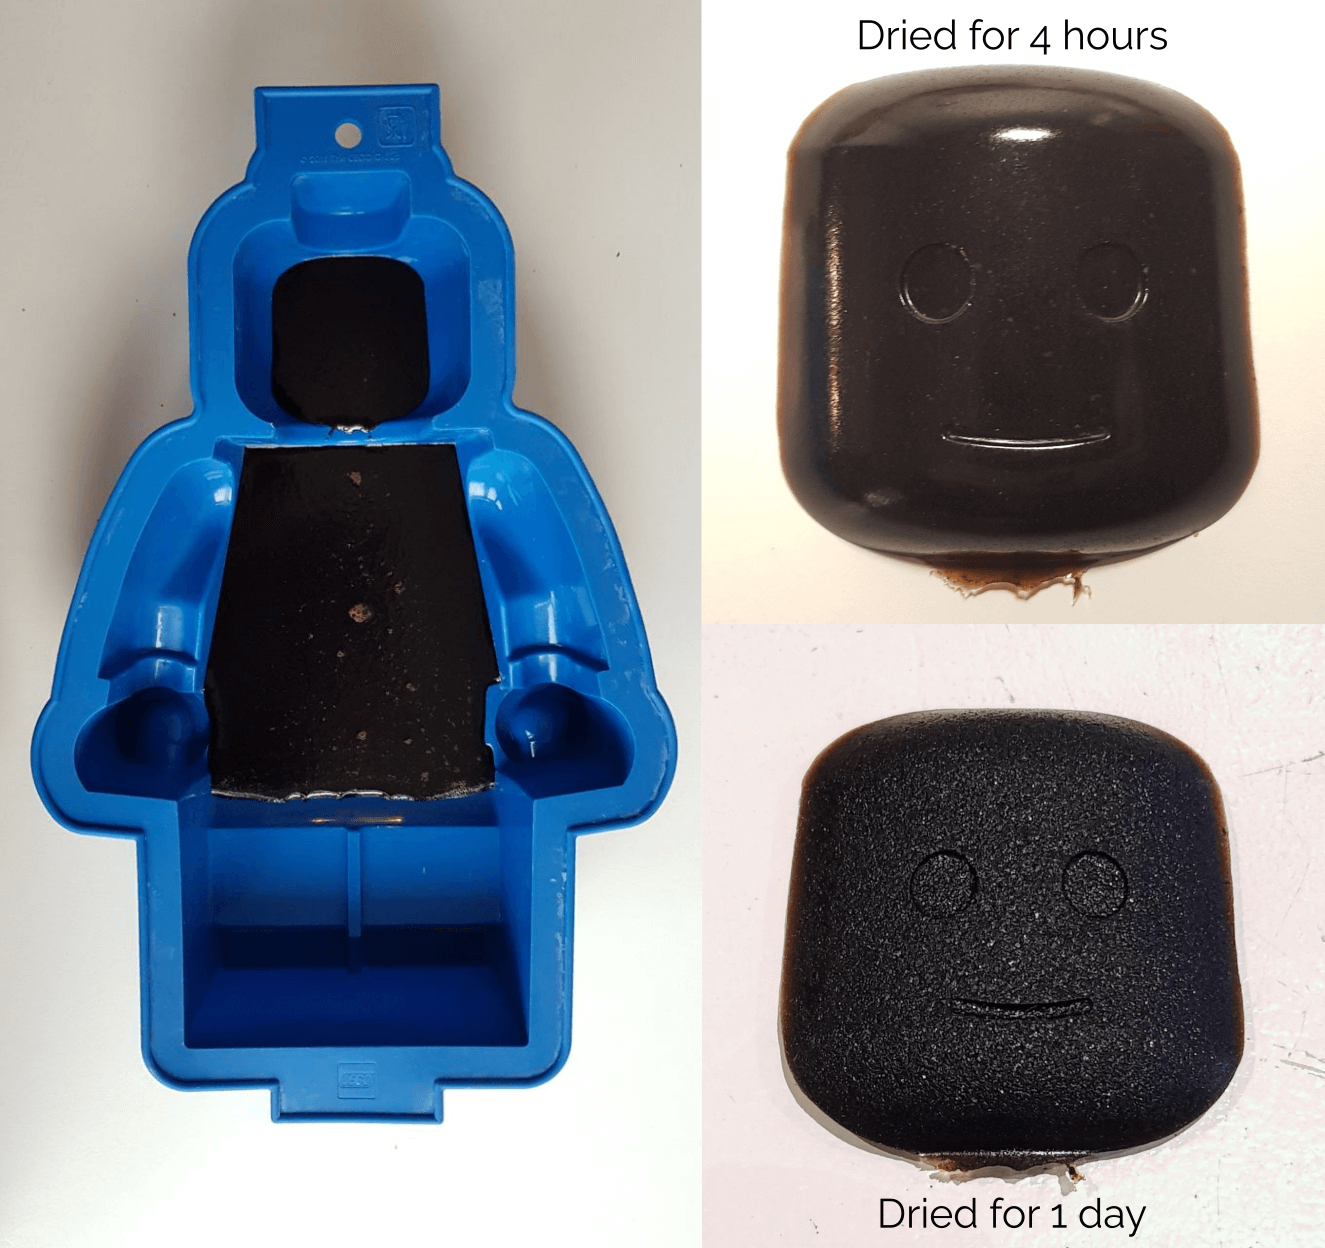
The result after one day of drying is quite flexible and silicone-like.
Recipe for coffee infused bio silicone
Recipe based on Cecilia Raspanti's, with addition of ground coffee to the mix.
| Material | Quantity |
|---|---|
| Gelatine | 48 gr |
| Glycerine | 48 gr |
| Water | 240 ml |
| Ground coffee beans | 20 gr |
| Step | Description |
|---|---|
| Heat water in a pot | Warm up the water in a pot on the stove. The water can be plain or already dyed if you're planning to use one color only. |
| Add glycerine | Add to the water and stir. |
| Add ground coffee | Add to the water/glycerine mix and stir. |
| Add gelatine powder | Add to the water/glycerine/coffee mix and stir until evenly mixed. |
| Simmer for 15-20 minutes | Be careful not to boil it. Temperature should be maximum 86C. |
| Pour on mold or surface to cast | Once the mixture has a syrup consistency, pour it on the chosen cast. Do it slowly to avoid the formation of bubbles and pour onto the liquid itself and not outside of it. |
| Let it dry | Let the mould dry in a ventilated and dry room. Turning your piece until it is dry will help preventing mold formation, but might deform the piece. |
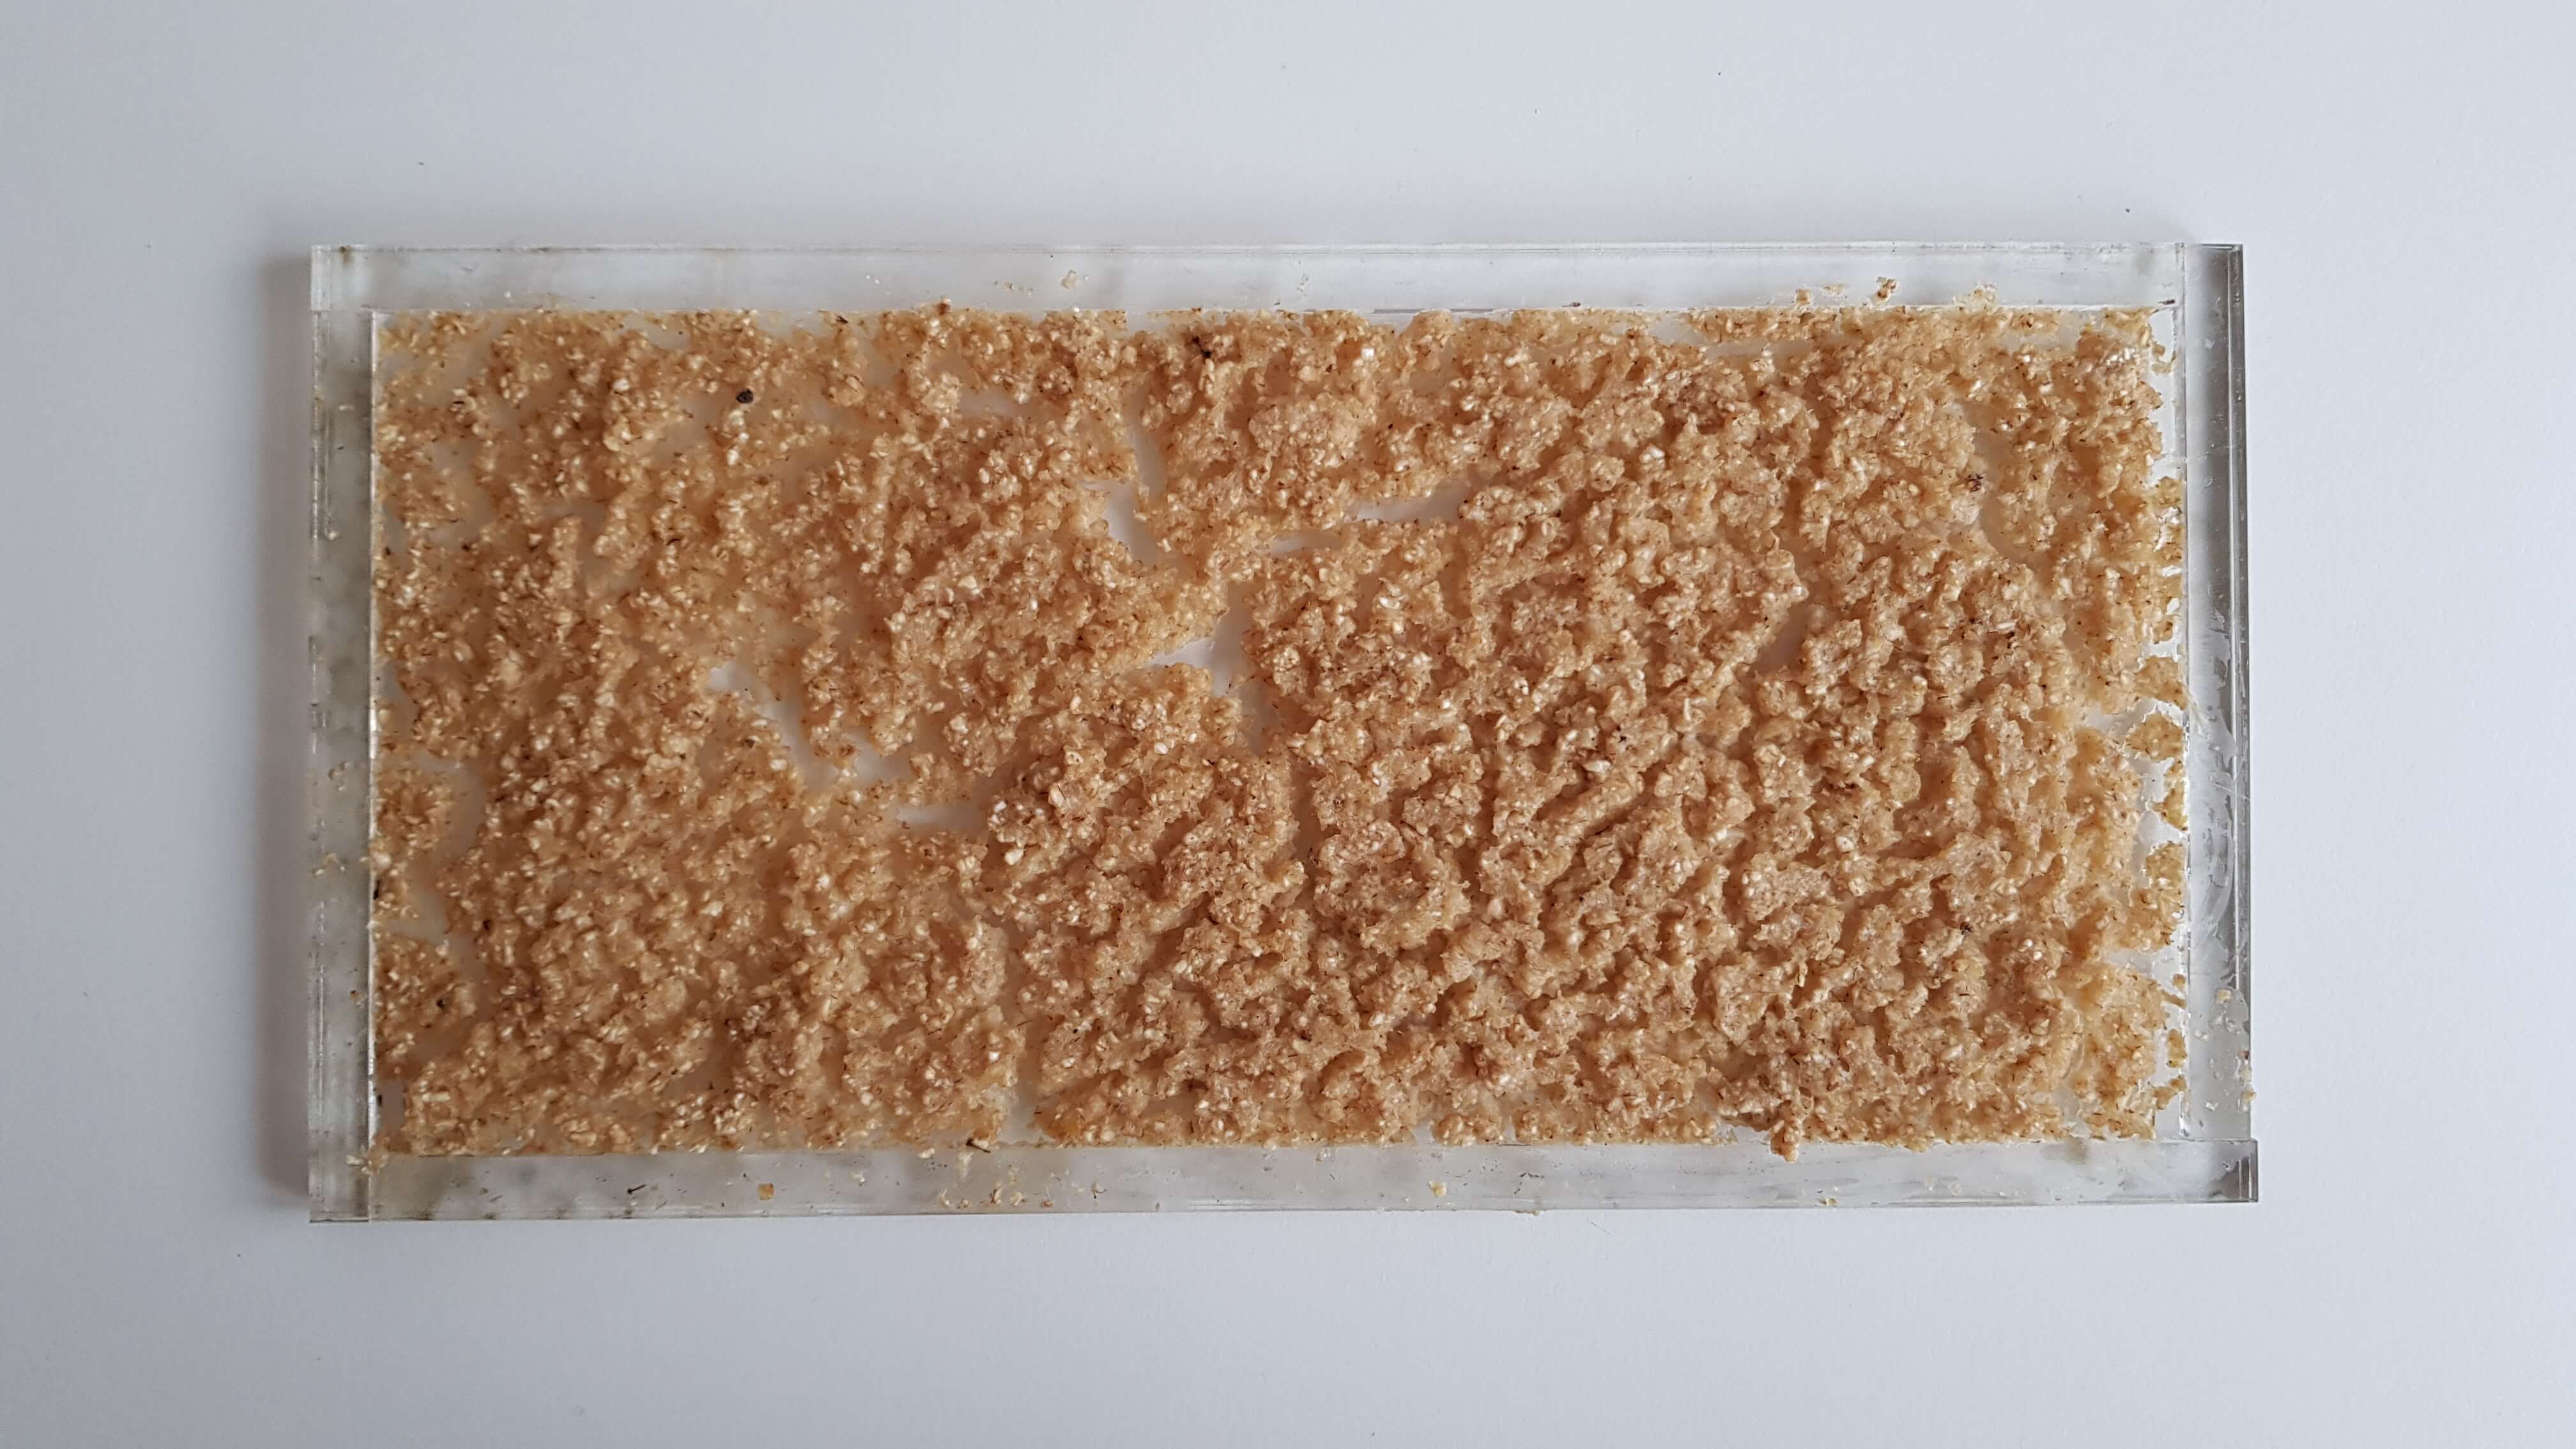
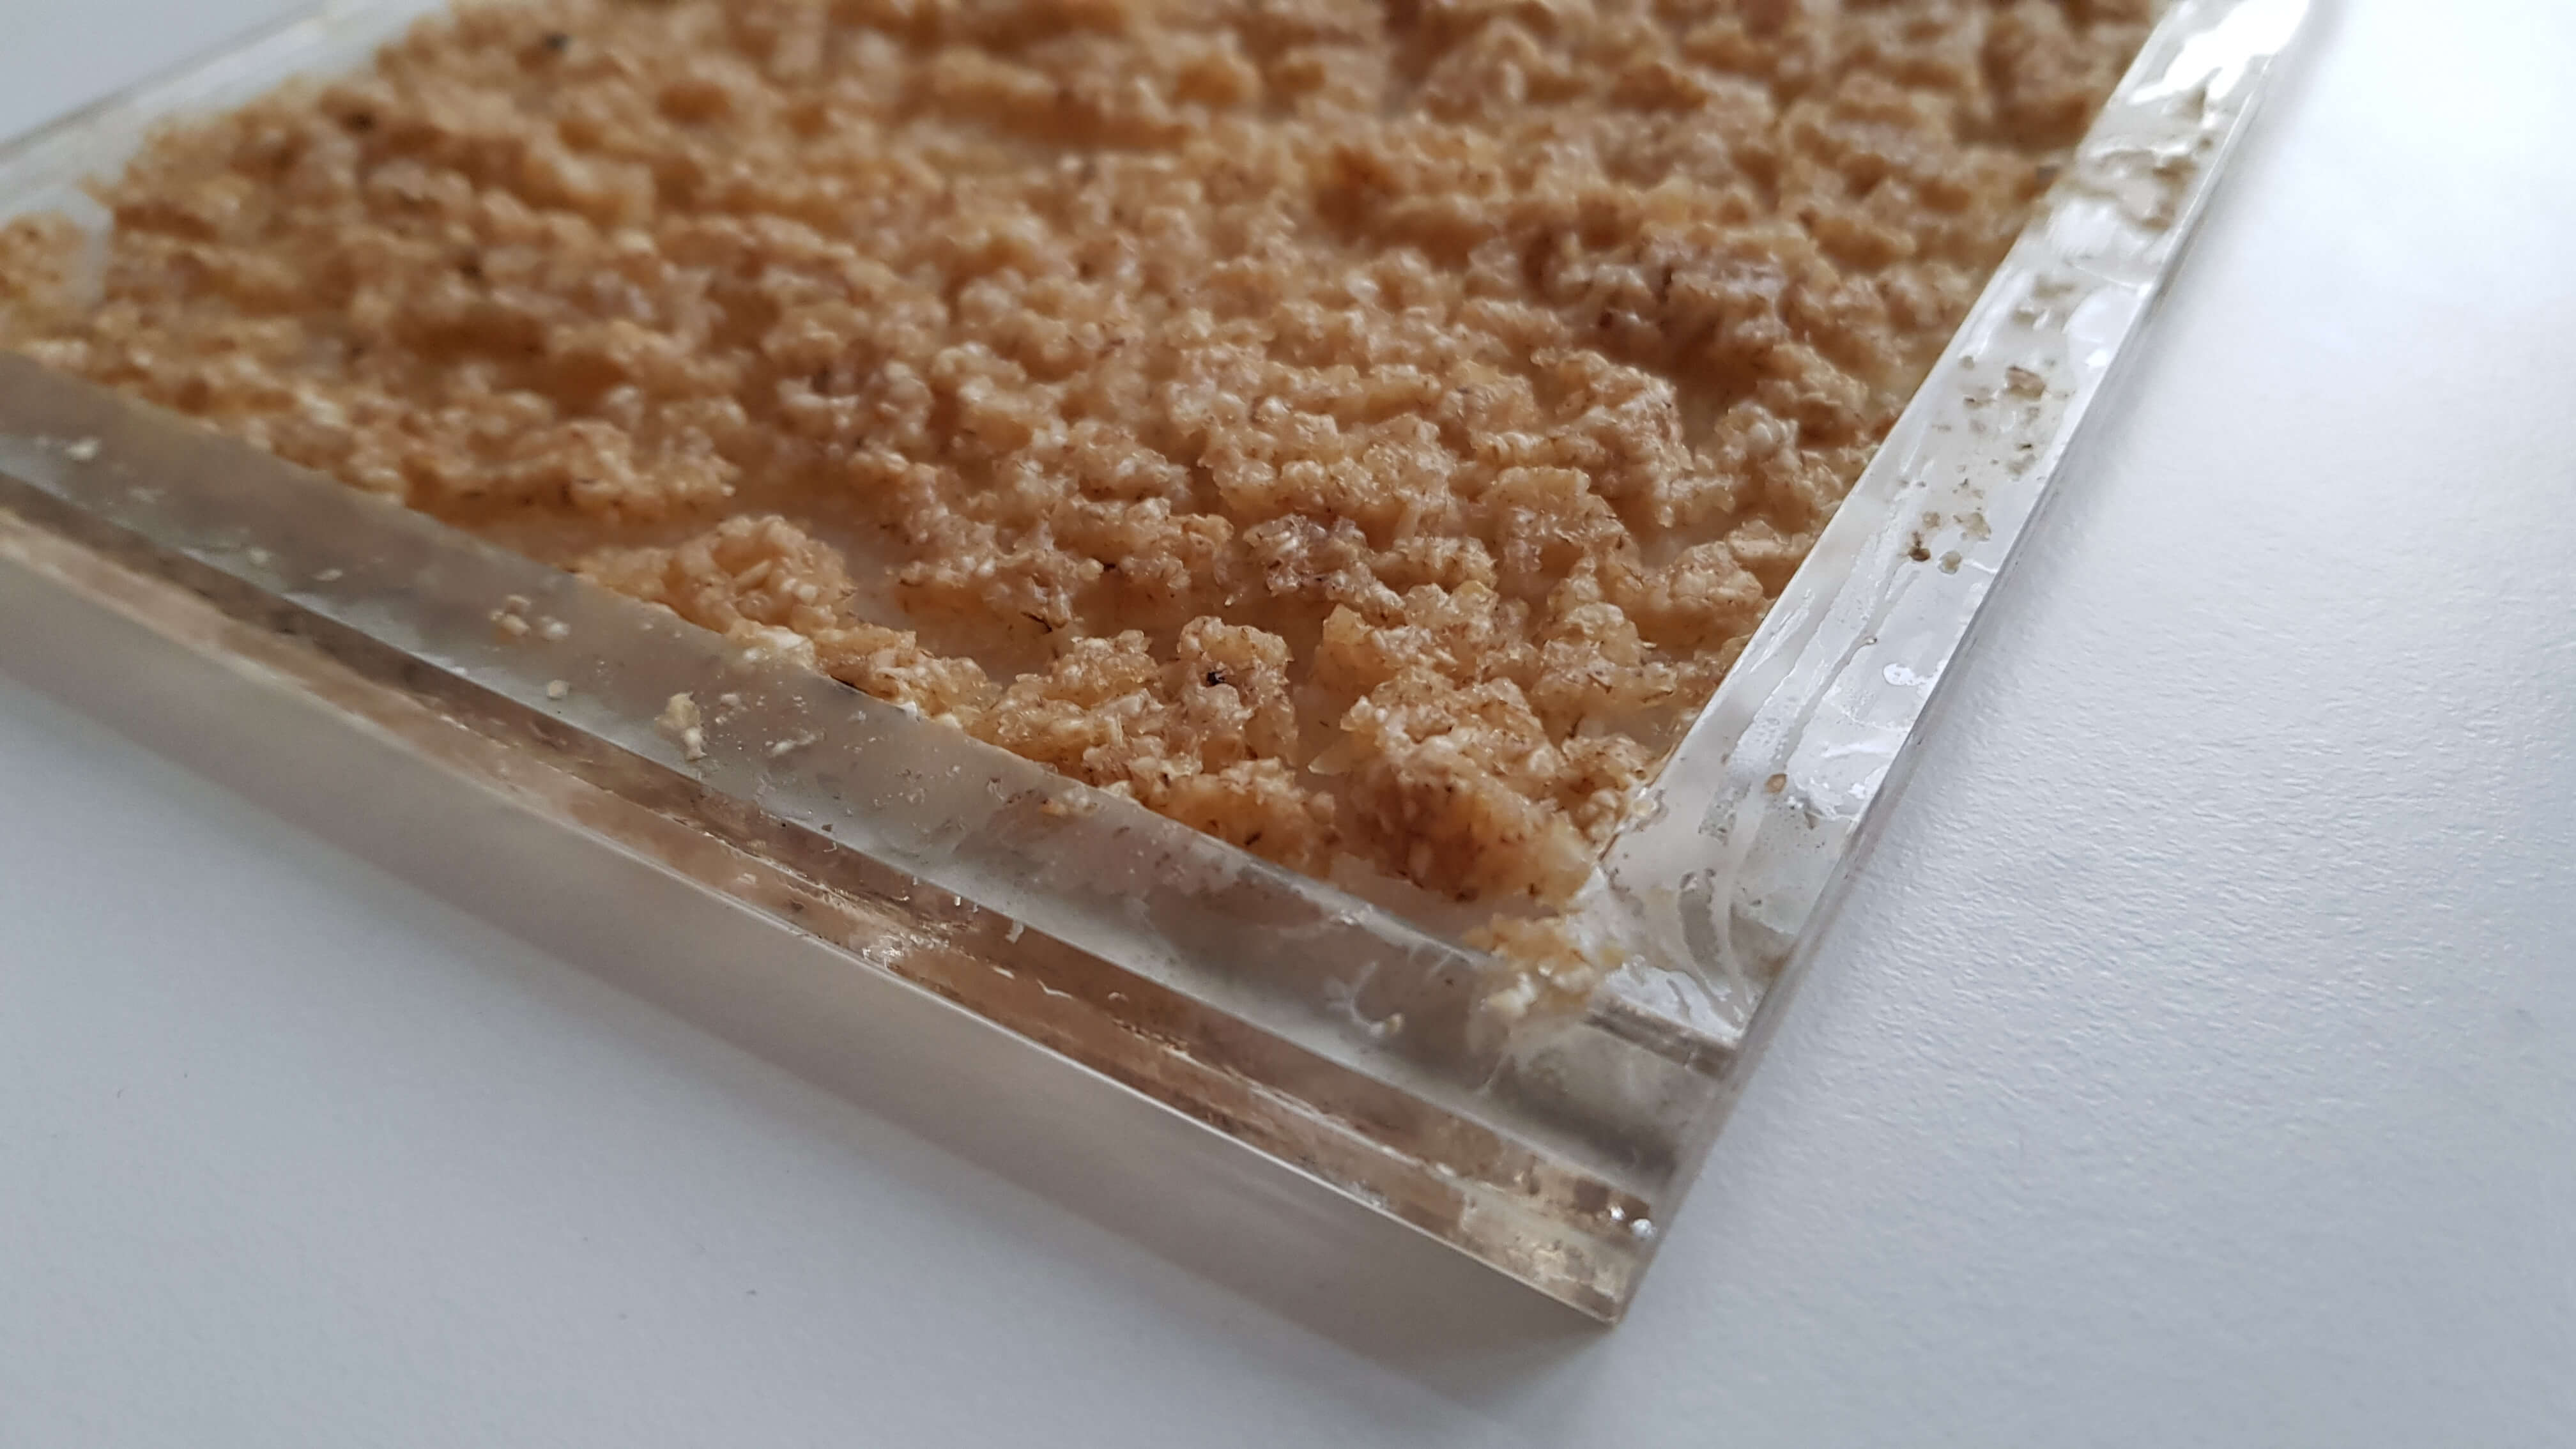
Oat bioplastic (fail)
As a final experiment, I wanted to try making bioplastic with oats. I eat porridge every morning, so I couldn't help but notice the glue-like consistency it has when cooked. I'm pretty sure this starch can be useful to create a plastic. However, my attempt wasn't successful as the oat-glycerine mix cracked while drying. Upon discussion with Bea and Cecilia, they both agree that the proportions of ingredients should be different to improve the cracking. For instance, more glycerine might help. Also, it would be beneficial to separate the starch from the fibers to obtain the most out of the nice properties.
Recipe for oat bioplastic
Experimental recipe I put together :) Didn't really work so for a next iteration I'd blend the oats thinner and I'd add more glycerine to the mix.
| Material | Quantity |
|---|---|
| Oats | 80 gr |
| Glycerine | 40 gr |
| Vinegar | 15 ml |
| Water | 210 gr |
| Step | Description |
|---|---|
| Blend the oats to small pieces | The idea is to make the final mix smooth so it is easier to cast. |
| Simmer water | Put water in a pot and heat it to simmer. |
| Add glycerine and vinegar | Add it to the water and stir. |
| Add oats | Add it to the pot and stir. It will thicken quite soon, so keep stirring. |
| Transfer to mould | Only about a minute after the oats are added, the mixture should be quite thick. It is ready to transfer to a mould. Then it can be leveled using a spatula or a spoon. |
| Let dry | You can leave it to dry on its own or speed up the process using an oven at lowest temperature (around 60C). |