5. E-Textiles and Wearables I#
For this week's assignment, I used soft materials to fabricate:
- Digital [TBD] sensors, and
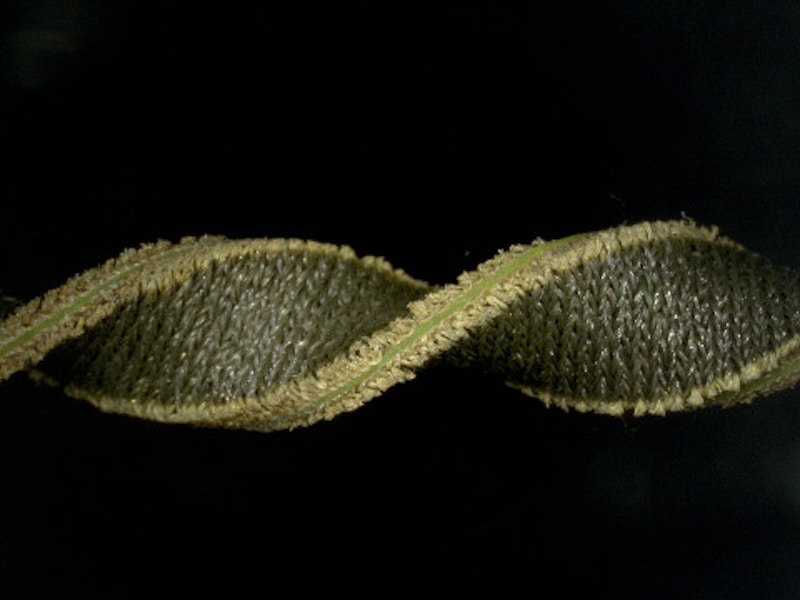
- Analog stretch sensors.

Digital [TBD] sensors#
Analog stretch sensors#
| Prototype ID | Description | Notes |
| I | Auxetic bioplastic stretch sensor | Bioplastic electrolyte caused corrosion, needs reformulation |
| II | Silicone stretch sensor | Successful to fabricate, but requires proper instrumentation to create reliable thin films |
Inspiration#
I’ve been fascinated with stretch sensors as a component for wearable technologies because I believe they can tell you a lot about body movement. A few stretch sensors have currently been produced and are shown below:

Left: StretchSense. Right: Harvard Wyss Institute
Prototype I - auxetic and bioplastic#
The first prototype was thing with stretch sensors is that all of them use elastic and stretchy material. At the time of trying to accomplish the assignment before global evaluation, our lab didn’t receive stretchy textiles in time, so I thought: how could one make a stretch sensor with non-stretchy materials?.
Materials research#
Auxetic materials
Drawing on the past lesson in circular fashion, I wondered if there was a tessellated pattern I could laser cut on a non-stretch that would render it stretchy. I came across auxetic materials! Auxetic materials are ones where, if you stretch it, it gets thicker instead of getting thinner. This video shows some of the patterns I was inspired by:
Conductive bioplastic
Materials and methodology#
Materials:
- Stretchy auxetic electrodes: woven ripstop conductive fabric laser cut with auxetic pattern
- Conductive bioplastic*: cornstarch-based bioplastic modified with salt and lemon juice to render it conductive
- Other ingredients: heat n' bond adhesive, hot glue, and stretchy textile to make it 'wearable'
*Wet ingredients measured out by volume, dry ingredients by mass. Assume 1:1 conversion of g/ml: 53% water, 11% glycerol, 8% cornstarch, 3% vinegar, 5% salt and 20% lemon juice
Methodology:
- Prepare two stretchy auxetic electrodes - use Epilog 40W laser cutter to create auxetic pattern (settings- speed: 80, power: 5, frequency: 500)
- Prepare conductive bioplastic formulation -
- Integrate auxetic electrode onto stretchy textile - Cut out swatch of stretchy textile. Place small squares of heat n' bond to every corner of each auxetic electrode. Adhere each electrode to the stretchy textile by one corner.
- Create dam for conductive bioplastic electrolyte - Use hot glue (or some other adhesive that can block absorption of bioplastic electrolyte through the textile
- Incorporate conductive bioplastic electrolyte - Formulate bioplastic as listed in the aforementioned section. 'Paint' bioplastic in the space between each auxetic electrode and the stretchy textile
- Secure everything - Iron down the rest of the other corners of the auxetic electrodes
Results#
What worked: Integration of materials worked for the most part, as well as successful blockage of bioplastic absorption throughout the stretchy textile support
What didn't work: Compatibility of bioplastic electrolyte with conductive electrode.
Recommendations for next time: Electrode material should be replaced with an organic material such as carbon.
Prototype II#
Motivation#
This prototype was motivated by failures of Prototype I and the arrival of stretchy textiles in our lab. I ended up following and modifying the method for making a textile silicone stretch sensor developed by researchers at the Harvard Wyss Institute.
Research - materials fabrication and integration#
Silicone dielectric fabrication
I did some experimentation to engrave acrylic at different settings to make 'thin film' molds that could be used for the silicone dielectric. This involved measuring the in-house engraving settings for the Epilog laser cutter that was already fabricated using calipers ([thickness of acrylic]-[thickness of engraved acrylic] = [mold film thickness]), then applying those settings for the film needed. To make the mold of the stretch sensor in my final wearable, the settings were 25% speed, 50% power, and 1500 frequency. The thickness of the acrylic was measured to be 5.58mm. I recommend not cleaning the engraved mold with any solvent as it makes the acrylic crack (something I learned from making the first small swatch).
Conductive thread sewing machine failures
I tried a great deal to implement the Pfaff digital embroidery/sewing maching to sew conductive thread onto my knit tank top. I failed miserably.
Materials and methodology#
Materials:
- Stretchy electrodes: ...
- Silicone dielectric: Ecoflex 00-30
- Conductive thread: ...

Creating textile silicone stretch sensor

Integrating textile silicone stretch sensor with wearable
Methodology:
- Fabricate thin silicone dielectric material
- Make Ecoflex 00-30 according to manufacturer instructions. Degas and pour into laser engraved mold. Make sure to level silicone with top shelf of mold.
- Bake at 175-200F for 5 mins.
- Create textile silicone stretch sensor
- Laser cut textile stretch electrodes (cut with Epilog 40W with the following settings: 40% speed, 10% power, 500 Hz)
- Smear a thin layer of Ecoflex 00-30 on top of thin silicone fabricated in Step 1. Place one laser cut electrode on top of smeared Ecoflex and flatten out to ensure adhesion. Bake in oven at 200F for 5 minutes. (Note: I made two at the same time in the figure above).
- Remove mold from oven, and peel composite made from previous step.
- Flip composite over, smear another thin layer of ecoflex and lay second laser cut stretch electrode on top, and bake as before.
- Integrate textile silicone stretch sensor with wearable - shirt, pants, pattern
- Laser cut heat n' bond shapes to adhere textile silicone stretch
- Follow directions for heat n' bond - iron on to wearable, peel off backing, and then iron onto conductive textile electrode.
- Hand sew each electrode to the wearable using conductive thread. Use a pretty geometric pattern!
- Get data from your sensor! (visit Reference #4 in the Useful Links section below)
- Load Arduino code below onto your Arduino
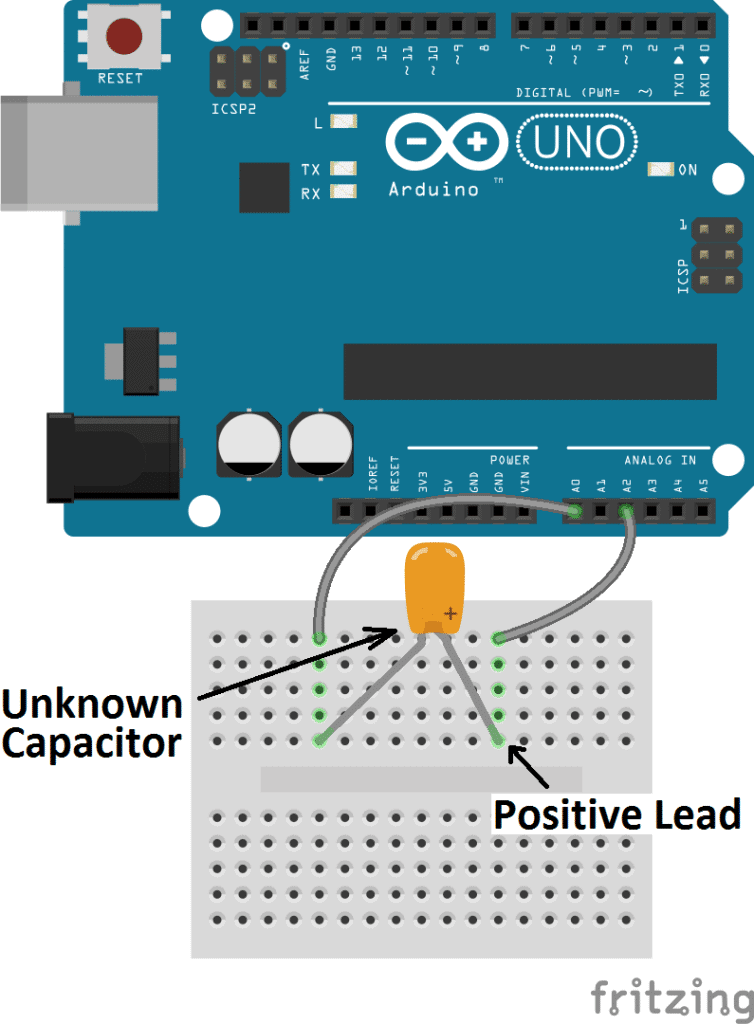
- Hook up stretch sensor to Arduino according to the fritzing diagram below
- Use serial plotter via Arduino to see real-time stretch data results!
Code for Arduino
const int OUT_PIN = A2;
const int IN_PIN = A0;
const float IN_STRAY_CAP_TO_GND = 24.48;
const float IN_CAP_TO_GND  = IN_STRAY_CAP_TO_GND;
const float R_PULLUP = 34.8;
const int MAX_ADC_VALUE = 1023;

void setup()
{
  pinMode(OUT_PIN, OUTPUT);
  pinMode(IN_PIN, OUTPUT);
  Serial.begin(9600);
}

void loop()
{
    pinMode(IN_PIN, INPUT);
    digitalWrite(OUT_PIN, HIGH);
    int val = analogRead(IN_PIN);
    digitalWrite(OUT_PIN, LOW);

    if (val < 1000)
    {
      pinMode(IN_PIN, OUTPUT);

      float capacitance = (float)val * IN_CAP_TO_GND / (float)(MAX_ADC_VALUE - val);

      Serial.print(F("Capacitance Value = "));
      Serial.print(capacitance, 3);
      Serial.print(F(" pF ("));
      Serial.print(val);
      Serial.println(F(") "));
    }
    else
    {
      pinMode(IN_PIN, OUTPUT);
      delay(1);
      pinMode(OUT_PIN, INPUT_PULLUP);
      unsigned long u1 = micros();
      unsigned long t;
      int digVal;

      do
      {
        digVal = digitalRead(OUT_PIN);
        unsigned long u2 = micros();
        t = u2 > u1 ? u2 - u1 : u1 - u2;
      } while ((digVal < 1) && (t < 400000L));

      pinMode(OUT_PIN, INPUT);
      val = analogRead(OUT_PIN);
      digitalWrite(IN_PIN, HIGH);
      int dischargeTime = (int)(t / 1000L) * 5;
      delay(dischargeTime);
      pinMode(OUT_PIN, OUTPUT);
      digitalWrite(OUT_PIN, LOW);
      digitalWrite(IN_PIN, LOW);

      float capacitance = -(float)t / R_PULLUP
                              / log(1.0 - (float)val / (float)MAX_ADC_VALUE);

      Serial.print(F("Capacitance Value = "));
      if (capacitance > 1000.0)
      {
        Serial.print(capacitance / 1000.0, 2);
        Serial.print(F(" uF"));
      }
      else
      {
        Serial.print(capacitance, 2);
        Serial.print(F(" nF"));
      }

      Serial.print(F(" ("));
      Serial.print(digVal == 1 ? F("Normal") : F("HighVal"));
      Serial.print(F(", t= "));
      Serial.print(t);
      Serial.print(F(" us, ADC= "));
      Serial.print(val);
      Serial.println(F(")"));
    }
    while (millis() % 1000 != 0)
      ;
}
Results#
Useful links#
- How stretch sensors work
- Method to develop textile silicone stretch sensors (Harvard Wyss Institute)
- Geometry of hand sewing (book)
- How to make an Arduino capacitance meter
Media#
Prototype I:
Prototype II- files for download:
- Laser etched acrylic mold pattern for making thin silicone
- Laser cut pattern for making chevron holes in tank top
- Laser cut pattern for making heat n’ bond patterns