9. E-Textiles and Wearables II#
For this week's assignment:
- I fabricated two actuator swatches, which include
- A mini textile-wooden tensegrity actuator using shape memory alloy wire, and
- A textile swatch that grows sodium acetate trihydrate (SAT) crystals using a vibrator motor.
- I explored hard/soft connections for e-textiles by:
- Attempting to making a breakout board with an ATTiny 45, and
- Used an e-textile stitch stretch sensor to light a LED
- I attempted to program an ATTiny, which includes
- Creating a flexible breakout board using a collar stay and explored hard and soft connections, and
Actuator swatches#
I framed the portion of this assignment in relation to my final project: I was hoping to make actuator outputs that would trigger the formation of sodium acetate trihydrate crystals using conductive knit fabric. My thought was: if a flex disc can trigger the formation of crystals by exposing seed crystals housed in the microcracks of the flex disc in solution, then maybe we can replicate it in textile by causing the textile to stretch/unstretch to expose microcracks in the yarn.
Mini textile-wooden tensegrity actuator using SMA#
Inspiration#
There are a lot of examples of tensegrity online, but the one architectural example I followed was from IAAC, called "The Tensegrity Lego.":
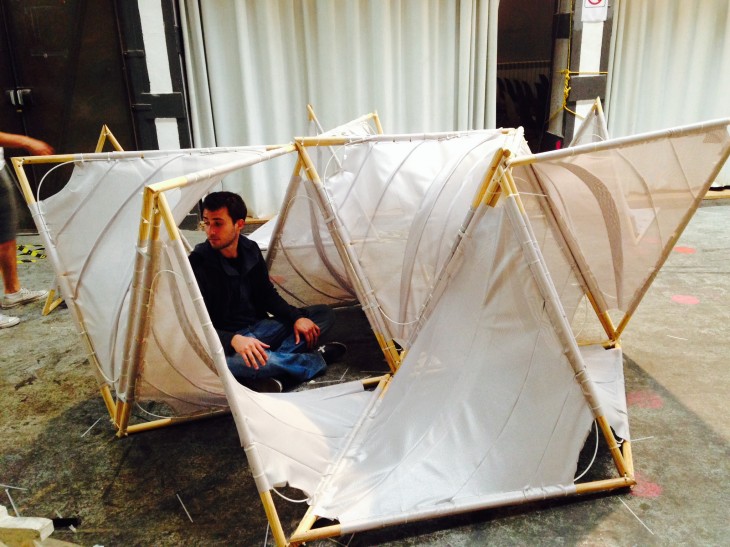

The structure seemed simple enough to replicate and one that would produce the 4-way stretch in textile that I needed if I added a shape memory alloy (SMA) wire to it.
Working idea#


The initial thought here was to explore tensegrity with knit textile and skewer sticks. On the left are some sketches I drew out.
Prototype#
How I made it

I used (1) bamboo skewers, (2) conductive jersey knit, (3) hot glue and (4) 3D pen to attach the textile to the bamboo skewer (see above picture).


I attached the end corner points of the two attached triangle structure to trained SMA wire. It seemed to actuate the tensgrity actuator the way I intended, except it only worked one way because we only had SMA wire that was trained to be straight and the force from the 3D pen generated hinge was not strong enough to bring the actuator in the desired initial bent position.
Textile swatch that grows SAT crystals using vibration motor#
Building off the finding that vibrating a solution of SAT in water could make crystals grow, I decided to make an actuator with textile, silicone, and a vibrating motor. See next section for process steps.
Process#
Materials
- Silicone - Ecoflex 00-30
- Acrylic sheet, 3mm and 6mm
- Textile to grow crystals on

In case you needed it in a more detailed form, the steps are as follows:
- Make your mold out of laser cut acrylic (just like you were making an inflatable for soft robotics, but the 'inflatable' in this case would be an area that the vibration motor can nestle in)
- Pour silicone into mold, degas and cure in oven for 5 min at 150 deg F

- Take mold with silicone out of the oven, place textile square on top, apply pressure to make sure textile is adhered to silicone, and then stick assembly into oven @ 150F for another 5 min

- Once silicone is cured, take assembly out of the oven, remove silicone+textile out of the mold
- Place vibration motor into molded cavity
- Seal vibration motor in place by pouring silicone on top of vibration motor + silicone

- Soak entire assembly into melted sodium acetate trihydrate crystals, ensuring that the textile side coming into the most contact with the salts

Results - the actuator does not grow crystals on the textile#
To test the actuator, I stuck it in a 2:1 SAT:water solution I prepared previously. With the wires of the vibration motor hanging out,, I covered the solution with plastic saran wrap and also stuck a thermometer to monitor the solution temperature to know what was going on. I made sure to operate below the melting point of SAT. I connected a 9V battery to the vibration motor. If you watch the video below, you’ll see that the vibration doesn’t induce crystallization, especially in this closed environment. Secondly, because instantaneous crystallization didn’t happen and I kept the vibration motor running, the actuator start heating up the solution because the motor is working itself (you’ll see the temperature start to creep up).
Explorations in hard/soft electrical connections#
Through the following projects (listed in each subsection), I worked with hard/soft electrical connections.
ATTiny breakout board prototype 1#

The picture above shows steps in the process of attempting to make a soft breakout board. I used the ATTiny45 board that was available in the lab, and after numerous trials failing to make a connection to it with conductive thread on textile, I realized that the legs on this board were too fragile for textile and the chip was really just designed for surface mount board. So... lesson learned: do not use this board for making e-textiles (unless you find a successful way to attach to this board, please share!
E-textile stitch stretch sensor to light a LED#
I created a stitch sensor that could stretch. I wanted to be able to get readouts of conductivity of a stitch made on textile. To make the sensor, I experimented with several stitch patterns using two types of conductive thread, and found most success with the thread that had the lowest resistance using a zigzag stretch. The stitches I used were the chain stitch and zig zag stitch, following tutorials from "The Geometry of Hand Sewing," by Natalie Chanin. I attached the ends of the stitch to buttom snaps as seen below:

I measure the resistance of the most stretchable and electrically reliable stitch with a multimeter, and the resistance reading from a multimeter was on order of 10-20 Ohms:

I connected the stitch sensor to an Arduino using the code in the following section. Basically, the code is a mash-up of (1) a code to turn your Arduino into an Ohm meter, which requires one to know an approximate resistance value of an unknown resistor, and (2) the code I used for my Skin Electronics assignment. My set-up is as follows:

Code to map stretch sensor values to LED brightness#
I used the following code to make the brightness of LED depend on how much I stretched an e-textile stitch stretch sensor I made
// Code for making an Arduino an Ohm meter
// Also mapping this to variable LED brightness


int analogPin = 0; // Resistor 1 (R1) is connected to pin 0
int LEDpin = 9; // connecting LED to pin 9 (PWM)
int raw = 0;
int Vin = 5;
float Vout = 0;
float R1 = 10; // resistor value connected to analog pin 1
float R2 = 0; // unknown resistor value, in this case, the stretch sensor
float buffer= 0;
int LEDbrightness;

void setup() {
  Serial.begin(9600);
  pinMode(LEDpin, OUTPUT); // this sets the LED as the output
}

void loop() {
  raw = analogRead(analogPin);
  if(raw)
  {
  buffer= raw * Vin;
  Vout= (buffer)/1024.0;
  buffer= (Vin/Vout) -1;
  R2 = R1 * buffer;
  //Serial.print("Vout: ");
  //Serial.println(Vout);
  Serial.print("R2: ");
  Serial.println(R2);
  // The following is being recycled from my Skin Electronics assignment :)
  // except, when the value is small (textile is stretched), the LED gets brighter
  LEDbrightness = map(R2, 12, 5, 0, 255);
  // LED gets brighter the more you stretch (resistance gets lower)
  analogWrite(LEDpin, LEDbrightness);

  delay(1000);
}
}
Attempts in working with ATTiny#

Following the failures of making a breakout board with the ATTiny 45 chip we had in the lab, I proceeded to make a breakout board that wasn't as flexible and soft, by using my husband's collar stay. The result? The legs of the chip did not break, my electrical connections were solid, but I wasn't able to program the chip (I used two different computers, and different types of Arduinos). The one thing I didn't do was program the chip before making the breakout board, which is the next thing I want to try before attempting this part of the assignment again.