2. Digital bodies
This week we are scanning and making bodies. Why? Good question. From what I understood it's because 1) mannequins are expensive so it's nice to make our owns, 2) because the future is bespoke garnments and wearables, therefore we need bespoke bodies.
That is probably a horrible description of this week.
Inspiration
Physical User Experience of Devices
I find UX fascinating, especifically tactile UX. At the moment we use our phones and devices through the touch of our fingers. It's a pretty slow output. It took me about 3 seconds to think these sentences, but a minute to write them. We need a better interface between us and the machines, one that will slowly make the physical device. Basically a device like NeuraLink implanted in the brain. Scary, but unavoidable?
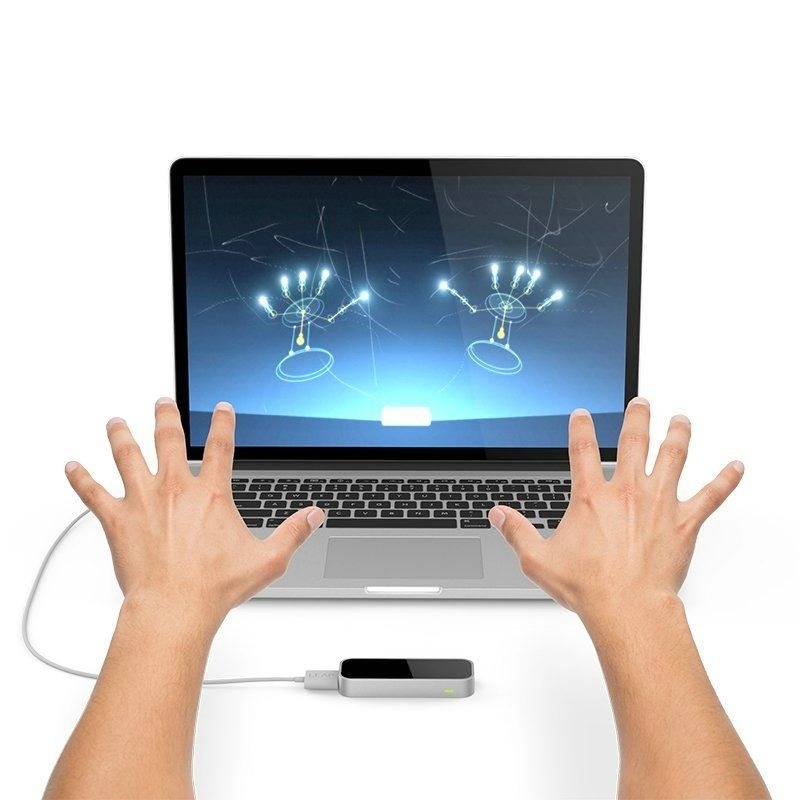
Leap Motion, now called Ultraleap
Found out about Ultraleap (previously Leap Motion) a few years ago. I like the sleek design (very Apple-y).
Recording hand motions for control
I've been also thinking about how, when I want to switch the hotspot on my phone, without thinking I swipe down from the top of my phone to get the quick menu, swipe down again to get the full menu, swipe right once and tap in the middle of the phone where the Hotstop icon is.
It is something I do so often, that has become so natural, that I thought you could probably record that brain activity which controls my hand to do that, and get the phone to switch the hotspot from simply imagining these movements, or do them in the air.
Another, more achievable way, which occured to me in Week 1, was to make a glove that can record that. I don't think it's doable, but it mentioned conductive fabric. Do they conduct more or less if they are strecthed? If so you could record the position of the finger from how strecthed the fabric is, although I would guess there'd be so much noise.
Some YouTube nerd that make stuff
Zack Freedman creates loads of wearables, he's done some pretty cool stuff like a AI data glove or some teleprompter glasses.
Materials
I'd love to delve into materials. Maybe even more into testing materials and making a library of their properties. Probably has been started somewhere?
I know about Materiom which has an extensive list of materials, but most of them only have the recipe to make them, not their properties.
Actually they have a material testing page.
Creating a 3D model with MakeHuman
MakeHuman to make a sexy human body
Make Human is an open source software to create 3D model of humans. The extent of its customisation is pretty impressive, from measuring the circumference of the ankle, knee, legs, arms, torso, to the skin colour of the model, the gender, the size, shape, firmness of the breasts, all the way to adding clothes, lighting, material, eyebrows.
The software is quite easy to use, you simply go from tab to tab, choosing the options you want, and later export it.
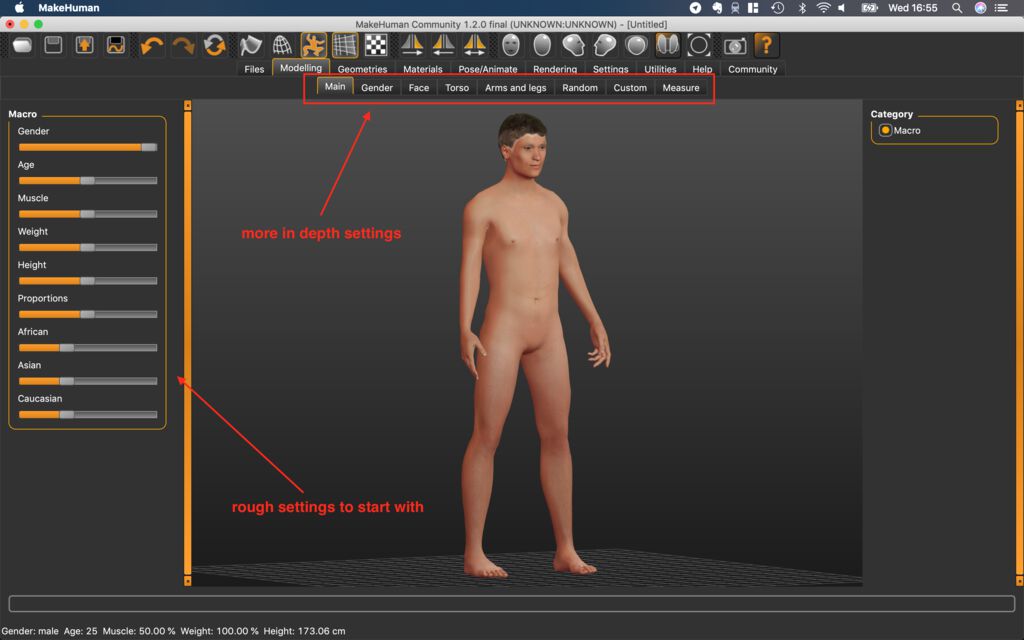
The first main category on the top is Modelling, this is where the setting for the morphology of the human we are creating.
On the left column you have sliders for basic settings...
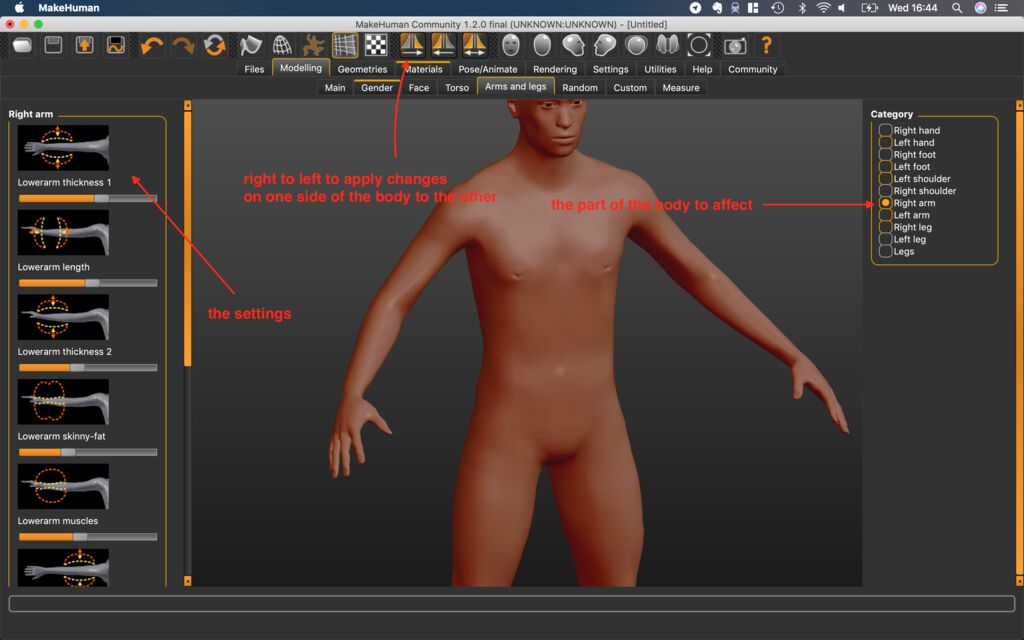
... which you can then fine tune with the more specific tabs, such as in Arms and legs.
A body is symmetric (mostly), so you can change settings on the right arm or leg, and then use the Symmetry R>L to copy the changes to the other side of the body.
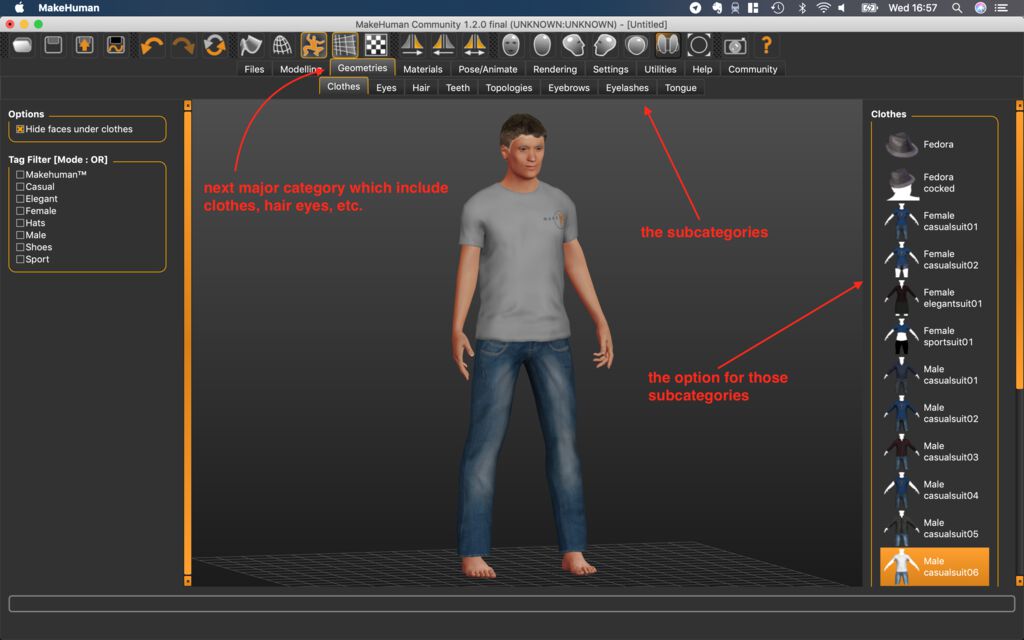
In the next tab Geometries you can add more detail such as clothes, hair, eye colour, teeth, etc.
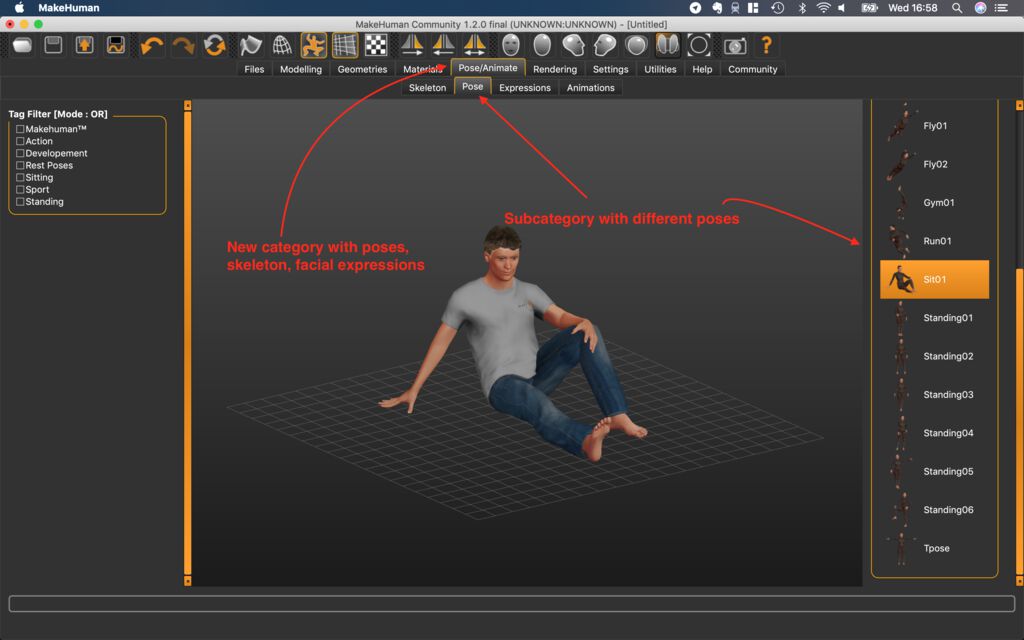
In the next tab Poses you can change the facial expresses, make the model sit, fight, fly, etc.


In the Settings tab you can add a background in the Background tab. You simply have to add a picture in the folder they indicate.

And fabracadabra, it's there!
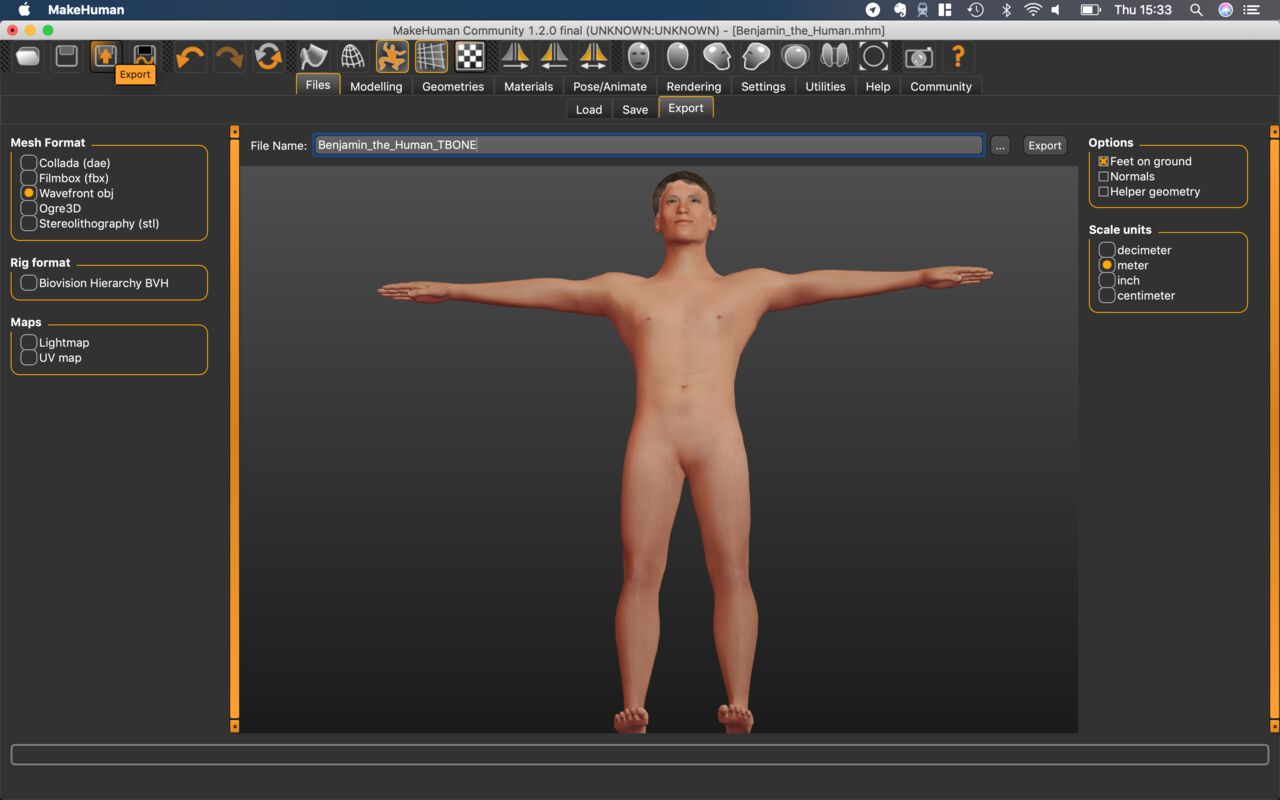
Finally you can click on the Export button on the top left of the screen, and it sends you to the Files > Export window.
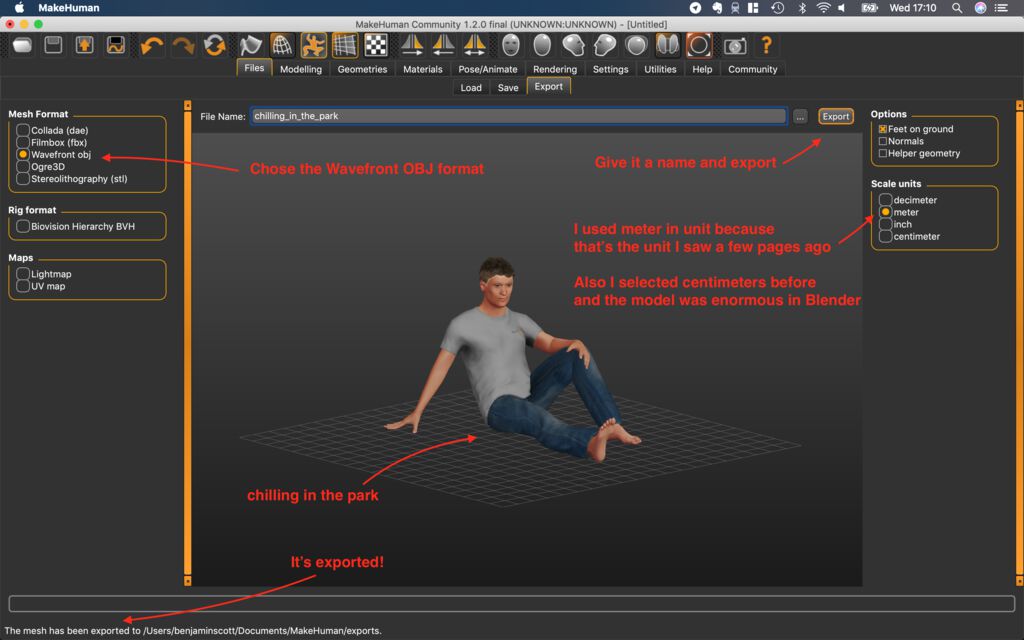
I exported in Wavefront OBJ format as it's a pretty widely accepted format and includes colours.
Rhino to cut it up in pieces {#rhino}
At Fabricademy we are psychopaths.
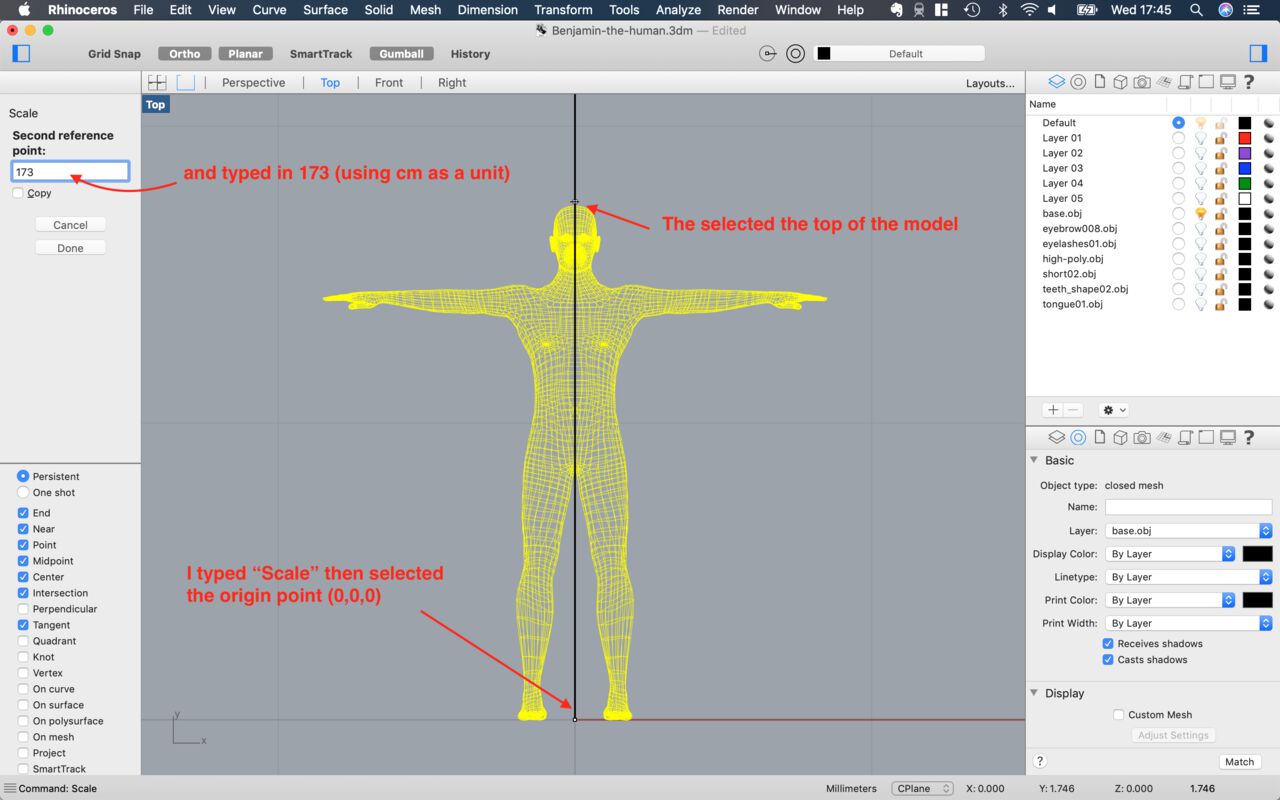
First I imported the OBJ model into Rhino. It was not to scale so I drew a line that was 173cm high, although realised after it was a bit useless. It was to give me guidance for when I did the scale function in the next step.
To scale it you simply type "Scale" and Rhino will give you the first option (you don't want Scale1D or 2D). I then selected the origin point of the project (0,0,0) by typing 0.
Then select a point just above the head from the model, on the line so it aligned with the center of the body.
Then typed "173" which tells Rhino I want the distance between the two points I selected to be 173cm (because I'm using cm as the unit in Rhino, at this scale).
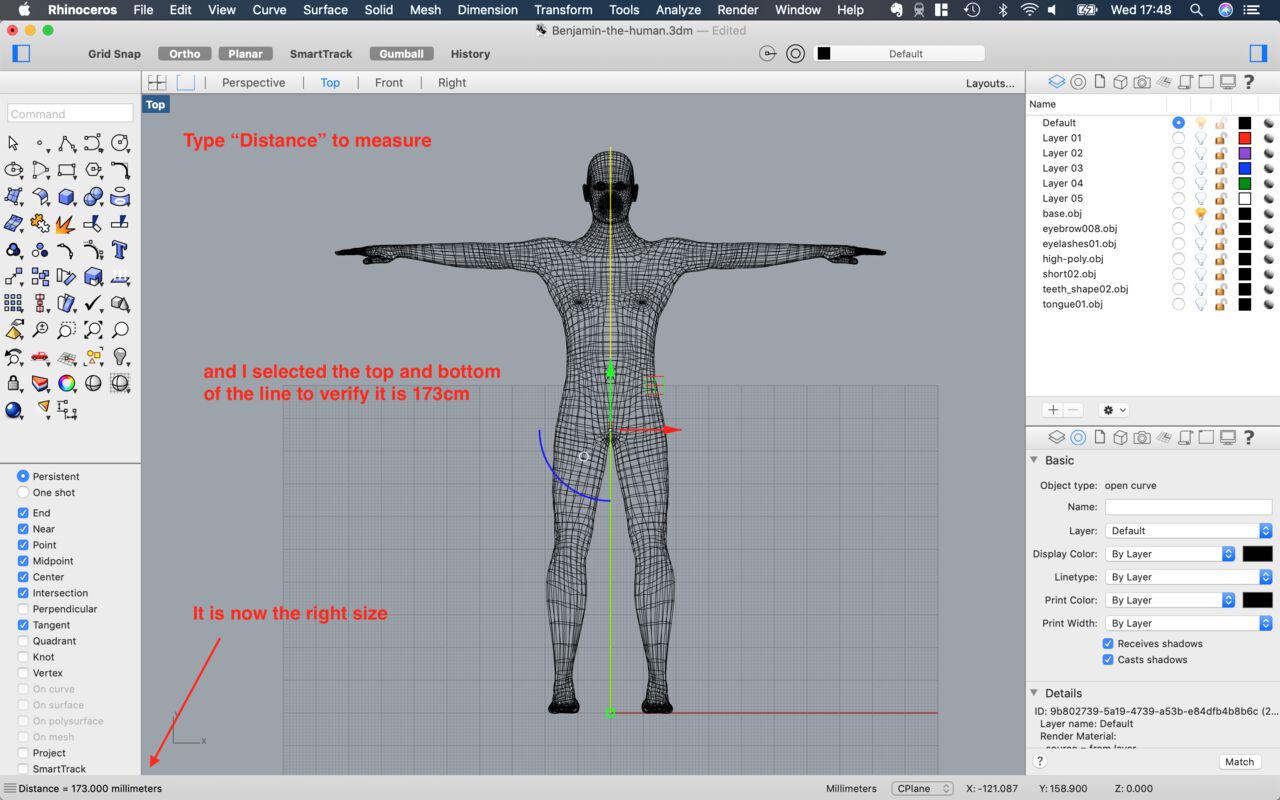
Just to make sure I'm measuring to check it's all good. Type "Distance" and then select the two points you want to measure.
You can see my line is exactly 173cm, my model therefore being a tiny bit smaller.
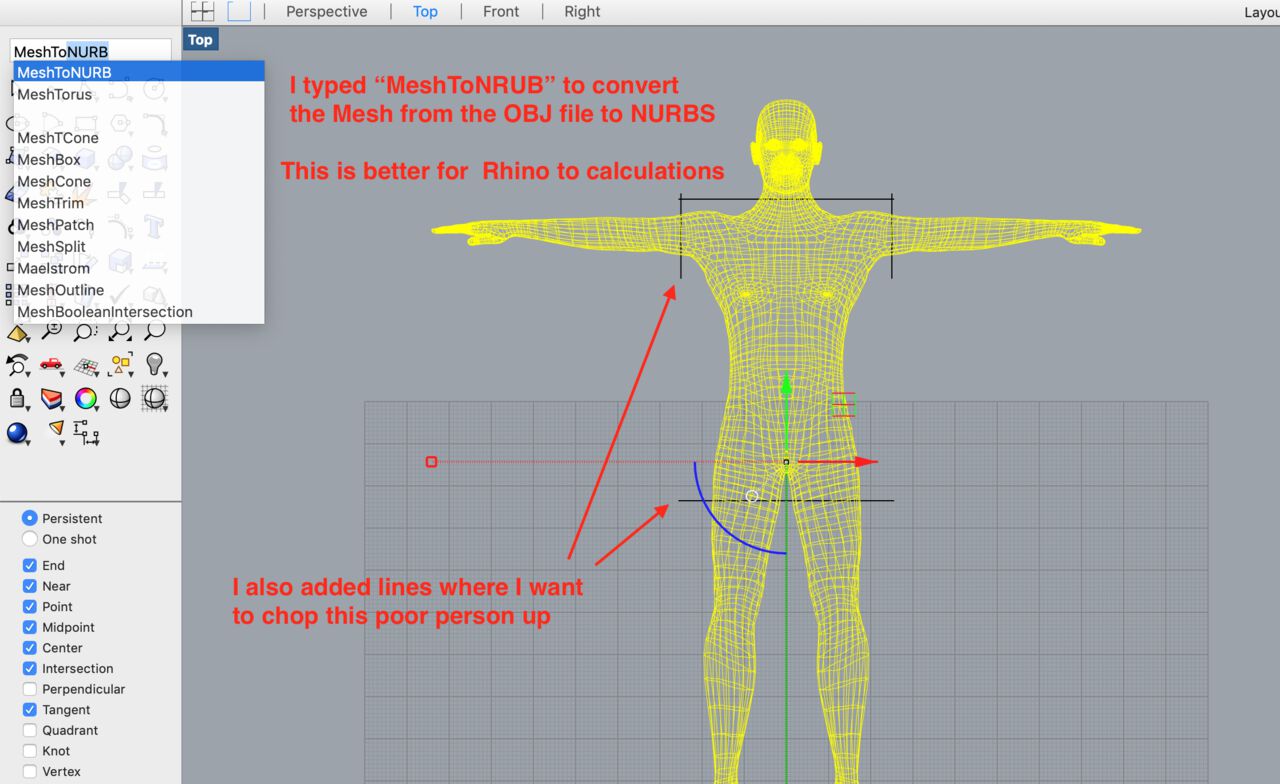
For Rhino to be able to calculate booleans, trims, etc. you need to transform the Mesh that is being exported by MakeHuman (the OBJ file, but same for STLs). For that use the MeshToNURBS function.
NURBS, Non-Uniform Rational B-Splines, are mathematical representations of 3D geometry that can accurately describe any shape from a simple 2D line, circle, arc, or curve to the most complex 3D organic free-form surface or solid. Definition from Rhinoceros3D
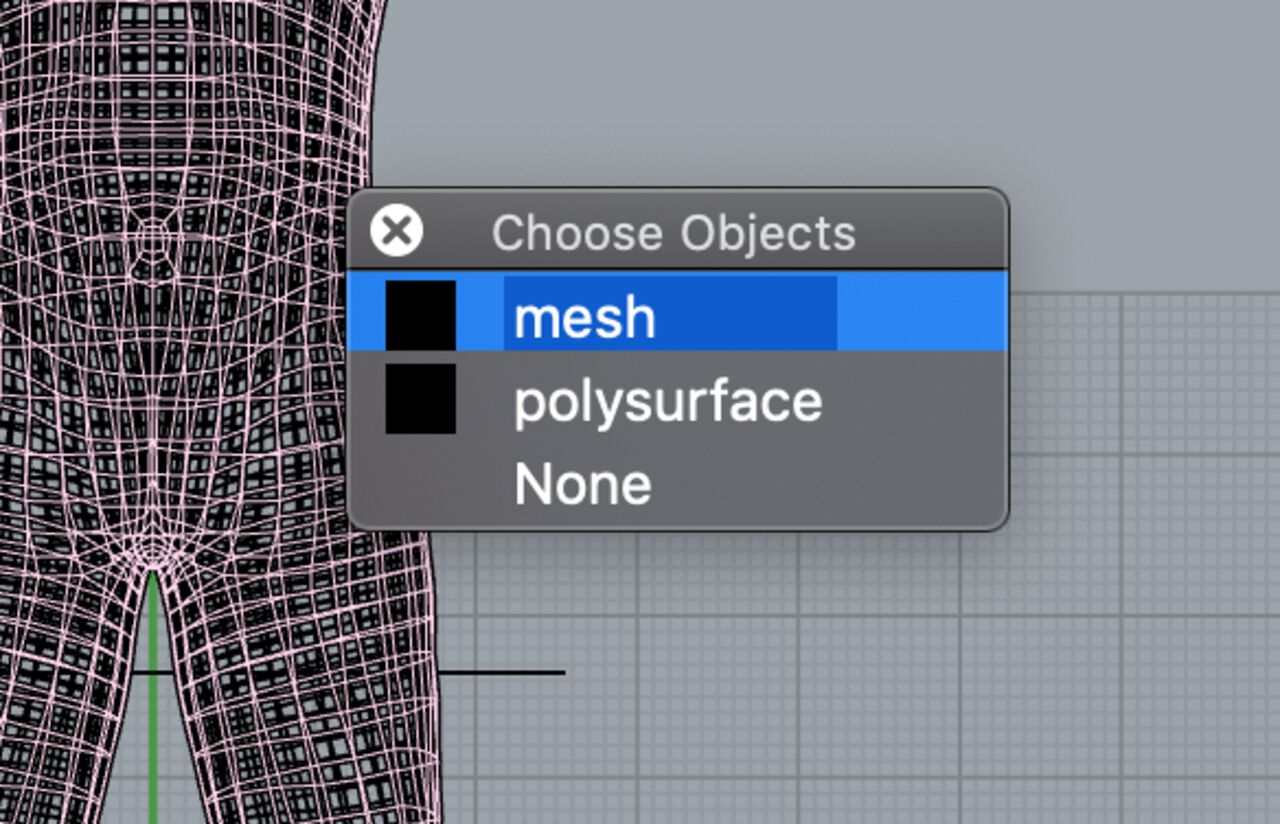
On Rhino if two objects are overlapping or very close to each other, when you click on them it asks you which one you want to select. In this case I want to work with the polysurface I created and Hide the mesh. Click on mesh and type Hide to hide it. Easy.
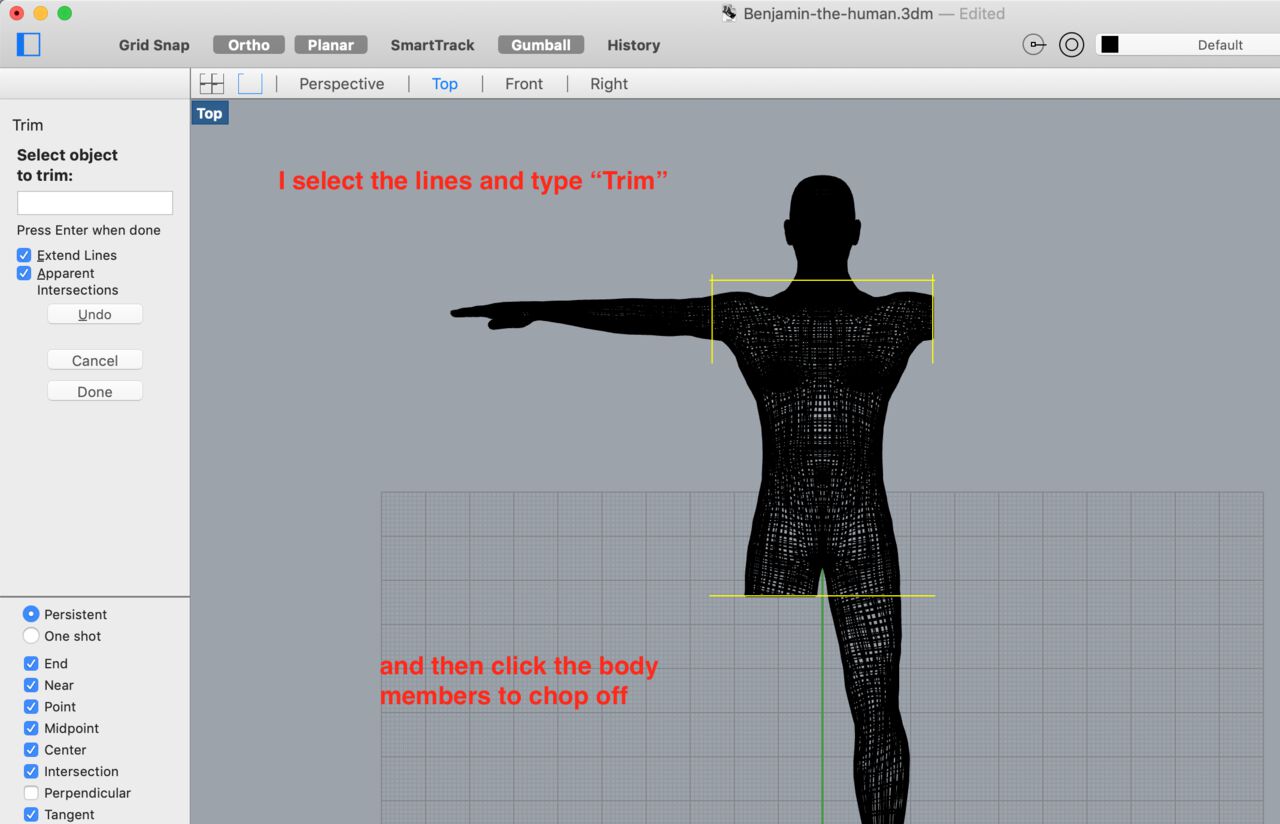
In Rhino, if nothing is selected and you run a function, it will ask you for an input, for example for Trim it will ask you what objects you want to use as the cutting object.
But if you select a line or multiple lines, before running the function, those objects (lines) are automatically used as an input.
In this case I selected the lines that I will use to chop my model up in pieces, and then typed Trim. I can then click on the NURB/polysurface that is my model, and boom, body members are dissappearing.
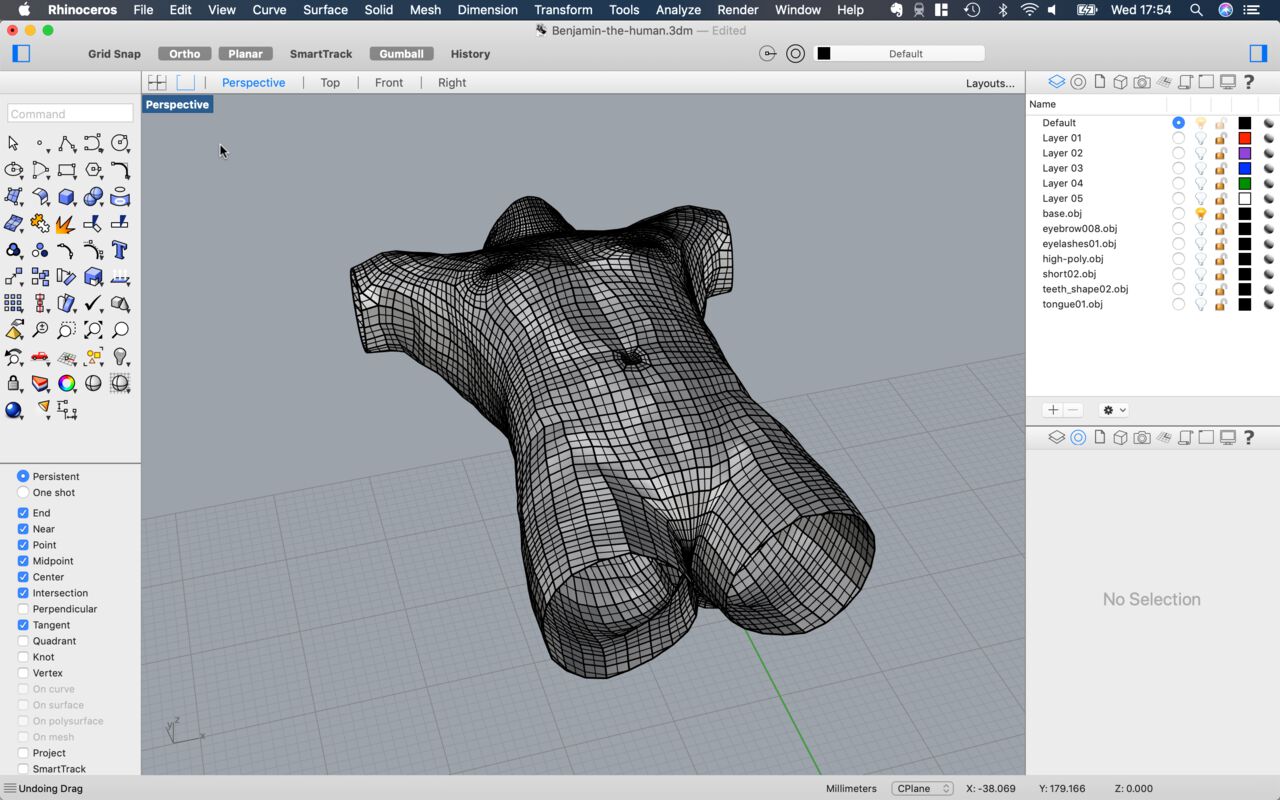
Unfortunately our mutilated corpse has holes in its legs, arms and neck, that is no good as we need a watertight model to be able to slice it, print it, work with it in general.
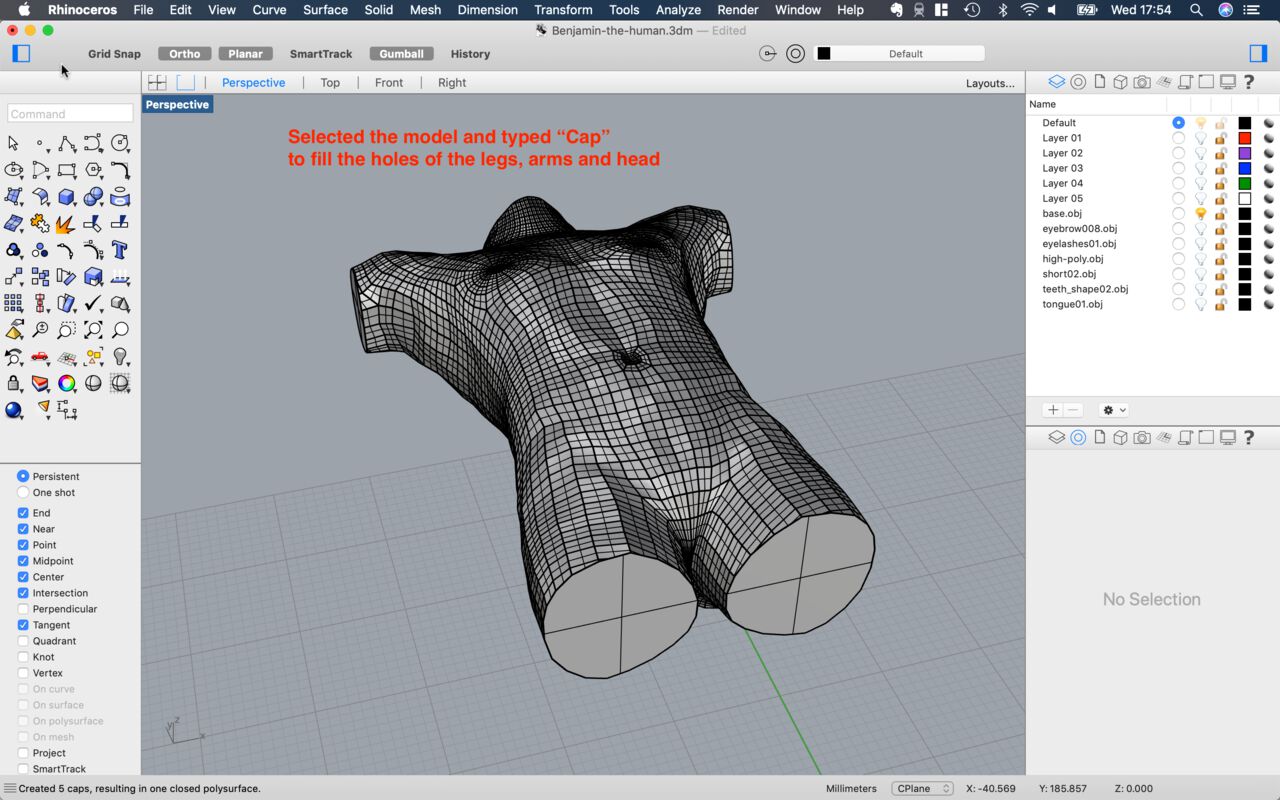
Select the model and run the Cap function, which fill the holes.
Finally select your leftover torso and do File > Export Selected and choose your preferred file format, in my case OBJ again.
Slicer to cut it even more
We love chopping bodies here, now let's slice them up to finish this Annibal Lecter like lecture.
The software is pretty straightforward, but beware! Because it's by Fusion you cannot save your projects, so do everything in one go, or pay for the license.
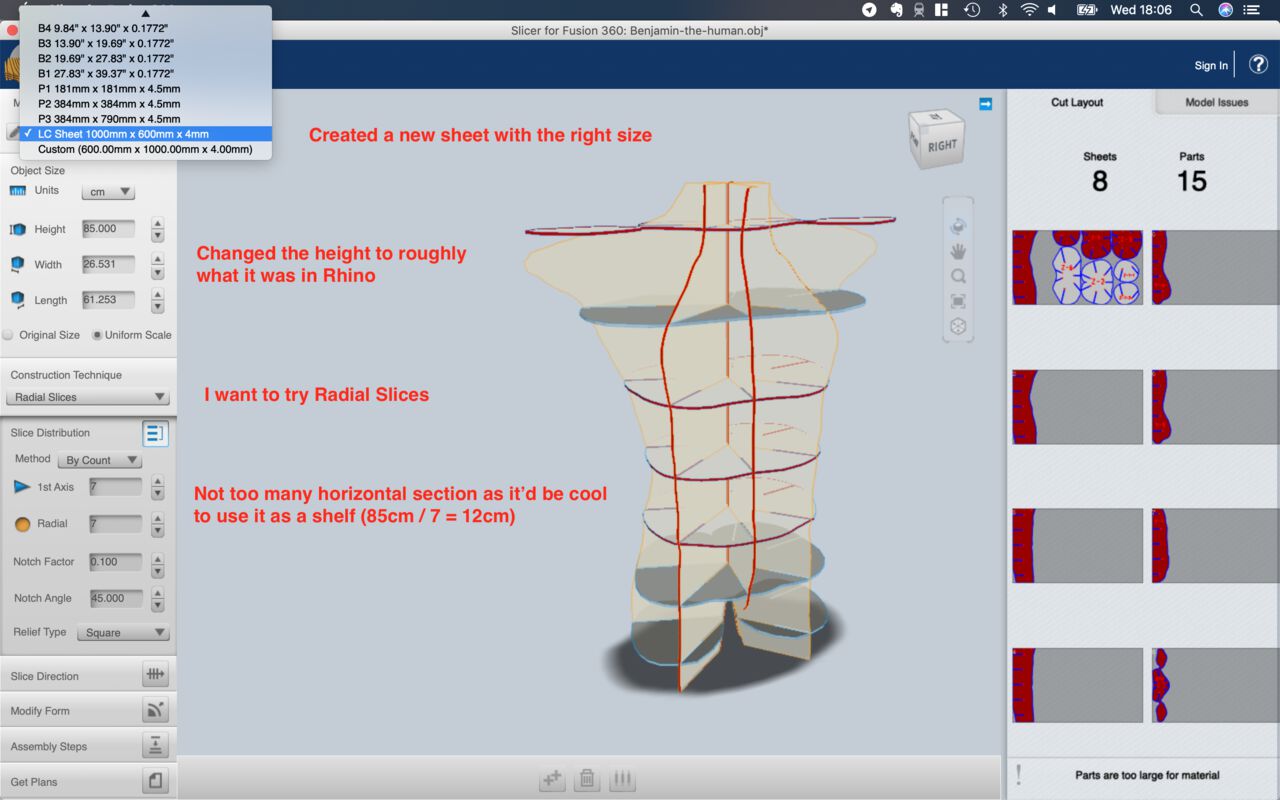
First thing I did was to create the material we are going to cut from. The standard cardboard sheets are 1000mm x 600mm x 4mm. I called it LC Sheet for Laser Cutter Sheet.
I decided to use the Radial Slices option as I have already played with the Interlock Slices option, and also because I fine that symmetry of the model would work well with the Radial nature of Radial Slices (can make the spine the center of rotation).
Finally I changed horizontal Slice distribution to 7, so it seems looks in good proportion with the vertical slices. It also gives more space in case I decide to use it as a shelf.
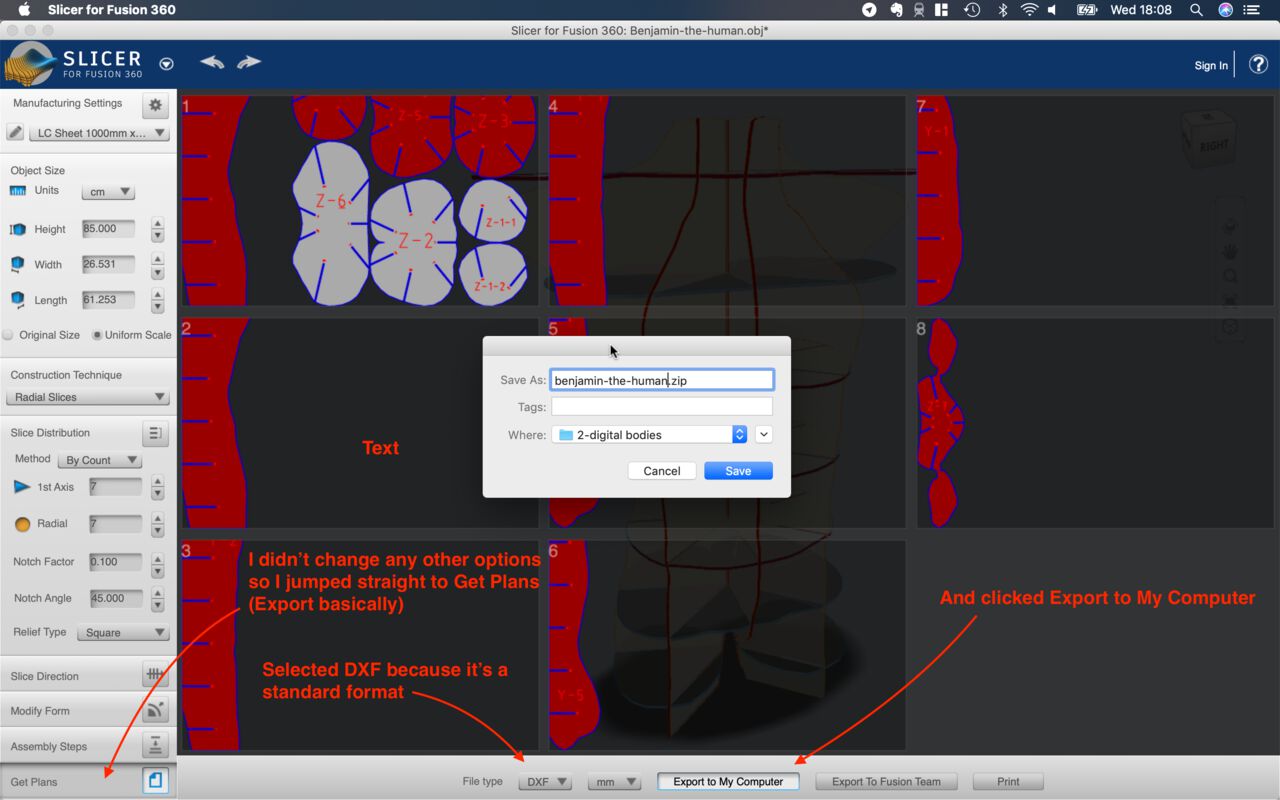
When you are happy with your settings click Get Plans at the bottom left of your screen, choose the file format you want to export in and click Export to my Computer.
Obtaining real body parts with Skanect
This is getting dangerous.
We went completely overkill and used the Kuka 6-axis machine to move the Kinect around the subject. We then used a rotating table to turn the subject around.
_________
The Assignment Making
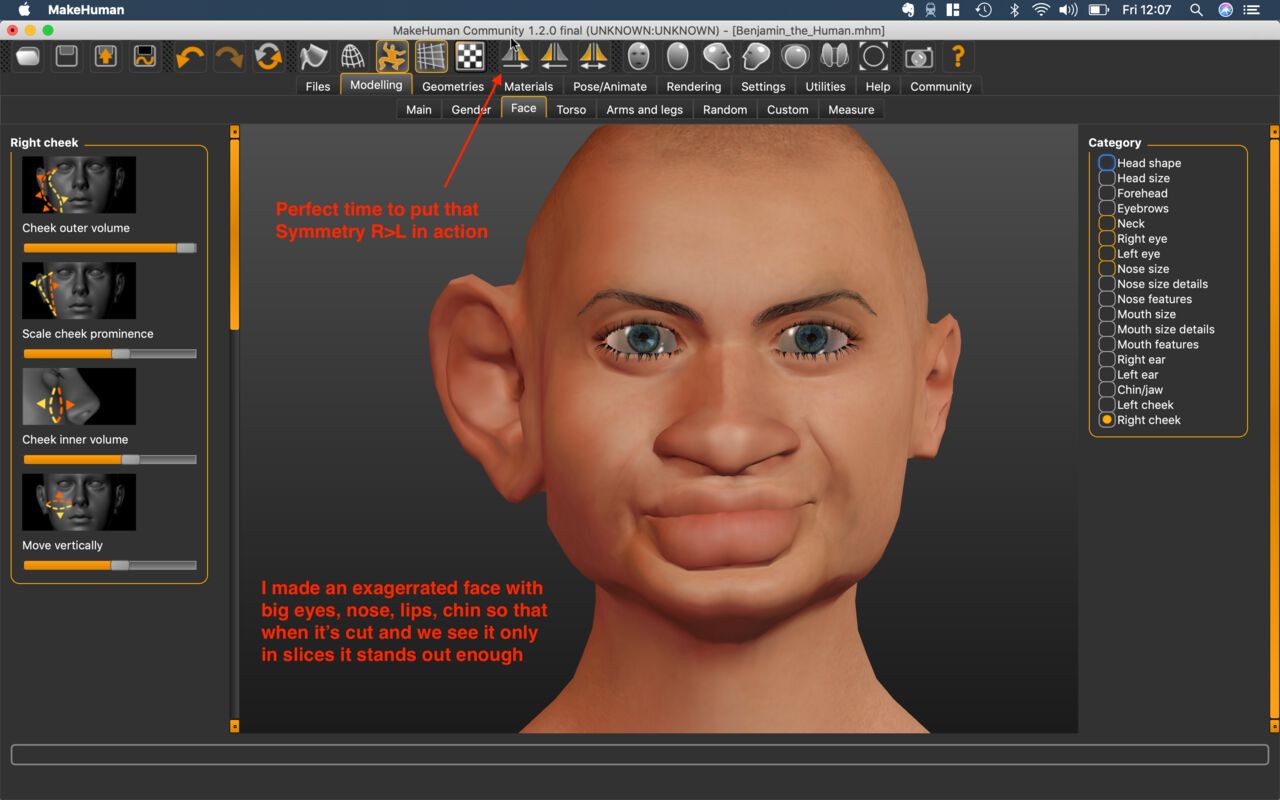
I documented how to use MakeHuman in depth further above, now I'm documenting what I made for this week. I decided to make a lamp that is the shape of a head. I wanted the head to be recognisable even if there aren't many slices to give it definition, so I exagerrated its features in MakeHuman, for example big ears, nose, lips, chin.
Designing the face in MakeHuman
I decided to design the face in MakeHuman as you can really customise a face.
Open a new project and go to Modelling > Face and go through every categories on the right, from Head Shape to Right Cheek. You can skip anything that is to with the left, i.e. left eye or left cheek as we'll be copying all the features from the right size of the face to the left, using the Symmetry R>L button.
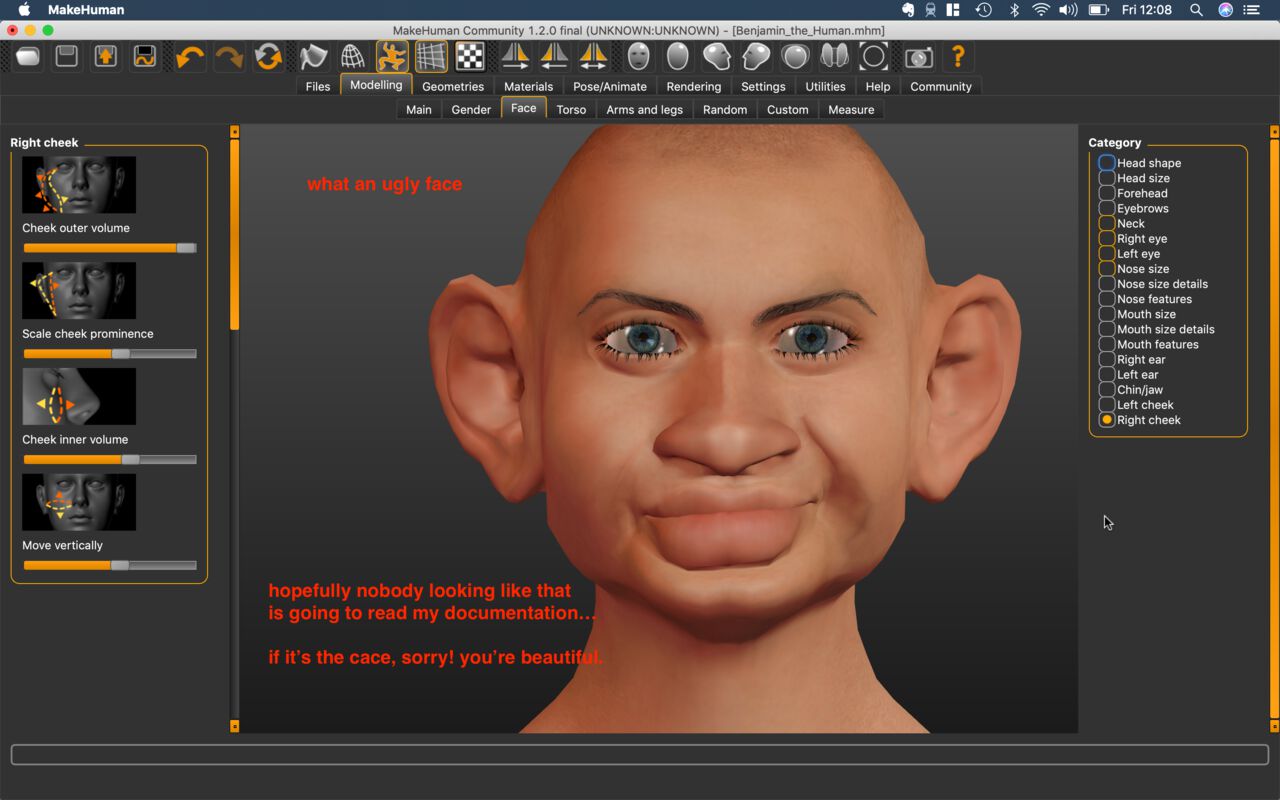
And boom, he's uglily symmetrical.
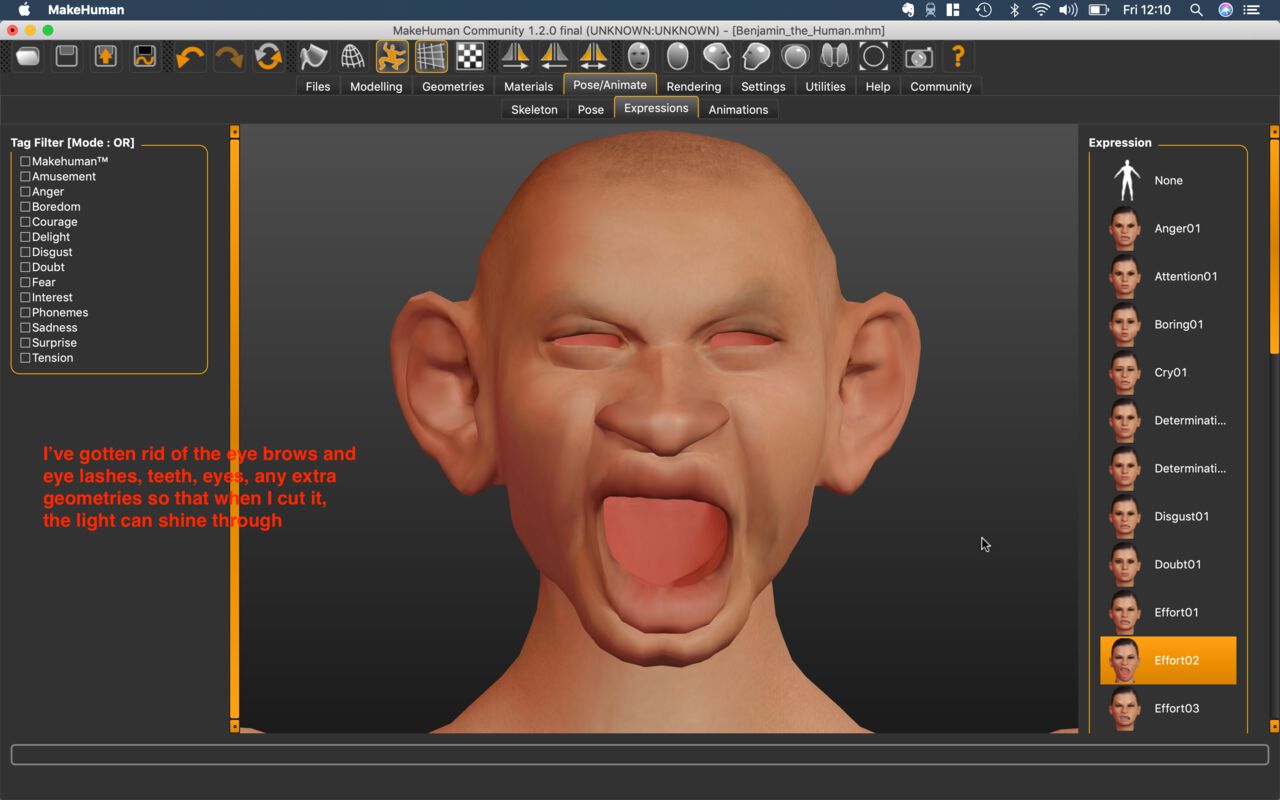
As the idea is to make a lampshade, I thought it'd be fun to have the light come out of the mouth, for that I went to Pose/Animate > Expressions and used the Effort02 expression, which has a big mouth opening. There were another few options like scared or happy expressions.
I got rid of all the geometries such as eyes, teeth, tongue as they were not needed.
Fixing it in Rhino
Using the same technics as mentioned further above I cut out the rest of the body to only keep the head.
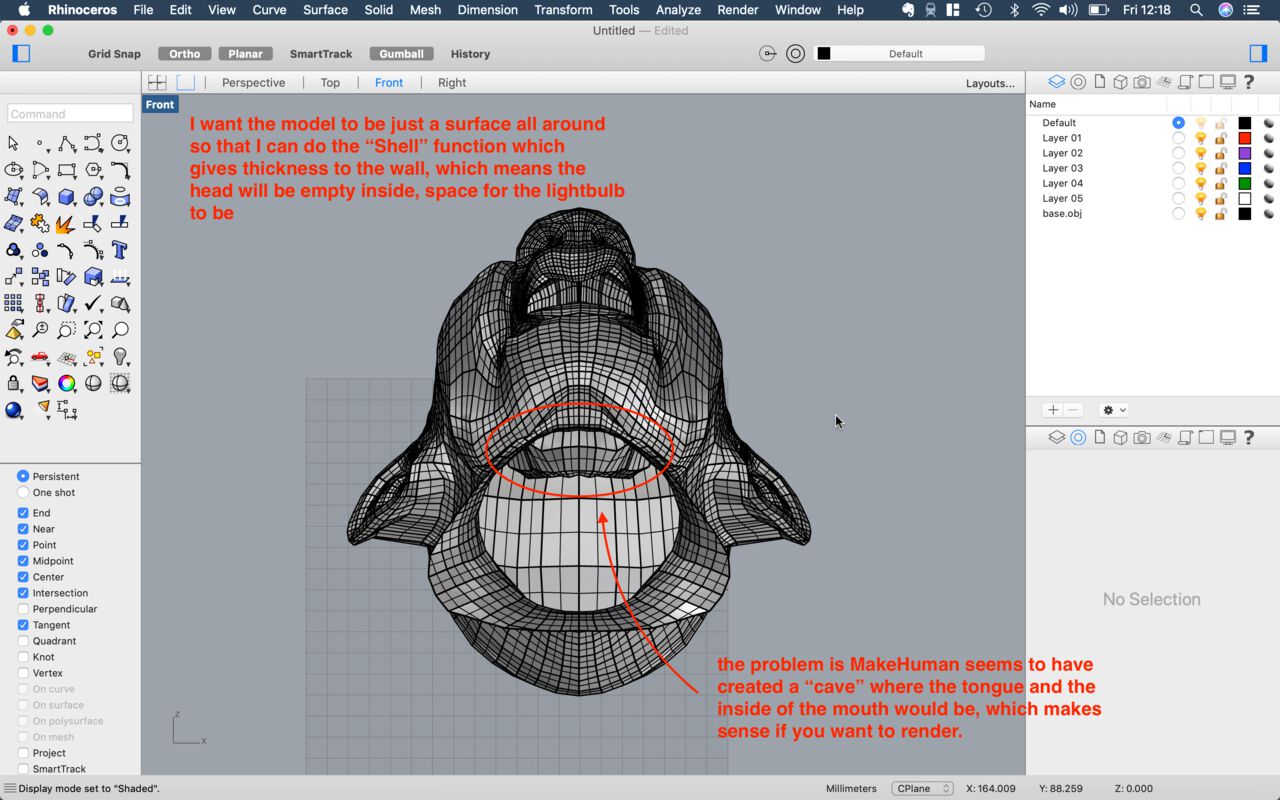
As I want the head to be empty, I want to only have a surface and use the Shell function. What it does is, it takes a surface with no thickess and then gives it thickness by basically doing an offset of the surface and linking them.
Oopsie I had forgotten, the shell function only works with closed objects (i.e. take a cube, do the shell and it'll ask you to select a face to delete, the result being a box with one opening). It doesn't matter though, I won't use it in the end.
MakeHuman creates a cave where the teeth, tongue and eyes will be. I guess that is purely for rendering purposes later. If the character opens its mouth, we don't want to see the back of his head, we want to see the inside of his mouth. If you gourge the characters eyes out (this assignment really is gory), then you see the same with the eye sockets.
As I want to do the shell, these need to go.
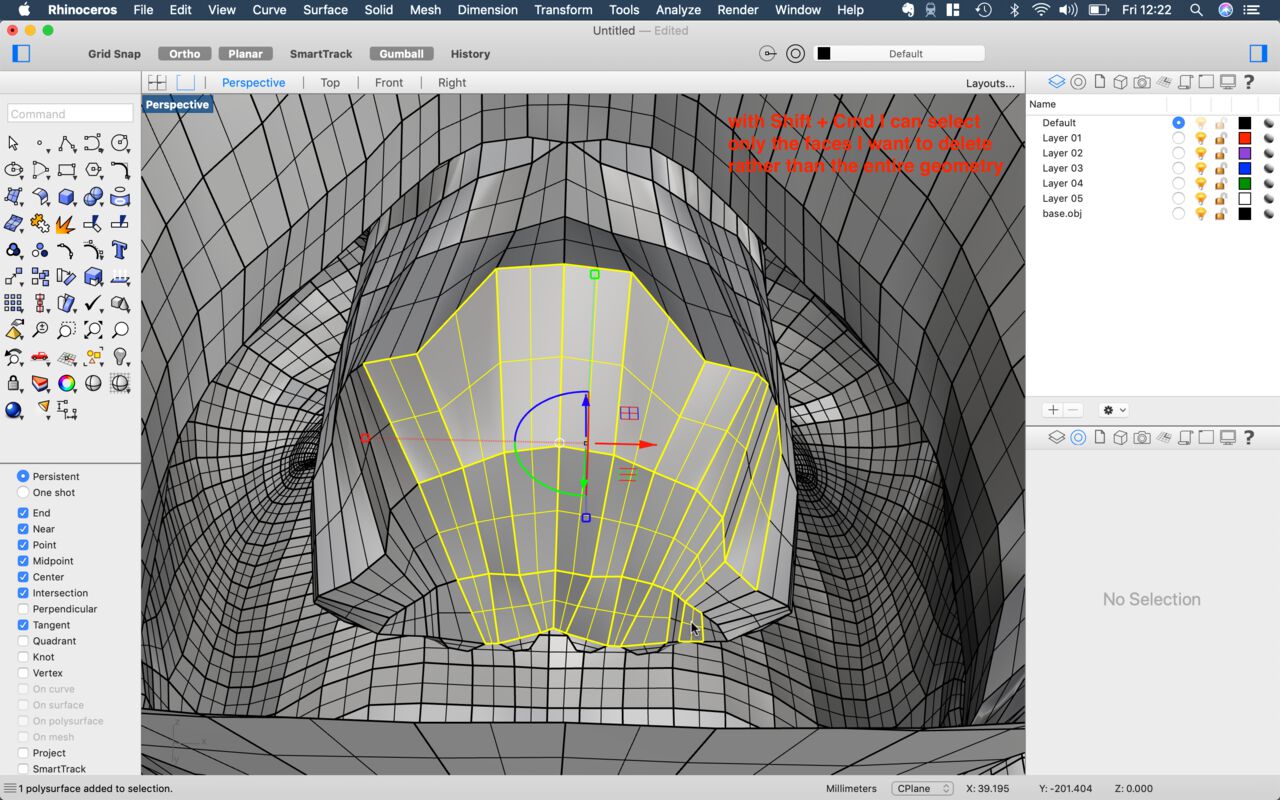

I selected each face by clicking on each face one by one while holding Cmd+Shift but it was taking a while, and was gonna take even more whiles to do everything. Let's think.
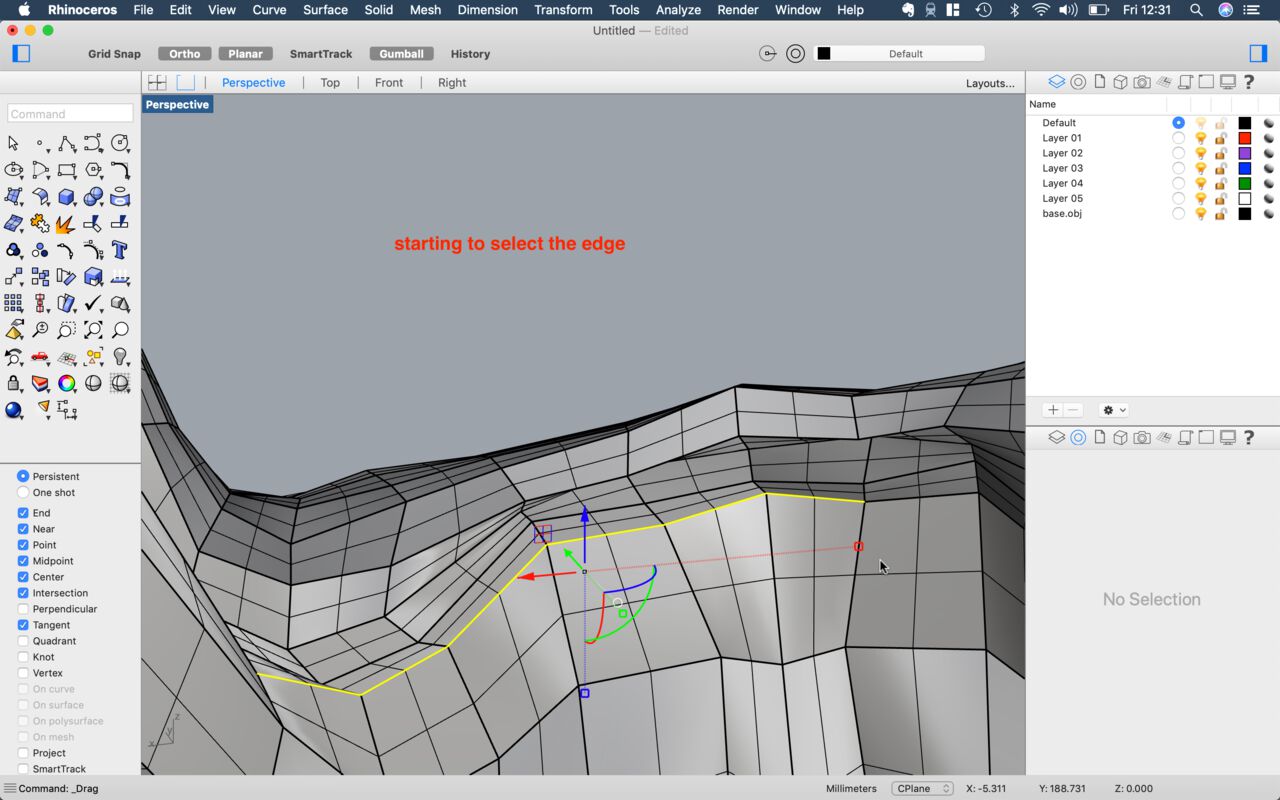
Instead I'm gonna select the edges that goes around the mouth and eyes, and use that Edge as the curve object to Trim the head.
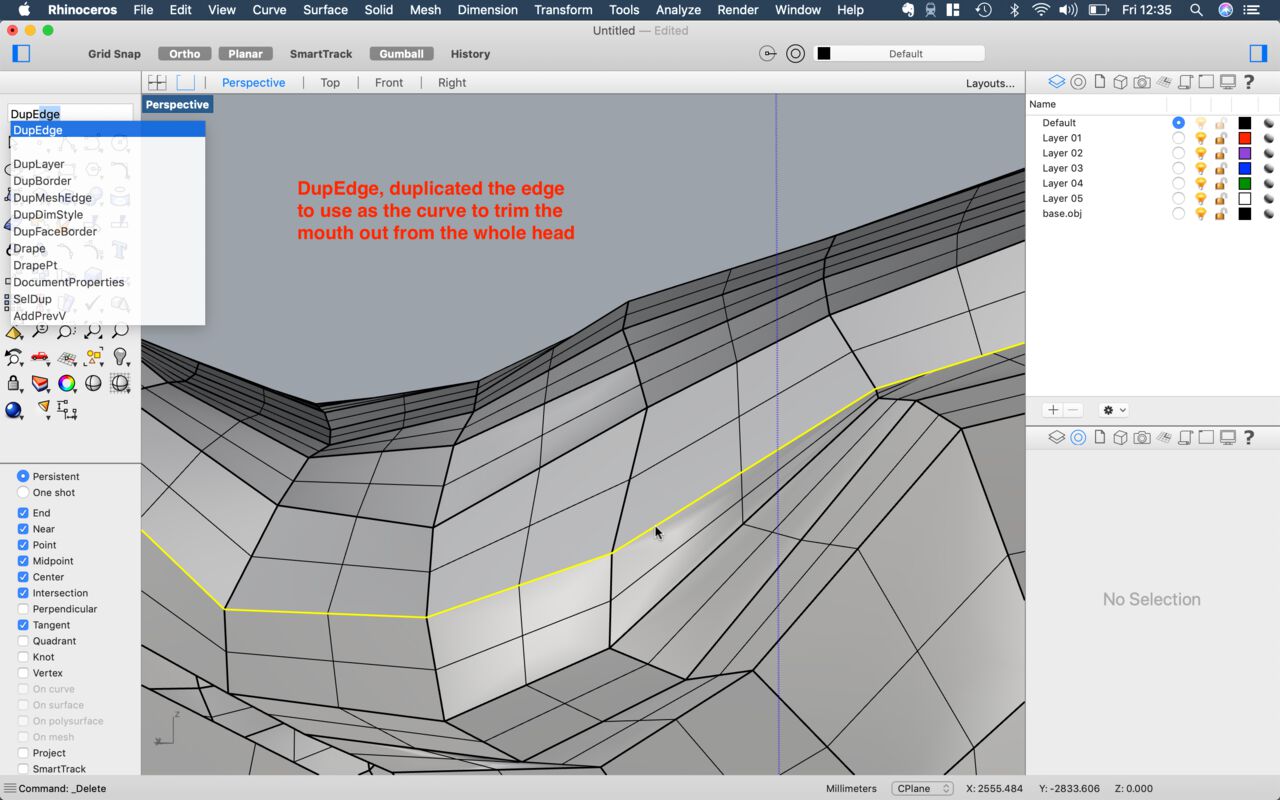
When the entire edge is selected, I use the DupEdge function to duplicate the edges selected. While they are still selected after running the DupEdge function I use Join to join them. If you don't you have to select them one by one later.
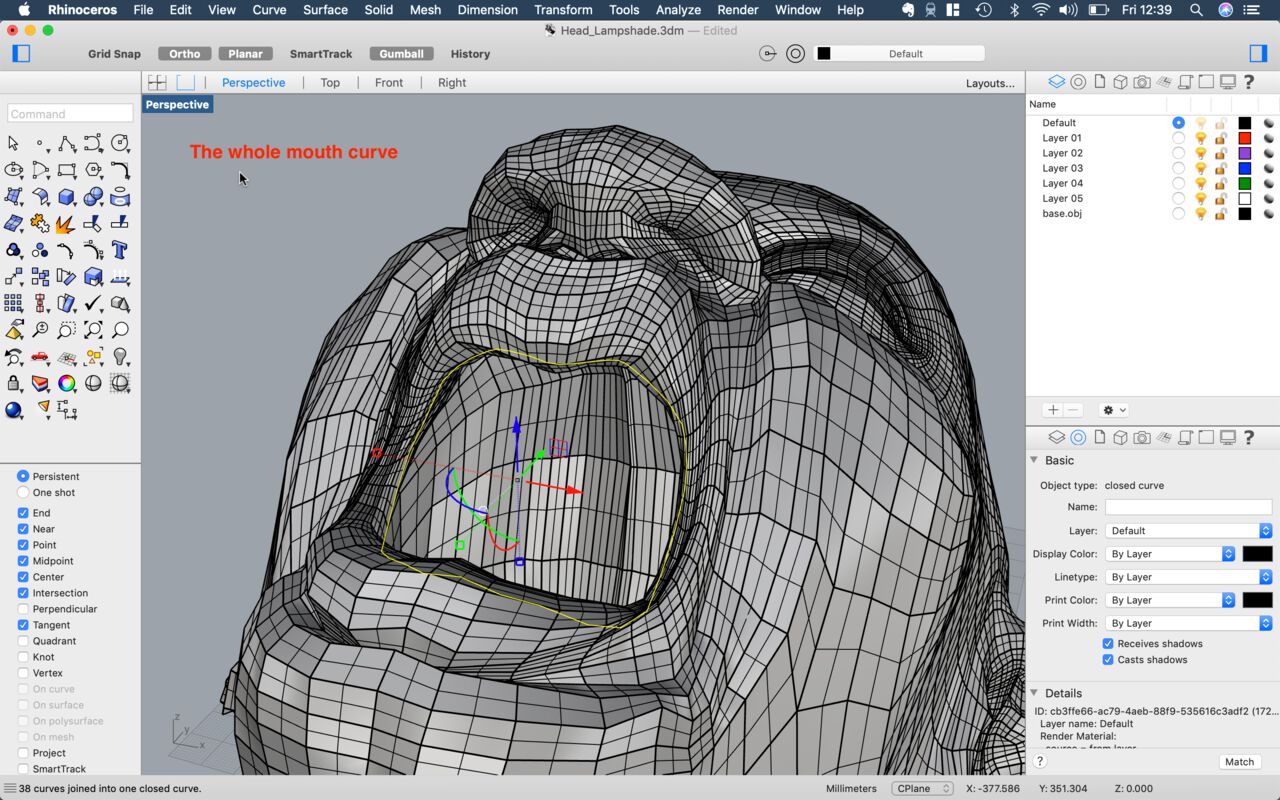
View of the whole curve. With it selected I run Trim. It automatically uses the curve as the trimming object, so I just need to click on the back of the mouth to get rid of it.
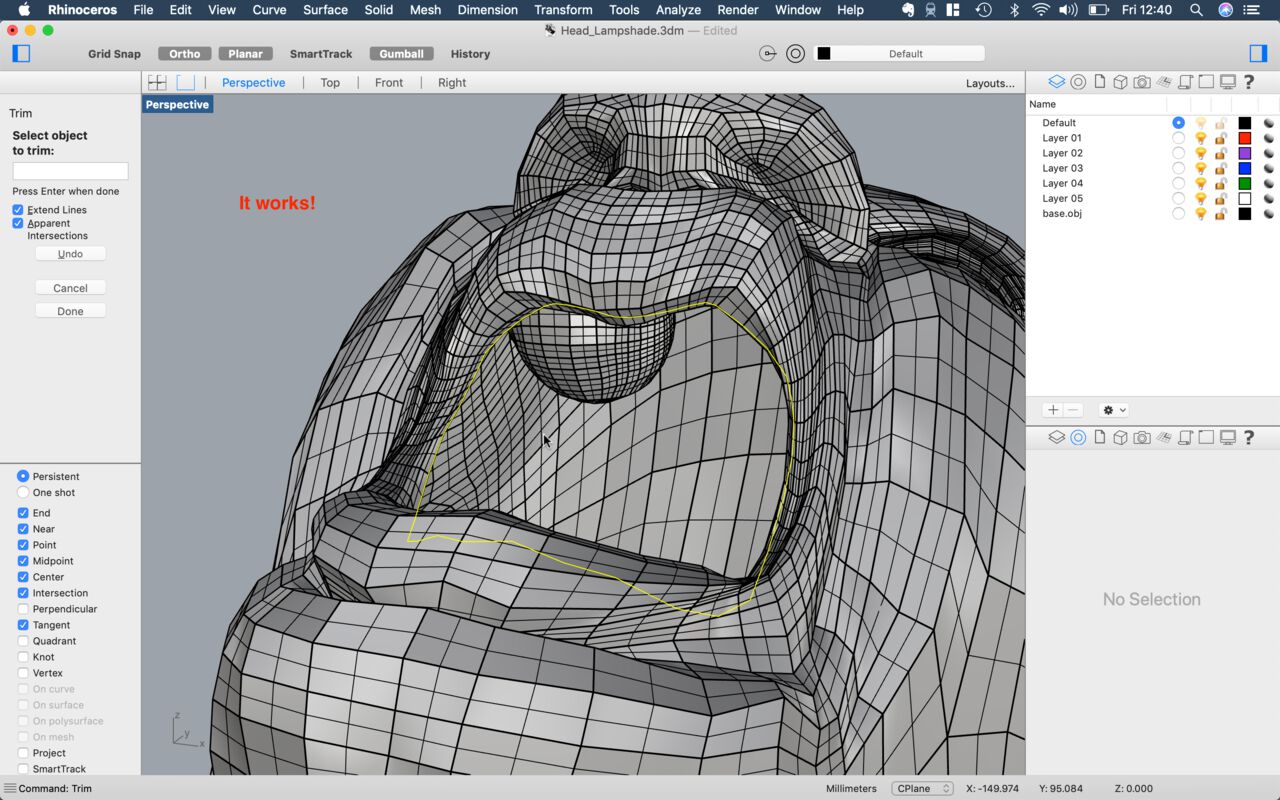
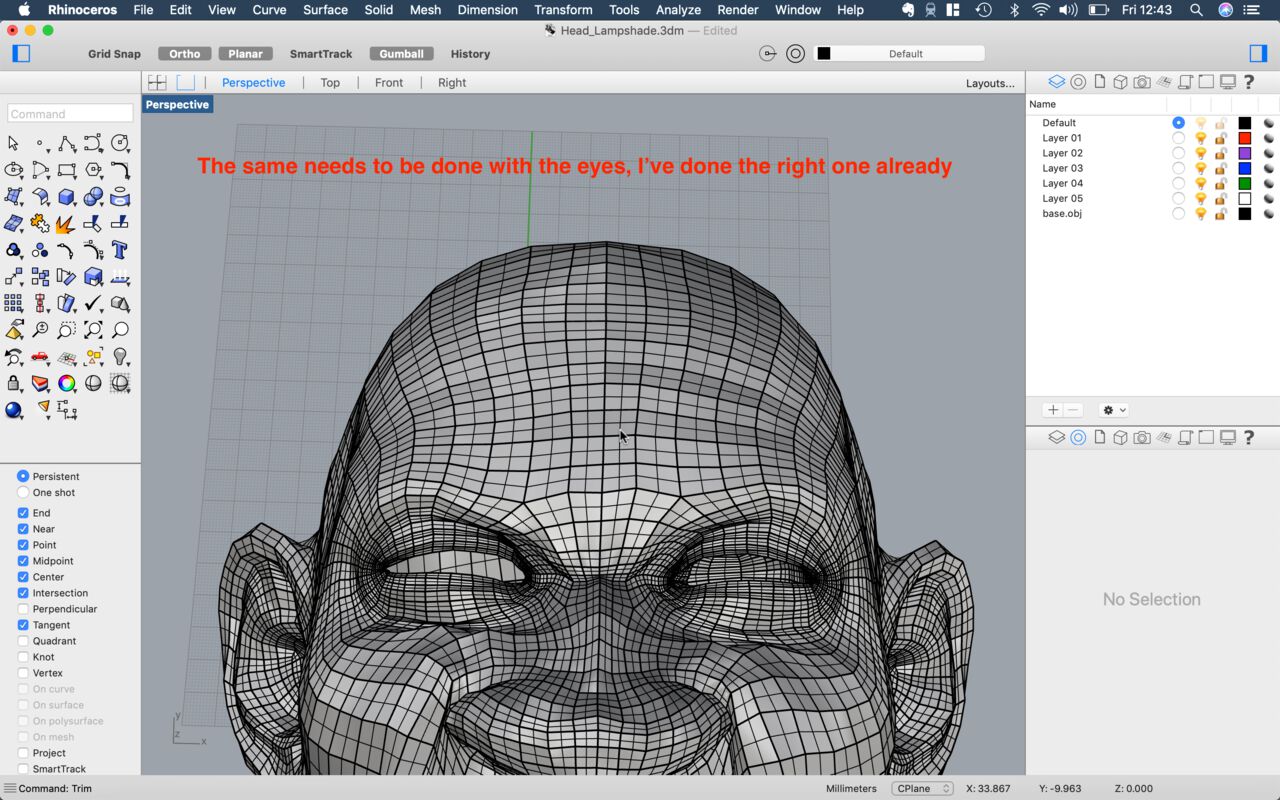
It worked! Nice, that was quicker. Now the same for the eyes.
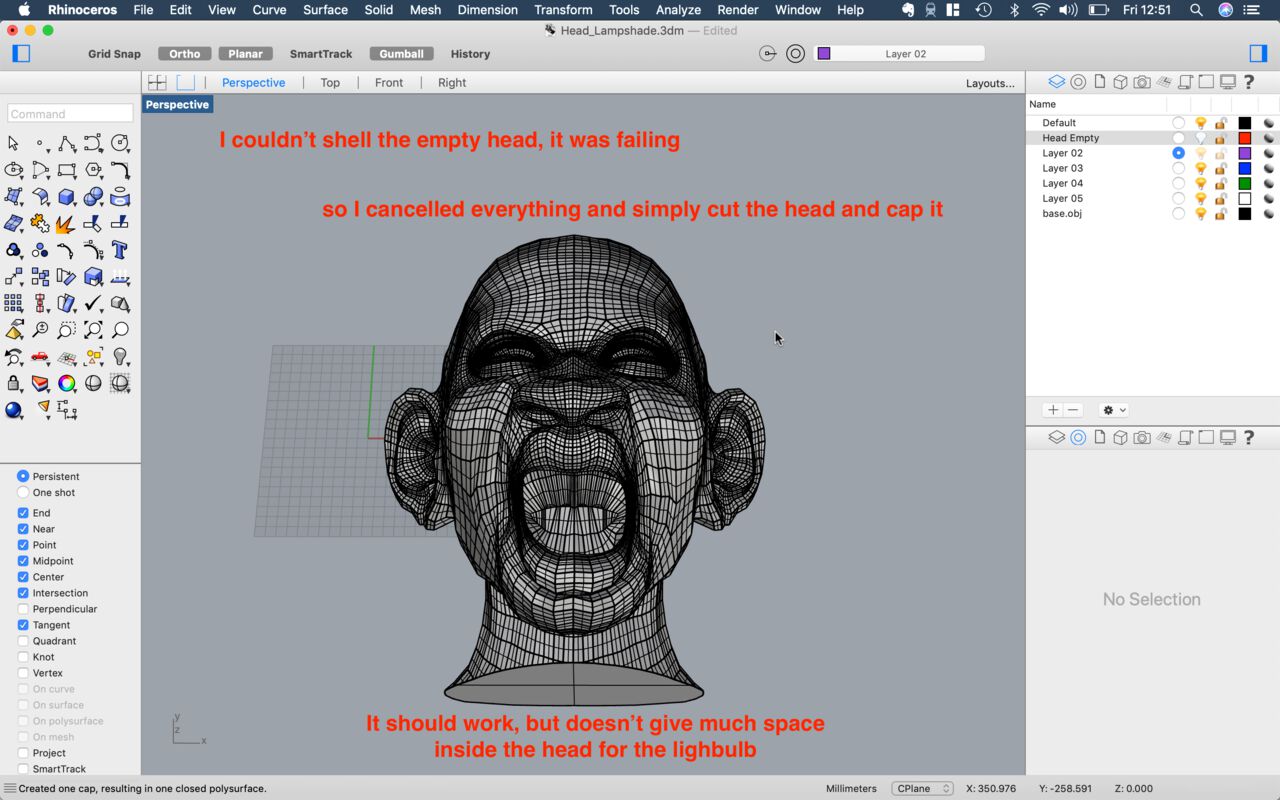
I couldn't Shell the volume. I wasn't sure why at first, but later discovered it's because it needs to be a closed polysurface (a watertight volume).
Instead I Cmd + Z a few times to get to the original head, used Cap to close it, and exported it for Slicer.
Slicing it in Slicer
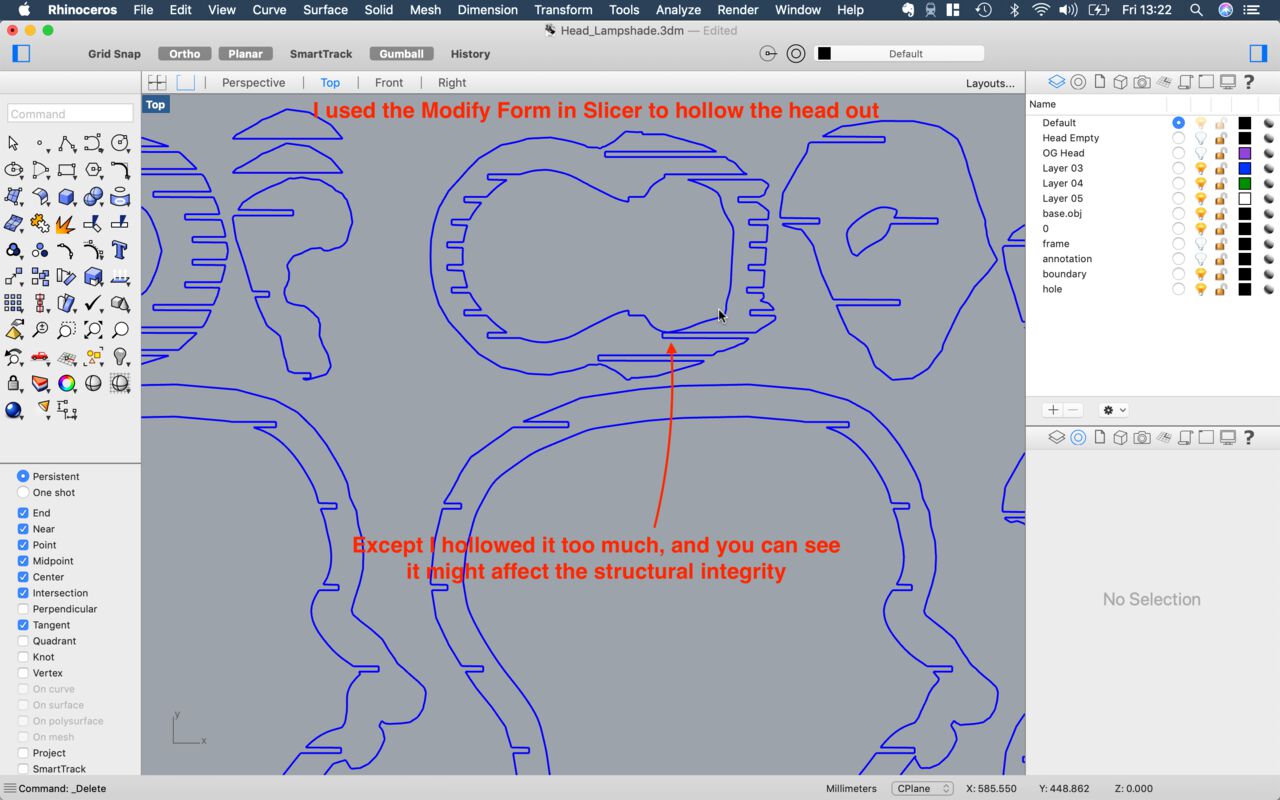
Turns out I didn't need to try and make a Shell with Rhino, as slicer allows to hollow the object throught the Modify Form > Hollow section.
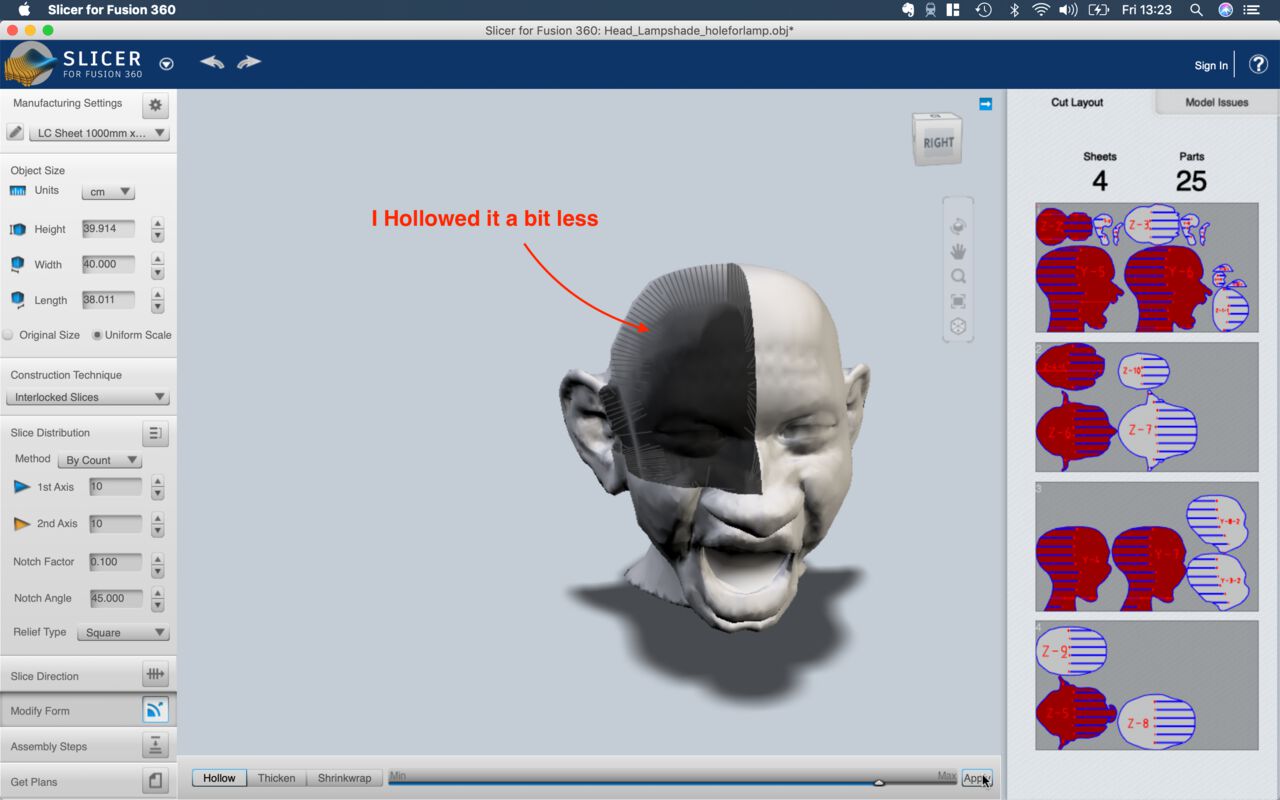
My first attempt was a bit too hollow, which made it look like it'd be quite fragile.
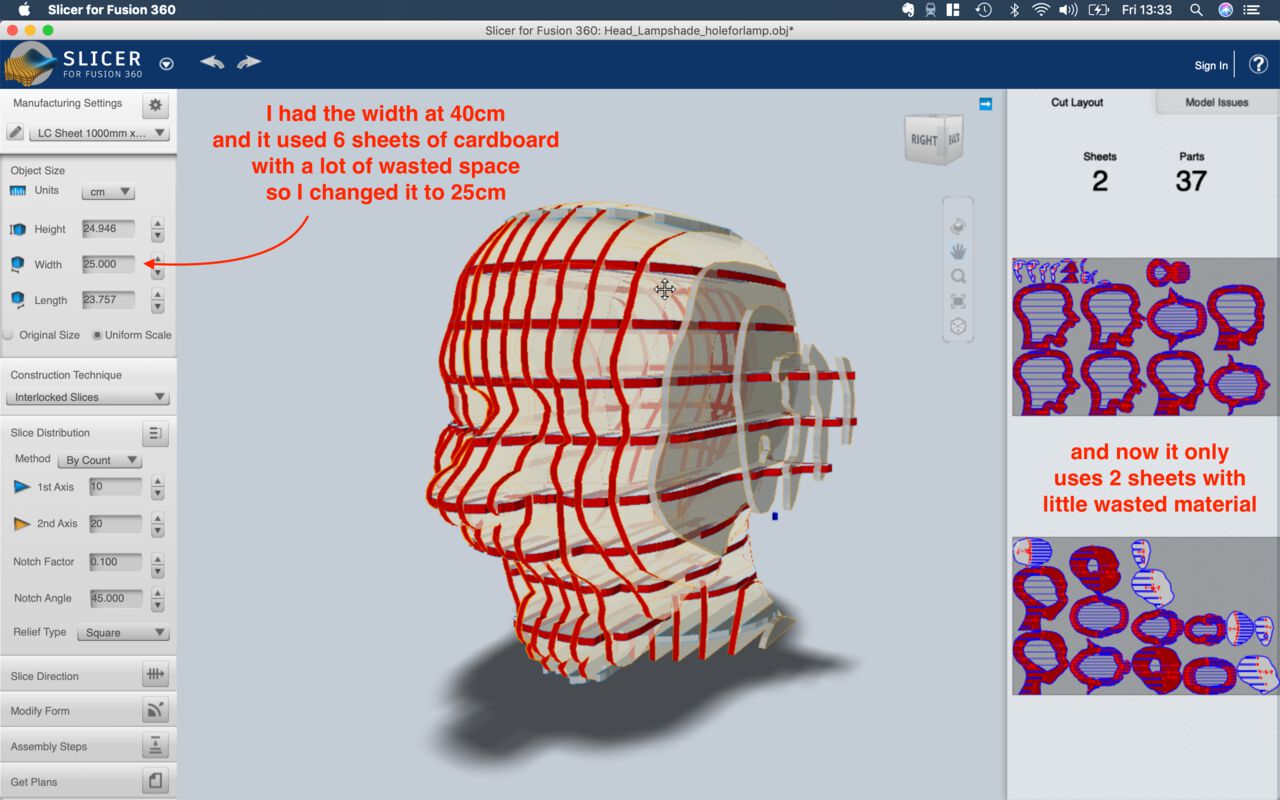
I had made the head 40cm wide, but it used six 1000mm x 600mm sheets of material, which I find to be a complete waste of material if this is not actually for a project. I decided to go with a smaller width, which cut the material being used by 3.
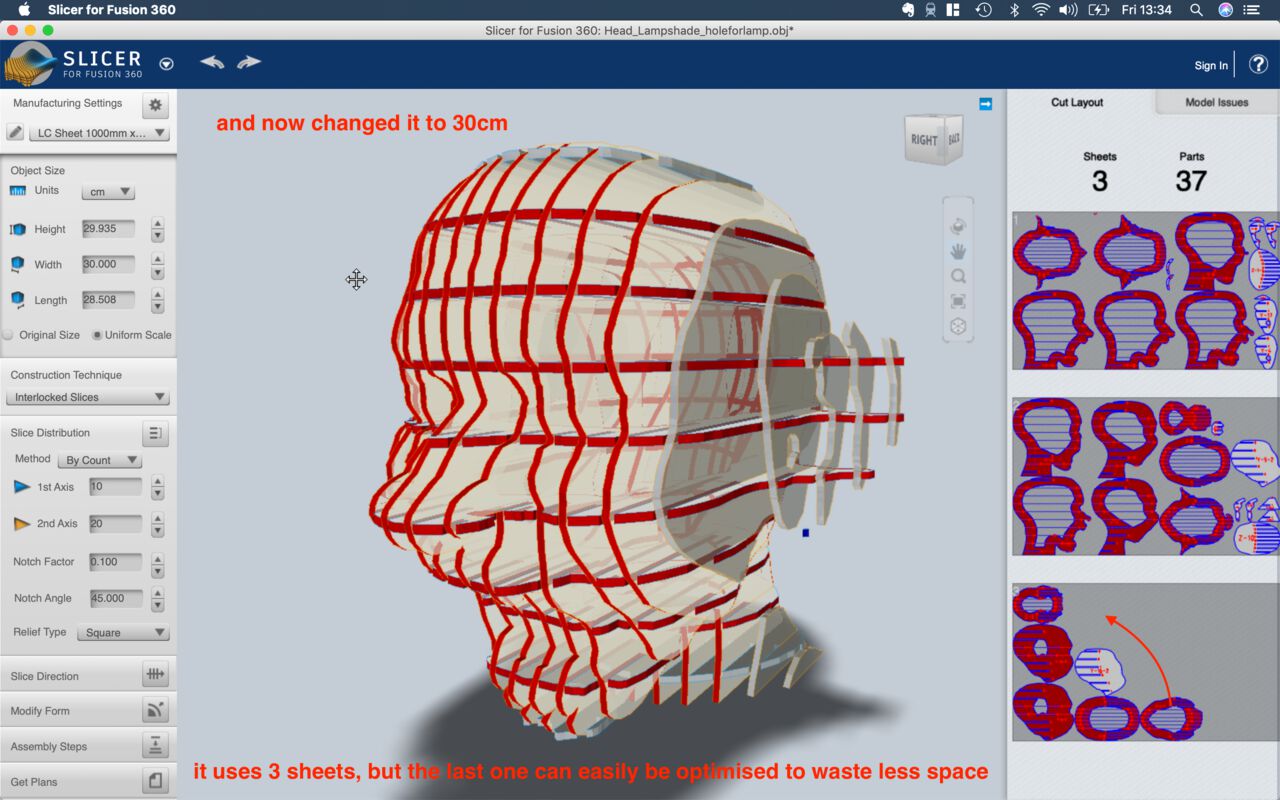
Actually I decided to go for 30cm, as it's more like 2.5 sheets. Good compromise between big and efficient.
I wasn't sure about the mouth and eyes actually, I think it might be better to keep the eye sockets and mouth cave to give some more definition to the cut.
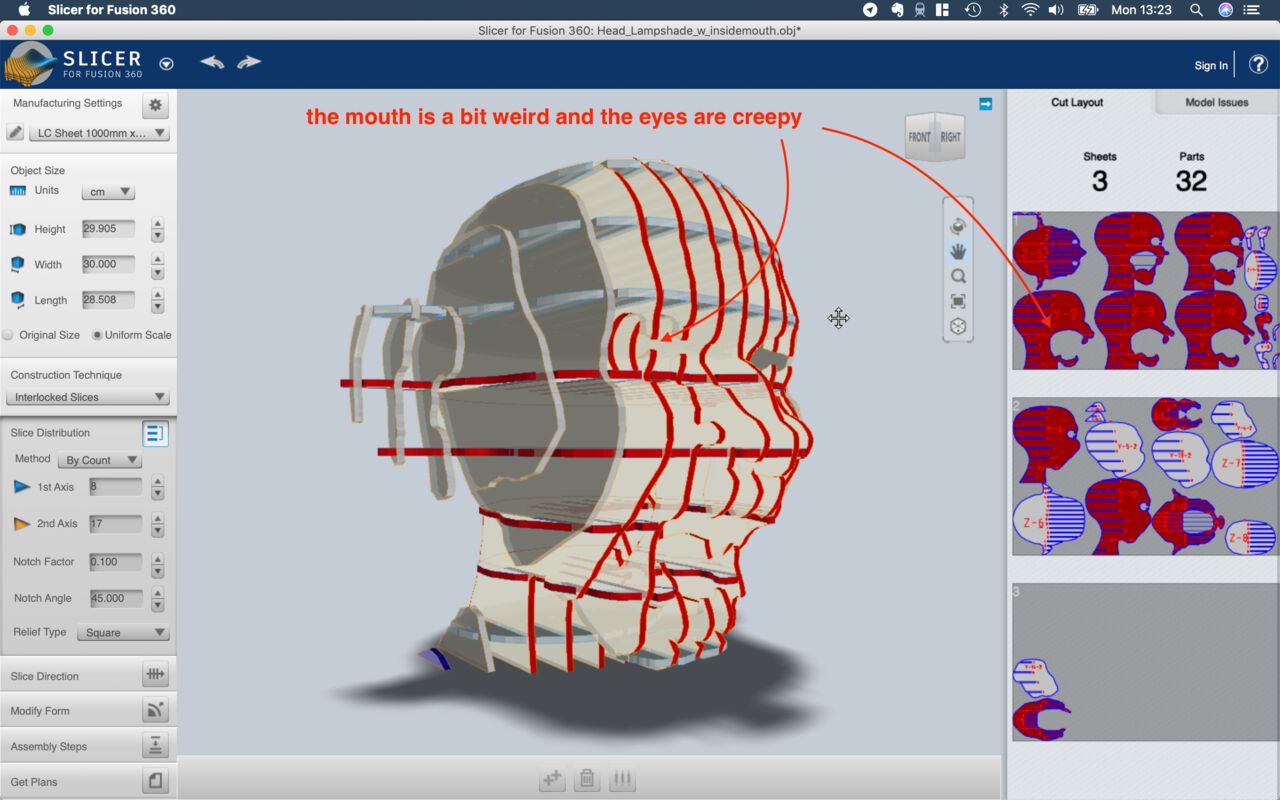
Actually I think it looks better with the eye sockets and mouth. Ignore the red writing. Just need to hollow it again to be able to pass the lightbulb / LED stripe through.
I made sure the number of vertical slices was even, so that there is a space exactly in the middle pass the cable.
Laser cutting it in laser cutter
I'm looking at my previous documentation to use the laser cutter.
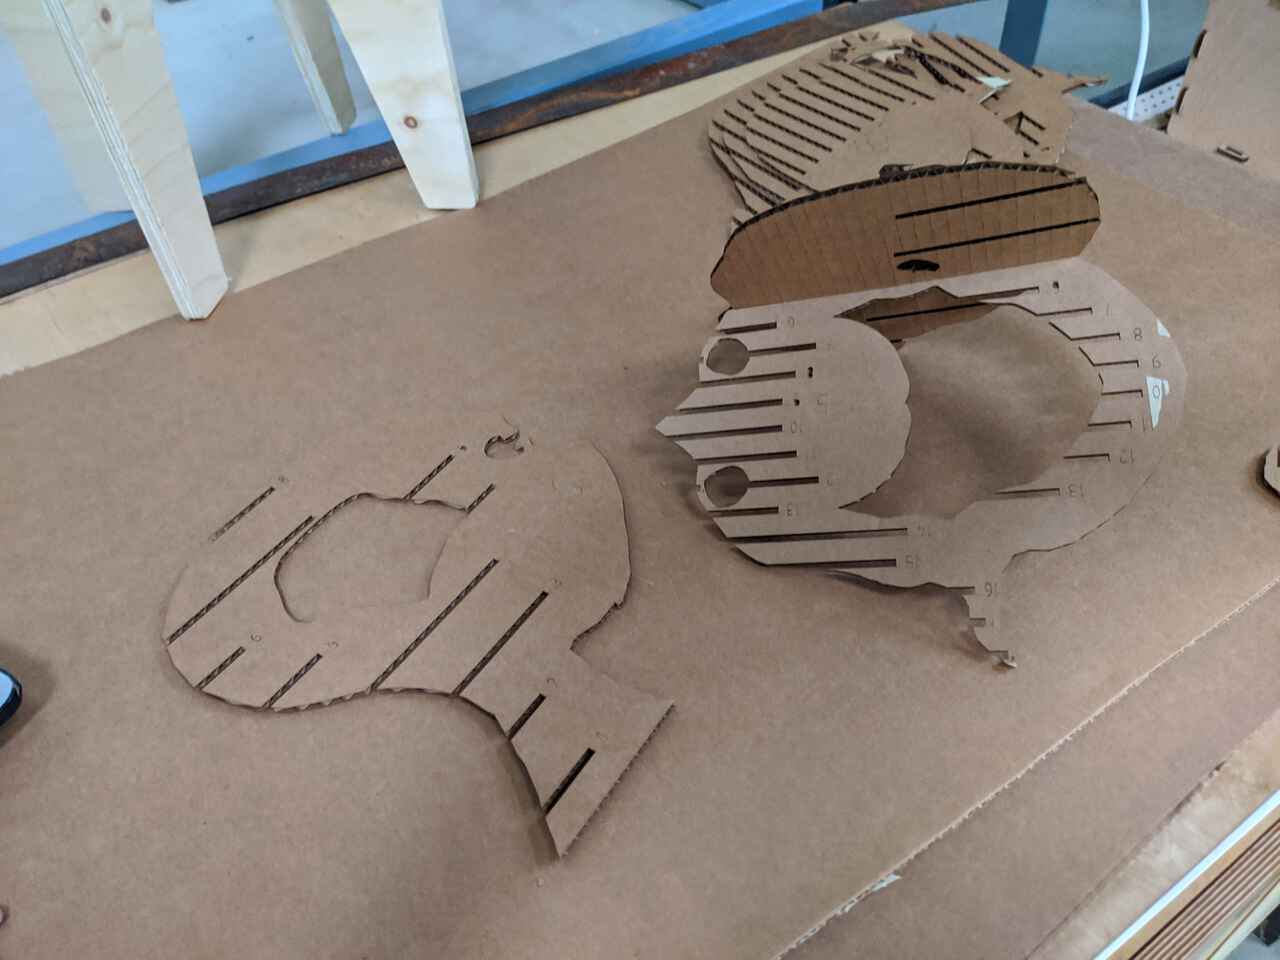
Oopsie doopsie. The problem I could have noticed when being in Slicer, is that my pieces are empty on the inside (just like me), therefore you can't slide them together, as there's some obvious material in the middle.
Saving material as well by reusing previous students offcuts.
Sliding the slices together
Transforming into a lamp
After sliding it all together and sliding a few lightbulbs in it, it was sufficiently creepy to my taste. I didn't have time to do it properly with something to hold the light bulbs (should have made the eye sockets big enough, damn), or to redo it completely. If I had to I would just remove most of the head at the back, so it's a cave.
Tip and tricks
Resizing an image in Markdown, using CSS and the selector for alt img[alt] { ... }.
Assignments
- Include some inspiration: research on artists or projects that work with the human body
- Document the use of 3D scanner and softwares to acquire a 3D model
- Document the process of repairing and/or manipulating a 3D mesh and slicing it.
- Create my ready to cut file for laser cutting, learn how to use the laser cutter and document the workflow and upload your 3D and 2D files
- Learn about the fab lab processes, booking system, usage, machine demos, tools and safety rules
- Build and/or assemble my mannequin, create a stop motion assembling it or stepped process
- EXTRA POINT Send one picture (HIGH RES) of my mannequin to enter the competition for the annual exhibition
How will it be evaluated?
- References - Concept
- Design : 3D scanning , 3D file manipulation, meshrepair tools, explore 3D programs (open and closed sourced)
- Fabrication : Capable of executing from file to production workflow, from slicer to laser cutting
- Documentation : Anyone can go through the process and understand
- Final outcome
- Originality - Aesthetics : Has the design been thought through and elaborated