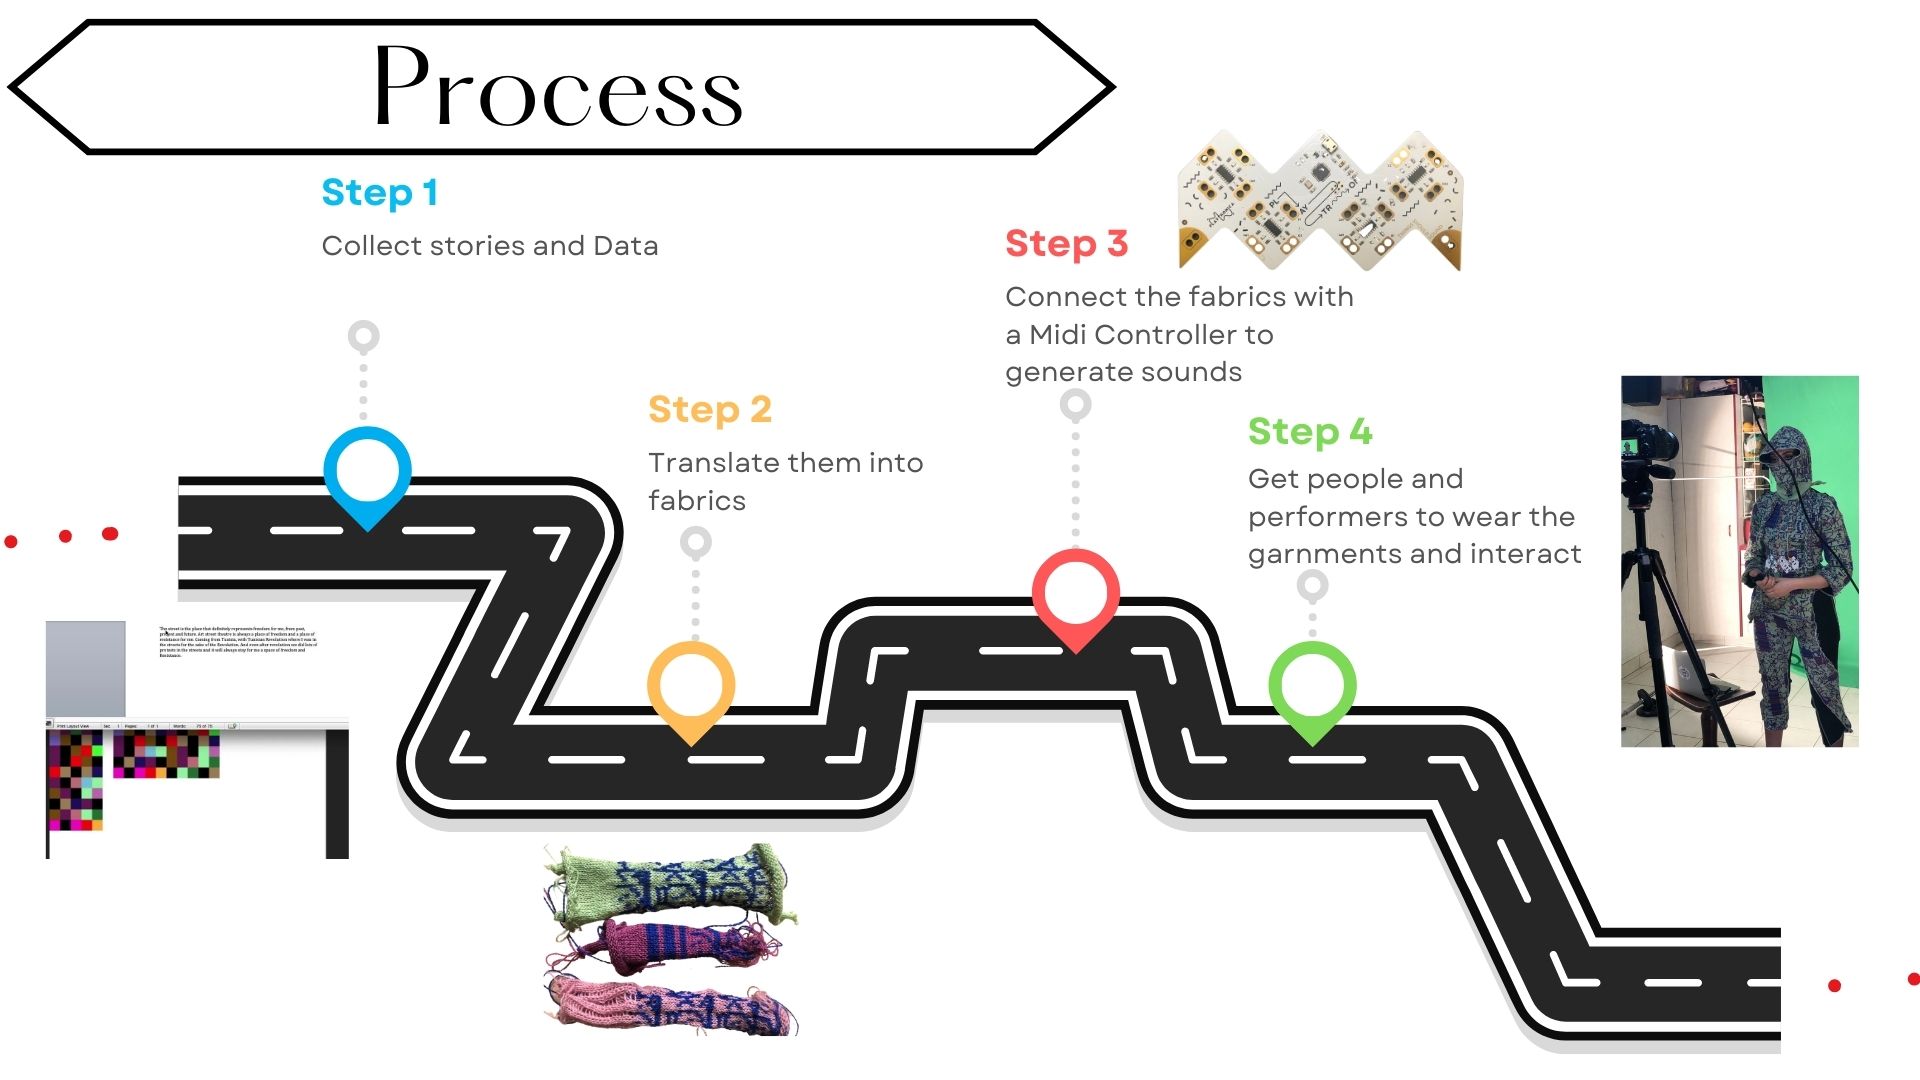
Process
Ideation & sketches
Planning:
-
Week 1 February Beginning of script and making the character into 3D and start thinking of movements and some scenes. First prototype of the Balaclava knitted and sewn Work on the script
-
Week 2 February Look for interactions with playtronica and Ableton? How to place it into the costume Documentation Gitlab find wools knit fabric for Balaclava and overall and tentacles sew Balaclava and maybe start overall visit Mattelon workshop place presentation at Leynaud
-
Week 3 february finish 3D animation think electronics, playtronica and Ableton and latte Panda
-
Week 4 overall and electronics together with latte panda o rasberry pi
-
Week 1 march video film
Procesus:
- Make the outfit : Balaclava, get threads, knit all the parts for it and the overall. Make patterns for the Balaclava and overall, and add tentacles.
- Find the good interaction between the overall and tentacles and playtronica and touch, find the circuit. Tentacles are with light or with something that has sensors for the playtronica. Playtronica can be outside.
- Make box for playtronica 3D printed for costume or the other element./rock
- Finish the 3D animation and film the outside parts with the outfit. Think of the exact script and how to do montage video. Add the soundtrack from live and recordings.
- Try out with tentacles and conductive thread and playtronica
Design & Fabrication
https://ayab-knitting.com/quick-start/
https://zoeey.notion.site/AYAB-0db3da3c6e31405ba2f1ee54062b1fbc
Week 1 February
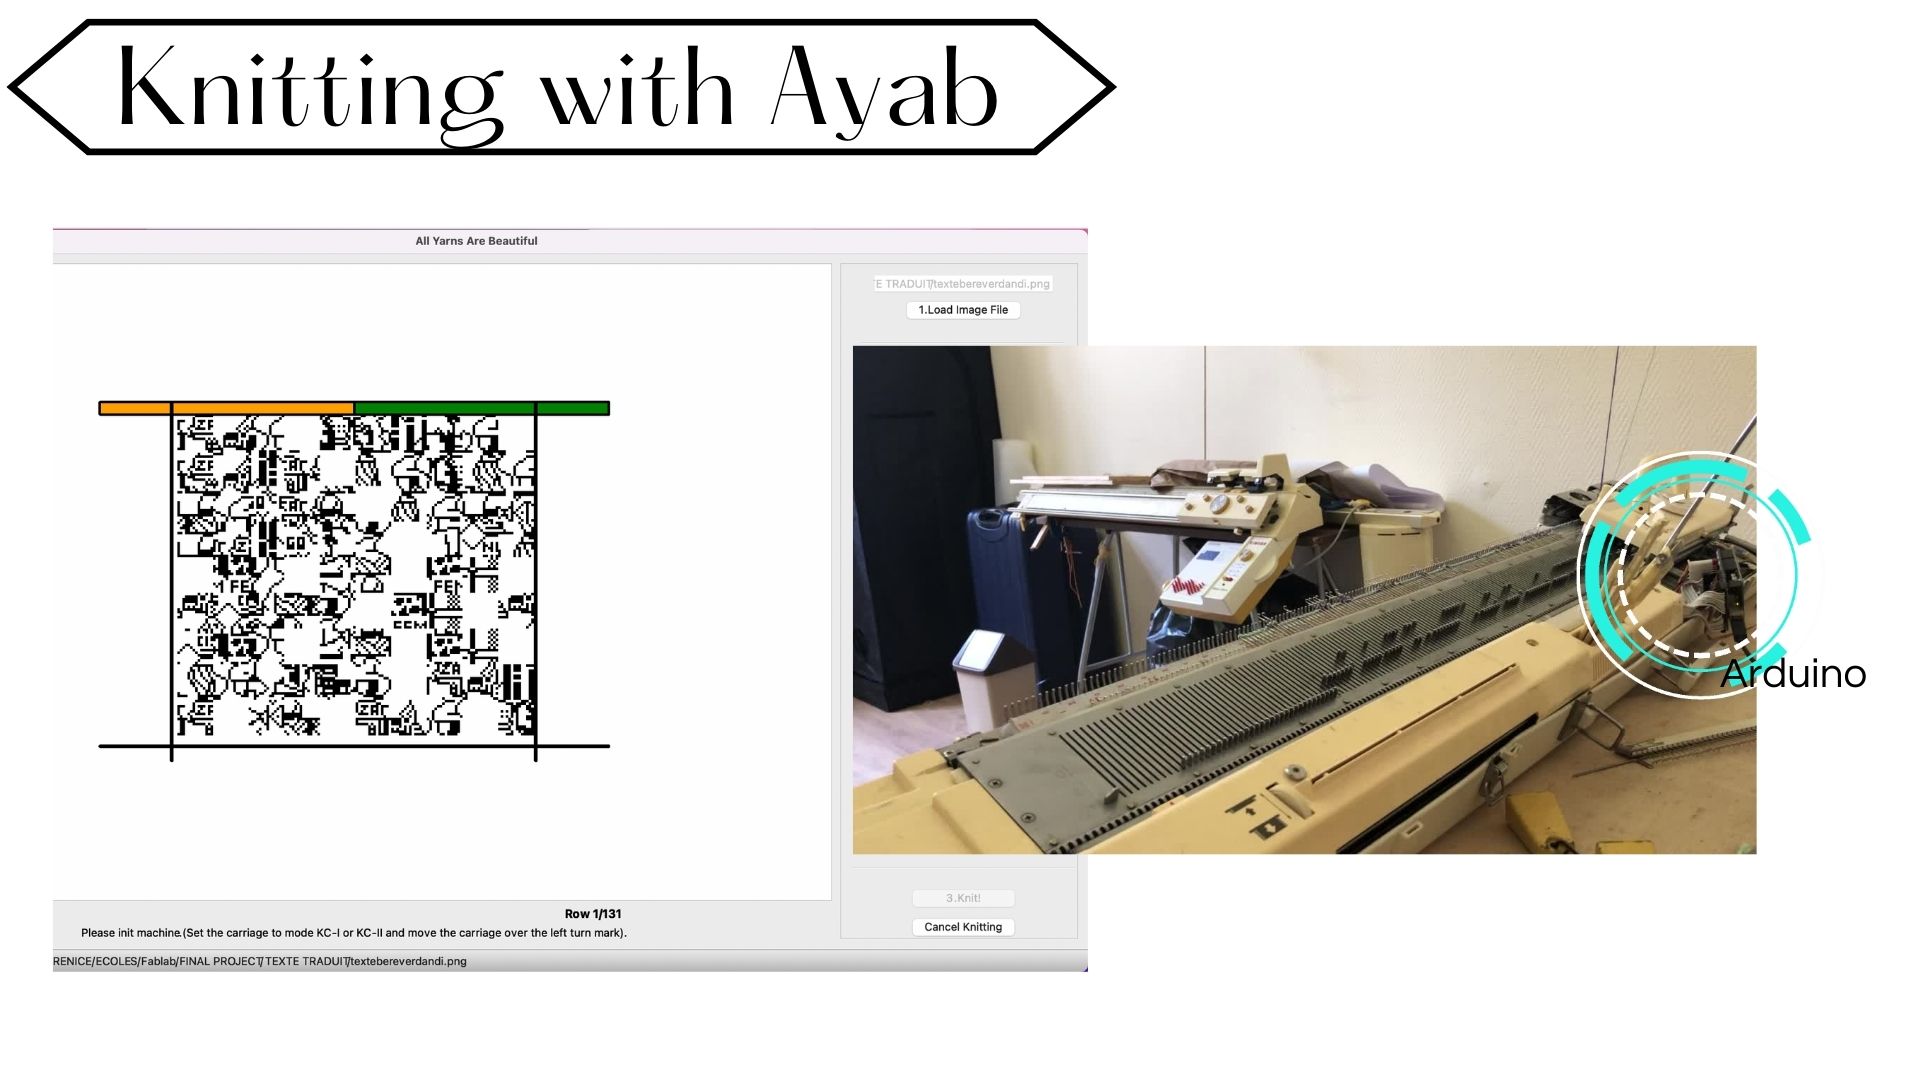
I tried to make a balaclava by knitting it in tubular which was the first time for me as I just almost just started to use this machine about a week ago. I spent two days trying out the technic that Amandine showed me at the lab, a friend from the lab. We calculated my size of head and the size of the balaclava I wanted and converted it into number of knits and lines of knitting. It was hard to get the tubular knitting decrease as there were troubles on the sides of the knitting, most probably from the weights on the sides that were not adapted. It was creating some additional shapes and knits and made it impossible to reduce the number of knits on the sides. It then generated some holes. As I also wanted to add complexity with using the Ayab and Arduino to introduce my patterns, I decided to choose another way to make the Balaclava, with making a pattern and sewing parts together.
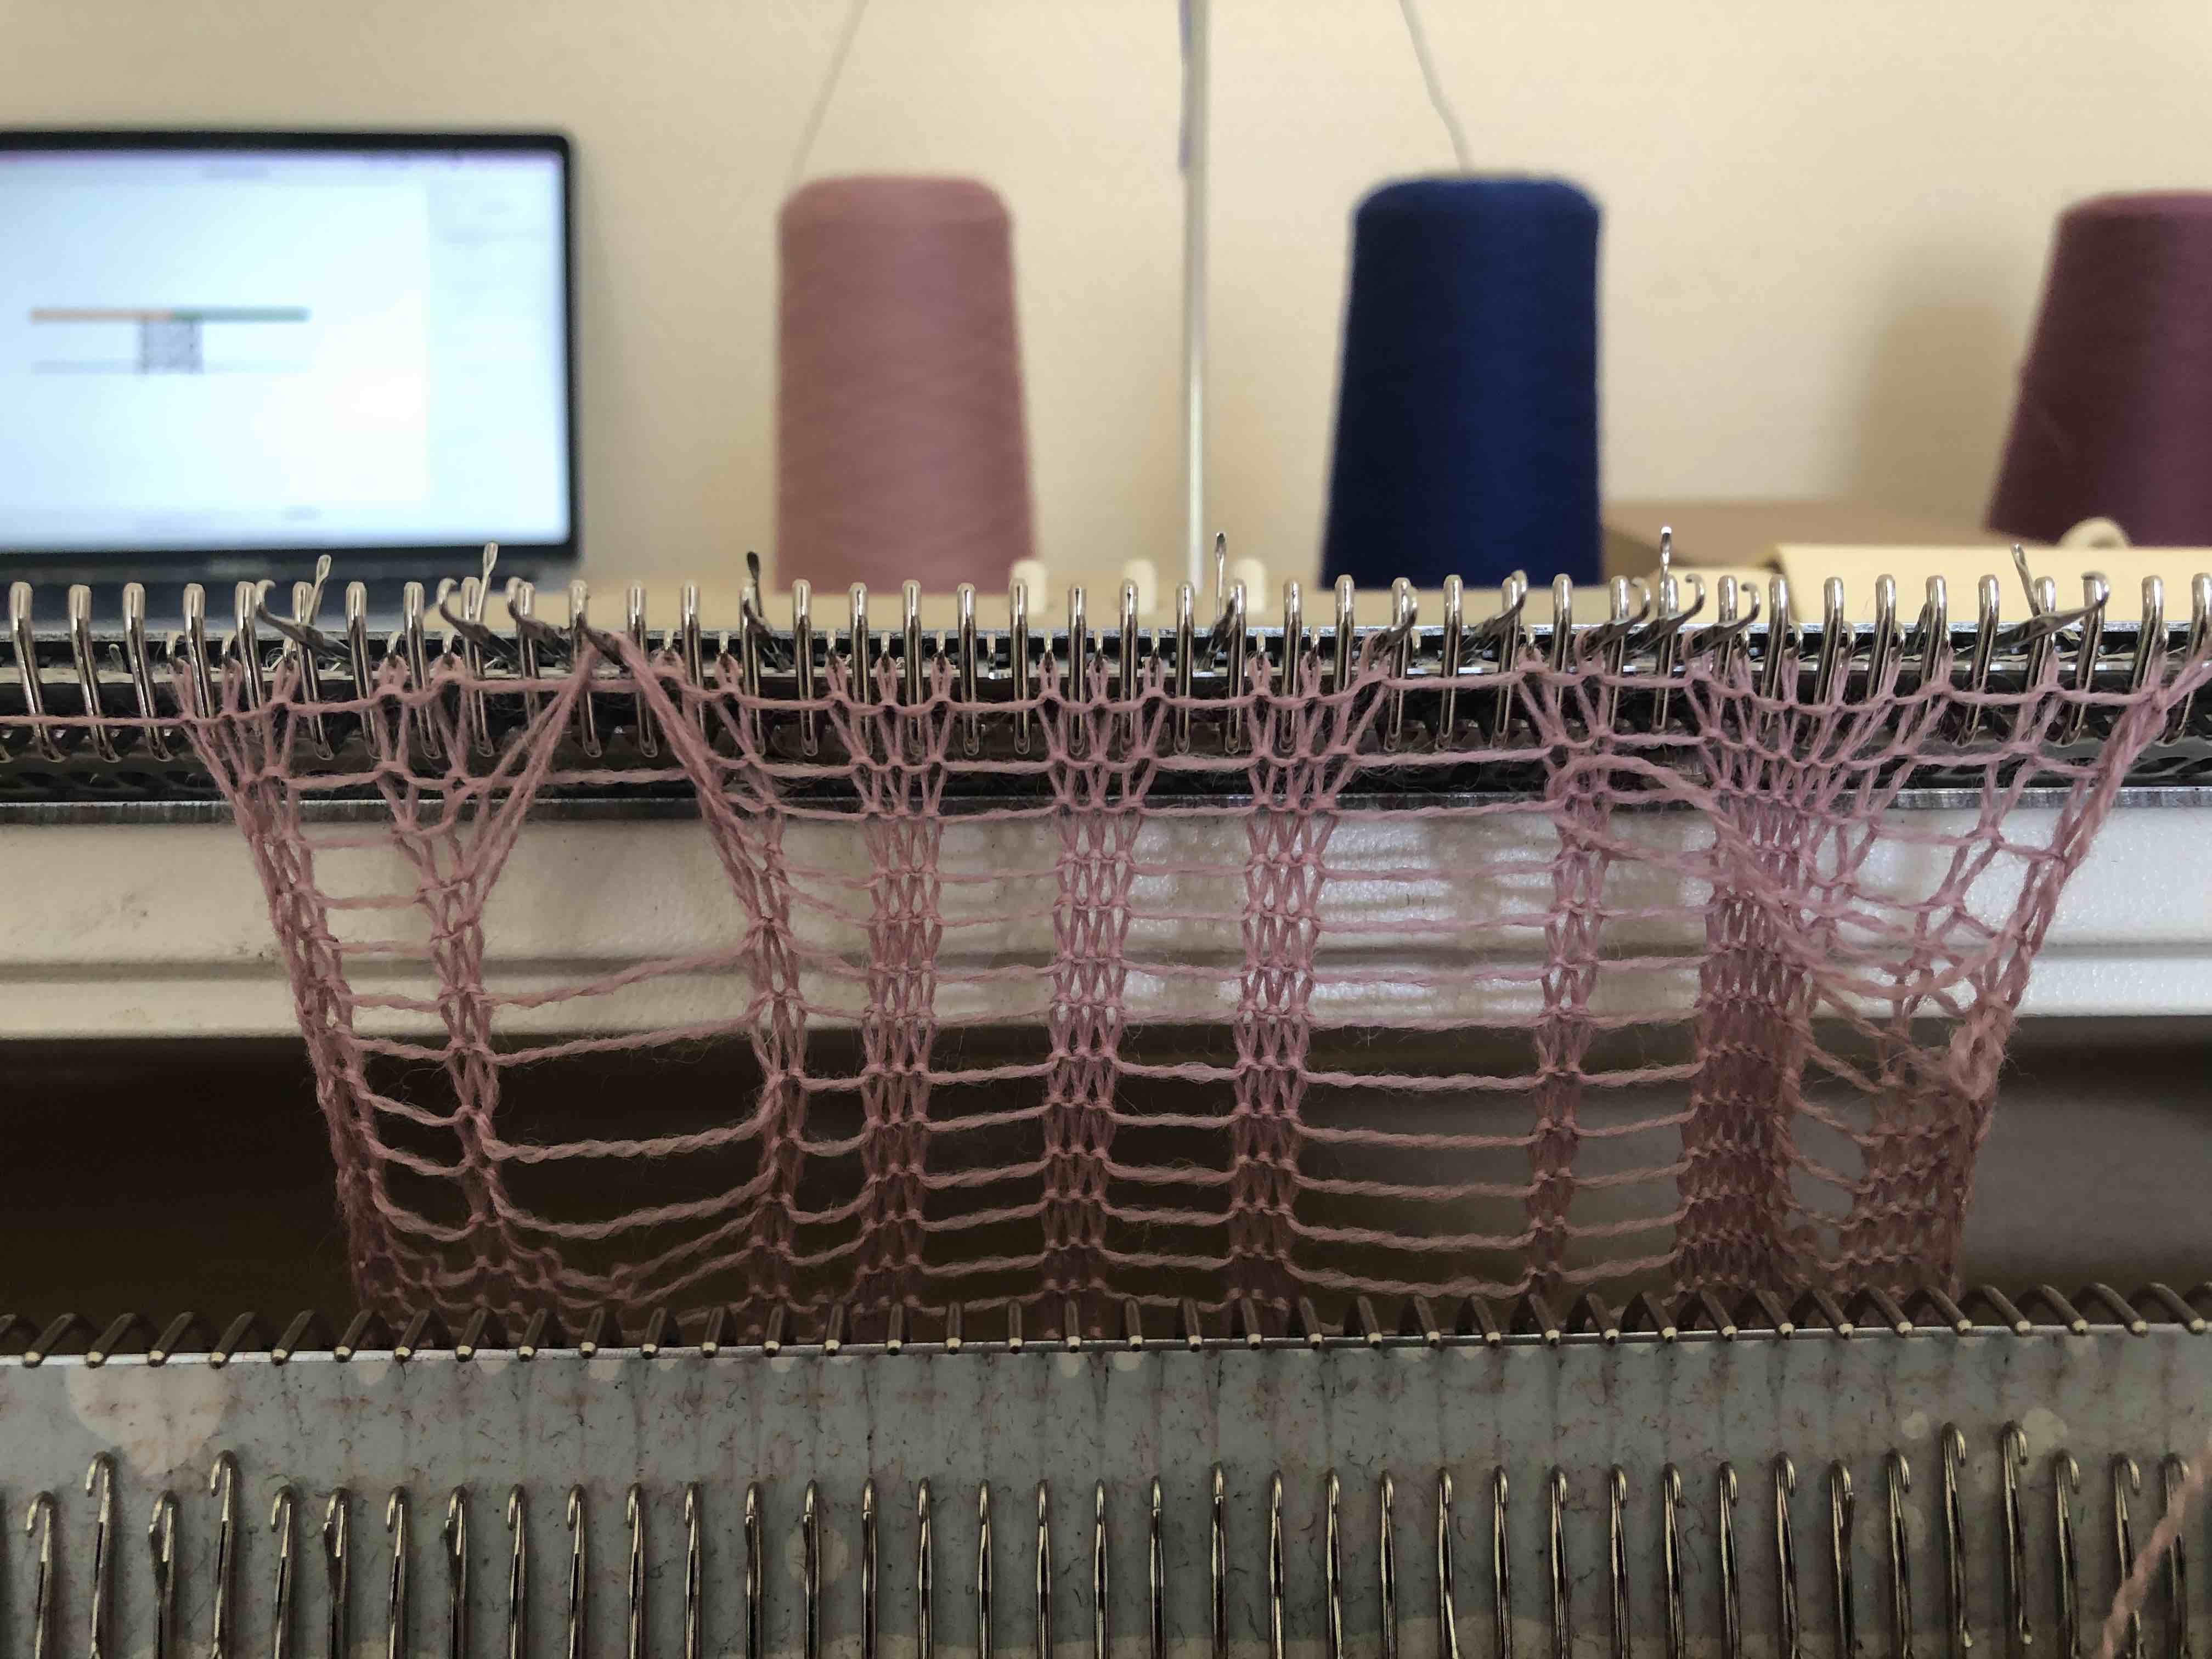
So I decided to make a big piece of knitting, as big as I could, which is 70x70 on both sides so 140 knits. I made my pattern from pixels and set it up on Ayab.
See Notion page from Amandine (At the top)
I had to start it over a few times as some holes were appearing. It took me few days to start understanding how to start the knitting by myself and to understand where the problems or holes were coming from. Most of the time it was from the weight and threads that got stuck because they were very long. I thought with ayab it could also be that I started the knitting on the left for the Arduino and there was not the Red, second thread added, so the first line was missing the red thread, so I added two empty white lines on the design on Photoshop in case.
After I got a big piece, I went to the other Textile Lab, to sew the parts together with an Overlock machine. Here again, holes appearing, and I had to sew over them again at some point.
I tried few different options of shapes until getting one that I preferred, using another sample I made the week before. I also quite like the effect of the overlock so I'll see if I wont make it visible later.
I have my first prototype, now I need to find threads of wool or cotton that are similar, to make it over again an then start thinking of the overall/bodysuit. I'll make it in 4 parts on the upper part + probably two parts for the arms and four parts for the legs. I'll then sew them together.
With my girlfriend, Sara, that is a 3D artist, we started working on the 3D representation of the character of my performance. It can then pictualize my idea and I want to start to animate it. During Fabricademy I started using Blender with her and we learnt together how to generate clothes and textiles there.
Her website:
Capitalistwhore.me
First, I tried to make clothes from 2 parallel squares, and sew them together, similarly to Clo 3D. Then I added the pattern from a picture I had of a weaving I made before.
Then the second technic was making a mask on the skin and separate it from the body like an object and inflate it, being careful of the holes because they can hide in the outfit, and I had to inflate more, slowly. I was using a Tablette graphic with a pen where I would press more or less to change the intensity of the inflation.
Then I wanted tentacles and there was a tutorial to make it but it was from a ball shape and not a human shape nor textile.
Problems:
I did not manage to make the tentacles at first, and I thought it was because of the subdivision of the skin that was too low but then I just had to change the quality of the tentacles and it was enough. At first it was making some holes in the outfit and the tentacles were too big or too smalls.
Week 2 February
I started to look at how to aninate my first character in Blender, through putting it bones first and then I added an Add-ons on Blender to detect moves from webcam to repeat them into the animation. I managed to get a move of me passing the future “cord” with my hands but there are still some glitches. There was a glitch where the legs were doing weird moves and another one with the arms going inwards the body.
Week 3 February
We have the mid term presentations so I prepared for that.
I wanted to make a few more videos on Blender.
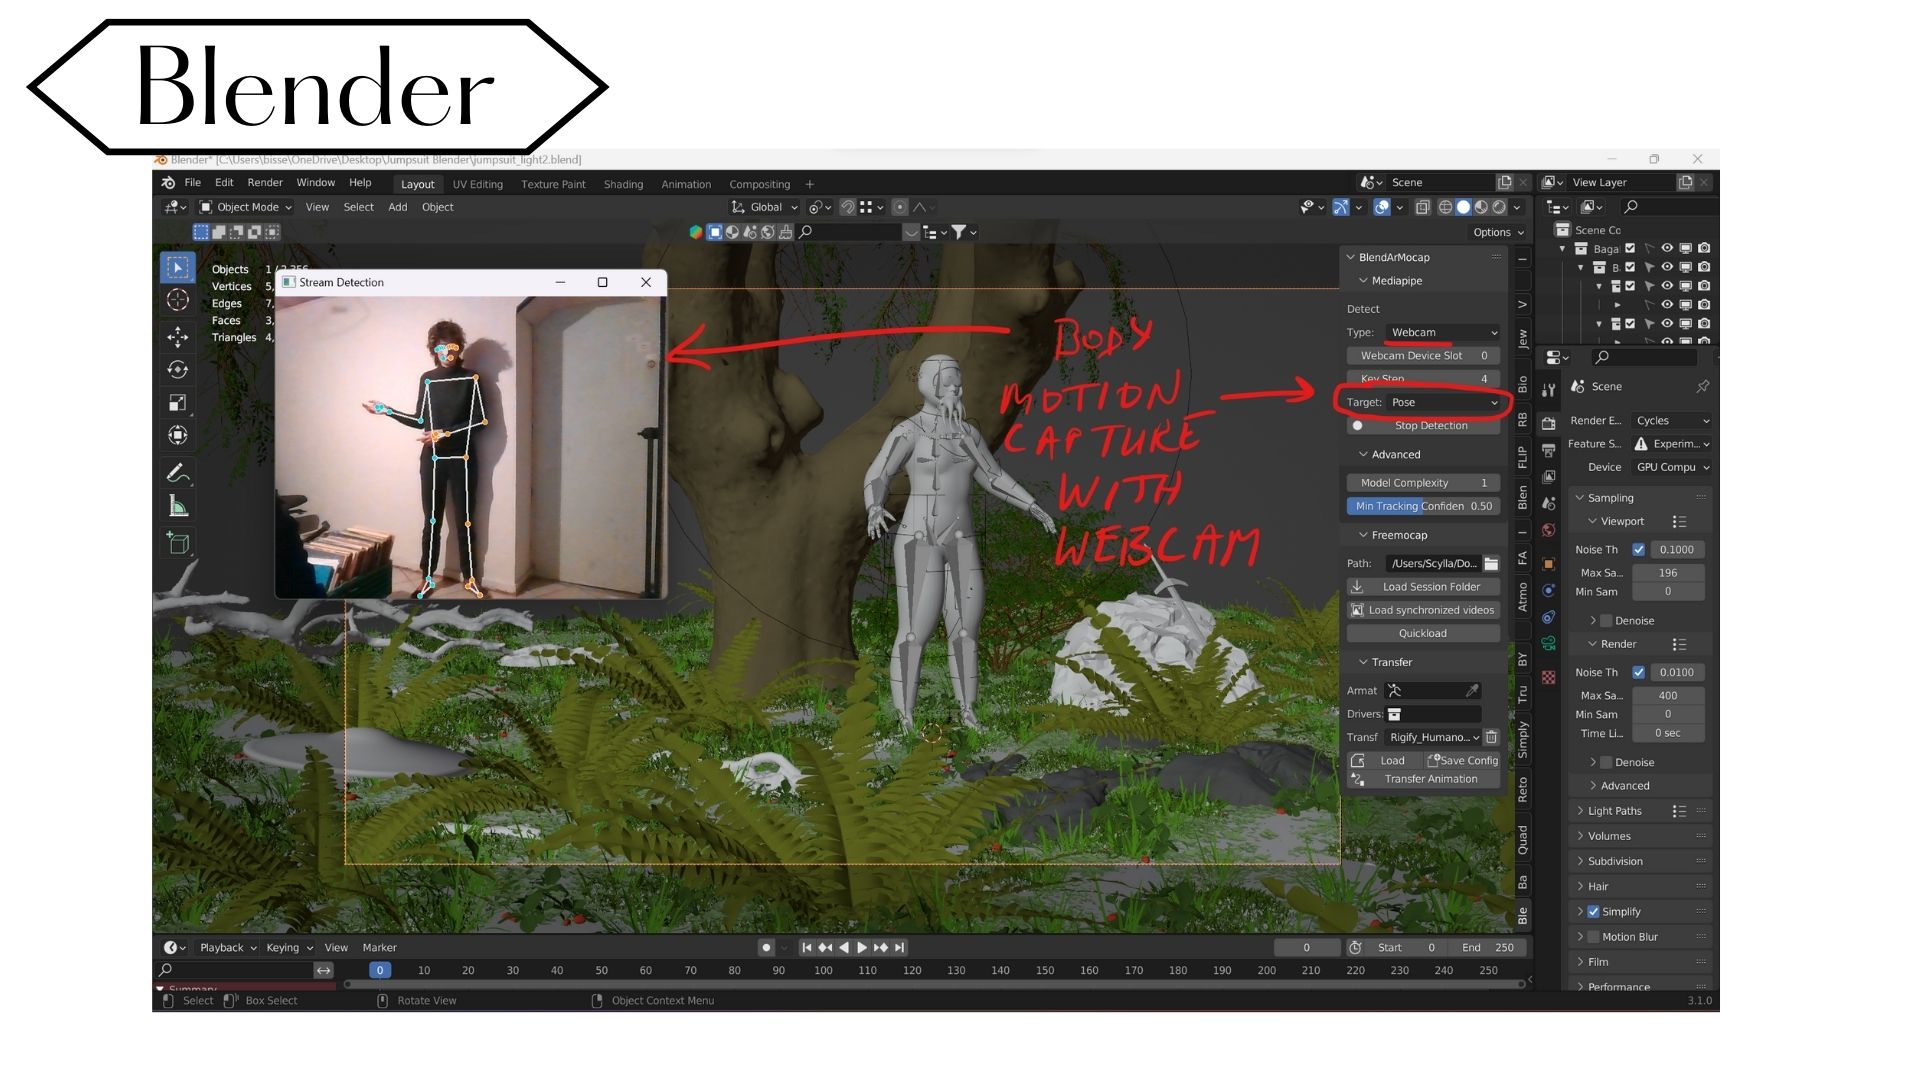
First of all, the process to animate my character was with the Add-on BlendarMocap. After choosing the add on on the right side, I had to select a motion capture with movie file, I then had to select the armature and the drivers for face, body and hands.
I then use the detection using Webcam and start with Target the Face, with facial rigs. Then I target Hands using webcam. Then the body motion, using the webcam, taking care of having enough space to be able to see the feet, otherwise the animation can make weird moves.
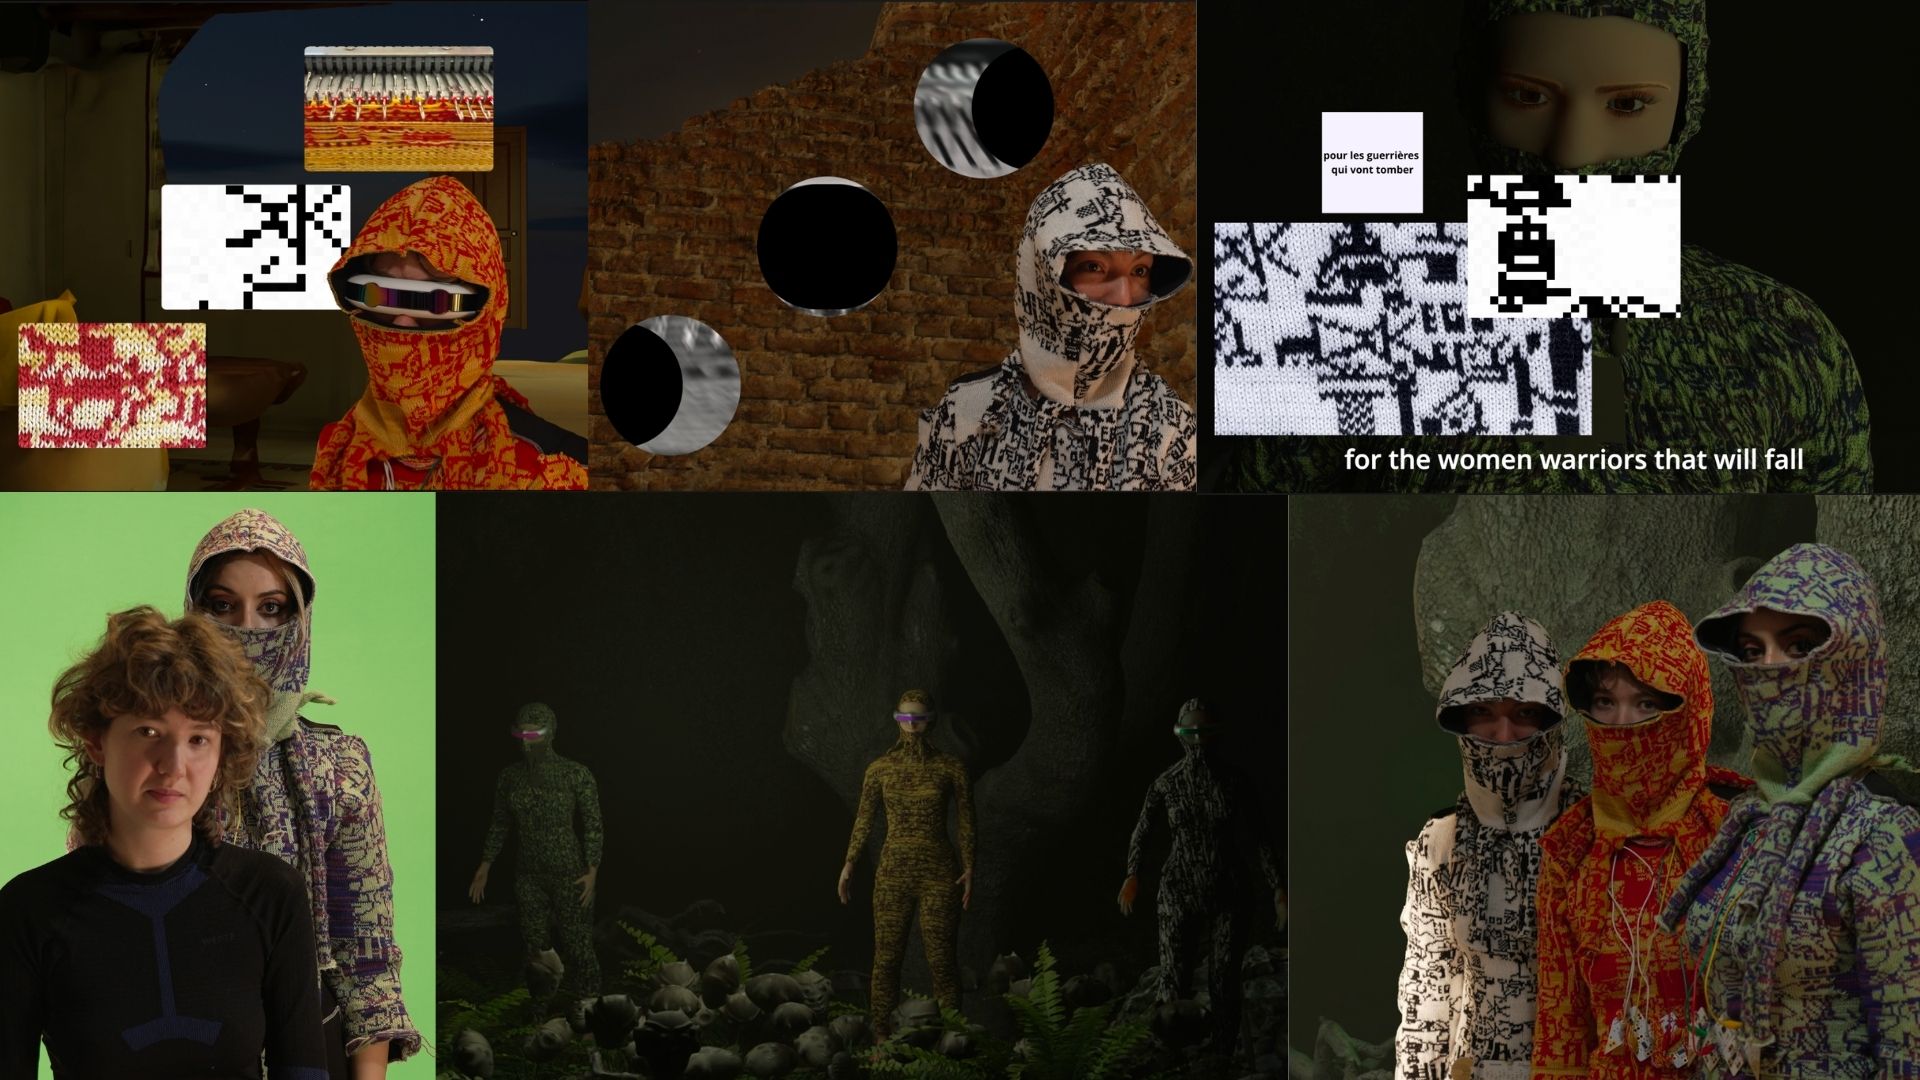
Then I made two videos showing a short animation with the front view of the first version of the 3 characters, this animation took about two hours to render. I made a second animation that was doing a body scan view of the character of Verdandi that took also about two hours to render.
Week 24 February
I made the characters again so that they could have better rigs and that they would fit better to their characteristics. Indeed, I decided to collaborate with Dora and Sara, that would be the two other Nornes for the 3D animation and the film. Dora would represent the future (Skul) and Sara the past (Urd). I asked them to send me a place that would represent a place of refuge or resistance for them, so that I could translate what they reply into my alphabet and then weave it onto the balaclavas that they will wear.
So I made the characters on makehuman, I changed the parameters of skin, body shapes, but I didn't put them hair because they are wearing balaclavas which should fit to the body. I added them rigs in “animation”.
Then, from the youtube tuto, I exported them to be able to get them into Blender.
Then on Blender, I had to open another version, older, because it didn't work with the recent one I had. Then I had to open it with right click “run as administrator”. I deleted all elements. Then I had to open the file.
I could set up an atmosphere. Then I set the add on for motion capture. I repeated few times the physical moves so that they would fit with the way they are being read.
The few moves were :
standing, passing the gut-cord. I started with passing my arms in front of my body. Unfortunately it then resulted to have the hands entering “inside the body”. So I started to make moves with my arms less close to my body. Even moves with hands towards outside. I tried with small moves and bigger moves. The feets didn't look very realistic as they were disconnected to the ground. Bending created weird body shapes and the bust didn't really make the turn.
Standing, making the character talk. I made smaller moves to make it more realistic, with some head and arm moves.
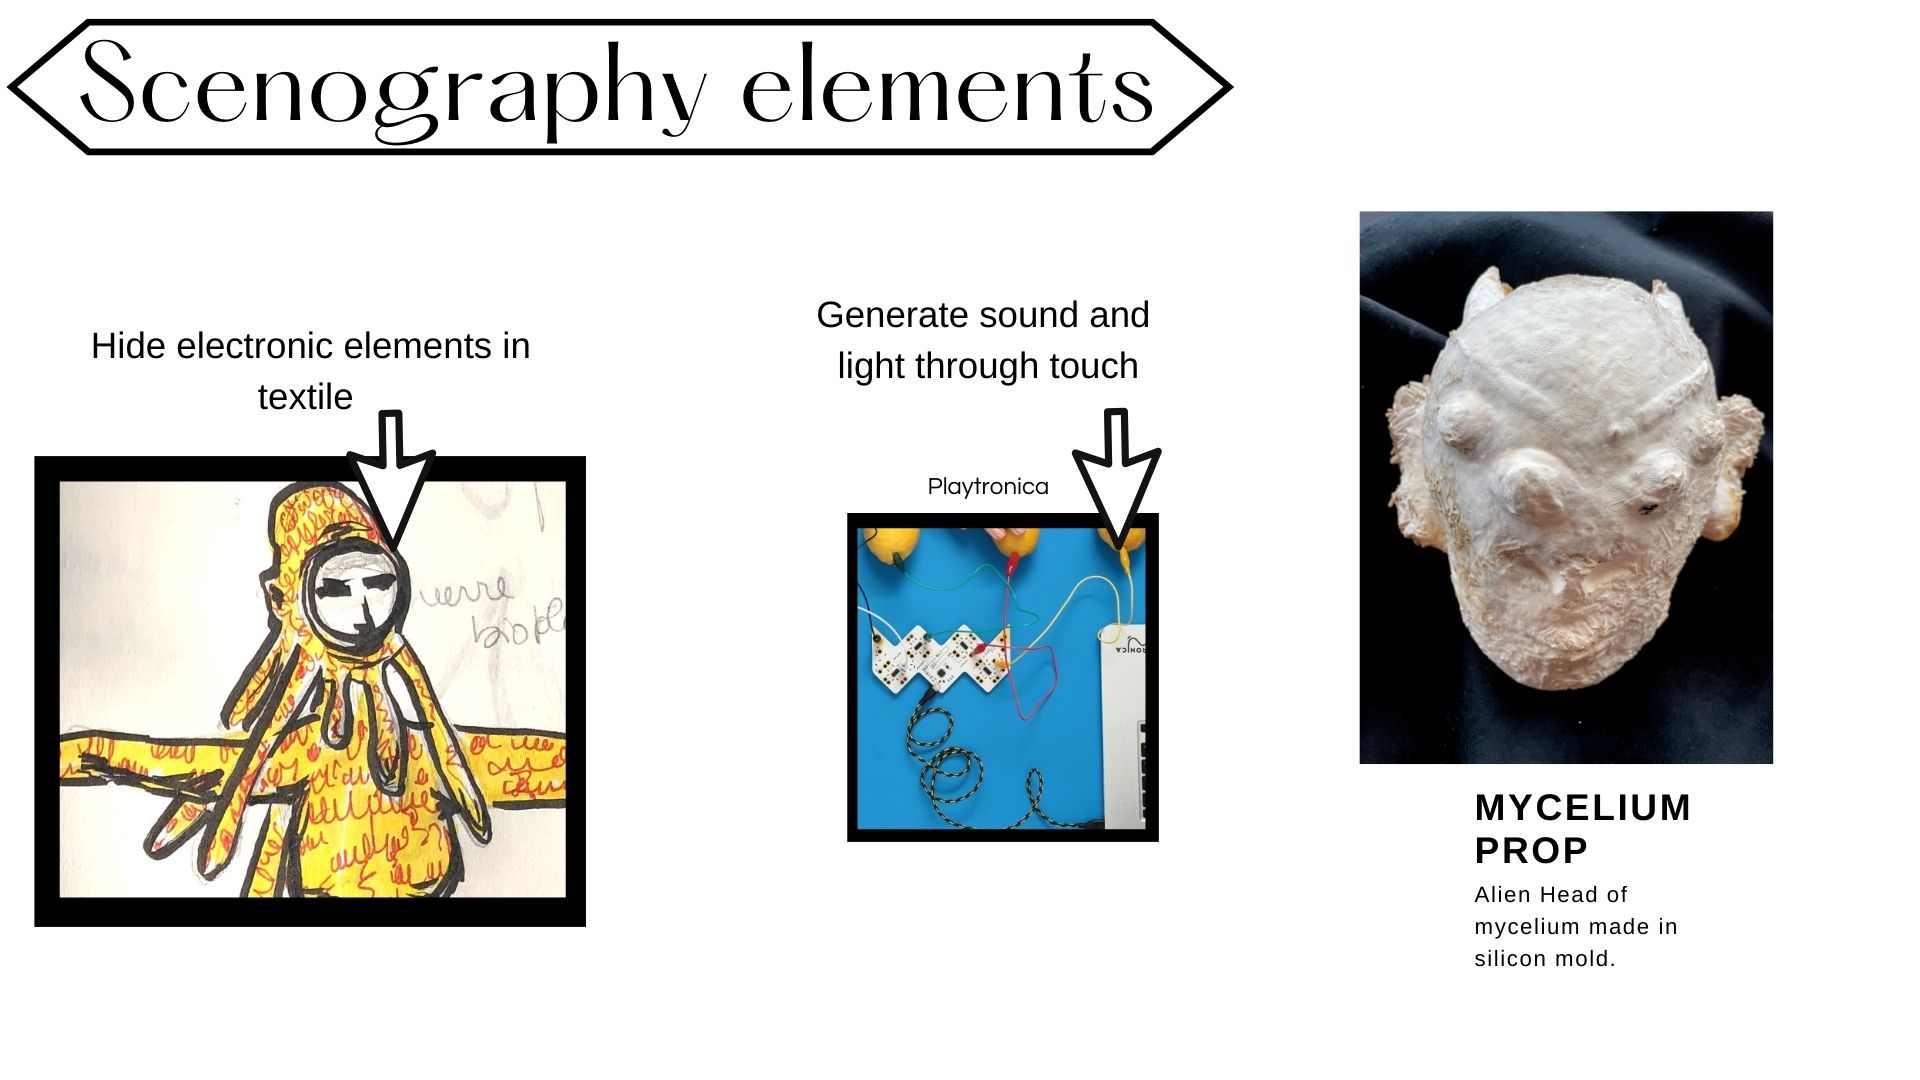
3D prop on Blender: the small mold of alien head from clea picture:
Then I made a small 3D from the website https://monstermash.zone/ , that got me to draw its shape thanks to this tuto https://www.youtube.com/watch?v=k043OByAG-4. I then exported it into Blender to modify it. I could sculpt it on top of the shape. I added first a picture of the real element to have indication of volume. Then with the tablet graphic, I drew the eyebrows with volume, the mouse and made hole where the nose is, pushing it more or less with the graphic tablet pen.
I also have the mycelium version of it that I made during Fabricademy and that I want to use for the video, on the floor near the Nornes, at their feet.
I made animation renders on Blender with the alien heads coming up. The characters are almost finalized. I still need to add the good glasses which are coming from Ornella Pizzi with whom I am collaborating as she is lending her sunglasses for the photoshoot and video as well as a 3D render of them that she made. It took more than one night to render 10 seconds of animation.
Prototypes
Knitting :
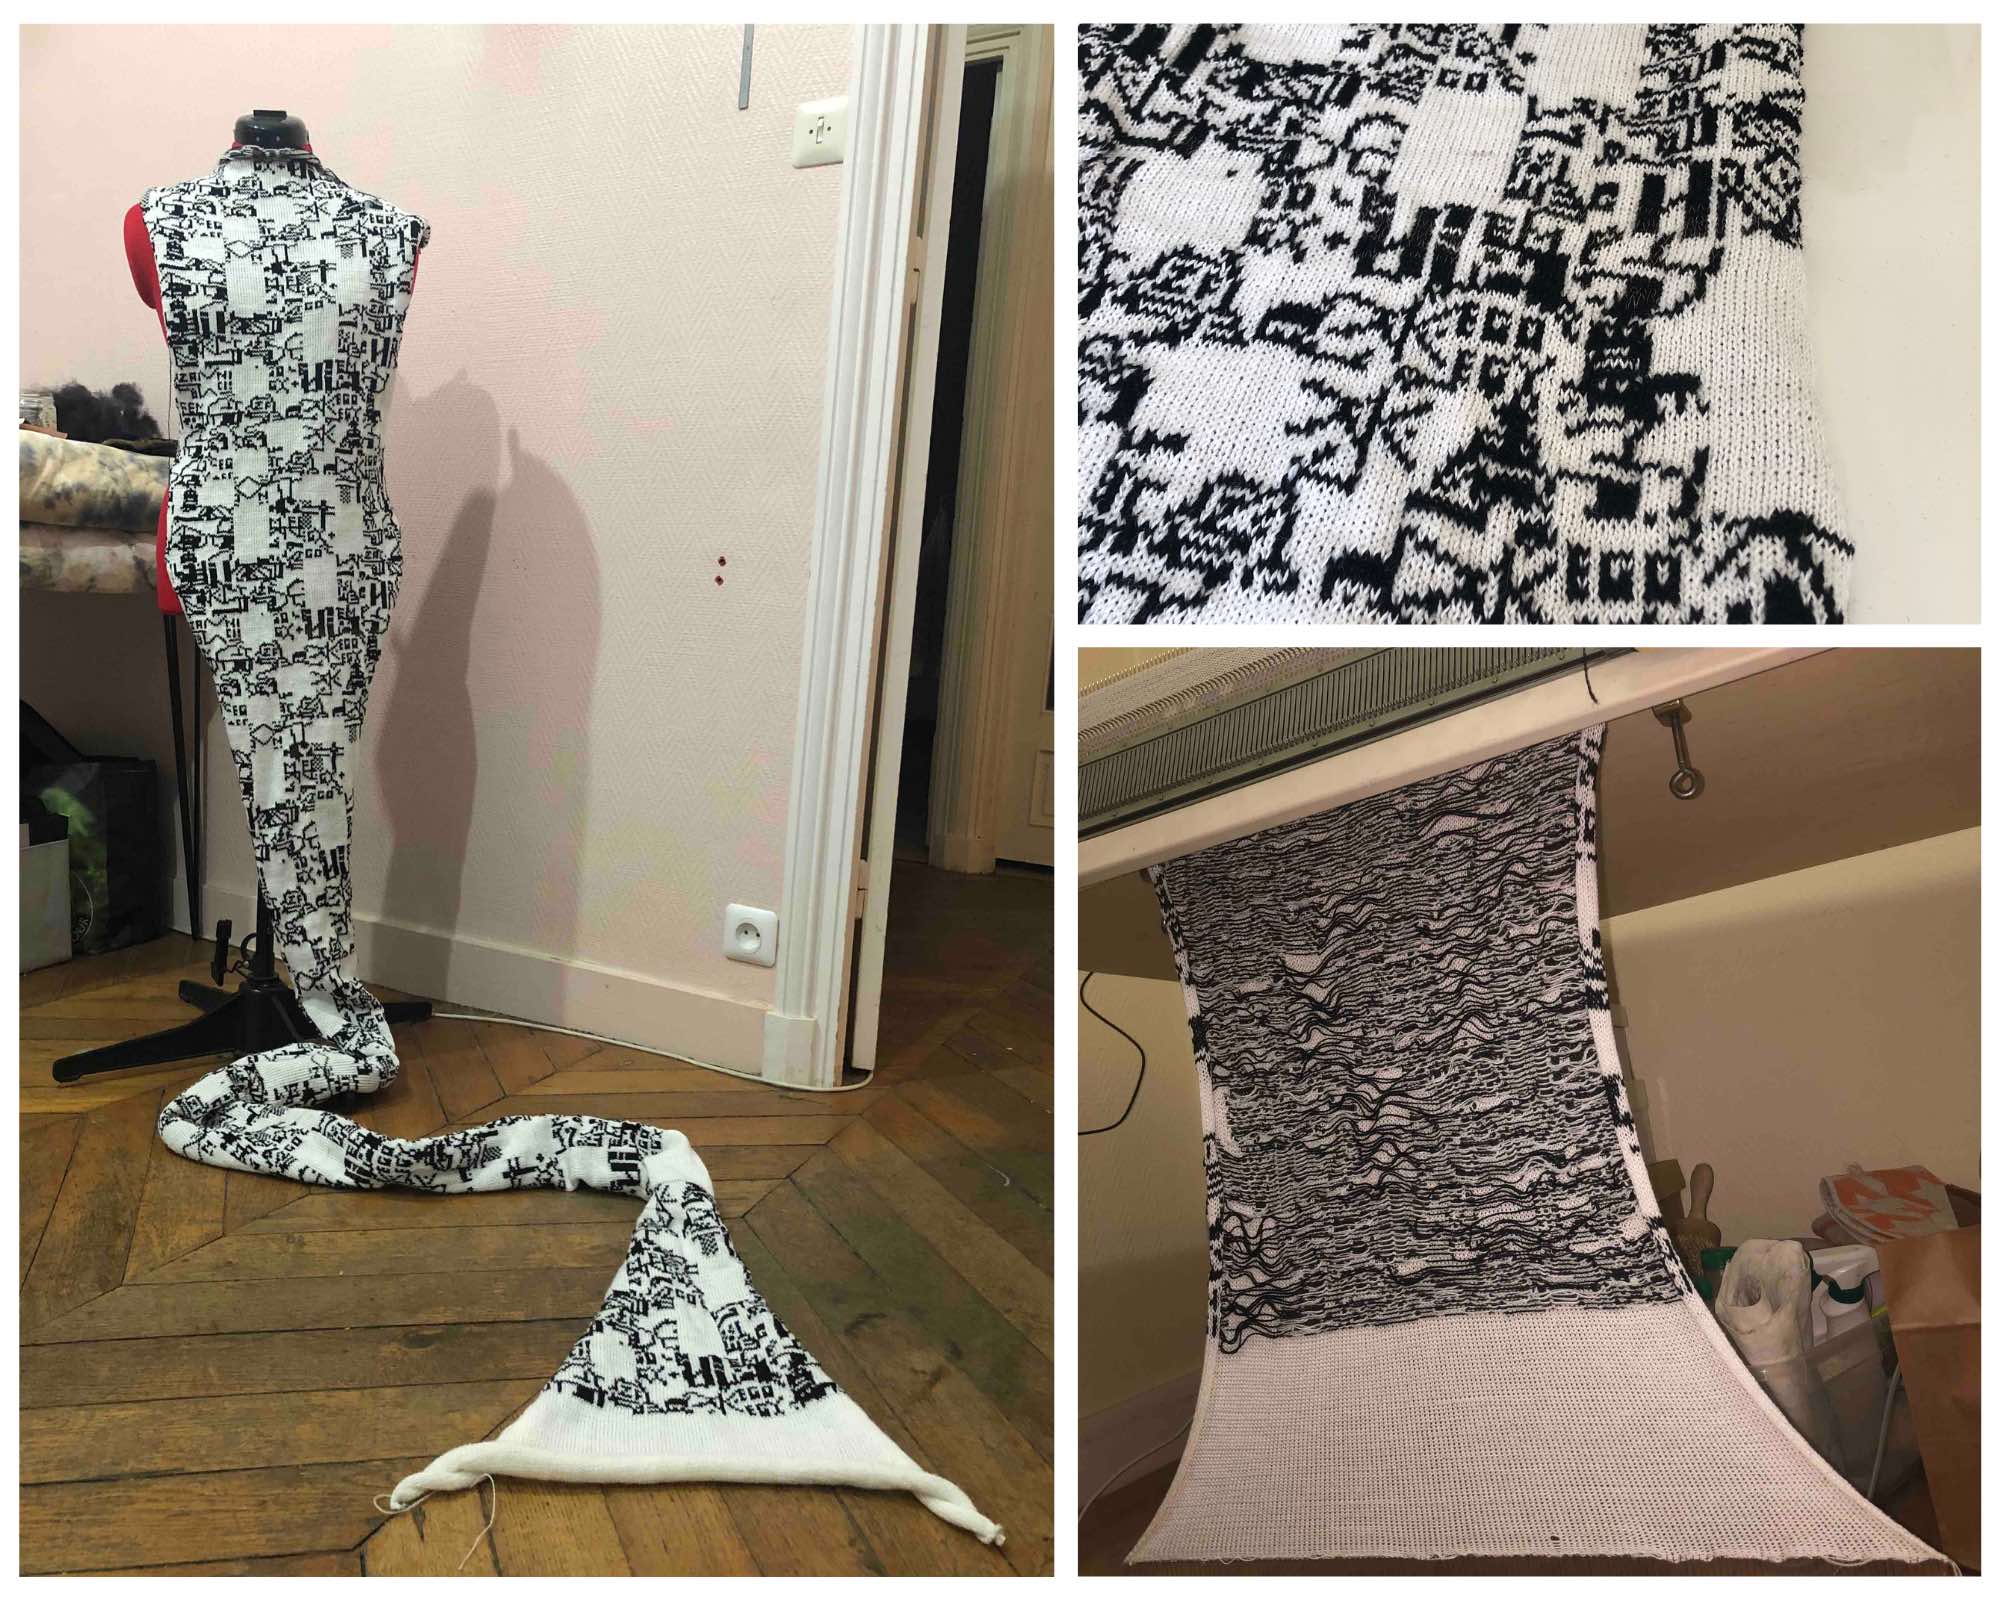
I knitted another big sample of 140 crochets. I had less troubles than before, I imagine it is thanks to the material, knitting with cotton of this size seems easier. I had to put bigger weights on the comb and every few lines of knit I had to put up the weights on the sides. I had to be carefull that the crochets were properly opened and that they were taking all of the threads, to not get holes. What worked the best was mixing cotton threads with wool threads for some reason, although there should be a way to make a bit fabric with only wool, but I didn't manage with the weigh and the quantity of knitting I needed.
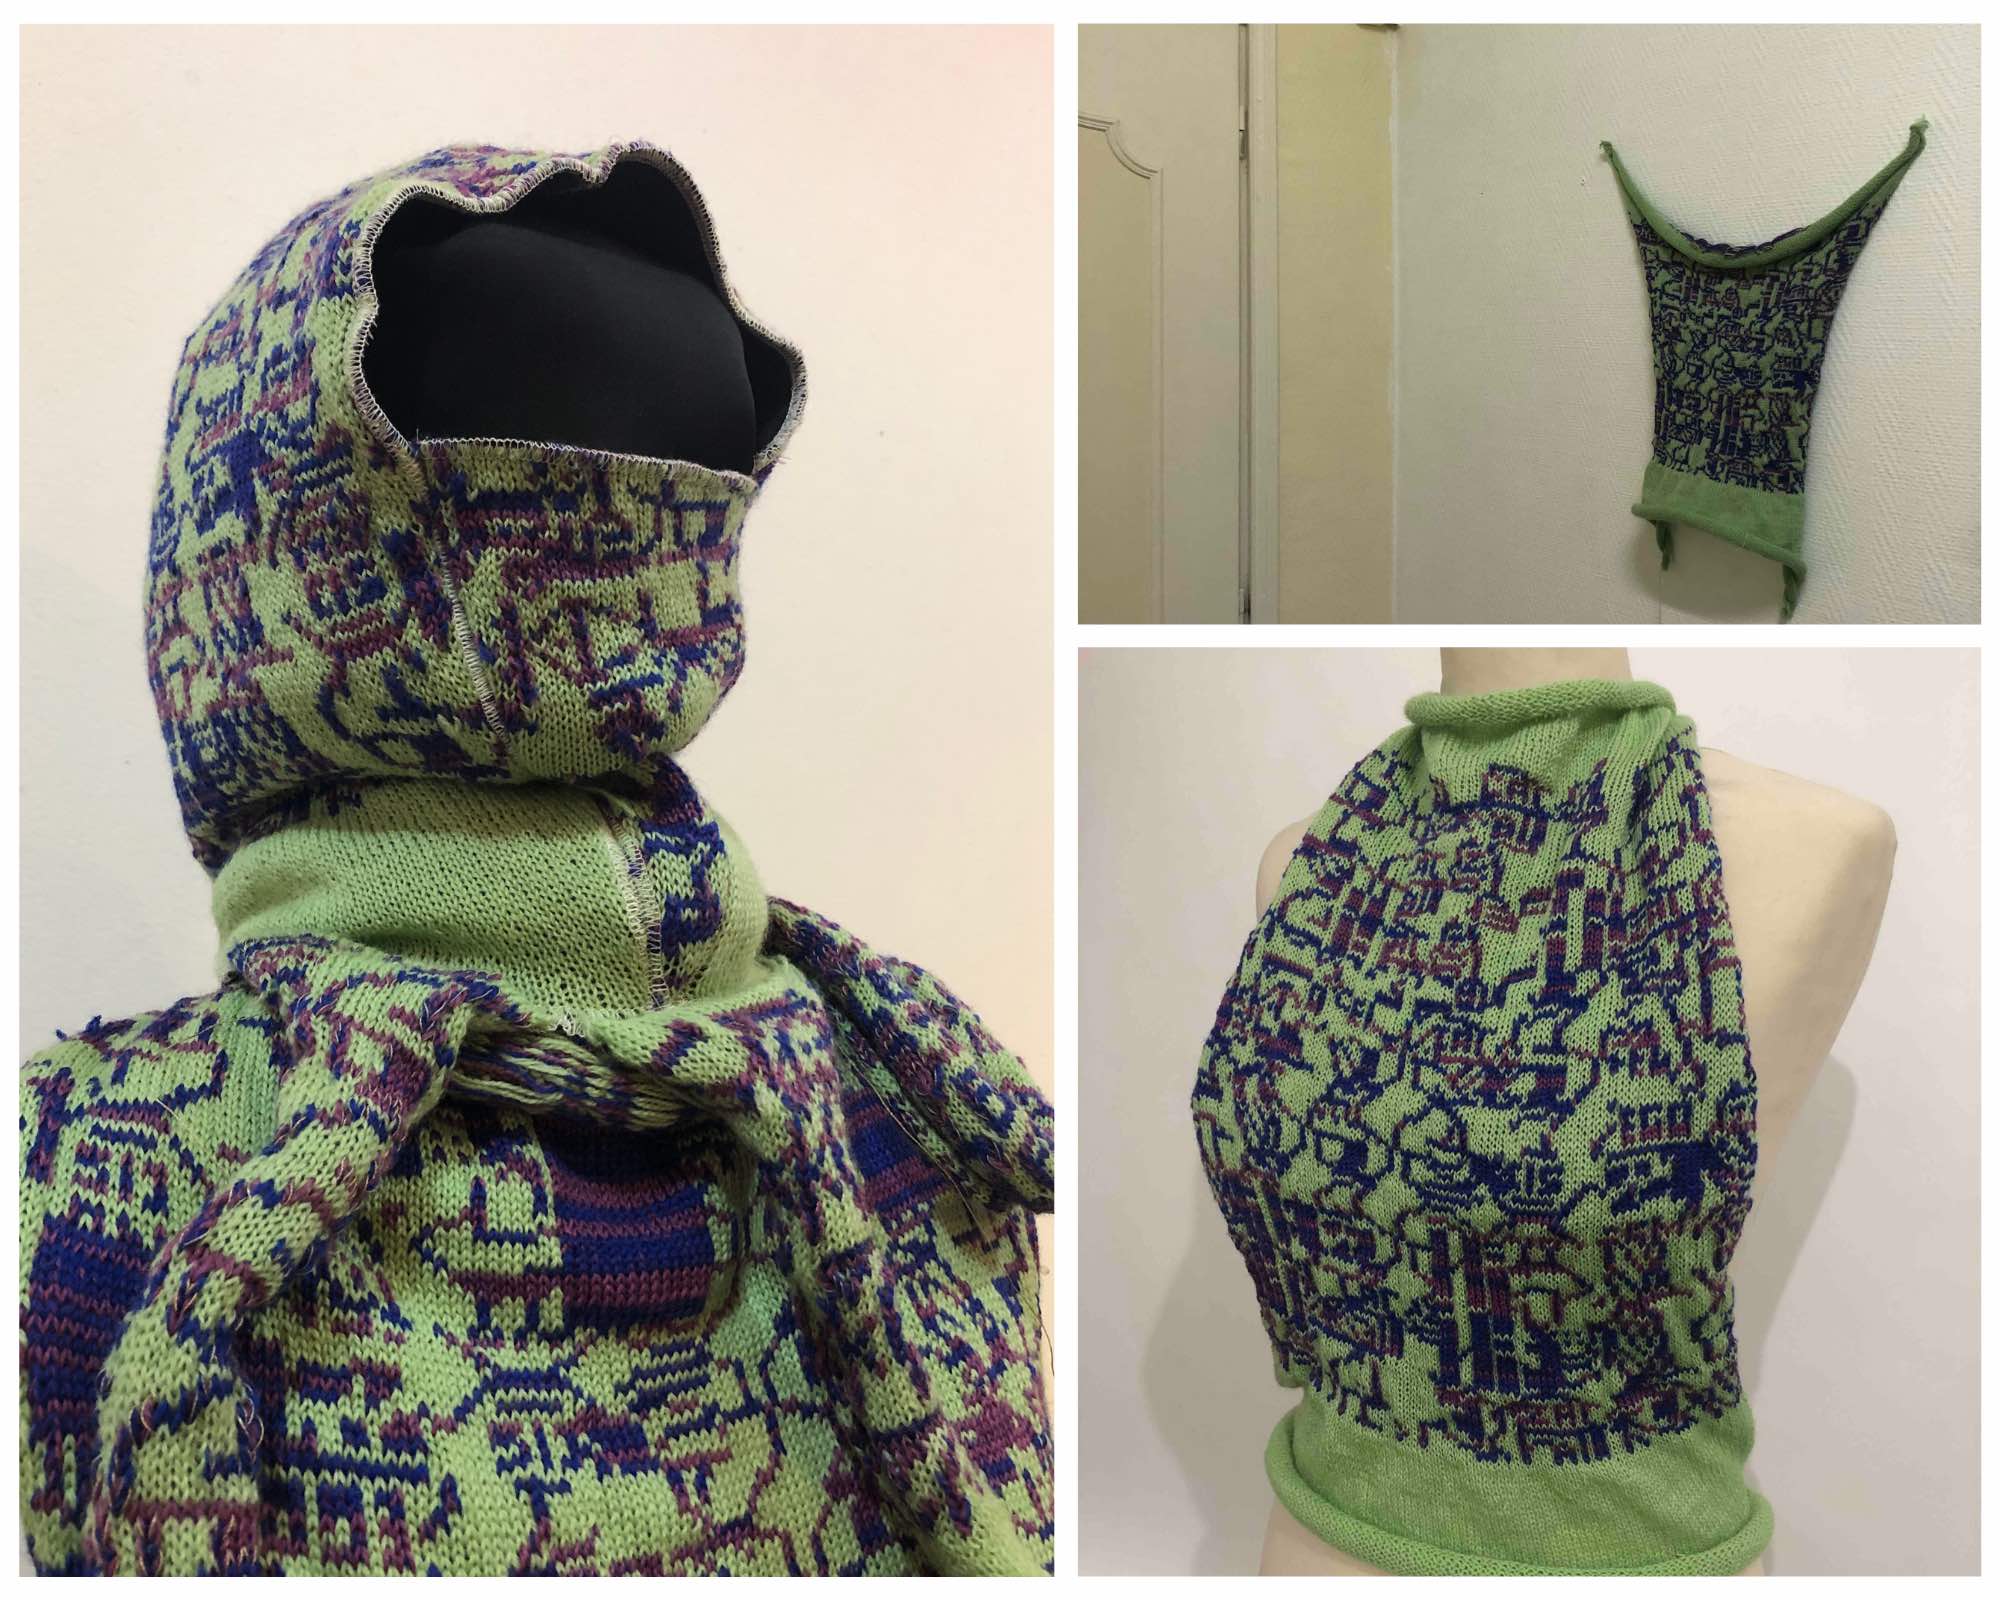
Pattern making of the balaclava:
For the pattern making of the balaclava, I decided to make a cut myself, from the past prototype. I took the measurements and did some adjustments to have it a bit tighter at the back. I then passed it onto Inksape, drawing it so that it would use as little fabric as possible. I wanted to have a fabric pattern to help me at the time of cutting the knitting and also I could use it as a “doublure”. So I used the laser cut to have a perfect cut. Then I added the pins to give it its shape and try it on and I put it on the head.
Sewing :
In Leynaud, Textile lab in Lyon I got to change the 4 threads of the overlock. In the end, there were only three of four functioning because there were just 3 needles and not 4. I struggled to set up the machine as the threads were detaching. Pauline helped me to see if everything was ok inside and told me to change the two last threads to “mousse” for a better effect. I checked the drawing to see where I had to set up the threads into the right needles. After few attempts I managed to make it work, with different tones of colour, some UV ones as I wanted.
I wanted to get the overlock sewing outside of the balaclava this time to try it out. I cut the outside border of the big neoprene pieces because they were being too big. I pinned the neoprene on top of it with all the layers at the same time. The struggle is going to be to not have the knitting falling apart because it cuts the threads with the overlock. I may have to make other sewings on top or add something. I made the sewing by first the first two big pieces of the balaclavas with the sewing on the top middle. Then I sew the borders of the middle triangle with the neoprene. Then I sewed the border of the balaclavas that is around the face. Finally I sewed the triangle in the middle. Then I just made the last sewing on the bottom border. There is a hole there which need to get fixed because as it is where the head is going to pass the hole will increase.
Knitting:
In oullins I received the french company yarns that I ordered, and the UV light threads. I thought the cotton threads were going to be thicker and they were thinner than the ones I was using for the previous samples that I used for the two first balaclavas that I got to be satisfied with.
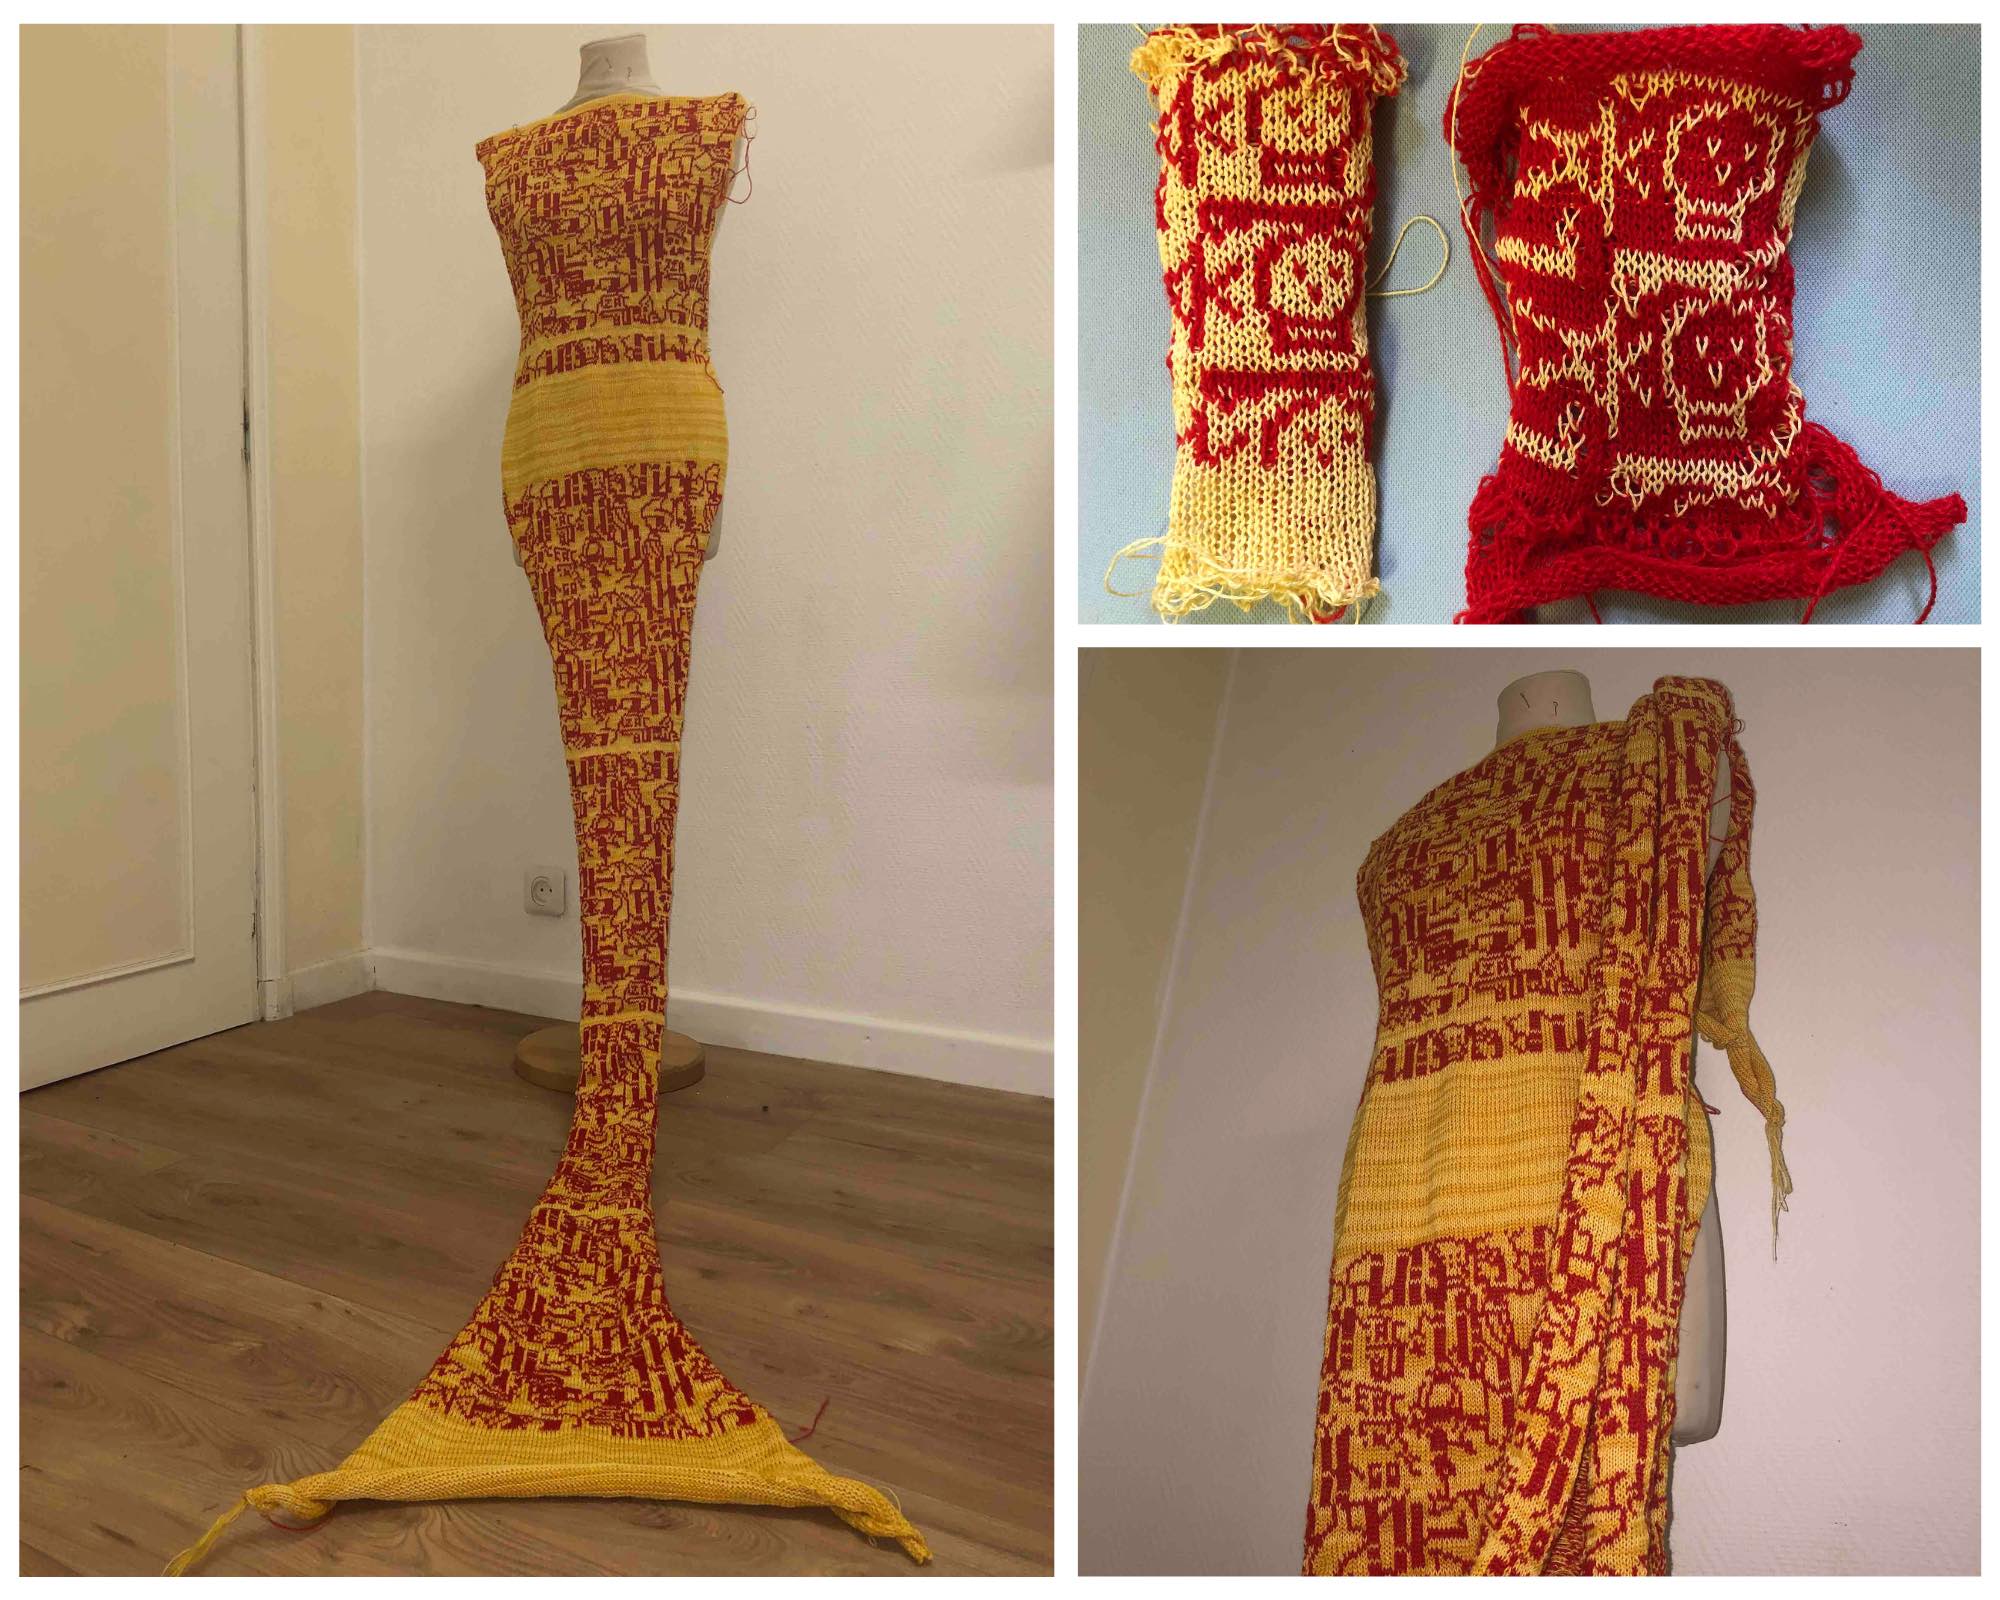
I then had to make few trials of combinaisons of threads together. I tried different colours and threads. First with yellow cotton and red wool but the yellow wasn't as satisfying as the previous one, and the tension I put was about 6. the first one was not dense enough and we would see less the patterns as there would be more space between knots. Then I tried to make one opposite colours and threads, yellow on red patterns, cotton on wool. It had an interesting look but quite not the one I wanted. I the tried with two wools blue and green and 4 as tension and I added conductive threads in the symbols. It could become what will be the tentacles or part of the head balaclava piece. The texture was better as more dense but maybe too dense and it shrinked a bit. I made another sample with 2 wools red and blue with a tension of 5 and I think that its the one that is the most appropriate for it. Then I made a last one with white cotton and black wool and some conductive thread and I quite liked the result, with a 5 tension.
I will anyways have to be care-full with the size of the fabric that is going to be smaller anyways if it is just wool. Ill have to calculate the size ill need for the balaclavas, probably have double for the two sides.
I received the final good threads, the wool yarn and the conductive thread.
I calculated the density of the small head pattern depending on the yarn and the density I used to knit. From 8 to 6 of density on the knitting machine. I multiplied the designs by 1,5 after calculating the knits per cm.
I managed to knit the Norne Skuld by using three wool threads and conductive thread for the tentacles. I tried it on the mannequi and set on the wall to see different options. But then the knit for Verdandi didn't work as the yellow thread was always breaking. I imagine the thread cone was specifically not strong enough as the other ones worked well. Ill mix it with cotton next time to try out.
I then started to make a new prop of alien head out of the mycelium trash from Amandine's workshop. I had to disinfect my tools, gloves and wear a mask. I then had to wet the mycelium pieces and make it into powder to put it back into the silicone mold I had.
The video
The week before we presented the video
It has been an intense week as I also had to plan the whole filming session, thinking about many things such as light, getting the interactions with garments working for the performers and myself. Getting the performance planned and sequences for the video that I will need. Think about it in the shortest time possible as it's good to not waste time. We were a team of 4 people so for a film we all had to have few roles at once. We also recorded the sound with a professional recorder in case it was not enough with the camera. Although I didn't use it in the end as it was a big jib to listen to the whole session, also it would have been good to mark the sound sequences with claps for instance.
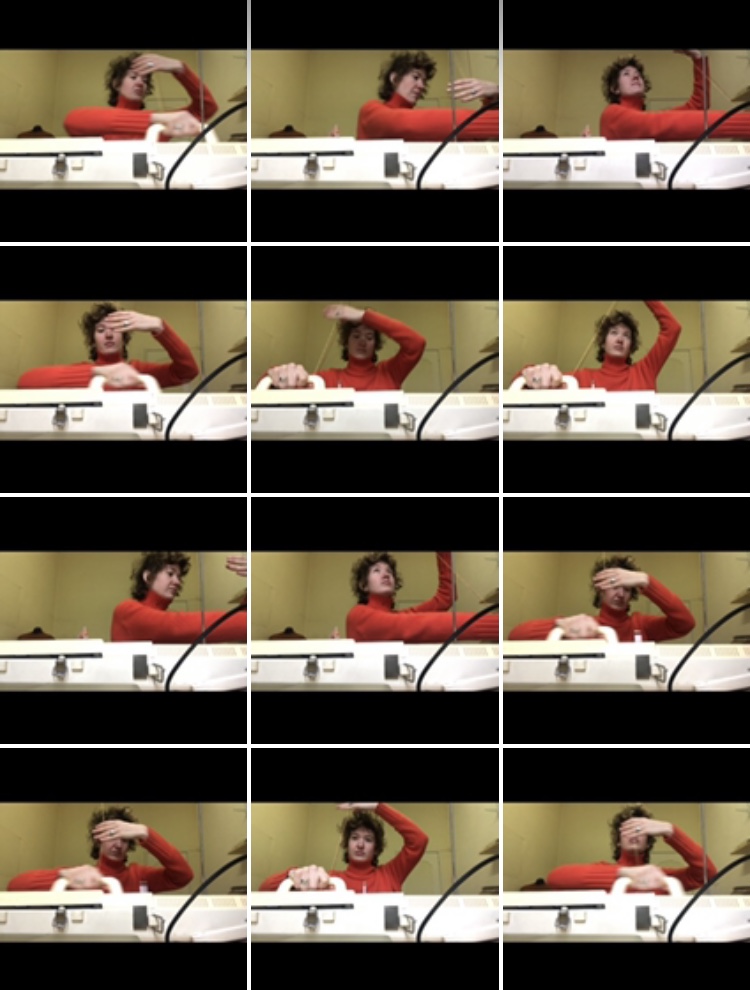
Filming :
For green screen :
While filming we had to tense the green fabric as much as we could, so that there is no shadow. I also had to use pinces for that and the clothes hangers as instance. It would have been better with a wider green screen for the three characters to fit in the same frame with “plein pied”. We set up the living room so that there was no sun light but we put as many spot lights as we could.
Film making – montage :
I've been working on the video on Davinci Resolve 18, which is a good free software. I've learnt to get away a green screen. In tutorials they explained how to remove it and I had to be carefull that the borders on the outside of the shapes of the characters was blurry enough to not make a line but not too blury that it doesn't take away too much of it and would look weird. I realised it looked better if the characters where from far than from closely. I had to control well the parameters to not get green parts of the characters transparent.
I made different collages by making different layers on top of eachothers. I got to understand better transitions in the sounds and the images.
For the exhibition I am doing in Oullins at the Lab I will present the video and some samples most probably as my garments are going to be presented in Romania for the Design Week. I have to make decisions for the set up or the way it can be exhibited as it can be complicated for head pieces.