4. BioChromes
Getting started
Of course it needs a little bit of preparation to work with biochromes. Let me share with you the process before getting the pots hot.
DYEING MATERIAL
I decided to work especially with wool fibres, silk and linen. From a previous project I had left overs in the appearance of hand spun yarn (sheep wool mainly from the breed Coburger Fox, that are kept in the garden and blended local alpaca wool with some sheep fibers). I also decided to mordant industrially combed tops from Coburger Fox and Merino to have more possiblities to blend them afterwards.To save resources - especially if it comes to silk, poor little caterpillars - I decided to buy some second hand clothes that are in a good condition but in my opinion not really fashionable. I bought :
_ an ugly blouse from 100 % linen in a very thick quality,
_ a pillow case that I assume to be cotton
_ and a light blue blouse made from 100% silk in the size of a tent
Unfortunately it was not white but this lead me to a so called idea I want to pursue:
What happens if I dye not pure white material like for example already natural coloured wool fibres like the breed Coburger Fox (beige, gold). The light blue blouse lead me also to the mission to find out what kind of colours I can achieve by overdyeing with biochromes.

THE COLD MORDANT
I used to work with the cold mordant during my final project for my master thesis and for the fabricademy context I reactivated the recipe. It is super easy and suitable for busy people not having the time to watch the pots temperature especially mordanting wool. And this also leads to an advantage mordanting wool: as it is cold you don’t risk the fibres getting felted. The other advantage is: it saves energy and water… and it is not depending on the weight of your materials you want to mordant, you just go for it, supposedly. The follwing cold mordant is suitable for protein fibres. I learnt that the aluminium formate cold mordant works better on cellulose fibers and is also suitable for protein fibres. I couldn't find a recipe but only direct links to shops selling the aluminium formate powder. For my research I focused on the aluminium acetate as I have mostly protein fibres in stock.
With the help of deepl I translated the full recipe from this ORIGINAL SOURCE :
Aluminium acetate mordant is gentle on wool as it is used cold. The stain can be used several times and has a long shelf life. The dry wool is placed in the mordant, pressed under so that the air bubbles escape and the wool remains under the surface of the liquid. The mordanting time is between 8 and 24 hours with newly applied mordant. Afterwards, a mordant period of several days up to one week is recommended. After the mordanting process, the wool is squeezed out, washed very thoroughly and is ready for dyeing.
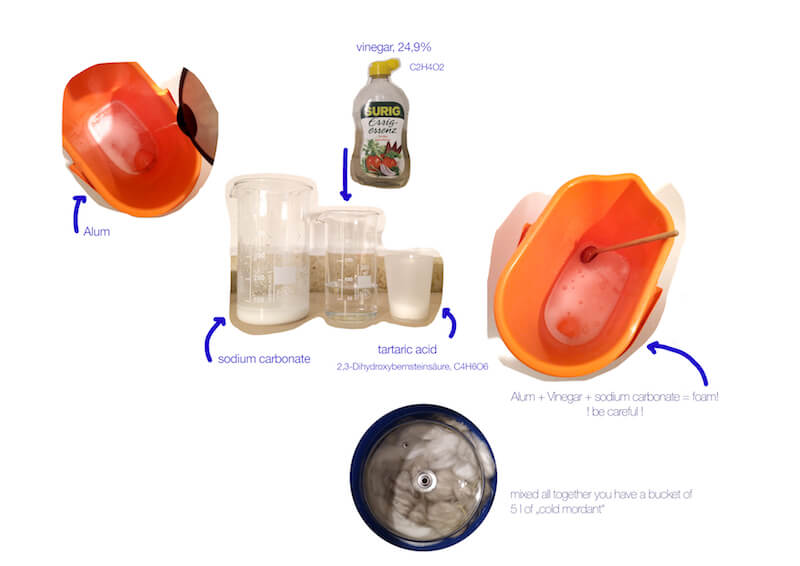
RECIPE
100 g alum (potassium aluminium sulphate KAl(SO4)2 × 12H2O)
73 ml vinegar essence (25% acetic acid, C2H4O2)*
31 g calcined soda (anhydrous soda, sodium carbonate, Na2CO3)
10 g tartaric acid (2,3-dihydroxysuccinic acid, C4H6O6)
5 L water (clean rainwater, if accessible)
The chemicals can be obtained from a pharmacy or chemical dealer. Calcined soda and acetic acid is available either in supermarkets or drugstores.
*fun fact: I tried to mordant material in Portugal during an artistic residency and I was not able to find 25% acetic acid. Even not with the help of local people. My conclusion was that it might be a German thing… maybe… tell me if I am wrong.
First, dissolve the alum in a 10 litre enamel, stainless steel or plastic container with hot water and then allow to cool. Then the acetic acid is added. In a second smaller enamel, stainless steel or plastic container, dissolve the calcined soda with cold water and very slowly! to avoid strong effervescence, add it to the first 10 litre container and stir. Then the tartaric acid is stirred in and made up to five litres total volume with water. The stain can be used immediately.
CAUTION!!!
Tartaric acid, acetic essence and soda may cause severe eye irritation. As a protective measure wear nitrile gloves and tight-fitting safety goggles. IN CASE OF CONTACT WITH EYES: Rinse cautiously with water for several minutes. Remove contact lenses if possible. Continue rinsing.
Clothing that has come into contact with chemicals should be removed immediately and washed out. Keep chemicals away from children. Do not eat, drink or smoke when handling the chemicals. Keep away from food, drink and animal feed. Do not reuse used containers for food.
COLOUR POSSIBILITIES
Regarding the dyes I have in stock:
_ onion skins, yellow and red
_ mallow blossoms (from an industrial context)
_ mallow blossoms (from my allotment)
_ elderberries (very stinky)
_ pomegranate peels
_ eucalyptus leaves and branches cut in pieces
_ dragonblood resin (does not dissolve in water, alcohol is needed)
experimental material:
_ seeds of curly sorrel / Rumex crispus (found them on a bee highway, already withered)
_ dry lavender
PROCESS & RECIPES
It took me in total 2 days only dyeing the material - not counting the preperations and post processing.
Day 1
I started with the eucalyptus plant (leaves and branches) and continued with the mallows. I wanted to compare two different kind of mallows: one from an industrial context and mallow flowers I collected this summer in my allotment. I finished day one with trying out grinded tulip petals I got from Tjeerd Veenhoven and promised him to use the powder only in my artistic research - which I of course do. I left my wool skeins over night in the mallow (industrial) dye bath and an over night dye with mallows from the gardem mixed with citric acid. Over night dye means that I heated up the dye bath (no boiling), put the material inside and left it cooling down. After dyeing I stored the liquids in bottles to reuse them for the biomaterial class.
The recipes
eucalyptus branches, cut in pieces: 28gr + 0,75l water (I used a small pot) + 15 gr (WOF) = 1 hour dye, not cooking just simmering!
eucalyptus leaves, cut in pieces: 22gr + 0,75l water (I used a small pot) + 15gr (WOF) = 1 hour dye, not cooking just simmering!
mallow, industrial: 30gr + 1,5l water (I used a medium pot) + 15gr (WOF)= 1 hour dye, not cooking just simmering! & over night dye (14 hours)
mallow, allotment: 30gr + 1,5l water (I used a medium pot) + 15gr (WOF) = 1 hour dye, not cooking just simmering! & over night dye (14 hours)
tulip petals, grinded: 15 gr + 0,75l water (I used a small pot) + 15 gr (WOF)= 1 hour dye, not cooking just simmering!
Day 2
The next day I started to take out the material from the over night dyes and let them dry. I proceeded with an experimental dye, as my research was not really successful to find out which colour the sorrel seeds can dye or if it dyes at all. I continued dyeing with red and yellow onion skins, and mixed the red onion skins with citric acid to achieve a very nice red instead of green/yellow. While the material was simmering in the pots I worked on the pigments and used five different left over dye baths. Of course I caused one "volcano" but everything went quite well. By the end of the day I made again two over night dye baths with yellow onion skins and and the red onion skins mixed with citric acid.
Comment on the wool from the karakul breed:
I added on day 2 some mordanted and woolen fibres from the karakul sheep. It is a breed with rough fibres and works well for felt work. Weeks ago I bought some fibres as I was attracted to the brown/caramel colour and wanted to make some spinning tests. Two days before working on day 2 I put a small amount of karakul wool in the bucket with the mordant to try out dyeing with it - thats why you see blank fields in the first dye trials. And I really amazed by the results! So I did some further research and found out that the colour I bought is not the original one but bleached. Normally the karakul fibres are grey or dark brown. So now I am wondering if this is the reason why the fibres are so rich in colour after dyeing?
sorrel seeds: 30gr + 1,5l water (I used a medium pot) + 15gr (WOF) = 1 hour dye, not cooking just simmering!
red onion skins: 23gr + 2,5l water ( I used a bigger pot) + 15gr (WOF) = 1 hour dye, not cooking just simmering - later I added citric acid and made an over night dye
yellow onion skins: 30gr + 2,5l water ( I used a bigger pot) + 15gr (WOF) = 1 hour dye, not cooking just simmering & over night dye (14 hours)
Pigment recipes
200ml of dye + 20gr alum + 5gr soda
I used this recipe for the following dyes and the instruction from Cecilia's presenations:
mallow (industrial), (mallow garden), sorrel seeds, tulip petals and red onion skins
Day 2,5
Coming back to the lab on the next day I collected all the dried samples and took out the over night dyes out of the pots. As I needed to take care of the pigments (checking if they are dry and if not improve my drying constructions) I made in the meantime two dye mixtures from some left overs. The mix with the re-heated eucalyptus leaves was so powerful that I got serious headache. So if you are sensitive to eucalyptus reheating might be not a good idea.
The recipes:
350ml mallow(industrial)+300 ml eucalyptus leaves + 200 ml red onion skins = might cause headache
200 ml yellow onion skins + 200ml red onion skins(+acid)
Day 3
As soon as the pigments were totally dry I tried my best to mortar as fine as possible and mix a small amount of the powder with arabic gum.
But it was not easy for me to achieve a fine mixture without grains, I guess I need this special glass-tool to get a smooth mixture. Anyway,I tried the pigments out as a water colour and surprisingly the colours were very similair to the dyes from the pots. Only the mallow tends to be darker and more blue. The sorrel seeds did not become a pigment powder but cristalised - I have no explenation why this happened.
COLOUR PALETTE OUTCOME
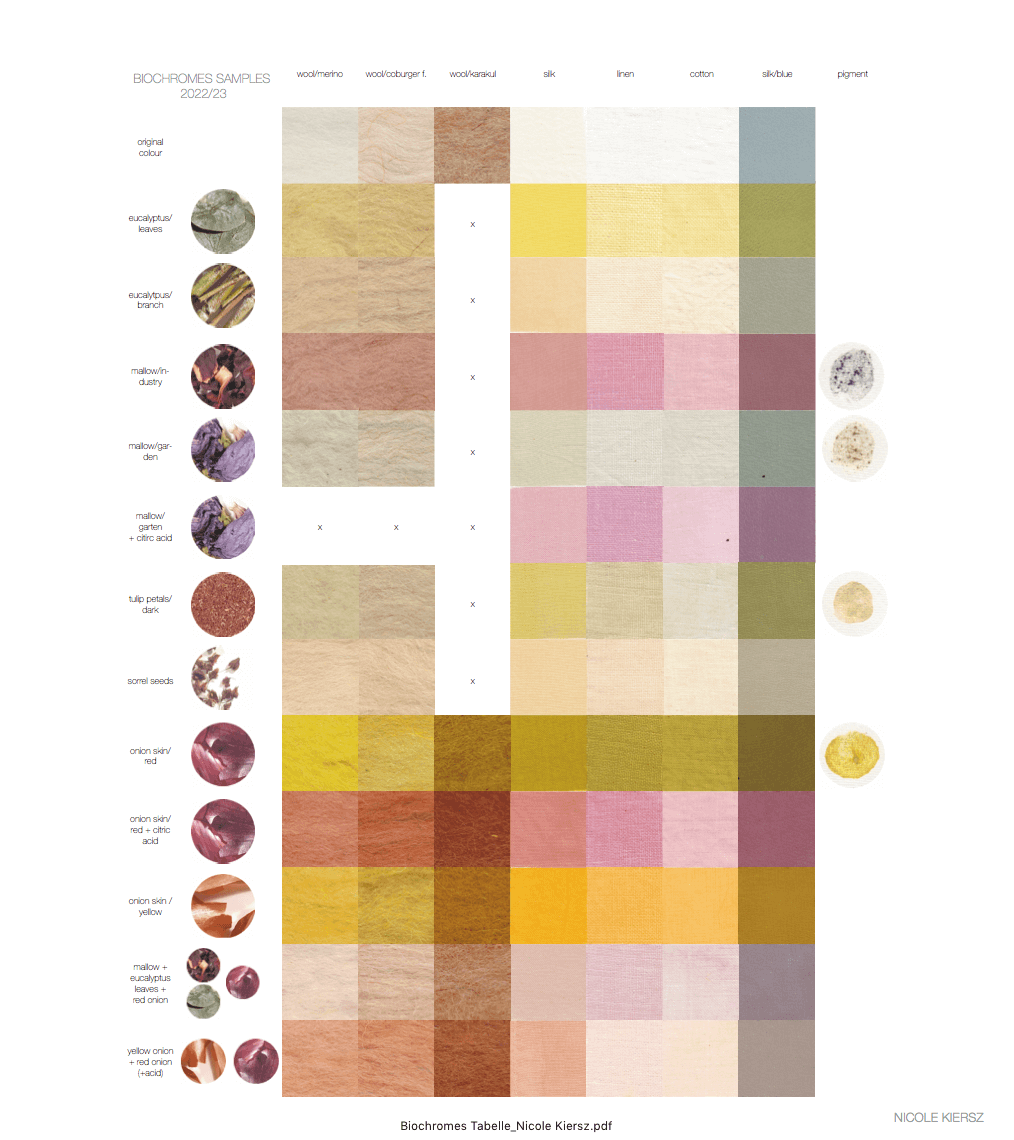
For a detailed colour chart and high resolution follow this link
The colour chart for the wool skeins I was also mordanting for this process will follow within the next time as I could not finish working on them due to lack of time. I am planning to knit and weave small samples for my archive.
CONCLUSION
In general it was fun to get back to dyeing and learning more about the endless possibilities. And the keyword "endless" leads me to my strategy to limit myself and not to overwhelm myself. I am quite happy with my results although it is a very pastel-heavy palette I created. For the next time - which will come definitely soon - I will experiment with darker colours and get some other dyes. Also the dragon blood resin needs another moment - it was just not enough time. But I am on fire and it is just the beginning!