Deliverables
GANTT

Week 9 is when the project should be nearing it's final iteration and focus shifts to final documentation. With an e-textiles project, this phase includes testing, more debugging, and preparing for the piece to be interacted with during an exhibition.
I also made a google sheets version that can be kept up-to-date.
Bill of Materials
| item | quantity | cost | source |
|---|---|---|---|
| rug backing fabric | 110cm | x | A. boeken (local shop) |
| undyed cotton yarn | 2 | €4.99 | A. boeken (local shop) |
| arduino UNO rev3 | 1 | €29.30 | link |
| conductive threads | 1 | €67.93 | https://www.digikey.nl/en/products/detail/kitronik-ltd/2744/8635455 |
| USB-C to USB-B Cable | 1 | €4.64 | pihut |
| 28mm Crocodile Clips, pack of 50 × 1 | 1 | €5.81 | pihut |
| Breadboard jumper cables Dupont 10cm male/male 40x | 1 | €1.40 | https://www.bitsandparts.nl/breadboard-jumper-kabeltjes-dupont-10cm-male-male-40x-p1905686 |
| Acrylic prototyping platform | 1 | €2.95 | https://www.bitsandparts.nl/prototyping-platform-acryl-voor-arduino-uno-p150194 |
| Wires | 1 | €1.95 | https://www.bitsandparts.nl/draad-1x0-14mm2-26awg-meeraderige-soepele-kern-10-meter-bruin-p1931378 |
| breadboard | 1 | €2.95 | https://www.bitsandparts.nl/breadboard-400-pins-mb102-universeel-experimenteer-board-wit-p121048 |
Material Note
I dyed yarns I already had in my yarn stash from previous projects over the years. There is really not a good way to quantify the data on this yarn, both in amount used or in cost. I will share more about the dye process and my notes, but I did not use up all of the yarn I dyed. I had leftover yarn in all of the colors.
Each hank of yarn I prepared was around 30 grams. I mostly used a worsted weight wool and 8/2 pearl cotton. I don't know that I would recommend the pearl cotton for a project like this, it stuck together very much. I would use cotton that wasn't made for weaving instead, I was choosing new yarns instead of using what I already had. The cotton used for the undyed portions of the tapestry would work well, I think.
Useful links
Slide show
Maddie Olsen Prairie Interfaces Waag 2026 by Maddie Olsen
Story telling script
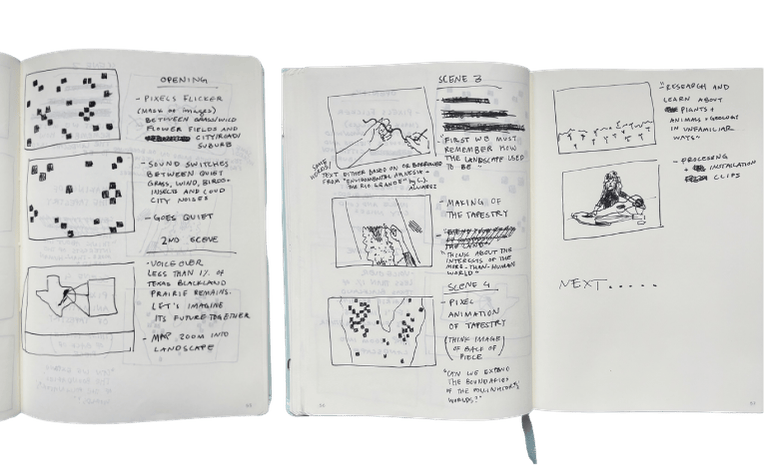
Beginning of storyboard. I am not aiming for a how-to/process/e-textile research video. Instead, I want to focus on the location, mindset, and care for the location. Video will be voiced-over, calm, reflective, and build a sound-scape representative of the restored landscape. Visuals reference the pixelated look of the rug, maps, and processing sketch with the noisy, flickering, and organic nature of a grassland. Combines digital collages/animations with footage of making and interacting with the textile.
FABRICATION FILES
While there's code below to copy and paste, here are the files including the transparent pngs of the wildflowers. Make a folder titled "data" within the processing sketch to store the PNGs:
Processing Arduino Bluebonnet Coreopsis Thistle Paintbrush
Processing Data folders
In the processing sketch, you must create a folder titled data and store the images you are using there. Make sure the file name in the data folder is written exactly the same as in your sketch bluebonnet = loadImage("bluebonnet-glow-sm.png");. Processing>Sketch>Show Sketch Folder>make a folder here and title it data.
Final Code
Processing
import processing.serial.*; //bridges arduino to processing

Serial myPort;

PImage bg;

ArrayList<Plant> plants;

//images for four species
PImage bluebonnet;
PImage paintbrush;
PImage thistle;
PImage coreopsis;

// sensor values
int sensor1 = 0;
int sensor2 = 0;
int sensor3 = 0;
int sensor4 = 0;

// spawn timing
int lastSpawn1 = 0;
int lastSpawn2 = 0;
int lastSpawn3 = 0;
int lastSpawn4 = 0;

int spawnInterval = 10;   // milliseconds between spawns
//int maxPlants = 1000;   // reset limit


void setup(){
  size(1470, 890);
  bg = loadImage("final-prairie-background.png");  //all images get placed in 'data' folder of sketch, see images in fab files

  plants = new ArrayList<Plant>();

  bluebonnet = loadImage("bluebonnet-glow-sm.png");
  paintbrush = loadImage("paintbrush-glow-sm.png");
  thistle = loadImage("thistle-glow-sm.png");
  coreopsis = loadImage("coreopsis-glow-stem-sm.png");


  println(Serial.list());
  myPort = new Serial(this, Serial.list()[3], 9600);
  myPort.bufferUntil('\n');
}


void draw() {
  background(0);

  image(bg,0,0);


  handleSpawning();

  for (Plant p : plants) {
    p.display();
  }

  // remove dead plants
  for (int i = plants.size() - 1; i >= 0; i--) {
    if (plants.get(i).isDead()) {
      plants.remove(i);
    }
  }
}


void serialEvent(Serial myPort) {
  String val = myPort.readStringUntil('\n');

  if (val != null) {
    val = trim(val);
    String[] values = split(val, ',');

    if (values.length ==4) {
      sensor1 = int(values[0]);
      sensor2 = int(values[1]);
      sensor3 = int(values[2]);
      sensor4 = int(values[3]);
    }
  }
}

// sensor to spawn behaviours (change values based on serial data + wiring) maybe diff #s guide different interactions?
void handleSpawning() {

  //Sensor 1 (A0)
  if (sensor1 > 650 && sensor1 < 900) {
    if (millis() - lastSpawn1 > spawnInterval) {
      spawnPlant(paintbrush, sensor1);
      lastSpawn1 = millis();
    }
  }

  // Sensor 2 (A1)
  if (sensor2 > 500 && sensor2 < 800) {
    if (millis() - lastSpawn2 > spawnInterval) {
      spawnPlant(thistle, sensor2);
      lastSpawn2 = millis();
    }
  }

  // Sensor 3 (A2)
  if (sensor3 > 400 && sensor3 < 800) {
    if (millis() - lastSpawn3 > spawnInterval) {
      spawnPlant(bluebonnet, sensor3);
      lastSpawn3 = millis();
    }
  }

  // Sensor 4 (A3)
  if (sensor4 > 300 && sensor4 < 600) {
    if (millis() - lastSpawn4 > spawnInterval) {
      spawnPlant(coreopsis, sensor4);
      lastSpawn4 = millis();
    }
  }
}

void spawnPlant(PImage img, int sensorValue) {

  float x = random(width);
  float y = random(height/2, height);

  float opacity = map(sensorValue, 300, 800, 100, 255);
  opacity = constrain(opacity, 50, 255);

  plants.add(new Plant(x, y, img, opacity));
}

///-------------------
///Plant class
///-------------------

class Plant {

  float x;
  float y;
  PImage img;
  float opacity;

  float birthTime;   // when this plant was spawned
  int lifetime = 20000; // how long (ms) the plant stays visible

  Plant(float x_, float y_, PImage img_, float opacity_) {
    x = x_;
    y = y_;
    img = img_;
    opacity = opacity_;
    birthTime = millis();  // record the exact moment this plant was spawned
  }

  void display() {
    float age = millis() - birthTime;
    float currentOpacity = opacity * (1 - age/lifetime);
    currentOpacity = constrain(currentOpacity, 0, opacity);

    if (currentOpacity > 0){
      tint(255, opacity);
      image(img, x - img.width/2, y - img.height/2);
      noTint();
    }
  }

    boolean isDead() {
    return millis() - birthTime > lifetime;
  }
}
Arduino
/*
  AnalogReadSerial

  Reads an analog input on pin 0, prints the result to the Serial Monitor.
  Graphical representation is available using Serial Plotter (Tools > Serial Plotter menu).
  Attach the center pin of a potentiometer to pin A0, and the outside pins to +5V and ground.

  This example code is in the public domain.

  https://docs.arduino.cc/built-in-examples/basics/AnalogReadSerial/
*/

const int sensorPin1 = A0;
const int sensorPin2 = A1;
const int sensorPin3 = A2;
const int sensorPin4 = A3;

// the setup routine runs once when you press reset:
void setup() {
  // initialize serial communication at 9600 bits per second:
  Serial.begin(9600);
}

// the loop routine runs over and over again forever:
void loop() {

  int sensorValue1 = analogRead(sensorPin1);
  int sensorValue2 = analogRead(sensorPin2);
  int sensorValue3 = analogRead(sensorPin3);
  int sensorValue4 = analogRead(sensorPin4);

  Serial.print(sensorValue1);
  Serial.print(",");
  Serial.print(sensorValue2);
  Serial.print(",");
  Serial.print(sensorValue3);
  Serial.print(",");
  Serial.println(sensorValue4);
  // println ends packet

  delay(200);
}