Open Source hardware: from fibers to fabric
THE MACHINE
Few years ago, Agnès made a simple structure to be able to dye creating a gradient. She did it using simple materials she could found on a hardware store. The structure has been useful for many years and still resist the dyes and the rain, but…
It isn’t a cool the idea to go one step forward and introduce some Fabricademy mood???
Thats how comes the idea to take the rudimentary machine and give it a new look.
The core of the machine stills the same.
Dye fabric or macramé creating nice gradients, but now, you can cook a yummy spaghetti or go to the beach when two stepper motors are doing the job the human was doing on the previous version.
No more annoying alarms every 8 minutes!!! The machine is programmed to move the supports 4 centimeters up every 8 minutes
But good news isn’t finish here!
Some amazing improvements are being developing and when the spring will come, you will be able to have at home the following properties and gadjets.
- Cavafácil to take away and dye on the forest or to the beach using solar power. Cavafácil is use in state of the foot it serves to hold the machine. As a beach umbrella have a spiral to drive the stick in to the soil
- More programs installed as the possibility to change the times and more movements stick does
- Pot to pour new colors to the bath also programed with stick timeings
- Built-in fan to fastest dry
- Take advantage of the energy you do when pedal your bike to feed the machine in the middle of nature
- A tank with built-in heater

until the news are coming...
FOLLOW THE STEPS TO HAVE YOURS NOW !!!
3D PRINT PIECES
We desing two pieces collaborating with the motor, they does the movement up of the support where the fabric to be dyed is.

Step by step
- Design on rhino the object or download 1 and 2 us
- Export on .stl the file with the design we want to 3D print
- Save the file on the computer. Don’t print it through the file on your USB
- Open the file on Cura, the software divides the objects we want to print in printing layers. We can print many objects in the same time if they fit on the bed of the 3D printer. Fit the objects, we have to place the flat side of the shape as the base of it. To work with the object on Cura, use the menu on the left
- Select on Cura the printer you gonna use
- Set the menu on the right with the printing settings, kind of material, layer height, the thickness of the wall, how much we want to fill the inside of the object
- Save the file on a USB and introduce it on the printer
- The printer is gonna search home.
- When the printer begins the work, is gonna do a line to clean the head.
- We used PLA PLA is a biodegradable thermoplastic which is derived from renewable resources, such as cornstarch, sugar cane, tapioca roots or even potato starch. This makes of PLA the most environmentally friendly solution in the domain of 3D printing, compared to all the other petrochemical-based plastics like ABS or PVA.
Test
Also we did a test to be sure the nut is gonna turn as a rotator into the 3D printed piece fits well on it

Tips
- Bed leveling is important. Any relief that may be under the bed, can produce problems when the material is being released
- If there are some problems with the work, it’s better to reset the machine in stead of stop it. If stops, when we switch on again, will do the material preparation again. In both cases the printer is gonna read the file from the beginning
- If the nozzle distance from the bed is not correct, may will be extrusion problems
Usful information


Sketching
CONEXIONS
We wrote for you a list with all components you should buy and where to find them,
3- Stepper 23 nema x1
5- Motor coupler x2 8-8mm 5-8mm
6- Endstop x 1
7- Potenciometro x 1
8-Varillas de 8mm metrica roscada x 2
9- 3 wire cable
10- Nuts x 2
11- Cable 3 hilos x Enchufe Interruptor
For purchases
Thats a simple graphic to understand the components that are connected between them


For more accurate information and not fail in your approach, watch this video and this one,and because it is never too much information and knowledge doesn't take place, you can spend some time watching this one too.
and this to understand how does a motor steper work
And this is how it looks

And also don't forget!!!

- Until you have more experience and know when to do it, always connect the negatives together
- Never open a power suplier
- Check the cables conexion 3 times
- VCC with V+ and GND with V- if you want to protect your circuit
Some more information about the motor
Stepper motor is an electromagnetic device that converts digital pulses into mechanical shaft rotation. The step is the angle the motor turns each time have this pulse, we can check it on motor datasheet. To calculate how much steps we need to do to complete an entire turn, we divide this angle between 365 degrees of a complete turn. Also the Driver have the option to divide in micro steps the final angle of the motor. The the caluclations are gonna be.

The code to program the microsteps on the driver, is wroted on it. We didn't use the micro steps so our code looks like that,

To do the calculations about the quantity of steps the motor have to do to move 4cm up we use a quite rudimentary technique.

Our numbers are, 360 (complete turn) X 1,8 (motor turn on each pulse) = 200 steps to do a complete turn 29 (turns to go up 4 cm) X 200 (steps for one turn) = 5.800 steps to go up 4 cm
The stepper motors can be bipolar or unipolar, to know more about the features of each one, you can read more here and also if you want to go deep on how they work you can read here and watch this video
ARDUINO TIME!!
First of all watch some tutorials
Easyest first
and continue with the first steps and more basics until you really can understand what Arduino does.
Then you are ready to go forward.
We still searching for the correct code...
WOOD ELEMENTS
Stick support
We will use a ribbon the pine wood the 9 cm wide and 9 mm thick - We cut two pieces of 1.24 cm long and two 10cm long - 3 cm from one end of the long piece, we make a 2.5cm centered hole - We place the short piece 18 cm from the other end of the long piece at a 90 degree angle. To keep it there and have resistance to support the engine, we will use two escapes screwed with special wood screws

Hold foot
Horizontal reinforced
ALSO WE WANT TO SHARE WITH YOU OUR SOME SPECIAL PICTURES THEY REMIND US THE BEAUTY OF SHARE A PROJECT WITH SOMEONE AND MAKE IT GROW


LIST LOVERS!
https://www.railreed.ee/multiweave-people-process
Second time
Studying Arduino functions
We have to re-read some arduino functions , we use the tutorial code,& try to understand it step by step
Also it was very useful to remember the time conversion table
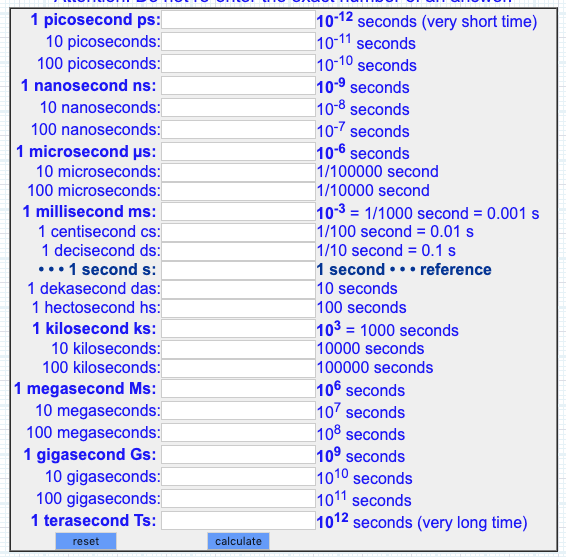
TUTORIAL CODE
int PUL=7; //Pin para la señal de pulso pul-
int DIR=6; //define Direction pin dir -
int EN=5; //define Enable Pin en-
void setup() {
  pinMode (PUL, OUTPUT);
  pinMode (DIR, OUTPUT);
  pinMode (EN, OUTPUT);
  digitalWrite(EN,HIGH);

}

void loop() {

  digitalWrite(DIR,LOW);
  for (int i=0; i<1600; i++)    //Forward 1600 steps
  {
    digitalWrite(PUL,HIGH);
    delayMicroseconds(400); // podemos cambiar velocidad
    digitalWrite(PUL,LOW);
    delayMicroseconds(400); // podemos cambiar  velocidad
  }

}
NEAR FINAL CODE!!
``` int PUL=7; //Pin para la señal de pulso int DIR=6; //define Direction pin int EN=5; //define Enable Pin int VU=0; //define las veces que hace el loop girar delay int BA=1;//define la najada final void setup() { pinMode (PUL, OUTPUT); pinMode (DIR, OUTPUT); pinMode (EN, OUTPUT); digitalWrite(EN,HIGH);
}
void loop() { while (VU< 3) { // repite la secuencia digitalWrite(DIR,LOW); for (int i=0; i<3000; i++) //Forward 5800 steps { digitalWrite(PUL,HIGH); delayMicroseconds(400); //Cambiar la velocidad digitalWrite(PUL,LOW); delayMicroseconds(400); //Cambiar la velocidad }
 delay(5000);
 VU++;
}
while (BA<2) {
delay(100); digitalWrite(DIR,HIGH);
for (int i=0; i<5000; i++) //Backward 1600 steps { digitalWrite(PUL,HIGH); delayMicroseconds(400); digitalWrite(PUL,LOW); delayMicroseconds(400); }
BA++;
} }
´´´