6. BioFabricating Material
Concepts
Biomaterial
Biomaterial terms
- Bio-based: baterial, fungal, vegetal... can be natural or synthesized
- Biodegradable: degrades when conditions change (such as PH or heat), otherwise stable
- Biocompostable: composts after 90 days
Biomaterial fabrication methods
- crafted, i.e. casted, extruded, assembled
- grown
Biomaterial application
Add Bio- as prefix, for exmaple Bio-leather:
-
Leather
-
Foils and plastics
- Foam
- Silicon
- Resin
- Rubber
- Composite
-
Fabirc and yarn
- Felt
- Yarn
Biomaterial characteristics
- thin/thick
- soft/resilient/hard
- stretchy/flexible/stiff
- smooth/rugged/sticky
- brittle/strong
- water resistent/water proof
Inspiring design properties (from Ceclia's lecture/material archive)
- sturcture: structural properties, structural decorative properties (lace-like netting, magnetic)
- texture: tactile and sensorial
- color: structural colors (refraction sheet, holographic charcoal)
- transparency

Scientific material tests
- tensile strength: the amount of load or stress that a material can handle until it stretches and breaks
- Young's modulus: a mechanical property that measures the tensile or compressive stiffness of a solid material when the force is applied lengthwise
- material density: weight/area
- elongation at break: also known as fracture strain, is the ratio between changed length and initial length after breakage of the test specimen

What is (bio)plastic?

Examples from the lab
The 2nd and 3rd one are kudos to Bea's tutorial 2022 and Loes Bogers's documentation 2020.
| Material | Polymer | Plascizer | Filler | Emulsifier | Color |
|---|---|---|---|---|---|
 gelatin resin |
gelatin | glycerol | n/a | n/a | food coloring, natural rust pigment |
 4 4gelatin resin with flowers |
gelatin | glycerol | dried flowers | n/a | n/a |
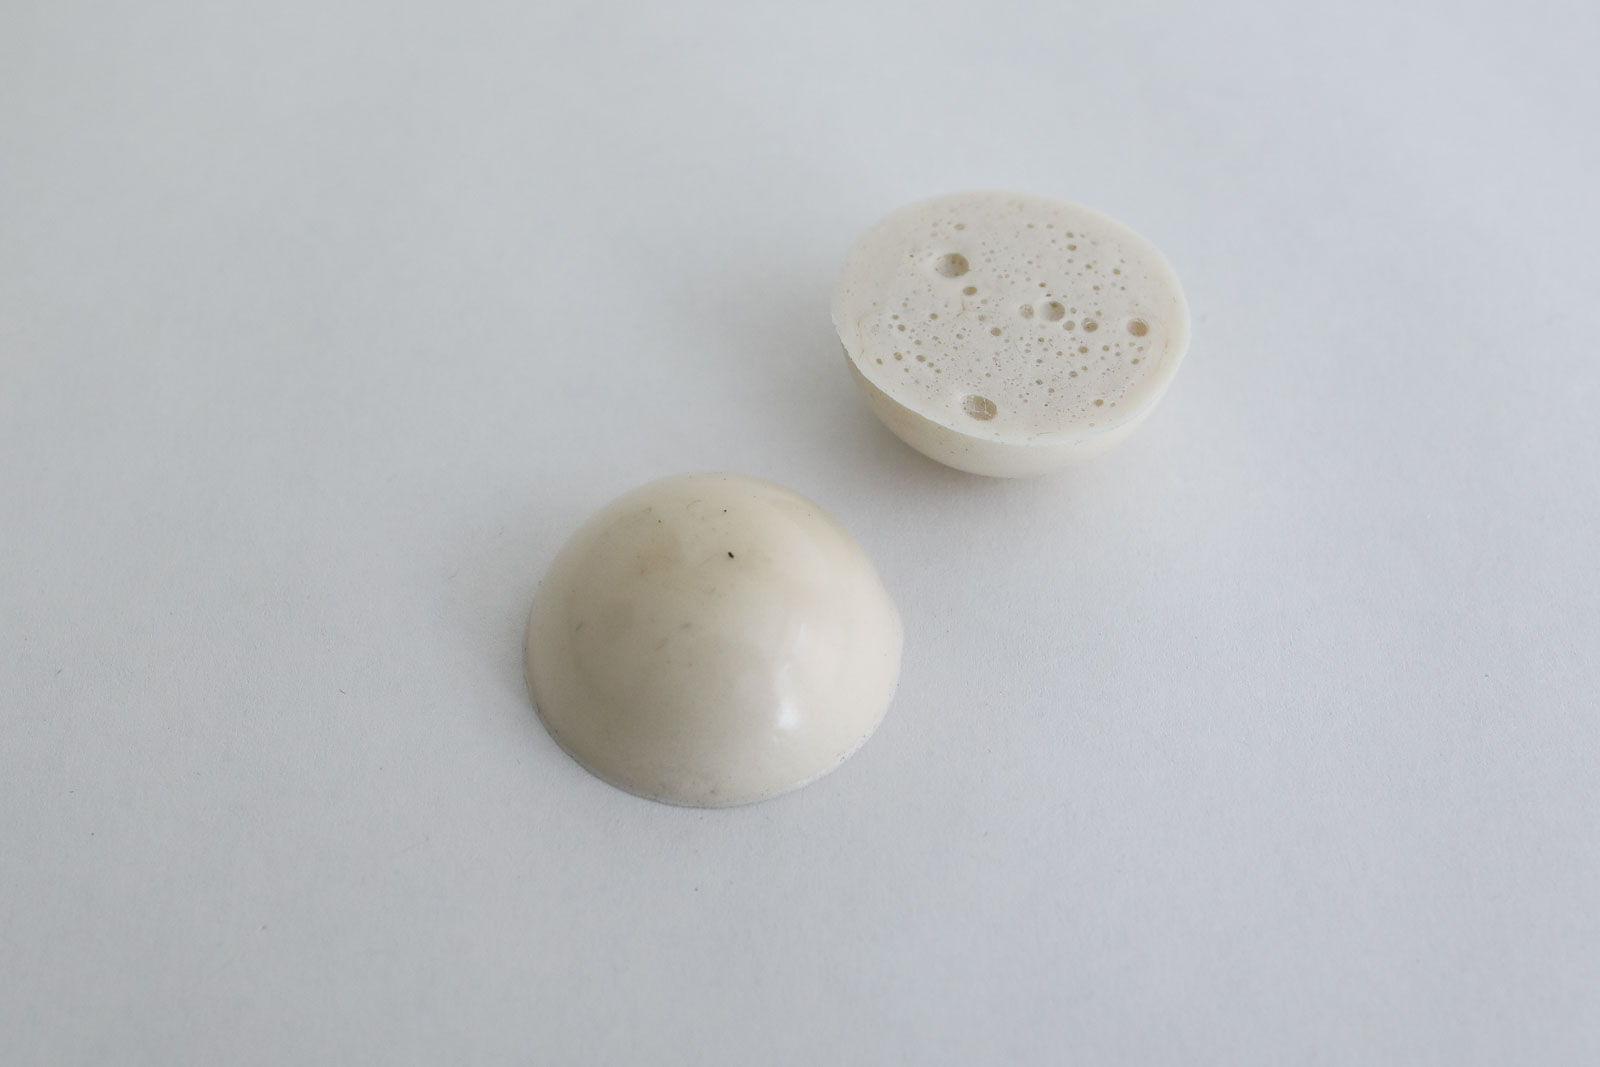 5 5gelatin foam |
gelatin | glycerol | n/a | organic dish washing soap | n/a |
What is cellulose?
A definition by Christopher Brigham, in Green Chemistry, 2018; sciencedirect link:
Cellulose is one of the most abundant biomaterials on the earth.
It is generally synthesized by plants, but it is also produced
by some bacteria. Like starch, cellulose is a homopolymer of
glucose, and yet unlike starch, glucose monomers are joined by
β-1,4 linkages (Fig. 3.22.4B).
During the lectures we mostly learned about microbial cellulose. A definition by Elena Fortunati, ... Luigi Torre, in Biomass, Biopolymer-Based Materials, and Bioenergy, 2019; sciencedirect link:
5.2.2 Bacterial cellulose (BC)
BC, also called BNC, microbial cellulose, or biocellulose, is
formed by aerobic bacteria, such as acetic acid bacteria of the
genus Gluconacetobacter xylinum, as a pure component of their
biofilms. These bacteria are widespread in nature where the
fermentation of sugars and plant carbohydrates takes place.

The Chemarts cookbook explains cellulose from the perspective of wood-based materials.

Examples

Inspiration
Tangible feelings
How to make feelings tangible? The following images are examples that have inspired me, even though some of them are not necessarily made with biomaterial.

Documenting tactility
One question I have as I make experiments this week is how I can translate feelings in the final form of the biomaterial. Thus in my documentation I pay specific attention to describing the feel/tactility of each outcome. I take inspirations from Fabricademy alum Loes Bogers and a booklet by Juliette Pepin.
Documenting tactility - video by Loes Boger:
Documenting smell and touch in a grid by Juliette Pepin:

Outcomes
| Material | Recipe | Feeling |
|---|---|---|
 Tapioca foil Tapioca foil |
Tapioca | transparent, sticky, shiny |
 Tapioca resin (dried with bubbles) Tapioca resin (dried with bubbles) |
Tapioca | translucent, hardened |
 Mango + tapioca leather Mango + tapioca leather |
Mango+Tapioca | translucent, shiny from certain angles |
| Gelatin resin (with flowers), made by Bea during a tutorial |
see tutorial video | reflective, transparent, capturing, smooth |
 Gelatin resin (casted on matte lining) Gelatin resin (casted on matte lining) |
Gelatin | matte, blurring, hidden |
 Alginate composite with sand Alginate composite with sand |
Alginate | sandy |
 Alginate composite with sand for handprinting Alginate composite with sand for handprinting |
Alginate | sandy |
 Agar cubes with coffee Agar cubes with coffee |
Agar | opaque, wobbly |
 Agar sheet Agar sheet |
Agar | translucent, soft |
Process and workflow
Crafted
Cooking

Cooking is done with agar, gelatin, tapioca and fruit leather. It requires the mixing the materials in a pot and heating them up to a consistency to be casted.
Casting

Prepare the casting surface/molds well beforehand. Cast the cooked mixture quickly before it cools down too much.
For even surfaces, use a squeegie or turn the casting surface slowly.
Use clamps to steady the edges when using some sort of frame.
Mixing/Blending

Mixing is for sodium alginate. It requires mixing the content with a (powerful) mixer or blender. The texture of the mix is usually full of air bubbles, resulting in a matte white color. Leaving the mix for a few hours (or overnight) will help it to set. The final result is a clear off-yellow color without bubbles.
Curing (sodium alginate)

After casting or extruding the alginate mix, it needs to be cured with sodium chloride hydrate. The solution is diluated at 10% (check again). It can be a bath or a spray.
Drying (crafted material)


All materials take a while to dry. Depends on the size, thickness, it might take days. Use an oven or dehydrator to speed up the process. When material is dried (partially or fully), it will have shrinkage and deformation.
Grown
Growing and caring


Growing kombucha cellulose is just like brewing it (though with more added vinegar, so don't drink it:) It requires brewing the tea (or preparing the beer/wine bath), adding acidity (PH around 4). When the liquid is cool, add the SCOBY.
Find ways to keep air flow to the bath by adding tapes to the tub edges or using a fabric as the lid.
To prevent fruit flies from the kombucha, ensure good enclosure.
Sometimes mold appears in the tea, try adding more vinegar to kill it.
Drying kombucha pellicle


Lift the pellicle out of the tub with gloves. Place it in a bucket of tap water for two hours to dissolve any remining sugars. Washing also helps with the smell.
Do not discard the fermented solution, as it can be used again to grow a second film or to replace the white vinegar in a new batch. Place the wet, clean film on a plastic surface with a slight roughness to prevent the film from sticking to it.
For thin layers of kombucha, it can be clamped with a frame and hung to dry. If drying on plastic, it will be too thin and becoem a sort of "coating".
Other drying instructions from Vivien Roussel's tutorial:
Matte plastic book cover adhesives provide a suitable surface. Parchment paper is a good alternative.
The film should be lightly massaged on the surface to get maximum contact area. Turn the film over every day to allow it to dry evenly and prevent it from sticking to the surface.
Treating a kombucha pellicle
The kombucha pellicle can be treated with beewax (double boiled) and using turpentine and linen oil, which is the same treatment for wood.
There are other experiments of treatment, such as in this video where the makers used a mix of coconut oil, mineral oil and beeswax.
Storing kombucha leather
Use parchment paper. Do not use plastic as it will stick.
Tools
Depending on what material you are making, the tools required are different. Here is a cooking station screenshoted by Magaret Dunne's cookbook:

- hot plate
- pot
- whisk
- measuring cups - liquids
- measuring cups - solids
- scale
- bowls
- table spoons
- cutting board
- measuring cups — liquids
- measuring cups - solids
- scale
- mixer/blender
- wide-mouth bottles
Extruded:
- syringe or cake nozzle
- bowl (for bath)

Casted:
- spray bottle
- petri dishes
- acrylic plates with edges
- plastic mats with different textures
- legos
- ice molds, cake molds, etc
- hot plate or kettle
- pot
- plastic tub or other containers
- measuring cups - liquids
- scale
- bowls
- PH strips (optional)
- wooden frame
- large book clamp
- matte plastic surface
- parchment paper
Recipes
Tapioca foil
- 250ml water
- 25g tapioca/manioc/cassava starch
- 10ml glycerine
- 10ml vinegar (as stablizer)
- Measure the ingredients
- Dissolve the tapioca with a bit water
- Add all ingredients to the pot
- Turn up the heat until mixture bubbles (10 min)
- Mix gently (for minimal bubbles), or diligently (for more bubbles) until thickens
- Cast the mixture into molds or onto surfaces
- Dry for at least 24 hours
- Peel/remove the sheet/shapes off the cast after drying
- If the result is not dry, leave it on surface for more drying time
Mango (+tapioca) leather
Mango fruit leather (we did not test this one in the lab)
- 2 mangoes (overripe)
- 1 lemon
- cinnamon or tumeric (to avoid mold growth, also adds color)
- beewax (optional)
- Peel the mangoes (keep or disgard the peel for effects)
- Blend the pulp (and peel, if using)
- If using beewax, melt the beewax in a container (placed in hot water)
- Mix ingredients in the pot
- Turn up the heat until mixture bubbles and thickens (15 min)
- Cast the mixture surfaces
- Dry for at least 24 hours
- Peel/remove the sheet off the cast after drying
- If the result is not dry, leave it on surface for more drying time
Mango + tapioca fruit leather
We did this two batches using this recipe: one with the peel and one without. For the batch without skin, we passed the pulp through a strainer.
- 2 mangoes (overripe)
- 25g tapioca
- 23g vinegar
- 5g salt
- 20g beewax
- cinnamon
- Peel the mangoes (keep or disgard the peel for effects)
- Blend the pulp (and peel, if using)
- Melt the beewax in a container (placed in hot water)
- Dissolve tapioca with a little water
- Mix ingredients in the pot
- Turn up the heat until mixture bubbles and thickens (15min)
- Cast the mixture surfaces
- Dry for at least 24 hours
- Peel/remove the sheet off the cast after drying
- If the result is not dry, leave it on surface for more drying time
Gelatin foil
96gr gelatin
24gr glycerin
480ml water
food coloring/pigment/paint
- Measure the ingredients
- Dissolve gelatin with a bit water
- Add all ingredients to the pot
- (If the coloring is liquid, add it to the mixture)
- Turn up the heat until mixture bubbles, cooks for another 15-20 min
- (If the coloring is paint or pigment, mix it in now)
- Dry for at least 24 hours
- Peel/remove the sheet/shapes off the cast after drying
- If the result is not dry, leave it on surface for more drying time
Sodium alginate
See Lecture Slides part 2 - Slide 13 link We modified the "flexible Bio-plastic" recipe (using 10gr glycerine instead of 10gr sunflower oil).
- 12gr alginate
- 30gr glycerin
- 200ml water
- for curing: 10ml sodium chloride hydrate + 100ml water
- Add all ingredients in a bowl
- Mix until even with a powerful hand mixer
- Keep mixture still for a few hours (or overnight)
- For curing: make a solution of 10% sodium chloride hydrate
Sodium alginate for handprinting
The recipe from the 3D bioprinting tutorial calls for CMC or guar gum.

We did not have those in the lab. So for experiementing we used the sodium alginate recipe (made from the above recipe) with a filler only. (I couldn't fully trace the water/glycerin amount in the ready-made alginate mixture. For finer controls, the alginate should be made from scratch to assure the right amounts.)
- 50g alginate plastic (see recipe above)
- 100g white sand
- for curing: 10ml sodium chloride hydrate + 100ml water
- Mix the alginate plastic mixture with white sand
- Fill the mixture into a syringe
- When using, squeeze the mixture and cure during or afterwards
- For curing: make a solution of 10% sodium chloride hydrate
Kombucha
For the experiment we made a beer kombucha. Unlike brewing kombucha for drinking, kombucha for cellulose requires a higher PH (achieved by adding vinegar).
- 1800ml beer
- 1800ml water
- 360g sugar
- 65ml white vinegar
- SCOBY
- Wash the tub with soap. Tap the corners so the lid will be raised when closed.
- Mix all ingredients in the tub. Test the mix (needs to be acidic around PH4).
- Add the SCOBY.
- Close the lid and leave for it to grow.
- If mold shows up, add more vinegar. (Isolate from other growing batches to avoid mold traveling.)
- Drying: if drying a thin layer, use the wooden frame + clamp. If the layer is thick enough, it can dry on a matte plastic surface.
Comparing experiments
Tapioca recipe: casting surfaces/amount
| Material pic | Material name | Casting surface | Casting thickness |
|---|---|---|---|
|
tapioca foil | acrylic sheet | 1mm |
 |
tapioca foil | petri dish | 2mm |
|
tapioca resin | petri dish | 4mm |
What affected the aesthetics of tapioca foil/resin: casting thickness, amount of air bubbles, drying time
- casting thickness: thinner ---> stretchy foil, thicker ---> not-so-stretchy sheet
- air bubbles: I find the bubbles that ended up in the sheet aesthetically pleasing. However this is not usually desired (uneven surface, breaking struture?)
- drying time: when dried for a long time, the thicker casts harden significantly
Gelatin and alginate recipe: texture acquisition, drying, molding
| Material pic | Material name | Casting surface | Casting thickness |
|---|---|---|---|
 |
gelatin resin | petri dish | 2mm |
|
gelatin resin 2 | matt plastic sheet | 1-4mm (uneven pour) |
 |
alginate composite | petri dish | 4mm |
Gelatin is better at retaining textures than alginate. Alginate deforms a lot after curing.
When drying gelatin: if the resin feels cold to touch, it means it's still drying and needs more time. In this experiment, it took several days for the large resin sheet to dry completely. Gelatin can mold if the cast is thick.
For alginate composite: oil can be an emulsifier that gives the mix a matte rather than a transparent feel.
When alginate cures and dries in a wooden frame, it sticks to the frame more than acrylic ones. In general, alginate composite takes quite long to dry. Alginate can mold easily when the cured shape contains a lot of water.
Alginate for handprinting
| Material pic | Material name | Filler amount |
|---|---|---|
|
alginate composite 1 | x g sand |
 |
alginate composite 2 | y g sand |
I was able to use both batches with a syringe. Alginate composite 1 was more rigid. I was able to emulate the handprinting process more with it. I sprayed sodium chloride hydrate as I printed, which was quite messy. The result broke easily, which could be due to 1) we did not have CMC to bind the material and/or 2) the curing was uneven.
Alginate composite 2 was more fluid. I could only printing one layer with it. When I tried to print more layers, they melded into one. I used this composite to write out letters. It felt like making a cake... The cured result was surprisingly nice. Many letters are sturdy enough to be picked up and handled (I wanted to wear one as a necklace!)
Coloring gelatin
| Material pic | Material name | coloring/pigment |
|---|---|---|
|
gelatin resin petri dish | food coloring (added when cooking) |
|
gelatin resin area 1 | food coloring (added when cooking) |
|
gelatin resin area 2 | food coloring + natural rust pigment |
 |
gelatin resin area 3 | food coloring + gold acrylic paint |
I used three types of coloring by dividing the gelatin mixture into three bowls. I added the food coloring as I cooked the mixture, which is why food coloring ended up in all the results. In retrospect, in order to control the result: I would have cooked the gelatin mixture without any coloring, then divided it into three bowls (one for each type of color).
All three bowls were casted onto the same matte plastic sheet, freely mixing into each other. The matte sheet gave the result a matte look. This is nice, as normal asthetics of gelatin tends to be shiny. (I poured the leftover gelatin with no pigment/paint into a petri dish, which produced an even and transparent sample.)
Since I didn't use a frame/edges for my casting surface, it was not easy to make the sheet even. This can be improved in the future.
Coloring comparison:
- food coloring: tinting
- natural rust pigment: opaque
- acrylic paint: speckled, flaked
References
Cookbooks
- Bioplastic cookbook by Margeret Dunne
- The secrets of Bioplastic by Clara Davis
- Chemarts (pdf) - focus on wood cellulose
- Recipes for Material Activism by Mirian Ribul
- Bioplastic visual research by Juliette Pepin
Material library/community
Alum pages
- Lucrecia Strano FabTextiles Barcelona 2018-19
- Loes Bogers TextileLab Amsterdam 2019-20
- Loes Bogers - final project
- Beatriz Sandini TextileLab Amsterdam 2019-20
- Carolina Delgado TextileLab Amsterdam 2019-20
- Petra Garaiová FabTextiles Barcelona 2021-22
General books, podcasts, movies
Kudos to Fabricademy group email :)
BOOKS
- Entangled Life: How Fungi Make Our Worlds, Change Our Minds & Shape Our Futures
- The Mushroom at the End of the World: On the Possibility of Life in Capitalist Ruins
- Braiding Sweetgrass
- Why Materials Matter
- I Contain Multitudes: The Microbes Within Us and a Grander View of Life)
- Being Material
- Wasted: When Trash Becomes Treasure
- Publications from Materiability
PODCAST
MOVIES-SERIES
-
Gelatin resin with food coloring and acrylic paint. Unless otherwise noted, photos are by Jue Yang 2022. ↩
-
Screenshot from the bacterial cellulose lecture by Vivien Roussel 2022 ↩↩
-
From Bea's tutorial 2022 ↩
-
Biofoam made with gelatin by Loes Boger, 2020. See documentation. ↩
-
Screenshot from the the Chemarts Cookbook ↩
-
Quilt made with Ziplock bags, thread, ribbon, ceramic shards, cable by crafthaus.ning ↩
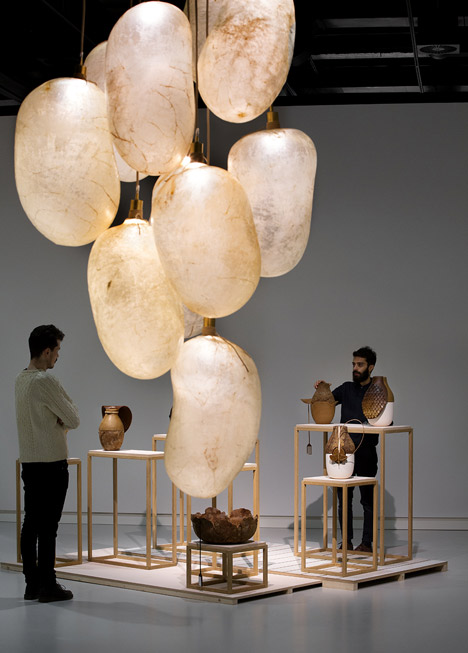
-
Cow bladders turned into hanging lamps by Formafantasma ↩
-
Shadows trapped in fused glass by Jessica Kelly ↩
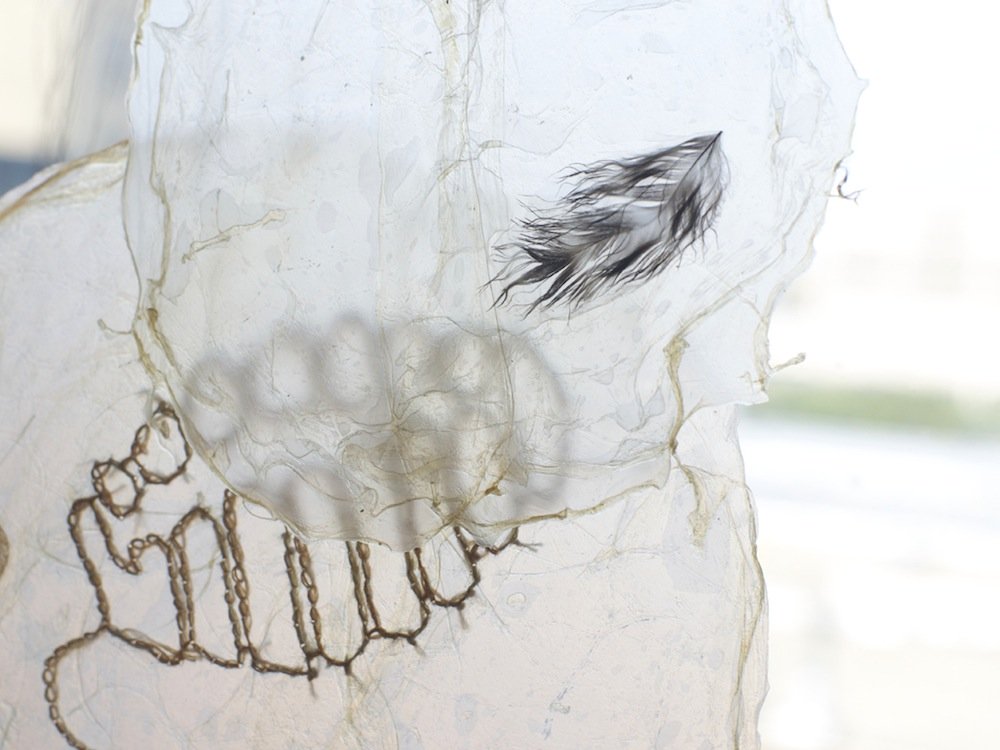
-
"Soft Slough" by Heather Komus. Embroidery, hog gut, seeds, hair, feathers Variable dimensions, website ↩
-
Screenshot from the Visual research bioplastics booklet by Juliette Pepin ↩