6. Biofabricating Materials
Alginate & Hibiscus Bio-Foil, Carolina Delgado
Global class by Cecilia Raspanti from TextileLab Amsterdam at Waag.
This week assignment represents an all-new world to material driven design. Aldo learning with a bigger group can result in very confused, the achievement of a larger range of samples and inspirations compensates. As usual, I'm maintaining the focus in more sustainable solutions, but still open to trying new approaches just to know better the combinations and results.
Assignment
Produce at least two grown and/or two crafted materials: * Craft materials - Craft a material, experimenting with at least 2 different recipes and variations thereof. Document the process, ingredients, changes, describe and compare the materials. * Grown materials - Grow a material, experimenting with at least 2 different recipes and variations thereof. Document the process, ingredients, changes, describe and compare the materials. * Document your recipes, the ingredients and process and if there have been changes, document your unexpected discoveries. * Name your materials, classify them by typology and display them in a systematic order of samples.
RESEARCH
What are Plastics?
Polymers mix - plasticizer, filler, stiffening, expanding and colour or pigment.
-
Plasticizer - to create flexibility
-
Filler - to avoid shrinkage
-
Stiffening - to structure and reinforce
-
Expanding - to create foams
Process
There are lots of processes to apply depending on the needs, from casting, milling, impressing, extrude, 3D mould and many more.
Why we don't love it?
- NEVER GOES AWAY
- SPOILS OUR GROUNDWATER
- THREATENS WILDLIFE
- POISONS OUR FOOD CHAINS
- AFFECTS HUMAN HEALTH
- ATTRACTS OTHER POLLUTANTS
- PILES UP IN THE ENVIRONMENT
- COSTS BILLIONS TO ABATE
from Plastic Pollution Coalition
Biomaterials or bio-based materials?
So that we don't get confused they can be different:
-
Biomaterials - substance or a mixture of substances, natural or artificial, that acts in biological systems partially or, to replace, increase or treating (e.g. prosthetics, implants, contact lenses)
-
Biobased-materials - are all of the materials from organic or non-organic. They can be divided as application or for the kind of material But also as Raw ingredients or made Materials.
But some are both, for example, recombinant spider silk that can be used in broken bones as a scaffold, or for coating silicon implants - Bioteel.
Furthermore, there are different names according to how they break down. In practice, most bio-plastics that are labelled “biodegradable” are only compostable in industrial facilities – not at home nor in the environment.
How Biodegradable are Bioplastics?
- Degradable – All plastic is degradable, even traditional plastic, but just because it can be broken down into tiny fragments or powder does not mean the materials will ever return to nature. Some additives to traditional plastics make them degrade more quickly. Photodegradable plastic breaks down more readily in sunlight; oxo-degradable plastic disintegrates more quickly when exposed to heat and light.
- Biodegradable – Biodegradable plastic can be broken down completely into water, carbon dioxide and compost by microorganisms under the right conditions. “Biodegradable” implies that the decomposition happens in weeks to months. Bioplastics that don’t biodegrade that quickly are called “durable,” and some bioplastics made from biomass that cannot easily be broken down by microorganisms are considered non-biodegradable.
- Compostable – Compostable plastic will biodegrade in a compost site. Microorganisms break it down into carbon dioxide, water, inorganic compounds and biomass at the same rate as other organic materials in the compost pile, leaving no toxic residue."
from Renee Cho (2017)The True about Bioplastics
Materials
Are they devised as application or for the kind of material? But also as Raw ingredients or made Materials.
By Techniques
Crafted
BIO-plastic, -silicone, -resin, -foam
FISH -leathers, -plastics | FRUIT-leather | ALGAE-leather, -yarn | BOMBIX-yarn (silkworms) | COCONUT-mat | PINATEX-leather
Grown
MICROBIAL-leather | FUNGII-leather | TEMPEH-leather | LAB GROWN-leather | SPIDER-silk
By Application
Plastics, Bricks & Yarns
BIO-plastic, -silicone, -resin, -foam
FISH-plastic | ALGAE-yarn | FUNGII-brick | BOMBIX-brick | COCONUT-mat | SPIDER-yarn
Leathers
MICROBIAL-leather | FUNGII-leather | TEMPEH-leather | FISH-leather | ALGAE-leather | LAB GROWN-leather | PINATEX-leather
By Category
Raw
Gelatine | Glycerine | Algae | Alginate | Cellulose | Bacteria | Silk | Fish Skin
Water | Ethanol | Pigments | Plants | Fruits
Made
BIO-plastics, -silicones, -resins, -foams
FISH-plastics | ALGAE-yarn | BOMBIX-brick | COCONUT mat | SPIDER-yarn | FISH-leather | MICROBIAL-leather
FUNGII -leathers | TEMPEH leather | ALGAE-leather | INVITRO leather | PINATEX
CRAFTING MATERIALS
Bio Plastics
A mix of bio-polymer Agar, Alginate, Gelatine, Casein, Cellulose, Chitin (chitosan) Starch… with:
- Glycerine – to create flexibility
- Filler (eggshells, chalk, fibres, oils, etc) – to avoid shrinking
- Fibres and Natural Debri – to structure and reinforce
- Green Soaps, emulsifiers – to create foams
Recipes Inspirations
Gelatine Bio-Plastics
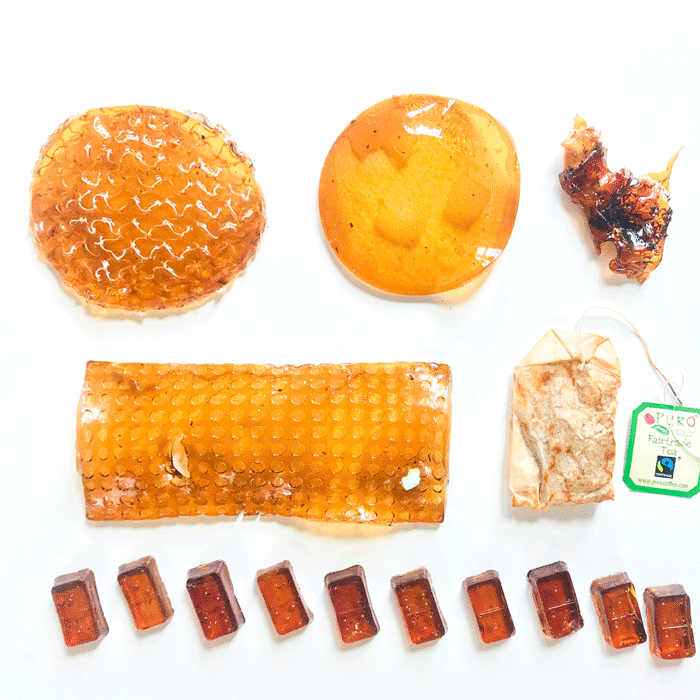
Gelatine & Rooibos Bio-Silicone studies, Carolina Delgado
Process
We double the recipes so that we have more. You can reduce them to half if you want a smaller amount. All the tools and How to are equal.
Bio-Resin
- 96 gr Gelatine
- 16 gr Glycerin
- 480 ml Water
- tbd Pigment
This mix should be first mixed all the components at 60 degrees until smooth and then boil at 100 degrees for 5-10 min. Boiling the plastic will change the chains and make it harder but slightly more brittle.
Bio-Silicon
- 96 gr Gelatine
- 48 gr Glycerin
- 480 ml Water
- tbd Pigment
This is the starting recipe for silicone mixtures, from here you can add even more glycerine, until 1:1 ration, where you will only add a splash of water and slowly mix by heating.
Bio-Foam
- 48 gr Gelatine
- 12 gr Glycerine
- 240 ml Water
- 10 ml Soap
For this mix, you must use also compressor or a simple electric milk foamer, or even a straw. These tools will help you create different size bubbles, air/gelatine ratio.
Tools
Pot | Stove | Spoons | Scale | Moulds | Jars for Mixing
How to
1. Warm up the water in the pot on your stove (plain or dyed)
2. Add your plasticiser, the more glycerine the more flexible the material.
3. Add the gelatine.
4. Mix until smooth.
5. Simmer for 10-15 minutes (86C max - time depends on the typology of heat applied).
6. Pour on your chosen surface.
7. Let it dry in a dry room.
Results
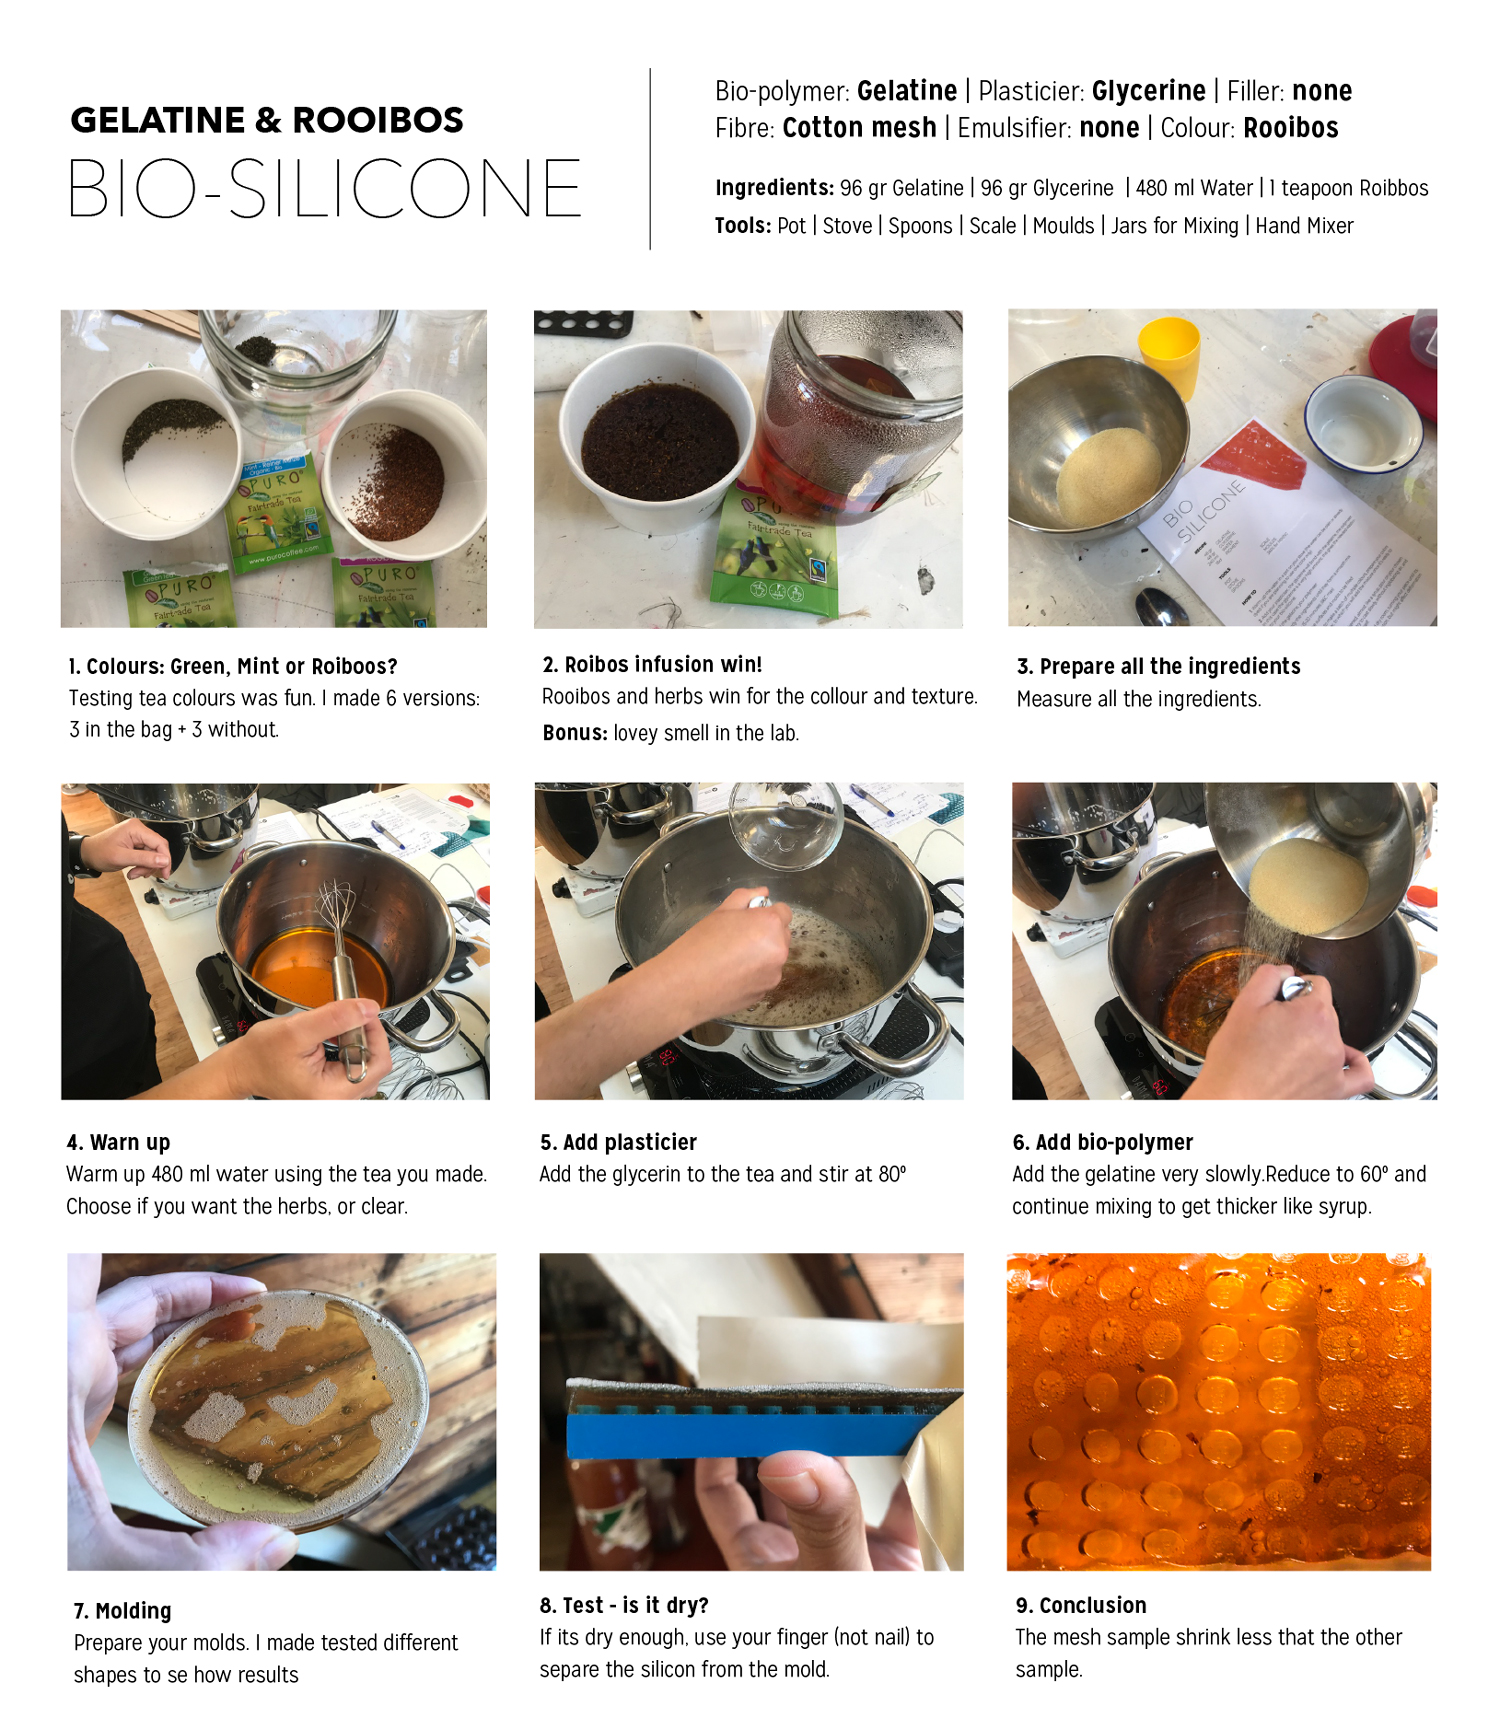
Gelatine & Rooibos Bio-Silicone, Carolina Delgado
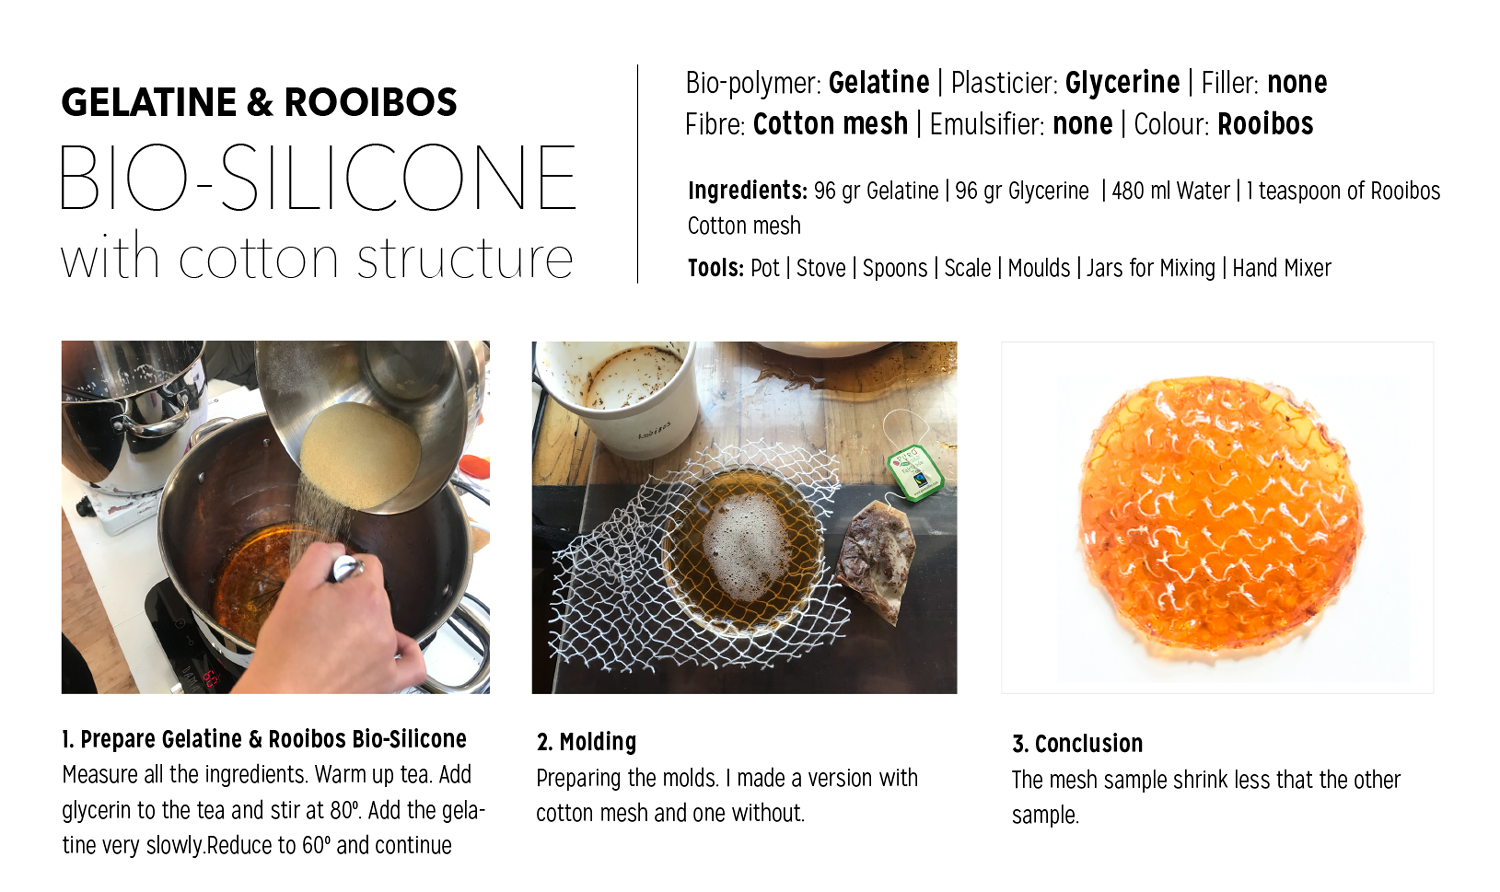
Gelatine & Rooibos Bio-Silicone with Cotton structure, Carolina Delgado
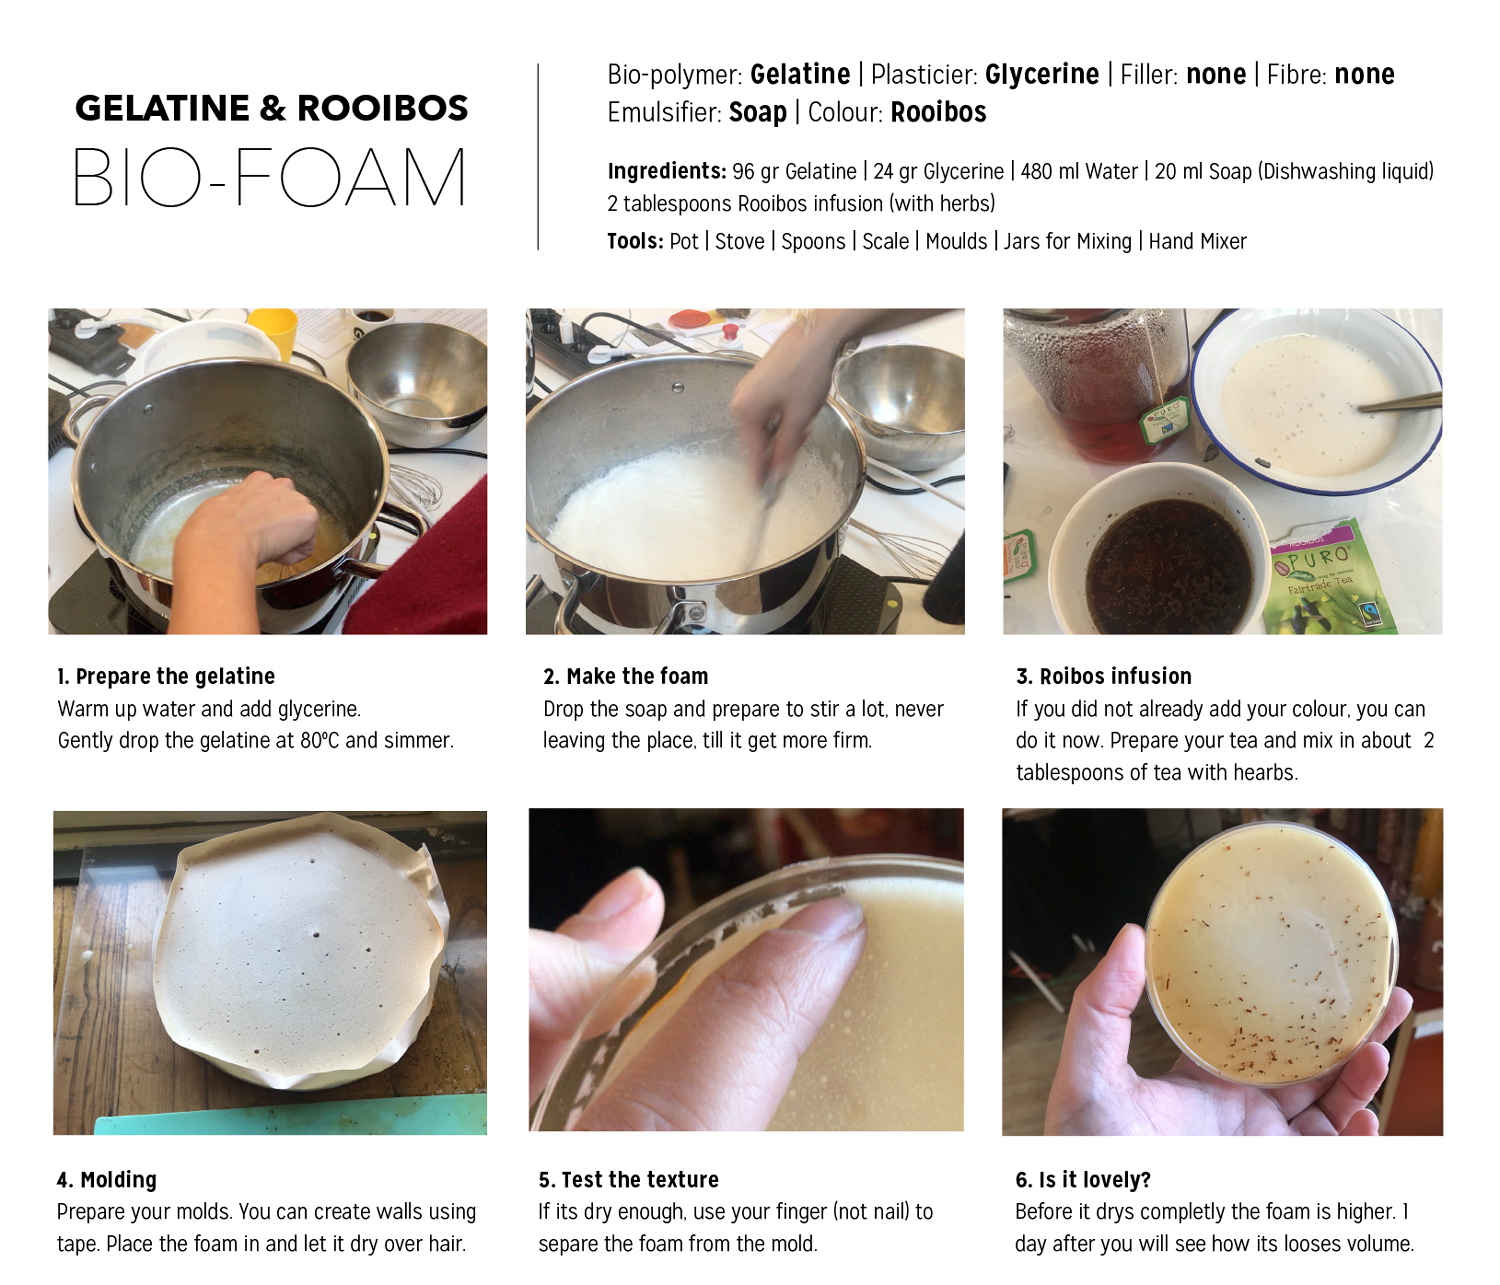
Gelatine & Rooibos Bio-Foam, Carolina Delgado
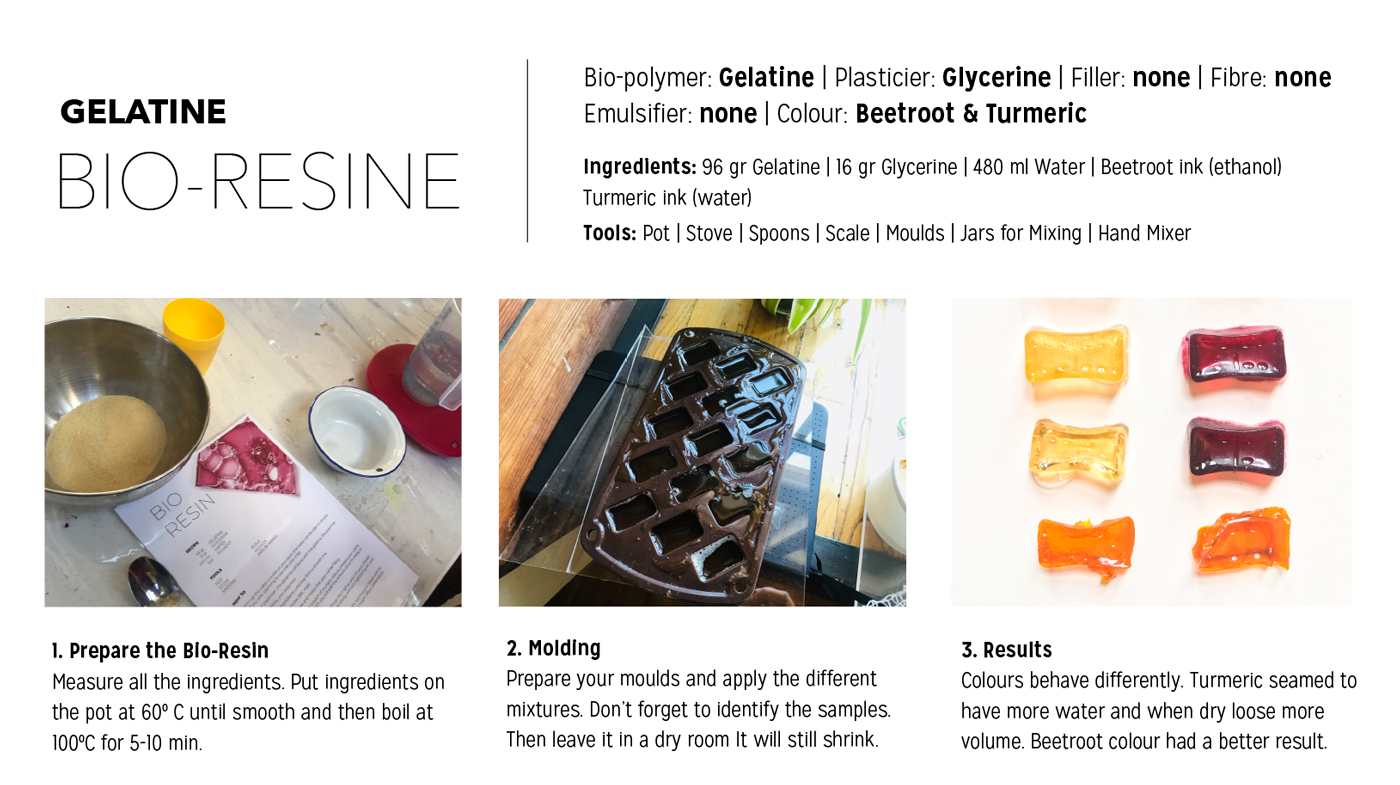
Gelatine Bio-Resine, Carolina Delgado
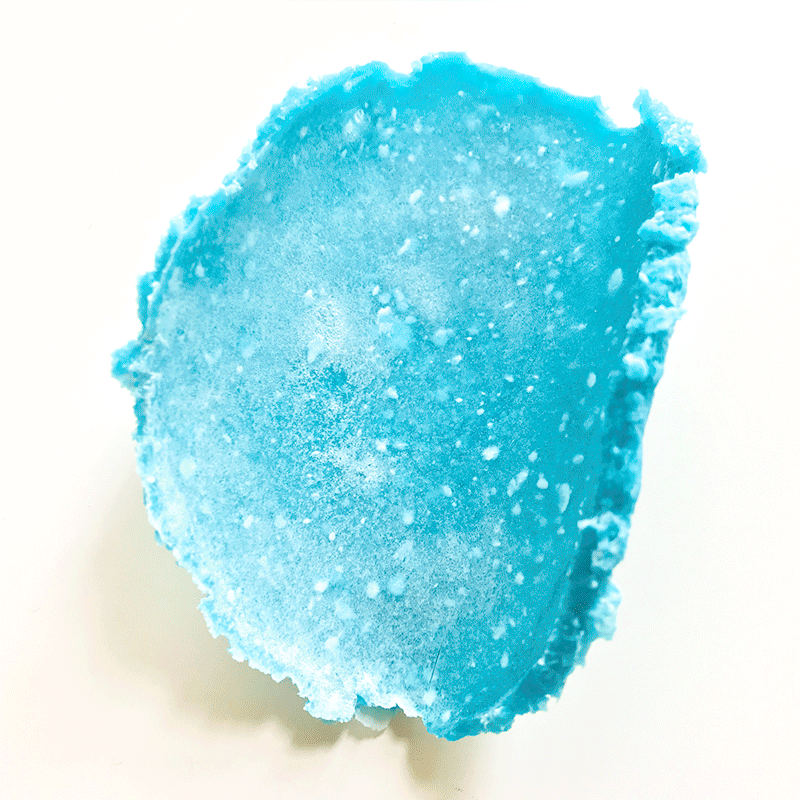
Agar Bio-Plastics
Agar Bio-plastics studies, Carolina Delgado
Agar – polysaccharide agarose from red Algae.
Agar Bioplastic is made by mixing water, glycerine and agar-agar powder.
Ingredients: Agar + Glycerol + Water.
They form a plastic substitute that can be cast in very thin films, resembling plastic foils. The casted
material is never elastic but is flexible. Agar is not heat resistant, starting melting at 80ºC.
Process
We made 2 recipes - one with gelatine and other without.
The how to do and tools are the same, only differs on the ingredients.
Bio-Foil Agar
- 4 gr Agar
- 3 gr Glycerine
- 400 ml Water
- TBD Pigment
Bio-Foil Agar+ Gelatine
- 3 gr Agar
- 20 gr Gelatine
- 5 gr Glycerine
- 500 ml Water
- tbd Pigment
Tools
Pot | Stove | Spoons | Scale | Moulds | Jars for Mixing
How To
1. Warm water in a pot
2. Add your plasticiser (Glycerine)
3. Add your polymer (Agar or Agar and Gelatine)
4. Mix gently at 60 ºC so that Agar is dissolved with the Glycerine.
5. Simmer more for 80ºC.
6. Prepare Molds.
7. Prepare your colours in jars.
8. Once it becomes thicker like a syrup, mix your colours on the jars and gently cast in moulds.
9. Let it dry on a ventilate and dry room.
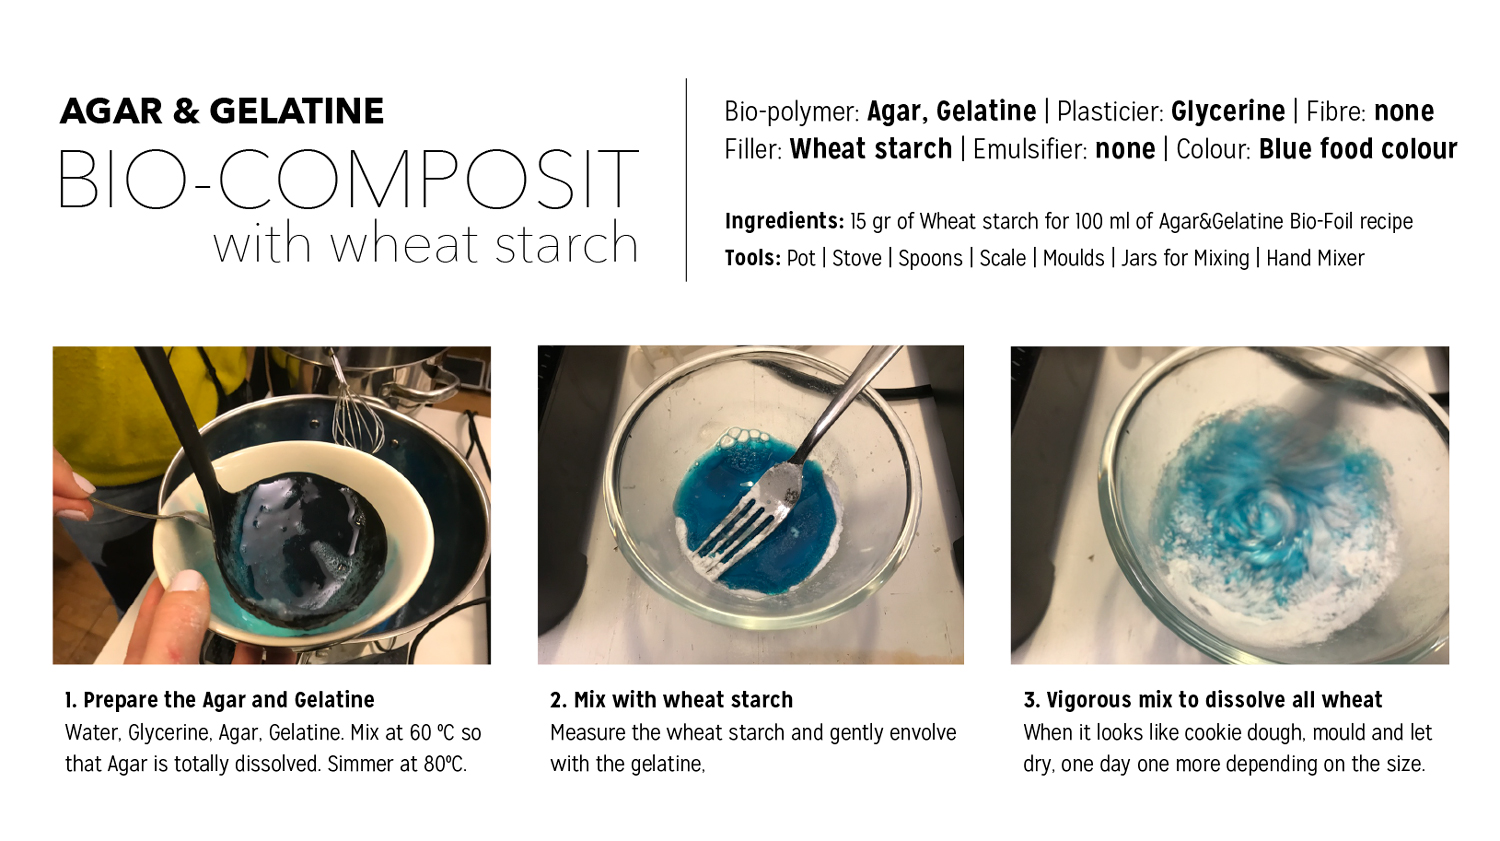
Agar&Gelatine with starch Bio-Composite, Carolina Delgado
Agar&Gelatine Bio-Composite, Carolina Delgado
Results
Agar tests were fewer than the Gelatine ones, but the results open a new range for future studies. My favourite was the Bio-Composite made with the starch filler. The result was a ceramic-ish material, not very heavy, but rigid like concrete. * Note to self: This recipe must be tested in a shaped mould to analyze shrinking and deformations, as well as the resistance of the material.
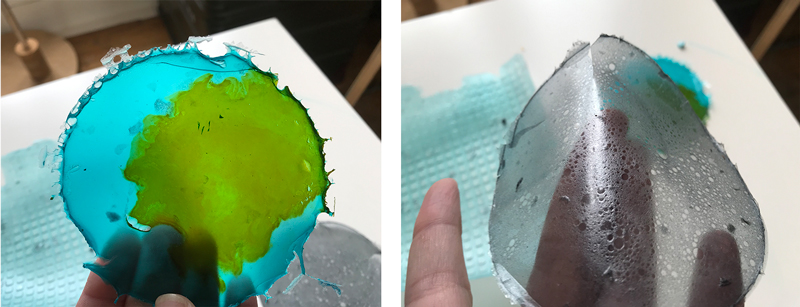
Comparing Agar&Gelatine Bio-films, Carolina Delgado
The Agar&Gelantine Bio-film with Tapioca (shown above with blue food colour and turmeric), and the Agar&Gelatine (with alkanet colour) are very different in flexibility and stiffness. although Gelatine gives flexibility, when adding Tapioca it shifted to a stiff film like the simple Agar Bio-Film (shown below, the 2 pieces in blue).
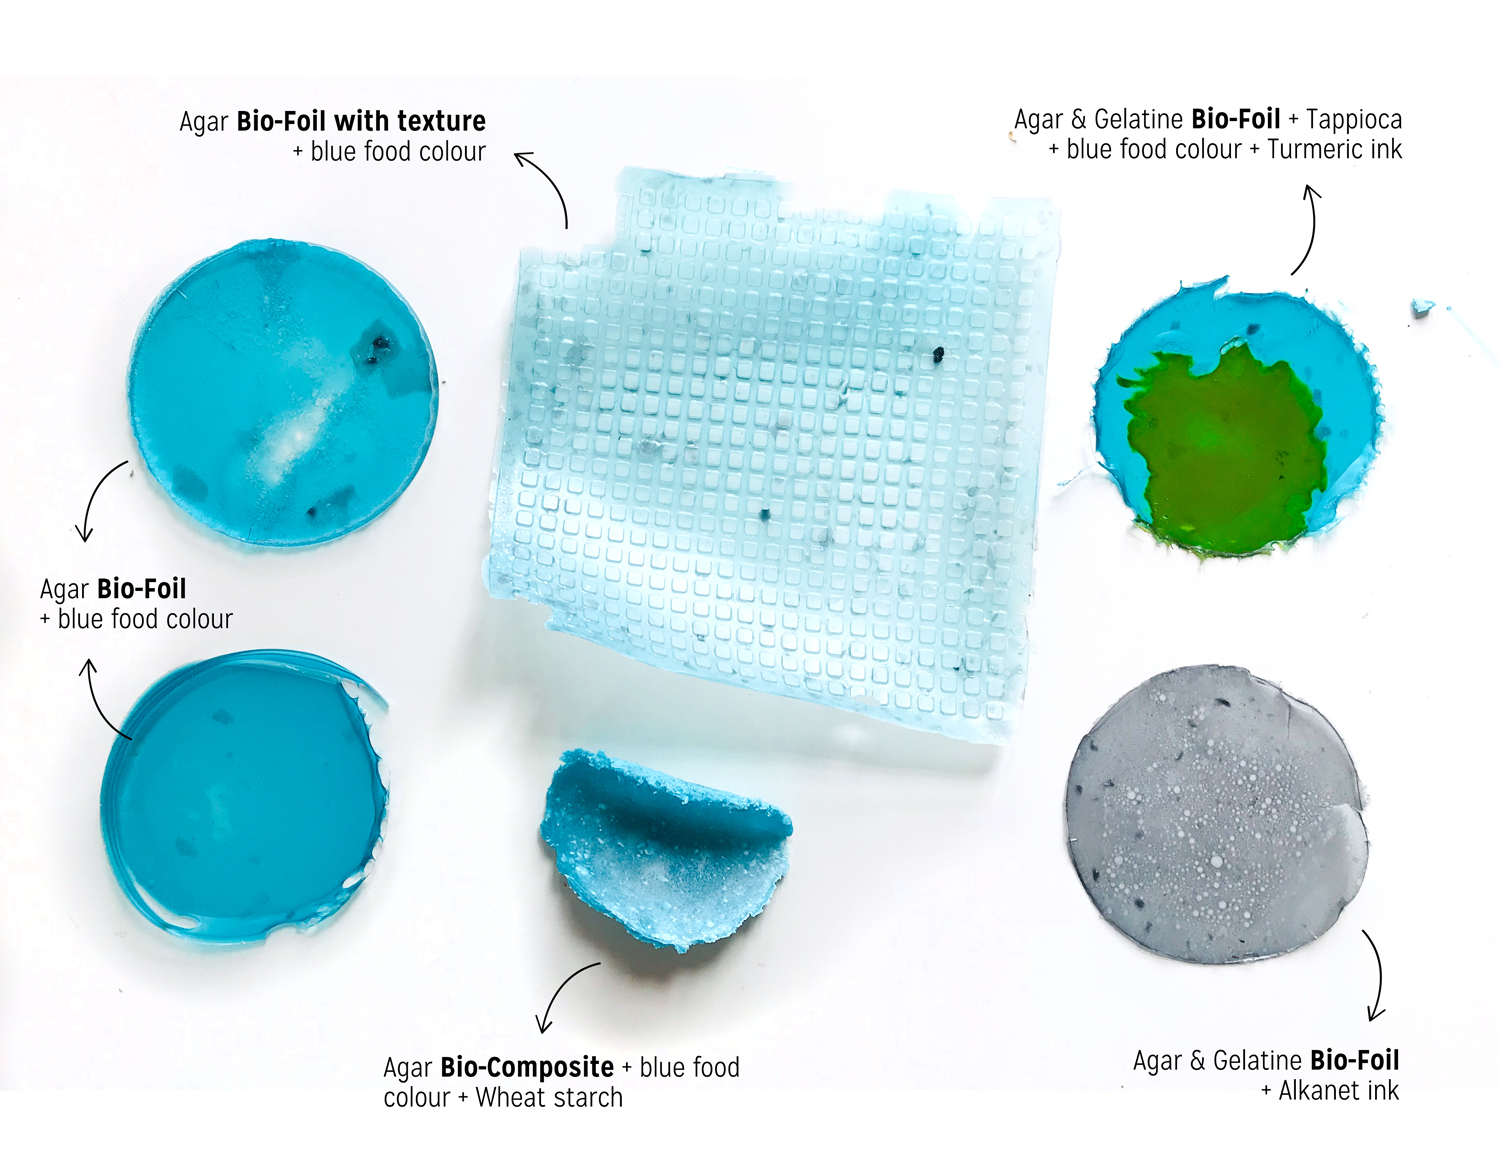
Agar tests descriptions, Carolina Delgado
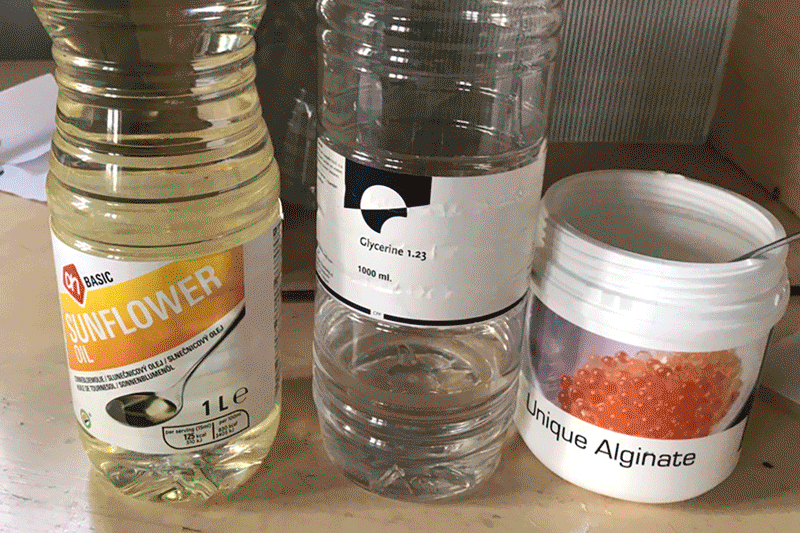
Alginate
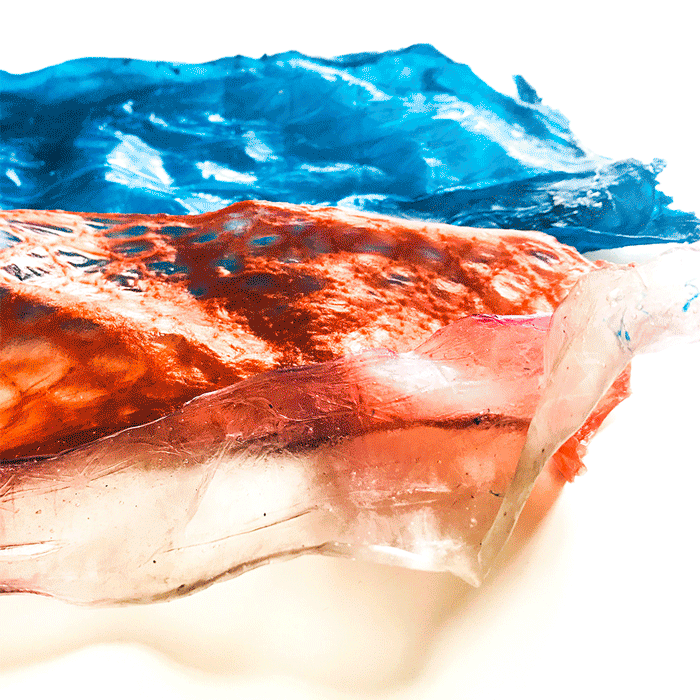
Alginate tests samples, Carolina Delgado
Alginate is more water resistance and is a mix of Sodium alginate from the brown algae + Calcium chloride hydrates. Gels formed can withstand heating to temperatures as high as 150ᵒC without melting.
Process
This preparation should be made the day before you need it (so the bubbles come out) and in a special clean environment.
We prepared in the WetLab 3 different recipes and add different colours to play with different results.
Only the next day, we test them.
All the Tools and How to are equal for the 3 materials. So is the recipe for the Calcium Chloride Hydrate, multiply it for your needs so you can use for all.
Flexible Bio-Foil
- 12.5 gr Alginate
- 30 gr Glycerin
- 400 ml Water
- tbd Pigment
Flexible Bio-Foil 2
- 8 gr Alginate
- 20 gr Glycerin
- 400 ml Water
- tbd Pigment
Flexible Bio-Plastic
- 24 gr Alginate
- 40 gr Glycerin
- 20 gr Sunflower oil
- 400 ml Water
- TBD Pigment
Calcium Chloride Hydrate
- 10 gr Calcium Chloride
- 100 ml Water
Tools
Pots | Blending mixer | Spoons | Scale | Moulds | Jars for Mixing | Sprayer (for the Calcium Chloride Hydrate)
How To
- Measure the ingredients.
- Put all the ingredients in the blender machine and mix it and leave it overnight so the bubbles come out.
- Put in different jars and add colours. Mix.
- Let rest overnight. In the next day, you'll be able to use them.
- Cast the alginate mixture onto the surface or mould (consider the size, the material will shrink a lot). If you apply it over a waterproof fabric or irregular surface, spray calcium chloride hydrate before you apply the material. It will be faster and easier to remove after.
- It will start to shrink, so work quickly. Spray with calcium chloride hydrate after, or it will dry faster and become waterproof.
- Once cured, rase in water (on a pot) so you remove any remains of the calcium chloride.
- Be patience. Let your work dry for 2 days in a dry room, over the air. Don't try to remove it before, or you will lose all that you have achieved. It has to lose all the water and will shrink a lot. Some times shrinks 5 times the size, that's normal.
- Test with your finger - if it's cold, it means it stills very hydrate and you need the material dry much more.
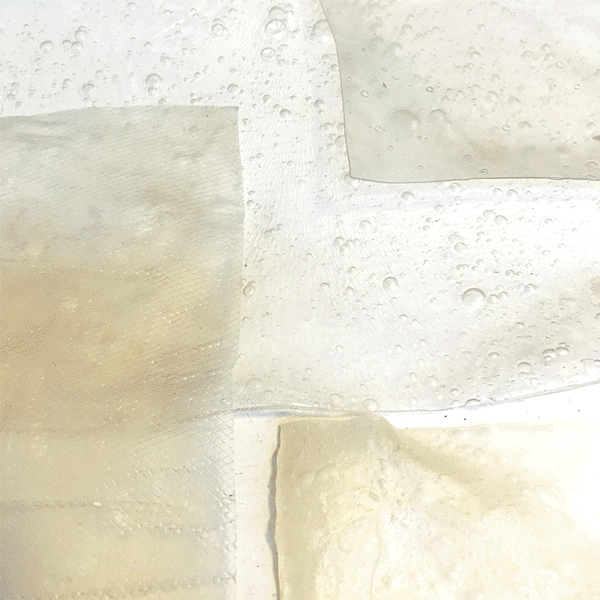
Results
Alginate BioFilm and BioPlastic Making-off, Carolina Delgado
Alginate scouring can take some ability and patience. Using the fingers to straighten the biofilm or a ruler are recommended. Otherwise, it can reveal unwanted outcomes for those who are looking for quick results.
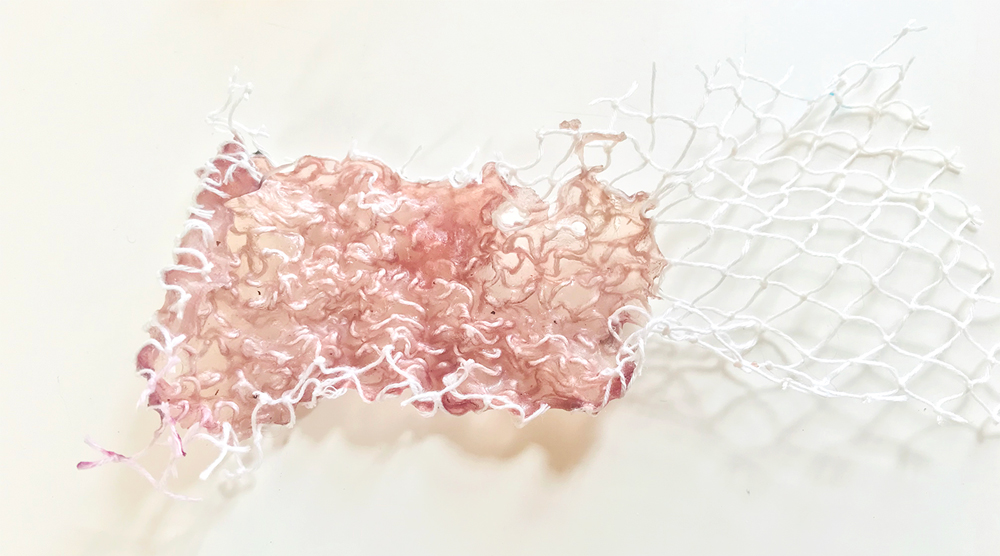
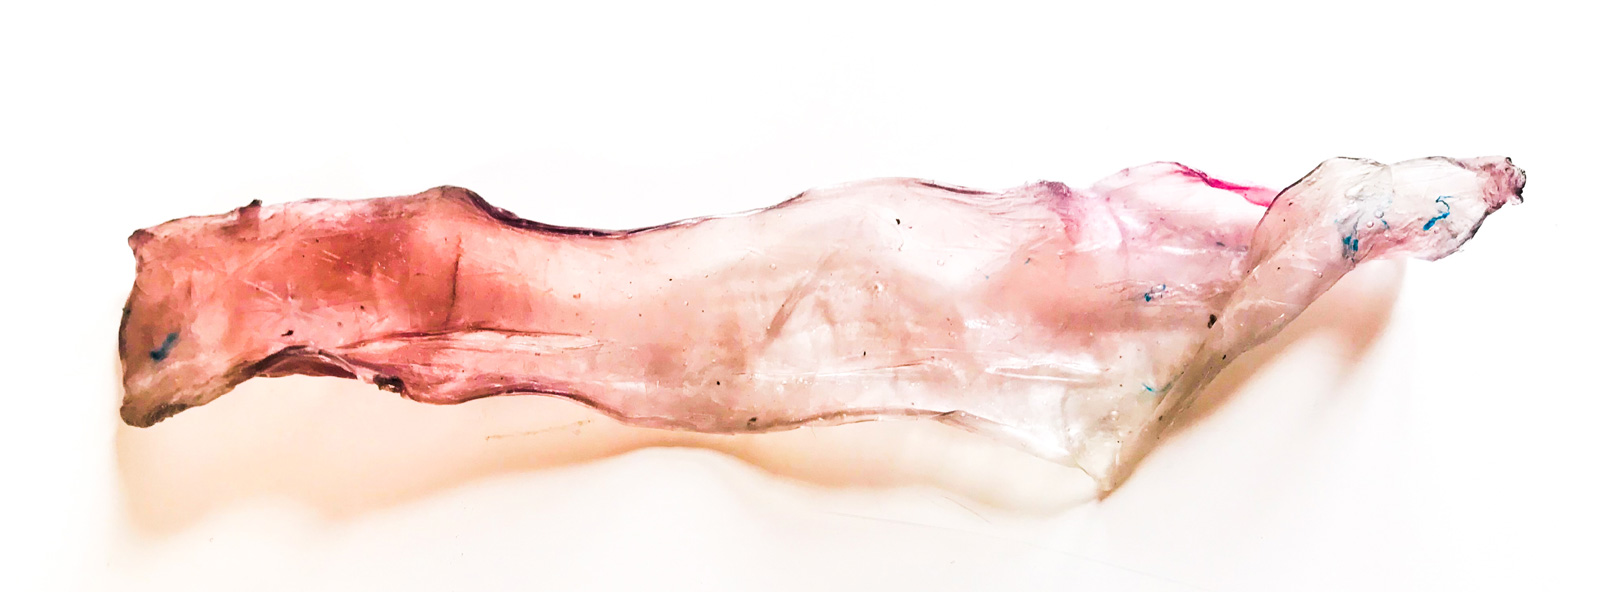
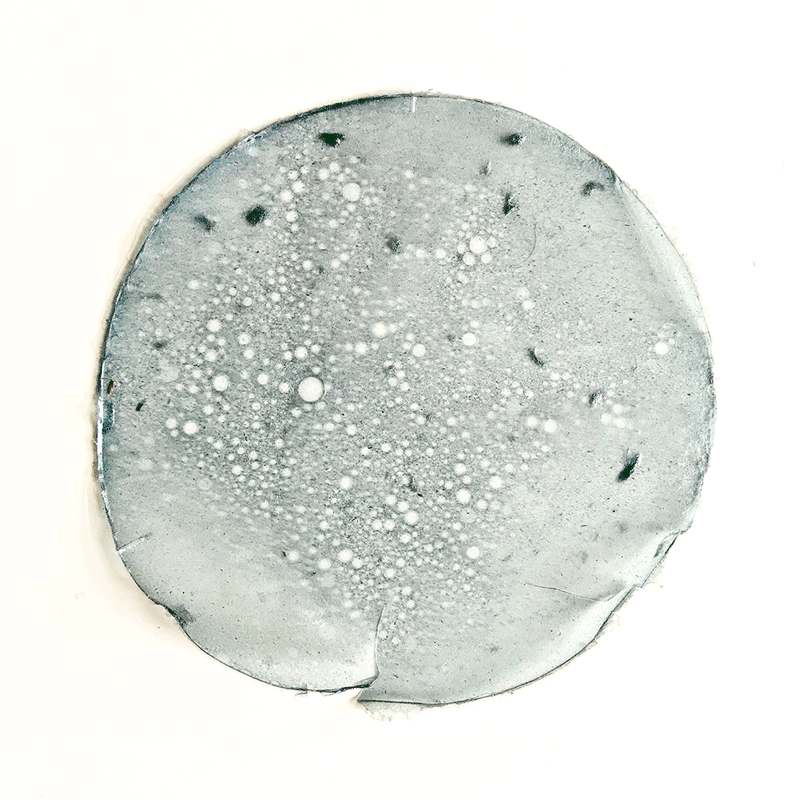
Alginate Bio-film with cotton mesh, Carolina Delgado
The Alginate film with cotton mesh was a failure when compared with the results previously achieved with Gelatine BioSilicone, which proved to reduce the shrinking.
In the other hand, the same recipe with the hibiscus shade revealed a lovely transparency (shown on top of this page).
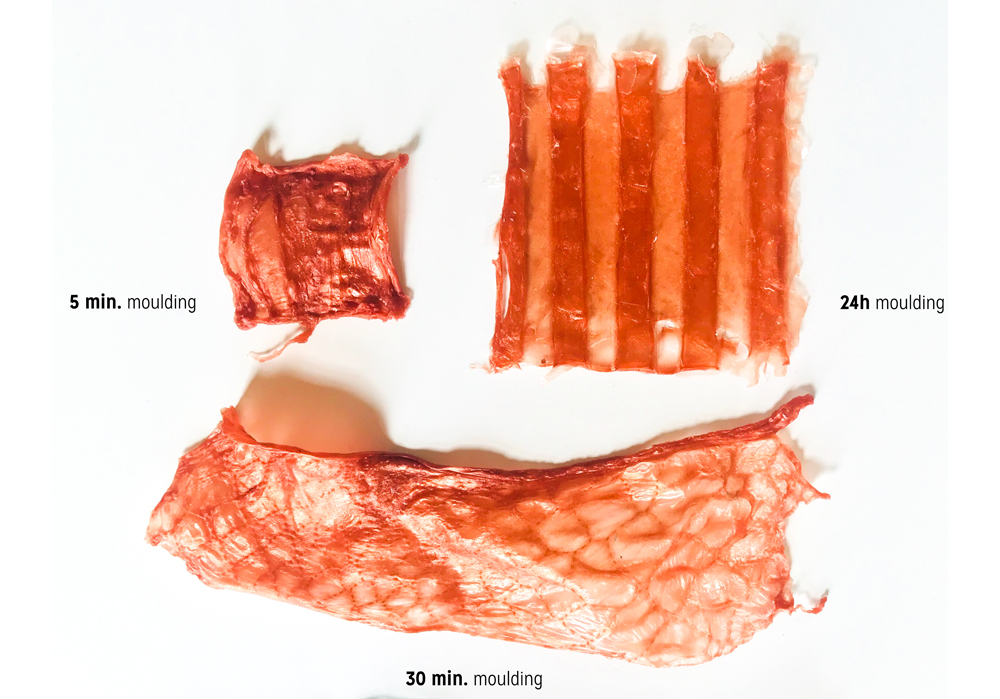
Alginate Bio-foil 2, with bronze acrylic paint, Carolina Delgado
This example of the same material in the same mould (on the right is shown the result of 5 min work using the Calcium Chloride Hydrate spray and on the left 24h waiting before a long and gentle, patiently removed from the frame which was stick in like glue). The longer one, on the bottom, was for 30 min over the fabric and then raised in tap water and let dry for 2 days to lose the rest of water.
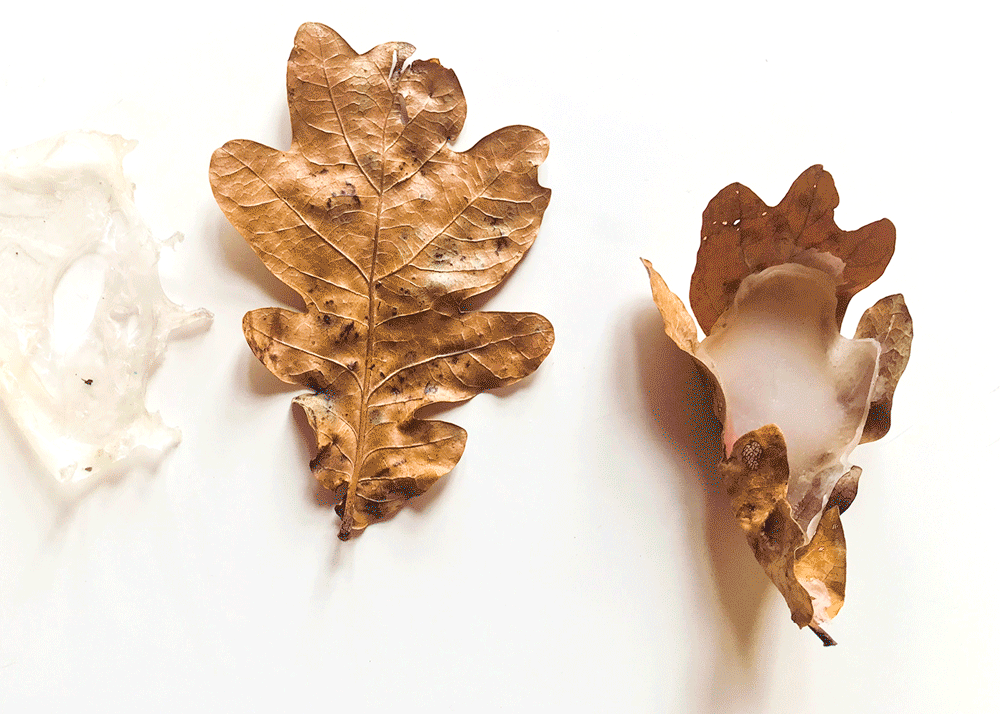
Alginate in leaves test, Carolina Delgado
I tested some leaves (my husband gave me, I don’t know the species) to look for natural textures. Aldo, they show some impression they should be sprayed with Calcium Chloride Hydrate and then left with a Petri or other weight on top to keep the shape. I didn’t know so the results were weak.
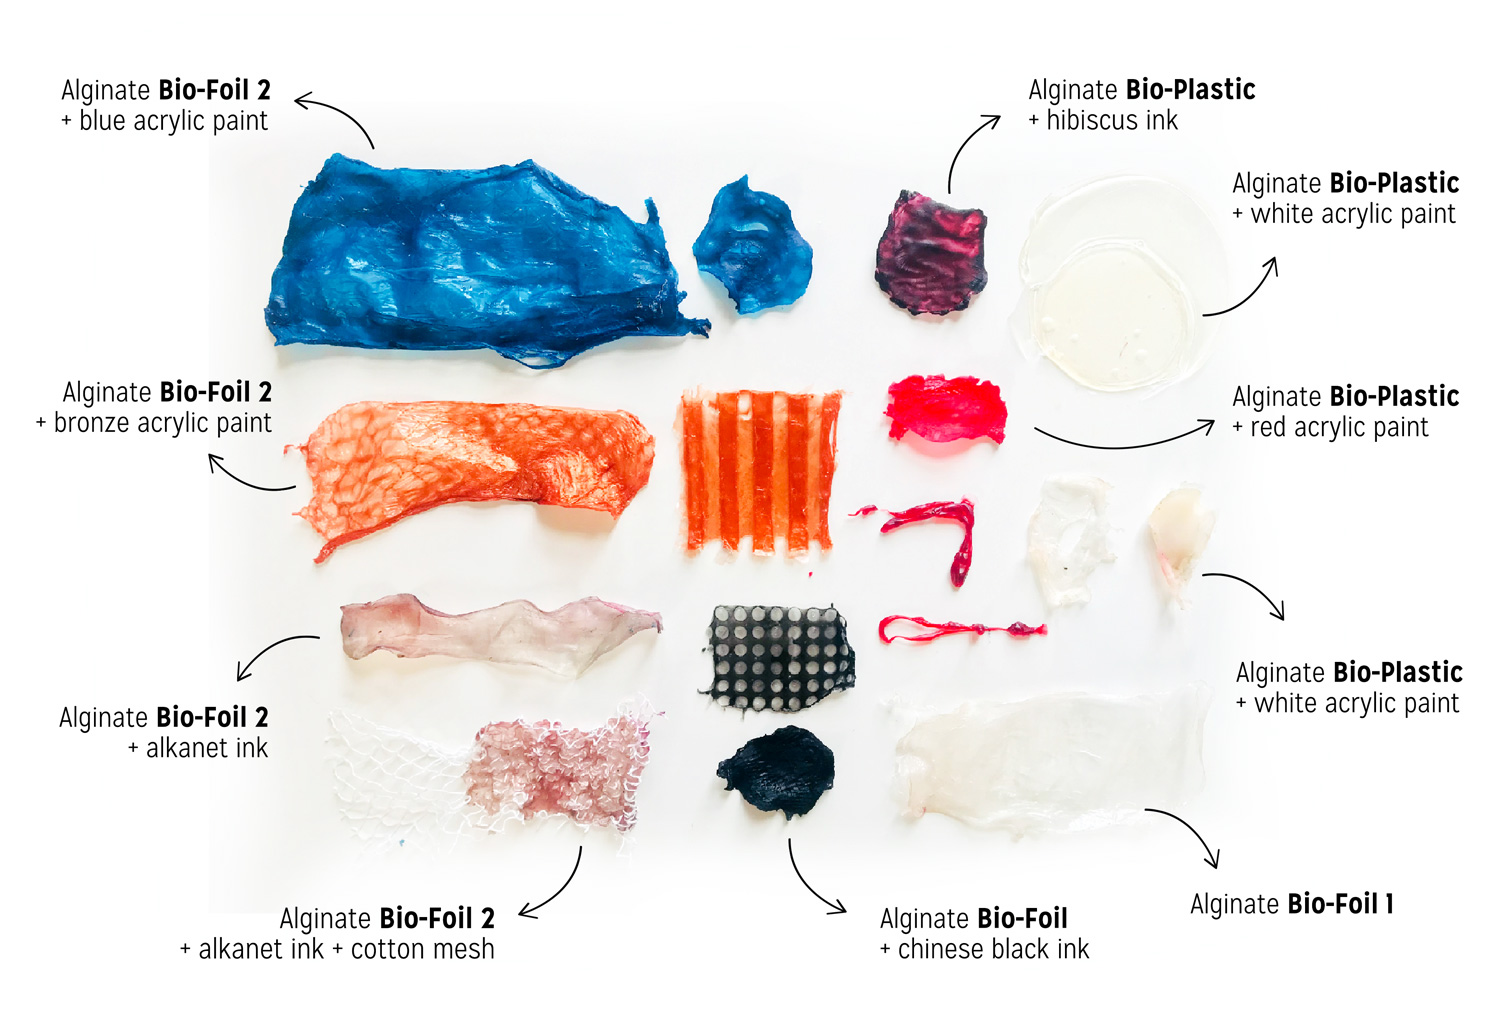
Alginate tests descriptions, Carolina Delgado
Alginate with Raw Seaweeds
Process
Looking at beatifull work of Bella Rofe mixing Alginate and Seaweeds, inspired me to try new recipes.
The idea is to put hands on Raw materials, but due to Covid19, it was too much challenging to collect directly from research centres or seashore. Therefore, I assume the risk of working with dry and packed from Chinese Supermarket.
** Ingredients**
- 16 gr Alginate
- 30gr Glycerol+
- 800 ml Water
- 10 gr of Undaria pinnatifida
- Spray with Calcium Chloride Hydrate 5%
How to
- Prepare Alginate BioFilm (I chosed with extra water recipe BioFilm E from my final project)
- Put 10 gr of Wakame on the water to hydrate
- Prepare clean moulds.
- Spray with Calcium Chloride Hydrate 5%.
- I spare dry Wakame in one mould and hydrate Wakame in other
- Let it dry in a dry room
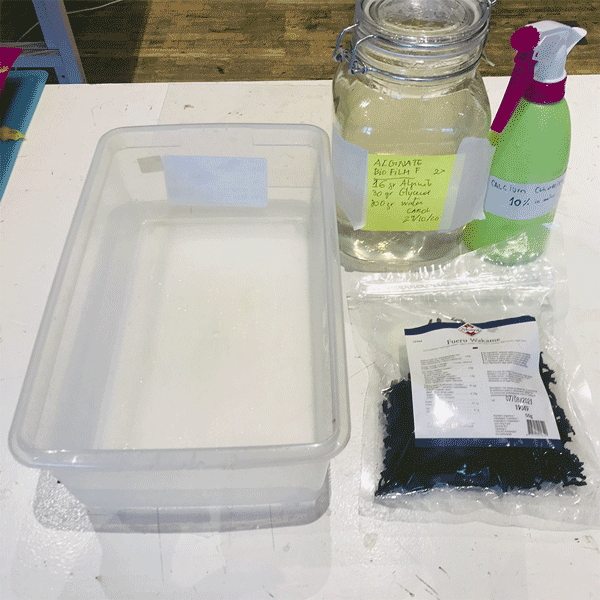
Alginate BioFilm with Fuero Wakame (Undaria pinnatifida), Carolina Delgado
Results
Tapioca Bioplastics
Bea Sandini tutorials with Tapioca and Fruit Leather Some of this materials can be made poured on big sheets and laser cut to the design.
Tapioca Biosilicone
- 24 gr Tapioca
- 10gr Glycerin
- 10 ml Vinegar
- 120 ml Water
Tapioca Bioplastics with Bea, Carolina Delgado
Tapioca Experimentations
I made some changes to Bea's recipe. Quantities were adapted for more liquid considering the eggshells absorb some water.
Also, I wanted to test on a syringe to extrude. But this didn't result because of the point, was very thin.
Note: consider this when making Alginate and Eggshells extrusion.
Process
I double the recipe and add 15 gr of Eggshell in half of the amount.
I consider 5 gr of eggshells per mould.
- 48 gr Tapioca
- 20 gr Glycerin
- 20 gr Vinegar
- 200 ml Water
- 15 gr of Eggshells powder (for only half of this recipe)
With simple Tapiopa Biosilicone, I made a sheet in an acrylic mould and one 3D mould to compare with other recipe results.
With Tapiopa Biosilicone with Eggshells, I poured in a petri dish, and to on the 3D mould.
Results
GROWING MATERIALS
New leathers
Alternative leathers are made with raw materials that others could call waste. Working with bacterias and mycelium, and rests of fruits, grains and vegetables, and water look modern biotechnology. But mankind uses them for centuries, for feeding - brewing drinks, making cheese and bread yeast, or even for making suits like the Inuits leather skin.
Types of leathers: MICROBIAL-leather | FUNGII-leather | TEMPEH-leather | FISH-leather | ALGAE-leather | LAB GROWN-leather | PINATEX-leather
Fruit Leather
Made with fruit wastes can represent one perfect solution to resolve some wastes management costs by returning to industry as raw material.
Mango Bio Leather
Recipe
- Two overripe Mangoes with skin: about 400gb
- 23gr Tapioca starch (aka povilho azedo)
- 23 gr Vinegar
- 5 gr salt
- 20 gr Bea Wax
How to
- Peel and chopped mangoes to the blender with a piece of the peal.
- Cook for reduction/ 10 min. on 80ºC
- Put Tapioca and cook more 10 min.
- Dry in the oven for 10 hours in 40º-50ºC (during the night - wake up to check it)
- Take it and let it rest in the air
Results
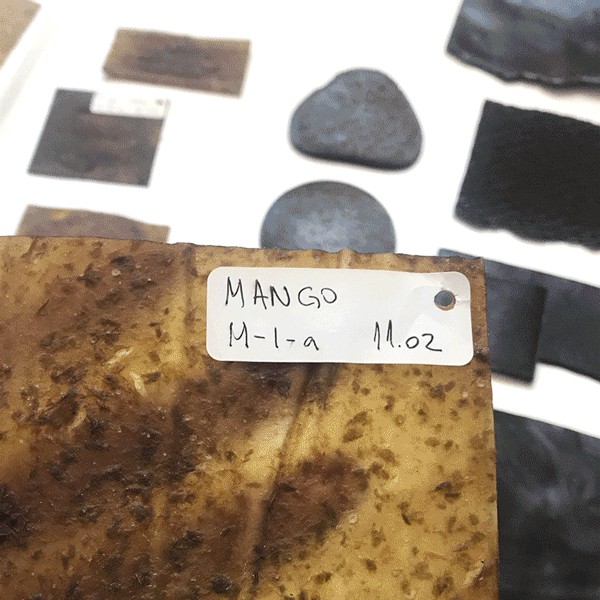
Bea's show on Mango Leather, Carolina Delgado
References
Shellac - Natural based gel resin Restology - using charcoal in BioPlastic as a filter
YouTube
FRUIT LEATHER – FRUITLEATHER ROTTERDAM
Mycelium Leather
Process
Some examples of material to grow and packaging
* Ecovative - MicroComposit; Grow Bio; Mushroom Packaging
Results
Micelium Leather at WetLab, Carolina Delgado
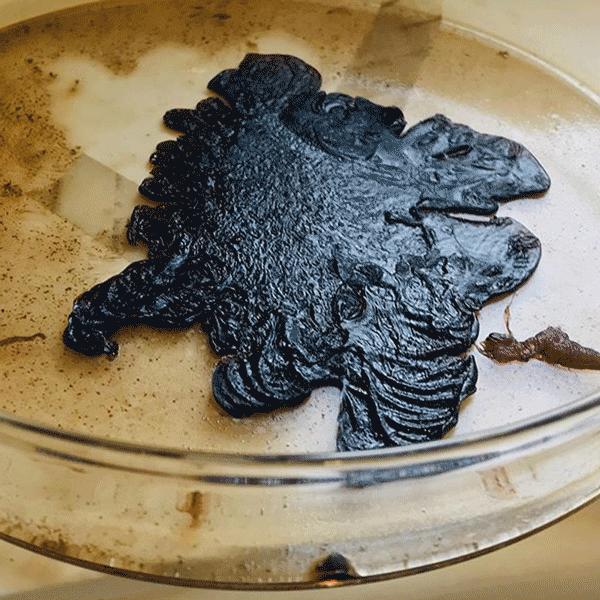
Microbial Leather
Lorena Trebbi Tutorial with Kombucha Scobby Lesson
Kombucha Fermentation
Design experiments with food and microorganisms.
S.C.O.B.Y. = Symbiotic Culture of Bacteria and Yeasts
Sugars > Yeasts > Ethanol > Bacteria > Acetic Acid + Nanocellulose
FOOD - also affects the texture = irregularity to uniformly
TEXTURES: powdered pigments vs liquid dye
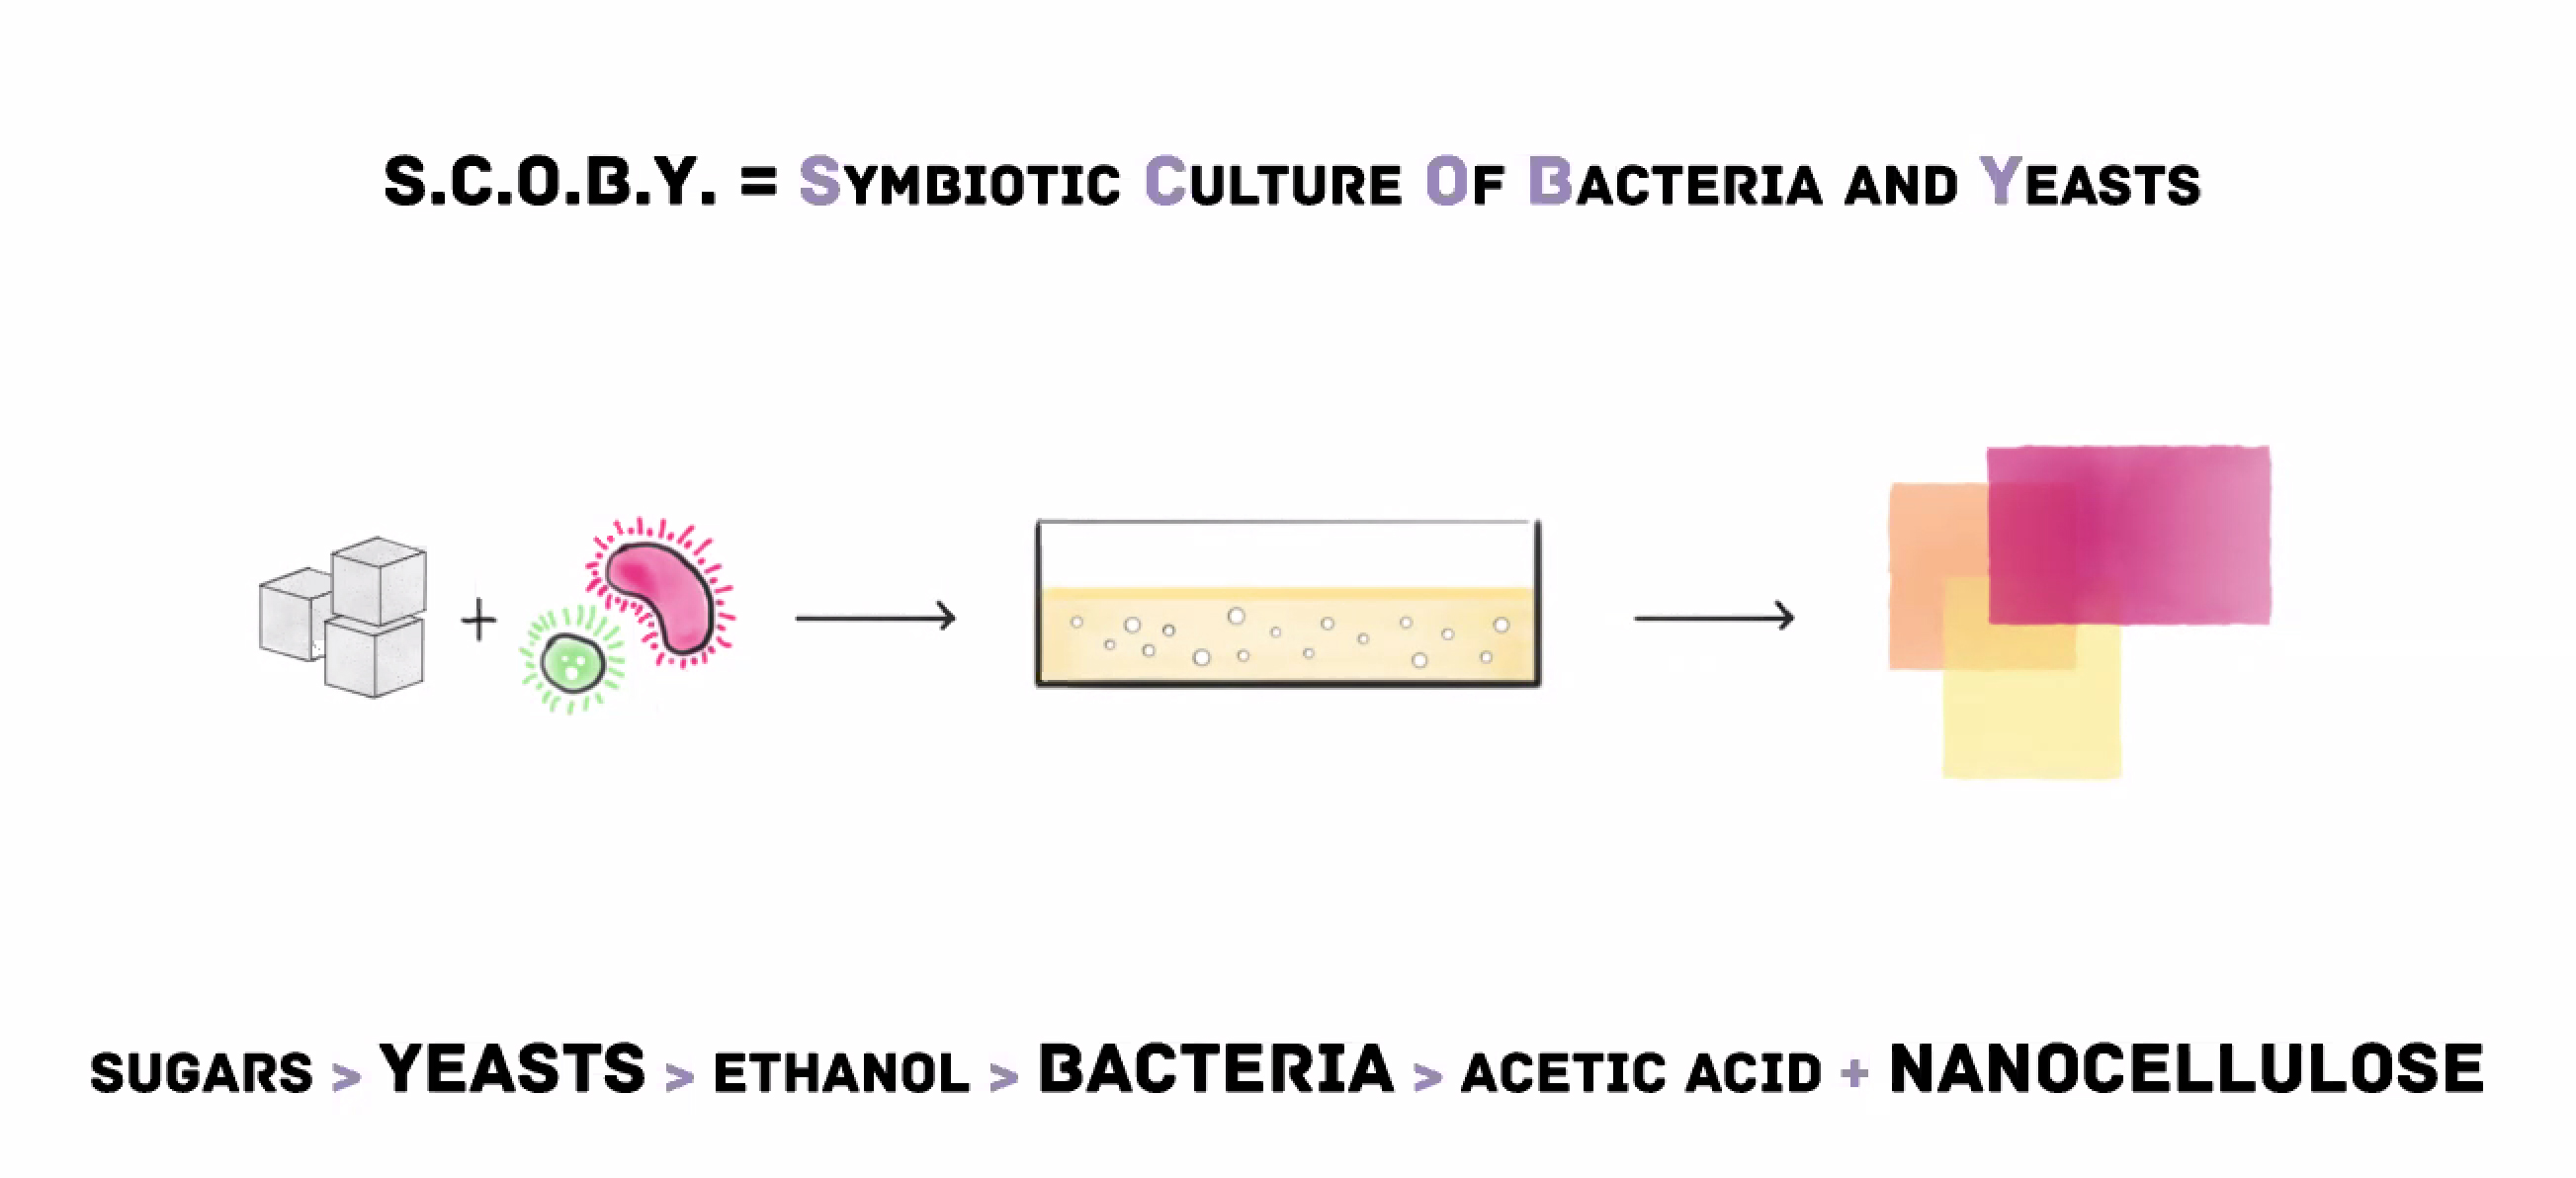
SCOBY squeme, Lorena Trebbi
FAILURES: mould - contamination of matter. Use gloves and sterilise everything. Wine can be attacked with air bacteria, for example in big containers, because of larger surface and air.
Note that you are interacting with a living matter.
Also, to archive keep the material in a dry place.
Processing
* Laser Cutting - can be cut, give pattern on the shape (cuts and folds)
* Folding - dry or wet
* Surface - treatment. Ex. Bee Wax or tung oil (used for Japanese paper) - mate texture and loses shine, but helps to preserve the material.
* Printing - can be printed in, stamp, etc.
* Dye after - reduces the life and resistance of the material with time, affecting the strength of it.
* Absorption - ex. Dipping in aloe vera absorb properties, can be used as a second skin.
Tools
* Container
* Lid or cloth
* Scale
* Ph Reader or Ph stripes (to get 2.5 to 3.5ph - acid)
* Spoon/ Fork/ something to stir
* Weigh - to keep it on the bottom of the container; can be acrylic leftovers.
Ingredients
* Grown medium (water, tea, beer, wine, etc)
* Sugar (food)
* Vinegar
* Scoby starter (Kombucha)
Tips
* Temperature (30º): use heating mats, or place it on the top of the fridge or near the heater. It will grow slower in room temperature
* Air Flow: keep it open but covered from the flies and mosquitos. Put a paper, breathable fabric, or let the lid open with paper (preventing condensation on the top)
* Wash - with neutral soap after
* Drying - Bumps - after harvest put on a surface to dry and will form bubbles. Pull the air by hand to the sides or pop-it.
* Texture - different surfaces to dry, will add texture printing a pattern
* Layering - drying when its very thin you cand fold it in layers to save the material
* Shaping -Drying on a 3D shape
Results
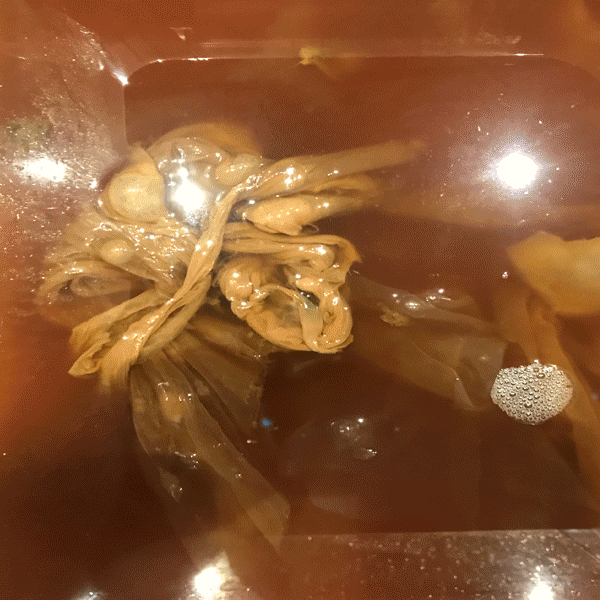
Growing Scobby, Carolina Delgado
Elena Mato Emma Sicher [Loes Bogers]https://class.textile-academy.org/2020/loes.bogers/files/recipes/kombuchascoby/ https://linktr.ee/studiosamiraboon
Kombucha – symbiotic colon of bacterial east (Scoby) – like paper very brittle or more like leather resistant and elastic. How: Bacteria feeding on the sugars and tea, start creating an acidic environment which allows them to spin cellulose layers.
See the open-source of thr34d5.org
References
Plastic Pollution
Bioplastics
- The secrets of Bioplastics
- Bioplastic Cook Book
- Bioplastic Cook Book
- bioplastic
- Recipes for a material activism
- Material Exploration
- Material Alchemy
- Rapportand
Rapport - bioplastic
- Restology
- biofabricacion
- Workbook
- fibre-fabrics-digital
- bioplastic
- biomateria
- design_foodforthought
- The ShellWorks