06. Computational Couture
Week 06 | Using Grasshopper for Rhino we explored computational design methods to reinterprate the image of cloths, garments and accessories for fashion design - mainly by using 3D printing.
• • •
Introduction
Assignment
- Document the concept, sketches, references also to artistic or scientific articles on 3D printing and parametric modeling
- Design a parametric model using Grasshopper3D (or alternative parametric software) and upload the 3Ddesign file + required parametric files
- Learn how to use a 3D printer and document the step-by-step process and settings
- Document the workflow for exporting your file and preparing the machine, Gcode and settings to be 3D printed
- Print your file and document the outcomes
- Upload your stl file
- Submit some of your swatches to the analog material library of your lab. Size 20cm x 20cm approx (extra credit)
I was pleased with the outcome of this week with my limited knowledge of Grasshopper! I continued down my theme of organic shapes and paths but would love to explore some more 3D, layered structures as I get better at Rhino and Grasshopper.
Inspiration

1,2,3Photo by Oxman on "Neri Oxman - Wanderers" | 4Photo by Nusi Quero on "Pinterest - Nusi Quero" | 5Photo by Iris Van Herpen on "Capriole - Runway 17" | 6Photo by Julia Koerner on "Julia Koerner 2022 Vienna" | 7Photo by Julia Koerner on "Julia Koerner Hybrid Holism" | 8Photo by Pinterest on "Pinterest - Hiro O Arimura" | 9Photo by Julia Koerner on "Black Panther" | 10Photo by Bio Lab Studio
★࿐࿔Alumni: ★࿐࿔
-
Zahia Albakri - Interesting pattern
-
Aslı Aydın Aksan - 3D printing with holographic foil
-
Dinesh Kumar - Easy to follow documentation
★࿐࿔The Wider World!: ★࿐࿔
I was most drawn to microscopic patterns in nature, dissorder/unpredictability/, brain waves/neurons and growth such as in bacteria and fungi in all axes - you can check out my Pinterest board here!
3D printed couture pieces that push the boundaries between virtual and visceral. Originally exclusively designed for celebrities and VIP clients.
One of my biggest inspirations for her 3D bioprinting and creation of alien-like and unpredictable forms that fuse biology, architecture and material engineering knowledge.
The OG of 3D printing fashion! Haute Couture meets technology meets nature meets architecture.
"Whether drawing from the intricate web of nature, the structural philosophy of living architecture or fluid anatomy of the body, the vision of Iris van Herpen encircles the metamorphoses of the body."
We had our global lecture given by Julia who creates at the convergence of architecture, product and fashion design. She has collaborated with Iris Van Herpen, Ruth Carter for the film Black Panther: Wakanda Forever and Swarovski. She was unreal!
A multidisciplinary architect who focuses on the fusion of bespoke parametric design, large-scale robotic fabrication, and emerging technologies in sustainable material research. Using Grasshopper, Rhino, Houdini, and Zbrush they explore an approach to design that generates a sense of ambiguity regarding how each form is generated - enabling each form to blur the boundaries between the natural and artificial realms.
• • •
Tools
- Rhino Grasshopper
- Grasshopper Tutorials - Fabricademy Tutorials
- Grasshopper Plugins
- Rhino/Grasshopper Basic Theory
- Grasshopper Kangaroo Tutorial - Collide Lines
- Food4Rhino - download various libraries here
- Ultimaker Cura
- Ender 3 3D Printer
- Bambu Lab
• • •
Protoype Drawings
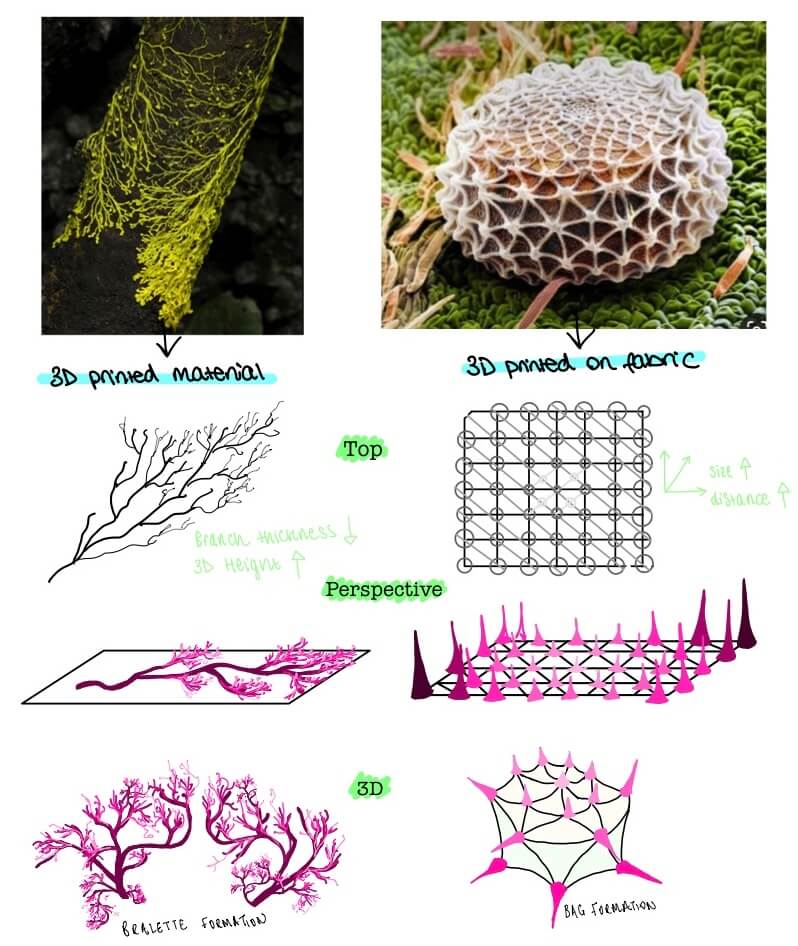
Using the inspiration from above I gravitated towards these two images. I was imagining two concepts:
-
module 3D printed onto fabric using the sandwich technique and PLA
-
design a 3D material itself using TPU
I wanted to play with layering, thickness and height differences to create similar elements found in nature.
I was exploring using the Vectorize Plugin and the Physarealm Plugin but there weren't too many tutorials that were well documented for beginners to Rhino - so I began to simplify my design to just try and create some sort of growth model.
• • •
Grasshopper
Grasshopper is a visual coding tool which allows you to create a 3D model by connecting different functional component blocks.
I wanted to try and create something as similar to my inspiration drawings as possible but quickly realised with my zero-knowledge of grasshopper and only a few days it probably wasn't going to turn out exactly as detailed as I wanted. I tried a few various plug-in libraries such as vectorize, parakeet and kangaroo whilst watching some youtube tutorials and all of them seemed to want to kill my macbook so I opted for some slightly simpler designs that kindof simulated bacteria growth.
TIP!
Switch between components labeled as text to icons by going on the 'Display' tab and clicking on 'Draw Icons'
Basic Rules
- To add a component either press space bar or drag down from the toolbar
- To undo a connection on mac hold down **'command'** key and press the output of the connection and drag it backwards to the input
- 2 cables on a connection means it is passing data multiple times
- A shortcut to add a number slider is to: Press spacebar and type 1..10 = a slider from 1 to 10
- To export your shape that you have built in Grasshopper you need to **'bake'** the final component of the code.
- Turn off previews for components you aren't working on: Right click on the component and deselect **'Preview'**
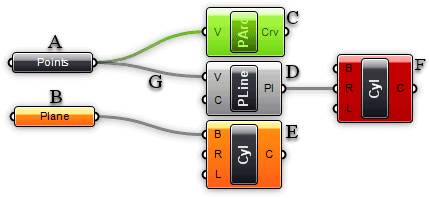
This picture is a helpful diagram to understand the colours of basic components.
1,2,3Photo by Grasshopper 3D on "Objects Explained"
- A. Parameter contains data
- B. Parameter doesn't contain data
- C. A selected component
- D. A regular component
- E. Component containing warnings
- F. Component containing errors
- G. A connection
• • •
Design For Printing Fabric With TPU
Grasshopper Process
I found this youtube tutorial which used Kangaroo to 'Collide Lines'. It seemed to create a growth which looked similar to bacteria so I created the Gcode and then shifted the parameters until I found a model that had many sections of growth that were following an unpredictable pattern.

In the beginning I was practicing seeing how the radius of the 'Sphere Collide' component affected the movement of the model.
I then started adjusting all the various number sliders to see which model I liked the best.
To create the 'wireframe' models I disconnected the boundary surface to the interpolate component and then turned the preview off.
All the models below have been previewed in the Rendered mode in Rhino.


I figured that the models I liked the most had a high 'Relay' value as the input to the divide curve, a high multiplication factor and a high strength factor entering the 'Sphere Collide' component. I think for the 3D printing I would extrude the 'wireframe' model rather than the solid model as this would work better on fabric allowing for different tensions and shapes to form.
Here is how the simulation develops for a model with this high inputs:
I messed about abit trying to get the wireframe model to extrude and work for 3D printing but it was too complex so Petra suggested I just work on the outline like the first two pictures below.
- Extrude the walls using Offset / OffsetMesh to a value of 2.
- Use rectangular array to create the mesh array pictured, make sure the modules slightly overlap so that the fabric joins together.
I planned to 3D print these modules as the fabric itself instead of printing it on fabric.
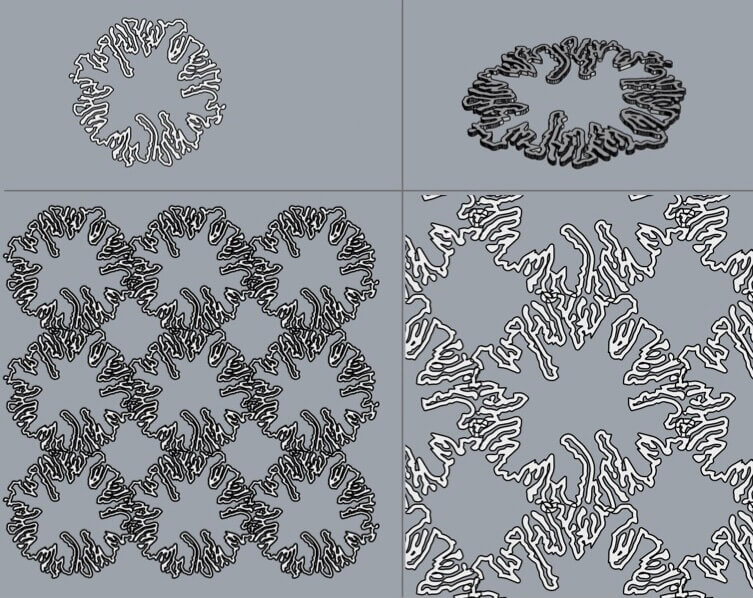
Now export this file as a .stl for the Ultimaker Cura :)
• • •
Design For Printing onto Fabric with PLA
Grasshopper Process
Our in-class tutorial with Dani introduced us to some skills in Rhino and Grasshopper by using the 'rectangular array' function, a geometry and a curve to create a parametric model which had different sizes depending on the distance from the geometry to the curve. I adapted it to add the 'polar array' function so that my design would form in a circle.
I followed these steps:
-
I tried to draw a similar organic looking module to my inspiration and set one geometry to the 'geometry' node.
-
I set one rectangle on the 'rectangular array' and adjusted the sliders.
-
I created a curve and set one curve to the 'curve' node.
-
I adjusted each slider until I got the desired effect and then baked the final product.

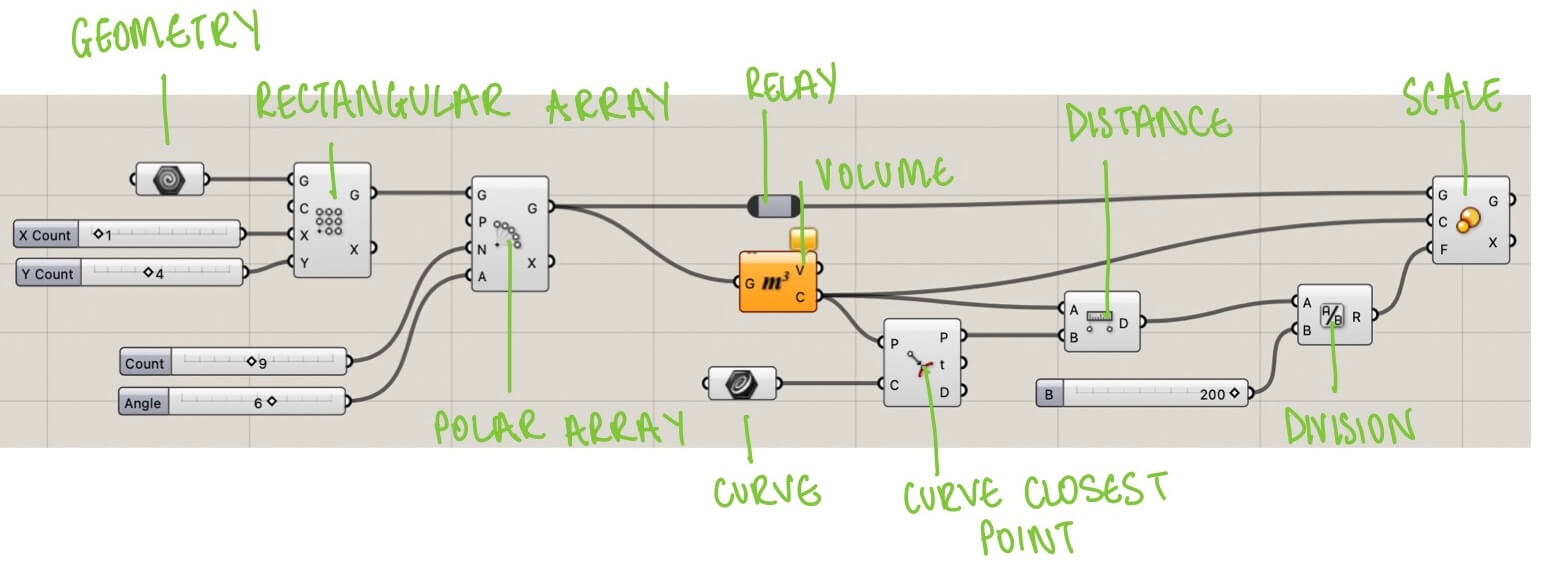
I realised when that I hadn't thought about scaling at all at this point and my model was huge! I didn't know how to scale these particular parameters so I am going to come back to it later on!
3D Printing
The 3 main types of 3D printing are:
-
Fused Deposition Modelling (FDM) / Fused Filament Fabrication (FFF)- melts and extrudes thermoplastic filaments, which a printer nozzle deposits layer by layer.
-
Stereolithography (SLA) - a laser cures thermosetting liquid resins in hardened plastic ('Photopolymerization')
-
Selective Laser Sintering (SLS) - a high powered laser fuses small particles of thermoplastic powder.
This week we focus on FDM printing! °❀⋆.ೃ࿔*:・
Below is a quick summary of some of the materials you can use for FDM 3D printing - the materials we have available for this week are PLA and TPU.
| Material | Features | Applications |
|---|---|---|
| PLA (Polylactic Acid) | - The easiest FDM materials to print - Rigid, strong, but brittle - Less resistant to heat and chemicals - Biodegradable - Odorless |
- Concept models - Looks-like prototypes |
| PETG (Polyethylene Terephthalate Glycol) | - Compatible with lower printing temperatures for faster production - Humidity and chemical resistant - High transparency - Can be food safe |
- Waterproof applications - Snap-fit components |
| Nylon | - Strong, durable, and lightweight - Tough and partially flexible - Heat and impact resistant - Very complex to print on FDM |
- Functional prototypes - Wear resistant parts |
| TPU (Thermoplastic Polyurethane) | - Flexible and stretchable - Impact resistant - Excellent vibration dampening |
Flexible prototypes |
| PVA (Polyvinyl Alcohol) | - Soluble support material - Dissolves in water |
Support material |
| Composites (carbon fiber, kevlar, fiberglass) | - Rigid, strong - Compatibility limited to some expensive industrial FDM 3D printers |
Functional prototypes |
3D Printers
In the FabLab in Barcelona the printers that we had access to were the Ender 3 3D Printer and the Bambu A1 3D Printer.
Ender 3 For this week this printer is better for the fabric based projects. Ultimaker Cura is the software used for this printer as it is open sourced
Bambu A1 This printer is better for the projects that are not 3D printing the modules onto fabric. Bambu Studio is the software used for this printer.
Exporting STL to Ultimaker
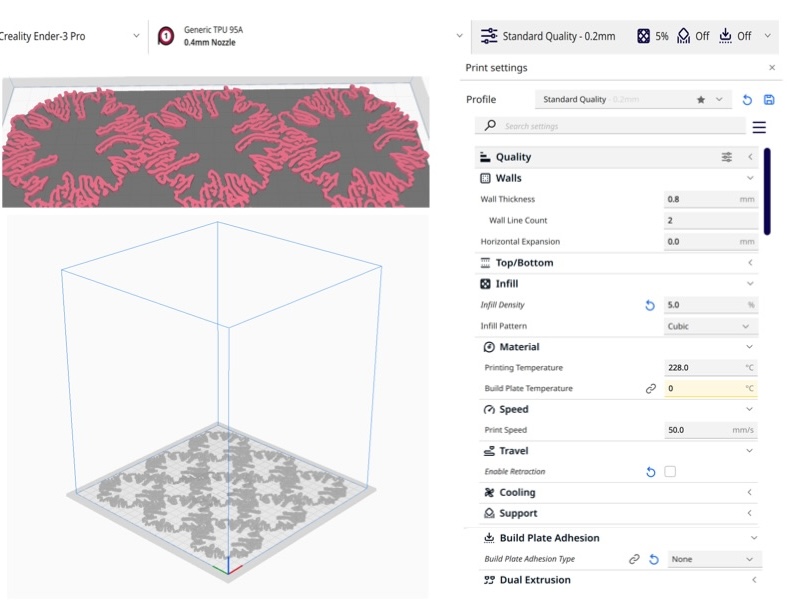
I uploaded the stl file to Ultimaker Cura and adjusted the settings to the ones pictured below. The programme suggested that the processing time would be around 2 hours.
Uploading File to the Printer
Ender 3
-
- Insert the USB stick into the 3D printer
-
- Callibrate the printer by clicking on 'Auto Home' - this allows the printer to find the (0,0,0) axes
-
- Make sure that the temperatures are correct - in my case the nozzle temperature was at 230 degrees. Main -> Temperature -> Nozzle
-
- Heat the bed to 60 degrees. Main -> Temperature -> Bed
-
- Wait and allow for the printer to preheat!
Remember!
- Once the printer begins it should print a practice line to allow filament to start flowing through the nozzle and to remove any previous colours.
- Make sure that the filament is sticking to the bed! After that the print should be okay.
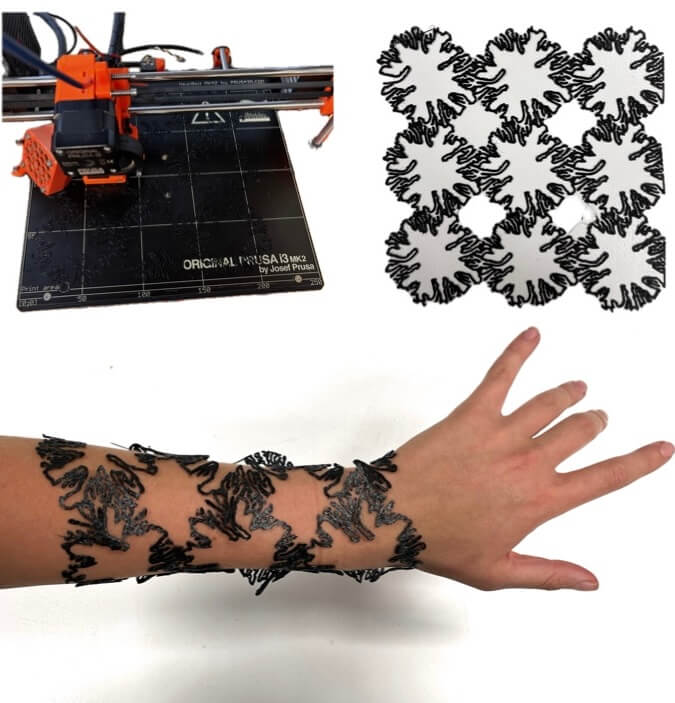
Final Product
Fabrication files
-
File: Bacteria Growth STL ↩
-
File: Web Grasshopper Code ↩