07. BioFabricating Materials
Week 07 | My favourite and most exciting week!! We learnt so many new biofabrication methods that I have wanted to try for so long. These include 3D Bioprinting; creating crafted materials such as bioplastics, biofoam and bioyarn; and creating grown materials using bacteria, mycelium and kombucha.
• • •
Introduction
Assignment
- Include some inspiration: research on artists, projects, platforms that work with biomaterials, local ingedients and resources
- Produce at least one crafted and one grown material, explore the different recipes and understand how to adjust them based on the ingredients
- Document your recipes, the ingredients and process and if there have been changes, document your unexpected discoveries
- Name your materials, classify them by typology and display them in a systematic order of samples
- Submit some of your swatches to the analog material library of your lab. (20cm x 20cm approx.)
I loved this week even and had quite a few ideas for future projects if I have time such as wound healing bioprinted accessories using plants such as aloe vera; scented materials using dried herbs or plants like lavender; I'd also really like to 3D bioprint some parametric earrings; using waste fibre from corn cobs in weaving yarn or making more robust biomaterials; crocheting an algae-yarn bag; algae-beads for jewellery; and using nutshells in a biomaterial :)
• • •
Inspiration
★࿐࿔Alumni: ★࿐࿔
-
Else Gill - comprehensive documentation
-
Zahia Albakri - glittering bioplastics using luster dust
-
Riley Cox - pearl jewellry ideas
★࿐࿔The Wider World!: ★࿐࿔

1Photo by Urban Reef on "Urban Reef - Printing with Life" | 2,3Photo by Rootfull on "Craftin Root / Material Innovation" | 4Photo by BioBabes on "Future Wardrobe Project" | 5Photo by BioMatters on "3D Printed Mycelium Based Composite and Algae Based Pigment Vase" | 6Photo by SoftMatters on "Imprimer La Lumiere" | 7Photo by BioCrafted on "Lucid Life" |
'Printing with Life': 3D printing with seeds within the biomaterial
Plant roots grow on templates which guide their shape as they develop
Biomaterial created from bioluminescent algae which can survive for around 6 months.
3D Bioprinting
Crafting a living jacket to raise awareness for the urgencies and opportunities related to rethinking our relationship with nature.
3D bioprinting bioluminescence.
• • •
Tools
• • •
Crafted Biomaterials
Key Words
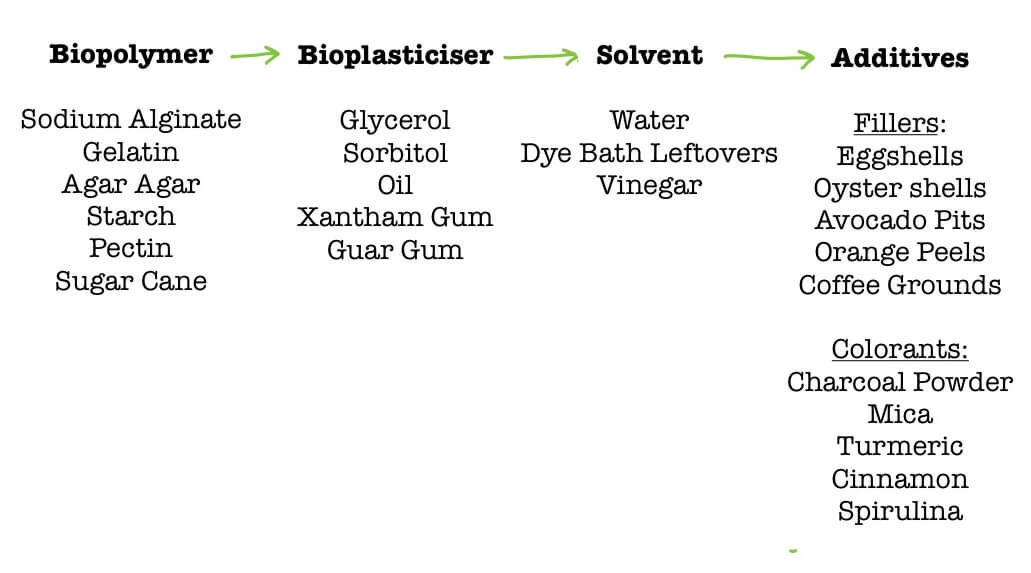
Biopolymer: a polymer that is produced/derived from living organisms
Bioplasticiser: an additive that is incorporated to impact softness and flexibility
Solvent: a substance that dissolves a solute, resulting in a solution
Additive: a substance that improves qualities or preserves the material. Characterized into fillers and colorants this week
• • •
Bioplastics
TIP!
Separate the gelatine, water and glycerol mixture into two and use the remaining for the Biofoam
Gelatin Based BioPlastic
- Biopolymer: Gelatin
- Bioplasticiser: Glycerol
- Solvent: Water
- Additives: Cinnamon (to prevent mold) and Spirulina
* 48g Gelatine
* 240ml Water
* 48g Glycerol
* Heated stove
* Pan
* Spatula
* Measuring cylinder
* Cast mold
* Digital weighing scale
* Heat up the water on a low heat.

* Measure the gelatin and add it to the water whilst stirring.

* Measure the glycerol and add it to the solution and keep stirring.

* Add the additives and mix until fully incorporated.

* Pour into the molds and leave to set for atleast a couple of days until completely dry.
Material Properties:

Agar Agar Based BioPlastic
Use the same recipe as above but replace:
- Biopolymer: Agar Agar
- Bioplasticiser: Glycerol
- Solvent: Water
- Additives: Red Mica
* 10g Agar Agar
* 300ml Water
* 16g Glycerol
Material Properties:

• • •
Biofoam
- Biopolymer: Gelatin
- Bioplasticiser: Glycerol
- Solvent: Water
- Additives: Cinnamon (to prevent mold)
* 48g Gelatine
* 240ml Water
* 48g Glycerol
* 1tbsp Washing up liquid
* Heated stove
* Pan
* Spatula
* Measuring cylinder
* Cast mold
* Hand Blender
* Digital weighing scale
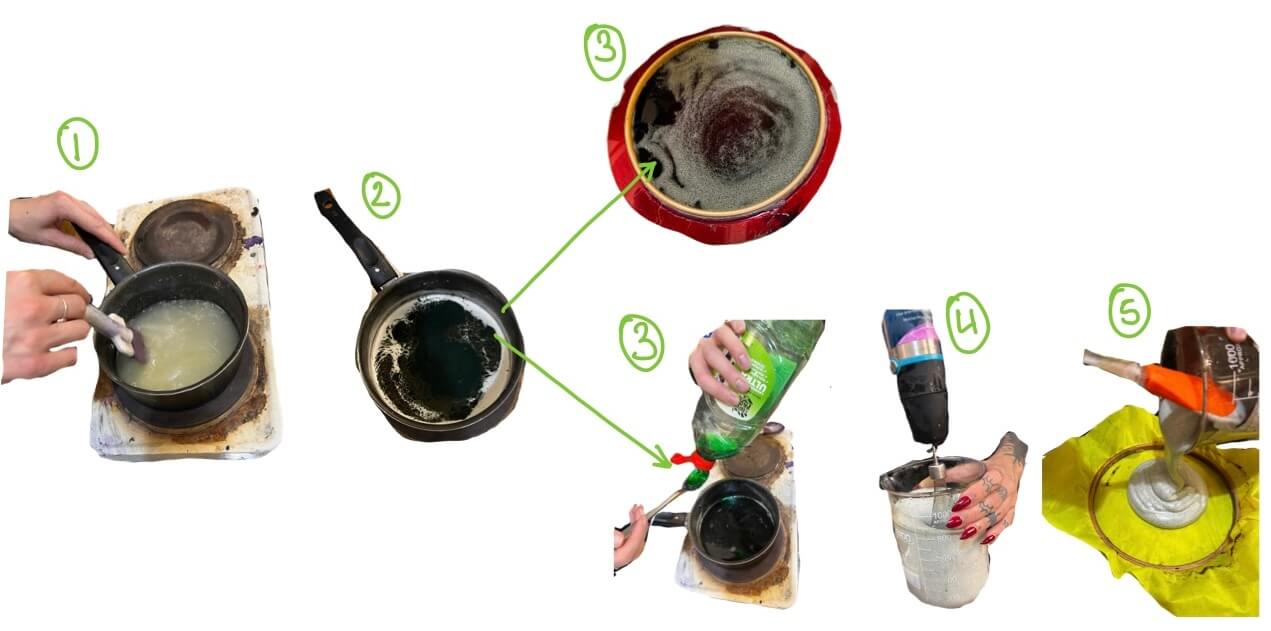
* After heating the mixture in the same way as the gelatin bioplastic recipe, take the solution off the heat and add the washing up liquid.

* Using the hand blender, blend the mixture until it at least doubles in size.

* Prepare the cast mold and pour the biofoam in.

* Let the biofoam set for atleast a couple of days until completely dry.
Material Properties:

• • •
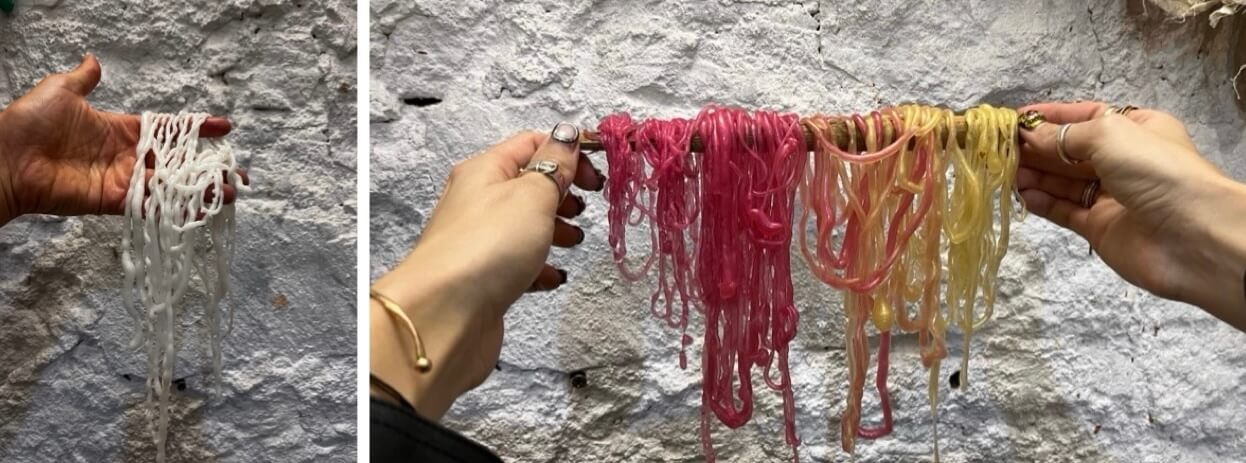
Bioyarn
To create Bioyarn which you could use for crocheting or bead making follow these steps!
TIP!
Separate the sodium alginate, water and glycerol mixture into two and use the remaining for the Bioleather
- Biopolymer: Sodium Alginate
- Bioplasticiser: Glycerol
- Solvent: Water
- Additives: Mica
* 4g Sodium Alginate
* 200ml Cold water
* 30g Glycerol

* 30g Calcium Chloride
* 300ml Cold water

* Mica for colouring
* Hand blender
* Syringe
* Measuring cylinder
* Spoons
* Gloves
* Digital weighing scale
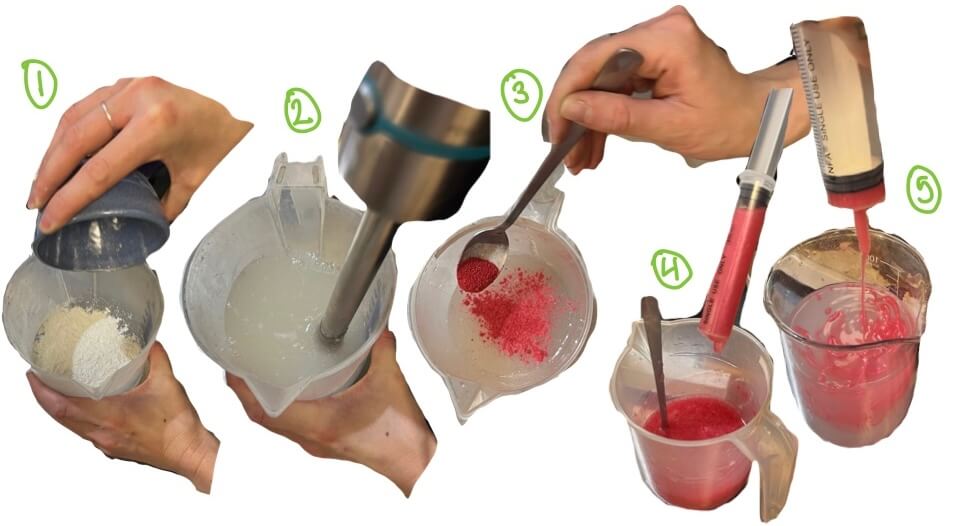
* Measure the calcium chloride and dissolve it in the water - leave to the side.

* Measure the sodium alginate and dissolve it in a separate measuring cyclinder of water.

* Blend the sodium alginate mixture with a hand blender for about 2 minutes - make sure to blend it on minimum speed to avoid bubbes forming.

* Leave mixture in the frige overnight so that the bubbles dissipate.

* Add the glycerol to the sodium alginate mixture [here is where you would divide the mixture into two] and any additives you want i.e Mica

* Transfer the mixture into a syringe and evenly push it over the calcium chloride solution

* Wearing gloves, lift out the solidified bioyarn and transfer it to another cylinder of water to rinse it

* Once rinsed remove the bioyarn and hang it up to dry which can take several days
Material Properties:

Crocheted BioBag in the process!!!
To create the white bioyarn I actually experimented with using Aquafaba after reading this article and researching Paula Nerlich.
I used:
-
200g of Aquafaba from chickpea bottles
-
300ml water
-
5g of Sodium Alginate
-
80g Glycerol
I blended them together and syringed them in the same way as above.
• • •
Bioleather
Using the divided Bioyarn mixture follow the steps below to create Bioleather!
- Biopolymer: Sodium Alginate
- Bioplasticiser: Glycerol
- Solvent: Water
- Additives: Spirulina/Mica etc
* 4g Sodium Alginate
* 200ml Cold water
* 30g Glycerol

* 30g Calcium Chloride
* 300ml Cold water
* Hand blender
* Syringe
* Measuring cylinder
* Spoons
* Gloves
* Digital weighing scale
* Casting mold
* Spray bottle
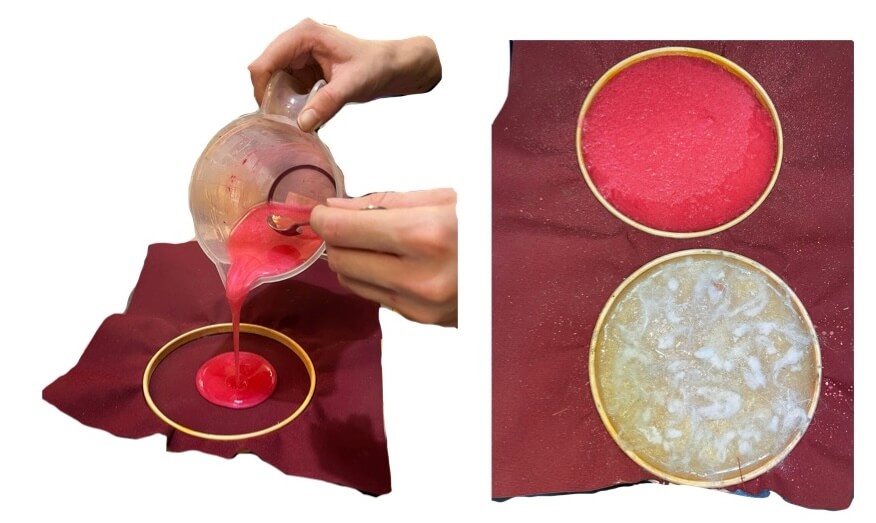
* Add the desired additive (i.e. spirulina) to the Bioyarn mixture of sodium alginate, water and glycerol and mix.

* Prepare a casting mold with appropriate fabric as the base.

* Pour the calcium chloride solution into a spray bottle and spray it over the fabric and casting mold making sure it covers it evenly.

* Pour the sodium alginate solution into the cast and spray more calcium chloride solution on the top - you should notice the top layer begin to shrink.

* Leave to dry for at least 3 days
Material Properties:

• • •
Resin-Based Biomaterial
- Biopolymer: Resin
- Bioplasticiser: Wax
- Solvent: Alcohol
- Additives/Filler: Wood Chips
* Resin
* Wax
* Alcohol
* Woodchips
* Measuring cylinder
* Spoons
* Gloves
* Digital weighing scale
* Casting mold
* Melt the pine resin on a low heat.

* Measure the wax and add it to the pine resin - still on heat.

* Measure the alcohol and add it to the mixture, continuously stirring.

* Once all has melted add the additive/filler and continue stirring.

* Working fast, take the mixture off the heat and put it in the pre-prepared mold before it sets.

* Let the biomaterials set for at least 15 minutes.

Material Properties:

• • •
Grown Biomaterials
🦠!STERILISE! !STERILISE! !STERILISE!🦠
Health and Safety
All grown biomaterials need to be handled and prepared in a completely sterile environment to avoid contamination and mold forming. You need alcohol spray, gloves, lab coat and a face mask always!
Mycelium
* A few medium sized chunks Mycelium from grow kit (includes sculpting mix (1 tbsp))
* 1/2 tbsp Guar Gum
* 1 tbsp Flour
* 4/5 tbsp Distilled water
* Charcoal
* 30g Filler (e.g sawdust, hay)
* Bowls
* Spoons
* Gloves
* Alcohol spray
* Autoclave bags
* Molds
* Cling film
* Wall pin
* Photo box
* Pressure cooker
* Chop up the hay into small pieces.

* Put the hay, sawdust and any equipment you want to be sterilised into separate autoclave bags. Then place them into the pressure cooker on the 'meat' setting for 40 minutes.

* To the hay add the flour, guar gum, charcoal and scuplting mix.

* Using sterlised tweezers, add the mycelium mixture to the hay mix.

* Measure the distilled water and add enough distilled water so that the hay is not dry. !KEEP SPRAYING ALOCHOL ON YOUR GLOVES AND EQUIPMENT ALL THE TIME!

* Prepare your mold by covering it in cling film and spraying alcohol across the whole surface.

* Put the mixture into the mold and cover everything with cling film. Using a pin, poke holes in the cling film to allow the mycelium to breathe.

* Place the molds into a photo box for a week

* Once grown, to kill the mycelium either dry the biomaterial out in the sun or bake it in an oven at 50-60degrees for 4 hours.

Material Properties:
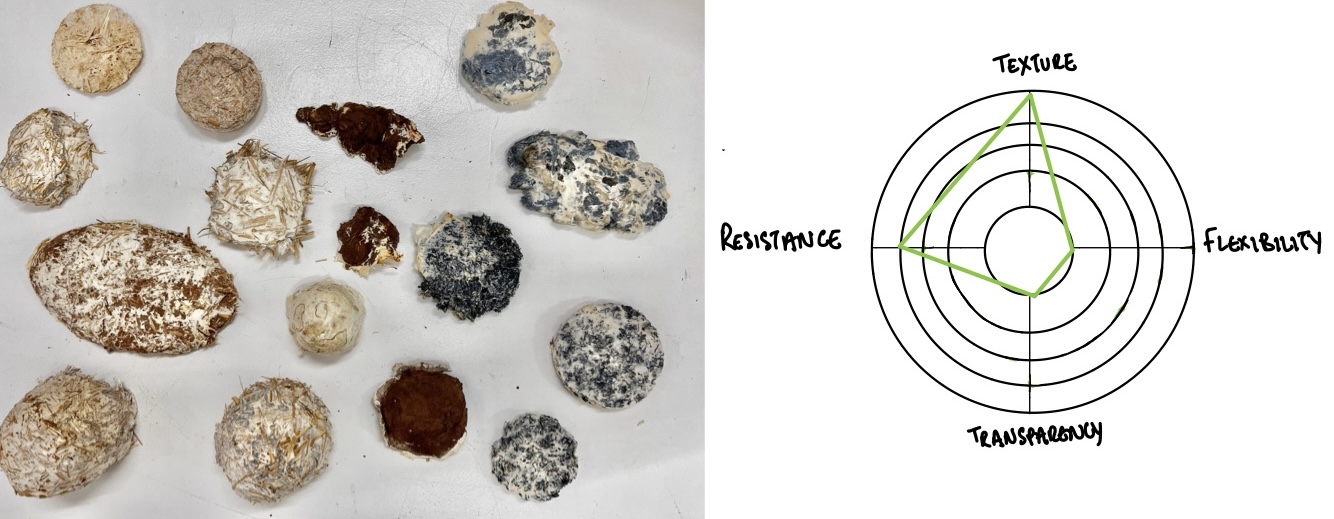
From left to right: Mycelium with straw, Mycelium with sawdust, Mycelium with denim offcuts
• • •
Kombucha
With the Kombucha recipes we need to test the PH levels
- add vinegar to decrease the PH
- add baking soda to increase the PH
Wine - Tea - Beer
Wine
* 0.75L Wine
* 100g Sugar

Tea
* 2 Bags Green Tea/Black Tea
* 2L Boiled water
* 200g Sugar
* 200ml Vinegar

Beer
* 300ml Beer
* 300ml Boiled water
* 60g Sugar
* 60g Vinegar

* Scoby
* PH strips
* Large containers for the liquid
* Hot stove
* Spoons
* Measuing cylinder
* Breathable fabric
* Tape
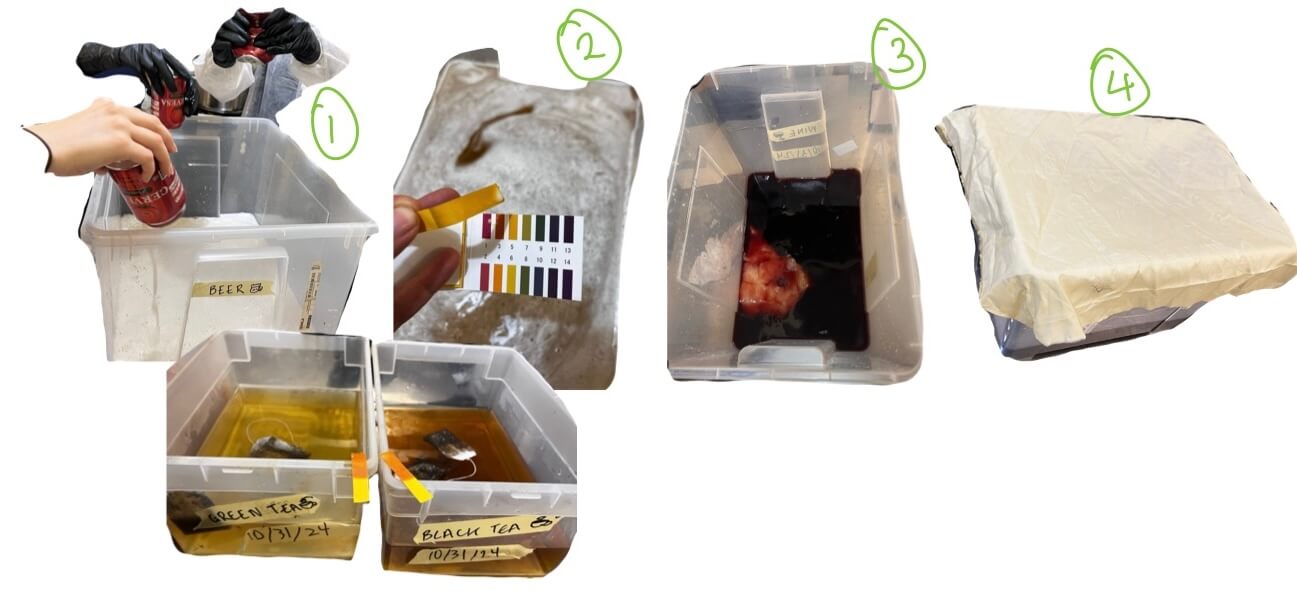
* Add each base liquid(beer, wine, tea) to separate large containers.

* Measure the water and add it the the tea and beer mixtures.

* Measure the sugar and add it to all the mixtures.

* Measure the vinegar and add to the tea and beer mixtures.

* Test the PH of each mixture using a PH strip - you want the PH to be between 3 and 4.5 .

* Add a piece of scoby about the size of your hand to each mixture.

* Cover the containers with breathable fabric and tape to the box. Leave the containers for a few weeks for the biomaterial to grow.
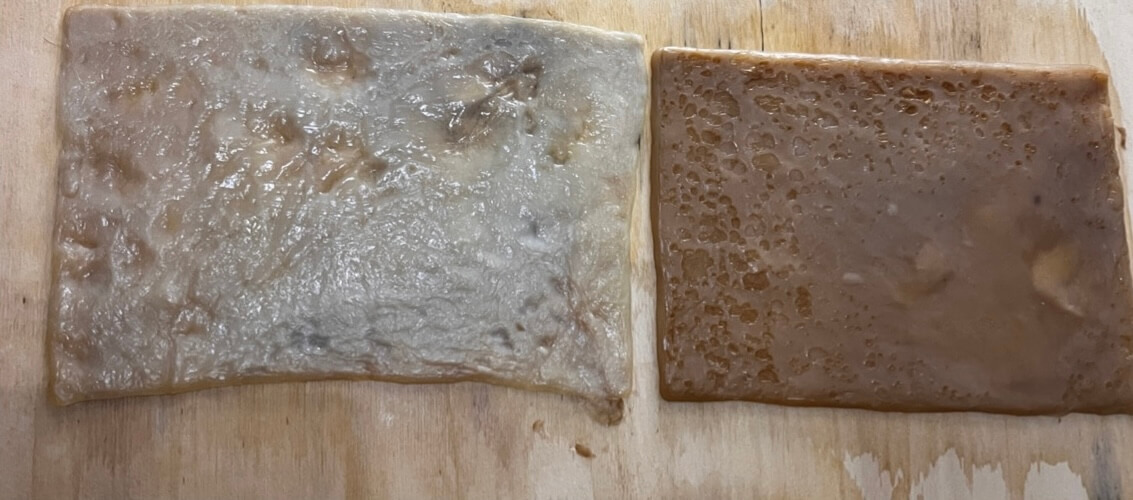
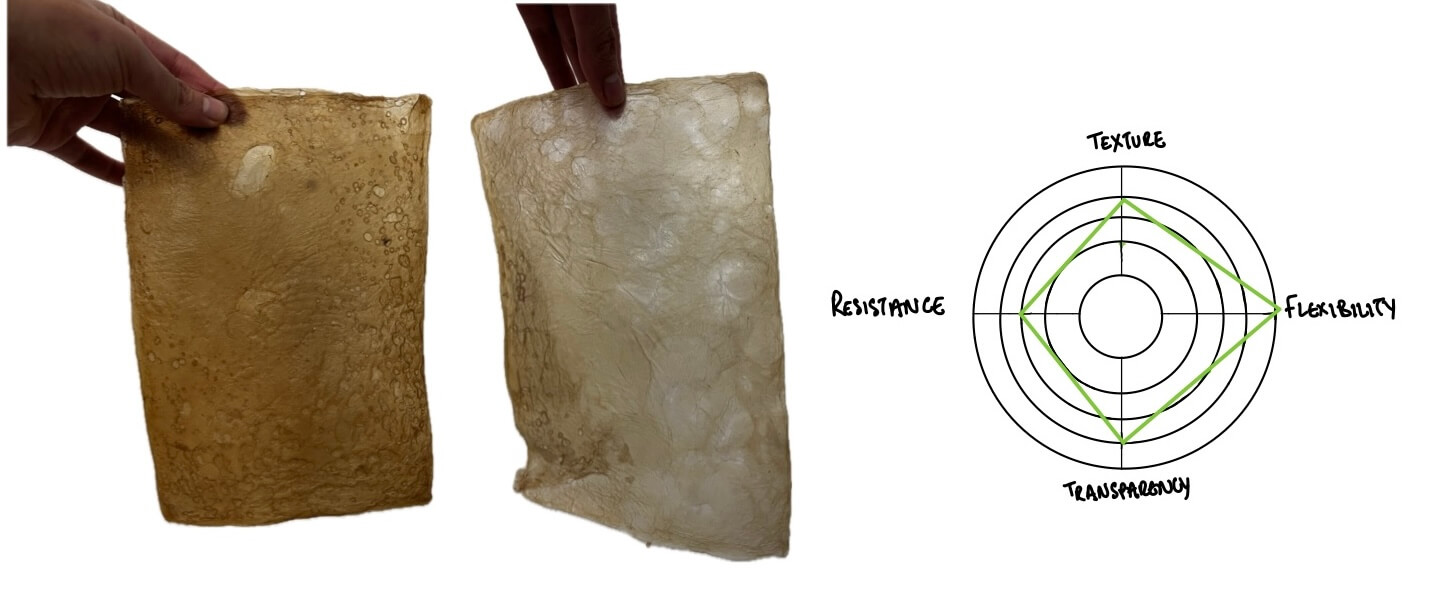
Kombucha Drying
Material Properties:
• • •
3D BioPrinting
We learnt how to 'paste bioprint' using a dough-like material with a basic recipe of....
Sodium Alginate and Glycerol
* 4g Sodium Alginate
* 5g CMC Cellulose
* 200ml Water
* 1 tbsp Glycerol
* 5 spoons of filler

Guar Gum
* 8g Guar Gum
* 200ml Water
* 7 spoons of filler
* Hand blender
* Digital Scale
* Measure all the ingredients out and hand blend them until thoroughly mixed to 'tooth-paste' consistency.

* Knead the mixture like a dough.

* Fill the printing cartridge by placing it upside down and twisting it in the dough, repeating this process until full or the dough is finished.

* Place the inner cap on the end of the cartridge and wipe the excess off thoroughly to avoid any gas leaking later on. Place the final external cap on after the edges are clean.

* Connect the cartridge to the air pressure tank to remove any last bits of air in the vessel.

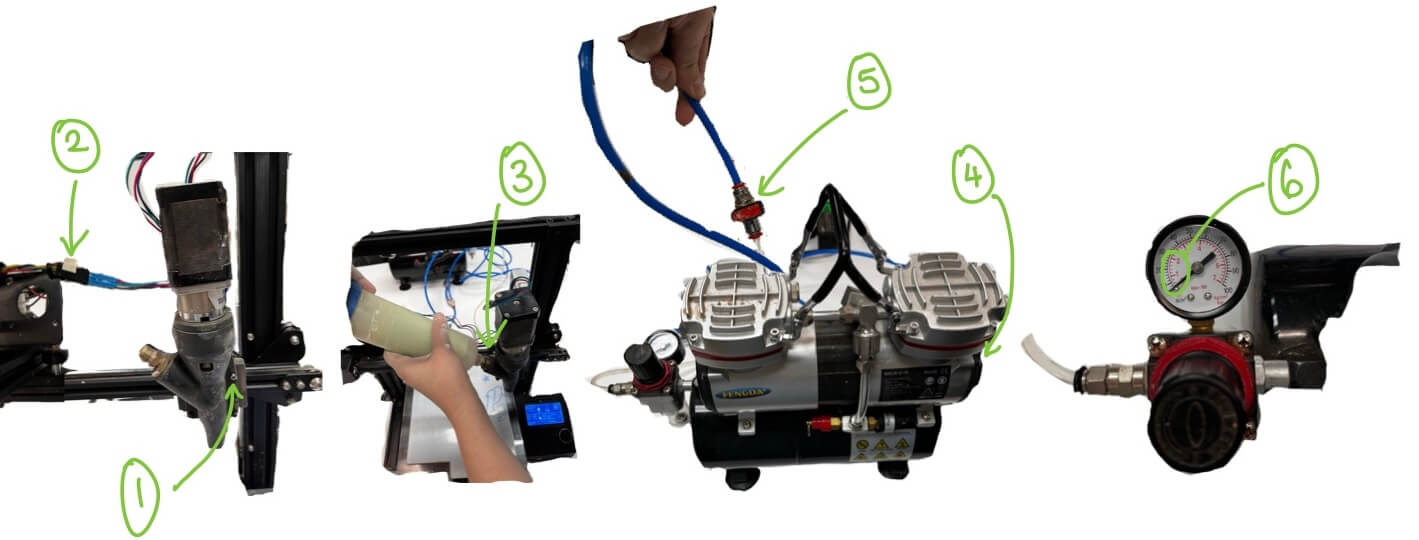
* Connect the cartridge to the 3D printer at the connection shown in the photo below - make sure it is firmly twisted in.

To set the bioprinter up follow these steps:
- Screw the nozzle to the arm
- Connect the wires: black to black, red to red
- Connect the air pressure machine to the cartridge and remove excess air
- Connect the cartridge to the nozzle
- Turn the air pressure machine on
- Open the air valve
- Adjust the air inflow between 2-3 bars of pressure
Material Properties:
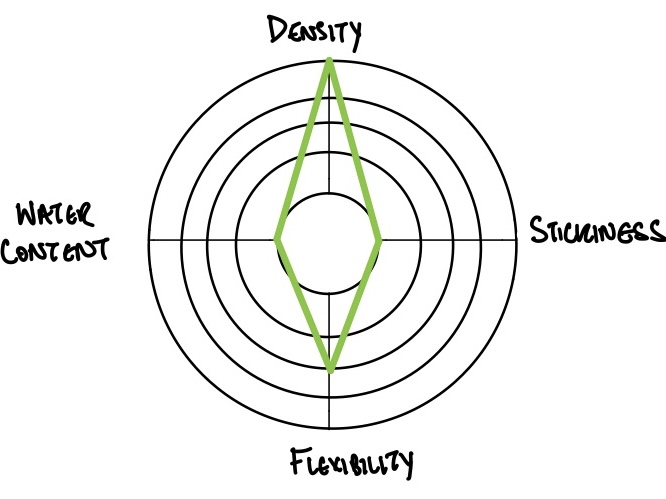
These are the desired properties of the 'bio-dough':
This video produced by Fab Lab Barcelona is very helpful! :)
For the next step which involves sending the 3D design from the computer to the printer I recommend following Petra's 3D Bioprinting Presentation and downloading:
-
Repetier - creates the G-code for Cura
-
Mamba for Rhino 3D - PlugIn for 3D bioprinters
-
Cura Slicer 5.8 - slices the 3D model for printing
• • •
Waste Coffee Grounds Bioprint
I experimented with creating a waste coffee grounds bioprint paste using the recipe above.
I wanted to create some vases so I followed this youtube tutorial, Grasshopper Tutorial for Beginners: Vase Design.
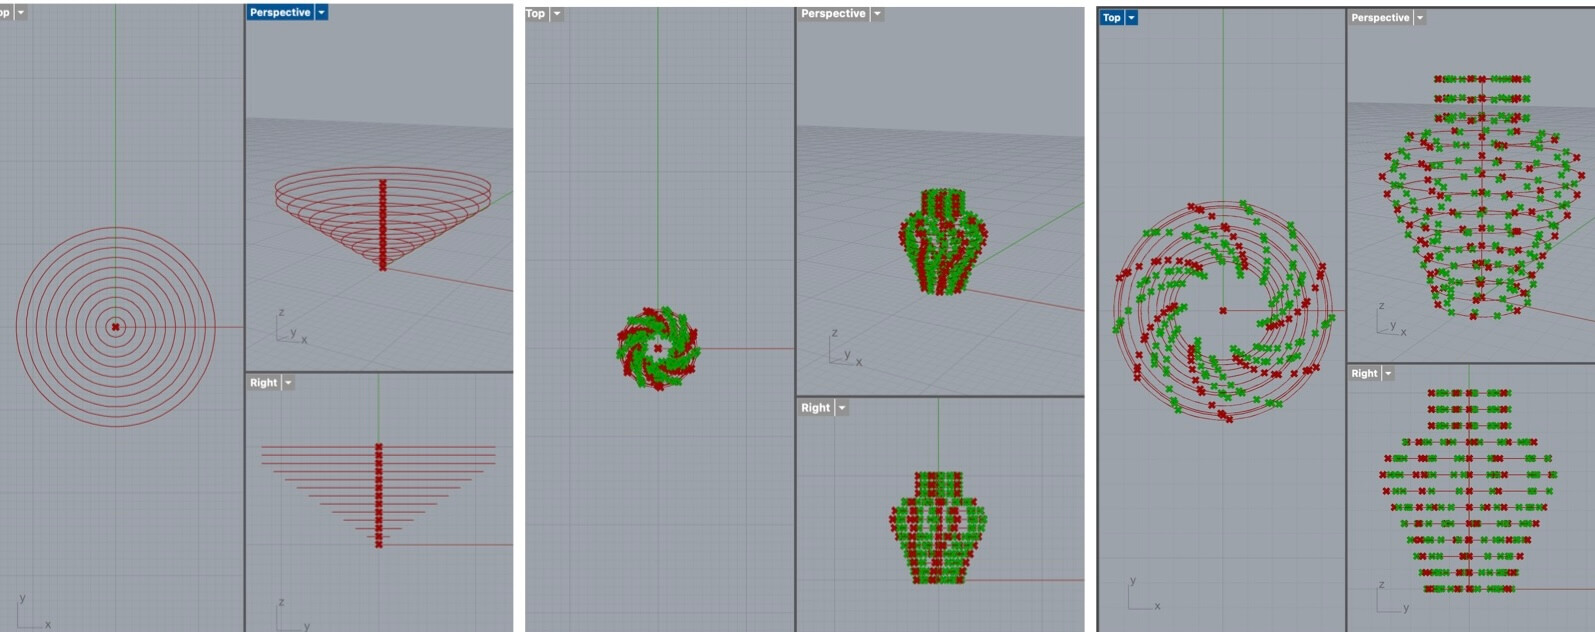
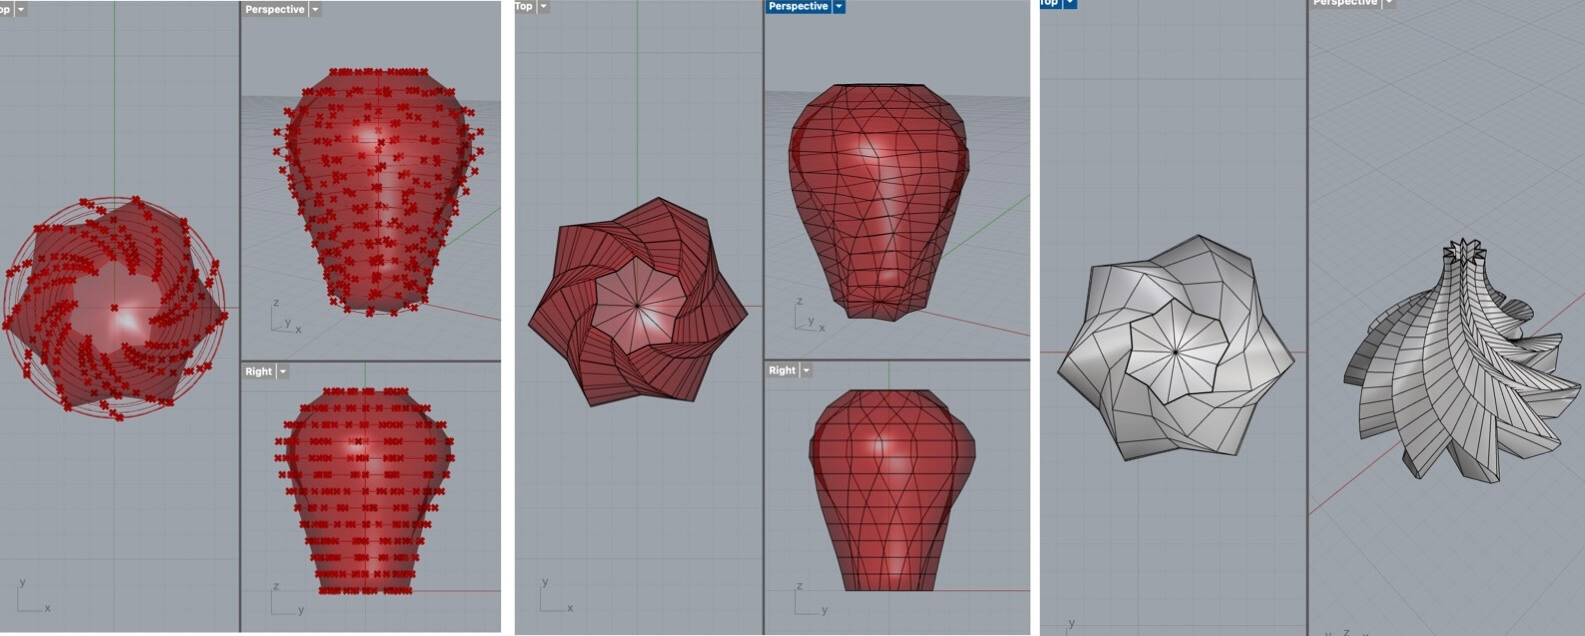
The final grasshopper code is below, playing with the number sliders allows you to completely change the geometry and create so many variations of vases. Once you are happy with a design, right click on the final command and press "bake".

I created many different variations, experimenting with the funneling and base width, height and rotation factors.
The shapes that would work best for bioprinting are more the vases towards the right.

I exported one of the models .stl file into Ultimaker Cura and scaled it appropriately.
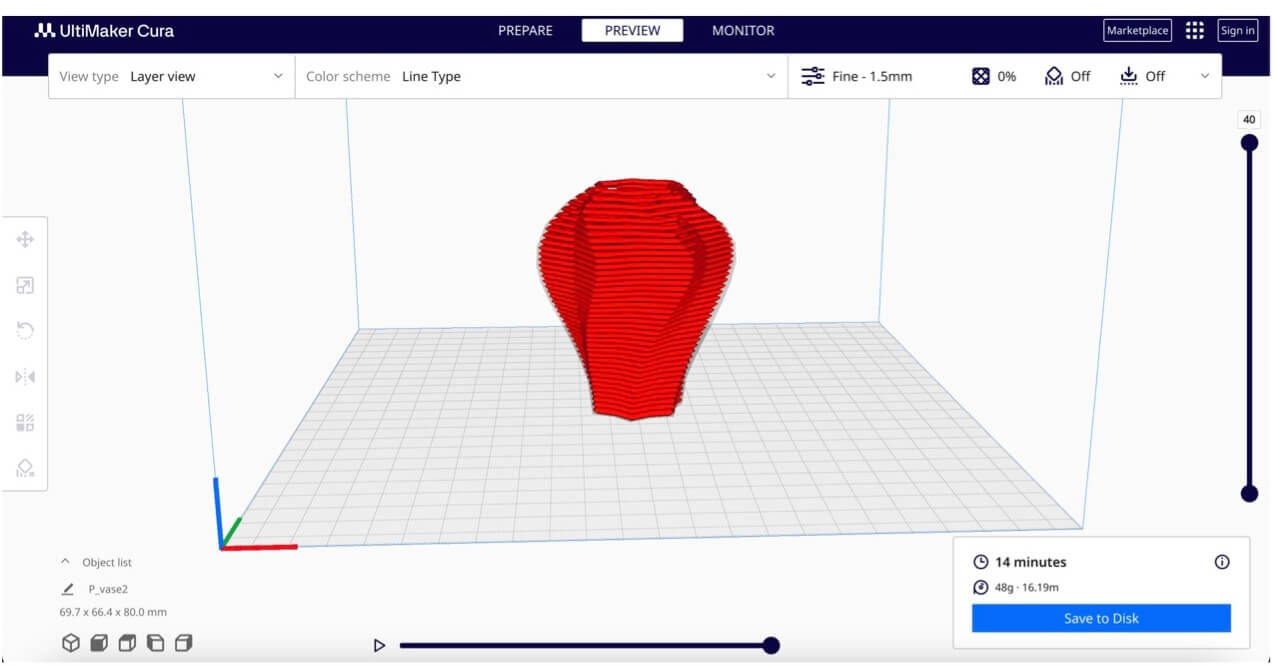
Petra showed me which settings to use:
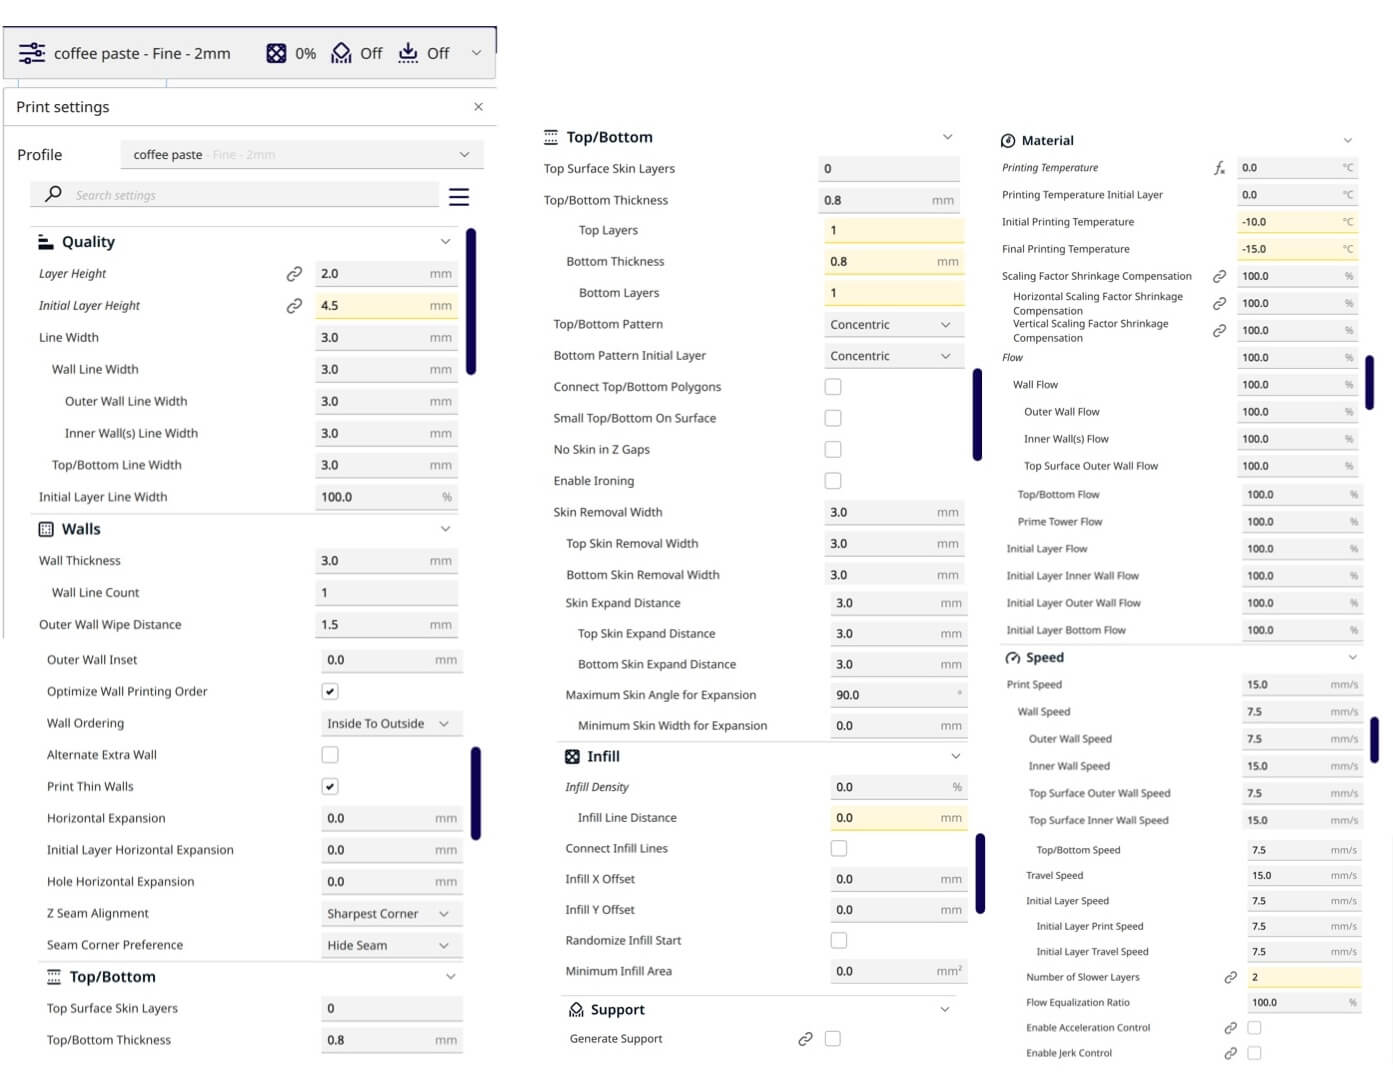
Along with the above settings make sure to search for and tick 'Spiralize Outer Contour". We also used 3bar pressure on the air compressor.
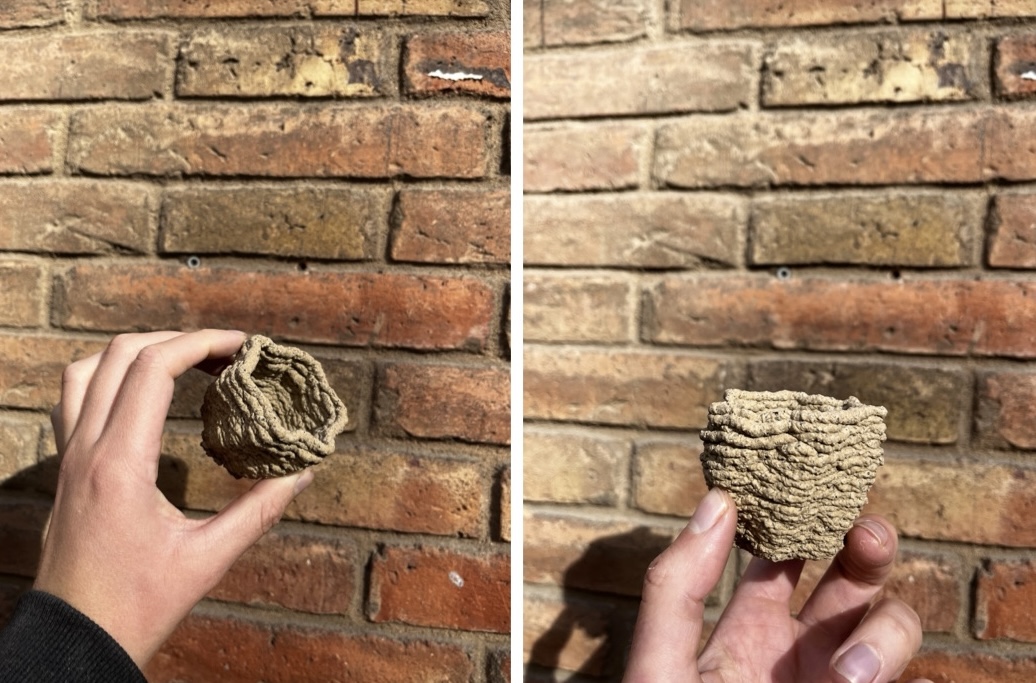
After setting up the printer and putting the coffee dough into the syringes, I was ready to print. I did a test print first to see how the material behaved with slight overhangs and also how it dried. We decided to stop the print halfway as the design I chose had too much of an inward slope on the top half, so it would have collapsed. Knowing this allowed me to go back to Rhino and create some geometries that aren't so curvy.

The final test result held its shape pretty well and dried fully within a day!
• • •