06. BioFabricating Materials
BIO-FABRICATE ME :)
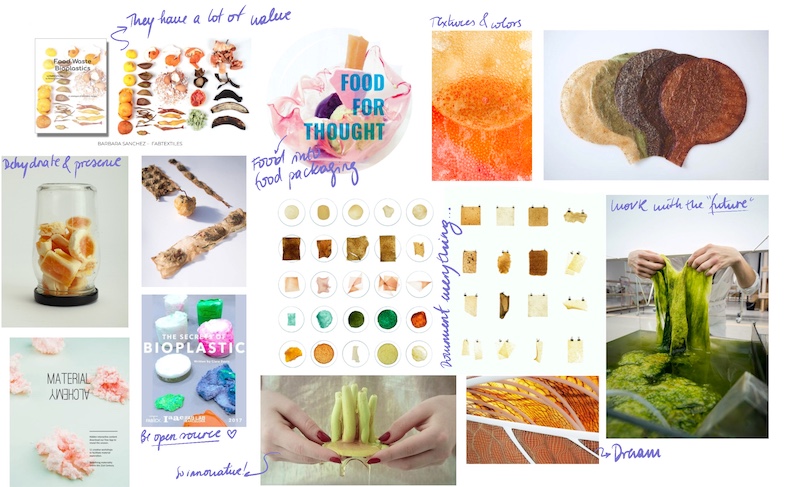
First of all let me explain you that this week was one of the main reasons that I've come to Fabricademy. Being able to create materials from bacterias, funghi or even from food waste...makes my heart jump. That's why in my pinterest board you could find all the different kind of biomaterials: it's been a collecion from years :D So imagine how long did I take to try to make up my mind in deciding which photos could go in my moodboard haha.
BIO-TUESDAY
We started learning the context, the confusion for the word plastic as an in plascitity; the difference meanings of the prefix Bio in the words: bio-based, biodegradable, biocompostable…
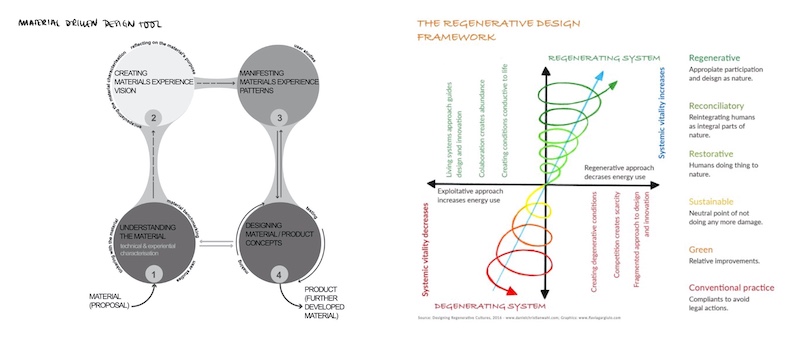
I would like to encourage people to really follow the Material Driven Design tool (MDD) as it guide you to understand and work with a material. Getting to know it takes time, but it’s worth it because if you fully comprehend it (its properties, interaction, appearance, environment conditions…) it would be truly part from your design.
Let’s design with a regenerative objective, it is not enough being sustainable. We need to recover our planet, and that can’t be achieved by being neutral; it is by giving more good than bad. Here’s a little graphic that helps to understand how regeneration works.
And how we, as designers, makers, artist, scientists… can help?? By using materials that come from earth, that don’t need toxic additives or processes; the ones that can use waste to grow; those ones that feed our grounds when their live is over… give an opportunity to this amazing world
KOMBUCHA
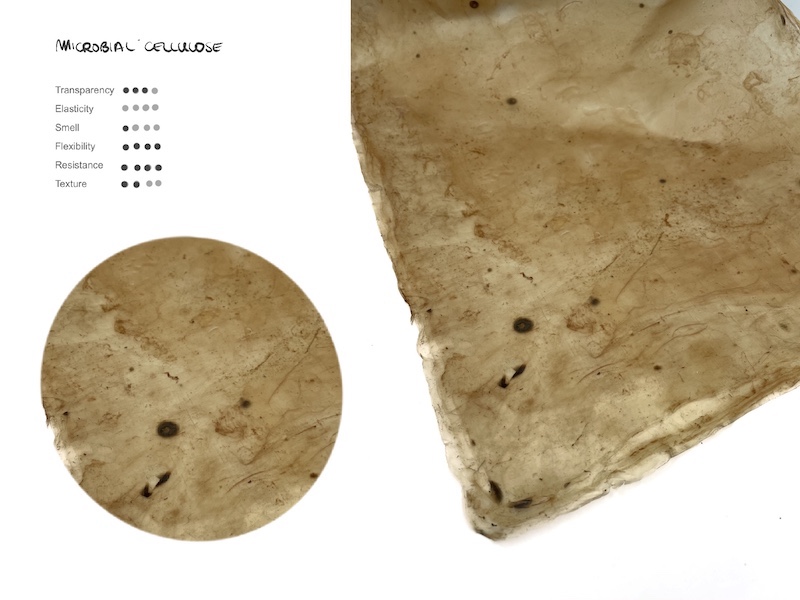
Before listening to Lorena Trebbi's recitation about her amazing work around kombucha we had a precious moment in the center while conmemorating Fermina's dead. Fermina is a one month old Scoby, that is going to turn into a microbial leather. But first the recipe that created Fermina:
How to grow your SCOBY
Ingredients:
- 1 cup of white sugar per 4 cups of water.
- Growth medium. 4 teabags: it must be green or black
- Starter Scoby (Eternal funghi): Mother of Fermina
Lorena’s kombucha tea recipe: - 1L water - 3teabags - vinegar - 100gr sugar (10%) - scoby
Tools: - Container, the socovby will have that shape - Lid or cloth (be sure that the oxygen can move through as it is an aerobic fermentation. They can be >secured with tape, rubber bands or laces. - Scale - PH meter or pH strips and leve it at the botton of the container
Esterilize your container. The size of it interacts with the possibilities of contamination. As bigger the container the more the chances of contamination as it has more surface in contact with the air. But with a smaller container (and ideally made from glass) the chances are very reduced.
Boil the water so the tea can be infused. Add the sugar and dissolve it in the liquid. Let it cool down before you introduce the mother, because if not…you won’t create life. If you want to color your kombucha you need to introduce it in the broth. It could be beetroot juice, hibiscus, wine, coffee grounds…
Cover it with a fabric. Be aware that it can’t touch the liquid so it needs to be tense. Ideal temperature 25-35º.
Let it grow! The scobby will grow in the surface. Check it regularly and when there’s no much liquid, feed it with the same proportions of 1 sugar-4 water. However if you want a perfect appearance and result, you need to measure how much food it is going to need before starting the fermentation. This is because every time you feed the microbial cellulose the liquid is going to be above and not on the bottom: the liquid must be always at the bottom.
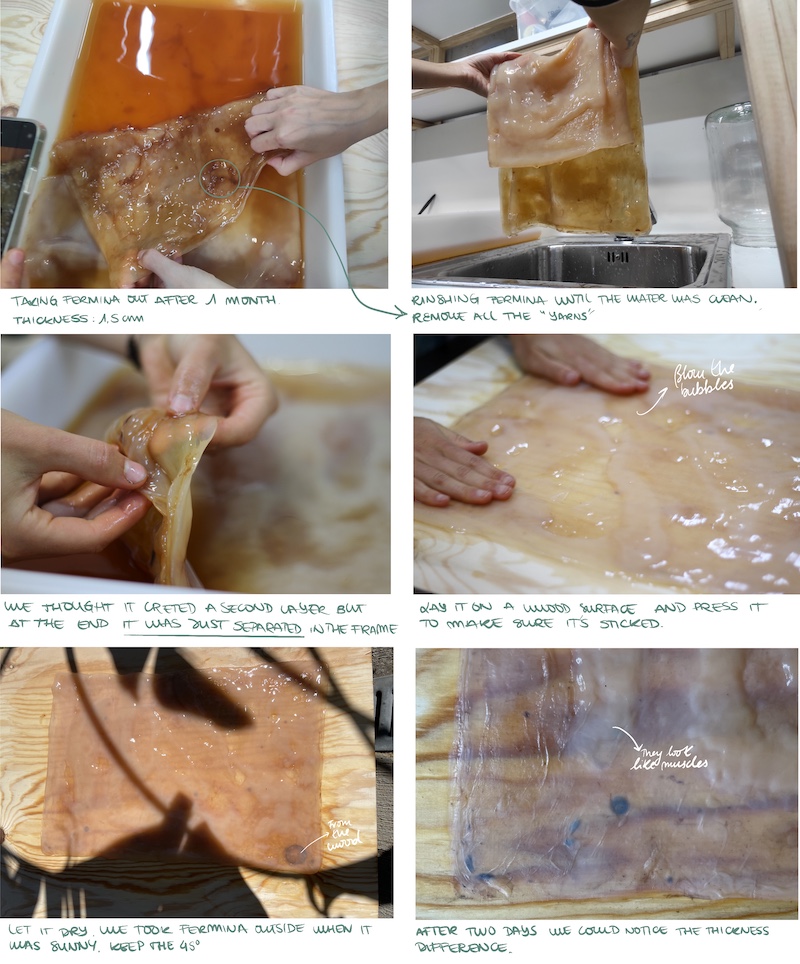
After 1 month we took it from the culture growth and wash it. Lorena said with soap but we didn’t use it, but we rinsed it many times until we took everything off and the water came clear. We took out the bumps from the sides but we couldn’t remove the ones from the interior: they would appear in the dried piece and act as a texture.
Don’t throw the broth because it is reusable and in the next fermentation you could use it as it has a lot of nutrients in it. You need to put it in a closed jar and keep it in the fridge.
You can layer the material if it is not thick enough and let it dry together. They would join during this process. You can also shape the material but you need first a mold.
Other Kombucha recipes from Lorena Trebbi:
BEER RECIPE - 500 ml beer - 500 ml water - vinegar - 100gr sugar (10%) - scoby
SOLID WINE VERSION - 0,75 wine - 100 gr sugar - vinegar - scoby
LIQUID WINE VERSION - 0,75 wine - 100 gr sugaR - scoby 70% SOLUTION
MYCELLIUM. Bringing Ma-ka to Bilbao
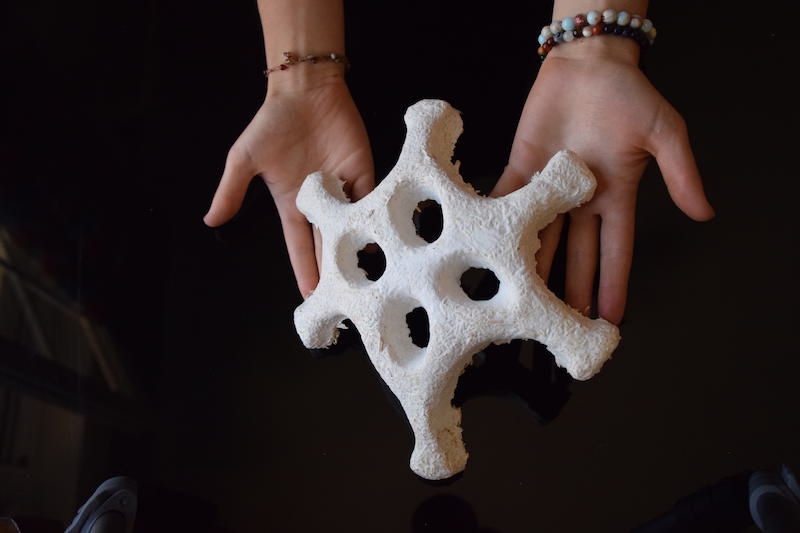
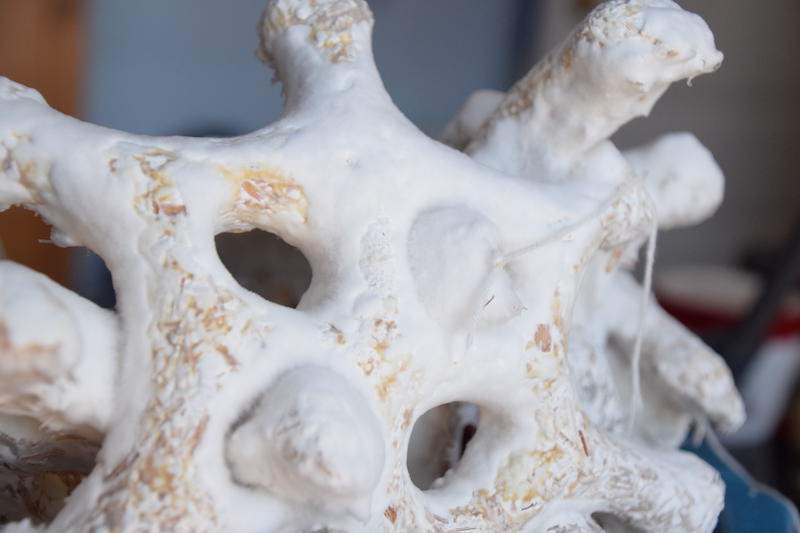
Ma-ka is my final project from my degree that I'm grateful to continue and improve while being in Fabricademy. We used the mycomaterial from Grow-Bio as we wanted to bio-fabricate and experience its latest phases.
This project aims to bring closer, raise awareness and teach the wide possibilities of the new material culture. It is an organic and playful macro-textile that brings the shapes and materials from nature into the spaces.
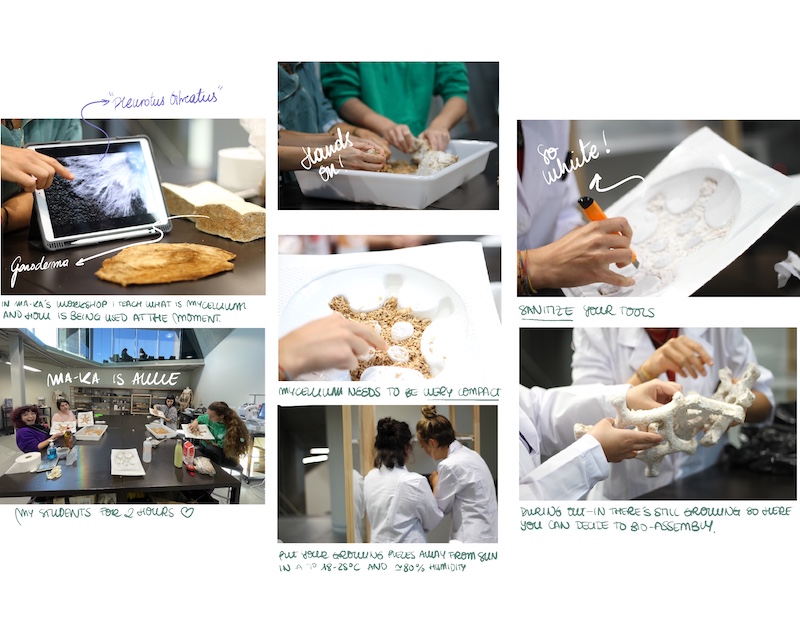
Hear Ma-ka is the sub-project that focuses in the co-creation of the structure. Through educational workshops, participants would learn what mycelium is, how it can be applied to our lifestyles, how we can interact with it. Each piece is going to be bio-fabricated by every single participant. This is the representation that we, all together, can fight climate change.
To developed this project I attended two different courses to learn more about organic materials and how they interact with the environment. One course was called Bio-Upcycling from BiologyStudio and the second one was Mycomaterials: biofabricating with mycellium
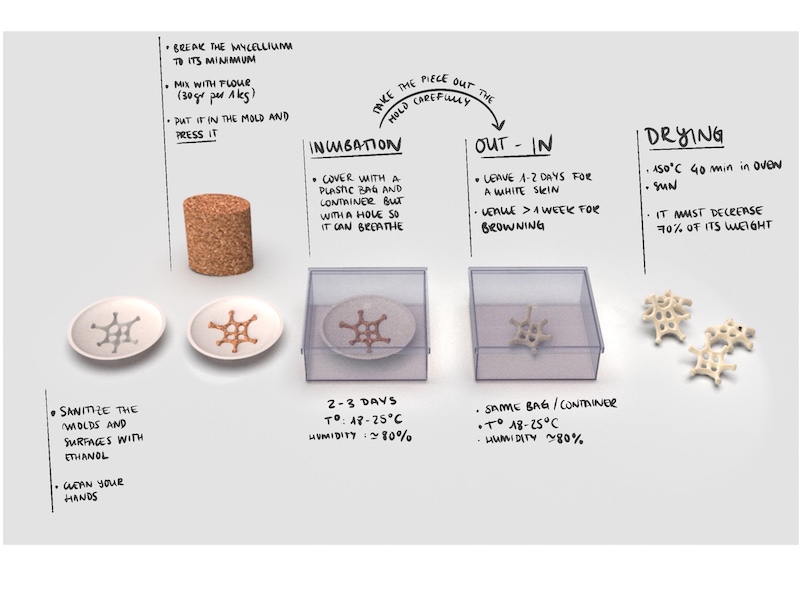
I was flattered to be asked to do the mycellium workshop (Hear Ma-ka) in my center. I started with a little recitation where I explain the context, what is mycellium, how designers are using it, how can we apply it to our lifestyle, the differences between types of mycellium, what are they going to bio-fabricate and why. After that we start with the practical part where we disinfect the surfaces, molds and hands.
Here you can see a video where all the process is explained:
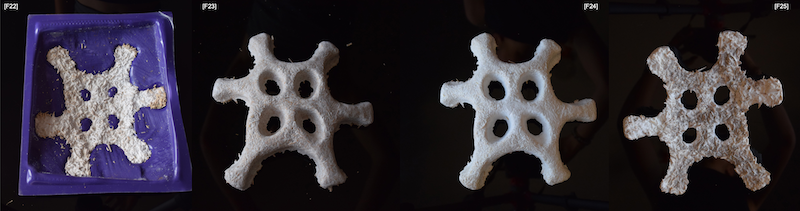
A very special part (my favorite one) is the bio-assembly that you can achieve with mycellium. After demoulding the pieces, they're still alive and they keep growing. So if you place them together, a skin would grow between the parts and join the pieces. After drying it would be totally assembled.
My objective from this point it's to experiment with growing mycellium since the beggining and trying to multiplicate it to the different processes.
BIOMATERIALS: BANANA BIO-LEATHER, CHESTNUT SHELLS BIO-PLASTIC AND BANANA-WATER PLASTIC.
My main objective for the week around creating biomaterial was to develop a laser cut material. As I already experimented with bio-plastics and composites, I wanted to focus on food waste leather.
First I want to show you some of this Previous work: composites made from "algarroba". This biomaterial was developed in order to use it as a prototype for Maka.
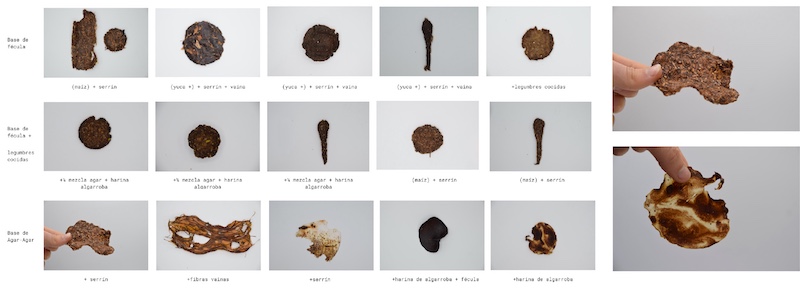
This first experimentation was done during my Bio Up-cycling course, where we were asked to have in mind what we wanted to achieve. This helps to decide which recipes are you going to use rather than making all of them without a purpose. Experimentation is really important and if you haven’t done any around the biomaterial field, it’s useful to test them. But you should know that you’re also creating waste.
"The use and transformation of biological and bioorganic waste to manufacture new materials and products >that can be reintegrated into the production chain and the environment to produce more value" (Medina & >Lopez, 2019).
I found very helpful the Life Cycle Analysis tool (LCA) where you write down all the inputs and outputs: material, tools, energy, waste…. It makes you realize the impact that you’re having with your experimentation.
CHESTNUT SHELLS LEATHER AND BIOPLASTICS.
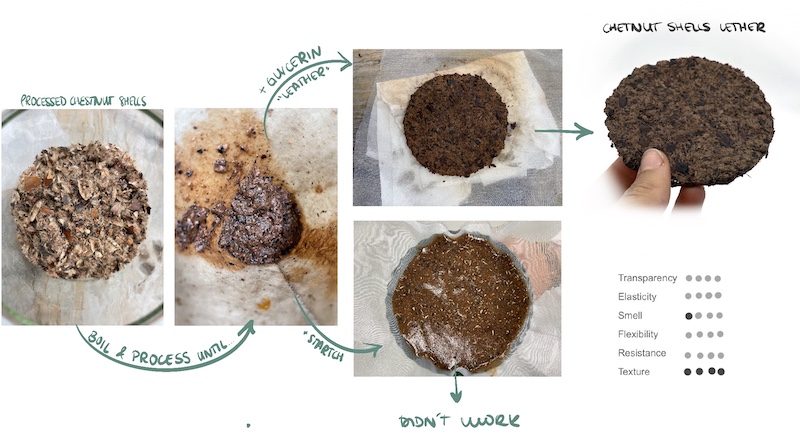
Chestnuts season has arrived to Bilbao, so as a lover I’ve been eating them every single day. The first time I wondered if the shells could be used to bio-fabricating.
After collecting a bunch, I processed them and I was amazed by its texture. It had a kind of fuzz, as well as the shell. Asking Adele, we decided that I could give a try creating a leather. Nevertheless, after simmering the shells so they could be processed, I knew that they weren’t going to join well enough to make a leather.
Chestnut shells leather recipe:
- 40 gr chestnut shells
- 1-2 tsp of glycerin
- 20 ml vinegar
- Water for boiling
I divided the mixture into two parts so I could test them apart. I added more glycerin to see of that would help joining: it did! (Apparently…). The other part I used it as a filler in a basic starch bioplastic.
Basic starch bioplastics recipe (for medium flexibility):
- 10 gr glycerin
- 80 ml water
- 1,6 gr corn starch
- 15 ml vinegar
- Chestnut shells as a filler
BANANA BIO-LEATHER
So first of all, I spent a lot of time looking for a good recipe for banana leather. Adele (our director) gave me one that they’ve been sharing through material driven.
Original recipe:
- 3 banana peels (40 gr pulp)
- 1-2 tsp of honey
- 20 ml vinegar
- Water for boiling
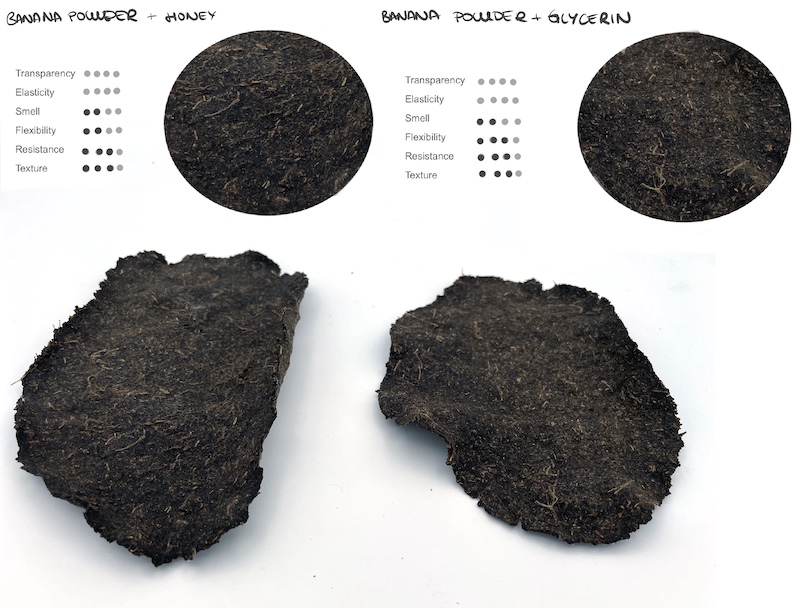
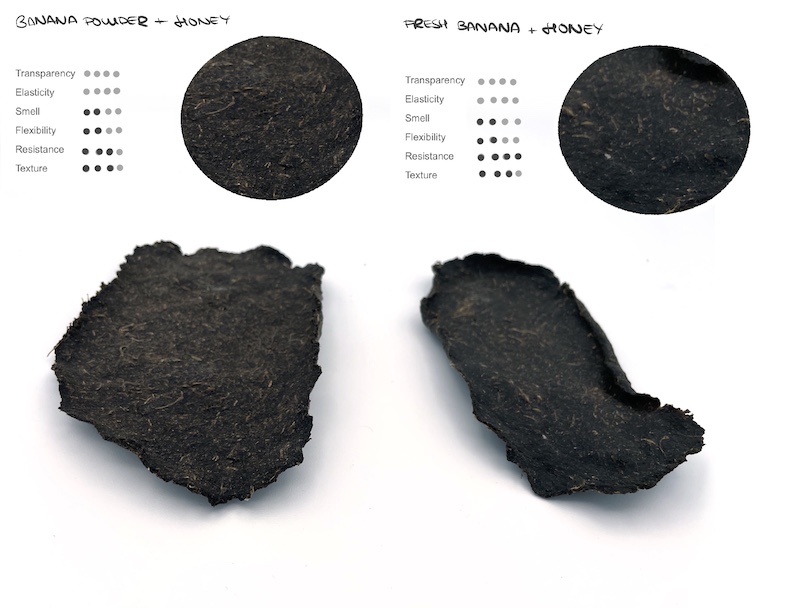
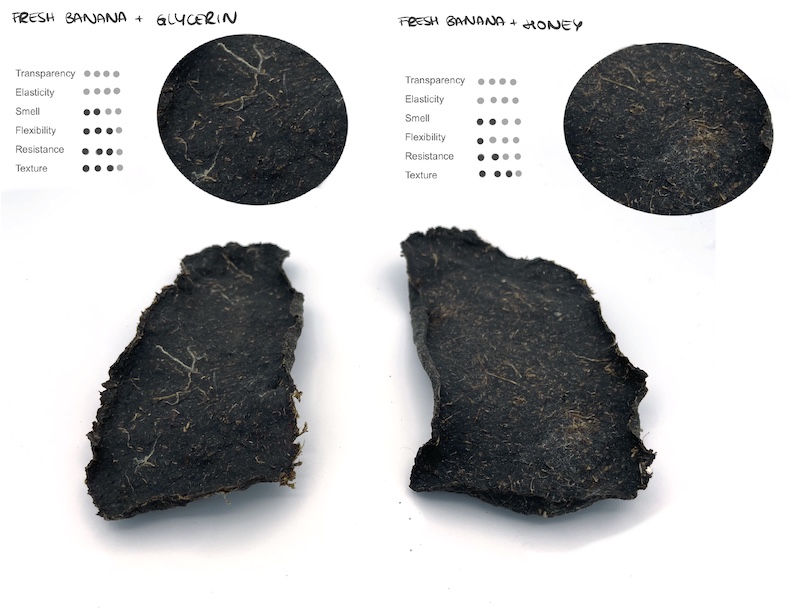
I wanted to make it plant based so I decided to experiment the difference between honey and glycerin (they are suppose to work y the same) and between banana ow peel powder and fresh banana peel.
I found necessary to rehydrate the banana peel powder so it could have a smooth texture. I also blend the already tender peels to achieve this goal.
The first batch I put the wrong proportions as I didn’t measure after the rehydration. If you use powder take in mind that they are going to weigh more than in powder. So my first batch was very dry as it has a lot of pulp.
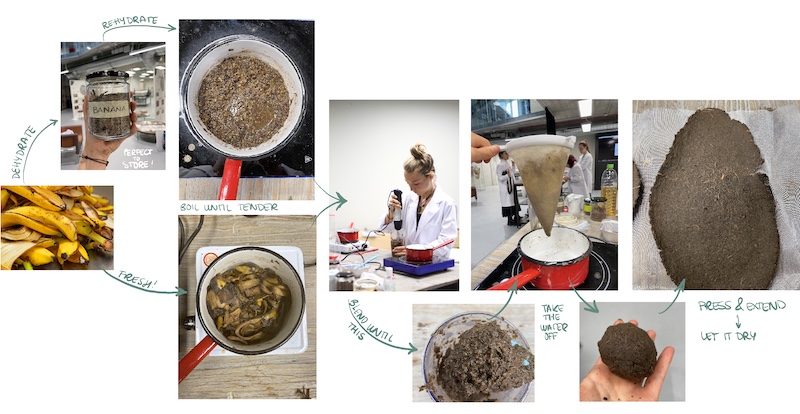
My second batch were done with the right proportions. I tried with glycerin and honey. The third batch was with fresh peels. They need to be boiled until tender so they can be processed. I also tried with honey and glycerin. I could see the difference between textures and color. The powder ones were more uniform and more brown. In The fresh ones you can see the fibers.
Conclusion:
After interacting with the results I obserb that the honey made the material drier than the ones with glycerin. These ones allow more movement, so in the next batch I'll use glycerin.
Between the powder and the fresh with glycerin: the fresh sample is more homogeneous in texture, although you can see the fibers; and flexible. In the powder one, the texture is homegenous but you can feel the particles more. So in the next batch I'll prefer using fresh banana peels instead of the powder.
The next objective is doing a biiger sample of banana leather with glycerin, attaching the sample to a canvas so it doesn't shrink and it could be as flat as possible for laser cutting.
BANANA-WATER AGAR-AGAR BIOPLASTIC
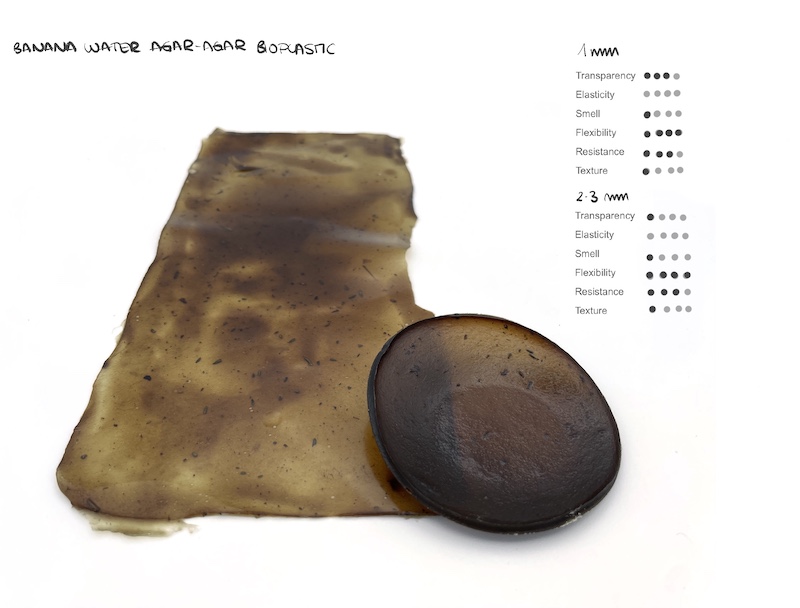
While I was draining the rehydrated banana peels, I noticed that the water that it was liberating was full of nutrients and very dense. So I thought I could use it in another recipe to achieve a bio plastic.
I used a basic Agar Agar recipe, replacing the water for the banana water.
Banana-water recipe:
- 400 ml water (so in this case banana water)
- 12 gr Agar Agar
- 18 gr glycerin
Final LCA:
Inputs: - Materials: banana peels, glycerin, water, honey. - Tools: dehydrator, refrigerator, pot, oven, spoon, fabric. - Energy: dehydrator for 3 days, electrical oven for 2 hours in total. Food processor.
Outputs: - Products: banana leather, banana water, banana Agar Agar bio plastic. - Waste: water from boiling - Impact: use of electricity ad drinkable water
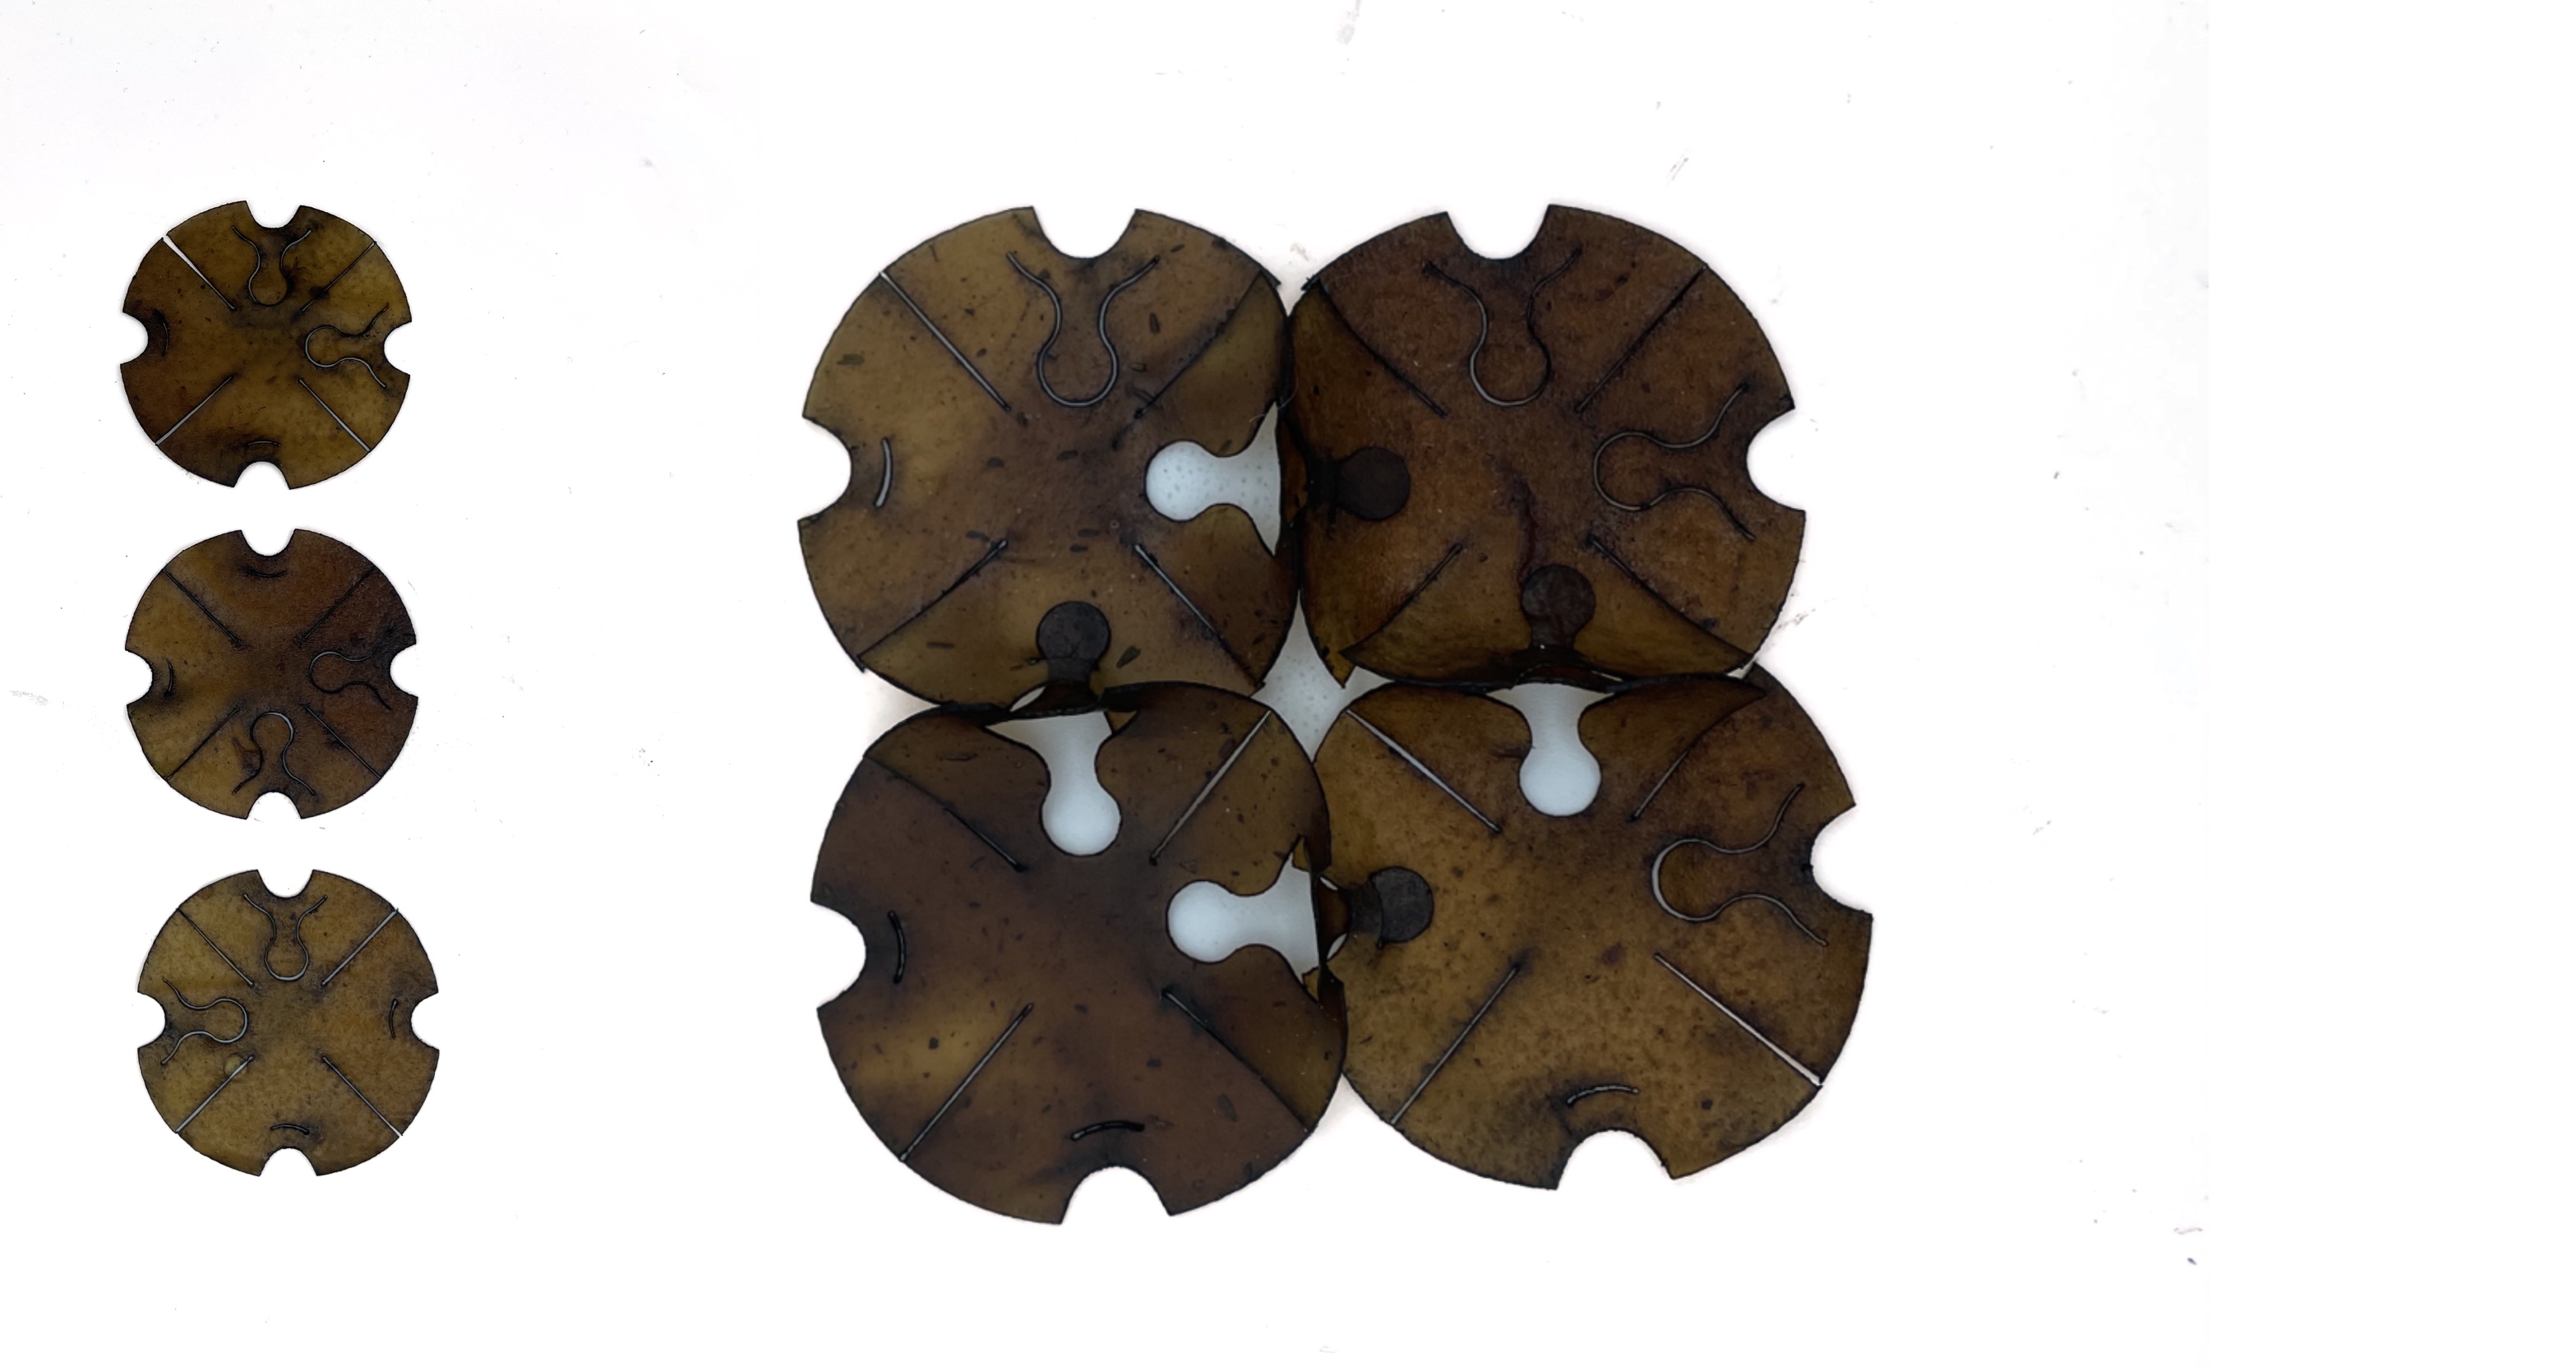
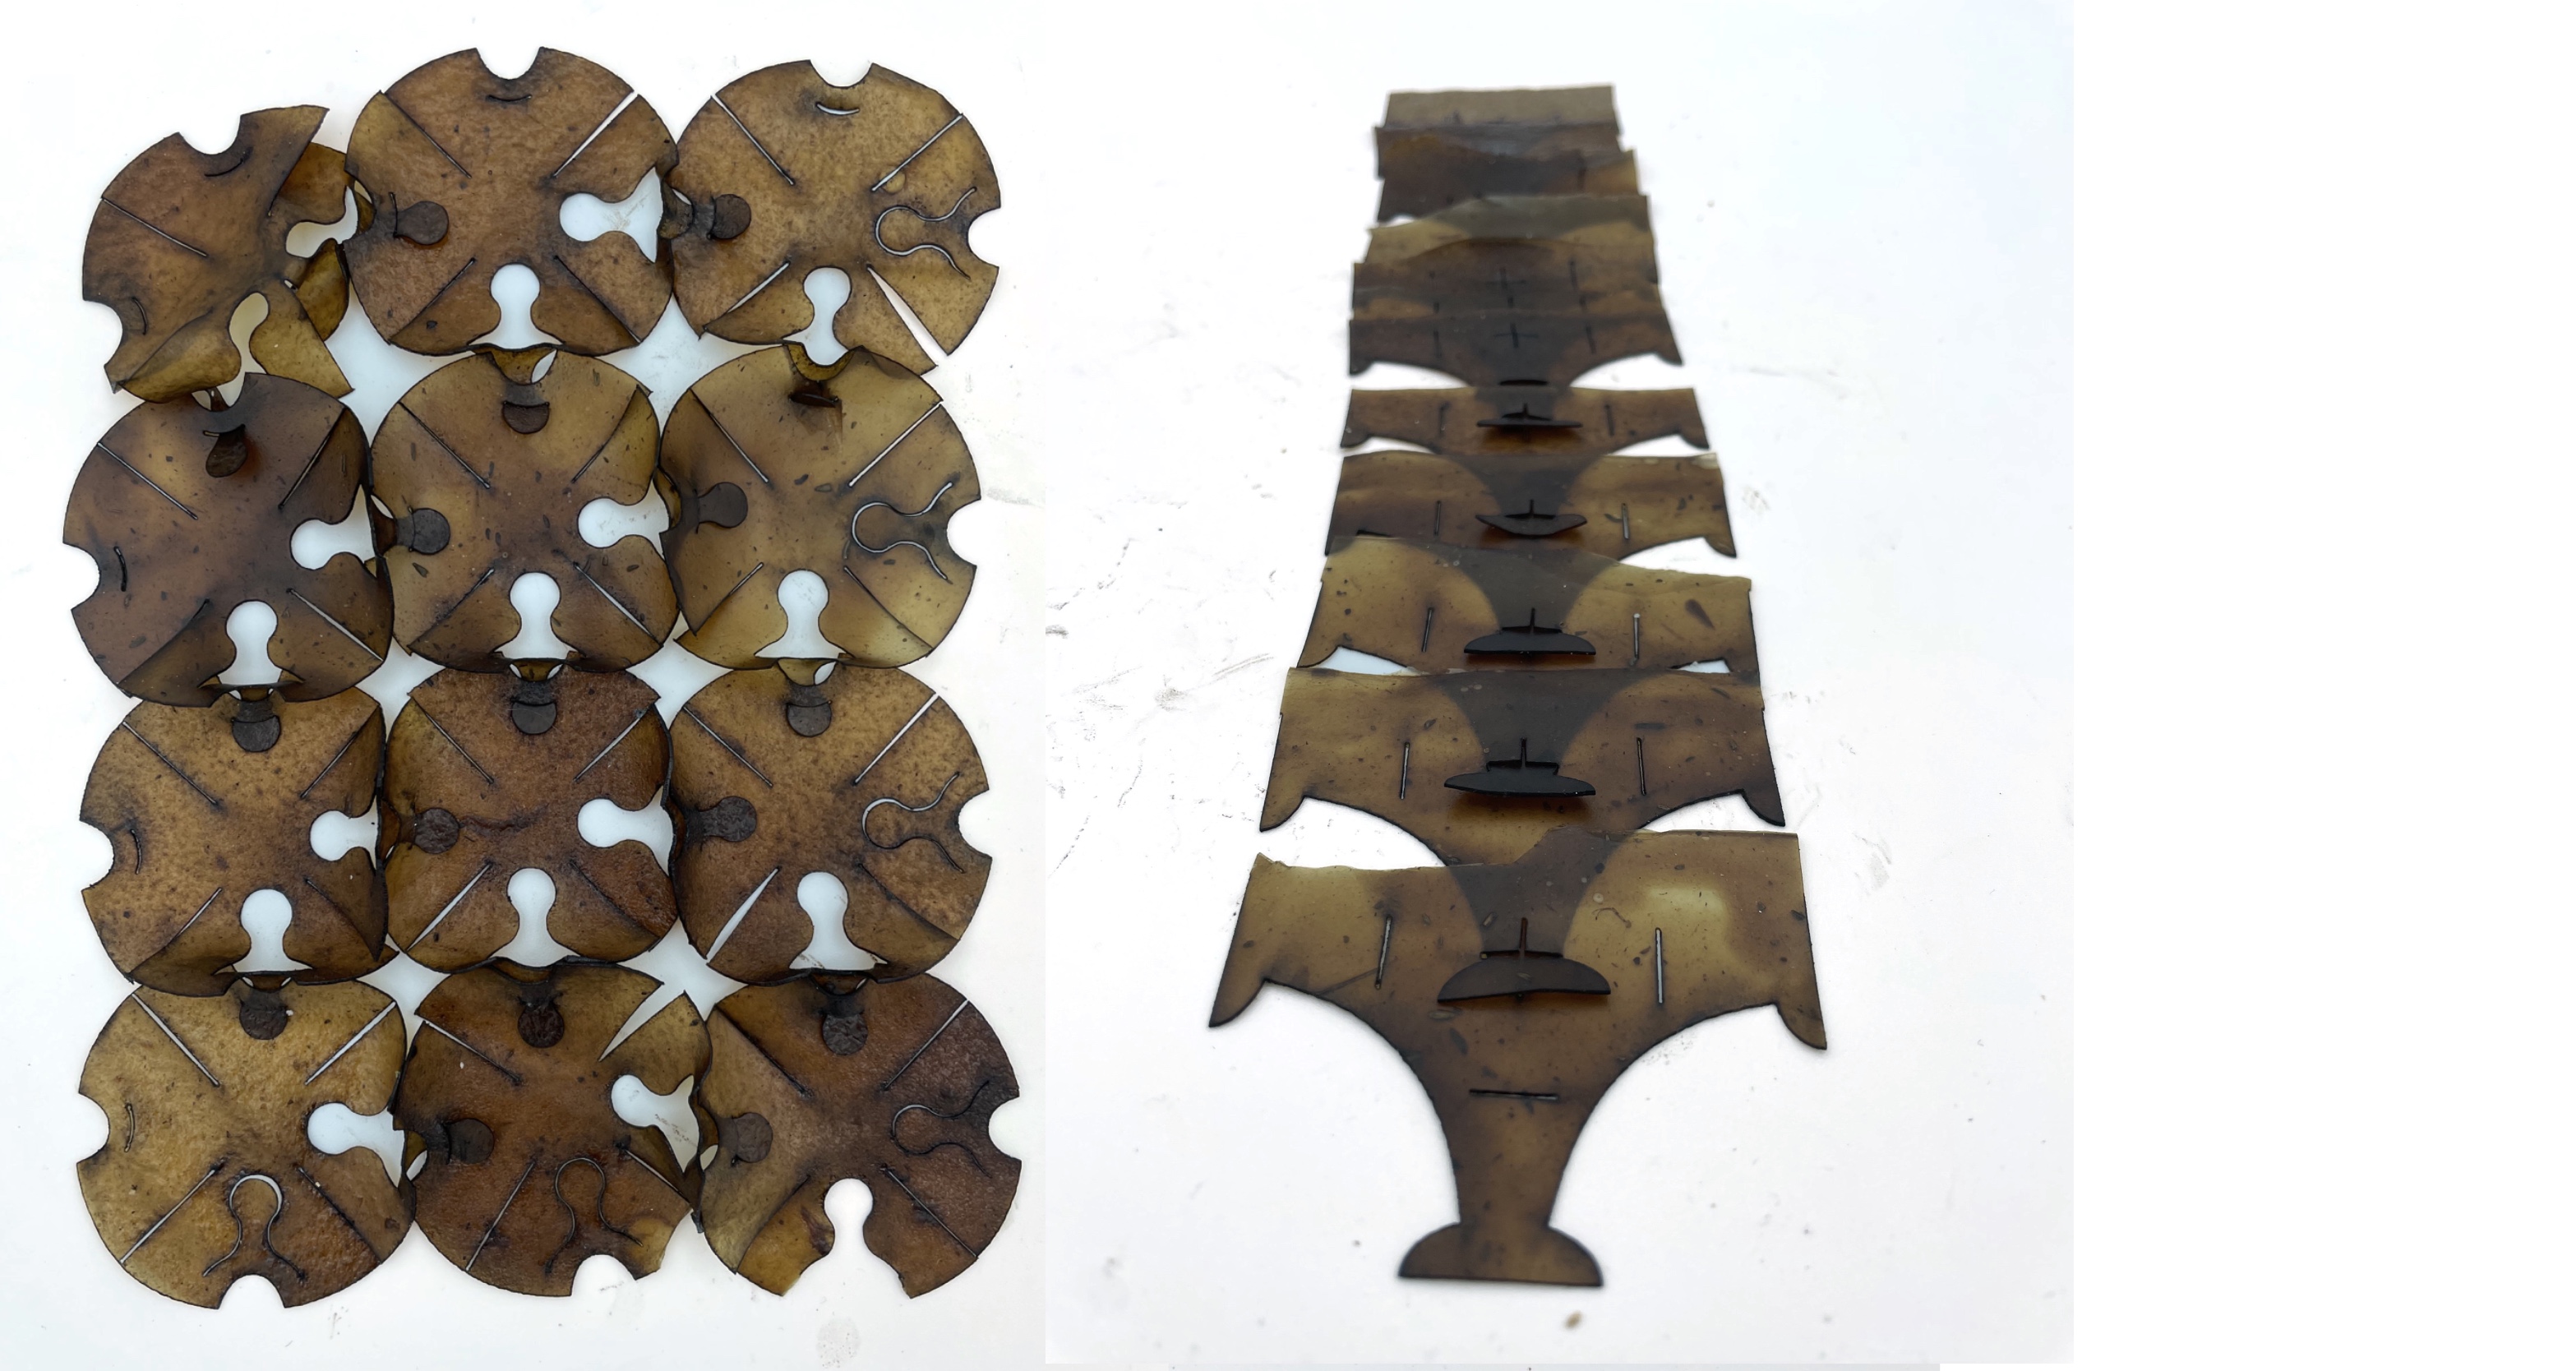
LASER CUTTING
In order to complete "Open source circular fashion" week, I cooked 500 gr of banana peels and banana powder to cover a 760x100 mm trade with the banana leather. The leftover water was used to the Banana Water Agar-Agar bioplastic in a 400x200 mm trade. This was my first try with a big batch of the fabrics, so the leather didn't go as planned as it was very thin and it broke with little manipulation. So we decided to cut the bioplastics because we though it was going to work even better.
We did a first try with the main shape in order to test the laser cut parameters in the material. We used the same ones as paper and worked perfectly! There were medium pieces as I was kind of impatient while taking the bioplastic out, so they broke. Nevertheless, they were at least rectangular and made the "waste" modules even pretier with its imperfections.
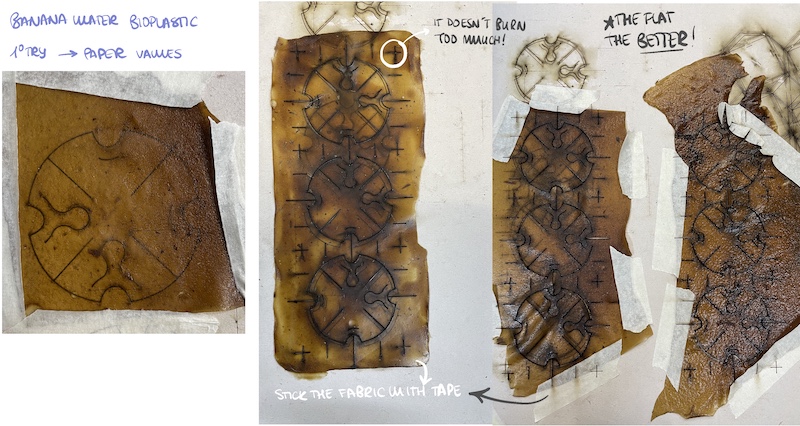
After cutting all the material avaiable, I assembled them and the seamless atachment system worked really well in the material. It is easy to assemble and hard enough to manage some interaction.
This swatch was exhibited in the Remake Textil in La Casa Encendida, Madrid. Showing different approaches to the circular economy through innovation in textile production. The programme features different proposals that showcase new trends in design and circular production in the fashion sector.
Useful links
- Fruitleather
- Materiom
- Future Material Bank
- Material Driven Blog
- Beatriz Sandini and her banana bioleather
Books: - Recipes for material activism - Material Alchemy - Food for Thought