Textile Scaffold
Research
This topic in general seemed quite interesting to me, where the perspective of the textile within its traditional conception is changing and allows us to explore different combinations that could be considered within textile manipulation.
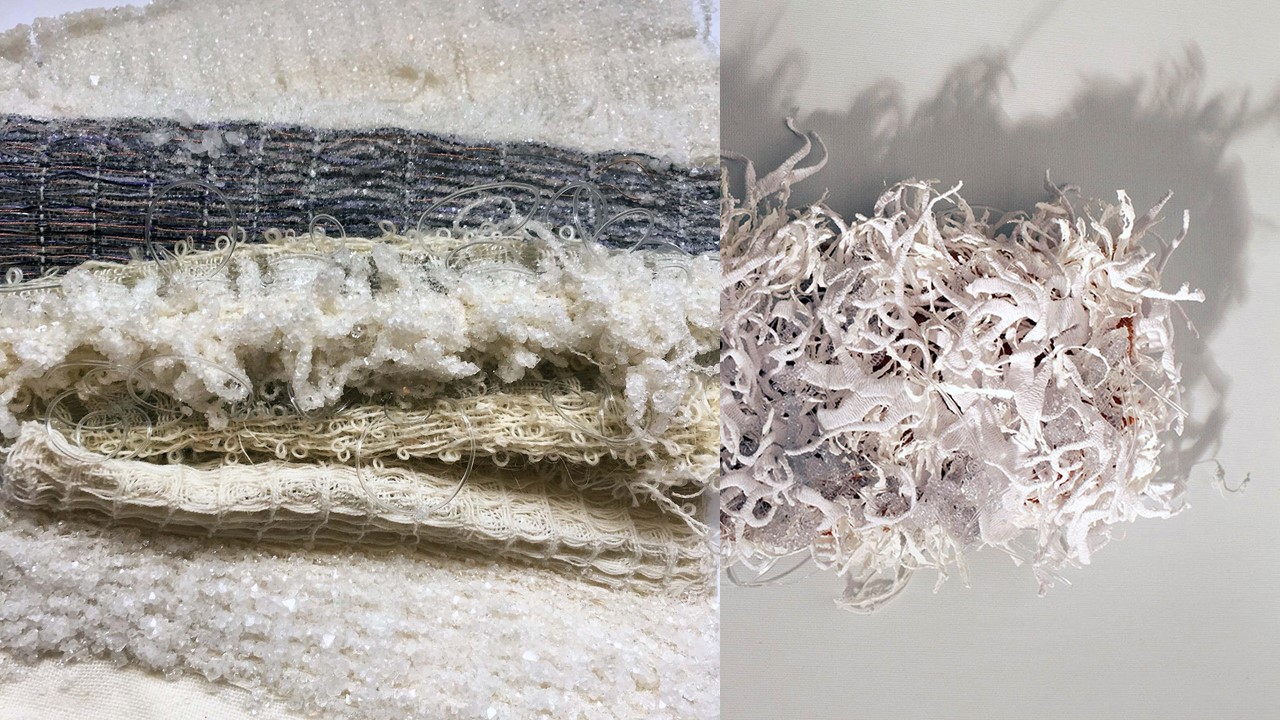
One project that addresses textile manipulation from this perspective is the work of experimental materials studio MUUNA, which creates conceptually driven textile collections. Led by designer Hannah Croft, whose background is in textile design innovation, the studio takes a more sensory and experimental approach, making different use of familiar design elements such as weaving, embroidery and crystal embellishment, while redefining certain concepts and characteristics unique to textile-based design. Her work brings together materials and processes from diverse fields. Hannah Croft, adopting the role of scientist as well as designer, combines luxurious yarns and fabrics with gritty, patinated metals, crystal growth inducing chemical solutions and molten resin, ingredients one tends to think of as industrial.
Another intervention that caught my attention was the fabric formwork, which is presented as a flexible, light, organic alternative to traditional formwork. In the research research conducted by Jon Engholt and Dave Pigram, they present a construction system that integrates 3D printing in this technique, where curved structures with great potential to improve the structure of buildings can be achieved. For this research, they performed numerous tests, including matching extrusion and fabric material, tuning the print technique, and then dealing with the composition of concrete. They also detoured to compare 3D plastic printing to that of fabric frameworks and 'the logic of tensile shuttering.

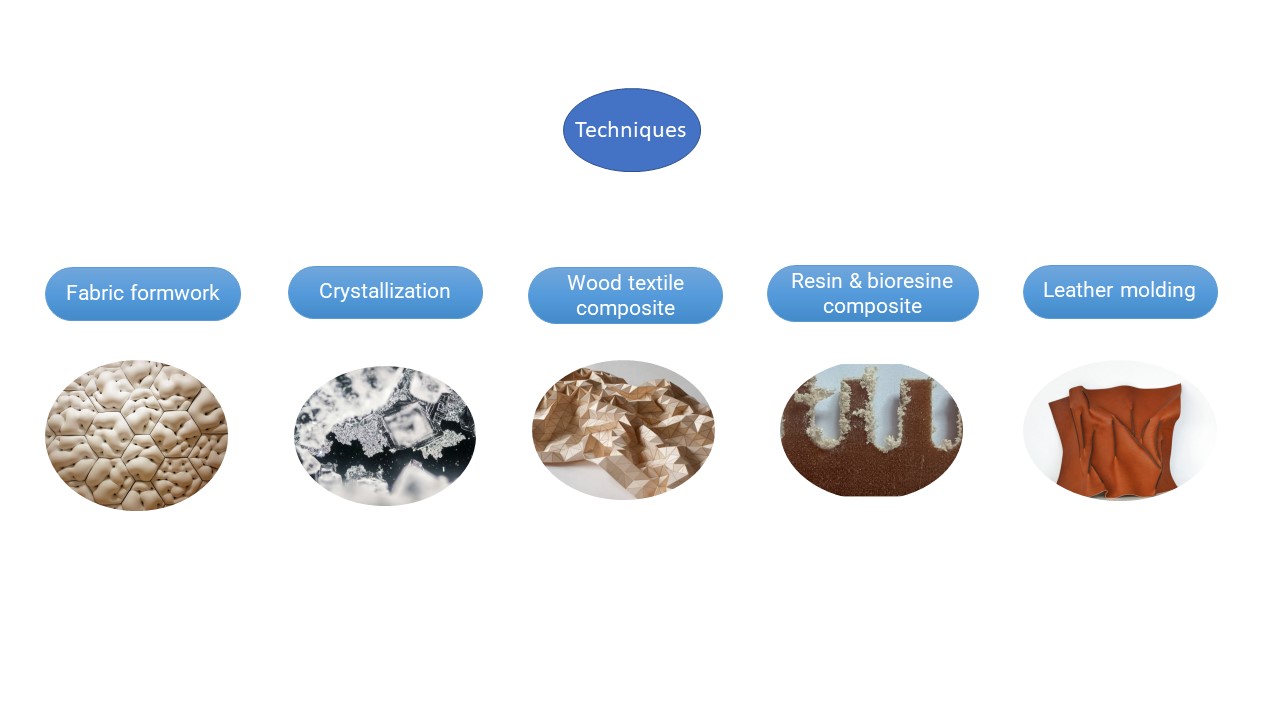
Thus, the options for the textile scaffold can be worked for different applications on different surfaces. In addition to those already mentioned, other interventions were seen during classes. Below is an outline of the different options that can be developed:
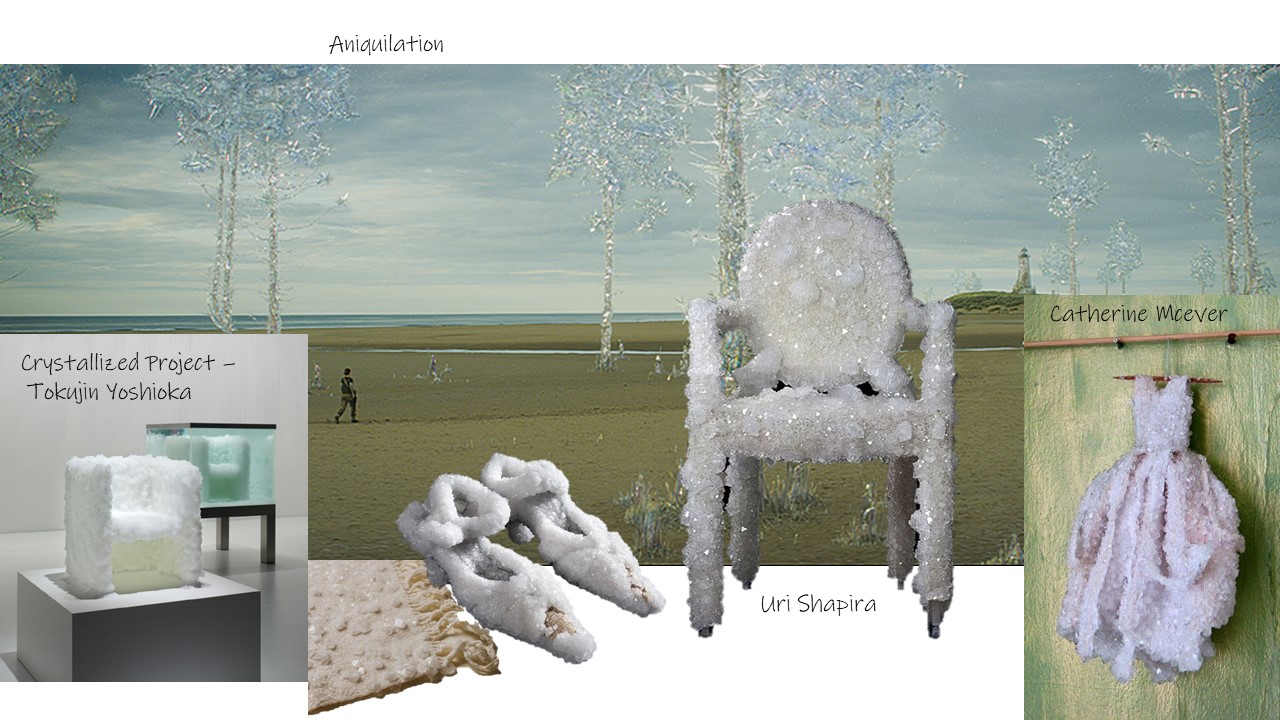
To begin the experimentation, I chose to start with crystallization, a striking effect that can bring a new aesthetic dimension to different projects. As references, I really like Tokujin Yoshioka's Crystallized project, in particular Natural crystal chair 'VENUS - Natural crystal chair' (2008) is a work in which in a water tank, natural crystals are grown to form crystalline structures and transformed into a chair. A musical piece creates a painting. In the crystal paintings 'Swan Lake', 'Destiny' and 'Moonlight', the music plays during the process of crystal growth and is completed when the crystal shapes change with the sound vibrations.
Ingredients & Recipes
Among the materials needed, and those that were more accessible, alum and borax were chosen. In addition, lids were prepared for the containers where the solution would be stored. They were made in mdf by laser cutting with a pattern of holes. This would help to hang the material that will have contact with the solution. The quantity used was:
* 6 tablespoons of borax x 500 ml of water
* 8 tablespoons of alum x 500 ml of water
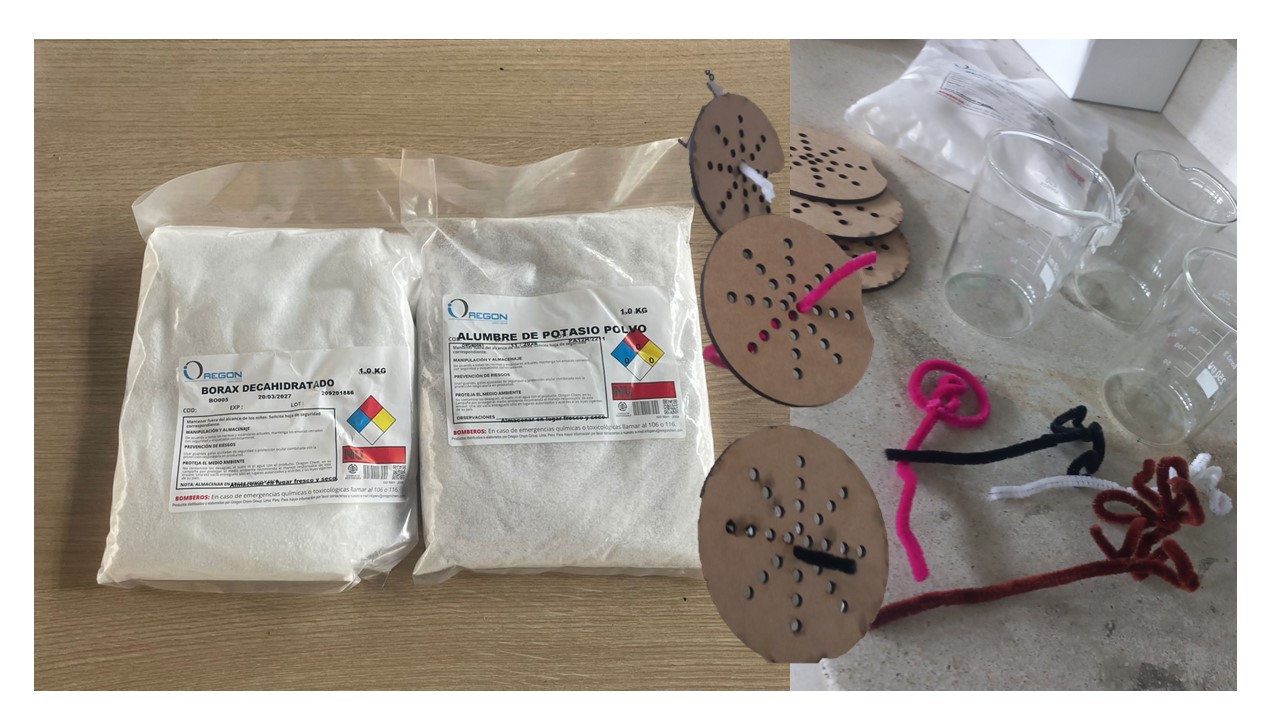
Proccess
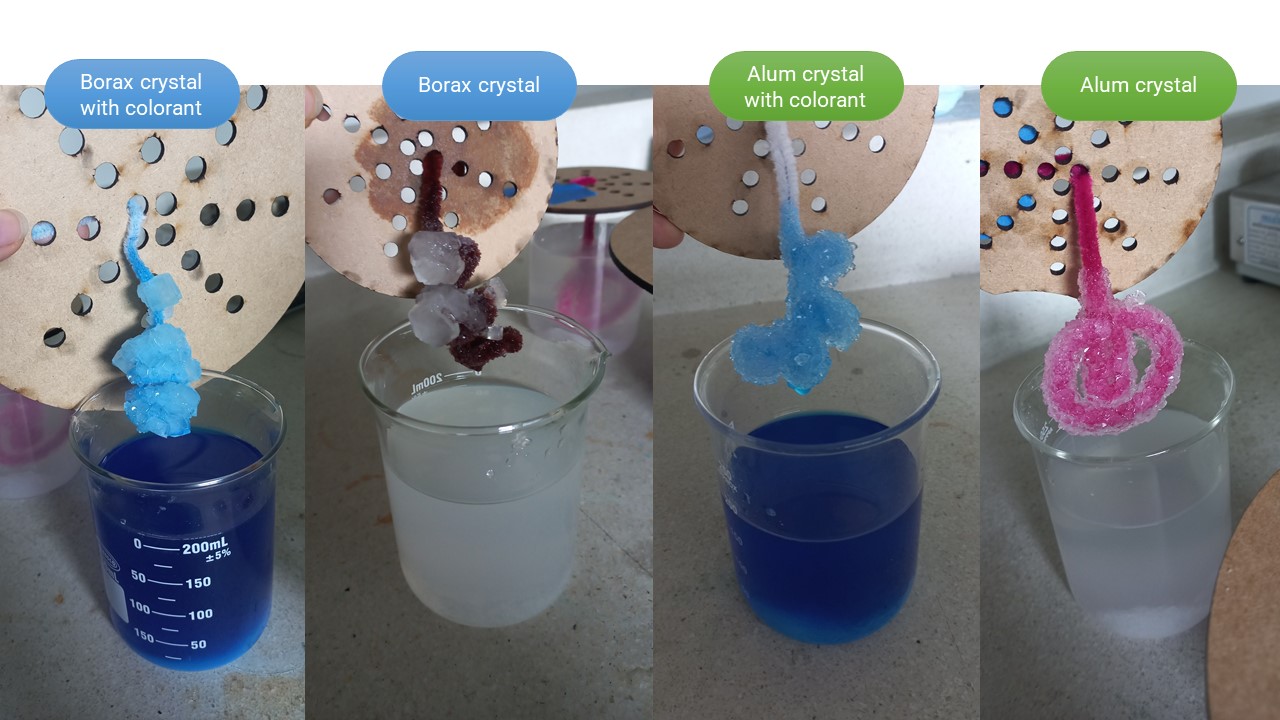
Once the materials were ready, we started boiling the water, in this case we did it in two beakers. To add one more variable to the experiment, we divided each solution into two parts, and in one of them we added 10 drops of blue vegetable dye. As a result we obtain 4 beakers: 2 of alum and 2 of borax.
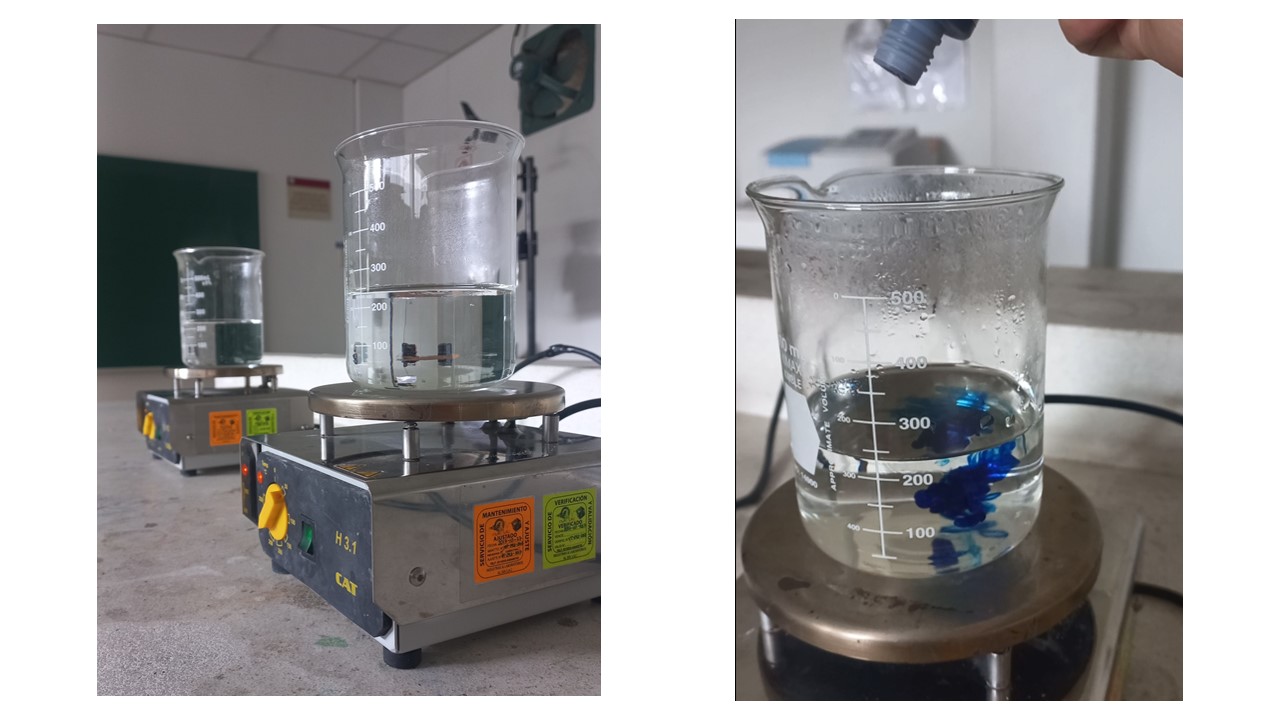
When the water has reached boiling point, we add the corresponding amount of alum and borax and proceed to dissolve. To obtain better results, it was considered to filter the content to obtain a liquid free of the minerals that had not been able to disintegrate, this was done with a filter paper and a funnel.
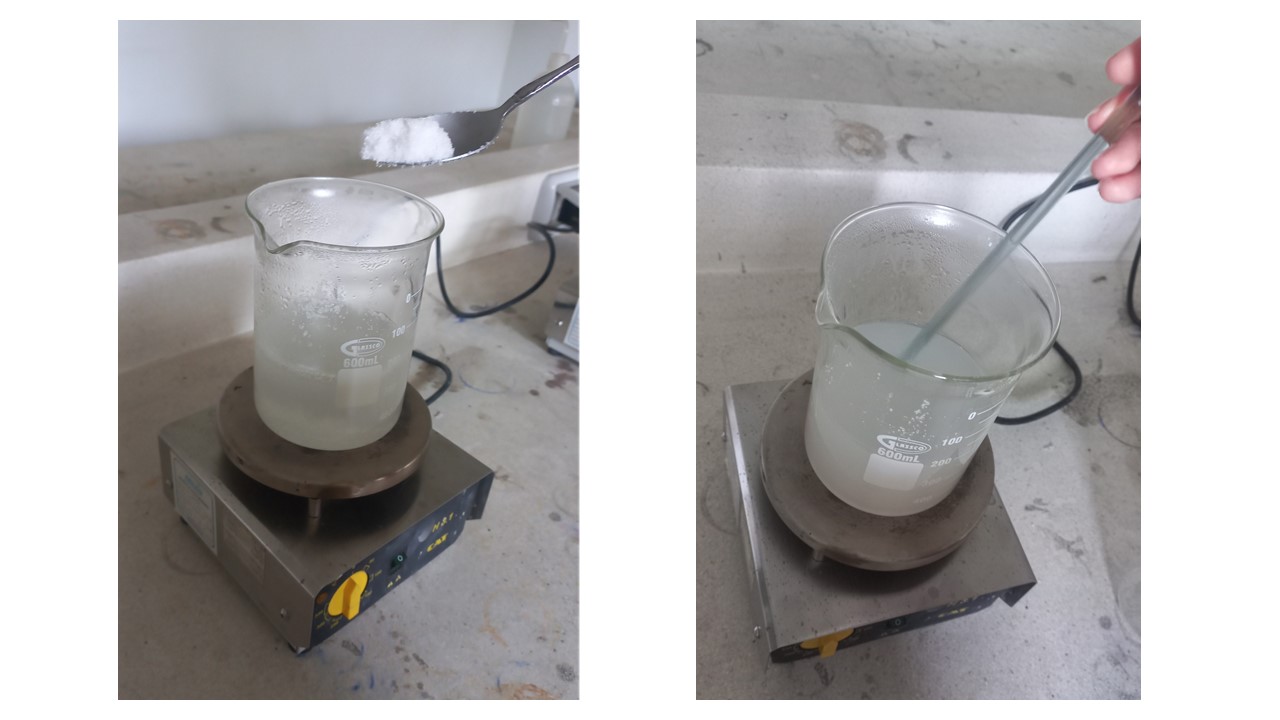

Something very curious is that as it was filtered, the alum solution began to form crystals quite quickly, both on the walls of the funnel and on the filter paper cone, which made it difficult for the solution to pass through, so the filtering took regular time.
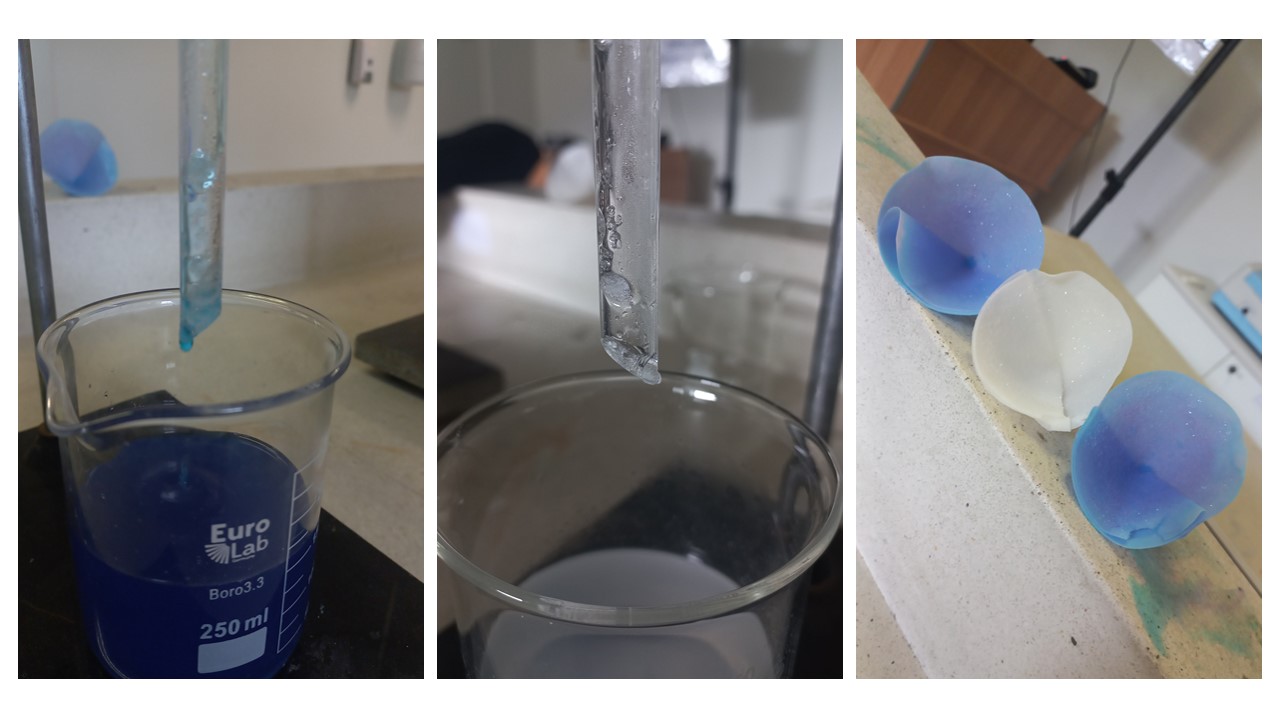
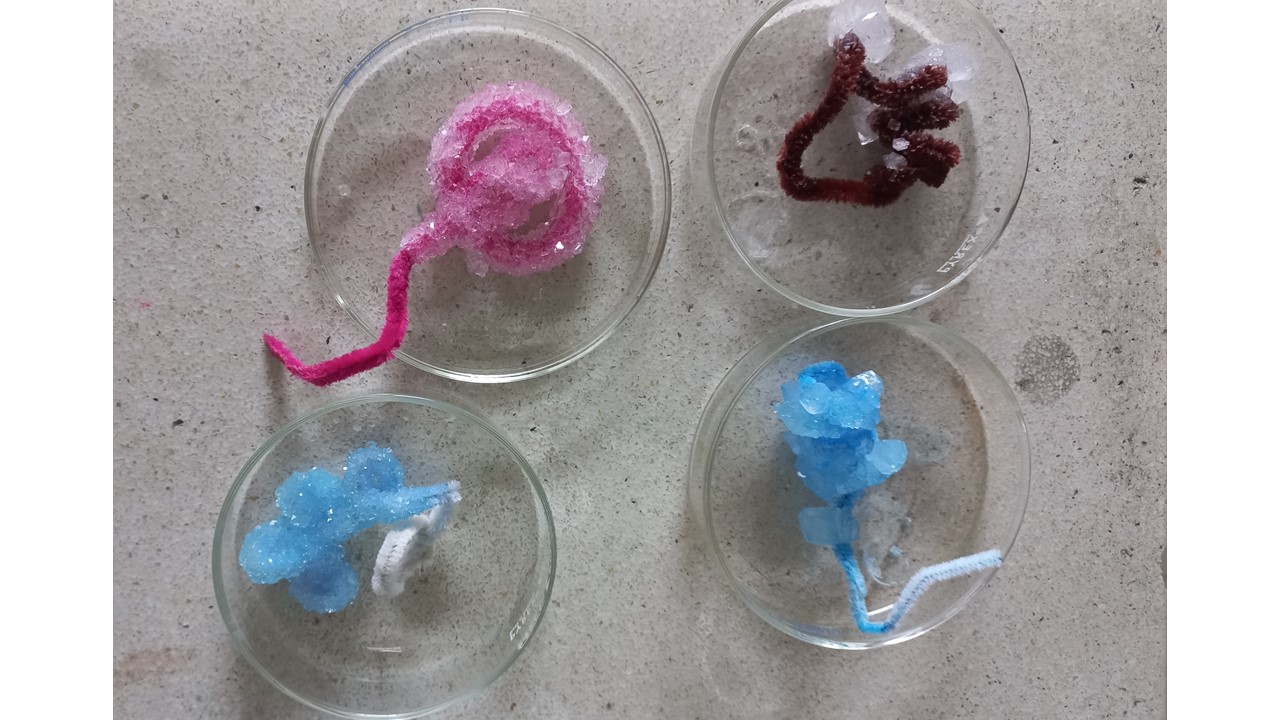
Pipe cleaners were used as a base for the crystals. Organic structures were formed and attached to the lids cut with mdf. and thanks to the lids with holes, it was possible to attach them without touching the walls of the container. The samples were left to stand without moving them with the pipe cleaners suspended.
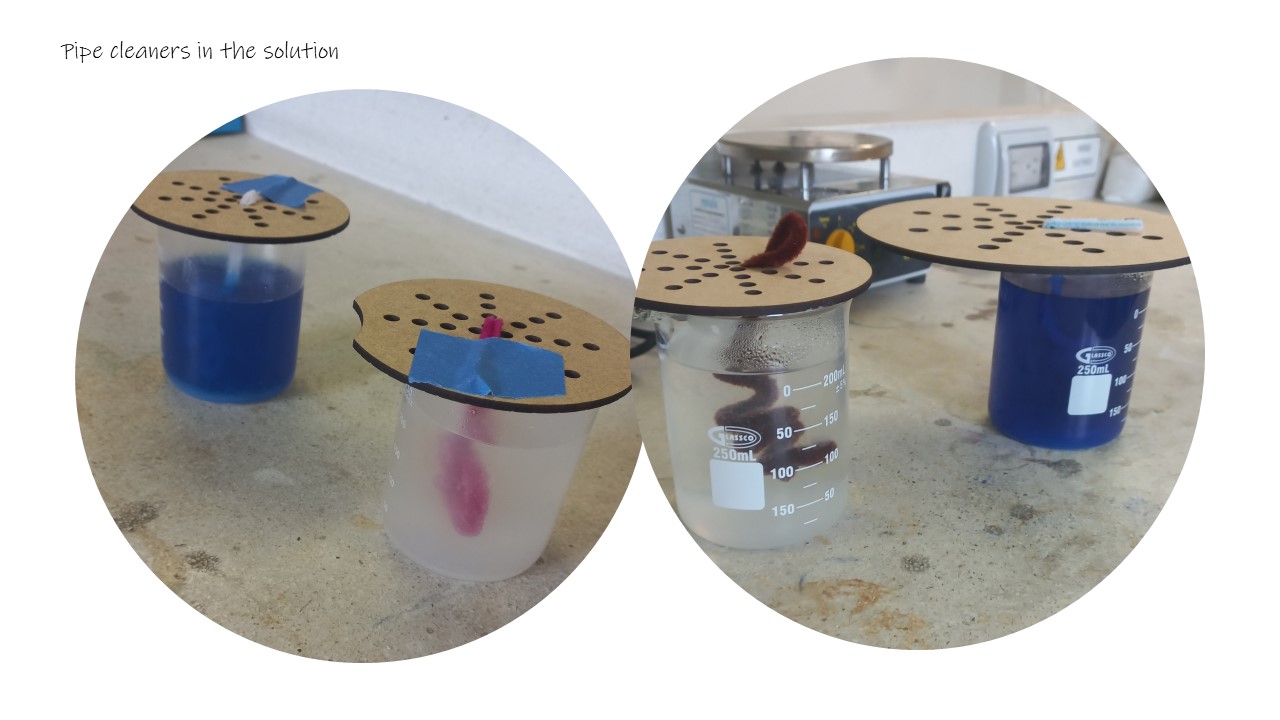
Within half an hour, crystal formations were already visible in the alum solution. After 24 hours, the pipe cleaners already had some crystal formations, while the borax apparently still did not work.
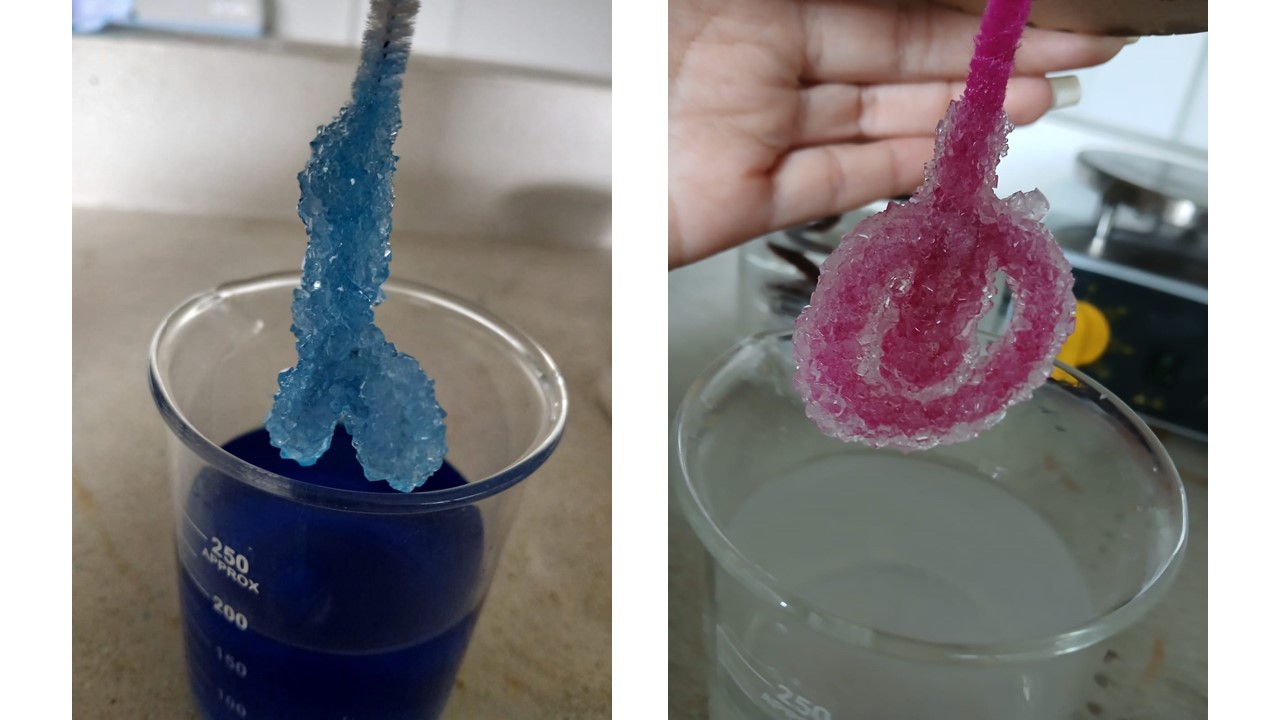
After 72 hours, the bases were removed, revealing the formation of crystals. In the case of the alum, they were finer and more abundant, covering the entire structure, while in the case of the borax, larger crystals were formed, but only in some areas. In addition, the color of the dye could be seen in the crystals. As an important note to consider, alum crystals tend to be more fragile, while borax gives a firmer result.
1. Objective
weekly assignment
Check out the weekly assignment here or login to your NuEval progress and evaluation page.
2. References, research & inspiration
2.1 Quick how-tos
remove chapter 2.1 after use
Uploading images
-
Remember to credit/reference all your images to their authors. Open source helps us create change faster together, but we all deserve recognition for what we make, design, think, develop. Use the caption and reference system examples you see in the template.
-
Resize and optimize all your images. Images are optimised in size with resolution 72dpi, a good max width for full screen is 800px and passed through tinypng for final optimisation.
-
Remove tips when you don't need them anymore!
How-to use footnotes for references or fabrication files
-
Fabrication files are a necessary element for evaluation. You can add the fabrication files at the bottom of the page and link them as a footnote. This was your work stays organised and files will be all together at the bottom of the page. Footnotes are created using 1 (without spaces, as shown in Step 1 & 2, and referenced as you see at the bottom of this page) You can reference the fabrication files to multiple places on your page.
-
Referenced footnotes are important for crediting work of others, within your documentation.
-
If you are using footnotes for both, make sure to not mix them up, work with the numbering to keep things organised
How-to compress a PDF BEFORE uploading it:
Use a compressor when uploading a PDF, you can use online tools such as ilovepdf or smallpdf
How-to encode a VIDEO BEFORE uploading it:
Use a video encoder when uploading a video it needs to be well compressed, you can download tools such as Handbrake or online tools such as this Video Converter
How-to ZIP/compress a large Fabrication file:
To zip a file on Windows, right-click the file or folder, select "Show more options," choose "Send to," then "Compressed (zipped) folder." watch On a Mac, select the file or folder and choose "Compress" from the context menu. watch
get inspired!
Check out and research alumni pages to betetr understand how to document and get inspired
-
OS Loom - Kae Nagano - Fab Lab Kamakura
-
The pattern machine - Marion Guillaud - LeTextileLab Lyon
-
Shopbot Hack - Painting machine Asli Aksan - Textile Lab Amsterdam
-
Prusa - Pegboard - Viviane Labelle - EchoFab
-
Final project - Pauline Gamore
Add your fav alumni's pages as references
"Lorem ipsum dolor sit amet, consectetur adipiscing elit, sed do eiusmod tempor incididunt ut labore et dolore magna aliqua. Ut enim ad minim veniam, quis nostrud exercitation ullamco laboris nisi ut aliquip ex ea commodo consequat. Duis aute irure dolor in reprehenderit in voluptate velit esse cillum dolore eu fugiat nulla pariatur. Excepteur sint occaecat cupidatat non proident, sunt in culpa qui officia deserunt mollit anim id est laborum. Lorem ipsum dolor sit amet, consectetur adipiscing elit, sed do eiusmod tempor incididunt ut labore et dolore magna aliqua."

Caption for the left image
Caption for the right image
-
Download references Links to online reference files, PDF, booklets
-
or embed your own PDF as:
- Video references: Vimeo (only when not yours)
- Video references: Youtube (only when not yours)
3. Tools
4. Process and workflow
"Lorem ipsum dolor sit amet, consectetur adipiscing elit, sed do eiusmod tempor incididunt ut labore et dolore magna aliqua. "
How-to use footnotes for fabrication files
Fabrication files are a necessary element for evaluation. You can add the fabrication files at the bottom of the page and link them as a footnote. This was your work stays organised and files will be all together at the bottom of the page. Footnotes are created using 1 (without spaces, as shown in Step 1 & 2, and referenced as you see at the bottom of this page) You can reference the fabrication files to multiple places on your page.
4.1 Step 1
This model 3 was obtained by.. Lorem ipsum dolor sit amet, consectetur adipiscing elit, sed do eiusmod tempor incididunt ut labore et dolore magna aliqua.
4.2 Step 2
The laser cut nesting 2 was created using.. Lorem ipsum dolor sit amet, consectetur adipiscing elit, sed do eiusmod tempor incididunt ut labore et dolore magna aliqua.
4.3 Step 3
...
5. Results
Results & documentation
- Don’t forget to document the outcome including:
- Final result
- Photos from different stages
- Videos of movement or interaction, show how a material moves, something was assembled or the interaction
- Include measurements or a reference object to give a sense of scale
- Describe the (material) properties of what you made
- Comparison between attempts, if you did multiple experiments or generated multiple files before fabricating / deploying. You can use a table as shown in week 4
5.1 BoM
| Qty | Description | Price | Link | Notes |
|---|---|---|---|---|
| 1 | Material one | 22.00 $ | http://amazon.com/test | order now |
| 1 | Material two | 22.00 $ | http://amazon.com/test | find alternative |
| 1 | Material three | 22.00 $ | http://amazon.com/test |
5.2 Code
Use the three backticks to separate code.
// the setup function runs once when you press reset or power the board
void setup() {
  // initialize digital pin LED_BUILTIN as an output.
  pinMode(LED_BUILTIN, OUTPUT);
}

// the loop function runs over and over again forever
void loop() {
  digitalWrite(LED_BUILTIN, HIGH);   // turn the LED on (HIGH is the voltage level)
  delay(1000);                       // wait for a second
  digitalWrite(LED_BUILTIN, LOW);    // turn the LED off by making the voltage LOW
  delay(1000);                       // wait for a second
}

// the setup function runs once when you press reset or power the board
void setup() {
// initialize digital pin LED_BUILTIN as an output.
pinMode(LED_BUILTIN, OUTPUT);
}
// the loop function runs over and over again forever
void loop() {
digitalWrite(LED_BUILTIN, HIGH); // turn the LED on (HIGH is the voltage level)
delay(1000); // wait for a second
digitalWrite(LED_BUILTIN, LOW); // turn the LED off by making the voltage LOW
delay(1000); // wait for a second
}
6. Weekly reflection & critical thinking
- What did I learn? What did I personally find interesting or surprised me?
- What would I do differently? If something "failed" do I know how else to tackle it now?"
- How does this connect to my final project or my learning trajectory?
- What are implications and possible applications, think also from the ethical or environmental aspect, how it could connect to your practice and project?
NuEval — final step
Go to NuEval and fill in the checklist, when not complete notify your instructor.