4. Biofabricating Dyes and Materials#
This week we worked with natural dyes, bacterial dyes, and made bioplastics!
What I made#

Top left and middle: yarn and fabrics dyed with alkanet natural dye
Top right and bottom right: silk fabric dyed with bacteria
Bottom left and middle: various bioplastics
Natural dyes#
Here’s my Flickr album of our lab in Amsterdam working with natural dyes
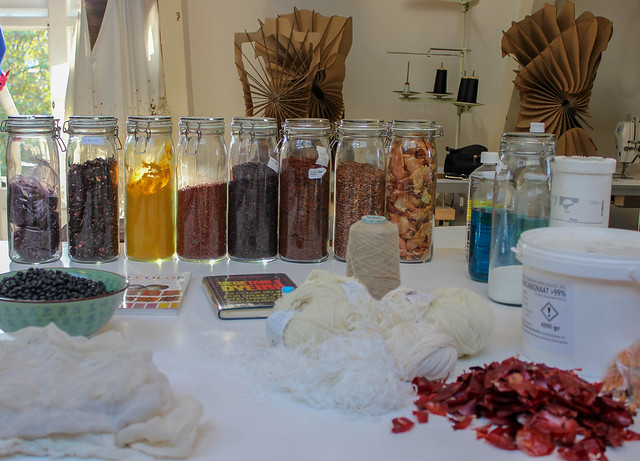
On Wednesday we got stuck into working with natural dyes at TextileLab Amsterdam. In our lab we had:
- Onion skins (red and golden)
- Campeche
- Annatto
- Hibiscus
- Alkanet
- Black beans
- Turmeric
- Brazilwood
Dyeing has a couple of different steps
- Weigh: you’ll need to know the dry weight of the fibers you want to dye (aka weight of fibers or ‘WOF’) for several steps of the process, so it’s important to do this at the start.
- Scour: cleaning the fibers before dyeing
- Mordant: Boiling the fibers in a solution that’ll encourage the dye to fix to the fabric, and/or alter the final colour
- Dye: preparing the dye and immersing the fibers in it
- Modify: optional ways to change the colour post-dye
Preparing and scouring the fibers#
We made small skeins out of cotton, wool, linen and hemp yarn, and cut some pieces of cotton canvas for dyeing. Vegetable fibers (that’s the cotton, linen and hemp) need to be scoured before dyeing, which basically means cleaning them, boiling them in water with a few spoonfuls of sodium carbonate (note: sodium carbonate, aka washing soda, not sodium bicarbonate, aka baking soda) added.

Mordanting#
Before dyeing, we divided the fibers into three groups to be treated with different ‘mordants’. This means boiling them in different chemical solutions which will affect the final colour after dyeing. There are several different types of mordant, but the ones we used were:
- Iron: you can make this by getting some rusty nails and leaving them to steep in a bottle with water and vinegar
- Copper: this you can make by collecting pieces of copper pipe and soaking them in vinegar for several weeks
- Alum: this one you’ll need to buy, and it can often be found at pharmacies or supermarkets

Dyeing with Alkanet#
Each of us at TextileLab Amsterdam took a different dye to work with - mine was alkanet! Alkanet is a plant in the borage family that produces blue flowers, and its root can be used as a dye. The colours you can get from alkanet range from reddish brown to purple, to grey, but as I’m a big purple fan, and not so much into browns, I wanted to aim for the most purple result possible. The recipe I used was:
- Weigh the alkanet. You need 100% WOF, which means that if you have 50g of fibers, you also need 50g of alkanet.
- Put it in a pot with enough water to cover the amount of fibers you have, but don’t put the fibers in yet.
- Bring the mixture to a boil, and let it simmer around 100 degrees Celsius for an hour to extract the pigment from the alkanet.
- Add the fibers and let them simmer in the dye bath for another hour.
- Remove, and wash!
You can modify the colour of the fibers post-dye by treating them with soda, vinegar, or other acidic/alkaline substances, but for alkanet I didn’t find that this had much effect on the colour of the fabric, so I didn’t document it in detail, and focused more on achieving different colours through altering the dye process.
Things I learned on round 1:
- Don’t be over-eager and throw all your fabrics and yarns in the pot too soon, and in one go. This is a recipe for a big tangled mess that will take you a long time to separate into different pieces.
- Extract the pigment first, then strain off the liquid for dyeing the fibers. Don’t dye the fibers with the alkanet root still in the pot, because it’ll embed itself in your fibers and be a real pain to pick out.

The results from my first round of dyeing were pretty…brown. For all three mordants. On Cecilia’s advice, and with the benefit of a bit of internet research, I decided to have a second try at getting purples out of alkanet, this time using alcohol and hot water to extract the pigment. I also dyed some fibers with no mordant, and found that this and the copper mordant gave the best purple result. Here’s my recipe:
- Weigh the alkanet, again at 100% WOF.
- Add alcohol (I used 95% ethanol), just enough to wet the alkanet and partially cover it.
- Add the same amount of hot water to the mixture.
- Leave to steep for 2 hours, then strain off the liquid and discard the alkanet root.
- Add the liquid to a pot, and heat it to 60 degrees Celsius. One of the articles I read online suggested that alkanet loses pigment if heated over 60 degrees, so I played it safe and kept the temperature low this time.
- Add the fibers and let them simmer in the dye bath for 2 hours. I also tried leaving some in for an extra two days with the heat turned off, but didn’t see much change in the colour.
- Rinse!

I got a noticeably more purple result this time! I got one lovely light purple shade on a skein of cotton with no mordant, but managed to lose it before I was able to photograph it (¬▂¬) A good reminder that documenting well, and storing your materials properly, are important habits to keep!

Bacterial dyes#

Here’s my Flickr album documenting bacterial dyeing at TextileLab Amsterdam
Working with bacterial dyes was the high point of the week for me ❤‿❤
When we say ‘bacterial dyes’, we mean growing bacteria that naturally produces a coloured pigment, and using that pigment to stain fabrics. In our case we were using Janthinobacterium Lividum, a type of bacteria that produce a distinctive purple colour.
Rather than immersing fabric in pigment created by the bacteria, we added bacteria to our fabric and let it grow across the fabric over the course of four days. The bacteria deposits pigment wherever it grows, giving the fabric a tye-dye effect, and making this a kind of collaboration between humans and bacteria.
For a really nice step by step guide to the method we used, watch this video by Nina Papakonstantinou of TextileLab Amsterdam!
BioShades by Waag's TextileLab Amsterdam from Makers of Waag on Vimeo.
Step 0: What you need#
You will need:
- A clean environment, preferably a wet lab
- A living sample of janthinobacterium lividum
- An autoclave or pressure cooker
- Plastic gloves
- A lab coat or similar over-garment to keep dirt on your clothes from contaminating your work
- A small gas burner, e.g. a bunsen burner or a camping flame
- A nutrient broth to feed the bacteria. e.g. LB broth and a sealable glass bottle to contain it
- An innoculation loop - if you don’t have one of these and don’t want to buy one, there are lots of tutorials online for making your own out of cheap materials
- A plastic petri dish
- Autoclave bags - plastic bags for sterilising objects in the autoclave
- Alcohol in a spray / squeeze bottle, for sterilising your working area and cleaning your hands
- A hot plate or small cooker
- Parafilm to seal your petri dish - you can probably get away without using this, but it’s handy!
- An incubator to keep your bacteria warm and happy so they grow. Or somewhere that’s warm if you don’t have an incubator, but preferably somewhere that can be sealed off, unless you want it to smell :)
- A pair of long metal tweezers or tongs
- Autoclave tape
Step 1: Prepare your fabric#
We needed to fold up our fabrics to fit them into small petri dishes. But the shape the fabric is folded in can also influence the dye pattern, as the bacteria seems to grow more along the creases in the fabric. You can achieve lots of different shapes by folding, twisting and knotting your fabric. I folded mine - a piece of silk into a triangle shape, like this:

To keep the shape, I stiched around the edges of the triangle with silk thread. This is important for the next step!

Step 2: Autoclaving the fabric and broth#
Before adding bacteria to the fabric, we first need to sterilise it, as well as the growth medium, to make sure that we’re only growing the right kind of bacteria on our fabric! To do this, all the fabric samples go into a plastic autoclave bag, which is then loosely knotted and placed in the autoclave, and water is added. Autoclaving creates a high pressure environment with lots of steam, at 120 Celsius, which is very effective at breaking down bacteria.
We autoclaved a bottle of LB broth and a bottle of agar - for this it’s important that the caps of the bottles are loose, and that the water level doesn’t come up higher than the level of the liquid in the bottles (so that nothing explodes out of the bottles.). We also taped over the lids with a strip of autoclave tape - this is tape that turns a different colour when the right temperature has been reached, so you know that you’ve successfully sterilised the contents of the autoclave.
The exact procedure for autoclaving will depend on what you’re using - a pressure cooker, a lab grade autoclave, or something else!
Step 3: Preparing the petri dishes#
Next take a new (and therefore clean!) petri dish. Set up a space where you can work, and turn it into a sterile space by lighting your gas burner, and cleaning the area around the burner with alcohol.
Get your tongs, and pass them through the flame of the gas burner a few times to sterilise. then reach inside the autoclave with the tongs, wait a second for the tongs to cool down a little, and then grab your fabric and put it straight into the petri dish, lifting the lid of the petri dish off for just long enough to place the fabric inside.
Finally, get the growth medium, take off the bottle cap, and pass the opening of the bottle through the flame quickly. Lift the lid of the petri dish (get someone else to do this for you if you need both hands to lift the bottle of broth) and pour the broth into the petri dish so that it is about half full, and the fabric is saturated. Quickly replace the lid of the petri dish.
Step 4: Adding the bacteria#
Make sure that your work area is still clean - add some more alcohol and clean your work surface to be sure! Now get the petri dish with the bacteria, as well as the one with your fabric in it, and keep them close to the gas burner. Get the inoculation loop, and pass it through the flame to sterilise. Open the petri dish with the bacteria, and first tap the innoculation loop in a part of the dish where there is no bacteria - this is to cool down the innoculation loop, so that it stays sterile but isn’t so hot that it’ll kill the bacteria.
Gently scrape the bacteria a few times so that it transfers to the innoculation loop, then open the petri dish with the fabric, and dab and wipe the innoculation loop onto the fabric, as well as the broth around the fabric, to transfer the bacteria. Do this twice, then sterilise the innoculation loop again by passing it through the flame for a few seconds.
Step 5: Incubate!#
At this point you can add parafilm to the edge of your petri dish to seal it, so it doesn’t spill. Then put it in the incubator, and leave it to do its thing for a few days.

Step 6: Autoclaving again, to kill the bacteria#
Take your petri dish out of the incubator - we left ours in there for three days. it should look very purple! Now grab two autoclave bags - one is for the fabric, and one is for the petri dish(es). Both of these should be loosely knotted and placed in the autoclave, following the same procedure as in step 2.
When it’s done, dump the bag containing the petri dish(es) into the bin. Open the bag with the fabric, take out your fabric, and gently wash it with soap and water. Then unwrap it, and find out what pattern your bacteria made! My triangle folding gave me a triangular pattern, and the colour is lighter at one end (at the middle of the fabric) and darker at the other end (which was on the outside and in direct contact with the bacteria and growth medium).

Bioplastics#
Bioplastics are plastics made from renewable / sustainable materials. At TextileLab Amsterdam we made bioplastics based on gelatin, and others with agar (which is from seaweed!).

My Flickr album of all kinds of bioplastics being cooked at TextileLab Amsterdam
Gelatin bioplastics#
We made a couple of different gelatin bioplastics. These set pretty fast and were easy to work with, but they smelled pretty bad (like pig!) while cooking, and during the drying process.

Bio-resin#
- 48g gelatin
- 8g glycerine
- 240ml water
- Mix at 60 degrees Celsius until smooth, then boil at 100 degrees for 5-10 minutes
- After drying for a couple of days, this turns into a stiff resin
I poured a film of the resin mixture onto the back of a large lego piece, and unmoulded it while it was still fairly flexible. We also used water that had had hibiscus flowers steeped in it, which gave the resin a slight pink tinge.

Bioplastic#
- 48g gelatin
- 12g glycerine
- 240ml water
- With a higher glycerine to gelatine ration than the bio-resin, this produces a more flexible plastic, that also takes about two days to dry out

The bioplastic above was poured into the underside of a piece of lego, which gave it its lego-like pattern. It was unmoulded while still soft, and twisted into a warped shape so that it would dry and set slightly askew. I used blue food colouring, mixed in just after it came off the heat, to get the colour.
I tried adding conductive paint to one of my bioplastic samples. The conductive paint is black as it contains a high concentration of carbon (which is what makes it conductive!). Unfortunately, my bioplastic didn’t turn out to be conductive, but it’s possible that with a higher concentration of conductive paint, it might be!

Bio-silicone#
- 48g gelatin
- 24g glycerine
- 240g water
- Again with a higher glycerine amount, this produces a very flexible, silicon-like plastic

I squeezed some gold acrylic paint into my biosilicon after it came off the heat, and gently stirred it to create small flecks of gold.
Bio-foam#
- 48g gelatin
- 12g glycerine
- 240ml water
- 10g dish soap
- For this you need a milk frother, a whisk, or something else to create bubbles! Whipping the mixture like egg whites, to create a stiff foam, creates a really nice foam texture when dry.

My bio-foam warped as it dried. The smoother (less foamy) side contracted more, probably because it contained more water, which evaporated during the drying process and reduced the size of the foam. As the foamy side didn’t contract as much, this resulted in a curved shape!