4. Biochromes
NATURAL DYES
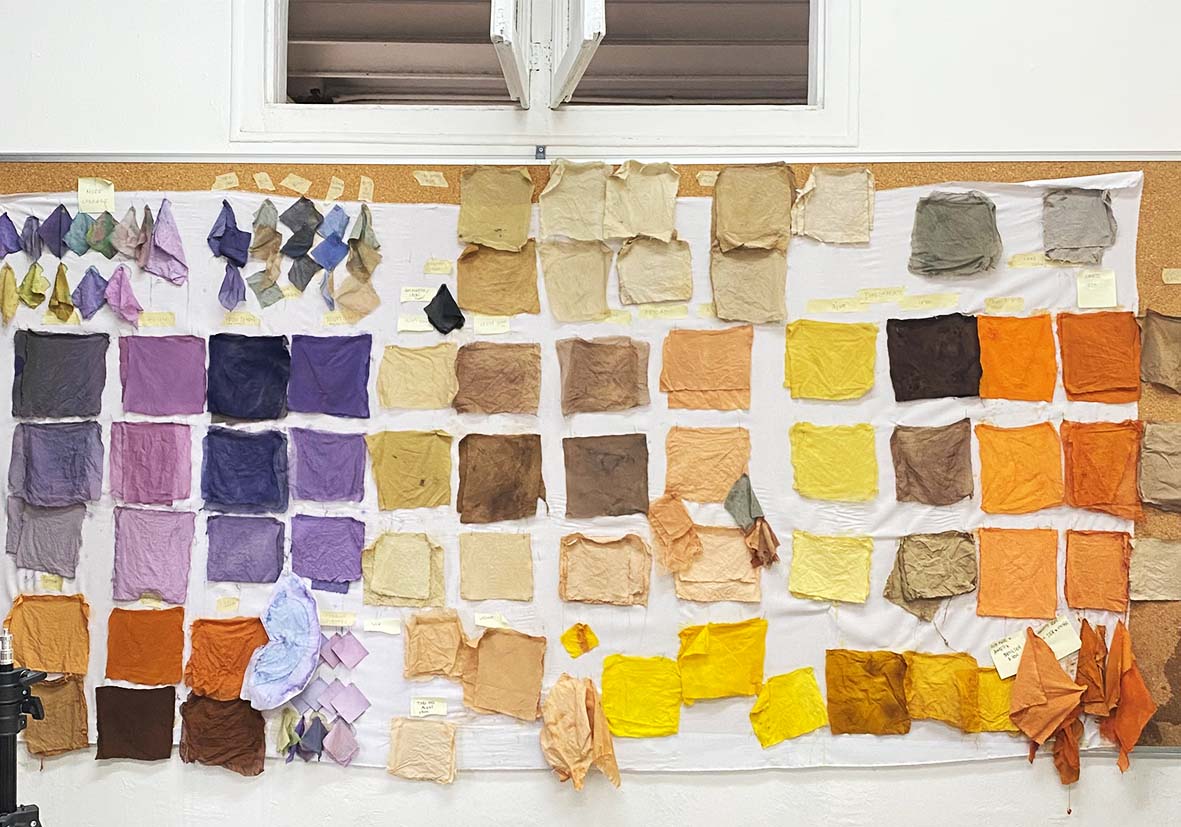
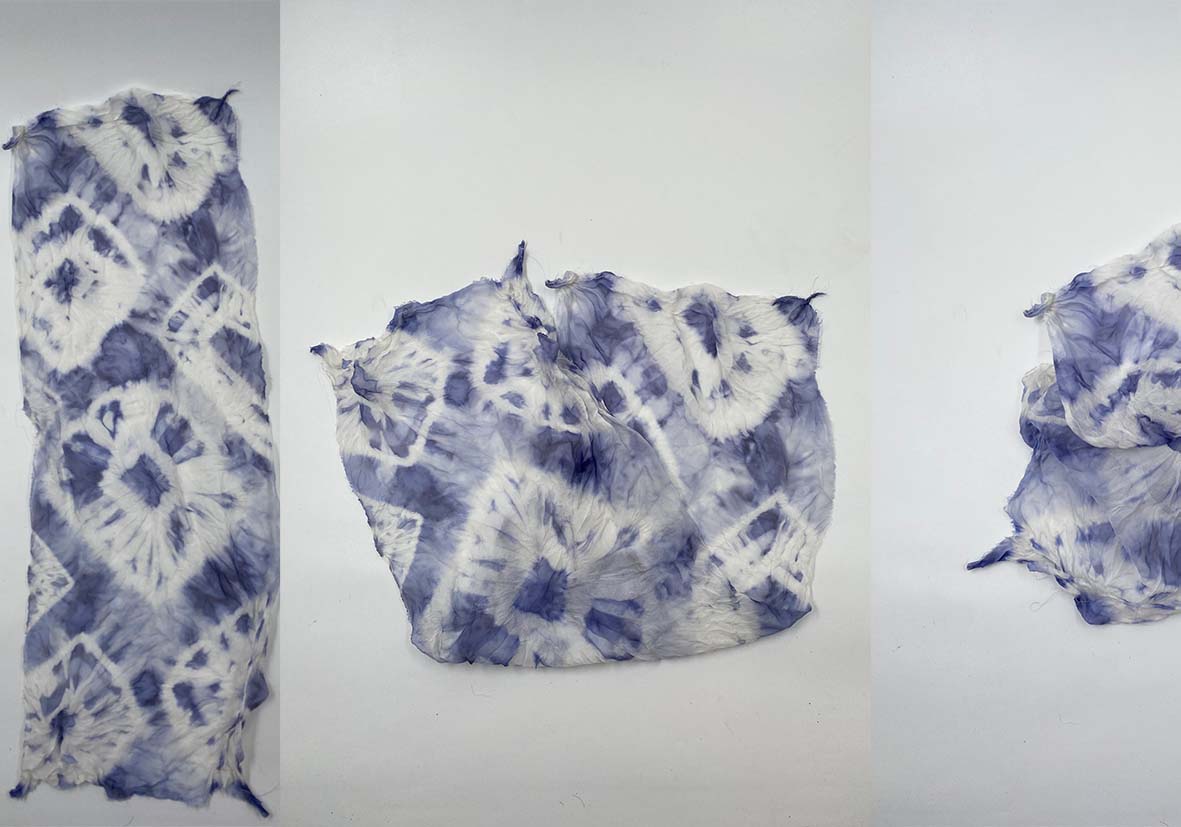
This was a super exciting week for me as we were going to be working on the development of natural dyes, pigments and bacterial dyes. Natural dyeing is something that I have been developing within my own practice for the past two seasons collections. I found that the more I researched and developed my dyes, the stronger that they become, and the more my understanding of colour began to make sense. It took me a long time to develop a green, but I was exceptionally happy when I managed to create my own deep green dye from foraging ivy locally. It took me a long time to develop this, and I find that the fabric has to ferment for days before you can get the kind of result that you want.
Even though I had some strong experience with natural dyeing, I have already found from taking the course that their are steps that I was not aware of. The main one being SCOURING the fabric before it is ready to dye. We learnt that you must scour the fabric properly, to clean it before natural dyeing can take place. You must scour the fabric with sodium bicarbonate, using about 2% of the weight of the fabric with a saucepan full of water. You then simmer the fabric for at least an hour to make sure it is lovely and clean!
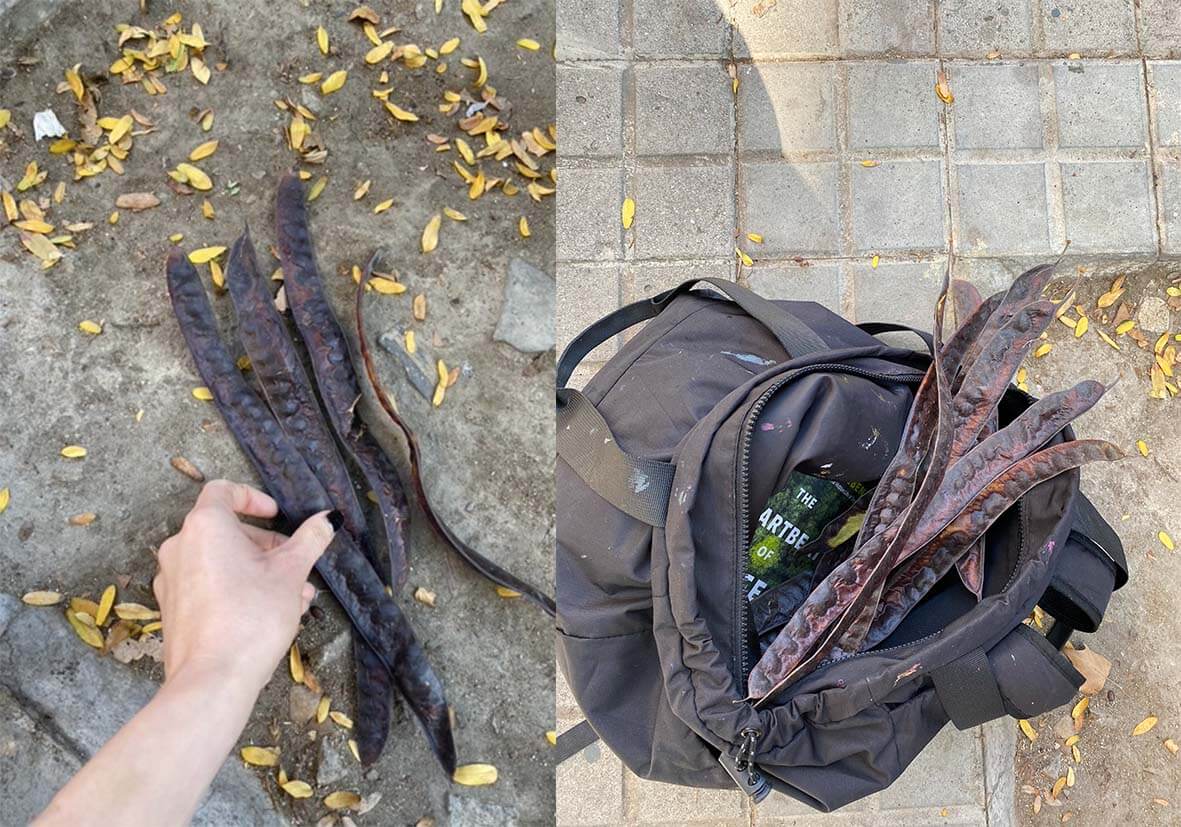
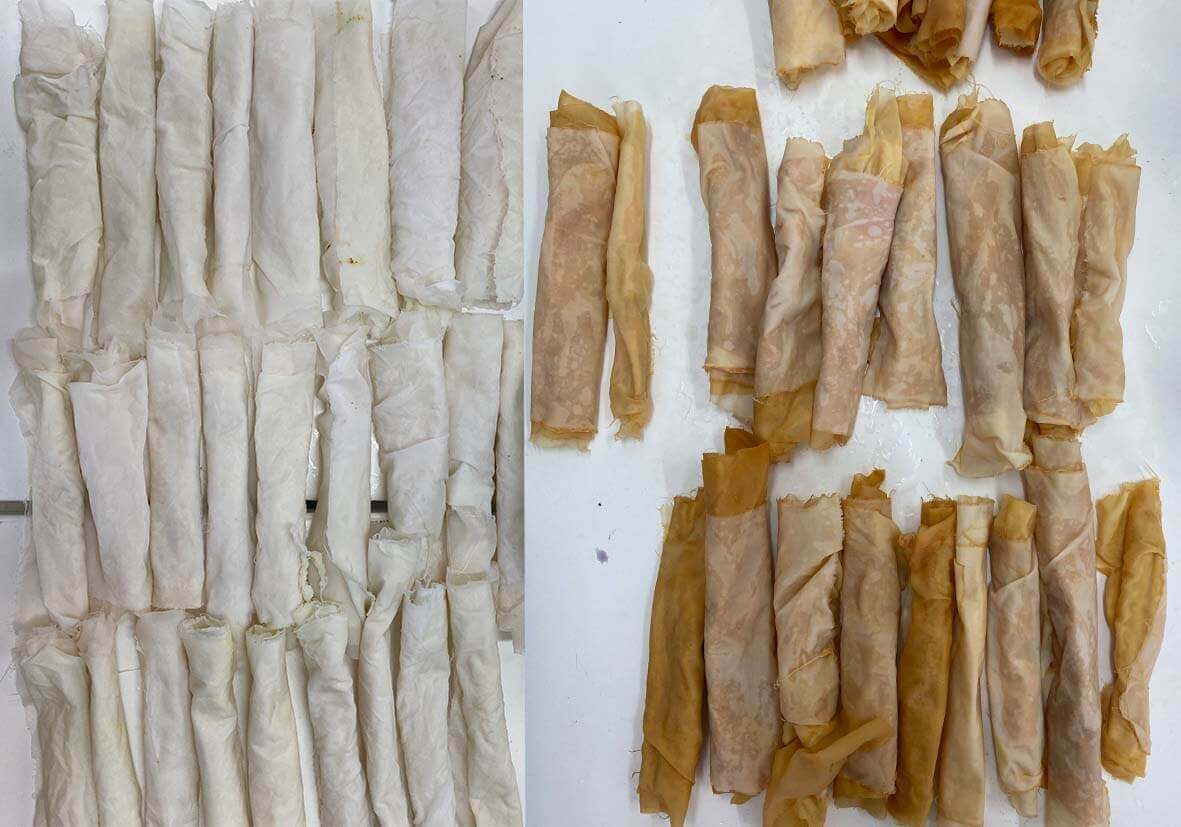
I chose to use euculyptus leaves to experiment with, as this is something I have access to at home but have not used for dyeing before. I also have noticed an abundance of giant seedpods filling the streets of the city, and as a keen forager, I went to collect as many as I could carry in my backpack so I could do some research and expiriment with how I could use them. I found out that the seeds were called Taro Pods and worked great as a Tanin for dyeing. Tanin is a process that happens after you have scoured the fabric, and before you mordant it. Not all fibres need to be soaked in a tanin, it compleltley depends on what plant you are using to dye with and what type of material you are using. Some natural dyes are weaker and are not colour fast, they require a tanin to make the final outcome stronger in colour. I really enjoyed working with the Taro Pods and I hope to be able to take somne back with me to continue to expirement with. For both the euculyptus leaves and the taro pods, I made sure to chop them up and let them to soak for an hour, before I began to heat them. Once they have been soaked for an hour, I then simmered the euculyptus leaves for 40 minutes, and the taro pods for 3 hours to maximise the colour. I think when working again with euculyptus I would experiment with heating it for a lot longer to try and get stronger greenish tones from the leaves.

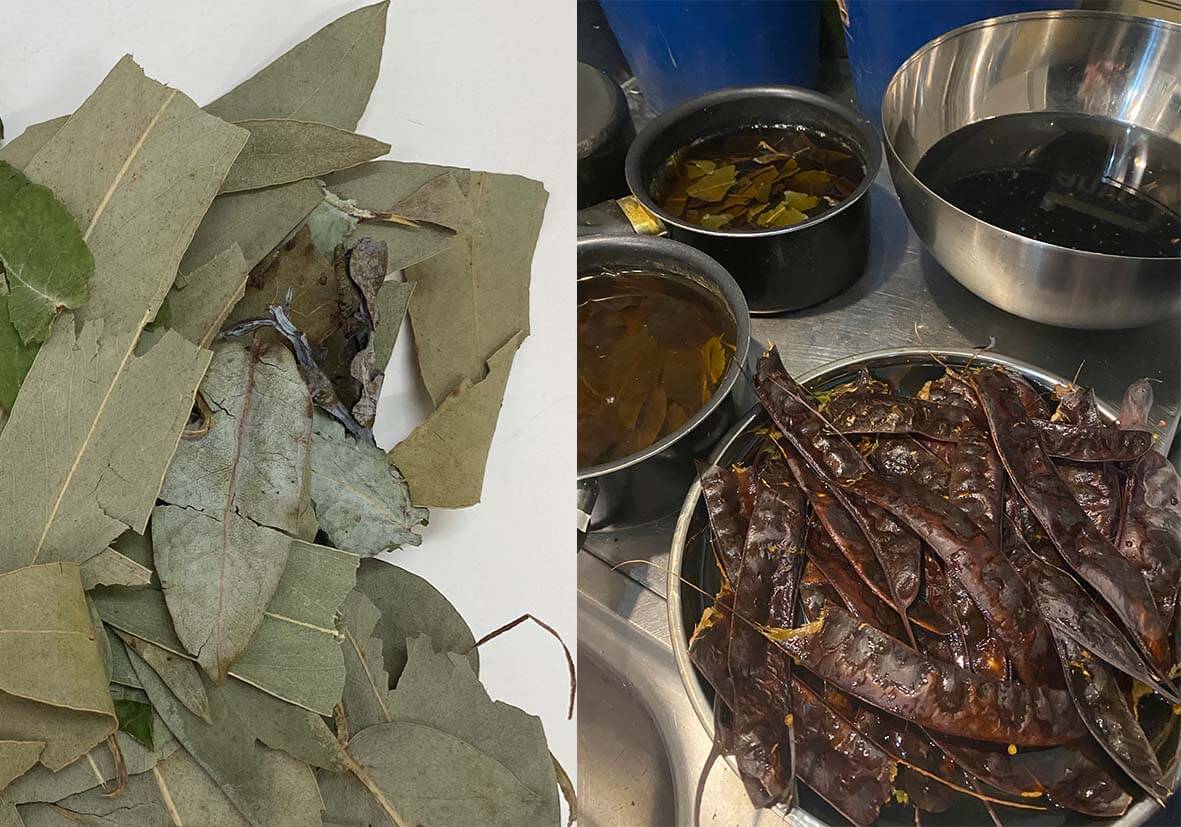
Whilst our dye baths are starting to simmer, we then have to mordant our fabrics. For this process we chose alum and iron as the mordants. This process enables the fabric to bind with the colour and in many cases stay colour fast. Alum is the best mordant for doing this, and iron works as both a mordant and as a colour manipulator. Iron is used in natural dyeing to sadden or darken the orginal colour and makes it stronger. To mordant our fabrics we use initially 2% of the fabrics weight. This can be modified later at the end of the process if we want to continue to change the colour. We mix the neccesary amount with water and then add it alongside the fabric to our dye bath, we simmer the fabric for an hour. These amounts are generalised, and work with many of the fabrics, but we always have to remember to research the correct amounts for our particular plant and fabric. These are the measures I used for both the taro pods and the euculyptus. After the fabrics have been mordanting for an hour, we can rinse them and then add them to our dye baths. Before adding the fabrics, I made sure to strain the water to take out the euculyptus leaves and the taro pods, these can be used for bioplastics later on, everything can be recycled!
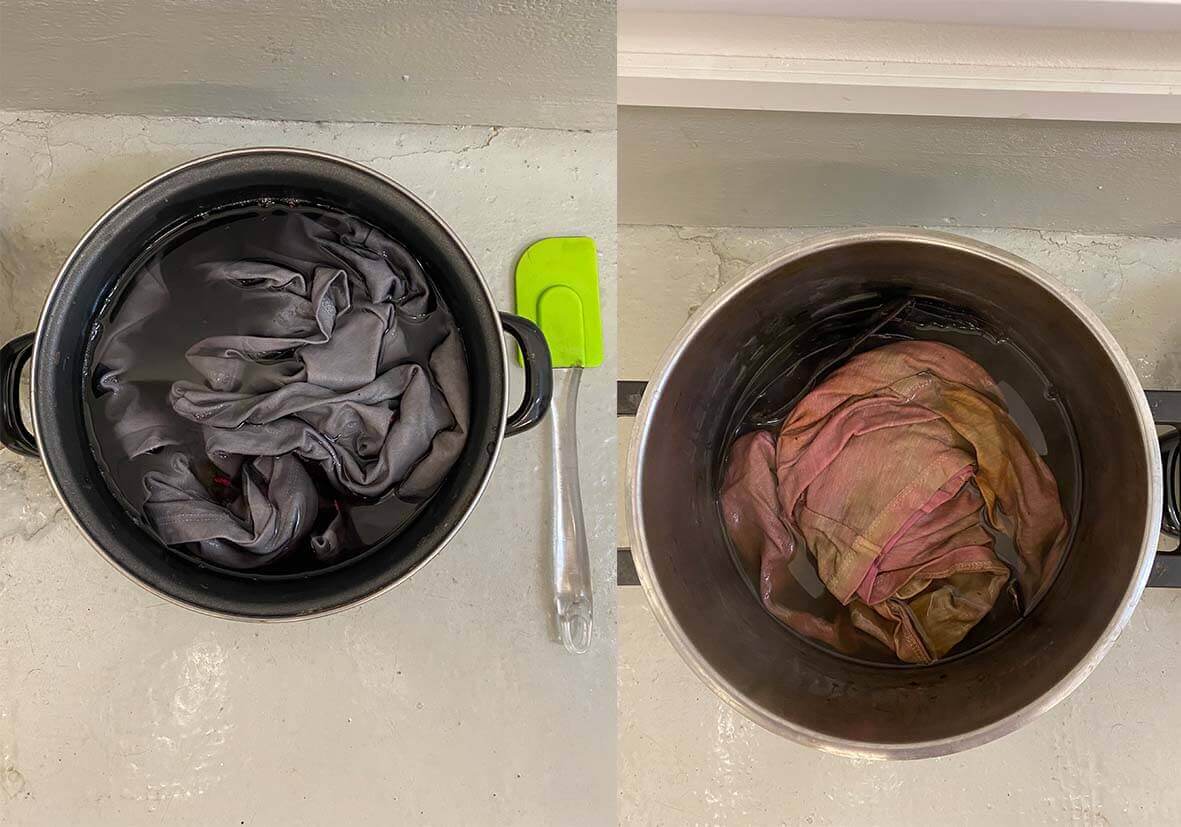
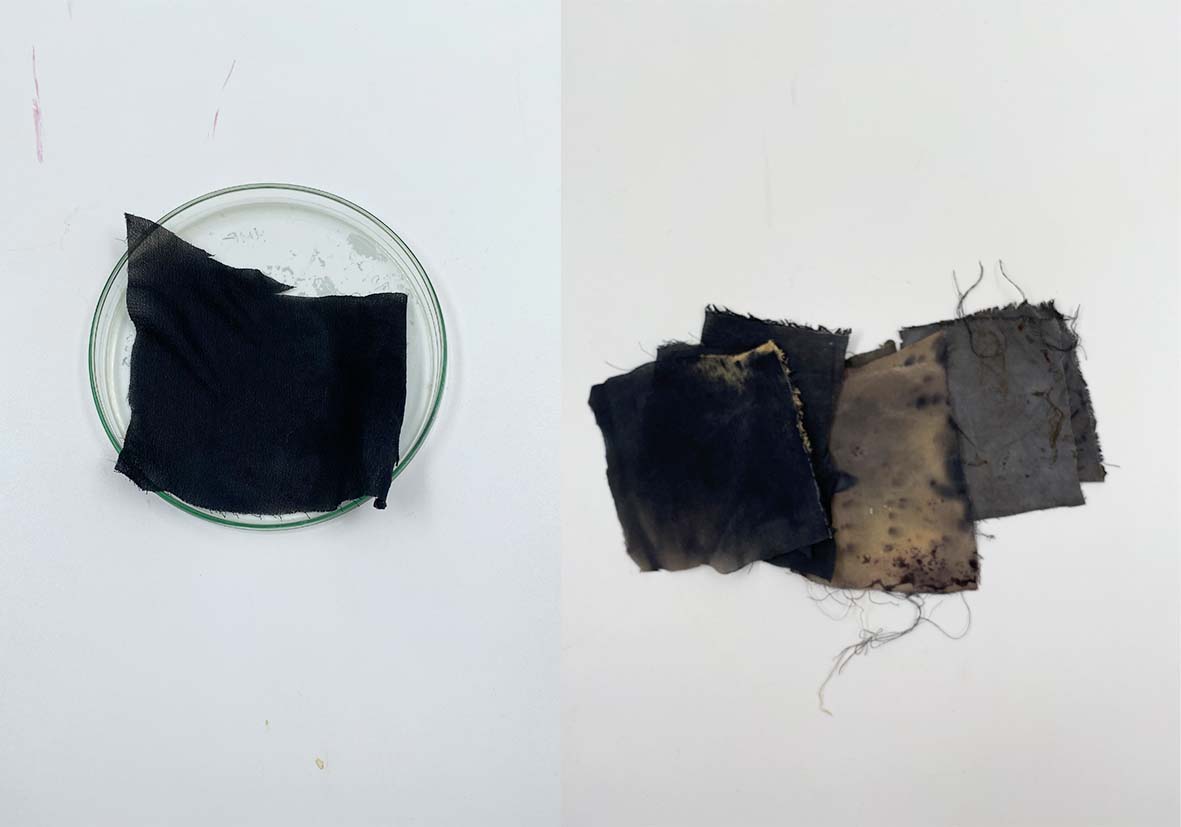
For the Tara Pods I found that as they were a tannin, it was very difficult to extract the colour from them, so I simmered them for about 4 hours in total, something I think I could have done for even longer! the iron mordant fabric wasnt taking, so I added another tablespoon of iron into the solution to try and extract some really awesome dark tones. I had not thought about making greys and blacks prior to this course, as I just assumed they were really tricky to make. Previously everything I make is super colourful, so I thought it could be really interesting to produce a collection with much sadder tones! The alum tara pod bath gave some really subtle peachy and skin tones that I really love.
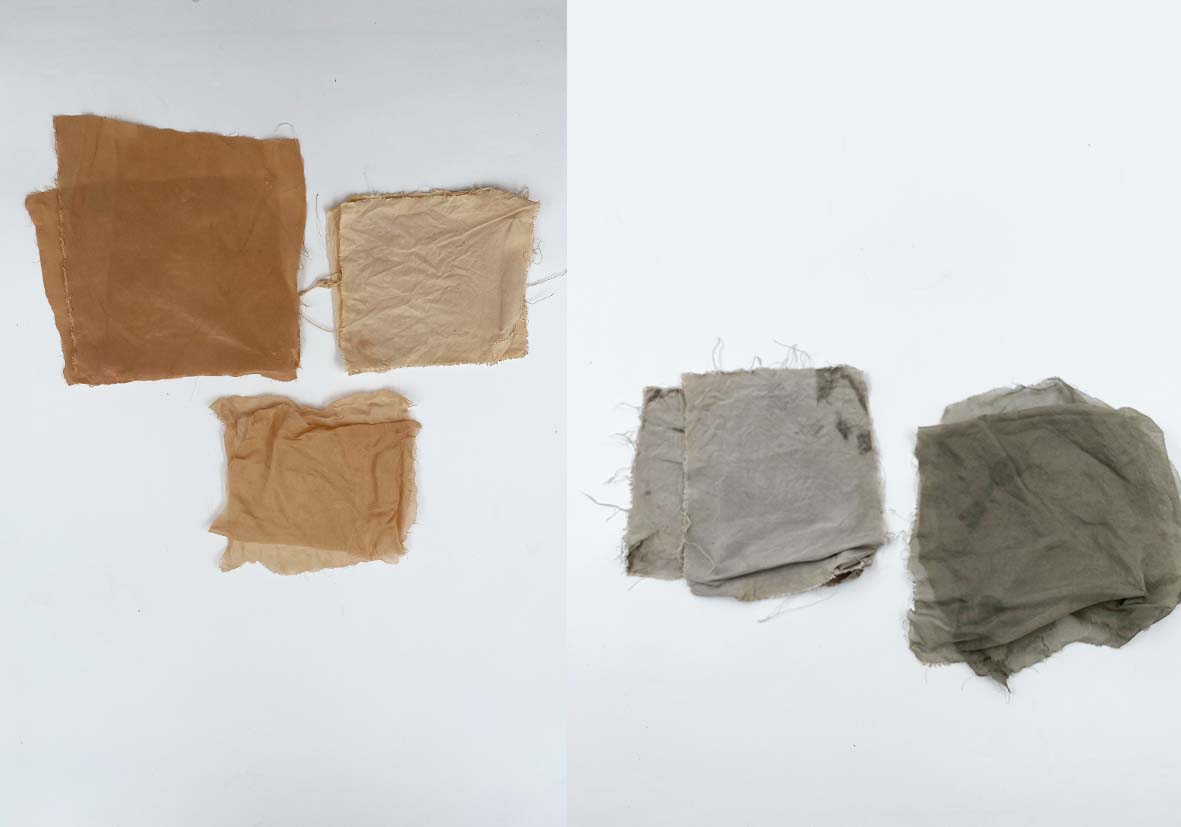
The Euculyptus had some really beautiful soft greeny/yellowish tones. I found with both fabrics, the colour was the least strong on the cotton, and the strongest on the viscoise which surprised me! I was happy with the results from the euculyptus dye as the tones were so delicate, but I would like to explore with adding more of each mordant and simmering for longer to try and get some stronger results.
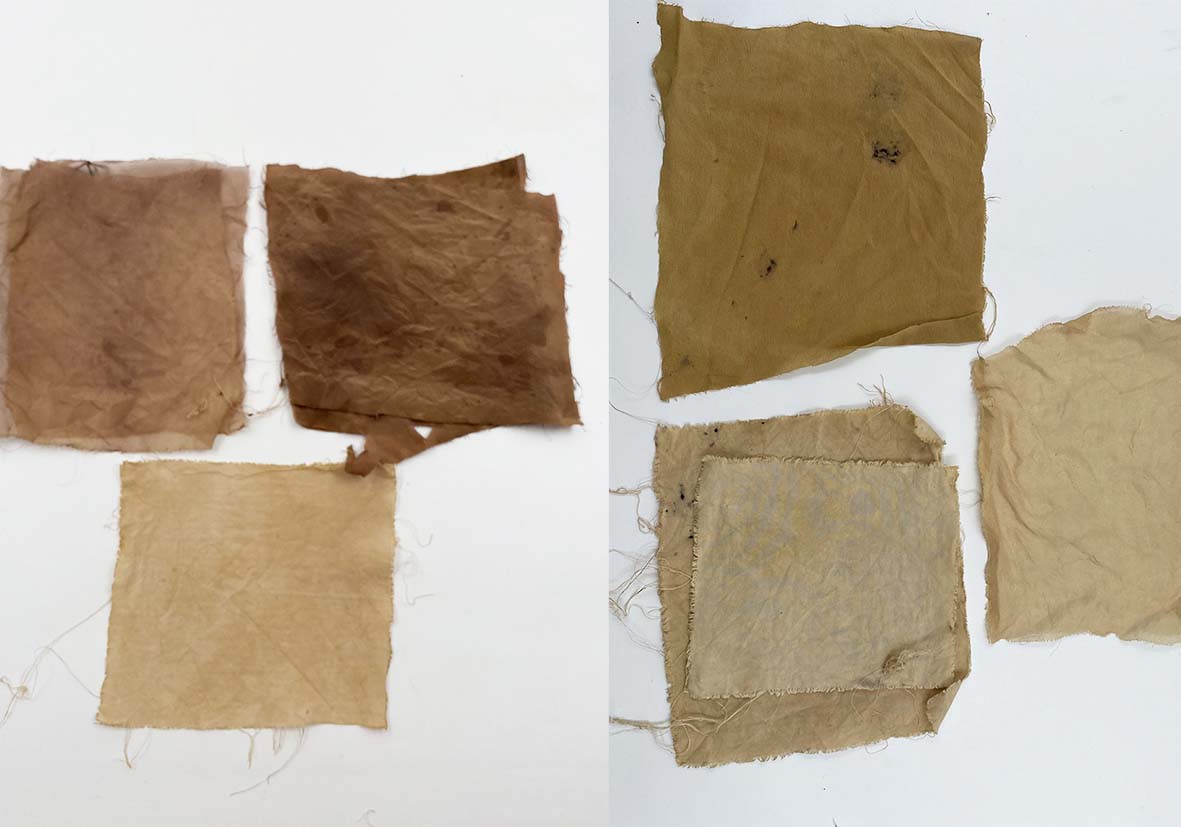
I wanted to play around a little more with dyeing. I had a pink top that had been artificially dyed with dylon pods in bright pink. I wanted to attempt to take out the bright pinks and get a more earthy outcome. I also had a body that I made from recycled cotton that I wanted to dye. I placed the top in the tara pod and iron solution. I simmered for a few hours, and then left sitting for 48 hours overnight to try and get a strong outcome, I knew it would be difficult as it had such an un natural colour to begin with. However, it darkened the pink and made it more earthy, and in the areas that were paler pink, it went an earthy brown colour. I made a new dye bath using rose petals, the colour was really weak and so I decided to add iron to try and create a sadenned grey colour. This worked really well and I am super happy with the final outcome. The rose petals require the fabric to be soaked in vinegar as an extra mordent to take the colour. If I had not added the iron, the outcome would have been a browny/pink colour.
I also wanted to play around with the PH balance of the euculyptus leaves dye bath. Unfortunately vinegar, and bicarbonate soda did not have any influence on the colour, but I was able to get grey and black as a result of using iron.
MAKING INKS
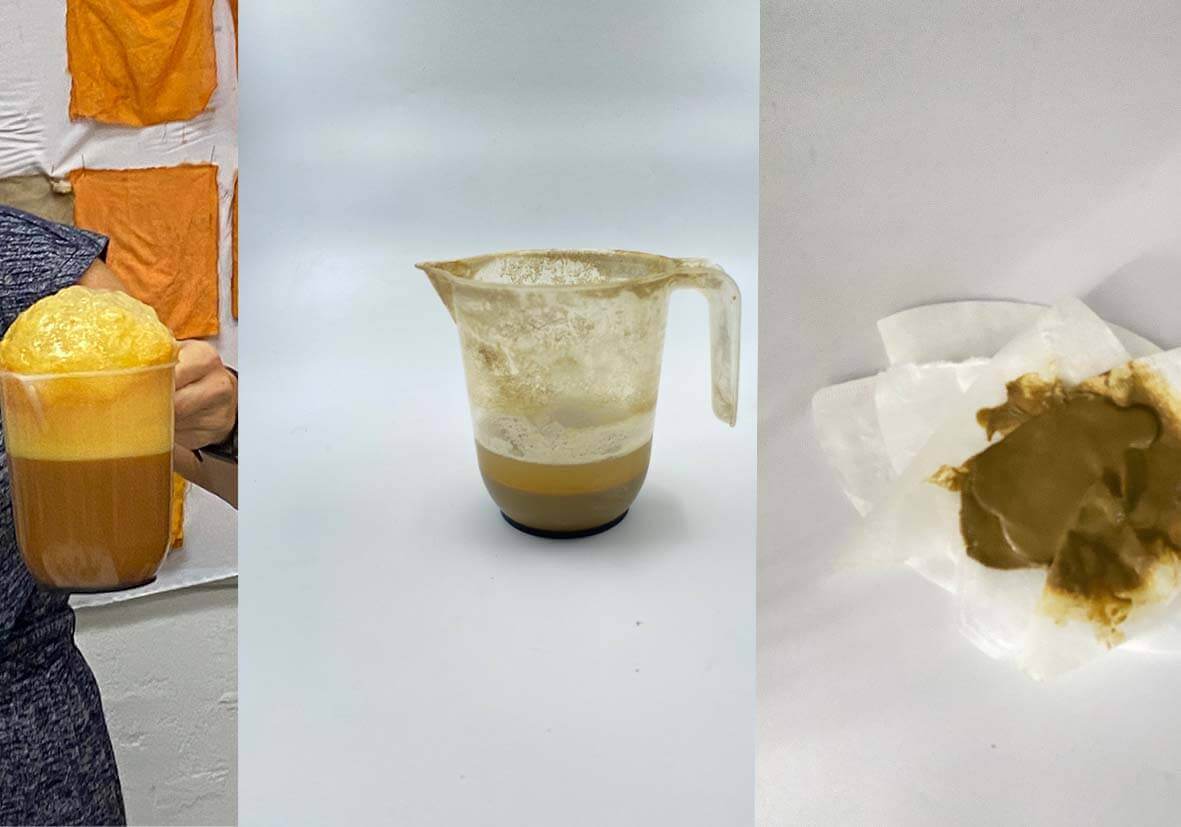
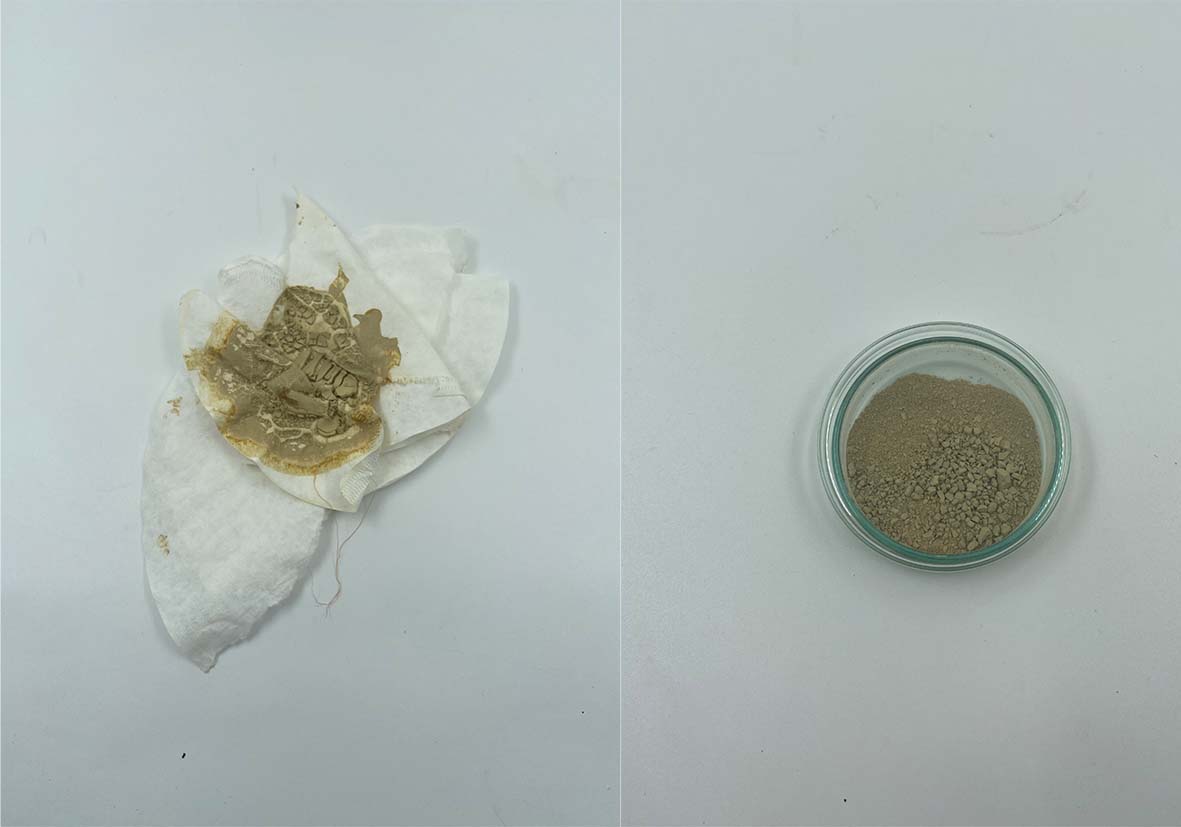
The amazing thing about natural dyeing, is that you can recycle the dye solution afterwards and turn it directly into ink that can be used for painting! This process I found so exciting! As a sustainable designer, I am always searching for innovative ways to continue to become more and more sustainable and find solutions to my waste. A lot of water goes to waste during the dyeing process, and there is a lot of waste leaves and food matter that no longer has a use post its dye bath. The process consits of adding acidic and alkaline solutions together to make a chemical reaction that causes the pigment to seperate. For our pigments we used 16g of Alum and 8g of bicarbonate soda. The Solution then bubbles up and we see a large foam layer above the watery layer. Given time to settle, there becomes a heavier pigment sediment at the bottom of the container. We leave the solution for 24 hours so it seperates fully, before draining it through a coffee filter. After a few hours, some of the solutions slips through, and the remaining solution creates a sort of jelly texture. This jellied sollution can then be put in the dehydrater for a couple of hours. Once dry, it has been turned into a powder! It can be scraped off and used as ink for painting.
FLOWER PRINTING
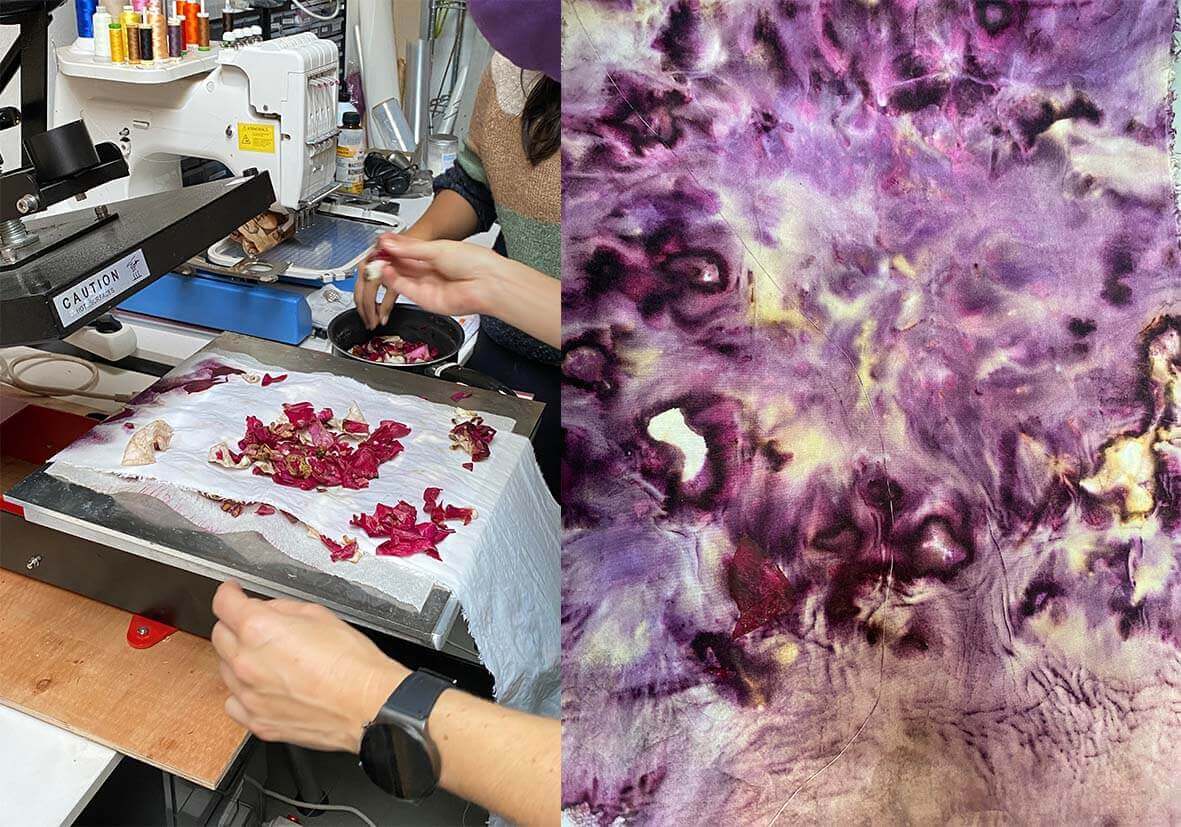
Anastasia gave us a beautiful demo on flower printing. In order for this to work and for the colour to remain colour fast, the fabric must be scoured and mordanted before hand. The mordant will depend on what plants are the most colour fast, so this should be thought about when making foraging for flowers. The petals can be dry, as long as the fabric is wet, but you can also pre soak the petals if you want a more abstract pattern as the final outcome. The petals are pressed onto the fabric using a heatpress, with greaseproof paper either side of the fabric to protect the press. This can also be done using an iron.
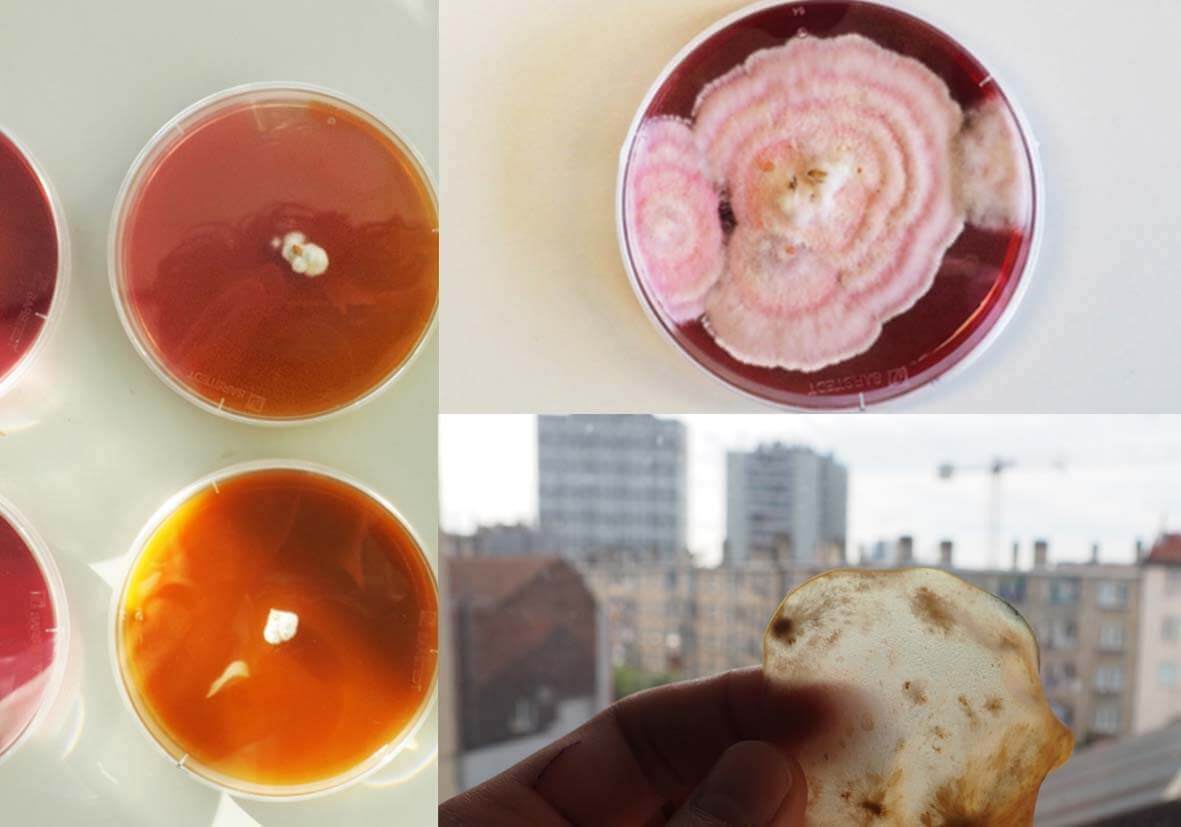
BACTERIA DYEING
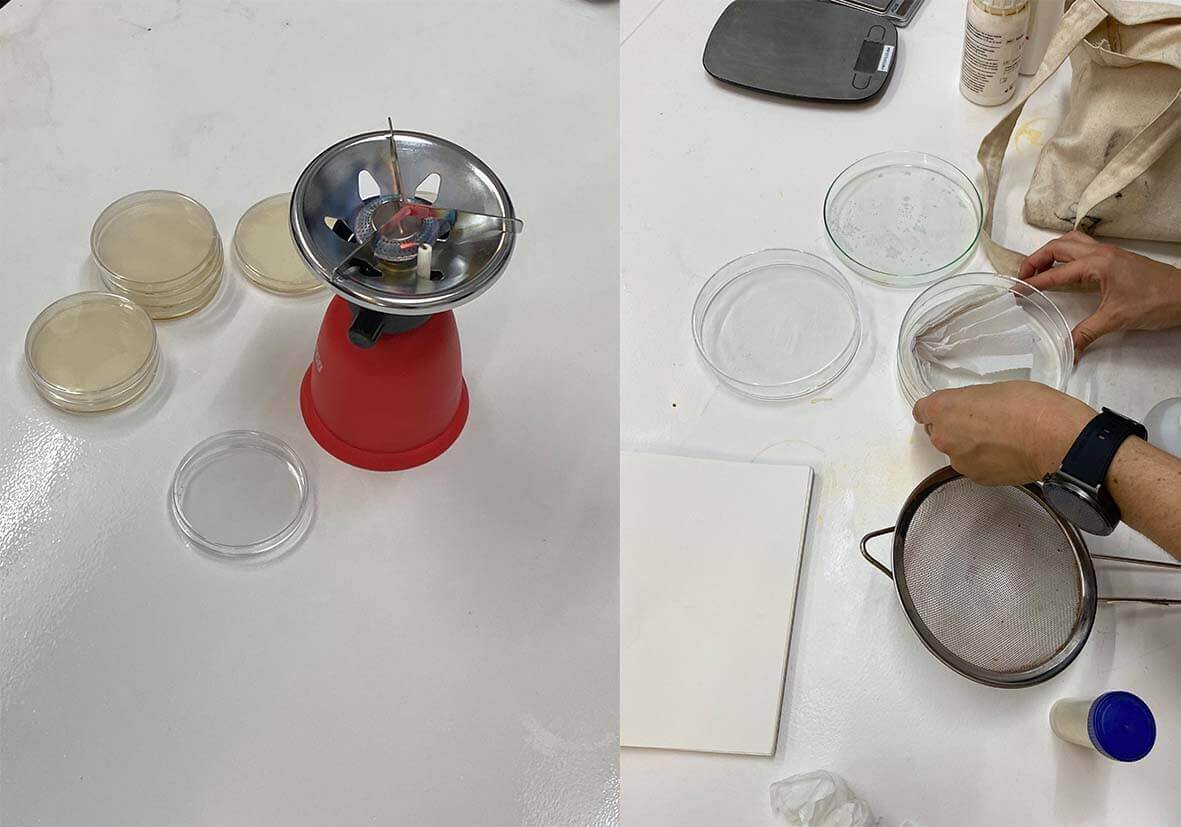
We are still in the process of finishing our bacteria dyeing, but I am so excited to see the results. I did not even think about the possibilities of dyeing with bacteria before the course, so this was really eye opening for me! For this part of the project worked on creating bacteria lividim. Bacteria lividim is not PH sensitive and takes 48 hours to grow. To create the enviroment for it to grow, we need both a solid and a liquid solution for it to grow. For our solid, we use agave, an aglea from the sea, which is like a sugar and the bacteria loves to feed on. We also use LB broth, we submerge our textile into the solution in a petri dish. The agar keeps the te bacteria alive, the LB broth makes the fabric colour fast. First we steralise our fabrics in pressure cooker for 15 minutes. The fabric is steralised in distalled water, as the water in Barcelona has too much calcium in it. Everything has to be really sterile for the bacteria to grow. We clean the table and all the surrounding area and utensils with alchohol to make sure that eveerything is clean. To create the agar solution, we disovle 5g of agar and 0.5g of glycerine into 250ml of water into a heat proof glass bottle. We close the lid, but not fully to keep it sterile, and put it in the pressure cooker for 15 mins. To make the LB broth, we dissolve 6.75g of LB powder and 0.5g of glycerine into 250ml of water, again in a heat safe glass bottle. We leave the lid a little open, and steralise in distilled water for 15 mins in our pressure cooker. Once the agar solution has been steralised, we take it out, quickly and carefully closing the lid so it remains sterile. Once its cooled down, we pour it into the petri dishes and watch it turn to jelly. We do this by holding the bottle over the bunsen burner, before pouring into the dishes, to help keep it sterile and to help the jelly process. The bunsen burner helps keep the area sterile. The agar has to cool down and fully jellify before it can be added to the textile. We put the agar petri dishes in the incubator at 24 degrees to grow and keep sterile. The incubator keeps the petri sterile. The next stage is to fold our fabric and place it into our petri dish. We can fold in any way we like to make the most interesting outcome, then we put it in the slow cooker to steralise, again for 15 minutes. 24 hours later, we return to our agar jelly solution. We create a sterile environment once more, steralising the surface around the bunsen burner, all surfaces and our hands. Using an enoculation loop, we keep it over the bunsen burner, and carefully stroke bacteria across the surface of the agave before closing the lid of the petri quickly. On this occasion we used bacteria that had already grown from a couple of days before, but we can get bacteria easily from things like our face masks. For the fabrics, we pour the LB broth onto the fabric, using the same careful process around the bunsen burner allowing no bacteria to get in. Once the bacteria has grown in the agave solution, we then carefully repeat the swabbing process with the innoculation loop, very gently in the clear areas, this time on the petri with the fabric in. We then leave the bacteria for at least 48 hours so that it can grow. I am still waiting to see the results from this process.
MYCELLIUM DYEING/ MICRO TEXTILE
As well as bacteria dyeing, I really wanted to experiment dyeing with mycellium. In order to dye with mycellium we initially need to either get or create the mycellium spores to grow with. We then need to create the mycellium a liquid broth, similarly to how we did with the bacteria dye. We start by mixing 4g of agar with 4g of malt extract into a 200ml of water. The water we use, will be recycled from our latest dyebaths. We can make a selection by deciding what colours we want, but also working out which solution will work best with the mushrooms. Once we make our selection, we pour everythng into the bottle and steralise inside the pressure cooker. Once the liquid broth is ready, and we have our sterile environment around the bunsen burner ready, we pour the liquid broth into petri dishe and let it cool down. Once it is cool down, we can then put a chunk of mycellium in, before we then put the petri dish into the incubator. I am yet to finish this process, but from my research, a light film should grow within the container that can then be dehydrated to create a material. I am hoping to research this further and perhaps use it to create buttons for my garments. I will continue to research other ways to use mushrooms for natural dyeing and to create biomaterials.
Research
I will be continuing to research in more detail both mycellium and bacteria dyeing, as well as looking at ways to make the inks colour fast so I can use them on fabrics as a natural screen-pringing solution. I also am super excited to test out printing with differnt plants on fabrics, I really enjoyed watching the colours and textures evolve.