2. Digital bodies
Research & Ideation
Source: thursd.com

Source: wall-corp
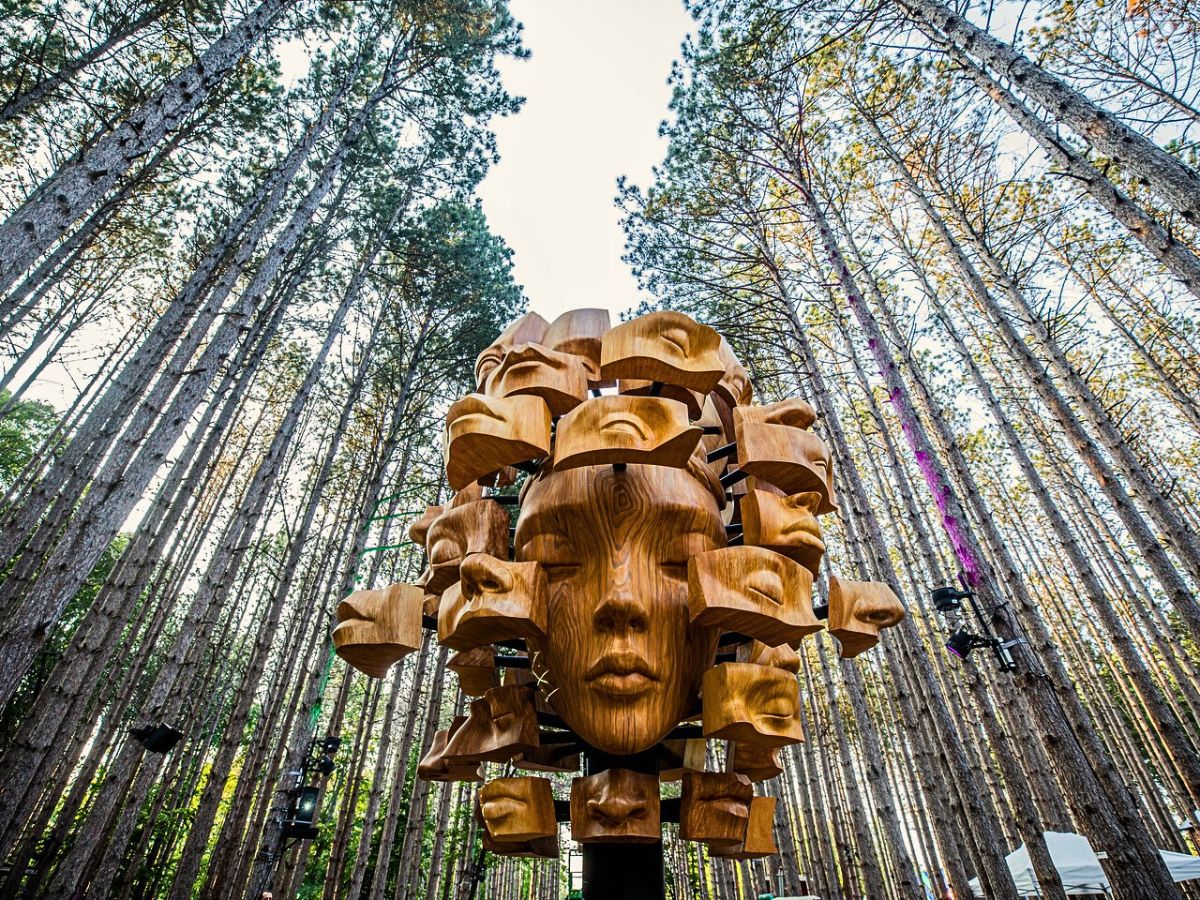
The human body has become a central site of investigation within contemporary digital culture. Across art, design, and technological practices, the body is increasingly mediated by computational systems that record, analyze, and transform its presence. Rather than being experienced solely as a physical form, the body is now continuously translated into data, images, and digital structures.
This shift introduces new ways of understanding embodiment. Movement, posture, gesture, and physiological signals can be captured and processed, allowing the body to interact with digital environments and influence audiovisual, spatial, and material outcomes. The body thus operates simultaneously as subject, interface, and material within hybrid physical–digital systems.
Within this context, the notion of the Digital Body emerges as a framework for exploring how embodiment is reconfigured through technology. It opens questions related to representation, identity, performance, materiality, and power, while challenging traditional distinctions between physical and virtual presence.
In this project, the Digital Body is approached through a practice-based exploration that connects digital modeling with physical fabrication. A human form is digitally generated or acquired and then translated into a modular structure through slicing and segmentation. This process allows the body to be reconstructed as a tangible, reconfigurable object, emphasizing the relationship between digital geometry, material constraints, and fabrication logic.
This approach bridges digital design and physical fabrication, enabling an investigation into the relationships between geometry, material constraints, and spatial construction. Through this process, the project examines how technological systems can transform the ways in which the human body is perceived, constructed, and experienced.
This investigation positions the body not as a static figure, but as a mutable system that can be deconstructed and reassembled. The Digital Body thus becomes a site where computational processes and material practices intersect, framing both the theoretical and practical explorations developed in the following sections.
- Source [ecochen.design] (https://echochen.design/02-DDFM)
get inspired!
-
Head portion - Betiana Pavon - FabLab Bcn
-
Artistic Slicing - Stephanie Vilayphiou - GreenLab
-
Artistic intervention - Kae Nagano - FabLab Kamakura
-
Exploration fabrication techniques - Hala Amer - FabLab Bcn
-
Electronics & DIY scanner - Naim Al-Haj Ali - CPF
-
Advanced - Grasshopper Slicing - Aslı Aydın Aksan - TextileLab Amsterdam
Representation of the Human Figure, Mannequin, and Digital Fabrication
Throughout the history of art, design, and science, the human figure has served as a fundamental reference for understanding proportion, scale, and meaning. From classical representations based on ideal geometry to modern and contemporary interpretations, the body has functioned both as a subject of representation and as a measuring system. Artistic practices, anatomical studies, and architectural theories have consistently relied on the human body as a foundational model through which space, form, and function are interpreted.
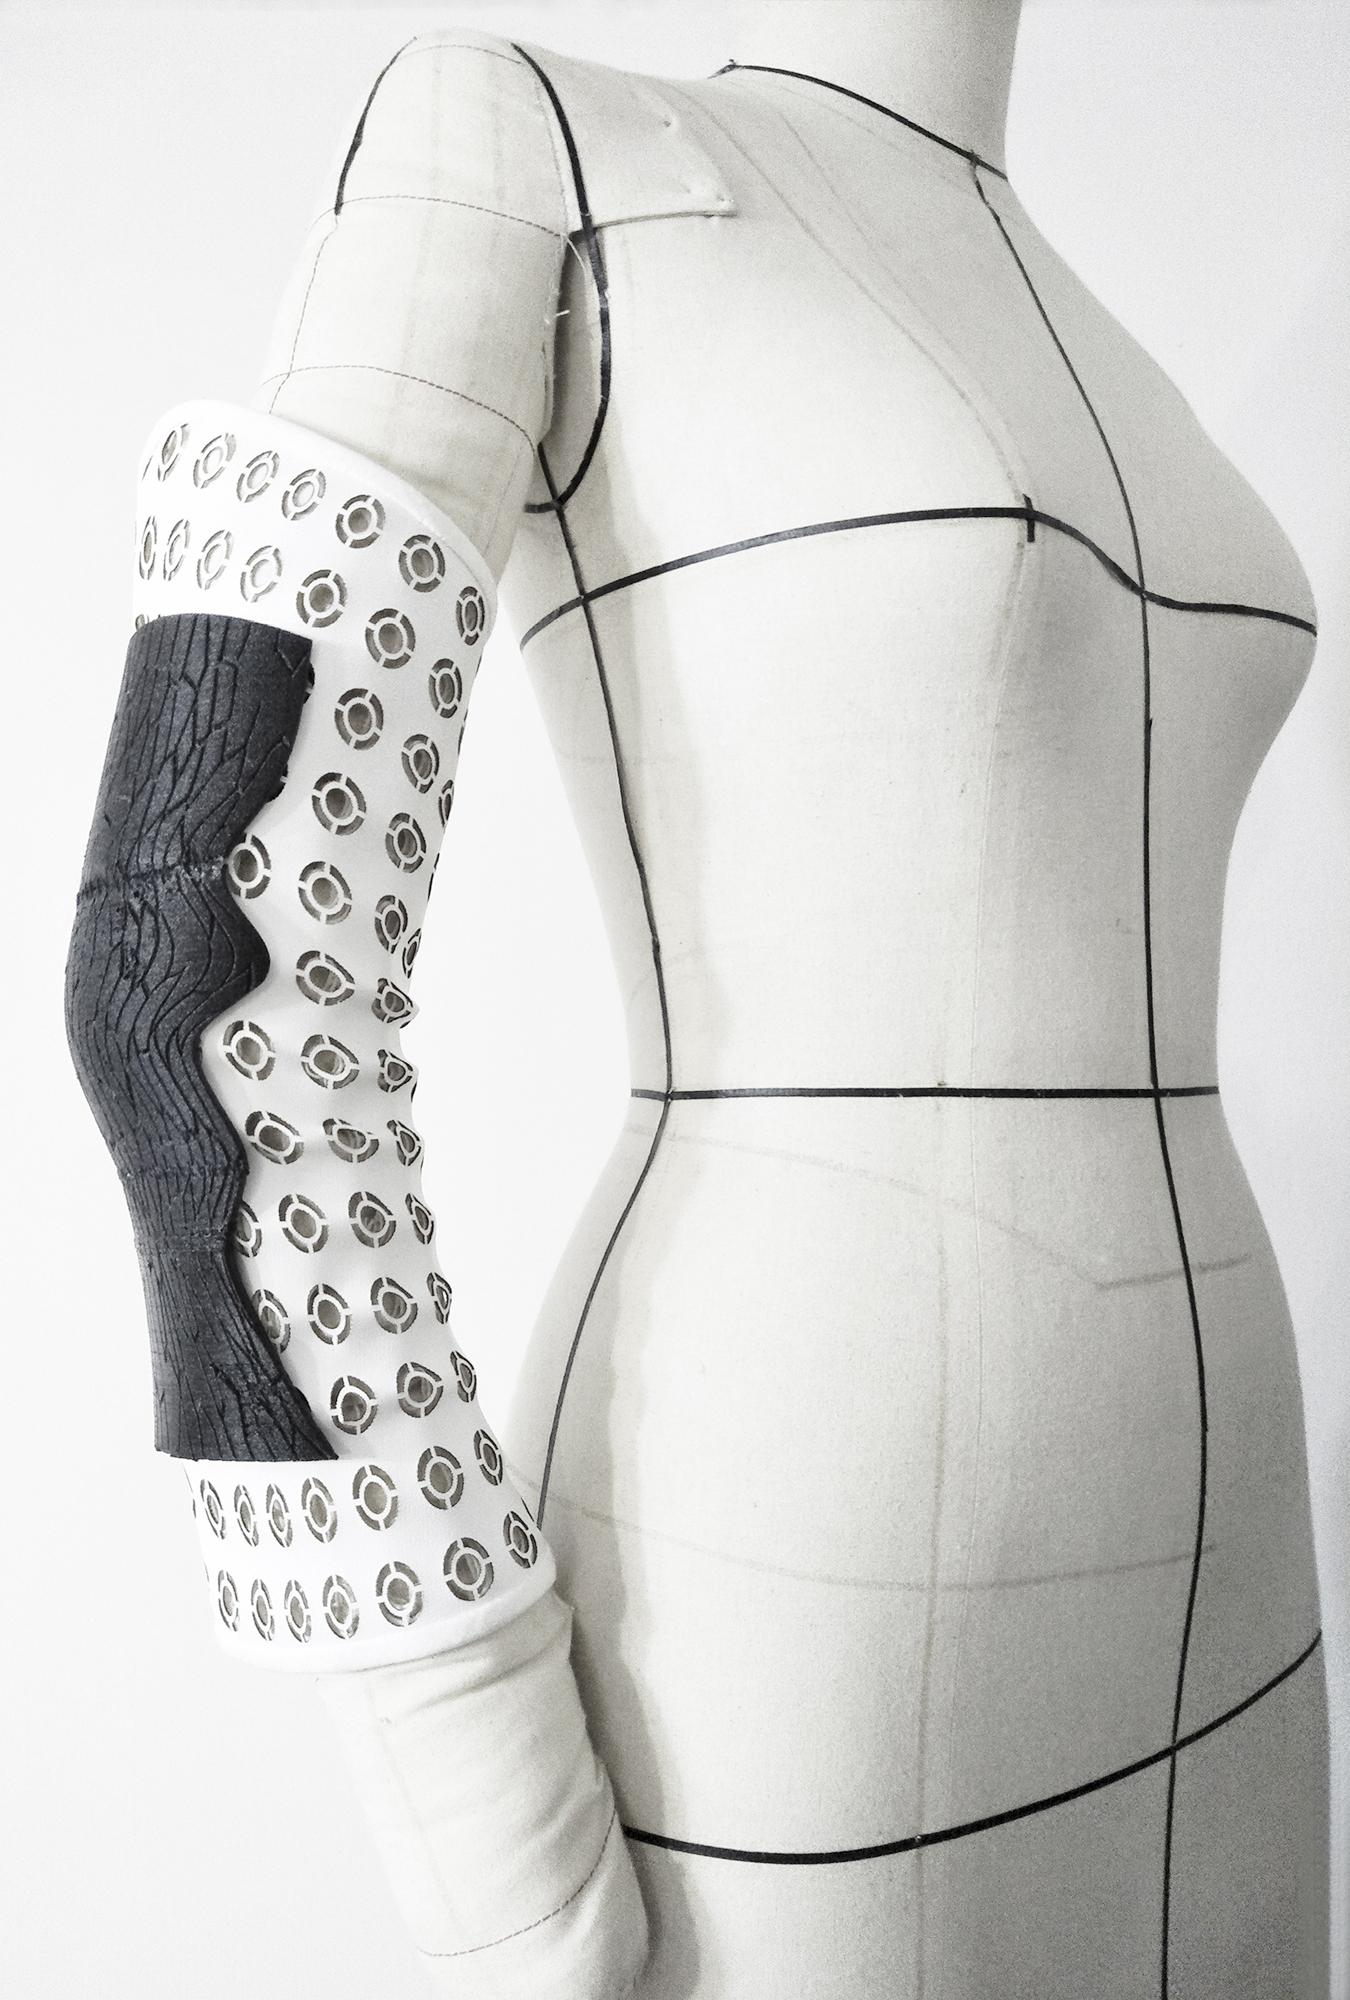
Within fashion design and haute couture, this role materializes through the mannequin. More than a passive support, the mannequin acts as an interface between the body and the garment, enabling the translation of conceptual ideas into three-dimensional form. Historically handcrafted and standardized, mannequins have evolved alongside design tools and production methods, reflecting shifts in aesthetics, technology, and fabrication processes.
Human proportions and body measurement play a crucial role in this evolution. Traditional measurement systems, often based on idealized bodies, have gradually been complemented by more precise and individualized approaches. Measuring the body has shifted from manual techniques to digital processes capable of capturing complex geometries, asymmetries, and variations, allowing for a more nuanced understanding of bodily form.
The introduction of digital fabrication techniques expands these possibilities by enabling the body to be constructed, deconstructed, and reassembled through computational logic. Methods such as waffle structures, stacking, triangulation, radial systems, bending strategies, and kerf patterns allow volumetric forms to be translated into fabricable components. These techniques transform complex three-dimensional bodies into modular systems that respond to material constraints, structural behavior, and fabrication efficiency.
Central to this workflow is scanning, which allows the acquisition of the human body as digital data. Through 3D scanning technologies, physical bodies are converted into point clouds and meshes that can be analyzed, modified, and adapted within digital environments. This data-driven representation enables experimentation beyond static models, opening the body to manipulation, segmentation, and reinterpretation.
Once digitized, the body can be materialized through multiple fabrication techniques. Laser cutting enables precise two-dimensional extraction for layered or interlocking structures. CNC milling supports subtractive fabrication of solid or sculptural elements, while vacuum forming offers possibilities for shaping shells and surfaces around bodily forms. 3D printing, although additive in nature, further extends the range of prototyping and material exploration. Together, these tools form an integrated ecosystem for design, prototyping, and fabrication.
Materials play a critical role in this process. Each fabrication technique introduces specific constraints related to thickness, flexibility, strength, and surface quality, directly influencing design decisions. Understanding materials in relation to digital tools is essential for achieving coherence between digital design and physical outcome.
Finally, 3D modeling acts as the connective layer between representation, measurement, scanning, and fabrication. Through digital modeling software, body data and fabrication logics converge into a unified workflow. The human figure is no longer treated solely as a given form, but as a designed entity—modeled, segmented, and fabricated as a customizable system.
Within this framework, the human body becomes both a conceptual reference and a material construct, repositioned as a dynamic canvas for creation. This approach allows fashion and design practices to move beyond surface application toward the design of the body itself as an active and generative structure.
Digital Techniques and Tools Overview
| Category | Technique / Tool | Role in the Project |
|---|---|---|
| Digital Fabrication Techniques | Waffle structures | Translation of volumetric body forms into interlocking planar components |
| Stacking | Layer-based construction of the body through repeated sections | |
| Triangulation | Structural subdivision of complex geometries for stability and fabrication | |
| Radial systems | Organization of body volumes around a central axis | |
| Bending strategies | Controlled deformation of flat materials into curved forms | |
| Kerf patterns | Enabling flexibility and curvature in rigid materials through patterned cuts | |
| Scanning & Acquisition | Scanning | Capture of the physical body as digital data |
| 3D Scanning | Conversion of the human body into point clouds and mesh geometries | |
| Digital Fabrication Machines | Laser cutting | Precise 2D cutting of sliced body components for assembly |
| 3D printing | Additive prototyping and exploration of body-related forms | |
| CNC milling | Subtractive fabrication of solid or sculptural body elements | |
| Vacuum forming | Shaping shells and surfaces around bodily geometries | |
| Materials | Material experimentation | Evaluation of thickness, flexibility, strength, and surface qualities |
| Digital Design | 3D Modeling | Processing, modifying, slicing, and preparing body geometries for fabrication |

Definition
The Digital Body refers to the representation, extension, and transformation of the human body through digital technologies. It describes a hybrid form that exists between the physical and the virtual, produced through processes of digital capture, computation, and mediation.
Rather than functioning solely as an image or replica, the Digital Body operates as an interface, a data source, and a performative entity, reshaped by computational systems and technological frameworks.
Categories of Digital Bodies
The concept of the Digital Body encompasses multiple modes through which the human body is digitally represented, extended, and transformed. These categories are not mutually exclusive; rather, they often overlap within artistic, performative, and design practices. Together, they describe the diverse ways in which embodiment is mediated through digital technologies.
Categories of Digital Bodies illustration by Carlotta Premazzi
1. Digital Representation
The Digital Body as representation refers to the translation of the human form into digital models and visual structures. The body is captured, reconstructed, or simulated as a digital object that can be viewed, manipulated, and animated.
Typical forms include: - 3D avatars - Digital twins - Photogrammetry - Motion capture (mocap) - Skeleton tracking
This category focuses on the body as an image, model, or dataset, often used in virtual environments, simulations, and visualizations.
2. Augmented Body
The Augmented Body describes forms of embodiment in which digital elements are layered onto or integrated with the physical body. Rather than replacing the body, technology extends its sensory, expressive, or functional capacities.
Common examples include: - Augmented reality (AR) bodies - Filters and digital overlays - Digital or cyber prosthetics - Sensory and interactive wearables
In this context, the body becomes a hybrid interface through which digital content is experienced and controlled.
3. Data Body
The Data Body refers to the body as a producer of measurable information. Through sensors and tracking systems, physiological and behavioral signals are captured and transformed into datasets that can be analyzed, visualized, or sonified.
Typical data sources include: - Biometric data - Heart rate - EEG - GSR - GPS - Other forms of datafied bodily information
This category highlights the body as an informational system, raising questions related to quantification, surveillance, and agency.
4. Performing Digital Body
The Performing Digital Body emphasizes the body as an active agent within interactive and performative systems. Movement and gesture directly influence digital environments, generating real-time audiovisual or spatial responses.
Examples include: - Dance combined with reactive systems - Motion-tracking-controlled VJing - Theatre integrated with digital technologies - Live volumetric or mixed-reality performances
Here, the body operates as both performer and controller, shaping the behavior of digital systems through physical action.
5. Synthetic / AI Body
The Synthetic or AI Body refers to digitally generated or algorithmically produced bodies that may not correspond to a physical human counterpart. These bodies are created, animated, or modified through artificial intelligence and generative systems.
Typical manifestations include: - AI-generated bodies - Autonomous avatars - Deepfakes - Synthetic or non-human digital figures
This category challenges traditional notions of authorship, authenticity, and embodiment, introducing speculative and post-human perspectives.
Concept Map — Digital Body (Categories in Relation)
The Digital Body can be understood as a multi-layered system in which different categories describe how the body operates within digital and physical environments. These categories are interconnected and often coexist within the same project.
| Category | Primary Role | Operates Through | Connects To |
|---|---|---|---|
| Digital Representation | Visual / structural translation | 3D models, scans, motion capture | Data Body, Synthetic Body |
| Augmented Body | Extension of physical presence | AR, wearables, digital overlays | Performing Body, Data Body |
| Data Body | Measurement and quantification | Biometrics, sensors, tracking | Identity Body, Performing Body |
| Performing Digital Body | Action and interaction | Movement, gesture, real-time systems | Augmented Body, Representation |
| Synthetic / AI Body | Generation and simulation | AI models, algorithms, datasets | Representation, Identity Body |
| Identity Body | Meaning and subjectivity | Avatars, virtual bodies, politics | Data Body, Synthetic Body |
1. Digital Body as Representation
It is the body translated into a digital format. Main forms
- 2D/3D Avatars
- Used in videogames, VR, virtual social spaces, * virtual performance.
- 3D Body Scans (photogrammetry, LiDAR)
- High-fidelity digital copies.
- Motion Capture / Body Tracking
- The body becomes data used to animate digital models.
- Volumetric Capture
- Captures the moving body in 3D for VR/AR.
- Digital Twins
- Accurate digital copies used in medicine, * sports, ergonomics.
In Art
- virtual performances
- immersive installations with digital shadows, * silhouettes, point clouds
- identity transformation projects
- digital mirrors, augmented bodies, glitch body
2. Digital Body as Extension
The body is augmented through technology—no longer a copy, but an expansion of what the body can do. Examples
- AR overlays → animated digital layers on the body
- Cyber prosthetics → digital extensions of the body
- Augmented sensoriality → wearables that extend perception
- Biofeedback (EEG, ECG, galvanic, respiration) → body generates visual/sound output
- Body as interface → the body becomes a controller (Playtronica, capacitive sensors, computer vision)
In Performing Arts
- dance with motion capture
- theatre where actors control visuals/audio through movement
- neural performances (EEG → visuals)
- corporeal VJing
3. Digital Body as Data
17stThe body becomes a data source—a central theme in contemporary thought. What data? * position, movement, posture * rhythms * heart rate * temperature * stress levels * facial tracking * gestures * voice * fingerprints, retina, biometrics
Key concepts
- Quantified Self
- Body Analytics
- Biometric Identity
- Datafication of the body
- Body as archive / body as memory
In Art
- works transforming bodily data into visuals
- biofeedback installations
- algorithmic bodies
- critiques of surveillance + loss of agency
4. Digital Body as Identity
The digital body becomes a space of identity. Examples
- avatars as expressions of the self
- fluid, mutable, non-biological bodies
- experiments in gender, fluidity, fragmentation
- digital drag
- glitch or deformed bodies as artistic language
- post-human and trans-human aesthetics
Philosophical themes
- posthuman
- cyberfeminism
- ecology of the digital body
- body as digital narrative
- immaterial materiality
5. Digital Body in Performance & Interactive Installations
A fundamental base for contemporary immersive experiences.
Techniques
- computer vision
- skeleton tracking (Kinect, ZED, Mediapipe)
- AI body tracking
- capacitive sensors (Playtronica)
- mocap suits (Rokoko, Xsens)
- volumetric capture
- visuals in TouchDesigner / Unreal / Unity
Interaction models
- body as brush
- body as musical instrument
- body as dynamic sculpture
- body as storyteller
- body as political device
6. The Digital Body as Artistic Material
Artists treat the digital body as a sculptable material.
Typical manipulations
- morphing
- glitch
- distortion
- fragmentation
- duplication of the body with textures/patterns
- transformation into point clouds
- transitions between real and synthetic
7. Aesthetics of the Digital Body
Recurring aesthetics:
- glitch body
- pixel skin
- mesh body
- skeleton tracking visuals
- AI-drawn body
- volumetric ghost
- holographic body
- limbs
- mirror worlds
- post-human forms
- liquid / fragmented / generative avatars
8. Digital Body & AI
AI pushes the concept further. New forms
- synthetic AI-generated bodies
- deepfake body
- body swapping
- impossible bodies (AI body synthesis)
- dataset-trained bodies
- autonomous avatars with emergent behavior
9. Digital Body as Politics
Major contemporary discourses involve the digital body.
Themes * surveillance * privacy * digital identity * gender * data rights “Who owns your digital body?” * algorithms that decide who you are * digital colonization * architectures of power
10. Digital Body vs Physical "Body
The digital body does not replace the physical one. It is:
- an extension
- a projection
- a possibility
- an experimentation field
- a political space
- a second (or third…) body
TEMPORAL LINE
| Period | Key Developments |
|---|---|
| 1960–70 | Video art → Nam June Paik |
| Performance → body art and electronic mediation | |
| 1980 | Cyberfeminism (Haraway, Cyborg Manifesto) |
| Early human–machine interfaces | |
| 1990 | 90s VR (Sensorama, CAVE VR) |
| Virtual world avatars (Active Worlds) | |
| 2000 | Motion capture in artistic practice |
| Second Life and digital identities | |
| 2010 | Kinect → democratized body tracking |
| Smartphone AR | |
| Quantified Self | |
| 2020–Today | Generative AI → synthetic bodies |
| Volumetric capture | |
| XR (AR/VR/MR) | |
| Post-human / multispecies digital identities |
6. Typical Technologies
A list of the main technologies used in creating, capturing, and interacting with the Digital Body.
Tracking
- Mediapipe
- Kinect
- OpenPose
- ZED camera
- LiDAR / depth sensing
Acquisition
- Photogrammetry
- Volumetric capture
Wearable
- IMU sensors
- Biosensors
- EEG, EMG
- Playtronica (capacitive touch)
Software
- TouchDesigner
- Unreal Engine
- Unity
- Blender
- Notch
- Runway ML
- AI systems
7. Applications in Art & Design
Immersive installations
- Digital mirrors
- Particle bodies
- Reactive silhouettes
- Audio-visual body
Performance
- Dance + visuals
- Digital theatre
- Corporeal VJing
- Live avatars
Design / Fashion
- Digital fashion
- Smart textiles
- Avatar fitting
- Digital aesthetic prosthetics
Bio-art / Neuro-art
- EEG → generative visuals
- Heart rate → sound
- Breath → interface
8. Aesthetics & Languages
- Glitch body
- Exposed mesh body
- Point-cloud body
- Hologram
- Liquid body
- Fluid avatars
- Mutant identities
- Real/virtual overlap
- Spectrality (ghost body)
9. Key Theorists
- Donna Haraway — Cyborg Manifesto
- N. Katherine Hayles — posthuman
- Rosi Braidotti — Posthumanism
- Paul B. Preciado — body as political technology
- Lev Manovich — new media / digital representation
- Mark Hansen — body + digital perception
- Paul Virilio — digital speed + body
10. Relevant Artists
- Laurie Anderson
- Stelarc (cyborg body)
- Bill Viola
- Hito Steyerl
- Lu Yang (avatar identities)
- Holly Herndon & Spawn
- Jon Rafman
- Sutu
- Zach Lieberman
- Troika Ranch
- Random International
- Refik Anadol
11. Politics & Ethics of the Digital Body
- Biometric surveillance
- Avatar control
- Identity exploited by algorithms
- Body as data capital
- Deepfake identity
- Loss of agency
- Aesthetics of digital power
- Rights over one’s digital body (“digital bodily rights”)
Historical & Anatomical References
Antiquity * Vitruvius — human body as proportion + measure
Renaissance * Leonardo da Vinci — anatomical + mechanical body * Vesalius — internal anatomy → precursor of digital slicing
Modern Era * Muybridge — sequential movement * Marey — chronophotography * Taylor & Gilbreth — ergonomics, motion study
Connection to Digital Body * Historical concepts → foundations for mocap, tracking, digital anatomy
Ergonomics & Digital Body
Ergonomics: adaptation between human body, tools, environment.
In Digital Body:
- Mocap must respect physical limits
- Wearables must ensure comfort
- VR/AR must prevent fatigue
- Posture and gesture analysis
Key ergonomic concepts
- Range of motion (ROM)
- Neutral posture
- Joint load
- Sensory comfort
- Reduced cognitive/physical fatigue
Digital Body as Representation & Digital Sculpture
The digital body becomes:
- A virtual representation (avatar, 3D scan)
- A digital sculpture to be deformed, fragmented, sliced, recomposed
- A plastic digital material (mesh, voxel, clay-like)
Key concepts
- Point cloud / mesh
- Sliced body
- Segmentation
- Morphing / distortion
Artistic Precursors
- Vitruvius, Leonardo, Vesalius
- Muybridge, Marey
- Stelarc, Hito Steyerl, Rafman, Lieberman, Lu Yang
Slicing Techniques
- Mesh segmentation
- Volumetric slicing
- Layered rendering
- Cross-section animation
- Glitch slicing
Artistic Symbolism
- Fragmentation = identity + memory
- Body as mutable sculpture
References & Inspiration

Digital Bodies Inspiration Moodboard by Carlotta Premazzi
- Captives, Quayola
- Amy Karle
- Thermogram designingbuildings.coThermal_comfort_and_wellbeing
- Giorgia Lupi, Mary-Lee-Internet-of-Bodies-Presentation
- Eadweard Muybridge, Plate Number 188. Dancing (fancy), 1887wikimedia
- Laurence Demaison
- Hito Steyerl
Process and workflow
3D Body Scan
↓
Mesh Cleaning
↓
Digital Slicing
↓
2D Layout (Laser Cut Files)
↓
Laser Cutting
↓
Assembly
↓
Reconstructed Body
Tutorial — Digital Bodies
1. Research and Concept
Objective: Define your idea and gather inspiration.
- Look for artists and projects related to Digital Body and sliced body.
- Decide your focus: whole body, a body part, mannequin, or abstract sculpture.
- Make preliminary sketches to understand proportions, layering, and sectioning.
2(A). Creating the body in MakeHuman
 Begin by modeling the body in MakeHuman, defining the basic proportions and anatomical features.
💻 MakeHuman Tutorial
- Download & Installation
✅ Goal: Obtain and install the open-source MakeHuman software.
📦 Steps: - Search for the official "MakeHuman Community" website. - Download the latest stable installer appropriate for your OS (Windows, macOS, Linux). - Run the installer and follow all on-screen prompts. - Launch the application to begin working with the default figure.
- Interface & Navigation"**
✅ Goal: Understand the main tabs that control the character creation process.
📦 Key Tabs: - Modeling/Model: Primary area for shaping the character's body using sliders and mouse manipulation. - Geometries: Used for adding accessories like hair, clothes, eyes, and teeth. - Materials: Used to apply and adjust the skin texture and shaders. - Pose/Animation: Selects a fixed pose or applies animations. - Export: Final step for saving the model in formats like FBX or OBJ.
- Body Modeling: Shaping the Figure
✅ Goal: Define the character's core physicality (Macro and Detail).
📦 A. Using Macro Sliders (General Shape): - Adjust Gender (male/female transition). - Set Age (child to elderly). - Control Height, Weight, and Muscle mass.
📦 B. Direct Manipulation (On-Screen Sculpting): - Click and hold the Left Mouse Button on the body part (e.g., thigh, waist). - Move the mouse forward/backward to adjust volume/mass. - Move the mouse left/right to adjust width/depth. - Use modifier keys (Shift/Ctrl) while dragging for precise detail sculpting.
- Refining Details & Finishing
✅ Goal: Add specific elements and prepare the figure for presentation.
📦 Refinement Steps: - Geometries: Apply clothing, hair meshes, and teeth models. - Materials: Fine-tune skin texture for realism (e.g., color, shininess). - Pose/Animation: Select a pose to check the character's appearance in different attitudes. - Measurements: Check precise body dimensions if needed for external tailoring or fitting.
- Exporting the Final Model
✅ Goal: Prepare the final 3D file for use in other software (Blender, Unity, etc.).
📦 Export Steps: - Navigate to the Export tab. - Choose the necessary format (FBX or OBJ are common). - Select export options (e.g., include pose, materials, and associated geometries). - Click Export and save the file to your computer.
2(B). 3D Acquisition
Objective: Transform a physical object (body, body part, or mannequin) into a digital model.
 Seashell 3D Scan by Carlotta Premazzi, with Pedro Fablab Lisbon.
[Object Preparation; Scanner with EinScan-SE;aquisition with Shining 3D Software; light patterns and captures; Scanning in several positions; Cleaning and Alignment The mesh; Exporting the 3D Model (.obj, .stl).]
Completed 3D SeaShell Scan Experience visible in 3D Scan Section in Textile Scaffold Documentation
Tools:
- 3D Scanner (photogrammetry or LiDAR)
- Camera for photogrammetry
- Software: Blender, Meshroom, RealityCapture, Rhino
Steps:
1. Place the subject in a well-lit, stable area.
2. Capture multiple scans from different angles.
3. Import the scans into the chosen software.
4. Generate the complete 3D mesh and clean any acquisition errors.
- Body Preparation
The person stands or sits in a stable position, keeping the upper body as still as possible. The bust is exposed clearly so the scanner can capture the silhouette and anatomical details. The environment is kept neutral, avoiding strong reflections, shadows, or patterned backgrounds that could interfere with the scan.
- Scanner / Camera Setup
A 3D scanner—typically a structured-light or infrared depth scanner—is positioned in front of the body. The scanning software is calibrated to recognize skin tones, contours, and textures. The operator adjusts lighting and distance to ensure accurate geometry capture.
- Data Acquisition
The scanner projects patterns or light sequences onto the bust, recording the way they deform across the surface. The operator moves around the person—or rotates the platform—to collect data from all angles: front, sides, and back of the shoulders. Multiple passes ensure full coverage, especially in areas with concave forms such as under the chin or between the shoulders.
- Point Cloud / Mesh Generation
The software produces a point cloud representing the entire scanned bust. This point cloud is then converted into a 3D mesh, generating a digital model that reflects the real proportions and geometry of the body.
- Cleaning and Alignment
The mesh is cleaned by removing noise, filling holes, and correcting small scanning artifacts. The model is aligned along the correct axes, scaled if necessary, and prepared for digital manipulation or further processing.
- Exporting the 3D Model
Once the digital bust is clean and complete, it is exported in common 3D formats (e.g., .OBJ, .STL, .PLY). This file can then be used for applications such as digital design, simulation, virtual garments, laser-cut pattern extraction, or physical fabrication.
3. Mesh Repair and Manipulation
Objective: Obtain a mesh ready for slicing and fabrication.
Software: Blender, Meshmixer, Rhino, Fusion360
Steps:
1. Check the mesh for holes, intersections, or non-manifold surfaces.
2. Use mesh repair tools to close holes and simplify the model.
3. Optional artistic manipulations:
- Extrusions
- Slicing (layering, horizontal/vertical sections)
- Distortion, morphing, deformations
4. Ensure all parts are closed and solid for cutting or printing.

In Blender, isolate the desired section by applying a Boolean modifier with the Difference operation (body – cube), obtaining a clean and precise cut of the model.
1. ✂️ Blender Tutorial: Cutting an Area of Interest
- Scene Preparation
✅ Goal: Set up the main object (Target) and the cutting tool (Cutter).
📦 Steps:
- Select your main model (the Target object, e.g., the body).
- Add the cutting tool: Press SHIFT + A and select Cube (or another suitable mesh).
- Rename the Cube to CUTTER in the Outliner (optional, but recommended).
- Positioning the Cutter
✅ Goal: Define the exact volume that will be removed from the Target.
📦 Steps:
- Move (G) and Scale (S) the CUTTER to intersect the precise area you wish to remove.
- Press H to hide the CUTTER temporarily; this helps you visualize the Target Model clearly.
- Applying the Boolean Modifier"**
✅ Goal: Apply the subtraction logic to the Target Model.
📦 Steps: - Select the Target Model (the body). - Go to the Properties panel (Wrench icon). - Click Add Modifier and select Boolean.
- Configuration: Difference Operation"**
✅ Goal: Set the modifier to subtract the Cutter from the Target (Target – Cutter).
📦 Settings:
- Ensure the Operation is set to Difference.
- For the Object field, use the eyedropper or dropdown menu to select the CUTTER (the Cube).
- Finalization and Cleanup"**
✅ Goal: Make the cut permanent and clean the scene.
📦 Steps:
- Click Apply in the Boolean modifier panel. (Warning: This step is permanent.)
- Press ALT + H to reveal the hidden CUTTER.
- Select the CUTTER and press X or Delete to remove it from the scene.
4. File Preparation for Laser Cutting
Objective: Create 2D files (DXF/PDF) from the 3D model layers.
Steps:
1. Divide the model into slices or layers corresponding to the laser cutting.
2. Export each layer as DXF or PDF.
3. Add alignment marks if needed.
4. Check material thickness and scale the layers correctly(cardboard 4mm).
✂️ File Preparation for Laser Cutting (Autodesk Slicer/Fusion 360)
- Import and Setup
✅ Goal: Load the final 3D model and prepare the workspace.
📦 Steps: * Open the slicing tool (Autodesk Slicer or Fusion 360's Additive Manufacturing workspace). * Import Model: Load the clean, cut 3D model (e.g., the model resulting from the Blender Boolean operation). * Orient Model: Verify the model's orientation and scale within the software.
- Selecting the Slicing Technique
✅ Goal: Determine the method for converting the 3D form into 2D interlocking parts.
📦 Techniques (Examples): * Interlocking Slices (Stacking): Slicing the model into layers along the X, Y, or Z axis. * Radial Slices: Creating pieces that radiate outwards from a central point. * Curve Slices: Utilizing curved planes to slice the model into unique, interlocking layers.
- Material and Parameter Settings
✅ Goal: Define the physical constraints necessary for accurate joint assembly.
📦 Key Settings: * Material Thickness: Input the exact thickness of your physical material (wood, acrylic, etc.). This is critical for joint sizing. * Sheet Size: Set the maximum dimensions of the material sheet available on your laser cutter bed. * Kerf Compensation: Apply a precise value to compensate for the laser beam's width (kerf) to ensure joints fit snugly.
- Generating the Layout and Export
✅ Goal: Generate the final 2D cutting files nested on sheets.
📦 Steps: * Generate Slices: Allow the software to calculate and generate all 2D slices, including all interlocking tabs and slots. * Layout: Use the layout/nesting function to efficiently arrange the pieces onto the defined sheet size, minimizing waste. * Export 2D Files: Export the final layout as DXF (Drawing Exchange Format) or SVG, which are standard formats for laser cutting machines.
 Generating and checking the slices in Slicer for Fusion 360 Import the model into Slicer for Fusion 360 to divide it into layers, inspect the structure, and prepare the slices for the next construction phase.

 Laser cut sheets and optimization by Carlotta Premazzi
5. Laser Cutting
Objective: Transform digital files into physical parts.
Steps:
1. Select material: cardboard 4mm.
2. Set machine parameters:
- Laser power 75/40
- Speed 100/35
- Frequency:
- Layer order: graving, cutting
3. Perform a test cut on a small piece.
4. Cut all layers of the model.
✂️ Laser Cutting Workflow
✅ Goal: Physically transform the nested 2D files into precise, ready-to-assemble components.
📦 Steps: - Material Preparation & Testing: Select your material and ensure it is flat and clean. Perform small test cuts on scraps to calibrate Power and Speed for a clean cut edge and reliable penetration. - Machine Setup : ** Place the material sheet flat on the bed. Use the calibration tool to set the laser focus accurately based on the material thickness. Define the origin (homing position) for the job. - File Import & Kerf Adjustment: Load the DXF/SVG file into the cutter's control software (as LightBurn). Apply Kerf Compensation (Offset) to the drawing outlines to precisely account for the width of the laser beam, which is essential for achieving tight joint fits. - Parameter Configuration: Set the precise parameters based on your test results: * Power: Controls the energy applied (penetration depth). * Speed: Controls the cut quality and heat buildup (charring). * Frequency (PPI/Hz): Controls the smoothness of the cut edge (higher frequency usually means smoother edge). - Execution Order (Crucial): Always configure the job to cut inner paths first (holes, slots), followed by the outer perimeter. This prevents pieces from shifting once cut, maintaining dimensional accuracy. - Final Cut & Safety: Start the main cutting process. Ensure the ventilation system is running at full capacity** and never leave the machine unsupervised.

Laser Cut work with Alexandre at Fablab Lisbon by Carlotta Premazzi. Dholetec machine, Lightburn Software, cardboard 4mm.
6. Assembly
Objective: Build the mannequin or physical sculpture.
Steps:
1. Follow the layer order defined in the digital model.
2. Use glue, pins, or interlocks to join the pieces.
3. Check that the model is stable.
4. Optionally, document the process with stop-motion or step-by-step photos.
7. Documentation
- Photograph the mannequin or assembled parts in high resolution.
- Document the workflow: software, tools, materials, and settings.
- Save and upload files:
- 3D: STL / OBJ
- 2D: DXF / PDF
Tools
Software
3D Models
Assemblage
Cardboard body assemblage simulation in Slicer for Fusion 360
Result
 Cardboard Manequin by Carlotta Premazzi
 3D printed Manequin (post-produced)
Created for a biomaterials exhibition. 3D printed in two parts using PLA.
3D printed Manequin (post-produced)
Created for a biomaterials exhibition. 3D printed in two parts using PLA.
Fabrication files
File: 3d MakeHuman modelling of realsize female bust
File: Laser cut sheets bust/female/realsize
🔗 References, Tutorials & Software
References & Inspiration
Image sources
- Daniel Popper, large-scale human sculptures — thursd.com
https://thursd.com/articles/daniel-poppers-larger-than-life-sculptures
- Vitruvian Man, Le Corbusier’s Modulor — wall-corp
https://www.wall-corp.com/post/vitruvius-man-against-le-corbusier-s-modulor
- Digital Body (DDFM) project reference — ecochen.design
https://echochen.design/02-DDFM
Moodboard / inspiration (as listed in the page)
- Quayola — Captives
- Amy Karle
- Thermogram / Thermal comfort and wellbeing — designingbuildings.co.uk
https://www.designingbuildings.co.uk/wiki/Thermal_comfort_and_wellbeing
- Giorgia Lupi — Internet of Bodies Presentation (PDF) — nationalpress.org
https://nationalpress.org/wp-content/uploads/2022/11/Mary-Lee-Internet-of-Bodies-Presentation.pdf
- Eadweard Muybridge — Plate Number 188. Dancing (fancy), 1887 — Wikimedia Commons
https://commons.wikimedia.org/wiki/File:Eadweard_Muybridge,Plate_Number_188._Dancing%28fancy%29,_1887,_NGA_166682.jpg
- Laurence Demaison
- Hito Steyerl
Extra documentation link
- 3D Scan Section — Textile Scaffold Documentation (Carlotta Premazzi)
https://class.textile-academy.org/2026/carlotta-premazzi/assignments/week10/#3d-scan
Tutorials / Get Inspired
- Betiana Pavon — FabLab BCN
http://class.textile-academy.org/2019/betiana.pavon/ - Stephanie Vilayphiou — GreenLab (Week 02 / End results)
https://class.textile-academy.org/2024/stephanie-vilayphiou/assignments/week02/#end-results - Kae Nagano — FabLab Kamakura (Digital Bodies)
https://class.textile-academy.org/2024/kae-nagano/assignments/week02/#2-digital-bodies - Hala Amer — FabLab BCN
https://class.textile-academy.org/2024/hala-amer/assignments/week02/ - Naim Al-Haj Ali — CPF (Electronics & DIY scanner)
https://class.textile-academy.org/2025/naim-ali/assignments/week02/ - Aslı Aydın Aksan — TextileLab Amsterdam (Grasshopper slicing)
https://class.textile-academy.org/2024/asli-aksan/assignments/week02/#grasshopper
Software & Tools
- MakeHuman (installation docs)
https://static.makehumancommunity.org/makehuman/docs/installing_makehuman.html - Blender
https://www.blender.org/ - Slicer for Fusion 360 (Autodesk support article)
https://www.autodesk.com/support/technical/article/caas/tsarticles/ts/3yg7zznS94MHNDG7KMV8Qg.html - LightBurn
https://lightburnsoftware.com/ - Dholetec DT 1000 — Laser Cut Machine
https://dholetec.com/corte-a-laser/
Embedded Media
Sketchfab
- Model embed
https://sketchfab.com/models/4eb54055b73a48ac88397188bbdb7bd4/embed
- Model page (Bust-female-realsize-makehuman)
https://sketchfab.com/3d-models/bust-female-realsize-makehuman-370ca34de35f43eb89c957c57c5ac8ba
- Author profile (cpds)
https://sketchfab.com/cpds
YouTube
- Cardboard body assemblage simulation (embed)
https://www.youtube.com/embed/le_hDn3Xu3k?si=S6MqOH3-9t3xoZR
Fabrication Files (local)
- 3D file (OBJ): bust-female-realsize-makehuman
../files/bust-female-realsize-makehuman.obj - 2D file (PDF): laser cut sheets bust/female/realsize
../images/week02/laser-cutting-sheets-bust-female-realsize.pdf
Lecture on September 23th, 2025, Global Instructors: Anastasia Pistofidou
Student checklist
- [ ] Include some inspiration: research on artists or projects that work with the human body
- [ ] Document the use of 3D scanner and software to acquire a 3D model
- [ ] Document the process of repairing and/or manipulating a 3D mesh and slicing it
- [ ] Document the process of file preparation for laser cutting
- [ ] Learn how to laser cut, document the workflow including the machine settings, material type and thickness
- [ ] Upload your 3D file (STL/OBJ) and your 2D files (DXF/PDF)
- [ ] Build and/or assemble a mannequin or body parts
- [ ] Create a stop motion or step-by-step assemblying process and upload one picture (HIGH RES) of your mannequin (extra credit)