9. E-TEXTILES & WEARABLES II#
Sketches / Ideas#
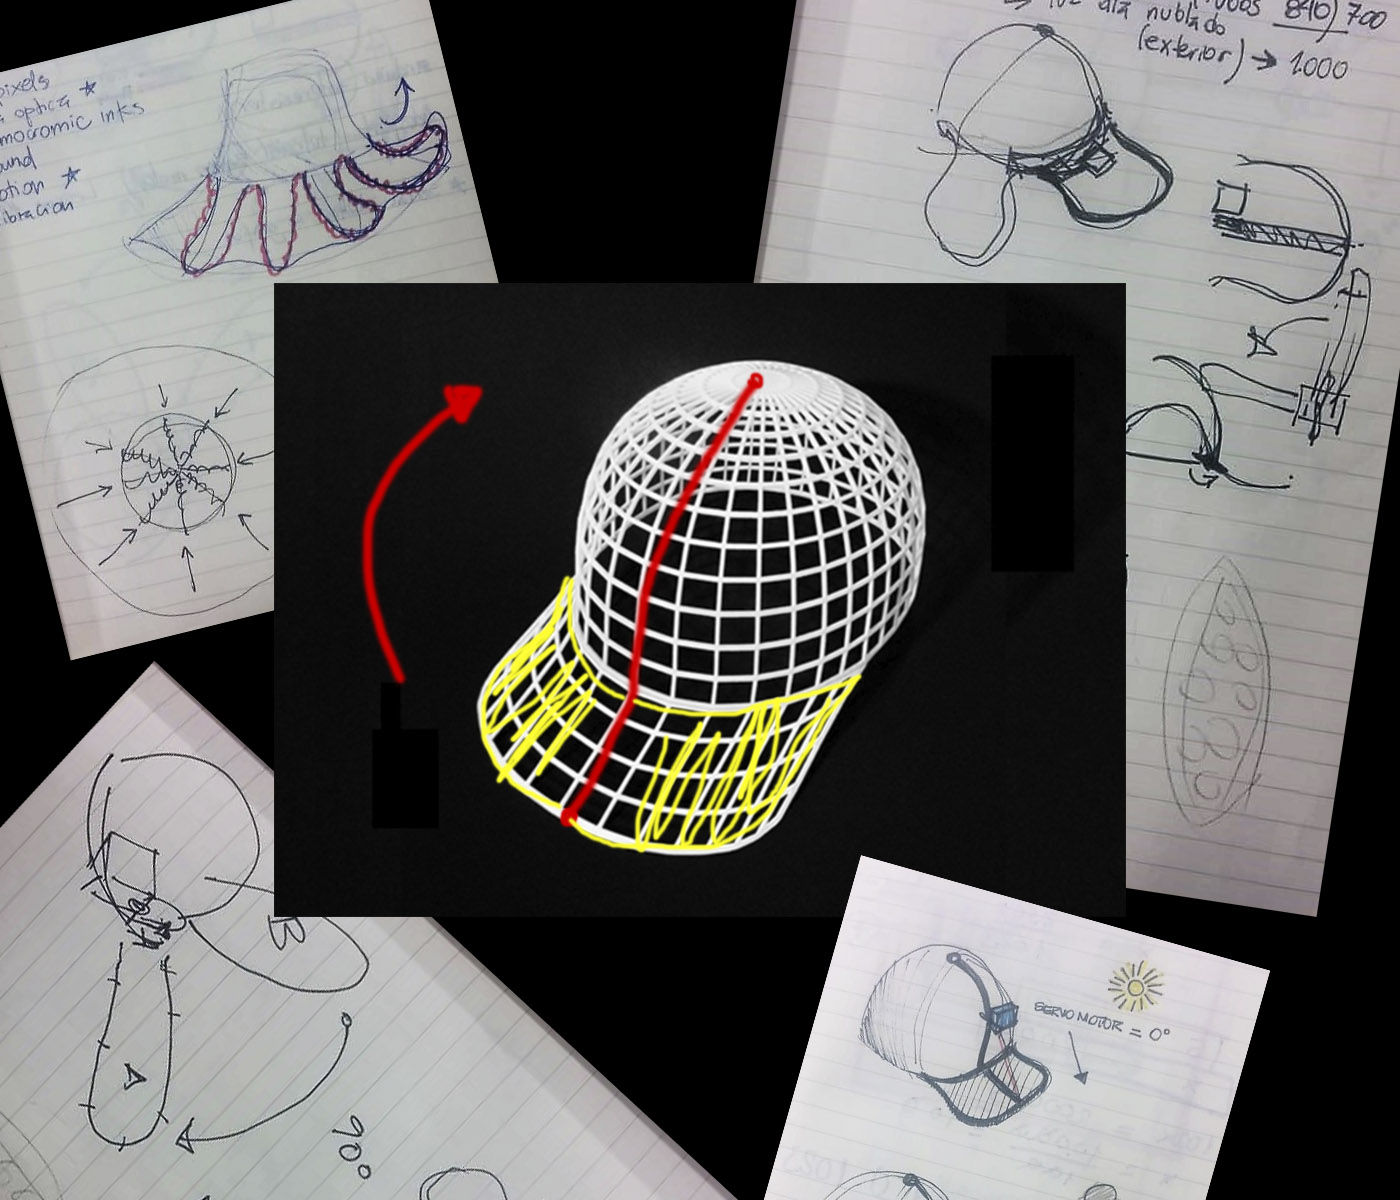
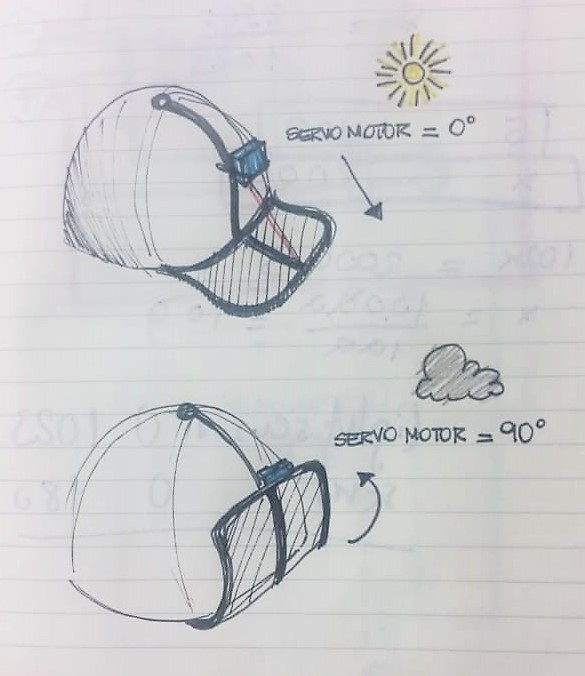
My main intention in terms of the application of electronics to my personal project is to generate movement of the brim of a hat or cap reacting to the exposure of sunlight; that is, when my hat is exposed to a certain amount of light, the hat’s brim rises to generate more protection on the face. While the movement through Shape memory alloys is the one that interests me the most, I must take more time to investigate the “training” of it, the necessary power and circuit to achieve the effect I want to achieve. For this reason, I started with a simpler and mechanically focused alternative using an engine, in order to first understand the operation of ATtainy and apply it to a Werable prototype.
Inspiration#
Taiknam hat from ricardo O'nascimento on Vimeo.
(no)where(now)here : 2 gaze-activated dresses by ying gao from ying gao on Vimeo.
Photoresistor#
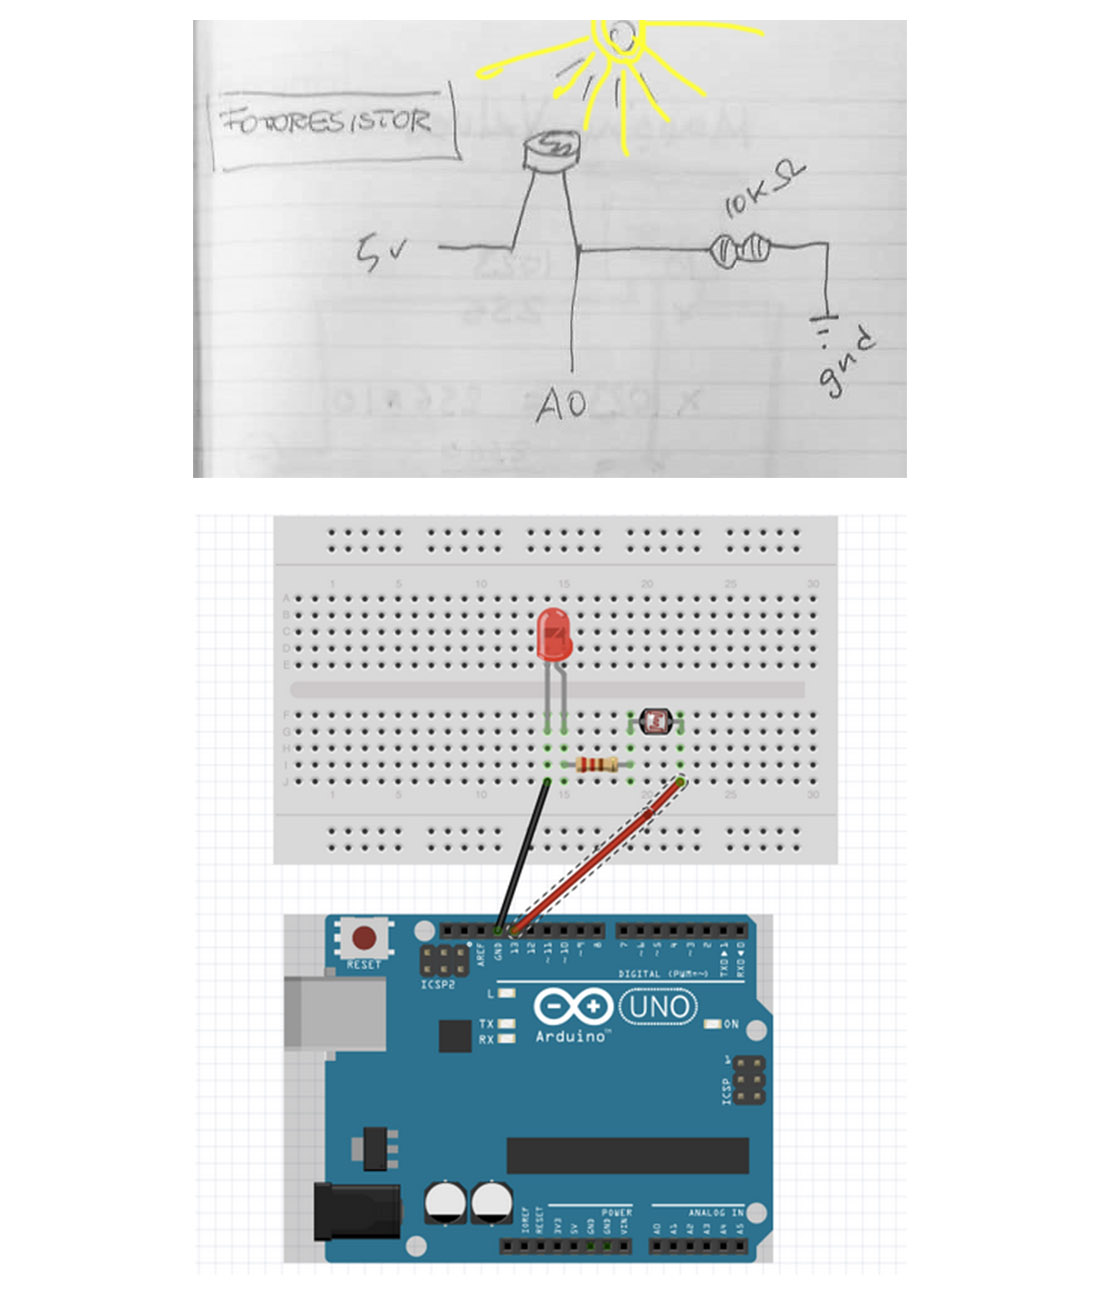
To start, like Input, I decided to use a light sensor. In order to extract data and read data I had to connect it to Arduino and identify the circuit and resistance needed (10K). Once this was done, I was able to read the graph and take note of the different light values: - Total Darkness: 0 - Obstructed sensor: 500 - Interior light (fluorescent tube): 700-840 - Day light (cloudy): 1000
My intention was to connect the value of external light with one movement (lower the wing) and the value of darkness with another (raise the wing). Similar to the analogy that could be established with the movement of an awning.

void setup() {
  // put your setup code here, to run once:
  pinMode (A0, INPUT);
  Serial.begin (115200);
}

void loop() {
  // put your main code here, to run repeatedly:

int valor = analogRead (A0);
Serial.println (valor);

delay (20);
}
Actuator 1: Servomotor#
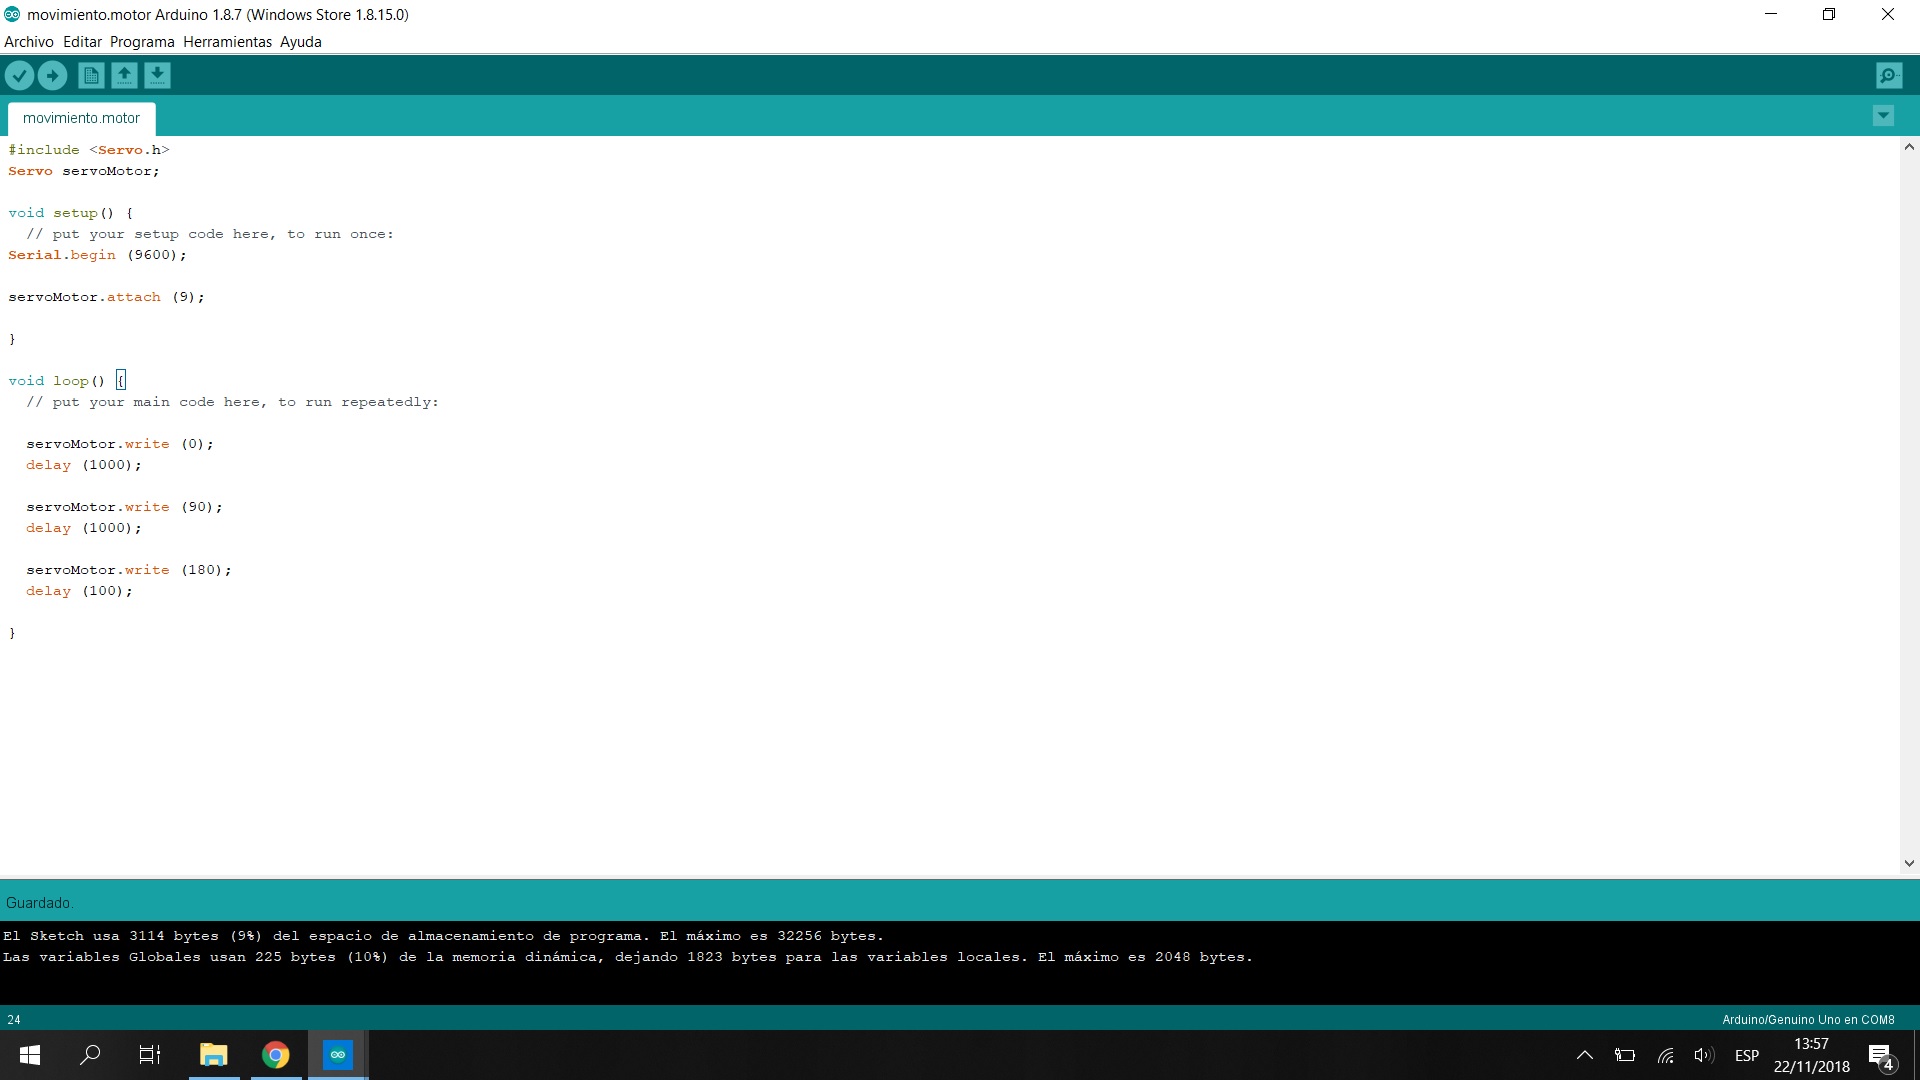
It is a device similar to a direct current motor that has the ability to be located in any position within its operating range, and to remain stable in that position. The servomotor is an electric motor incorporating a regulation system that can be controlled both in speed and in position. Initially, I connected the Servo to Arduino, identified the circuit and put it into operation; movement in its range of positions: 0 ° / 90 ° / 180 ° (initial / middle / stop).
#include <Servo.h>
Servo servoMotor;

void setup() {
  // put your setup code here, to run once:
Serial.begin (9600);

servoMotor.attach (9);
}

void loop() {
  // put your main code here, to run repeatedly:

  servoMotor.write (0);
  delay (1000);

  servoMotor.write (90);
  delay (1000);

  servoMotor.write (180);
  delay (100);
  }
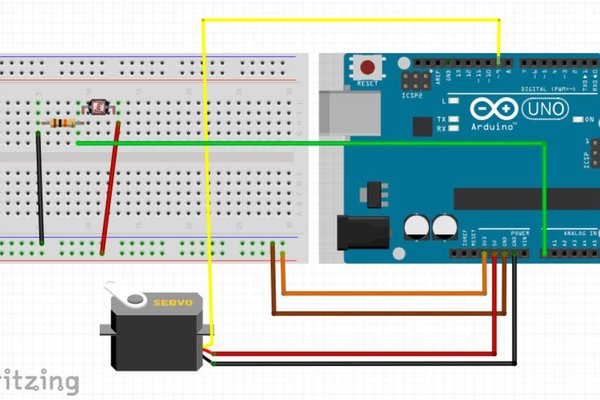
Input = Photoresistor + Output = Servomotor#
Once tested and codified these 2 components separately, should join them in the same circuit and programming for Arduino; to achieve the desired movement in my prototype. In order to visualize and test it, I made a model (very fast) on cardboard and paper tape, in which I located my motor with the sensor in operation and with a basic mechanical resolution of tensioned wire between the end of the wing of the cap and the engine.
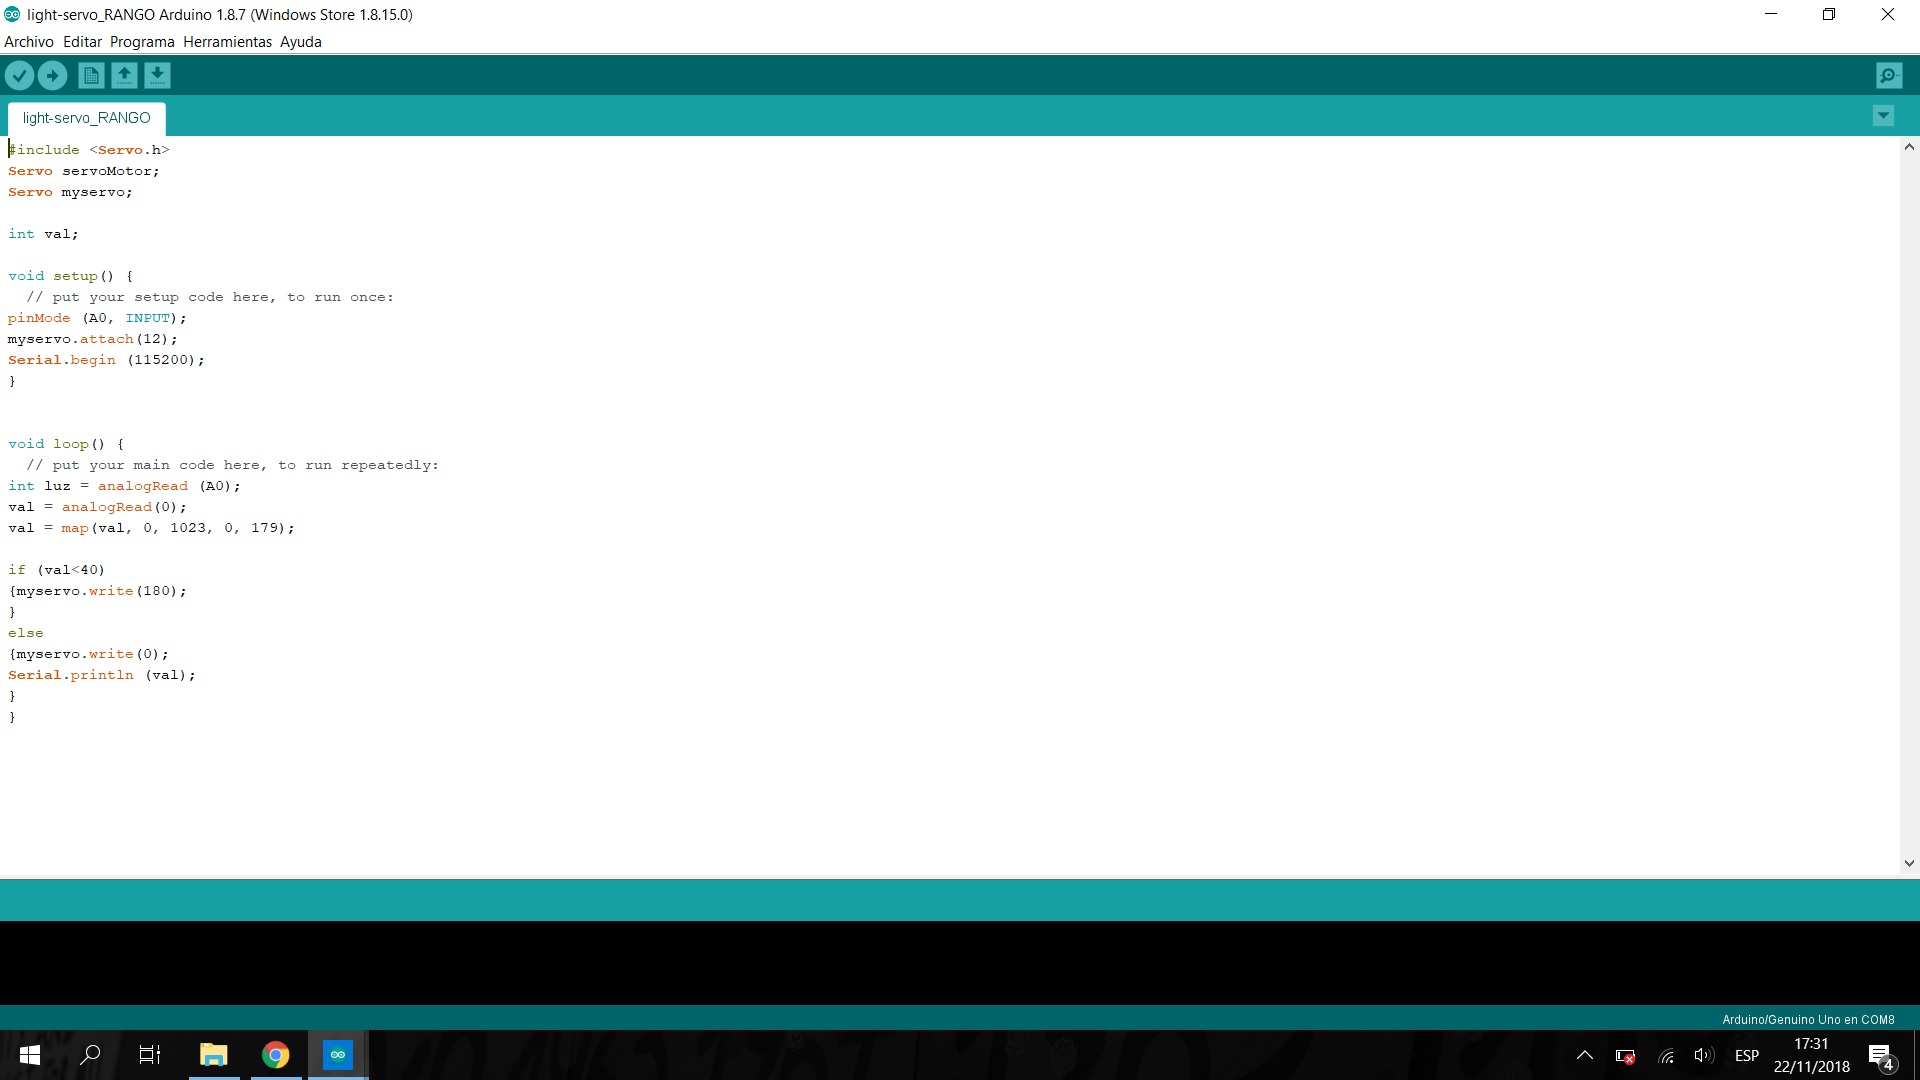
#include <Servo.h>
Servo servoMotor;
Servo myservo;

int val;

void setup() {
  // put your setup code here, to run once:
pinMode (A0, INPUT);
myservo.attach(12);
Serial.begin (115200);
}

void loop() {
  // put your main code here, to run repeatedly:
int luz = analogRead (A0);
val = analogRead(0);
val = map(val, 0, 1023, 0, 179);

if (val<40)
{myservo.write(180);
}
else
{myservo.write(0);
Serial.println (val);
}
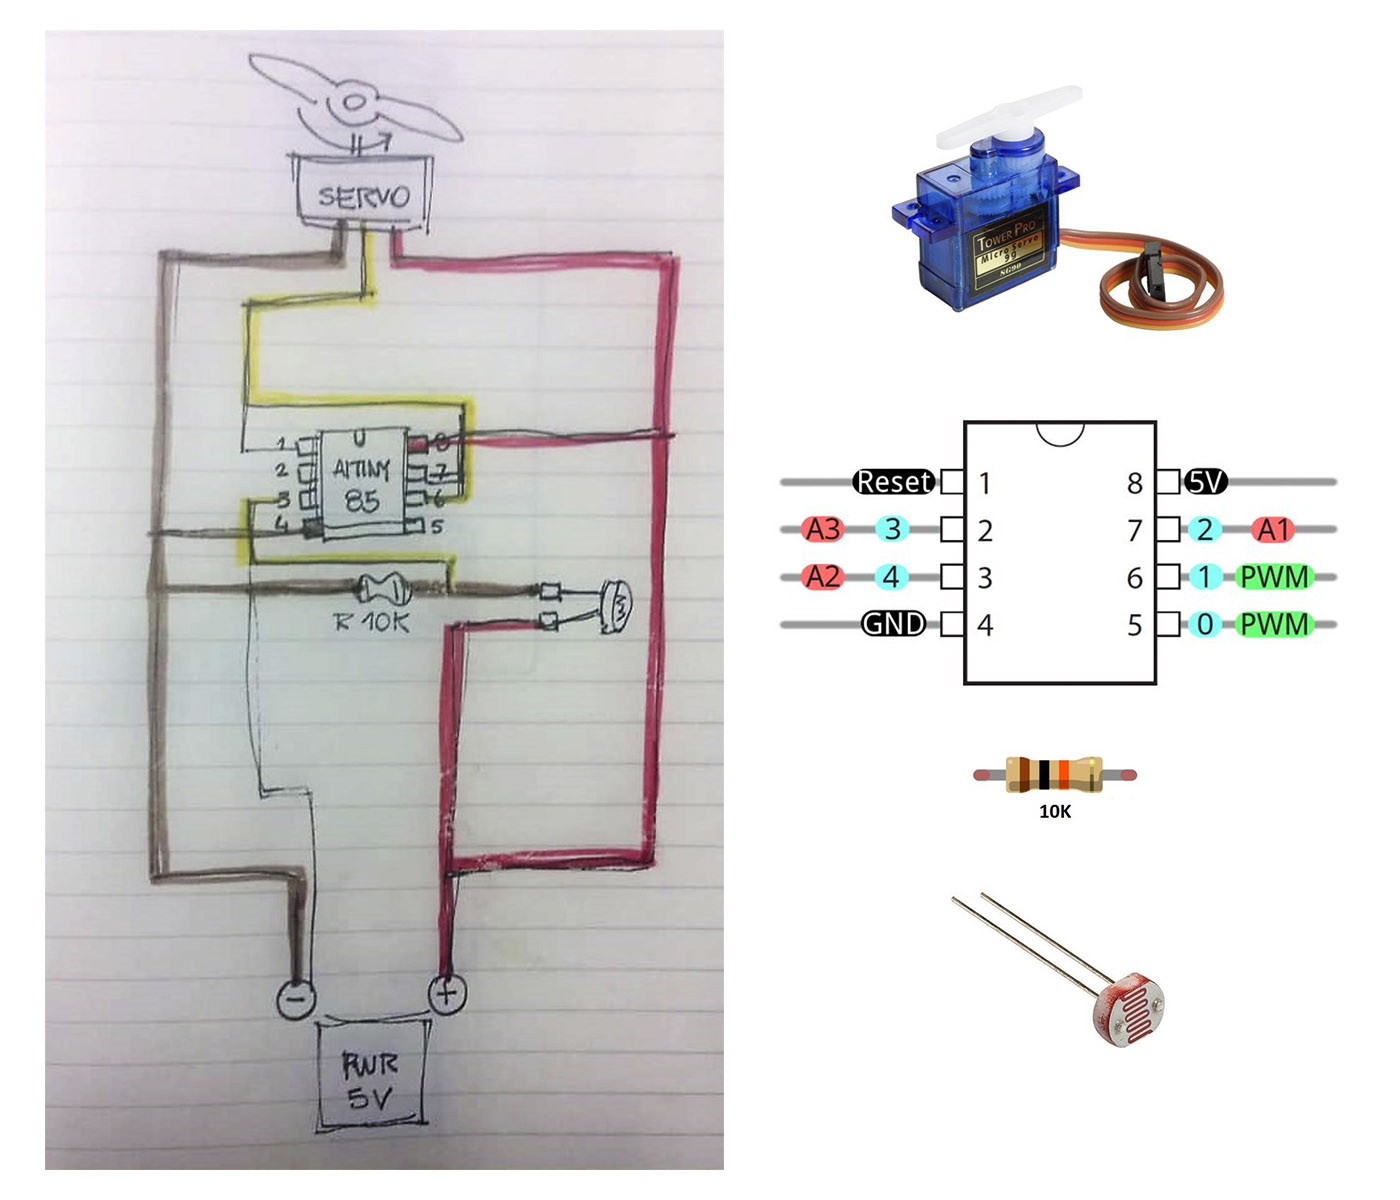
ATtiny#
The last step, I had to store my data (Programming of my actuators) in a small device, apt to be portable and applicable to a Wearable: ATitiny 85. For this, it is necessary to investigate how it works and identify and draw a new circuit (inputs and outputs, power, Gnd ..). The next step was to install the Tiny AVR Programmer, it is a general AVR programmer, but it is specifically designed to allow fast and easy programming of ATtiny85 (as well as 45) on my computer. It has a built-in socket, where you can plug and program directly the small 8-pin IC. Does not require dirty cables or welding! Once you have programmed the ATtiny85, just remove it from the programmer and paste it onto a test plate or prototype board. Process that takes time, but in the tutorial that I attached below, it guides you step by step. ATtiny does not read the same language as Arduino, therefore some changes must also be made with respect to the typing of the Programming. In my case, to use the Servo; I had to use this library: ATTINY HACKS: ATTINY45 / 85 SERVO LIBRARY
Useful links#
Demo#
Week 09. E-TEXTILES & WEARABLES II - Servomotor + Fotoresistor / Demo from Betiana Pavon on Vimeo.
Conclusions / Experimentation with Movement I#
Although the operation of the sensor coordinated with the motor was correct, the movement applied to the prototype was not as expected (it was nice, but not functional) the range of angle of the Servomotor, is too small to make the wing of the cap rise completely (vertically). The solution would be to replace the Servo with a full-turn motor (360 °). The positive thing about this experimentation was to understand the step by step operation of each one of the components and its subsequent enzamble, both in the physical circuit and in the programming. Each time you achieve something “work” or act with electronics is a micro-moment of happiness that excites you and drives you to keep moving forward and experimenting.
Actuator 2: Experimentation with Shape Memory Alloys (SMAs)#
In this second experimentation with the movement, I took time to explore different alternatives in terms of material (SMAs) as in the subsequent application of them; different mechanical alternatives on a portable accessory on the head, to achieve the movement of the visor of a hat or the brim of a hat, taking advantage of the material contaction.
About the SMA
There are 2 types of SMAs:
- Untrained flexinol will contract by 10% of its length when heat is applied.
- The trained flexinol also contracts by 10%, but has been “trained” in one way through a warm-up process. When it is hot, it will return to the way you trained it.
Variables:
- Diameter size: The higher the diameter of the cable, the more power it will need to change its state.
- Length: The resistance increases as the length increases.
- Substrates of material: In general, any lighter paper or fabric will produce better results. For example, paper, cotton, silk, etc. (Not polyester).
In our Lab I found samples of this material, but I did not know what type they were, I could only appreciate that they had different thicknesses. So, I decided to “Train” them all and see what happened.
Training SMA#
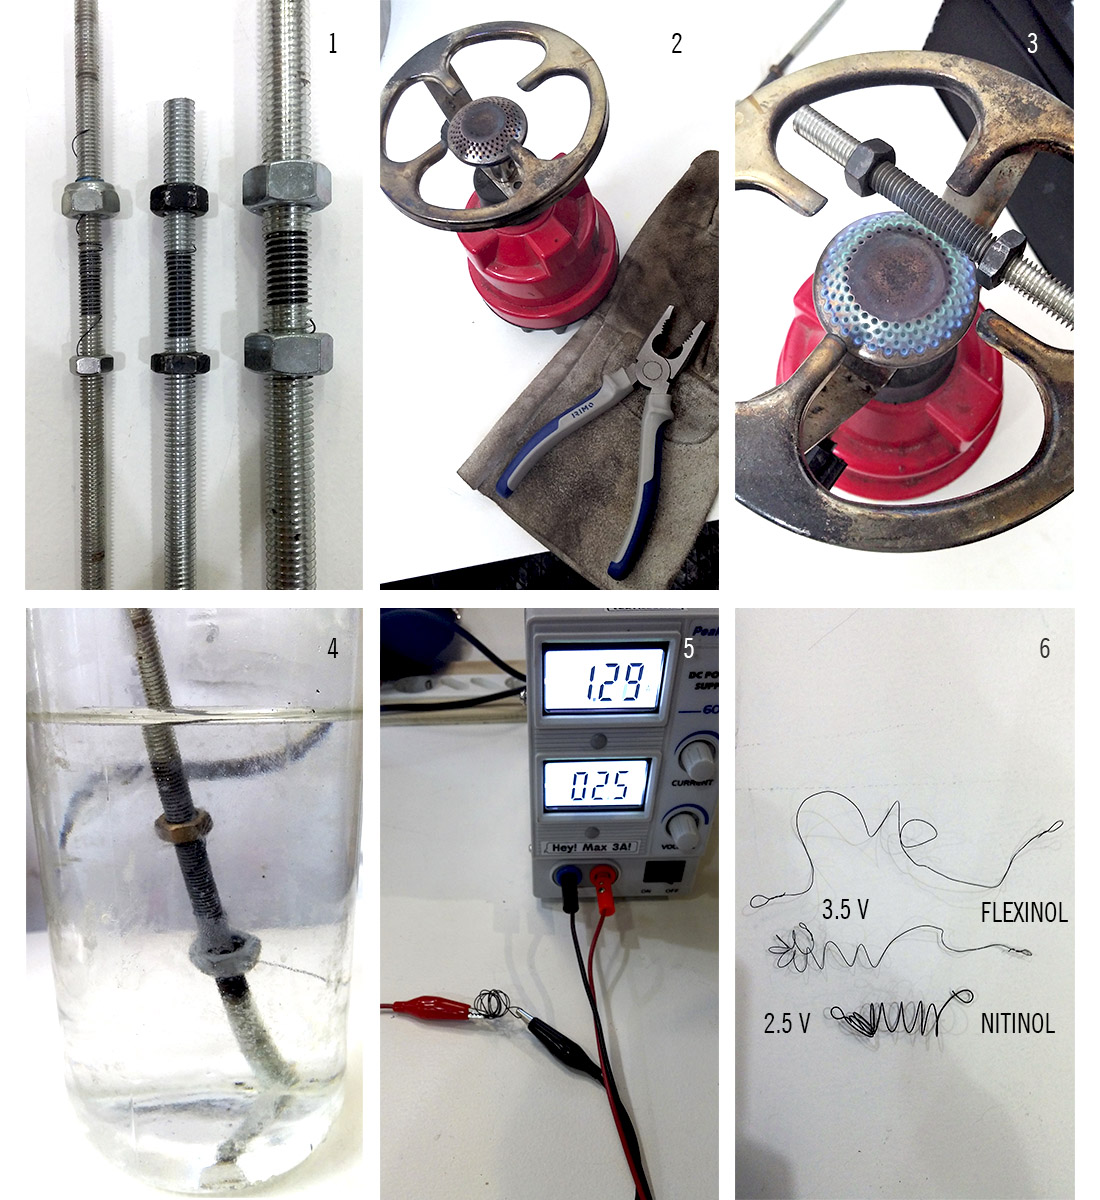
- 1 It had 3 different thicknesses of SMAs, which I placed in a spiral on 3 different diameters of threaded rods, fastened the ends with nuts. We must bear in mind that to give shape to these wires we must use supports that are non-flammable.
- 2 After reading and watching some tutorials, I decided that the fastest alternative to apply heat was to use fire directly, for this I used a camping gas burner. To protect myself from the heat and the flame I took as a precaution to use gloves and a clamp to hold the rods.
- 3 Once the flame was lit, I held the different rods on the fire for 10 to 15 minutes each.
- 4 After heating the rod with the wire, it is necessary to immerse it in cold water to lower the temperature and cut the process.
- 5 To quickly check if the “training” worked, you can submerge the wire in hot water (between 80 to 90 °) and appreciate the reaction of the wire to heat. (Video attached). After this, I could see that the sample that reacted most dramatically in terms of time and shape (Spiral) was Nitinol. The next step was to connect them to a source of electricity and apply voltage, in order to achieve the heating of the same and its subsequent contraction.
- 6 Once tested, I came to the conclusion that the lower thickness Flexinol samples copied the form to a lesser extent and needed more Voltage. Maybe this is because they were different brands of product.
Quick contraction check + SMA form with hot water
Contraction check + SMA form with Voltage. - Remember: More power does not make the movement more dramatic, it only changes the shape more quickly.
Helpful Links
Different SMA application alternatives to achieve movement on a prototype#
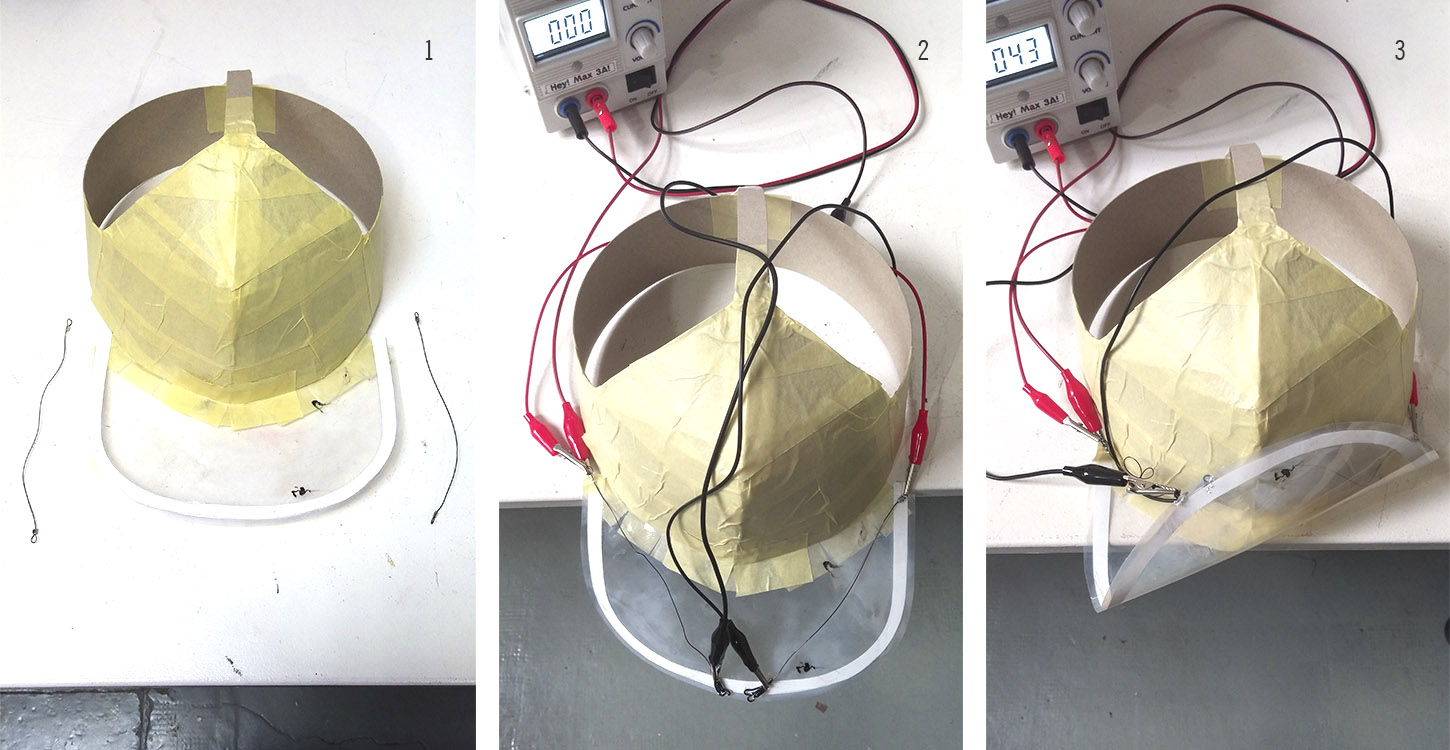
Test 1 Nitinol movement in the visor
- 1 I cut the wire in 2 segments and curved the ends, holding them with other metal pieces to obtain “eyelets”. I used a cardboard box to hold different alternatives of possible visors or wings. In this first test I built a transparent vinyl visor, lightweight and flexible material.
- 2 I fastened with thread the ends of the stretched wires, in the lateral and half points of the visor.
- 3 When applying voltage (always in one positive end and in the other Gnd) the segments were repeated but in a different way, achieving an asymmetrical movement.
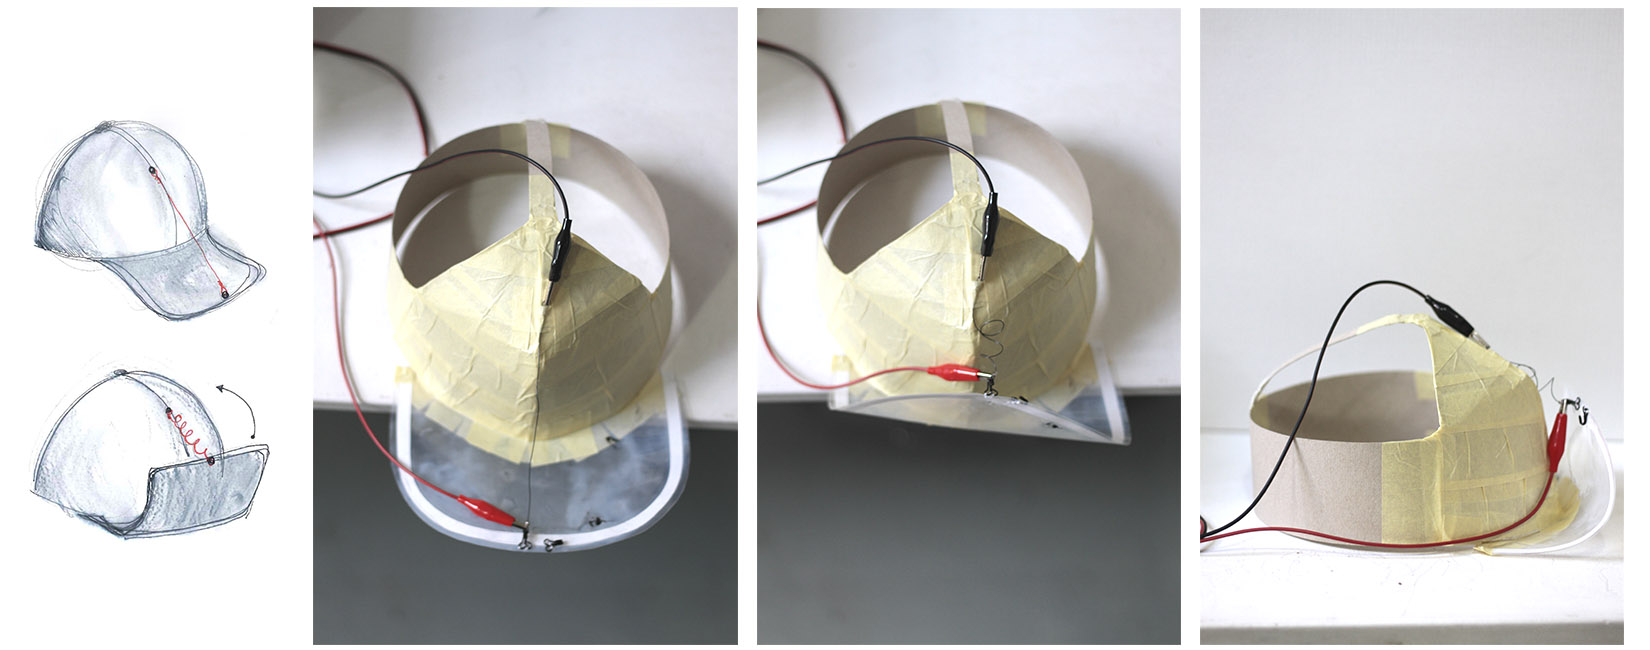
Test 2 Nitinol movement in visor
In this second test, I decided to use a single segment, since the thicker Nitinol had a great retracting power with 3V quickly. But, using the central axis of the cap as anchor points between the helmet and the visor (tensioned), thus achieving the folding of the same in a more symmetrical movement. The result was as expected, it is very similar to the idea I had in mind from the first moment to address this assiggment. The visor managed to fold at an angle that almost reaches 90 °.
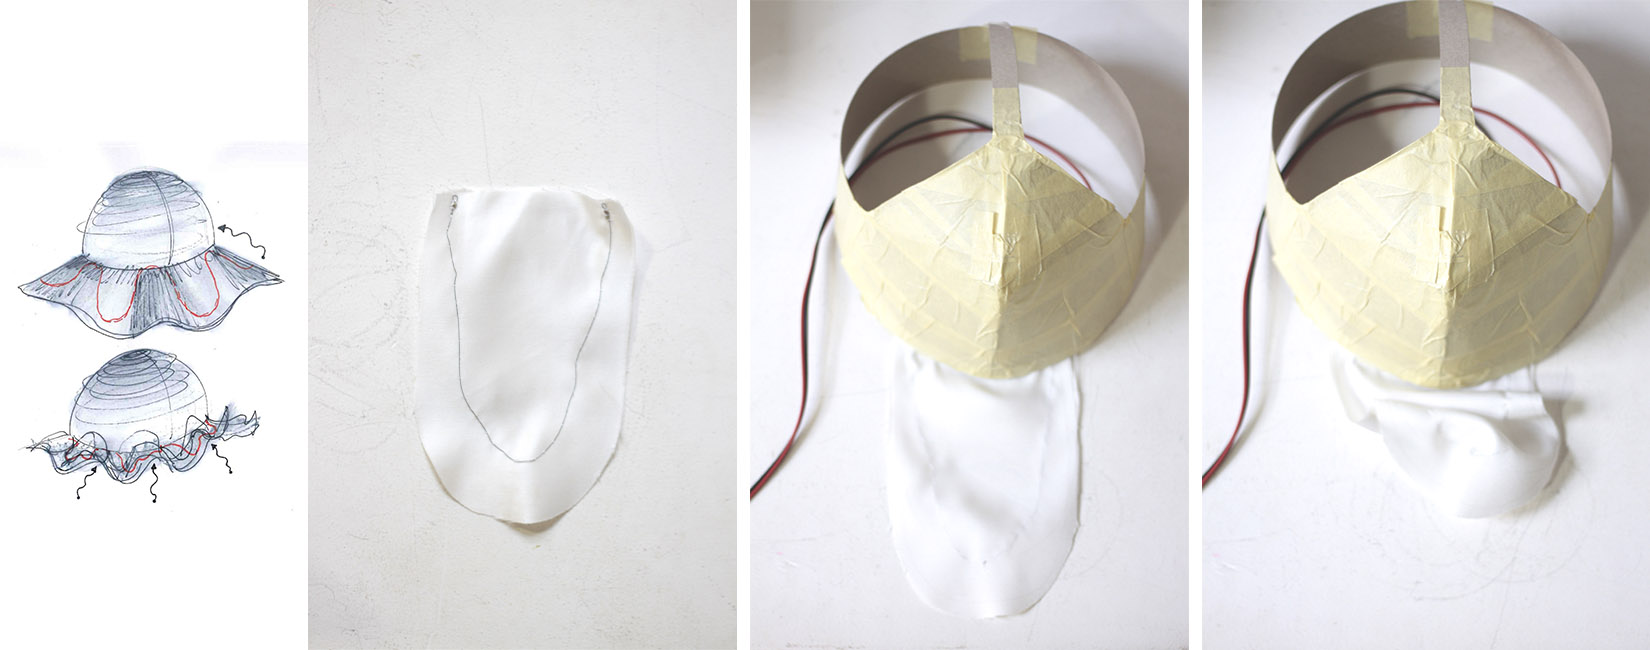
Test 1 Flexinol movement on fabric
In this case, my future idea would be to use different wavy segments, on the surface of a hat’s brim (similar to a capelin). That with the retraction of the wire fastened to a textile (seam) by an electrical circuit, it achieves a “shrinkage” of the same, in an organic form, like the petals of a flower. The result was an unexpected folding, since being attached to the fabric generates a morphological resistance and does not allow the wire to coil spirally, but generates a movement of retraction of the surface.
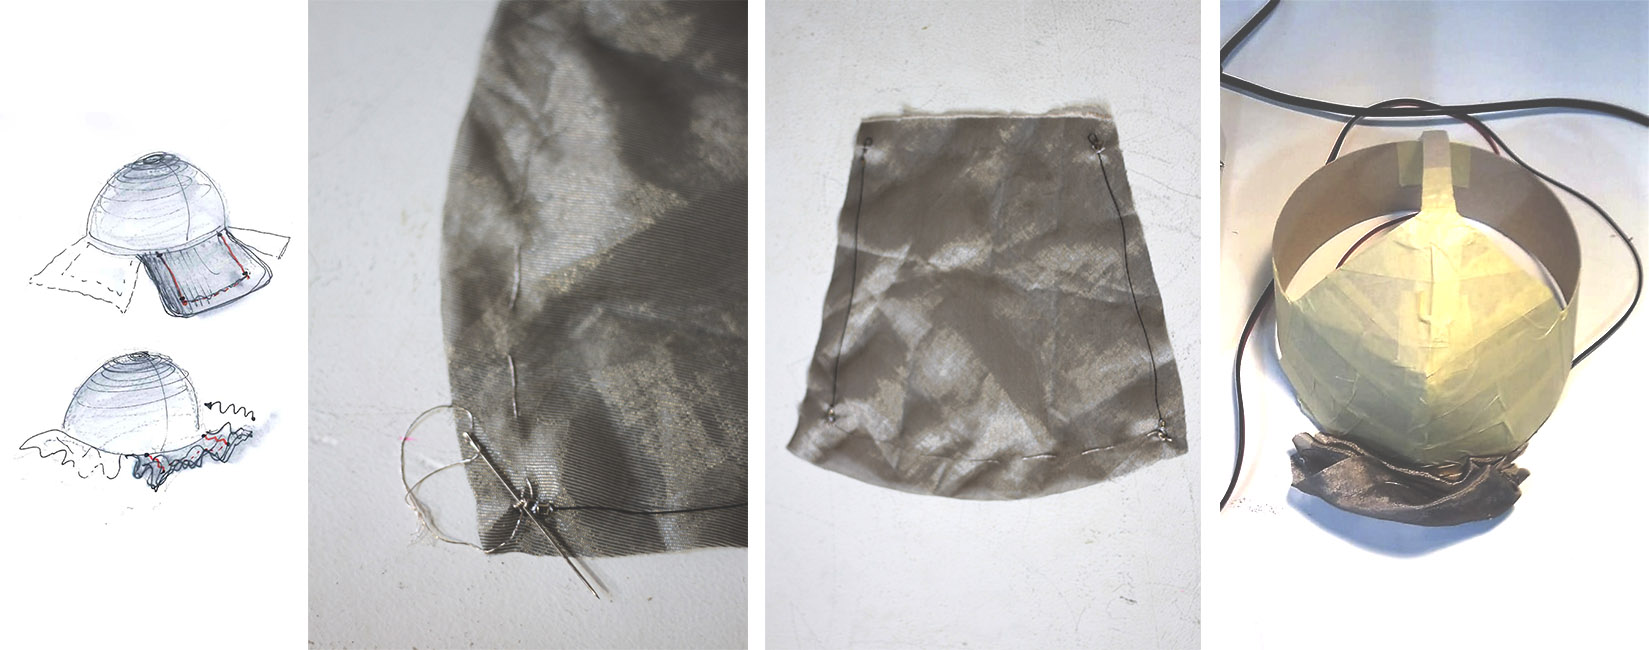
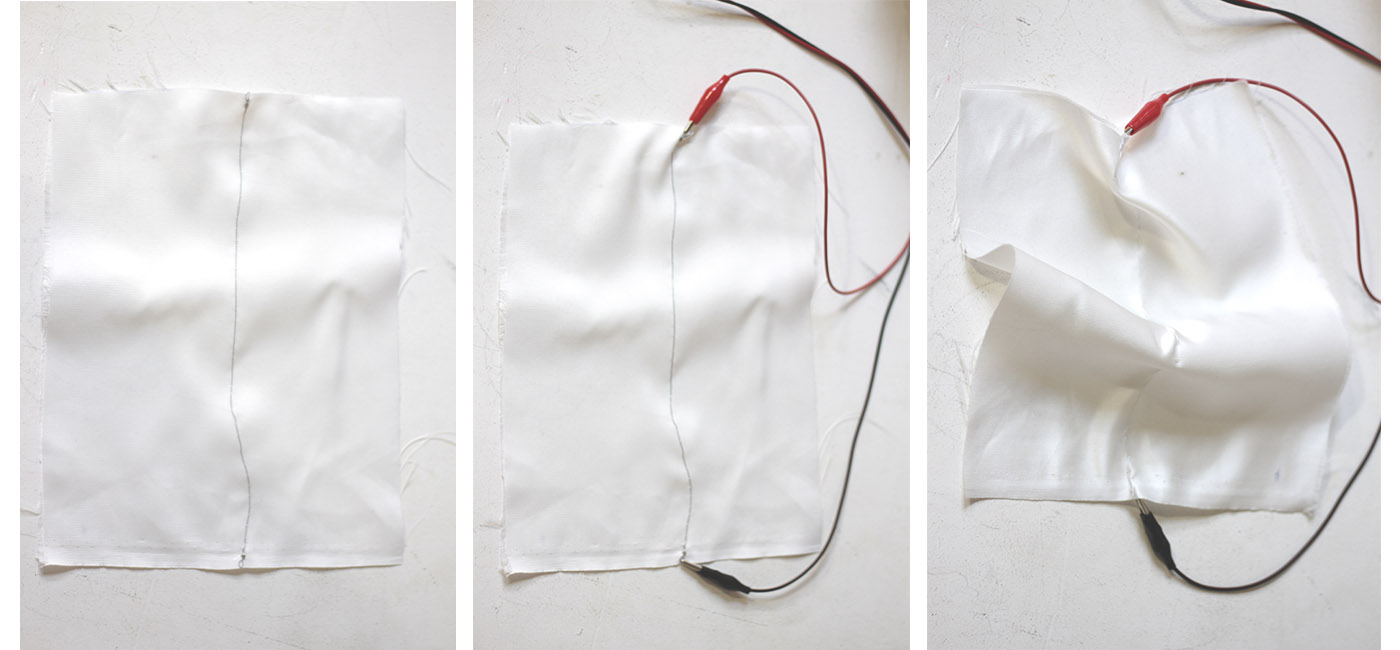
Test 2 Flexinol movement on fabric
In this case, I used another type of lighter fabric and combined the use of structural SMAs on the sides of the surface, connected together with conductive wire; which allows the circuit to close and only need to connect at the ends (located in the helmet). The result was a much greater retraction of the surface, in a more complex and dramatic way.
Test 3 Flexinol movement on fabric
This was a simpler exploration, it was the Flexinol sample of smaller thickness and greater length, which in the previous test with voltage, had observed that its shrinkage was the least. I decided to sew it to a cotton cloth cutout, with a larger surface, to observe how far the SMA could react to the voltage. The result was a wavy fold.
Circuit + Components#
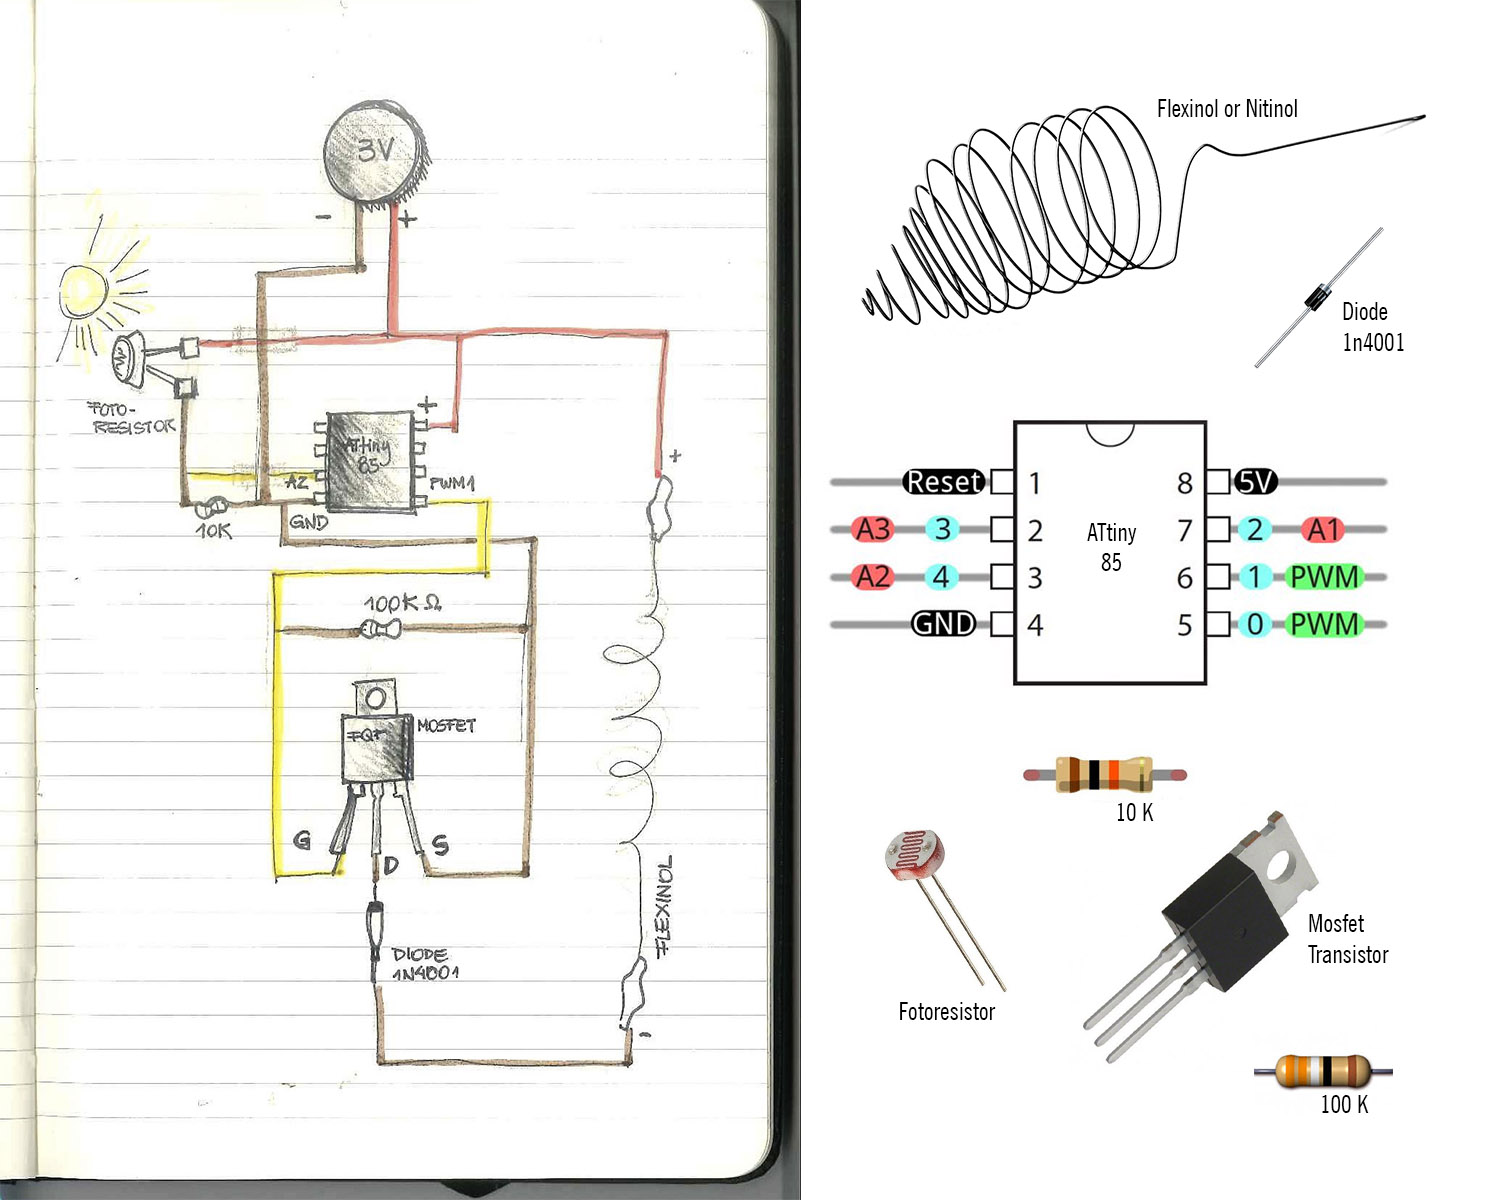
Following the logic of the circuit made previously: INPUT = Photoresistor + OUTPUT = Shape Memory Alloys (SMA) I made the circuit diagram, this requires other components such as:
- Mosfet / Transistor: as an electric switch. By applying a small amount of voltage to the gate with Arduino or ATtiny, the current can flow between the drain and the source.
- Diode: it is an electronic component of two terminals that allows the circulation of the electric current through it in only one direction, blocking the passage if the current circulates in the opposite direction, not only serves for the circulation of electric current, but also it controls and resists it.
Code
Heating element Shape Memory Alloy.

int heater=1;

void setup() {
  // put your setup code here, to run once:
pinMode(heater,OUTPUT);
}

void loop() {
  // put your main code here, to run repeatedly:
digitalWrite(heater,HIGH);
delay(100);
digitalWrite(heater,HIGH);
delay(100);
}
Conclusions / Experimentation with Movement II#
The conclusions after this experimentation with SMA are extremely positive, since the resulting movement was the expected in several cases and the probability of application of this Actuator in my final project is very high. I believe that the possibility of being able to “Train” the material generates infinite alternatives of movement, applicable in wereables with performance characteristics.