7. Computational Couture
This week I would like to try several processes. I have already experimented with embedding Fabric within 3D prints, from online examples, my own designs and also running workshops. I have also printed some examples I found online of the 'chainmail' type fabrics. I find these super interesting as they take advantage of some particular features of 3D printing.
I would like to explore 3D printing on elastic fabric, printing very 2dimensional gemoetries that I find to be flexible and crating flexible prints by taking advantage of traditional 3d printing defects such as underextrusion and/or stringing.
Stretch Fabric
I had tried this before but had never had much luck. Some of the challenges were attaching the fabric to a print bed and this also led to issues printing on the surface with the print head pulling up and distroting the elastic fabric. These tests were mainly done on Prusa MK3 printers. My tutor gave me some advice for attaching the fabric to the ultimakers. It is still not perfect but much better and more secure than previous attempts.
I created a simple pattern in rhino and grasshopper with no particular outcome in mind. I had to make the brep width and height 0.7mm and 0.35mm to be picked up by the standard 0.2mm profile. I made some minor adjustments - Line width -0.32mm / Initial Layer Line Width - 200%. The speed for initial layers is only 20mm/s which is very slow and I also removed any bed adhesion.
I am very happy with the initial outcome. It is clear I should include some z hope when travelling between geometries and it was also nice to see the pattern had an effect on the slightly stretched fabric. For the next test I will increase the tension in the fabric and also add a zhop.
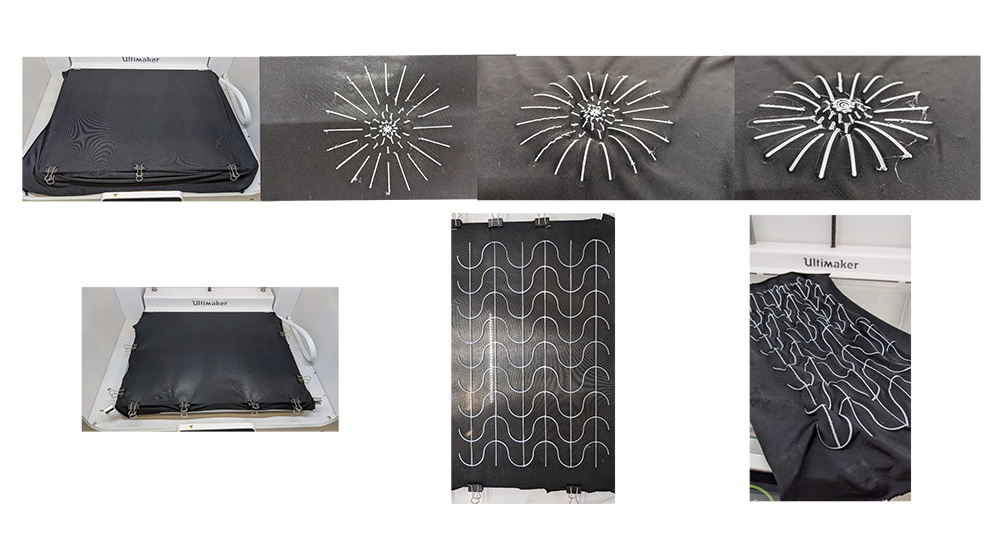
Z hop was actually already on, so I increased this value from 2mm to 5mm. I also increased Initial layer line width to 500%. I understood this setting a lot more this time and increased the width of the geometry to 2mm I stretched the fabric much more for this example.
I wasnt super happy with the outcome, I need to increase the stretch in the ortoganol axis of the fabric, rather than just fron to back. I was much happier with the initial settings and widths I had for printing. The adhesion of the pla to the latex fabric is very good and I dont see this being an issue.
Next test is to use initial settings on a much larger pattern and see the outcome.
I was happy with the results of this and something I had wanted to do for a while. However with the printers I have available to me, it is too difficult (or I need a new method) to get a reliable stretch to achieve consistent results.
Future trials could involve larger nozzles on bigger beds. We have a mahor.xyz extruder which is due to be fit to our WASP 40100 and I believe this would be ideal for this purpose.
Limit pattern
I came across some really interesting work by one of the presenters. Laura Civetti.
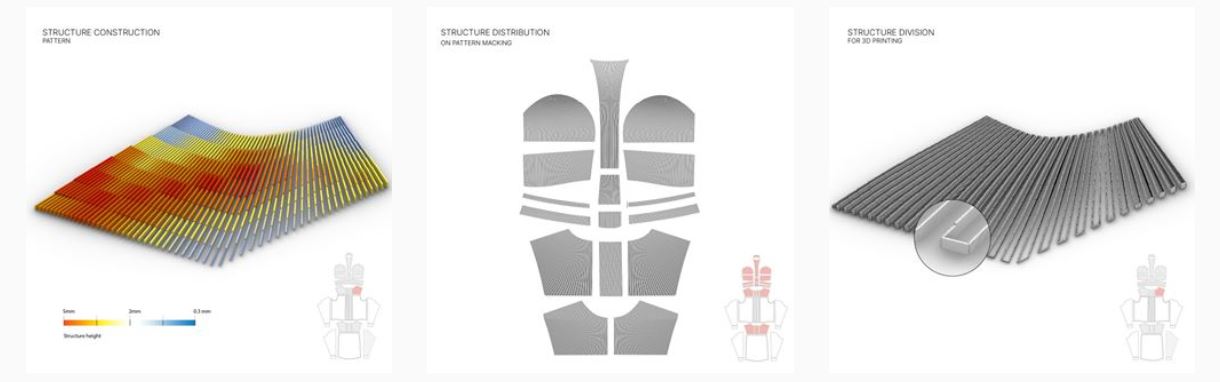
It reminded me of some of the waste support material I have from some of my prints (pic to follow) where the initial layer is a simple grid (effectively the textile) and above is a pattern going back and forth up several mm. This allows the piece to bend in one direction, but not the other.
I wanted to try this effect and see how the different heights could be mapped onto a piece of material.
I did some samples, being inspired by the support sample I had, but it wasnt printed in a very logical way and bed adhesion became an issue. I want to return to this, probably printing the lines on a piece of fabric mesh using the sanwidch technique to understand how many layers allows for what diameter bending. These results from this study can then be worked back into a grasshopper definition which will change the height of a based on the curvature of a piece.
I first downloaded a mannequin and projected curves onto it to create patches which I could ideally fit on the 3D printer. I decided to work with a piece which had some nice curvature but also some flat pieces to achieve the whole range.
https://www.thingiverse.com/thing:3408296?collect
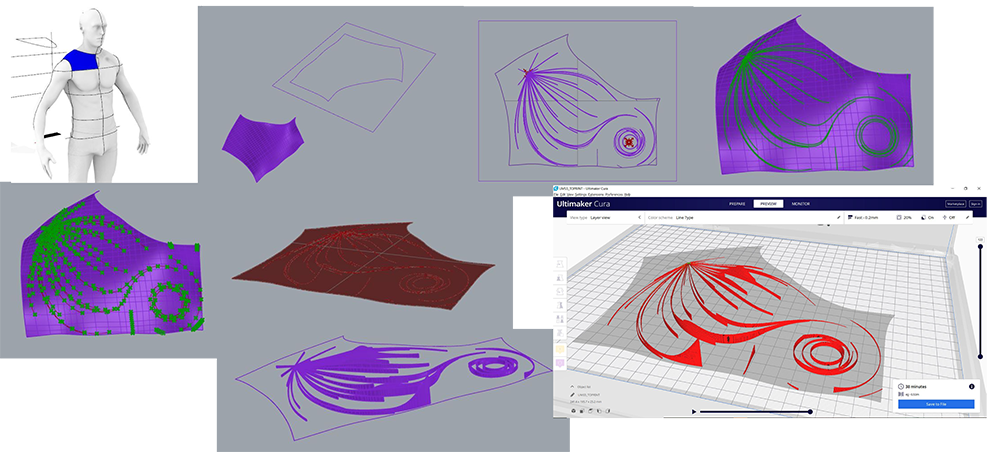
I used the create UV Curves to allow a flat representation of the piece so I could apply a pattern. From here I used the technique from the tutorial using field lines to create my pattern. I used flowAlongSurface to apply these curves in to the 3D piece. I used divide curve and used the points as locations to measure the curvature of the piece. I remapped these numbers to match the results from the previous study. with the new numbers I offset the points from the surface by an amount. I rebulit the degree 3 curves with these new offsetted points from here I used the squish command to accurately flatten the doubly curved surface and the pattern. I offset the curves and extruded them down. This can then be 3d printed and everything will work fabulously.
or use a ball (bigger on flat surface, smaller on curved)