5. E-textiles
//DOCUMENTATION WIP//
This week was crazy like :

 🤯 MY BRAIN IS HANGING UPSIDE DOWN 🤯
( ͡° ͜ʖ ͡°)
-BASICS-
-
WHAT IS A CIRCUIT?
Is a path for electricity to flow.
-
How ELECTRICITY moves?
a stream of moving electrons create current. -> electricalE
-
VOLTAGE = electrical PRESSURE between two points. (VOLTS). V= I * R -> (OHM LAW)
- CURRENT= stream of electrons that FLOWS (AMPERES)
- RESISTANCE= amount of material that resist the flow of current (OHMS)
LED= + connect to POWER | anode - connect to GROUND | cathode
PLEASE MIND THE LED's POLE
EMBEDDING and EMBODIE = "incorporated" & "incarnate"
HARD TO SOFT -> working with hard circuits and soft fabrics, Practice where merge connective circuits to fabrics.
Examples:
- Snap buttons
- Clips
!ALWAYS cover knots and joints with fabric or hot glue! & MAKE STRONG CONNECTIONS!
INPUT= information or data that enters a system = like a button press
SWITCHES are DIGITAL -> Are breaks in the circuits, and they return only 2 possible results as: ON/OFF, BLACK/WHITE, 0/1
SENSORS are ANALOGUE -> they returns a range of values
SMD= SURFACE MOUNT DEVICE (very small device)
EMMA PARESCHI | BASIC ELECTRONICS CLASS
REMINDER
DIGITAL= black or white / open or close / GND or VCC / on or off
ANALOG= From GND to VCC / max to min / all possible values
INSTRUCTIONS FOR A DIY MOMENTARY SENSOR -> Button
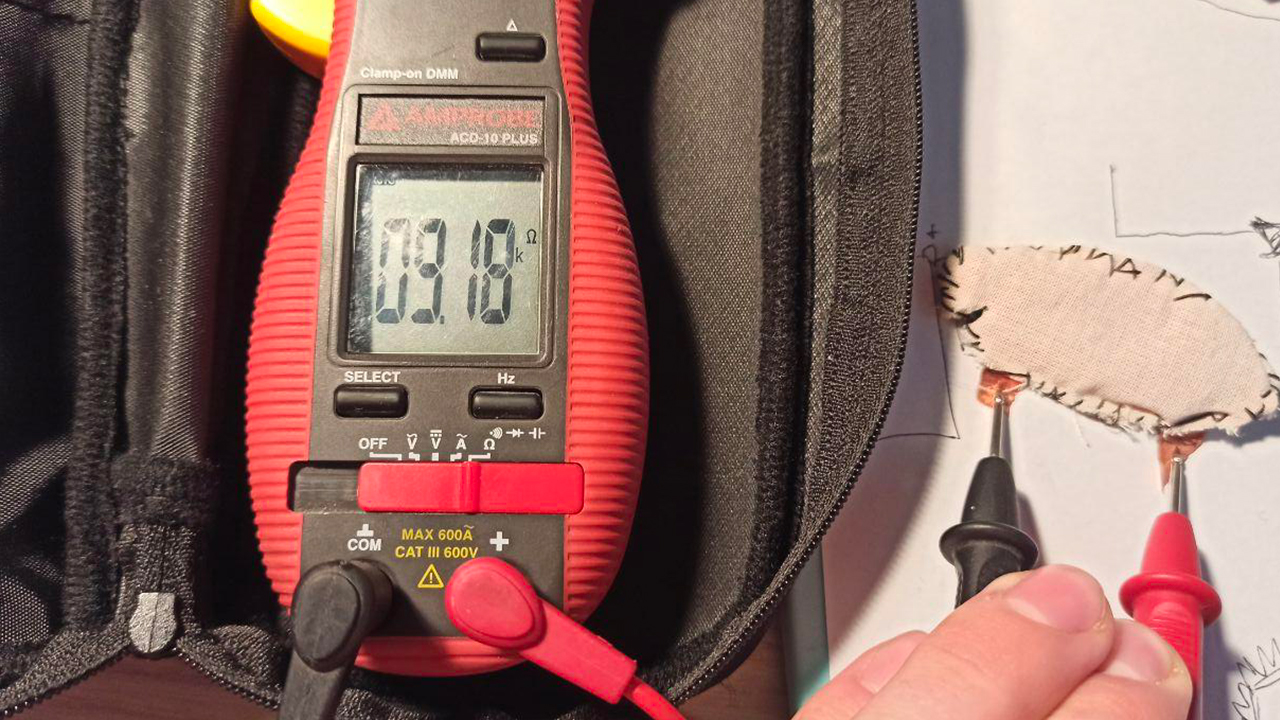
1 Alum foil + 2 conductive threads + foam(sponge) with 5 holes -> continuity mode of multimeter = 2 layers will touch each other making a connection (conduction of current)
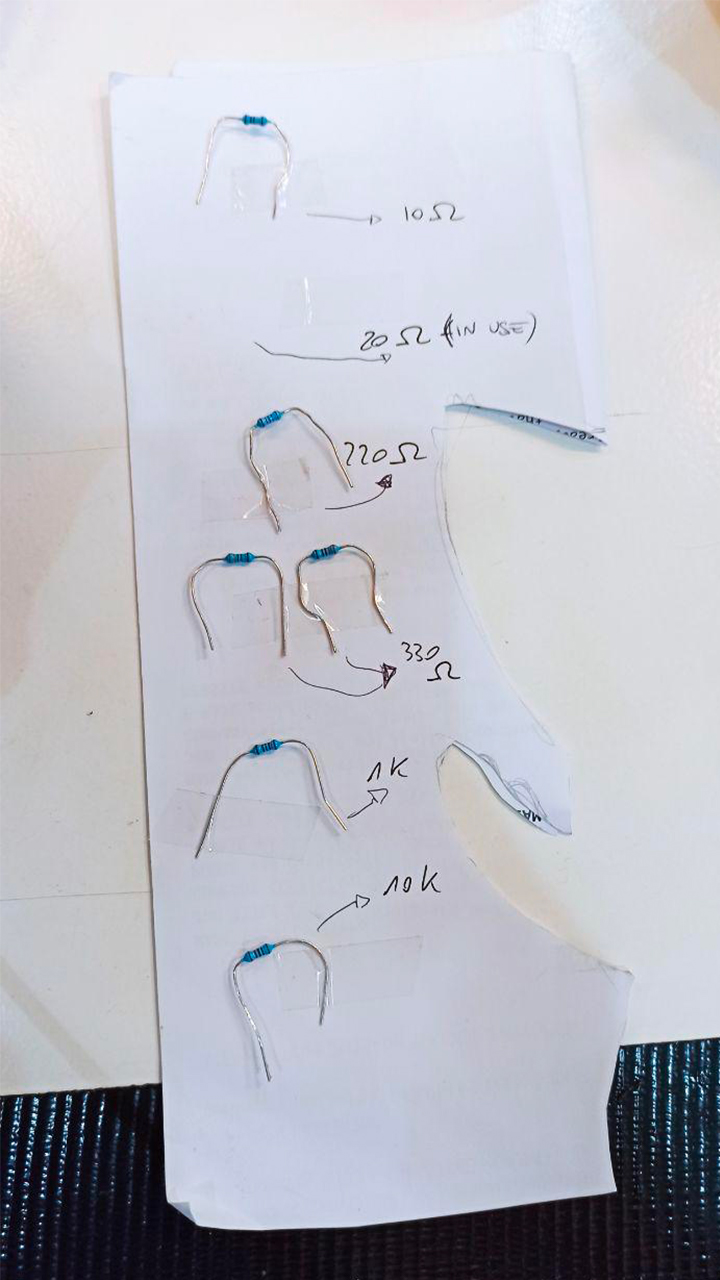
ALWAYS REMEMBER TO CALCULATE THE RESISTANCE OF THE CIRCUIT!!!! V= I*R
In ARDUINO -> In the digital pins we have some with tilde, they can PWM simulate the ANALOGue
BASIC ELECTRONICS 1
Fabricademy 20-21 Tutorials Electronics Basics from Textile Academy on Vimeo.
BASIC ELECTRONICS 2
Fabricademy 20-21 Tutorials Electronics Basics 2 from Textile Academy on Vimeo.
MOTIVATION:
In the beginning I was looking for something complex and useful, but mostly COOL,
like LIZA STARK'S SIGNAL LOST VEST (an anti-surveillance vest) 
Then I realize that the most logical aim to reach the assignment was, trying to experiment with many and different types of sensors, combining Digital and Analogue ones. So extremising the "circuit conditions" and complicate my own life, in short ( ͡° ͜ʖ ͡°)
INSPIRATIONS:
In the process of research I was mostly taken by wearable projects and ideas, then I realize that an E-glove might have been too MAINSTREAM! 🙄 So, I was listening to an electronic playlist, just to immerse myself in "E-environment", and I had and epiphany on this song:

then the Web is a magical place...
-
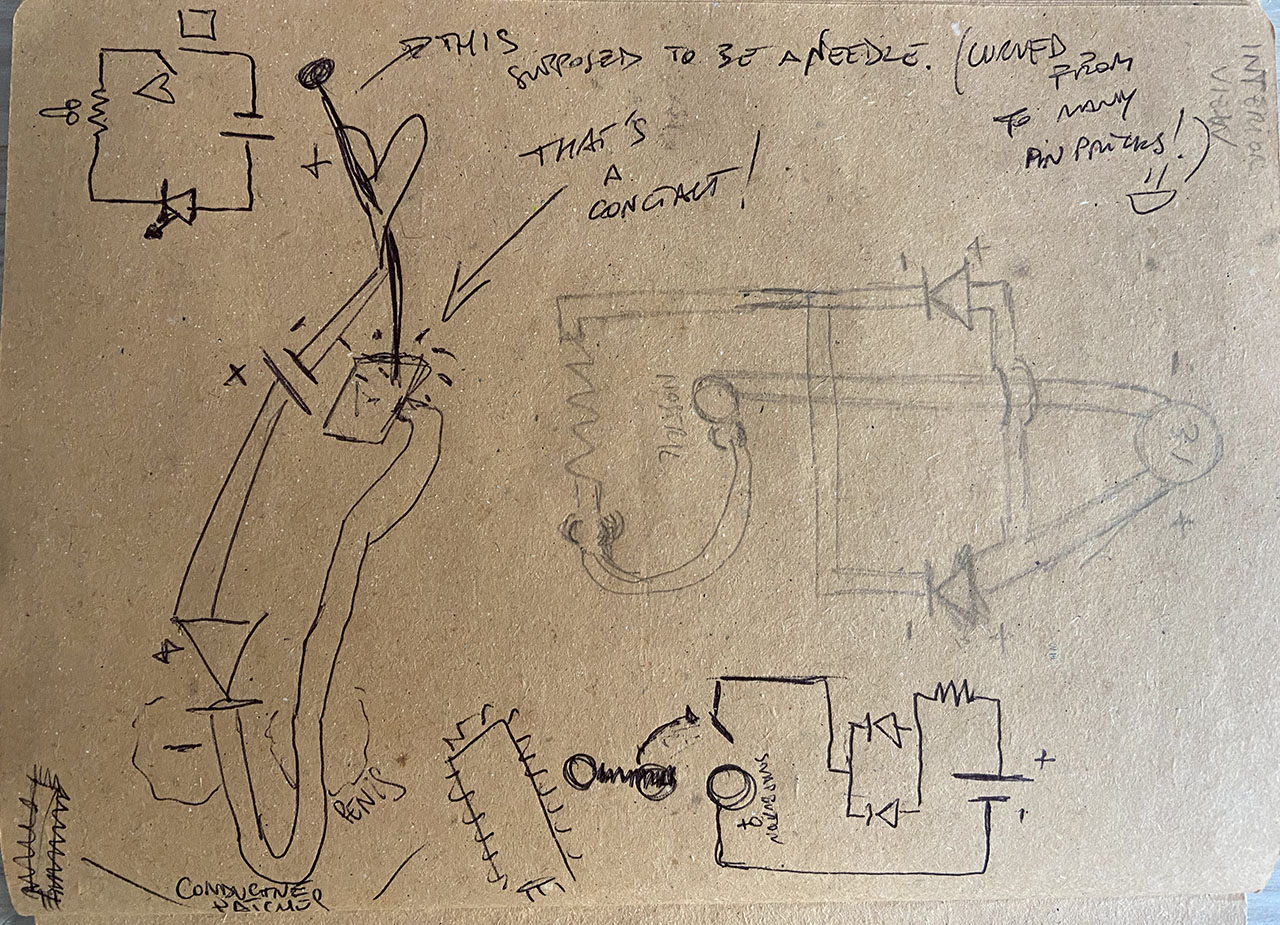
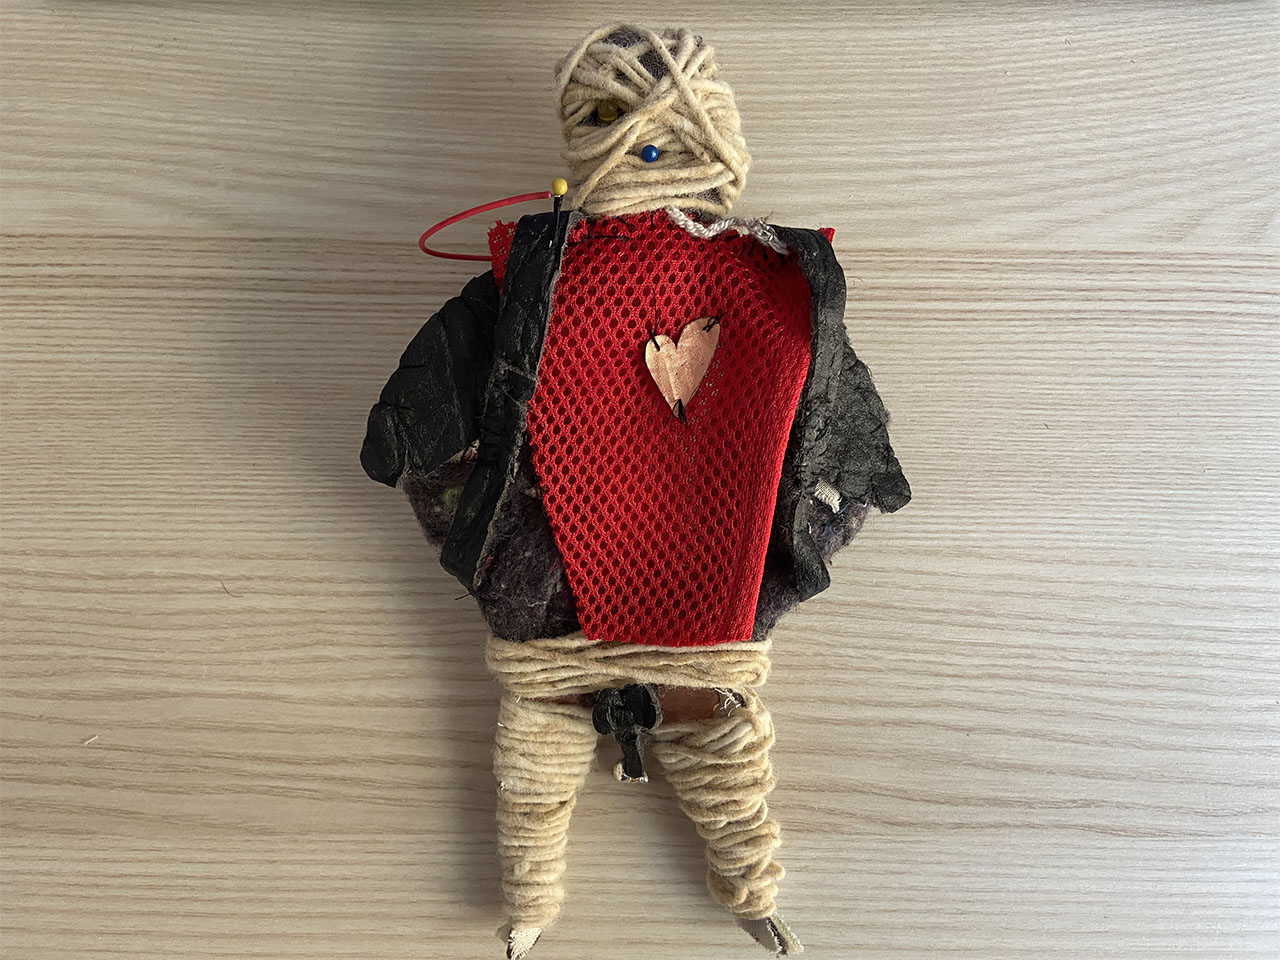
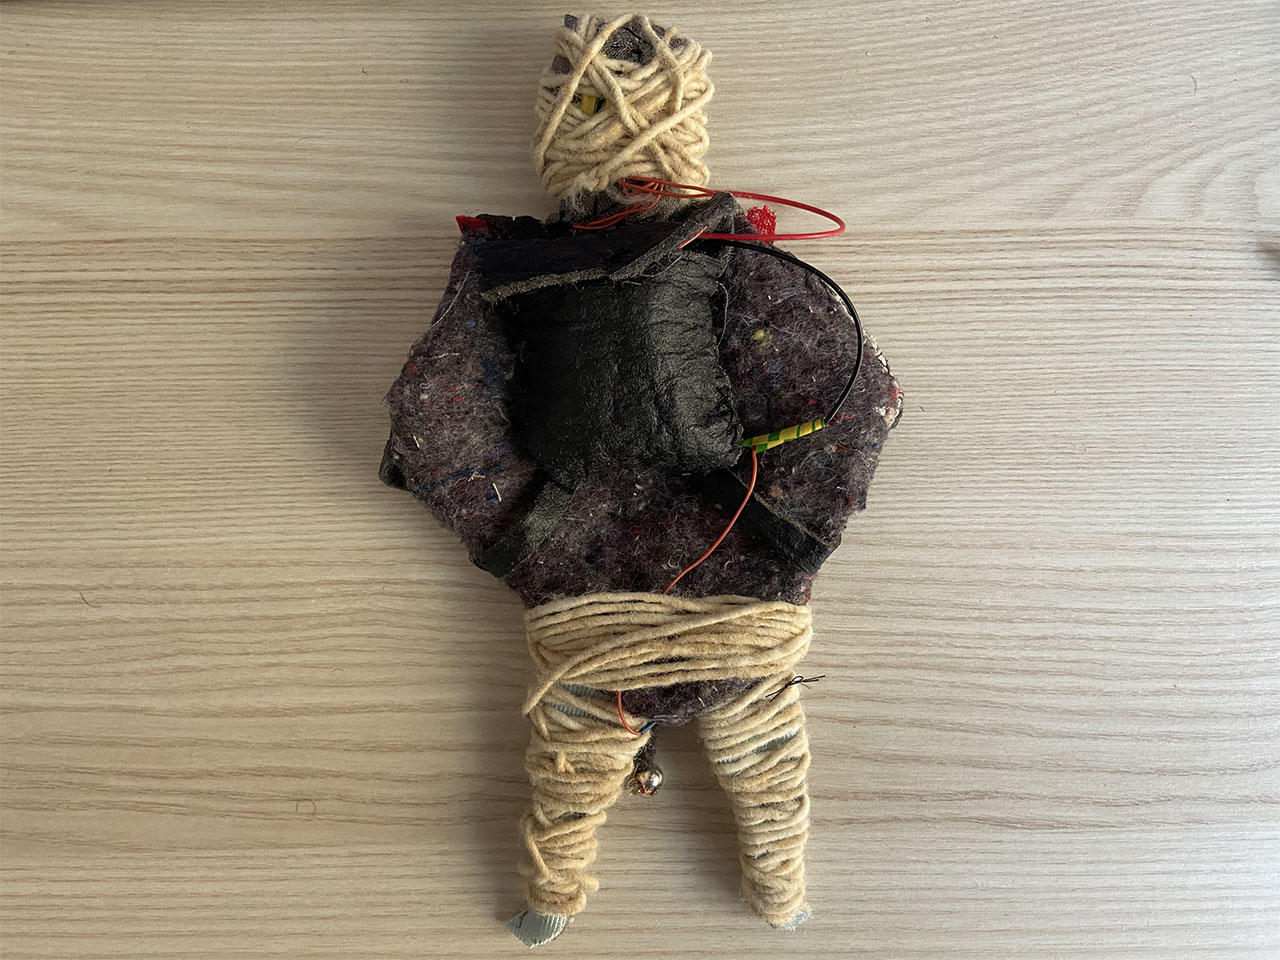
https://www.kobakant.at/DIY/?p=4240 VOODOO SENSOR

-
https://www.wikihow.com/Make-a-Voodoo-Doll
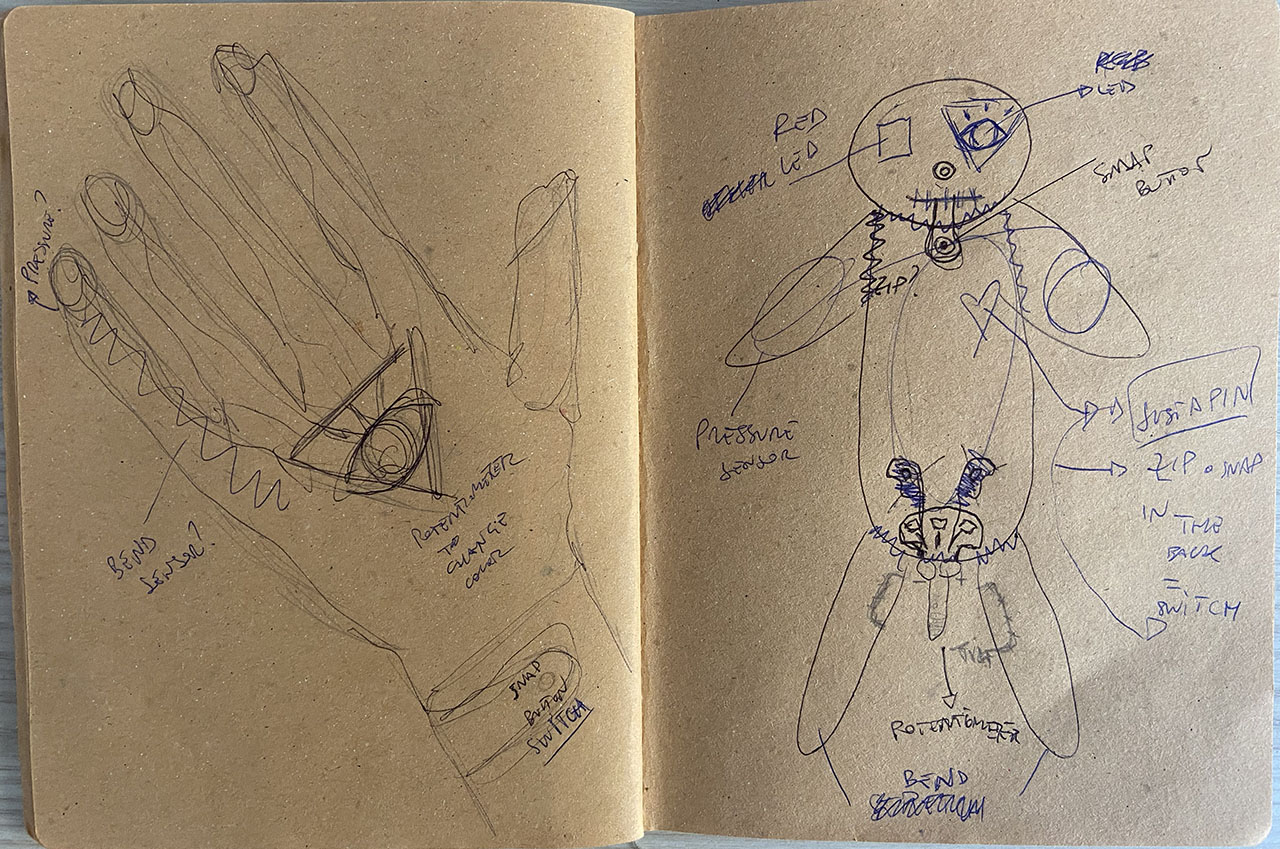
🔮 -"HOW TO TURN A VOODOO DOLL INTO A CYBORG"- 🤖
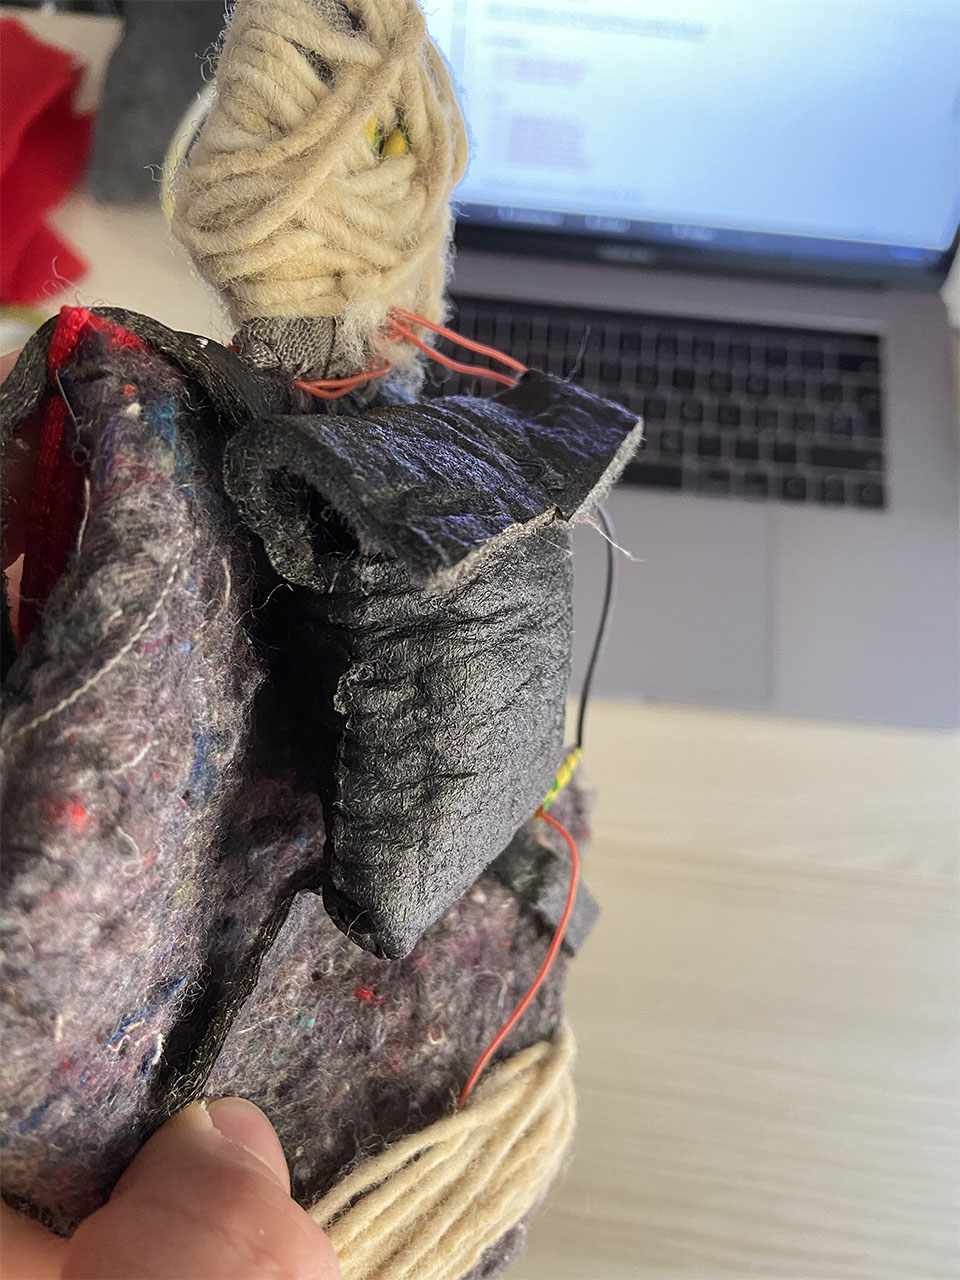
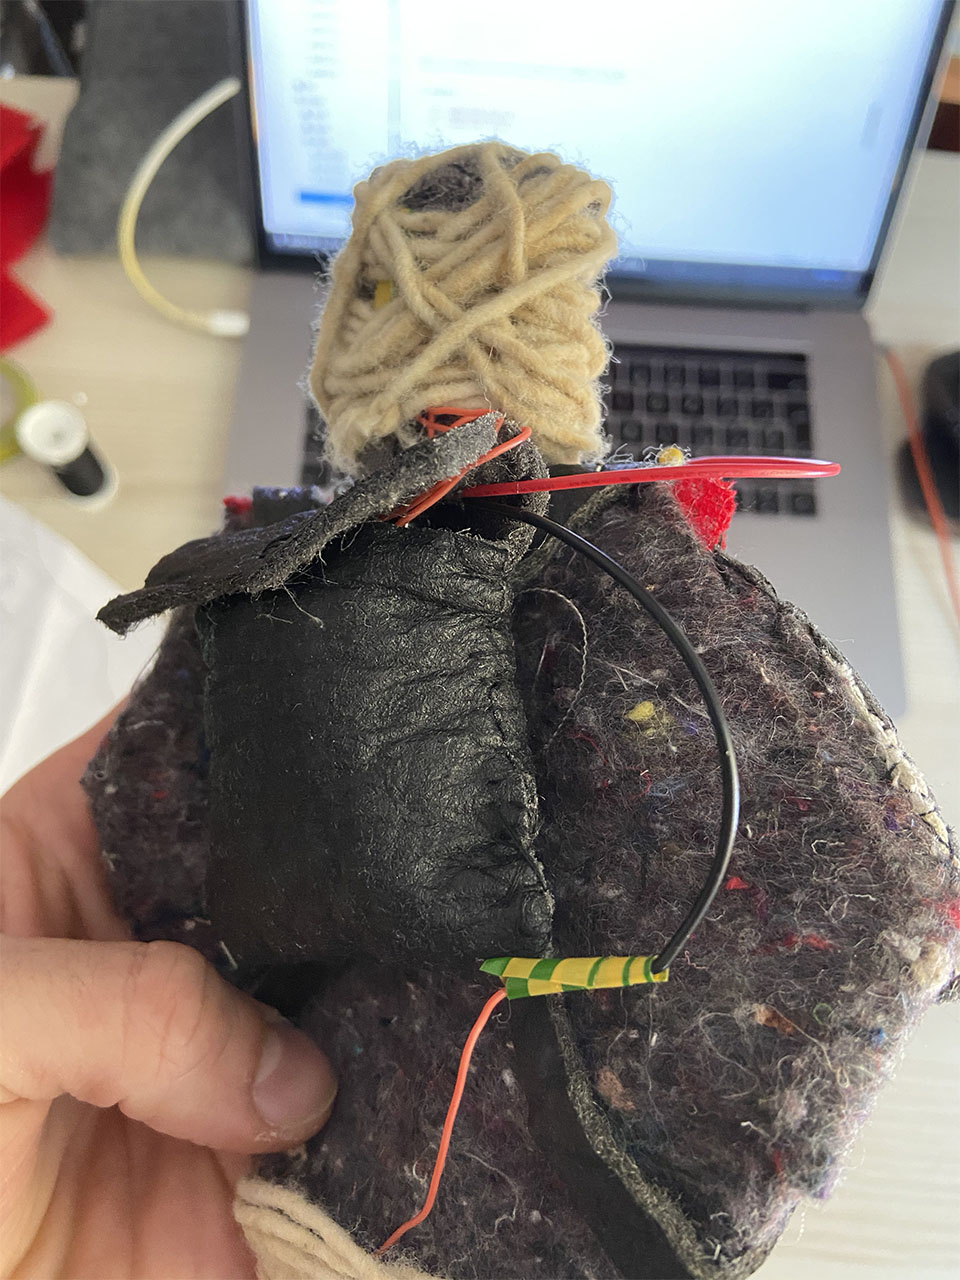
1) Drawing circuits & Calculations
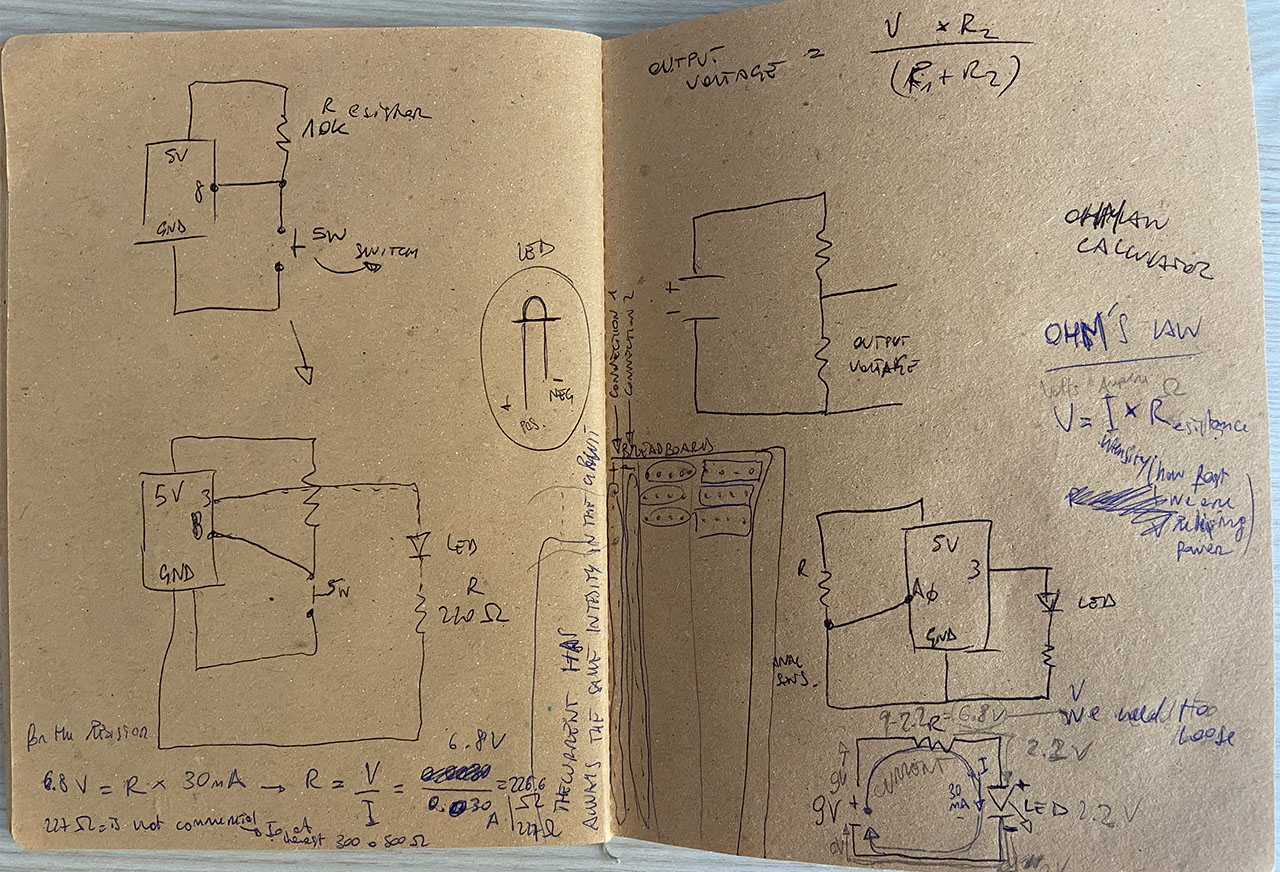
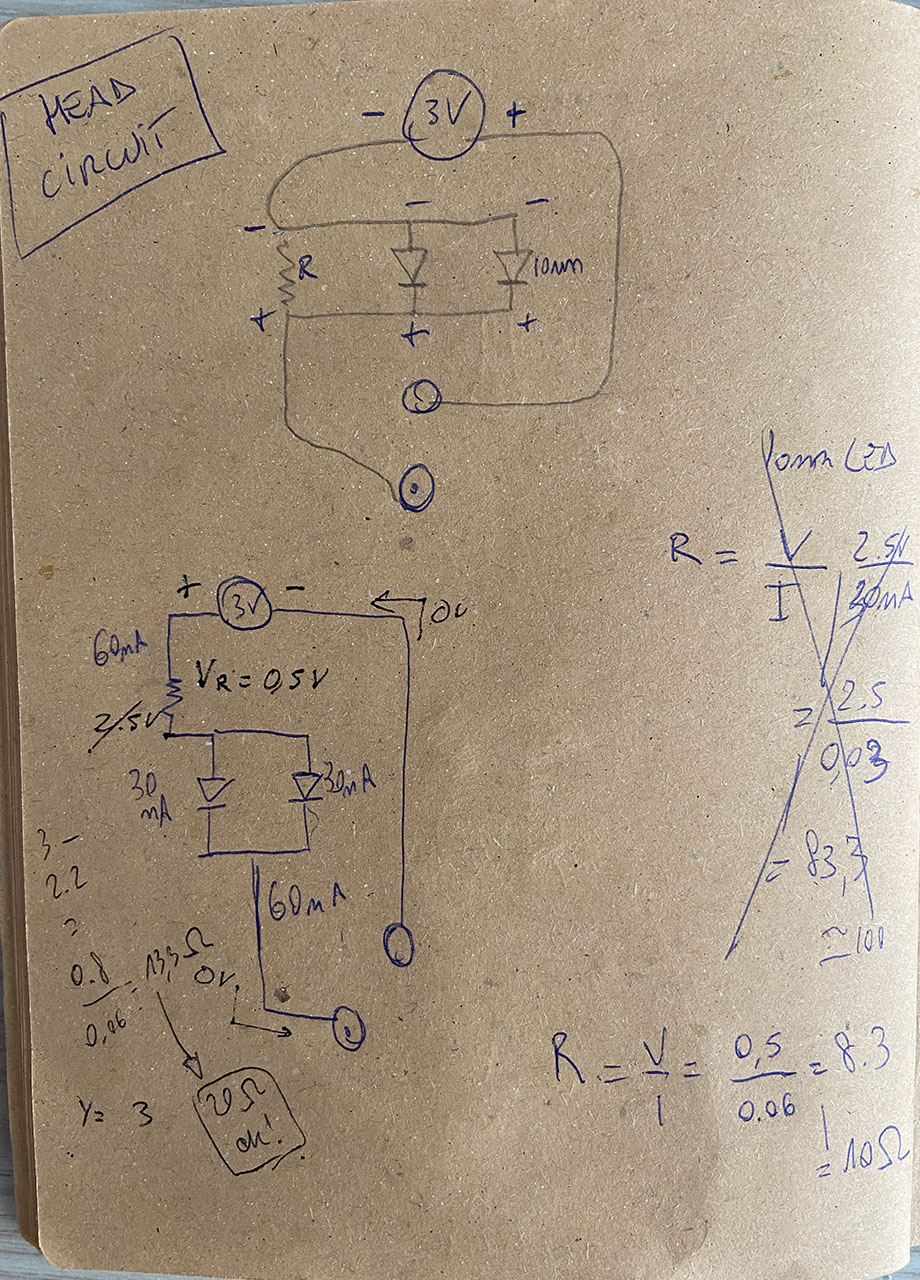
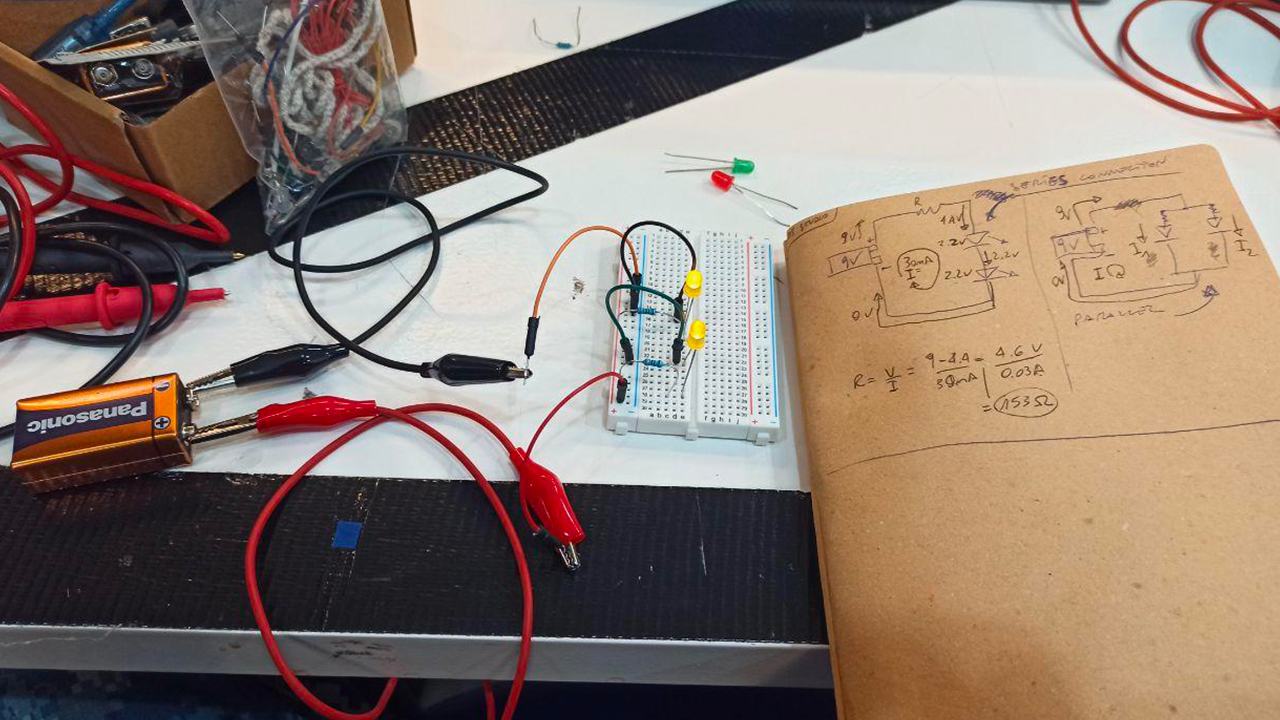

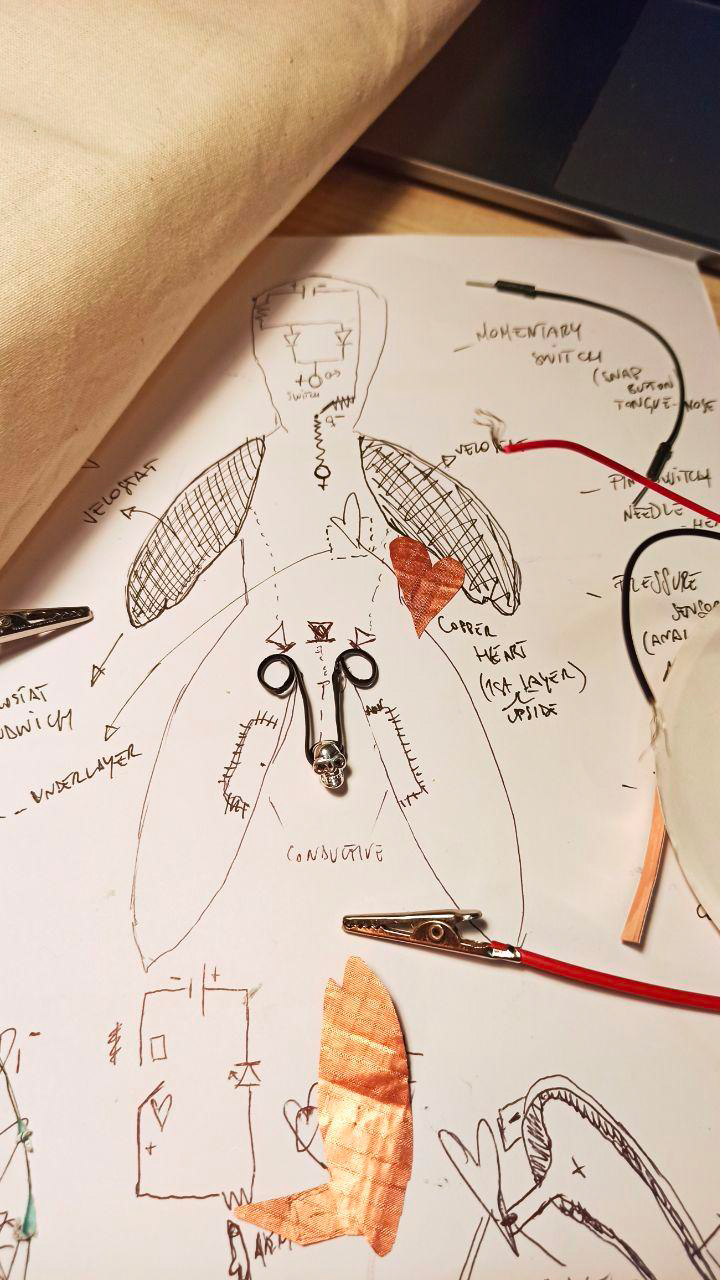
Usually is preferable to use Parallel connections, instead of Serie ones, because the Voltage would be the same but the Current would be splitted.
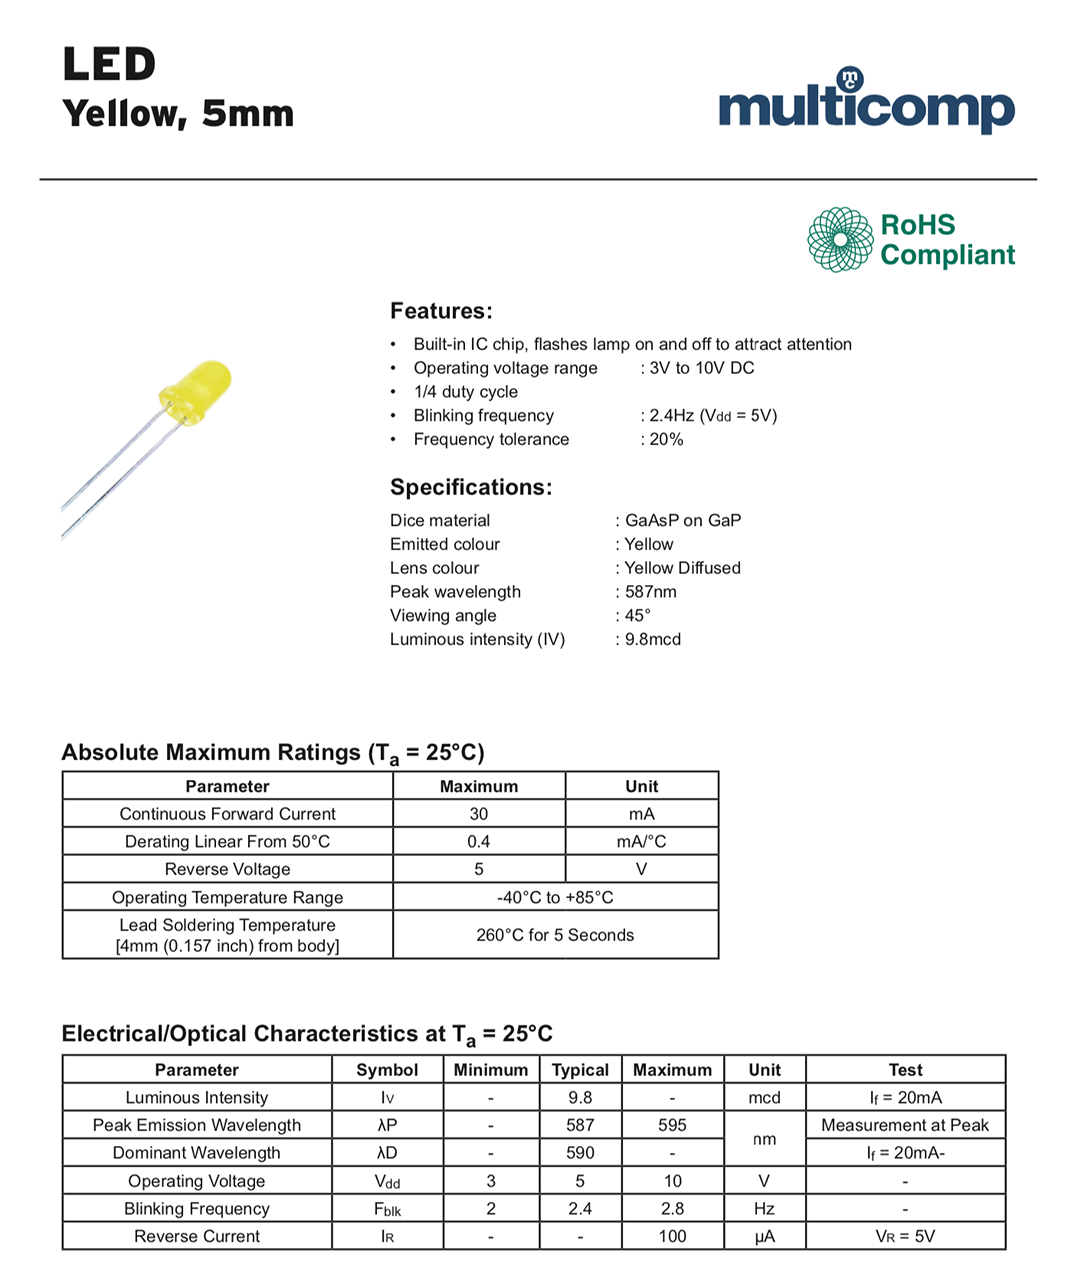
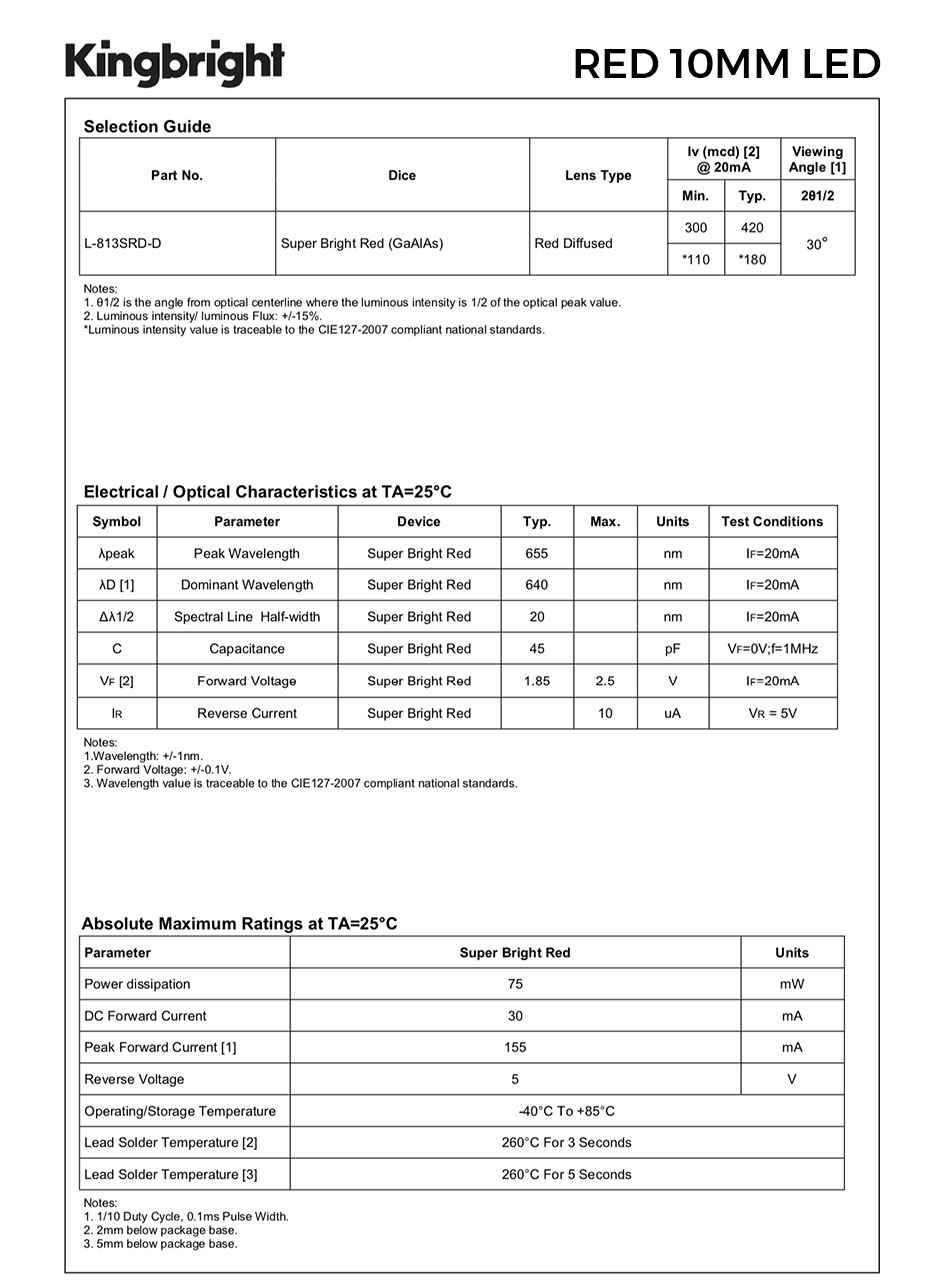
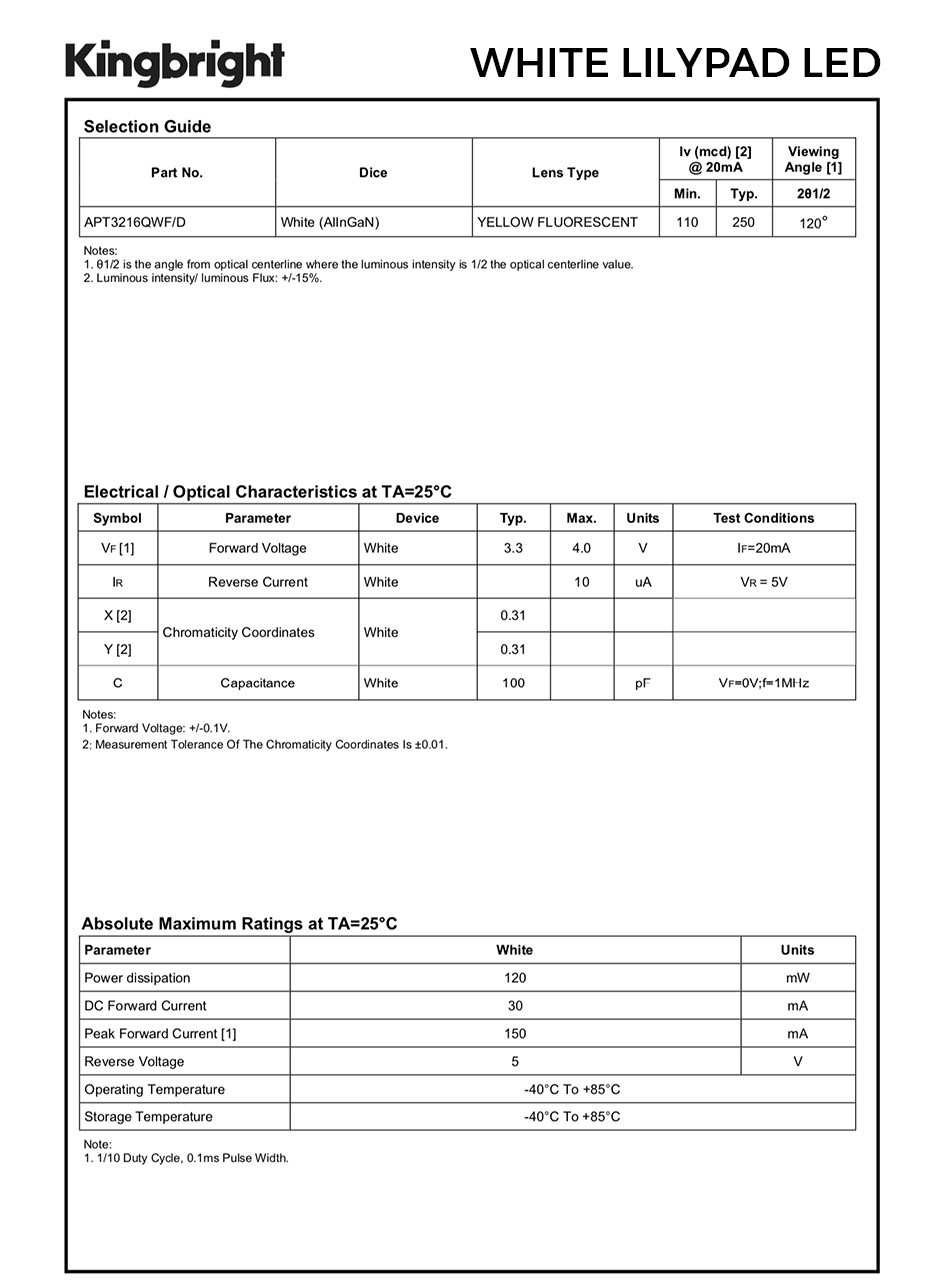
LED DATASHEETS
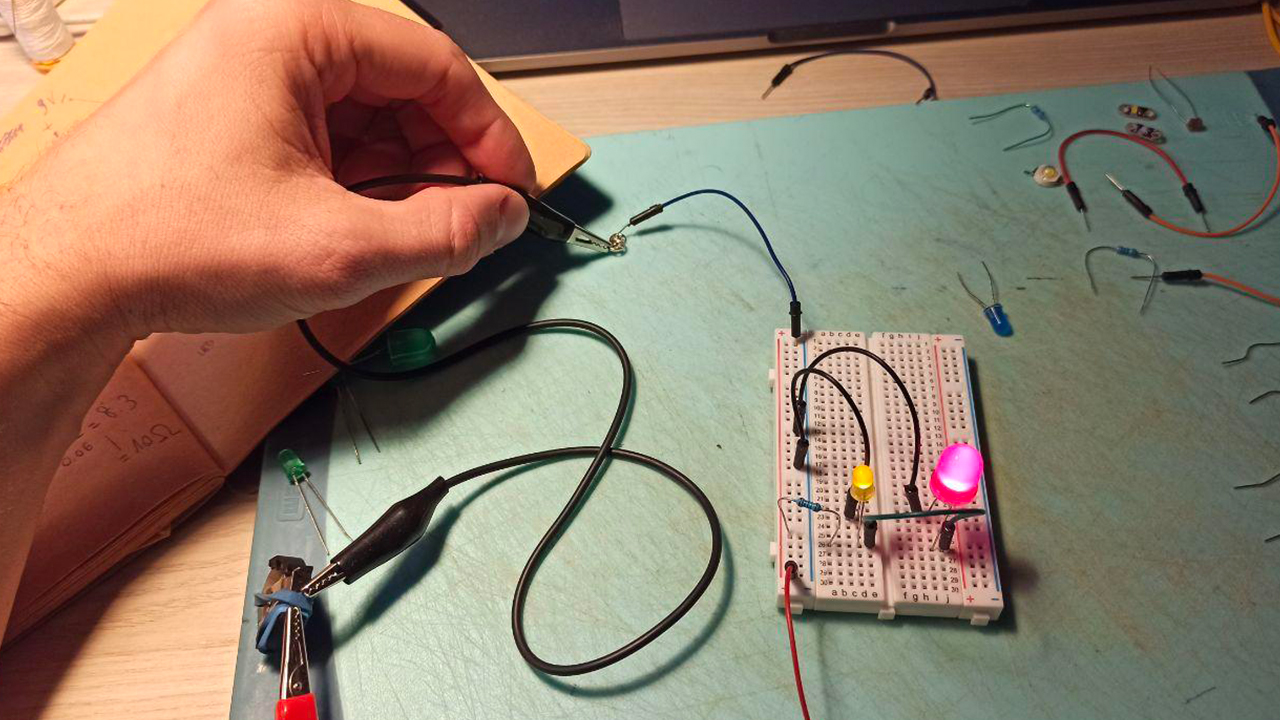
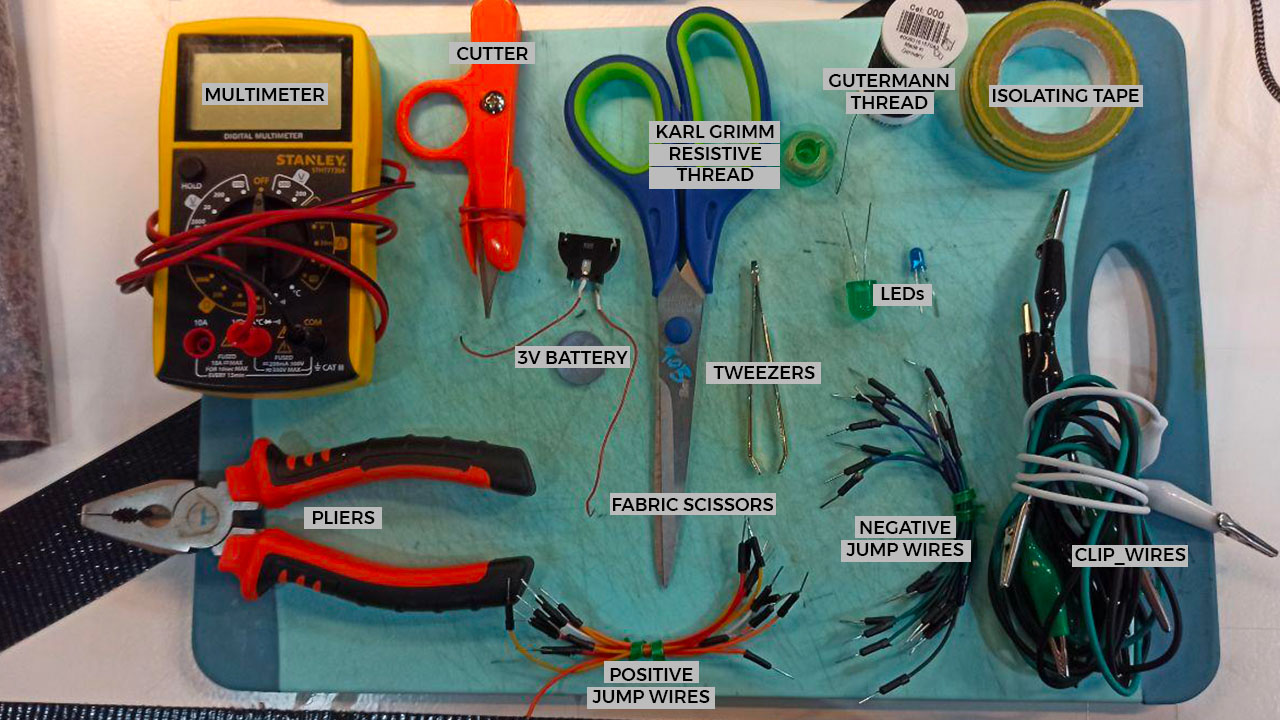
2) Tools
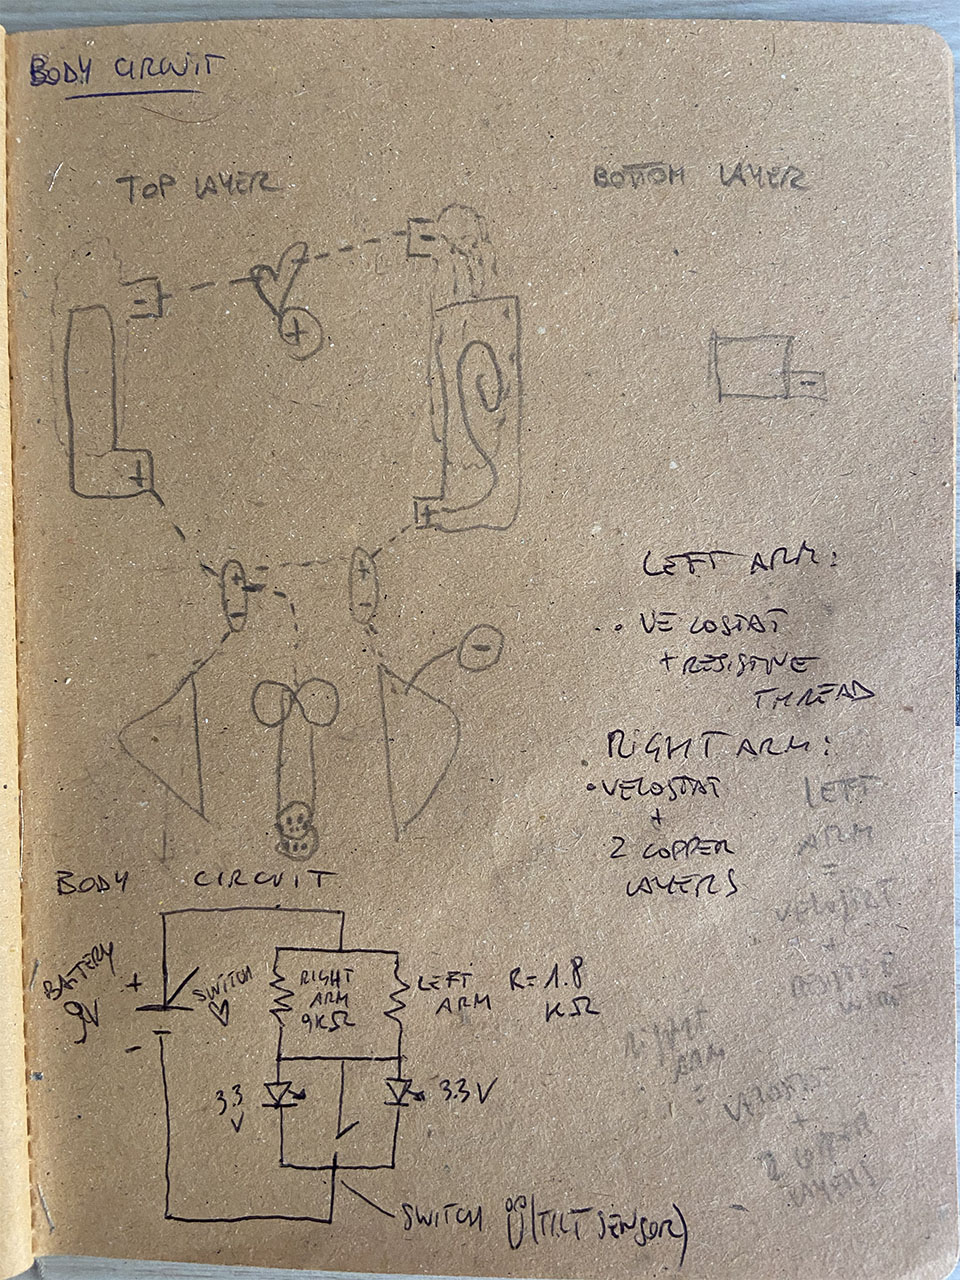
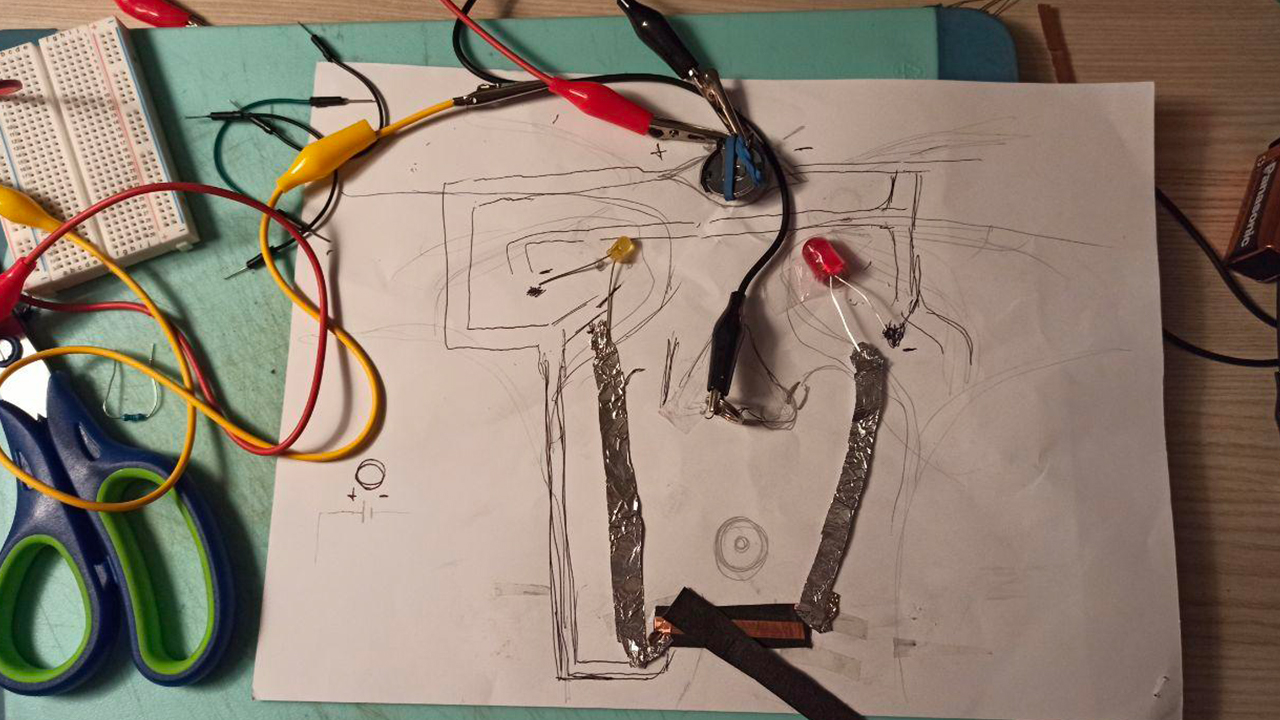
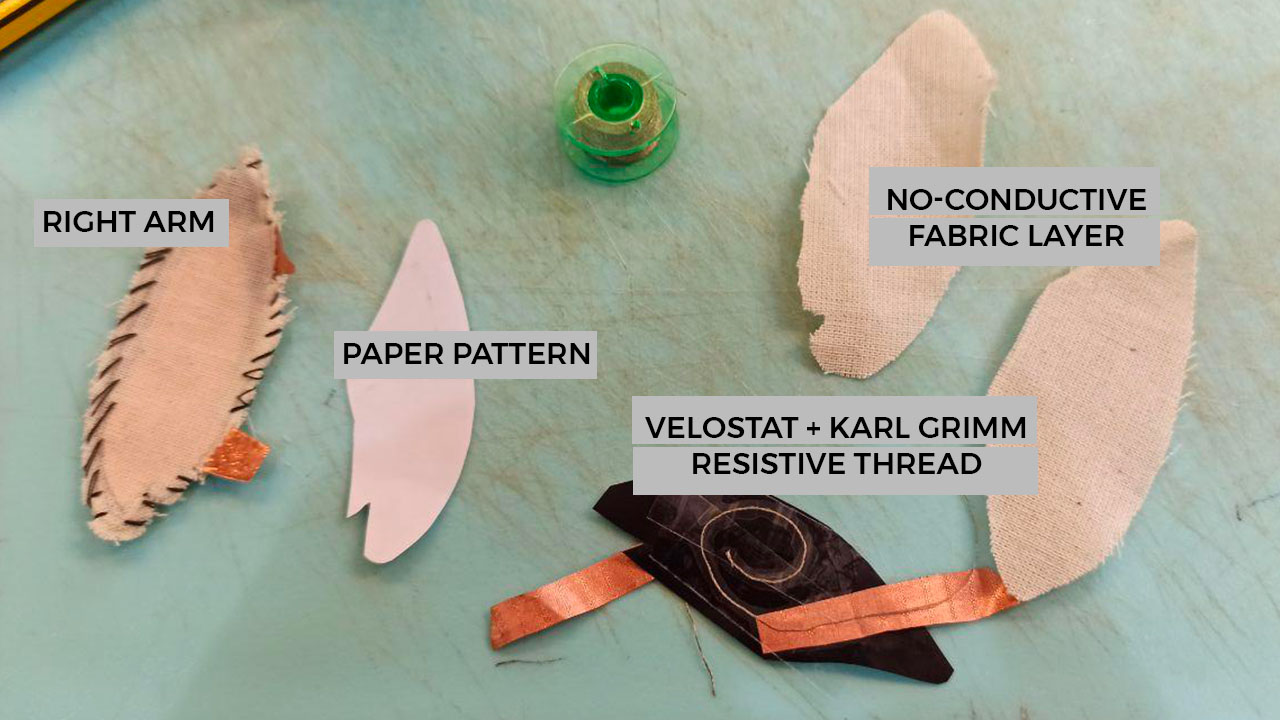
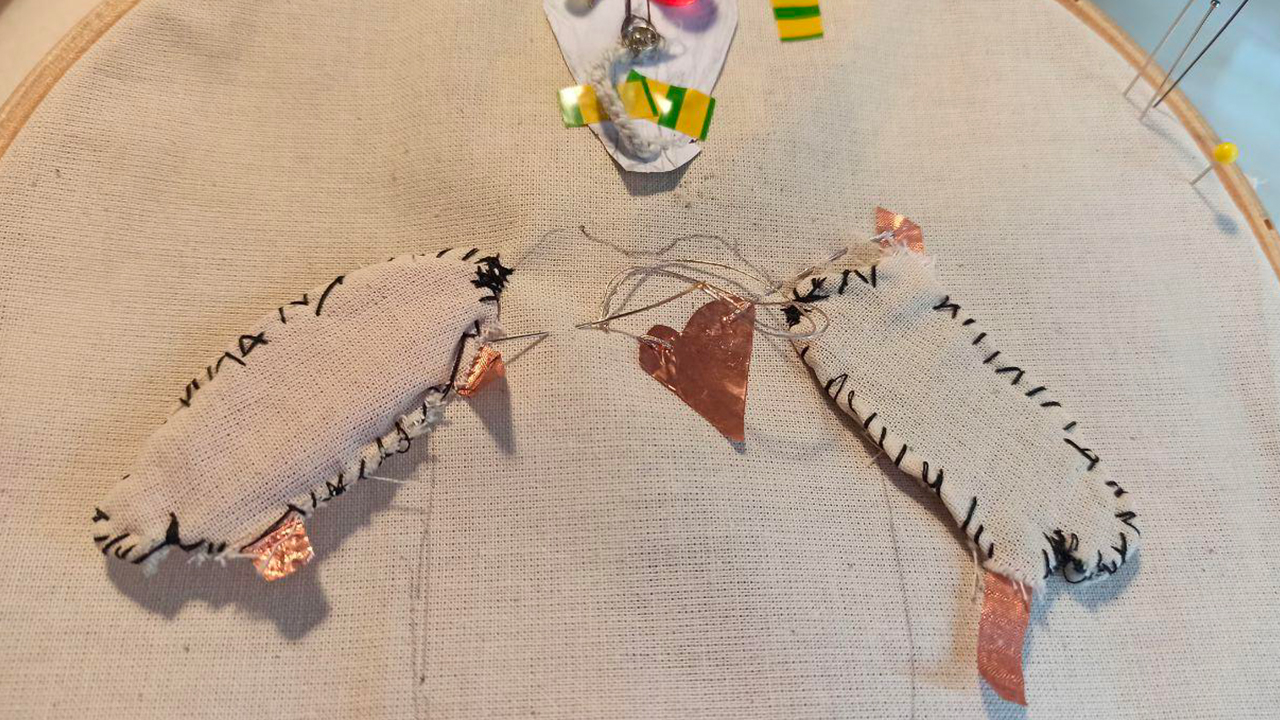
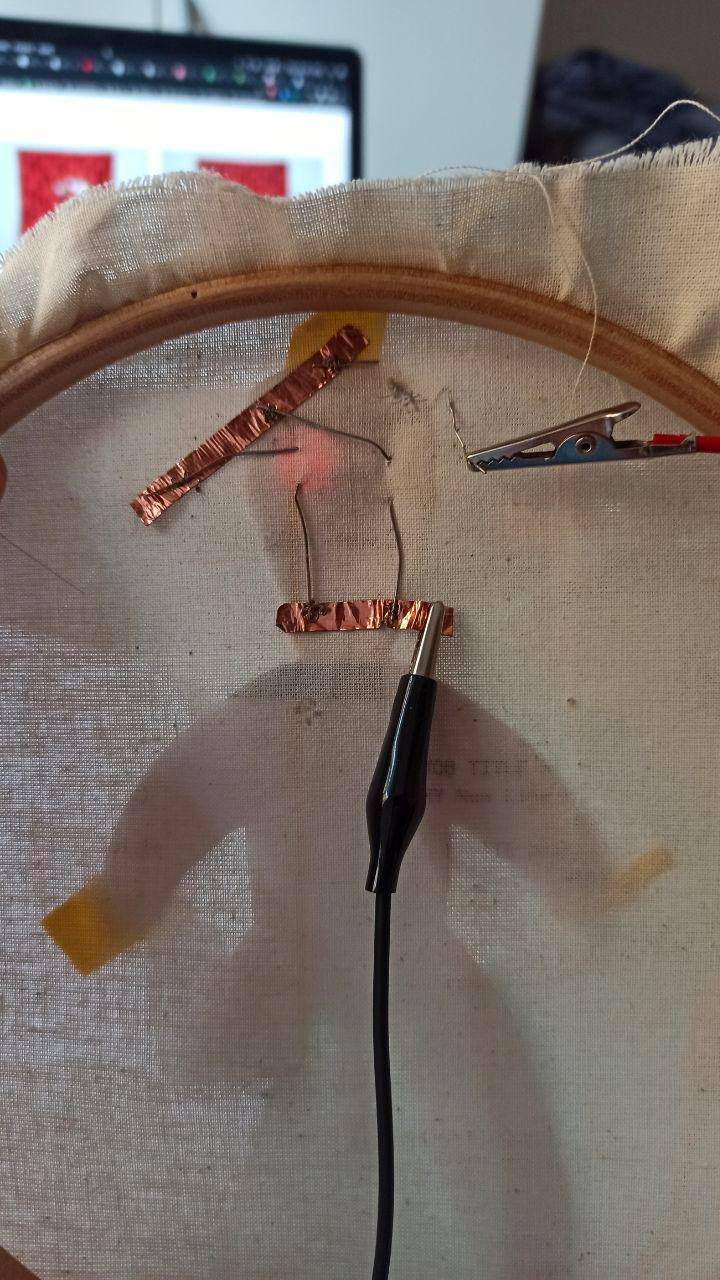
3) Make Hard-Soft connections a.k.a translate them on fabric
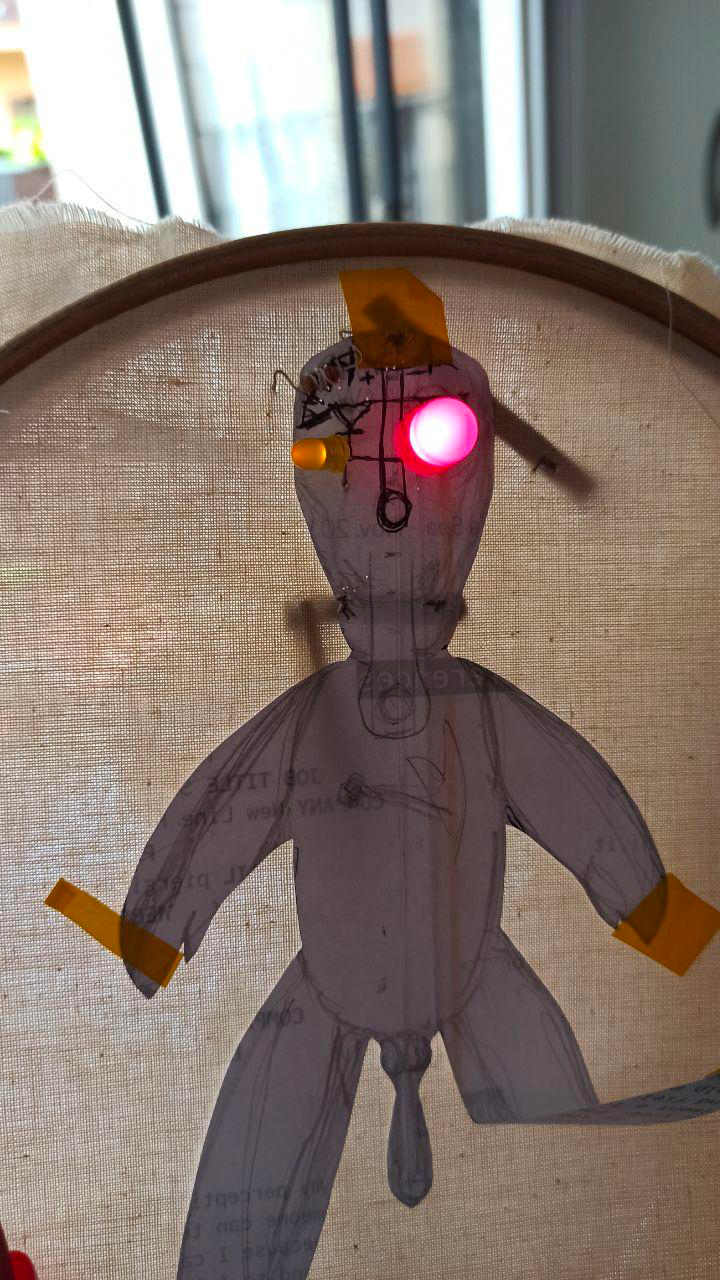
WORKING ON LAYERS (NEXT TIME I want to made the body before the circuits)


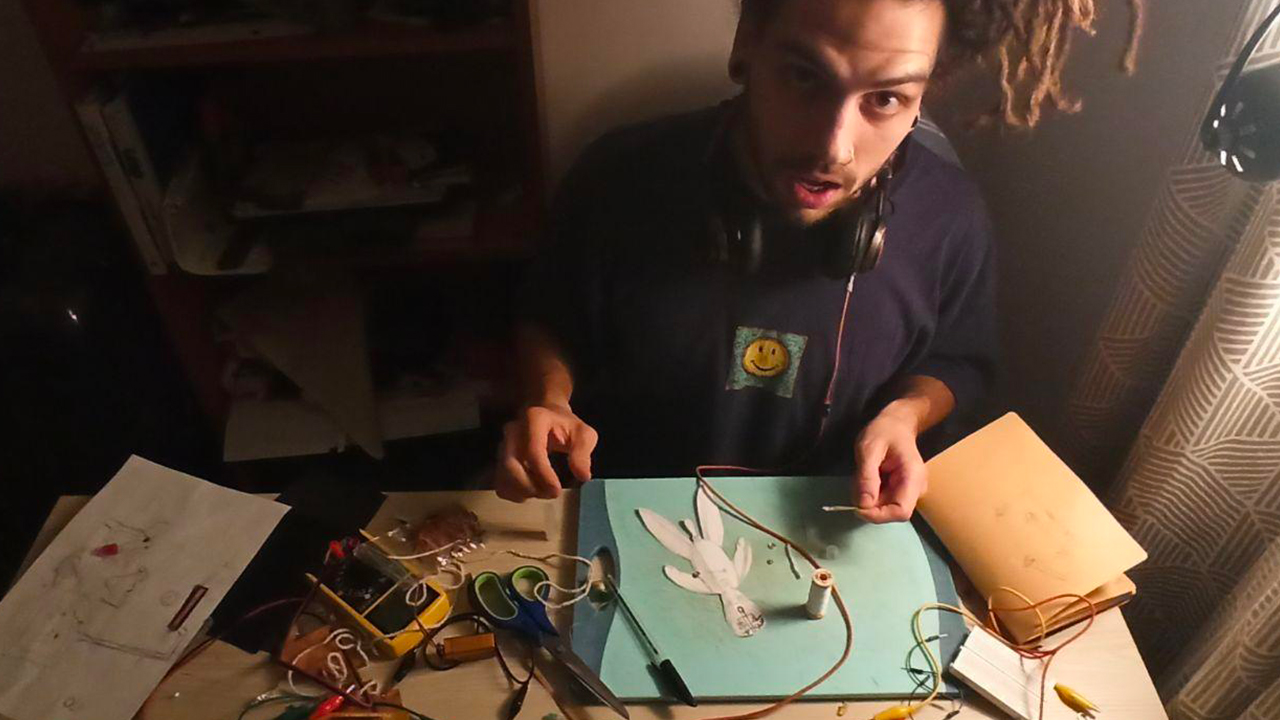
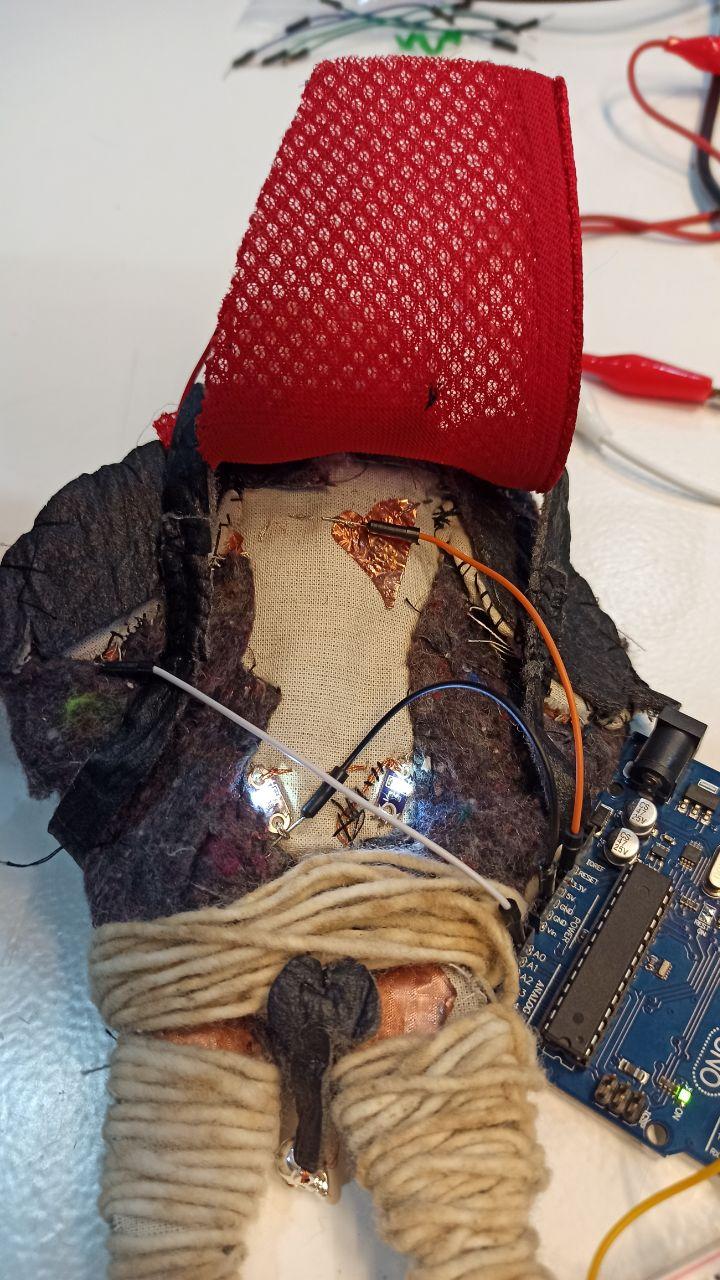
4) Tests & Unbugging & Tests
5) Coating (with leftovers and scraps from the Lab)

FAIL 🙄
 FINAL RESULT

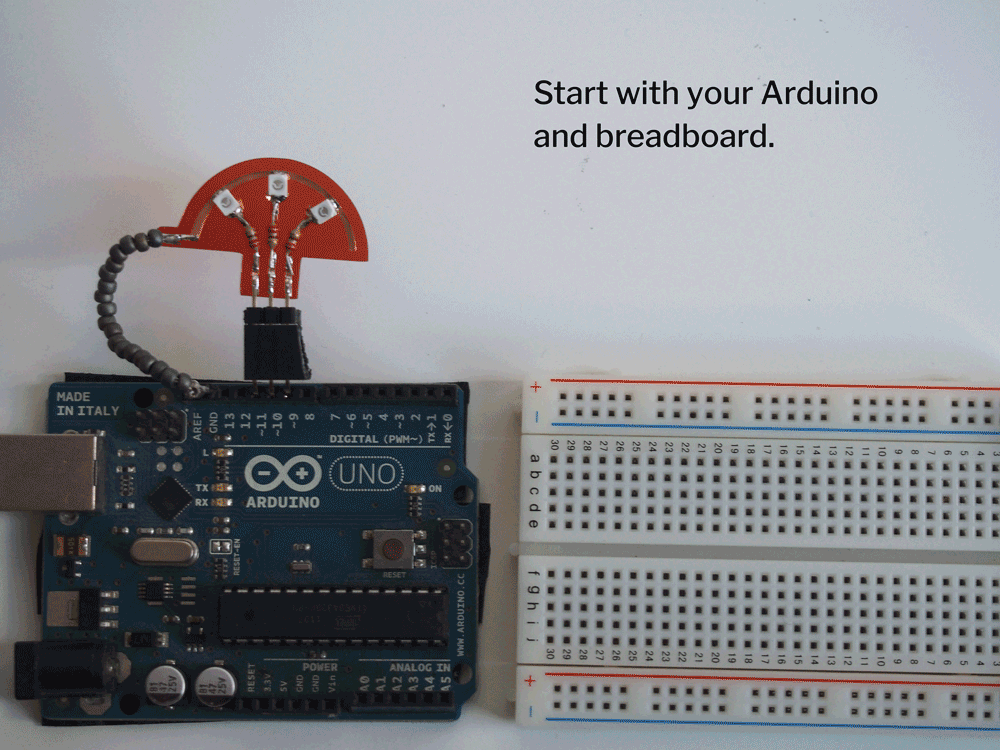
ARDUINO
PRESSURE ANALOG_READING
AnalogInOutSerial Arduino Code
// These constants won't change. They're used to give names to the pins used: const int analogInPin = A1; // Analog input pin that the potentiometer is attached to const int analogOutPin = 3; // Analog output pin that the LED is attached to
int sensorValue = 0; // value read from the pot int outputValue = 0; // value output to the PWM (analog out)
void setup() { // initialize serial communications at 9600 bps: Serial.begin(9600); }
void loop() { // read the analog in value: sensorValue = analogRead(analogInPin); // map it to the range of the analog out: outputValue = map(sensorValue, 550, 1023, 0, 255); // change the analog out value: analogWrite(analogOutPin, outputValue);
// print the results to the Serial Monitor: Serial.print("sensor = "); Serial.print(sensorValue); Serial.print("\t output = "); Serial.println(outputValue);
// wait 2 milliseconds before the next loop for the analog-to-digital // converter to settle after the last reading: delay(2); }
Rainbow Color Arduino Code Example (made for a wearable Led project)
// the setup routine runs once when you press reset: void setup() { // initialize serial communication at 9600 bits per second: Serial.begin(9600); }
// the loop routine runs over and over again forever: void loop() { // read the input on analog pin 0: int sensorValue = analogRead(A1); int sensorValue2 = analogRead(A2); // print out the value you read: Serial.print("Right Arm: "); Serial.println(sensorValue); Serial.print("Left Arm: "); Serial.println(sensorValue2); delay(1000); // delay in between reads for stability }
FAB LAB BCN TOOLS:
- Copper sheet
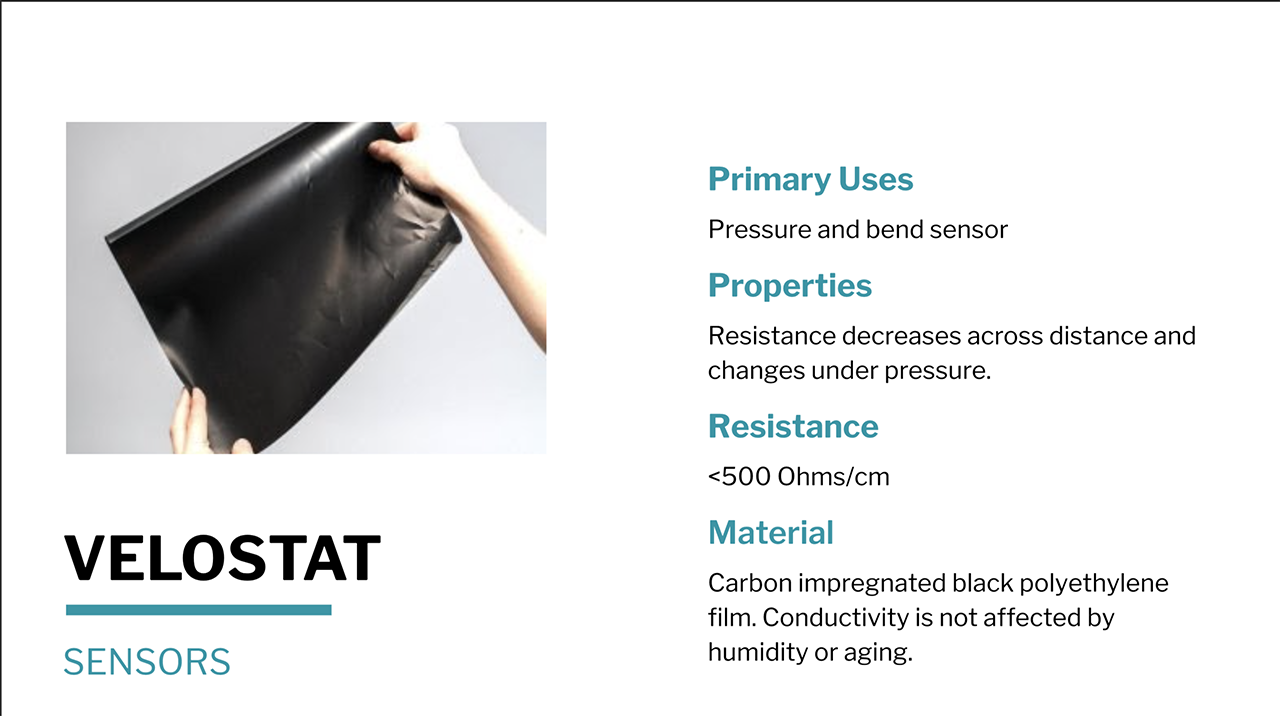
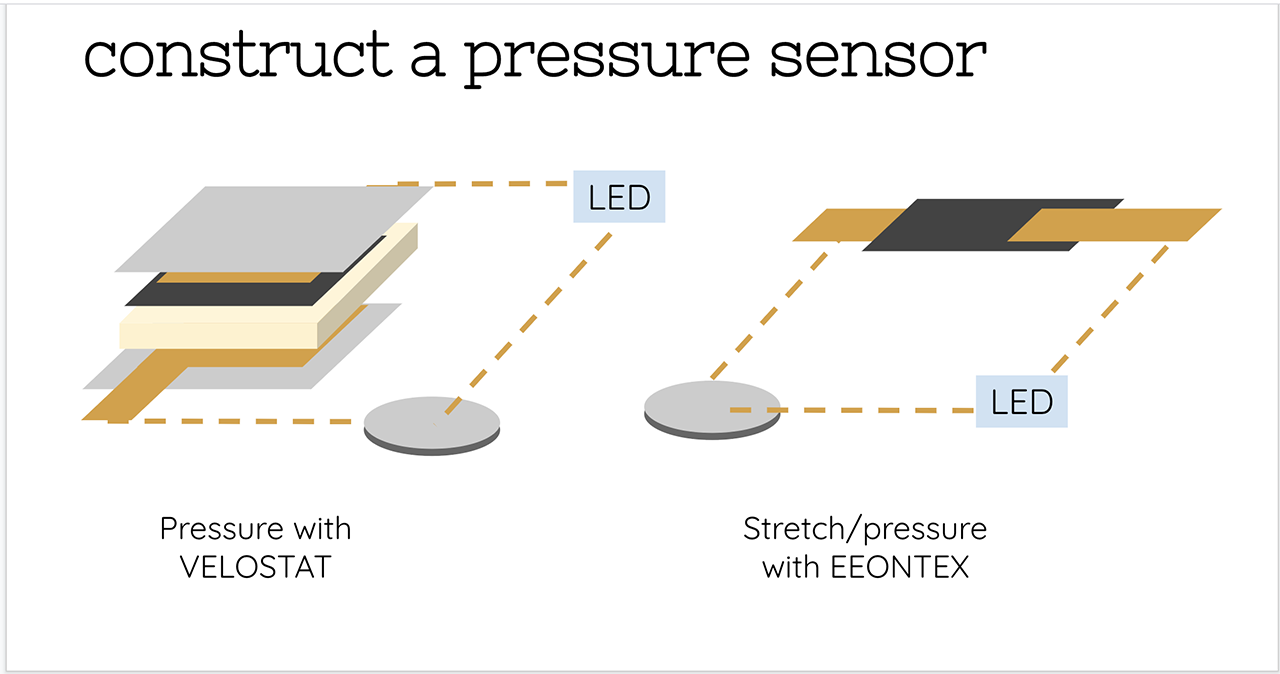
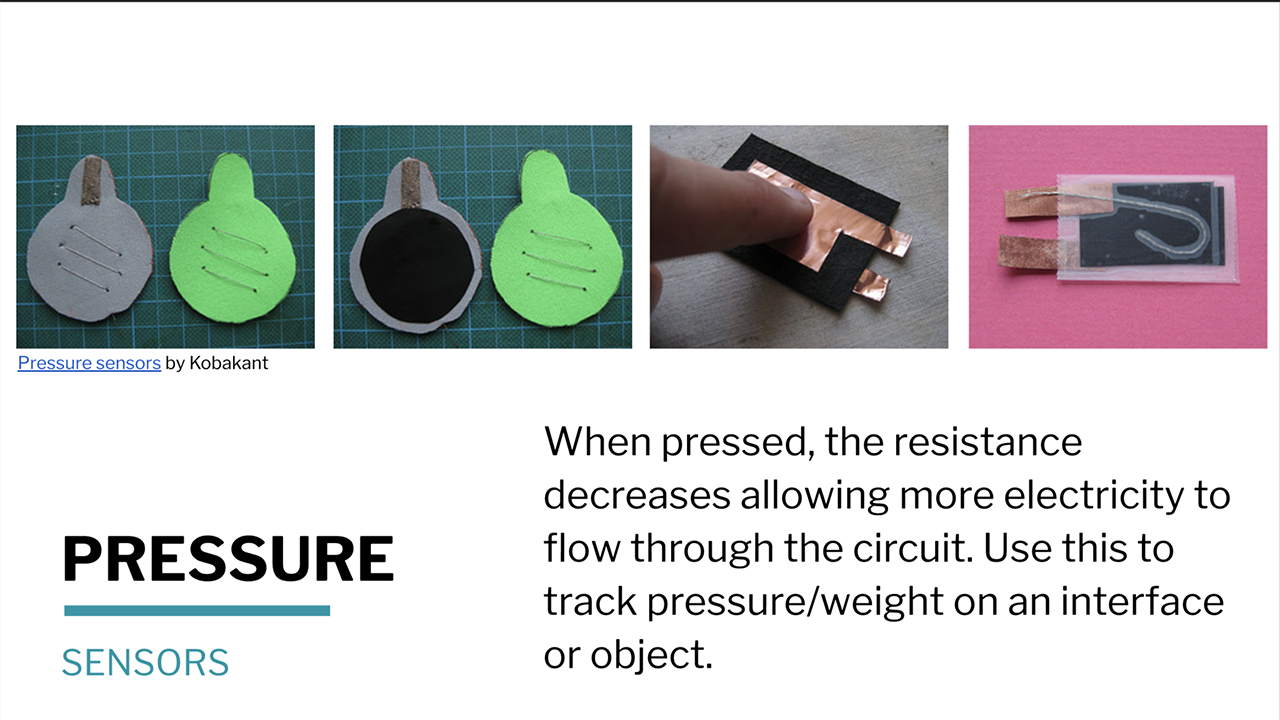
- Velostat = resistive film -> pressure resistance
- Eeonics = resistive “fabric” from carbon
- Resistive Thread MADEIRA = resistance/meters , for heat up or instead of a resistor
- Knittin thread = conductive WOOL thread / elastic -> for stretch sensors
- Adafruit cable
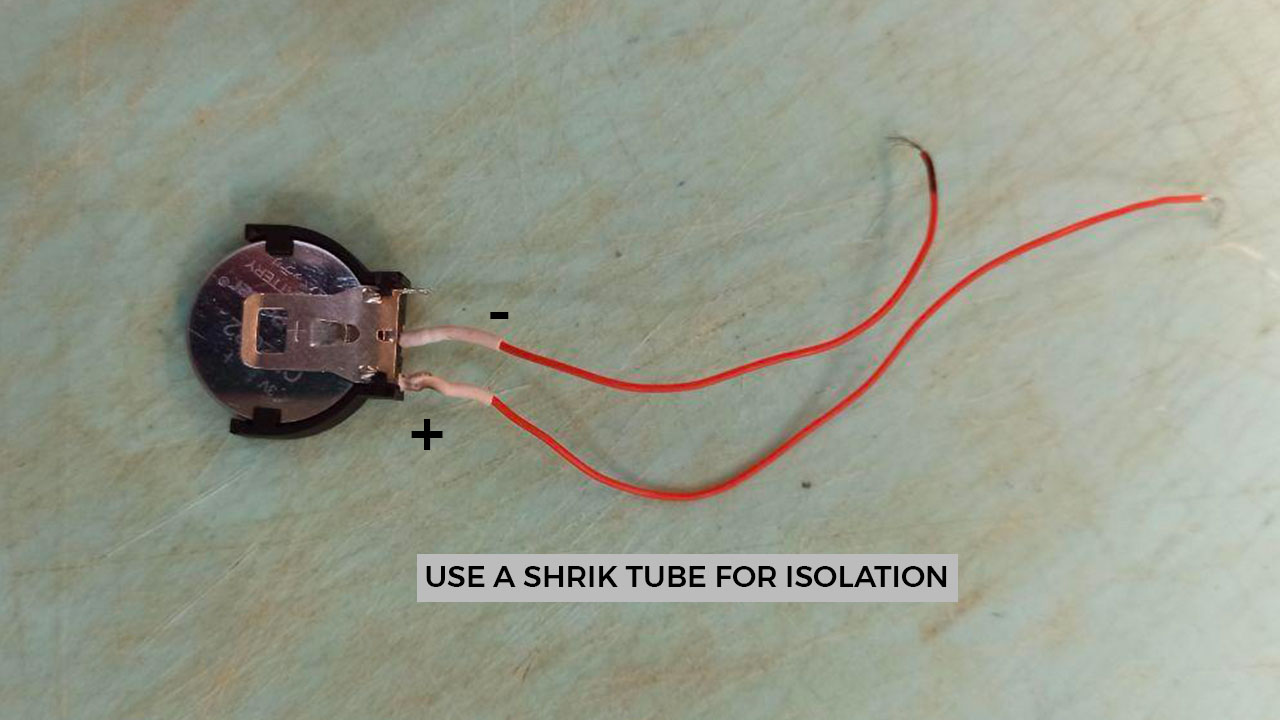
- Heatshrink tube to make stable connections
- White Sewable Adafruit LED ( it has already a resistance)
- PHOTORESISTOR ( variable values, react to Light)
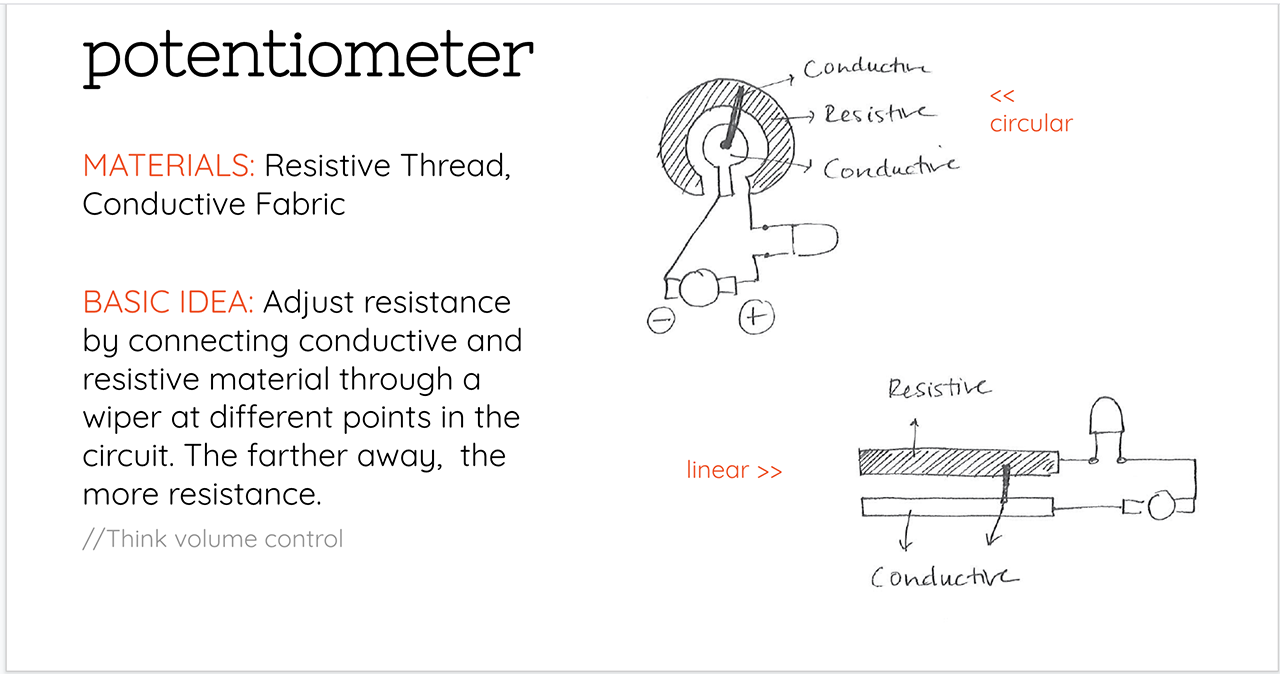
- POTENTIOMETER ( dimmer)
- RGB LEDs 5mm
- NEOPIXELS DIFFUSED RBG ADDRESSABLE
- KARL GRIMM conductive thread sewable
WISHLIST: POLYSENSE = dyeing stuff to get fabrics conductive!!!
Useful links
- How to Work with Conductive Fabric
- LIZA STARK
- Shih Wei Chieh
- Shih Wei Chieh_Project
- Body Modifications
- Chromotherapy
- Masks
- Body Modifications
- Smart Materials