8. Open Source Hardware - From Fibers to Fabric
This week has been  ...
In a good way. Just read on and you will understand.
...
In a good way. Just read on and you will understand.  After presentations of Mar Canet & Varvara Guljajeva we had many ideas of what we could work on, but little did we know, our lab already thought that through and suggested making a multipurpose machine which was developed during the first lockdown and who knows when the next one will start, so better be safe than sorry, right?
We really enjoy working together and this time we worked also with our mentors at the FabLabBcn as well as some other students, which made the making process more lively and we were able to share the tips and tricks he to assemble it, since some parts of the design had to be changed, after all, it is a work-in-progress project and not everything can be updated as soon as the changes are made.
SPML a.k.a SixPackMobileLab or SimplePersonalMiniLab
Spoiler Alert This is our final (for now) version of the machine!
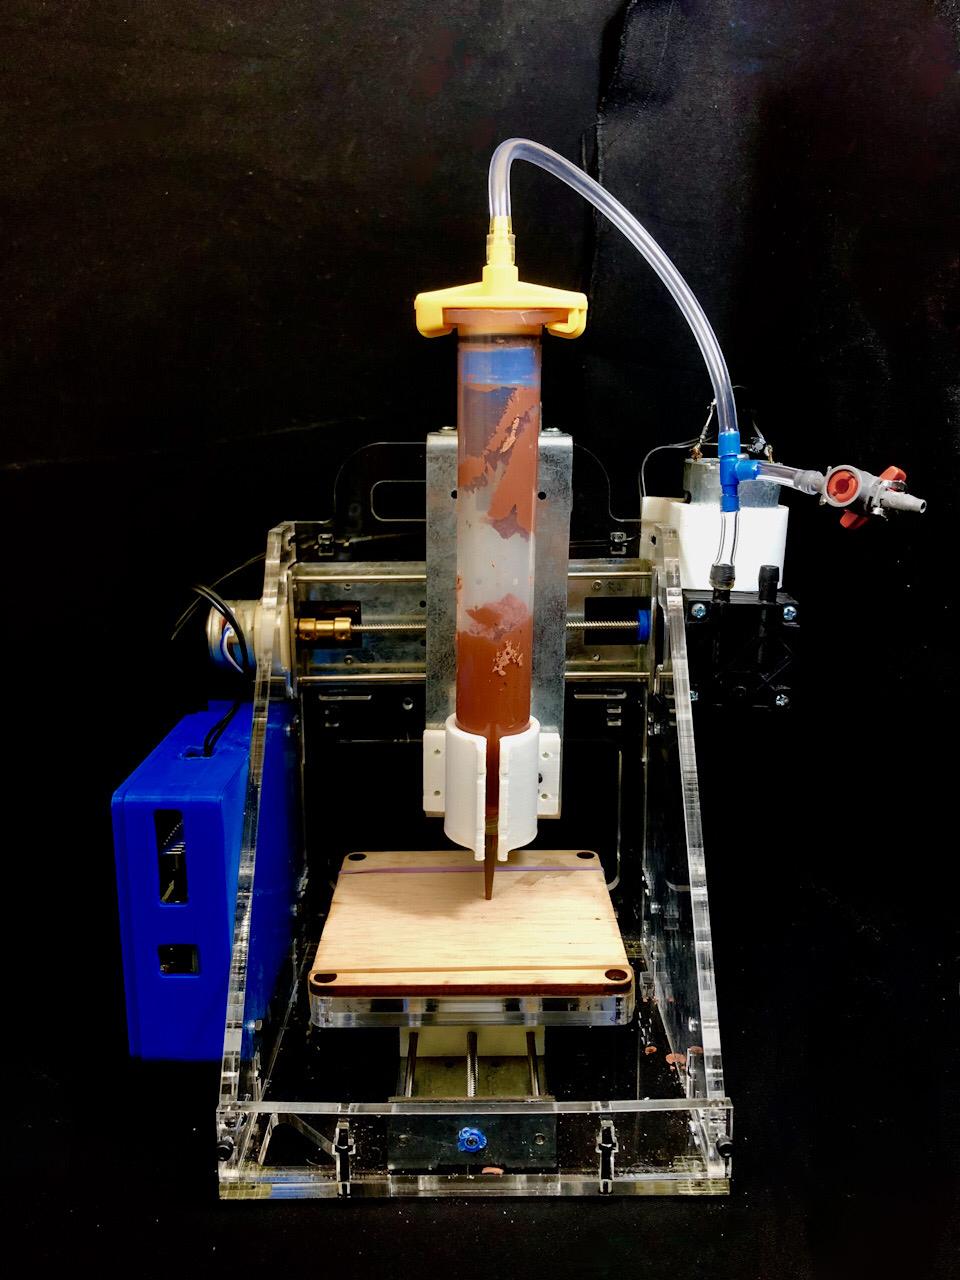
What is SPML?
SPML is a fabbable and open source mini machine,which bode can lasercutted or 3dprinted and with fully Fabable electronics boards. This is a 3 axis machine with a tool work area of 100x100x80mm and exterior footprint of 150x150x200 (almost the same as a pack of six cans) that make it really portable,lightweight and extremely low cost.

The story
This pico machine started as a project to make a fab academy kit machine to help the students develope their FabAcademy assignments during the COVID-19 confinement. This machine was inspired by the pico dvdroom recycled motor based machine DIY projects but translated to a fablab environment was designed by Eduardo Chamorro Martin, Oscar Gonzalez and Josep Marti in Fab Lab Barcelona 2020. It is a 1.0 version with 3 different models (3mm closed case, 5mm closed case,5mm open case)

Closed Case on the left - OpenCase on the right
There is two options for fabrication: lasercutted/3dprinted.

Main features of this version are:
- Low material usage,body can be fabricated with a 600x400x3 board
- Uses low current motors so could be driven with 5v
- 100% compatible with default Arduino IDE
- Fabbable electronics (fablab inventory components)
- ESP32 control board with usb-wifi-bluetooth control
- Modular tool head (laser and cnc)
- Standart GCODE control
- Accurate upto 0.1mm
- Self Publish Web Control interface,no need to install a control software
- Compact(can be carried in a backpack) and lightweight <2kg
- Tiny linear motion system that reduces the total cost to <60 euros.
- Open case version(better for modifications) or closed(better for travelling)
- Modular electronics.Base BARDUINO BOARD + CUSTOM CNC SHIELD
- Integrated one hole in the base to clean up the dust accumulated in the base
- High mobility, ability to be run on batteries.
This has been the evolution of the machine until now:

**Update on ELECTRONIC CONTROLBOARD - Barduino+CNCShield+Casing
OUR EXPERIENCE
Making process of the Machine
(in the slideshow underneath you can find the steps we did for assembling the machine)
Recipes
BALLPEN TEST
(we tried with a simple ball pen to use the machine as a drawbot)
MARKER TEST
(then we try again, but this time with a brush marker)
Hardware
-
3x motor+rail systems 100mm microsteppers we choose this as the power train due to its small size,power consumption,travel and cost.
-
1x dc motor rs555Standart 555 size dc motor up to 17.000rpm at 12v
-
3x microendstopAny normal 3d printer endstop will work we choose a small one to make it easier to fit.
-
screw set 3mmWe choose this kit as it contains all the screws needed(in particular we need :30 x m3-20mm screws + 30 x m3nuts)
-
screws flathead m2We choose this kit as it contains all the screws needed(in particular we need :20 x m2-8mm screws)
IMPORTANT, THESE SCREWS ARE FLATHEAD!!
-
nuts screw m2We choose this kit as it contains all the screws needed(in particular we need :20 x m2-nuts)
-
600x400x3/5mm material(our choice was acrylic)This material opcion is the most expensive one to look for an alternative you can use mdf boards
Electronics
All the electronic components are standard fabacademy inventory
What you will find in this repo
- Kicad Design Files + fab library + esp32 library + Design Rules
- GRBL firmware + WebUi
- Png files for producing the boards
- Diagrams of connections
- Libraries install for arduino
- Lasercutter ready files for 3 and 5mm material
- 3d stl files in case you want to 3d print the casing(you need a least a 220x220 3d printer)
ControlBoards
Currently, the control boards are under development. It's based on an Barduino (ESP32) with micro usb.
CNC
Arduino ESP32 LibrariesRequired
http://arduino.esp8266.com/stable/package_esp8266com_index.json
https://raw.githubusercontent.com/espressif/arduino-esp32/gh-pages/package_esp32_index.json
https://dl.espressif.com/dl/package_esp32_index.json
Using GRBLESP32
SelfPublish web interface to control the machine through the browser via wifi or bluetooth through a cncgbrl app.
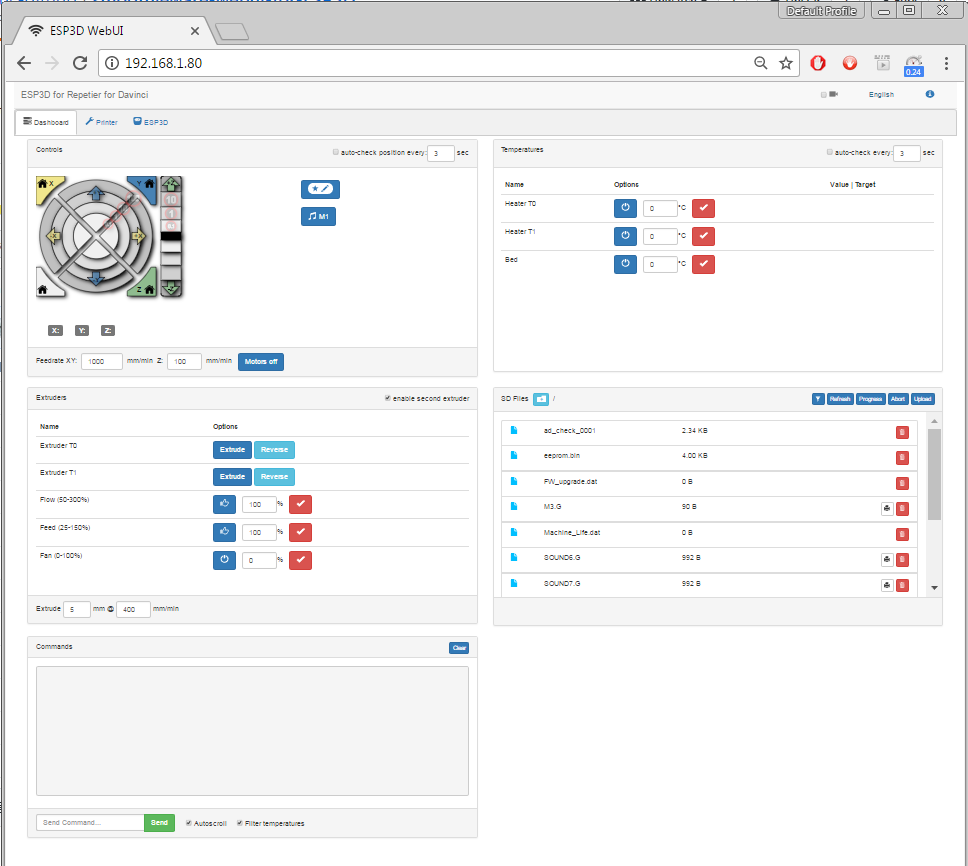
COMPLETE INFORMATION OF THE GRBLESP32 ORIGINAL WIKI
COMPLETE INFORMATION OF THE WEB UI CONTROL - ORIGINAL REPO
The ESP32 is potentially a great target for Grbl for the following reasons
- Faster - At least 4x the step rates over Grbl
- Lower Cost
- Small footprint
- More Flash and RAM - A larger planner buffer could be used and more features could be added.
- I/O - It has just about the same number of pins as an Arduino UNO, the original target for Grbl
- Peripherals - It has more timers and advanced features than an UNO. These can also be mapped to pins more flexibly.
- Connectivity - Bluetooth and WiFi built in.
- Fast Boot - Boots almost instantly and does not need to be formally shutdown (unlike Raspberry Pi or Beagle Bone)
- RTOS (Real Time operating System) - Custom features can be added without affecting the performance of the motion control system.
The code should be compiled using the latest Arduino IDE. Follow instructions here on how to setup ESP32 in the IDE. The choice was made to use the Arduino IDE over the ESP-IDF to make the code a little more accessible to novices trying to compile the code.
I use the ESP32 Dev Module version of the ESP32. I suggest starting with that if you don't have hardware yet.
For basic instructions on using Grbl use the gnea/grbl wiki. That is the Arduino version of Grbl, so keep that in mind regarding hardware setup.
How to Switch on & off the engine
How to generate Gcode from Inkscape
Rhino & Gcode Process
We recommend you to use a Gcode visualizer before sending the Files to the machine.
We have recompiled this minimalistic version LINK TO Gcode WebVisualizer
Special Thanks goes to :
- eduardo.chamorro@iaac.net
- oscar@fablabbcn.org
- josep@fablabbcn.org