5. E-textiles
The goal of this week is to explore how digital electronics could be integrated into clothing by using conductive materials which could be applied, sewn, embroidered, or otherwise incorporated into fabrics.
References & Inspiration
 |
 |
 |
| Stymphalian Birds by Audrey Briot | Musical Jacket by maggie Orth | A fabric thar remembers by laura Devendorf |
- Stymphalian Birds by Audrey Briot
- Musical Jacket by maggie Orth
- A fabric thar remembers by laura Devendorf
eTextile continuity tester
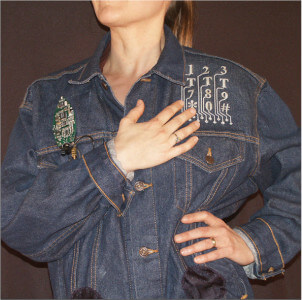
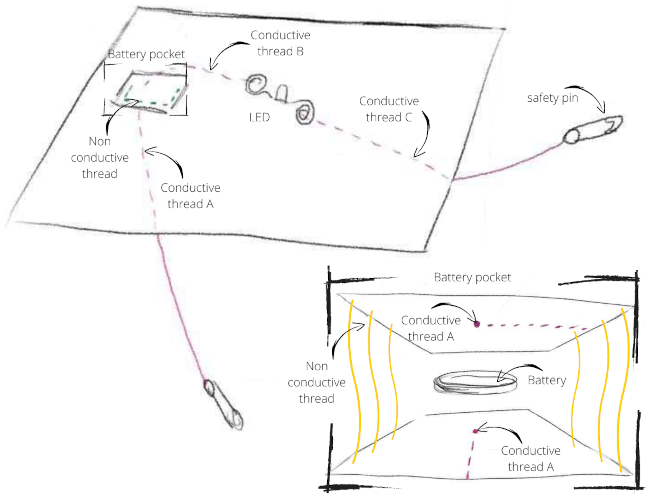
The eTextile continuity tester is a circuit whose LED lights up when the safety pins touch two connected points. It will test the conductivity of materials and our eTextile circuits.
Steps
* Conductive thread
* Non conductive thread
* Safety pins
* LED
* Fabric
* Needle
* Multimeter
The positive and negative traces of the circuit cannot overlap.
Led
LED: an electronic component that emits light when an electric current flows through it. It allows the electric current to pass only in one direction, from the anode (longest leg) to the cathode. To protect the LED, it is always necessary to associate, in series, a resistor that limits the current flowing through it.
To build it:
- Bend the legs of the led in spiral to sew it
- Connect the positive terminal of the battery to the anode of the LED
- Connect the cathode of the LED to a safety pin
- Connect the negative terminal of the battery to a safety pin
Outcome
The led on my continuity tester lights up when the circuit is closed (the safety pins meet) and I press on the battery bag. I tightened my battery bag so that it lights up only when the circuit is closed.
Sensors
Sensors are electronic components that measure some aspect of the physical world. Sensors can sense such things as light, temperature, touch, and movement. In combination with microcontrollers, sensors can measure the physical environment and display the information in various ways, including lights, colors, and sounds.
Digital sensors
* Conductive Thread
* 3V battery
* Alligator clips
* LED
* Non conductive thread
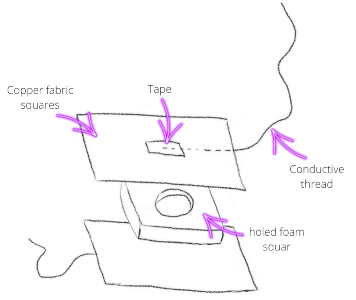
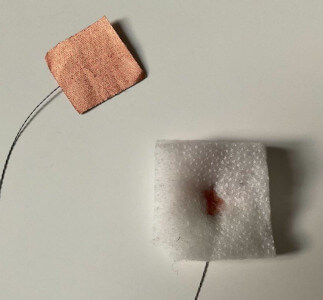
* 2 copper fabric squares as conductor
* 1 holed foam squar as insulator
* Needle
* Multimeter
* Scissor
* Alligator clips
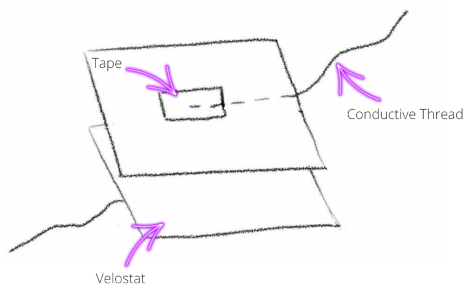
To make a switch button we make a sandwish with a perforated foam piece between 2 strip of copper fabric pieces. This switch button closes the circuit when it is pressed, and opens it when it is released.
 |
 |
Analog Sensors
* Conductive Thread
* 3V battery
* LED
* 2 “velostat” fabric squares as resistor
* Needle
* Multimeter
* Scissor
* Alligator clips
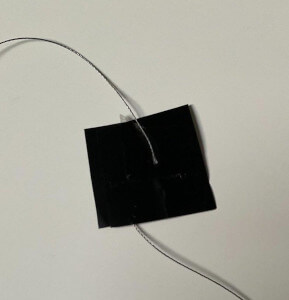
"Velostat": pressure sensitive conductive material. Applying pressure to this material reduces its resistance. The velostat can be used as a pressure sensor
The pressure sensor is connected in a simple circuit with a LED. The LED is an indicator of the pressure applied to the velostat, the harder I squeezed the brighter the LED got.
 |
 |
Arduino circuit
* Arduino Uno
* USB cable
Installation of the Arduino software
To install the Arduino software, I went to the official arduino.cc website and click on the Software / Downloads tab in the navigation bar.
-
Connecting the Arduino hardware to the computer.
-
Select the board: tools→board→Arduino AVR board→Arduino Uno
-
Select the port: tools→port→
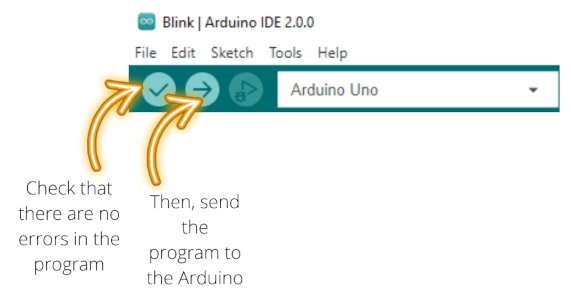
I first tested my Arduino board with the blink script example. I opened the Blink program by clicking on File→Examples→01.Basics→Blink.
Control a Led with a Digital Sensor
/* Emma Pareschi - Fabricademy 2022/2023
 */

int digital_sensor_pin = 8;     //change the pin, where the sensor is connected
int digital_sensor_value = 0;   //variable in which we save the sensor voltage
int led_pin = 3; //change the pin of the Led

void setup() {
  // put your setup code here, to run once:
  pinMode(digital_sensor_pin, INPUT_PULLUP);  //initialize the sensor pin
  pinMode(led_pin, OUTPUT);   //initialize led pin
  Serial.begin(9600);}

void loop() {
  digital_sensor_value = digitalRead(digital_sensor_pin); //read the Voltage at pin sensor

  //if the sw is pressed, then the led turns on
  //otherwise (else) (the sw in not pressed), then the led turns off

  //status 1 ==> 5V (switch is not pressed)
  //status 0 ==> 0V (switch is pressed)

  // check if the pushbutton is pressed.

        if(digital_sensor_value == LOW){    //If it is pressed

            digitalWrite(led_pin, LOW);     // turn the LED on
            Serial.println("the Led is on.");

        } else {                             //If it is NOT pressed

            digitalWrite(led_pin, HIGH);    // turn the LED off by setting the voltage zero

  }

}
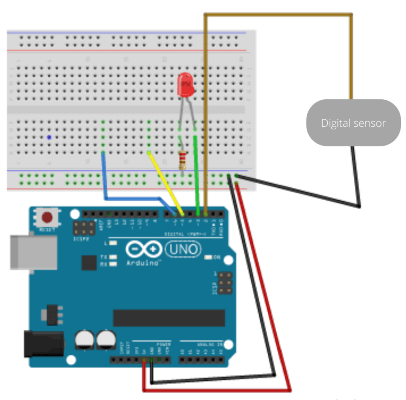 |
Control a Led with a Digital Sensor