8. Soft robotics
Research
Soft robotics draws directly from the remarkable efficiency of living organisms, which achieve complex behaviors through softness, flexibility, and seamless interaction with their environments. Many species demonstrate how adaptable and energy-efficient movement can emerge without rigid mechanisms: jellyfish propel themselves through gentle pulsation; octopuses manipulate objects with continuous, fluid deformation; corals optimize structure and flow through porous, branching geometries; sea stars and worms rely on hydraulic pressure to extend and contract their limbs. These biological systems show how form, material, and function coevolve to create solutions that are lightweight, responsive, and sustainable. By observing how organisms sense, move, and adapt to external forces, soft robotics seeks to translate nature’s strategies into engineered systems capable of resilient motion, distributed actuation, and harmonious interaction with their surroundings. This research draws from these natural strategies to inform the development of soft, efficient, and environmentally responsive mechanisms.
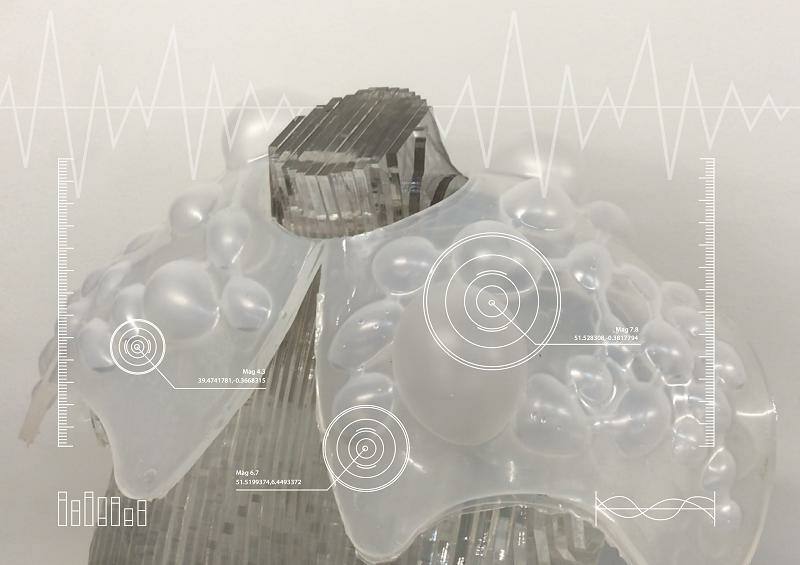
Seismic Garment, Adriana Cabrera, Moon Ribas fuorisalone.it
Biomimicry & Biometics
 biomimicry nature inspired design, montage by Carlotta Premazzi
Image References
- The Mimosa pudica, also known as the “sensitive plant,” is famous for its ability to respond rapidly to touch, vibrations, or changes in light by folding its leaves and bending its stems. This movement, called seismonastic movement, occurs through changes in water pressure within specialized cells at the base of the leaves, called pulvini. In this way, the plant can protect itself from potential threats, demonstrating a natural system of fast, reversible movement without muscles or rigid structures. Mimosa Pudica https://seedtherapy.com
-
Dynamic Facade inspired from Touch-me-not leafyoutube.com
-
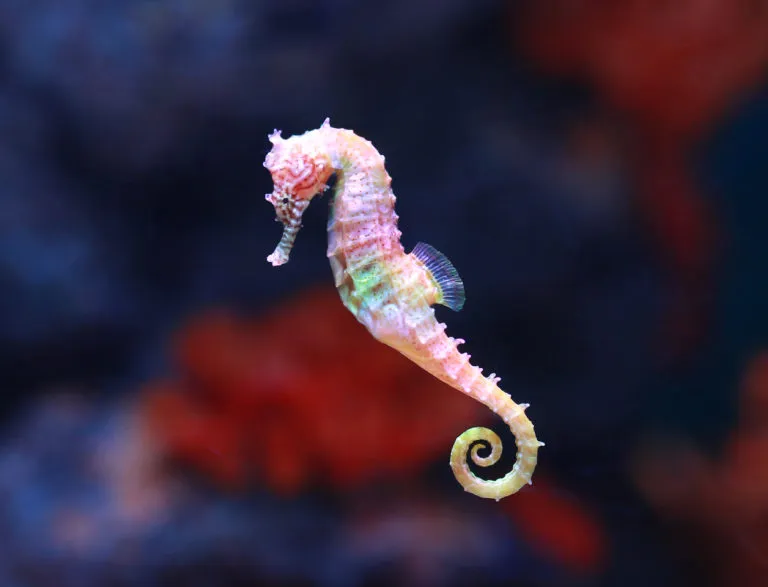
Seahorses use their prehensile tails to anchor themselves to seagrass, coral, or other structures, preventing them from being swept away by currents. zooplus.it
-
Fibonacci Solar Biomimicry – Golden Mean Calipers goldenmeancalipers.com
-
The Sea Iridescent Jellyfish inspires biomimetic design through its soft pulsating movement and naturally iridescent, flexible body, ideal for creating fluid light and motion effects. static.scientificamerican.com
-
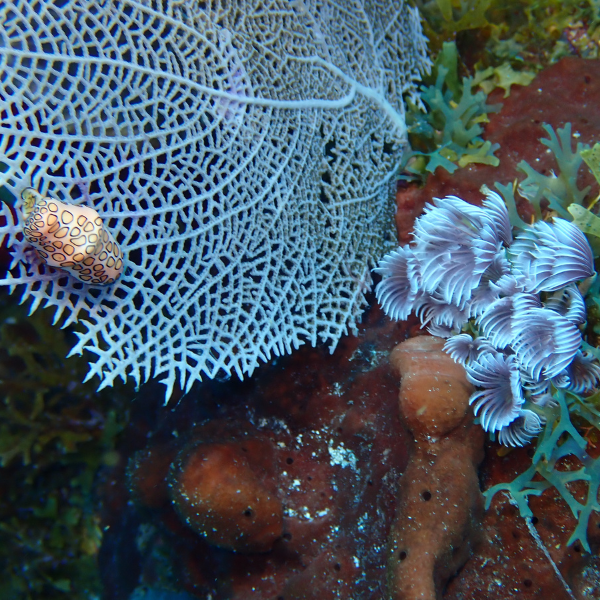
Corals inspire biomimetic design through their branching, porous structures that optimize fluid flow, light distribution, and structural strength with minimal material. cdn.biomimicry.net
Biomimicry is the practice of learning from nature to solve human challenges. It studies how living organisms move, adapt, resist, and use energy efficiently, then applies these strategies to engineering, robotics, and design.
By observing natural forms and behaviors, designers connect structure to function, understanding how shapes and materials influence performance. These insights are then translated into innovative and sustainable solutions.
Examples: * Velcro, inspired by burdock seeds. * Soft robots, mimicking the flexibility of octopus arms. * Architectural structures inspired by efficient nests or hollow bones.
inventive principles in nature translated into engineering solutions sense think act

- Overview of the biological actuation and sensing motifs in nature
- Overview of actuation structural/functional motifs (left) and prototypes (right) in the plant system
- Soft actuators inspired by plant actuation systems
Biology and bioinspiration of soft robotics: Actuation, sensing, and system integration Ren, Luquan et al., iScience, Volume 24, Issue 9, 103075
- Pneumatic Soft Robot

- The soft actuator inspired by the elephant trunk
- Soft robot base and tip and two pneumatic chambers.
- The effects of gravity on bending displacement and stress.
- Soft robot actuation for selected loading cases
Ambaye, G.; Boldsaikhan, E.; Krishnan, K. Soft Robot Workspace Estimation via Finite Element Analysis and Machine Learning. Actuators 2025, 14, 110

-
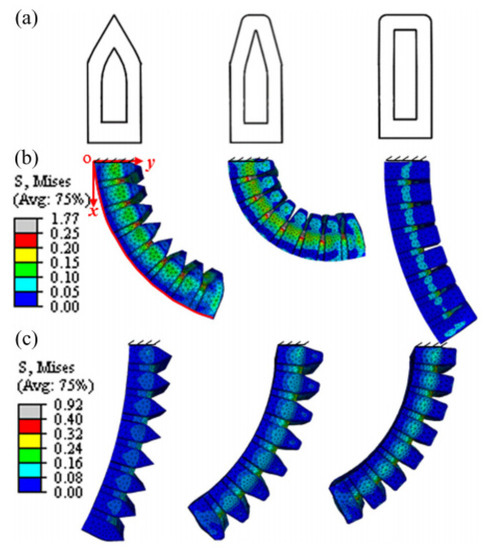
FEA model of a soft robotic actuator compared to experiment. (a) Schematic of the chamber shape, (b) The maximum bending angles of the three actuators when deflated, (c) The FEA results of the three actuators at pressurization state (20 kPa).Open Access

Five-dimensional design space for digital fabrication of custom aeroMorph composites.
The width/height aspect ratio of the diamond hinge (a) determines the bending angle at full inflation (b).
Ou, J., Skouras, M., Vlavianos, N., Heibeck, F., Cheng, C., Peters, J., & Ishii, H. (2016). aeroMorph - Heat-sealing Inflatable Shape-change Materials for Interaction Design.(https://cdfg.mit.edu/assets/files/aero-morph.pdf)

Seyidoğlu, B., Parvaresh, A., Taherkhani, B., & Rafsanjani, A. (2025). Advanced Robotics Research, Article e202500044
References & Inspiration

Soft Robotics Inspiration Moodboard by Carlotta Premazzi
- Anouk Wipprecht
- Soft Robot Flower instructables.com
- trash binECAL - MIT Soft Machinesvimeo.com
- Octobot zmescience.com
- Seismic Garment, Adriana Cabrera, Moon Ribas acart.design/senseofnature
- Furl: The EEG-Responsive, Soft Robotics
- Final Fabriacademy Project Montserrat Ciges class.textile-academy.org
-
Anouk Wipprecht: Clothing as emotional interface, TED Residency youtube.com
-
Spirobs Shape-Shifting Robot Moves Like an Octopus youtube.com
Reference and Inspiration
-
materials comparison - Julija Karas - FabLab Bcn
-
Artistic intervention - Riley Cox - TextileLab Amsterdam
Process and workflow
Inflatable Thermo-Vinyl Origami
 Inflatable Thermo Vinyl Origami Mimosa Pudica and Flower Vector by Carlotta Premazzi

"Quick and dirty" handmade AeroMorphOrigami by Carlotta Premazzi
Tutorial – Inflatable Origami Chambers with Vinyl Paper
✅ Goal: Create origami-style inflatable structures inspired by Aero-Morph, using vinyl paper, parchment paper, and a household iron. The parchment paper is used to define the chambers and protect the vinyl during sealing.
📦 Materials Needed:
- Sheets of thermo-vinyl or lightweight vinyl paper
- Parchment paper (to create and protect chamber walls)
- Household iron (low to medium-low heat, no steam)
- Scissors
- Ruler and pencil
- Optional: tubes or valves for inflation
🔧 Step-by-Step Procedure:
1. Design Your Origami Pattern:
- Draw the fold and chamber layout on the vinyl sheets.
- Identify where chambers will be created for inflation.
- Prepare the Iron:
- Set to low/medium-low heat, no steam.
-
Ensure it is clean to avoid marking the vinyl.
-
Layer Vinyl and Parchment:
- Place two layers of vinyl together where you want a sealed chamber.
-
Insert parchment paper between them to define the chamber walls and prevent the iron from touching the vinyl directly.
-
Seal the Chambers:
- Slowly pass the iron over the parchment-covered area.
- Move evenly to avoid burning or deforming the vinyl.
-
Check frequently that the layers fuse correctly to form airtight chambers.
-
Cut and Fold Origami Structure:
- Trim excess vinyl carefully.
- Fold along your origami pattern, using sealed chambers as structural elements.
-
Attach valves or tubes for inflating if needed.
-
Test Inflation:
- Blow gently or use a pump.
- Check for leaks and reseal with parchment and iron if necessary.
Results
Pneumatic 3D Soft Robotics
The mold was custom-designed starting from the internal air chamber geometry by Carlos Roque at Biolab Lisbon.
The pneumatic behavior of the soft robot was defined at the digital modelling stage, not during fabrication.
tools
Software - Rhino — 3D solid modeling of air chambers and actuator body - Grasshopper — parametric control and design variations (optional) - Fusion 360 — boolean operations, mold splitting, and STL export Hardware -FDM 3D Printer — fabrication of the mold parts - Air pump / syringe — pneumatic testing and actuation Materials - PLA or PETG filament — 3D printing material for the mold - Silicone (Ecoflex Shore 00-30/ similar) — casting material for the soft actuator.
Mold Design Workflow
- Air Chamber Design (Functional Geometry)
The design process begins with the internal pneumatic chambers, which determine how the soft robot inflates, bends, or expands.
Design parameters include: - Chamber shape (linear / curved / segmented) - Wall thickness - Distance between chambers - Air inlet position - Symmetry or directional bias (to control bending)
These parameters directly affect: - Direction of movement - Inflation speed - Structural resistance
- 3D Modelling Software
The geometry was modeled using parametric and solid modeling tools, allowing precise control over dimensions and tolerances.
Typical tools used in this workflow: - Rhino (solid modeling of chambers) - Grasshopper (optional, for parametric variations) - Fusion 360 (boolean operations and mold logic)
- Mold Construction (Negative Geometry)
Once the air chambers were finalized, the mold was generated as a negative volume.
Steps:
1. Create the positive air chamber model
2. Subtract it from a solid block (boolean difference)
3. Split the mold into two or more parts
4. Add:
- Alignment keys
- Pouring channels
- Air inlet pin channel
This ensures: - Correct sealing - Easy demolding - Precise internal cavities
- Mold Optimization for Fabrication
Before fabrication, the mold design is adjusted to suit the chosen manufacturing process.
Considerations: - Minimum wall thickness for silicone casting - Draft angles for demolding - Avoiding trapped air bubbles
- Fabrication Output
The finalized mold is then: - 3D printed (PLA or PETG) - Assembled - Used for silicone casting to produce the pneumatic actuator
The geometry of the mold directly defines the movement behavior of the soft robot.
Why This Matters (Conceptually)
In soft robotics, form = behavior.
Unlike rigid robotics, movement is not programmed afterward — it is embedded in geometry.
This workflow shows that: - The design is intentional and computational - Pneumatic motion is pre-designed, not accidental - Fabrication is the last step of a longer design logic
3D Printing — Slicing Settings
| Setting | Value | What it means | Why it matters for the mold |
|---|---|---|---|
| Layer height | 0.2 mm | Thickness of each printed layer | Gives smoother surfaces for silicone casting |
| Wall / Perimeters | 3 perimeters (~1.2 mm) | Thickness of the mold walls | Makes the mold rigid and leak-proof |
| Top / Bottom layers | 5–6 layers (≥ 1 mm) | Solid top and bottom thickness | Prevents silicone leakage |
| Infill | 20–30% (Gyroid / Grid) | Internal density of the print | Provides strength without wasting material |
| Print orientation | Flat on split plane | How the mold is placed on the print bed | Improves sealing and avoids supports |
| Supports | None | No support structures used | Keeps mold surfaces clean and precise |
| Print speed | 40–50 mm/s | Speed of the printing process | Improves dimensional accuracy |
| Nozzle temperature | PLA: 200–210 °C / PETG: 230–240 °C | Extrusion temperature | Ensures good layer adhesion |
| Bed temperature | PLA: 60 °C / PETG: 70–80 °C | Heated bed temperature | Improves bed adhesion and print stability |
Tutorial – 3D Printed Mold for Silicone Soft Robot (Pneumatic Chambers)
🧠 Step 1 — Design the Chamber System
- Choose your motion type: bending, twisting, elongation, or multi-directional.
- Use CAD software (e.g., Fusion360, Rhino, FreeCAD) to model a mold with internal cavities for the air channels.
- Include air inlet ports — small cylindrical holes for connecting silicone tubing later.
- Export as STL and prepare for 3D printing.
💡 Tip: You can find examples in the “AeroMorph” project by MIT Media Lab, which uses origami-inspired folding patterns to define chamber behavior.
🖨️ Step 2 — 3D Print the Mold
- Print using PLA or ABS filament at 0.2 mm layer height.
- Use 100% infill for strong walls.
- You’ll need two mold parts (top and bottom) or a single mold with open cavities.
- Once printed, clean the inside and apply a thin layer of mold release agent (e.g., Vaseline or silicone spray).
🧴 Step 3 — Prepare the Silicone Mixture
- Use a soft silicone rubber like:
- EcoFlex 00-30 / 00-50 (Smooth-On)
- Dragon Skin 10 (for higher durability)
- Mix Part A and Part B in a 1:1 ratio.
- Stir slowly to avoid bubbles.
- (Optional) Add pigment for visual differentiation or aesthetic effect.
- Degas the mixture in a vacuum chamber if available.
Step 4 — Casting Process
- Pour the silicone slowly into the 3D-printed mold.
- Tap the mold gently to remove trapped air bubbles.
- Cover with the top mold (if two-part) and fix with rubber bands or screws.
- Let cure for 4–6 hours at room temperature or 30 minutes at 60°C in an oven.
🔗 Step 5 — Demolding and Sealing
- Carefully remove the cured silicone part from the mold.
- Close open surfaces with a thin silicone membrane:
- Pour a small layer of silicone on a flat surface (using baking paper).
- Once semi-cured, press the actuator onto it to seal.
- Cure again for 1–2 hours.
- Connect silicone tubing to the air inlet using a syringe or pneumatic pump.
💨 Step 6 — Testing the Soft Robot
- Inflate the chambers with air using:
- A manual syringe,
- A micro air pump, or
- A compressed air line with pressure regulator.
- Observe motion — chambers expand asymmetrically, causing bending or curling.
- Tune wall thickness, chamber geometry, and material softness for desired performance.
| Category | Items |
|---|---|
| Printing | 3D Printer (PLA/ABS), STL mold file |
| Casting | EcoFlex / DragonSkin silicone, pigments, vacuum chamber (optional) |
| Assembly | Silicone tubing Ø3–5 mm, syringe or air pump, scissors, mold release |
| Finishing | Baking paper, spatula, gloves, oven (optional) |
One-direction movement

3D Soft Robotics montage by Carlotta Premazzi
Two-direction movement
 Pneumatic muscle with two-direction movement by Carlotta Premazzi
Experiment failed due to unsealed silicone, but I want go further creating a more complex form.
Pneumatic muscle with two-direction movement by Carlotta Premazzi
Experiment failed due to unsealed silicone, but I want go further creating a more complex form.
Star Pneumatic muscle
Tutorial –Star Pneumatic Muscle — Design Process
Goal Create a radial pneumatic actuator with symmetric expansion inspired by jellyfish / flower blooming.
Software Rhino · Fusion 360
Steps
-
Define geometry Draw a radial star layout to define the overall shape and number of arms.
-
Design air chambers Model one pneumatic chamber per arm, ensuring uniform wall thickness for even inflation.
-
Add air inlet Place a central air inlet to distribute pressure to all chambers simultaneously.
-
Create positive actuator model Combine chambers and outer body into a single solid representing the final silicone part.
-
Generate mold Subtract the actuator from a solid block using boolean difference to create the negative mold.
-
Split mold Divide the mold into multiple parts to allow demolding.
-
Fabrication test Cast silicone and test inflation.
 Star Pneumatic muscle for jellyfish/flower and his reference by Carlotta Premazzi
Yirmibesoglu, Osman & Oshiro, Tyler & Olson, Gina & Palmer, Camille & Mengüç, Yigit. (2019). Evaluation of 3D Printed Soft Robots in Radiation Environments and Comparison With Molded Counterparts. Frontiers in Robotics and AI. 6. 10.3389/frobt.2019.00040
Star Pneumatic muscle for jellyfish/flower and his reference by Carlotta Premazzi
Yirmibesoglu, Osman & Oshiro, Tyler & Olson, Gina & Palmer, Camille & Mengüç, Yigit. (2019). Evaluation of 3D Printed Soft Robots in Radiation Environments and Comparison With Molded Counterparts. Frontiers in Robotics and AI. 6. 10.3389/frobt.2019.00040
 Star Pneumatic muscle Airflow pressure diagram Illustration by Carlotta Premazzi
 Star Pneumatic muscle and microcontrolled Air Pump at Biolab Lisbon
Results
Movement Behavior Based on Shape
| Shape / Chamber Type | Movement Behavior | Notes / Tips |
|---|---|---|
| Straight chambers | ↔️ Linear expansion | Produces pushing or extending motion |
| 🌀 Curved chambers | 🔄 Bending / curling | Use for actuators that need to curl or wrap |
| 🔺 Asymmetric chambers | 🔀 Twisting / rotation | Creates complex 3D motion |
| Multi-chamber designs | 🔄↔️ Combination of bending, twisting, extension | Allows versatile and programmable movements |
| ⚖️ Varying wall thickness | ✨ Changes flexibility and speed | Thinner walls → more flexible, faster response |
| 📏 Chamber spacing variation | 🐢 Modifies deformation patterns | Wider spacing → more subtle, slower bending |
Motor Control System with Arduino Uno and Keyestudio KS0063 Driver
 12 Volt Air Pump Controlled by Arduino Uno by Carlotta Premazzi
🛠️ Motor Control System with Arduino Uno and Keyestudio KS0063 Driver
✅ Goal: Compact control system to operate a DC air pump/vacuum motor using an Arduino Uno and KS0063 motor driver shield, with user interaction via push button and trimmer to adjust speed.
📦 System Overview: Arduino Uno as central controller, KS0063 shield for high-current motor drive, trimmer for speed control, push button for on/off, with additional effects like speed fading and smooth transitions. All components mounted on a lightweight wooden/cardboard base.
🔧 Main Components: Arduino Uno, breadboard, DC power supply, push button, potentiometer (trimmer), jumper wires, KS0063 shield, DC air pump/vacuum motor, power wires, wooden/cardboard mounting board, soldering iron & solder.
⚡ Electrical Integration: Trimmer to A0 for variable speed, push button to digital pin 7, 10 kΩ pull-down resistor. Motor connected to M1 output, shield amplifies power from external DC supply, all grounds tied together.
📝 Assembly Notes: Motor leads soldered for durability, jumper wires organized, mounting base keeps components accessible for testing, modification, and demonstration.
Code Example
CODE – Motor Control with Arduino Uno & KS0063 Shield
/*
  💡 Motor Control with Arduino Uno & KS0063 Shield
  09-11-2025 by Carlotta Premazzi, Fabricademy
  file: sketch_motorcontrol_KS0063.ino

  🔧 Description:
  This sketch controls a DC air pump/vacuum motor using an Arduino Uno
  and Keyestudio KS0063 motor driver shield. Motor speed is adjustable
  via a potentiometer (trimmer) and toggled on/off with a push button.

  🧠 How it works:
  - Potentiometer provides analog voltage for speed control.
  - Push button toggles motor state between ON and OFF.
  - KS0063 shield amplifies the Arduino output to drive the motor safely.

  🧩 Required components:
  - Arduino Uno
  - Keyestudio KS0063 Motor Driver Shield
  - DC air pump/vacuum motor
  - Potentiometer (trimmer)
  - Push button
  - Jumper wires, breadboard, soldering materials

  💡 Notes:
  - Button uses pull-down resistor for stable readings.
  - PWM output from Arduino controls motor speed smoothly.
  - All grounds tied together to maintain stable reference voltage.

  🔗 Inspired by:
  KS0063 datasheet & Arduino tutorials for DC motor control

*/

// Pin definitions
const int motorPin = 3;    // PWM output to motor via KS0063
const int buttonPin = 7;   // Push button input
const int potPin = A0;     // Potentiometer analog input

// Variables
int buttonState = 0;
int lastButtonState = 0;
bool motorOn = false;
int speedValue = 0;

void setup() {
  pinMode(motorPin, OUTPUT);
  pinMode(buttonPin, INPUT);
  Serial.begin(9600);
}

void loop() {
  // Read potentiometer
  speedValue = analogRead(potPin) / 4; // Map 0-1023 to 0-255

  // Read button with simple toggle
  buttonState = digitalRead(buttonPin);
  if (buttonState == HIGH && lastButtonState == LOW) {
    motorOn = !motorOn; // Toggle motor state
  }
  lastButtonState = buttonState;

  // Apply motor speed
  if (motorOn) {
    analogWrite(motorPin, speedValue);
  } else {
    analogWrite(motorPin, 0);
  }

  // Debug output
  Serial.print("Motor state: ");
  Serial.print(motorOn ? "ON" : "OFF");
  Serial.print(" | Speed: ");
  Serial.println(speedValue);

  delay(50);
}
3D Models
Fabrication files
- Download Inflatable Thermo-Vinyl Flower Origami EPS
- Download Inflatable Thermo-Vinyl Mimosa Pudica Origami EPS
- Download Star Mold
Lecture on Tuesday, November 4th, 2025, Global Instructors: Lily Chambers & Adriana Cabrera, Local Instructors: Guilherme Martins, Carlos Roque
- **Workshops, November 5th, 2025
- Local Workshop: Research Bio-inspirations
-
Global Tutorial: Talk with Falk J. Tauber
-
**Workshops, November 6th, 2025
- Local Workshop: Pumps and Arduino, Silicones and moulds
🔗 References & Tutorials
Tutorials, DIY & Making - Molding and Casting Guide - Making Origami Soft Robots from Low Cost Household Materials - Making Inflatables with Thermo Transfer Vinyl - Therms-Up!: DIY Inflatables and Interactive Materials - How to Make Magnetic Soft Materials for Interactive Devices - Instructables – Soft Robotics - Soft Robots 3D Printing Artificial Muscles
Educational Courses & Classes - Fab Academy – Marion Guillaud Week09 - Fab Academy – Stephanie Urbano Week06 - Fab Academy – Loes Bogers Week12 - Fab Academy – Elsa Gil Soft Robotics - Fab Academy – Irene Caretti Week11 Useful Links
Soft Robotics Research & Labs - Zhao Lab – Stanford Soft Robotics - EPFL GCM Lab - Soft Robotics Toolkit – Low-Cost EP Circuit - Soft Robotics Projects – jfras.github.io - Soft Robotics Resources – GitHub - Manufacturing of Soft Robotics – Adrianacabrera - Introduction to Soft Robotics – Adrianacabrera
Soft Robotics Companies & Tools - Air Giants - Soft Robotics Inc. – CHI 22 - SoftModBot - MotorSkins
Arduino & Electronics Tutorials - Arduino DC Motor Control Tutorial – L298N PWM H-Bridge - How to use the Fluidic Control Board?
Simulation & Computational Design - Simulation of Soft Robots & Inflation – YouTube - Simulation of Inflatable Soft Robotics – YouTube - Grasshopper3D Forum – Simulating Soft Robotics - McNeel Discourse – Soft Robots - Computational Design – AeroMorph
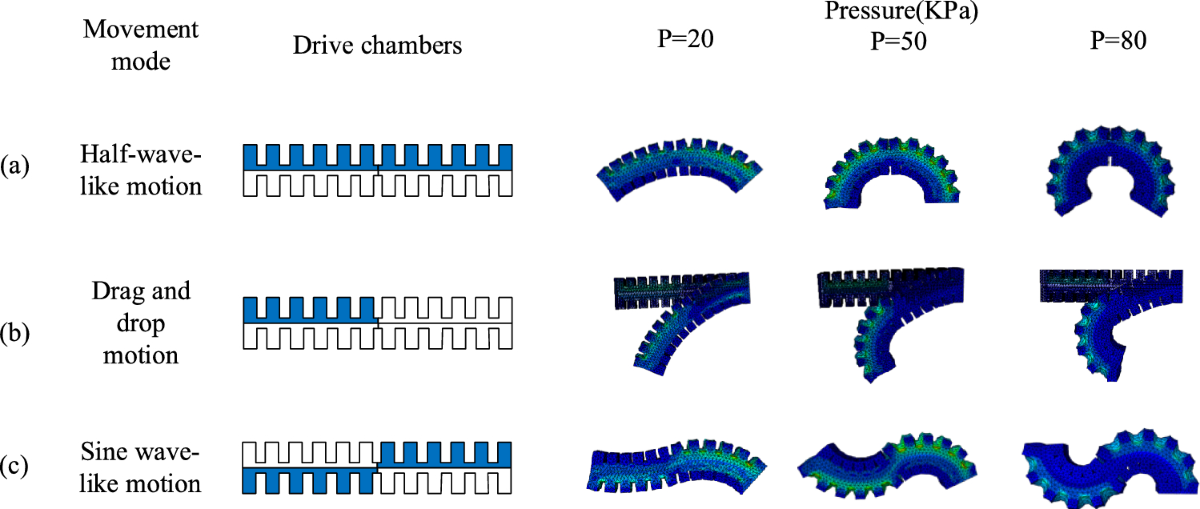
Inflatables & Origami Soft Robotics - AeroMorph PDF – MIT - 3D Printed Inflatable Flowers - Origami-Inspired Artificial Muscles – YouTube - Fluid-driven Origami-Inspired Artificial Muscles – PNAS - Active Textile Made of Thin McKibben Muscles – YouTube - Aeromorph Inflatables – YouTube - Curved Origami with Tunable Stiffness – YouTube - Inflatable Kirigami Actuators Image - Seyidoğlu, B., Parvaresh, A., Taherkhani, B., & Rafsanjani, A. (2025). Inflatable Kirigami Crawlers. Advanced Robotics Research, Article e202500044. DOI
Pneumatic & Soft Actuators - Pneumatic Soft Robot Image - Soft Actuator Inspired by Elephant Trunk - Pneu-Net Soft Actuators 3D Deformations - 3D Printed Soft Robots – Hexapus & Pneu-net Actuator - FEA Model of Soft Robotic Actuator - Soft Robot Flower - PneuBots – Modular Inflatables YouTube
Biomimetics & Biological Inspiration - Overview of Biological Actuation Motifs - Overview of Plant Structural/Functional Motifs - Soft Actuators Inspired by Plant Systems - Ren, Luquan et al., Biology and Bioinspiration of Soft Robotics: Actuation, Sensing, and System Integration, iScience, 24(9), 103075. Full Text - Mimosa pudica – Seismonastic Movement YouTube - Fibonacci Solar Biomimicry – Sunflower - Sea Iridescent Jellyfish Inspiration - Seahorses – Prehensile Tail - Corals – Biomimetic Structures
Student checklist
- [ ] Document the concept, sketches, references (also to artistic and scientific articles)
- [ ] Make a soft robotic sample, develop the pattern for the Inflatable and draw a sketch of the air flow:
- build a pneumatic wrist brace (basic level) or
- build a Soft Gripper (intermediate level) or
- build and document a Pneumatic, digitally controlled system, electronics schematic, electronic control and code (advanced level) design your own version of an inflatable / soft robot
- [ ] Experiment with different materials, such as silicone, 3d printing, parchment paper, thermoadesive vynil, TPU fabrics, bioplastic, document your achievements and unexpected outcomes
- [ ] Make a small video of your inflatable/soft robot working
- [ ] Upload your digital design files (if any)
- [ ] Build the electronic circuit to control your inflatable/soft robot (extra credit)