Deliverables
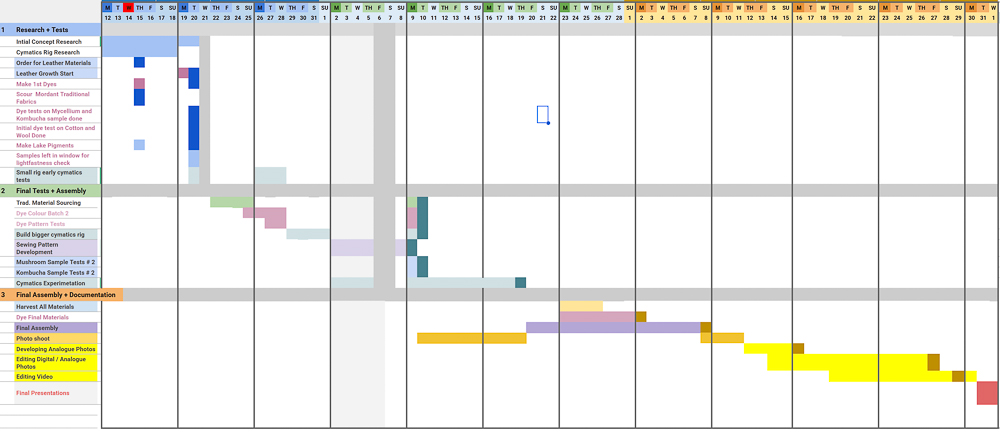
GANTT
Below is a rough gant chart of the timeline for my project.
DETAILED SCHEDULE
These are the goals I hope to have done by next Tuesday Jan 20th end of day:
Thursday Jan 15
Morning:
-
scour cotton with soda ash
-
Extract dyes from japanese knot weed, avacados, cabbage
After Lunch:
- Alum treat cotton
Time dependant:
- shopping for wool / cotton options
By 2:30pm
-
Start making lake pigments
-
Add dye modifiers to dyes
-
package and clean up
Tuesday Jan 20:
-
Dye tests with existing mushroom and kombucha waste samples
-
Dye tests with treated cotton
-
Set up mycelium growth / and or kombucha growth if possible
-
collect lakes and dyes for trip to Ontario
-
Leave cotton test swatches in window over Quebec break to test colour fastness
BoM
Below is a working list of materials I have / will need to purchase listed in $ CAD
| Qty | Description | Price | Source | Notes |
|---|---|---|---|---|
| 1 | Wool / Silk | 130.00 $ | Local Supplier | Natural Dyes |
| 1 | Kombucha Starter | 20.00 $ | Mycoboutique (Local Supplier) | Leather |
| 1 | Alum | 26.00 $ | Amazon | 1LB Mordant |
| 1 | Sodium Carbonate | 9.00 $ | Canadian Tire | For Scouring |
| 1 | Glycerin | 8.00 $ | Amazon | For Kombucha Leather coating |
| 1 | Citric Acid | 12.00 $ | Amazon | Modifer |
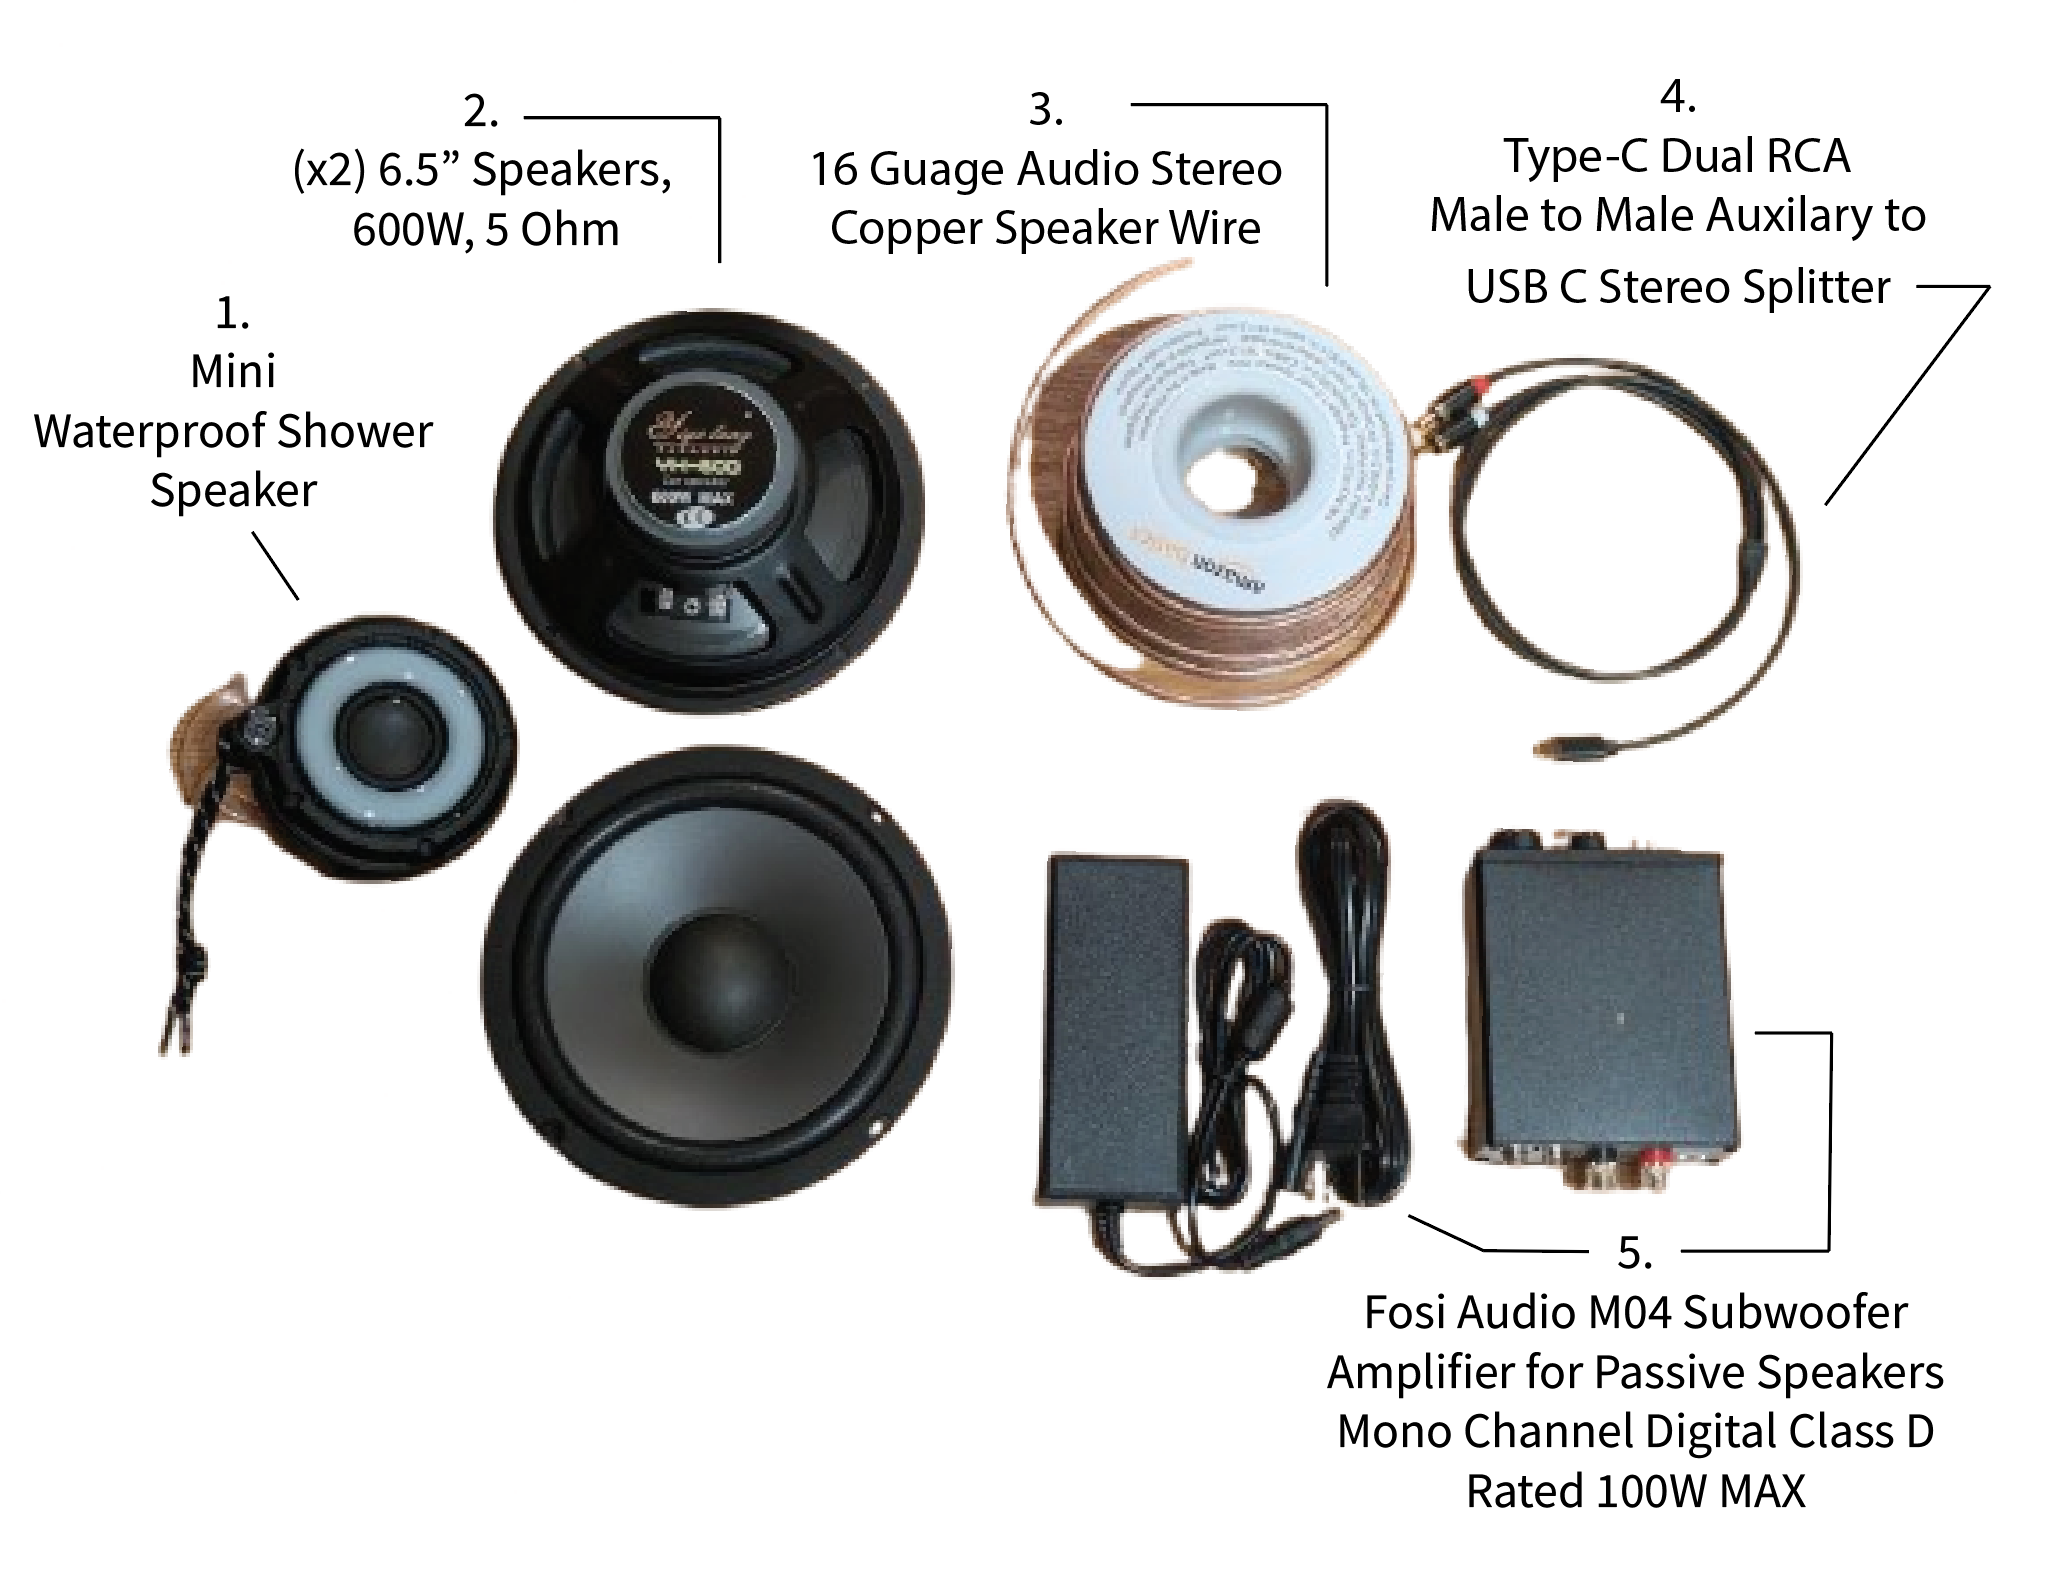
| 1 | Small Waterproof Speaker | 30 $ | Amazon | |
| 1 | Large Speaker | 50.00 for pair $ | Amazon | |
| 1 | Aluminum plate | 1 $ | Dollar Store | |
| 1 | Surface transducer | 28-50 $ | Local Supplier | |
| 1 | Wood Base | free | - | at lab |
| 1 | Amplifier | 89.99 $ | aMAZON | |
| 1 | Large tray to catch salt and water | free | at lab | |
| 1 | Indigo Powder | 18.95 $ | Julie Sinden For the Love of Colour | 50g |
| 1 | Sumi - Ink | 5.00 $ | Kama Pigments | 180ml |
Below is a list of materials I already have:
| Qty | Description | Price | Link | Notes |
|---|---|---|---|---|
| - | Avacado Dye Materials | - | Grocery Store | Food Waste |
| - | Japanese Knotweed | - | Home | Invasive Plant |
| - | Muslin Fabric | - | Home Stock / Amazon | Test Fabric |
| - | Coffee Filters | - | Home | For Lakes |
Machines Needed
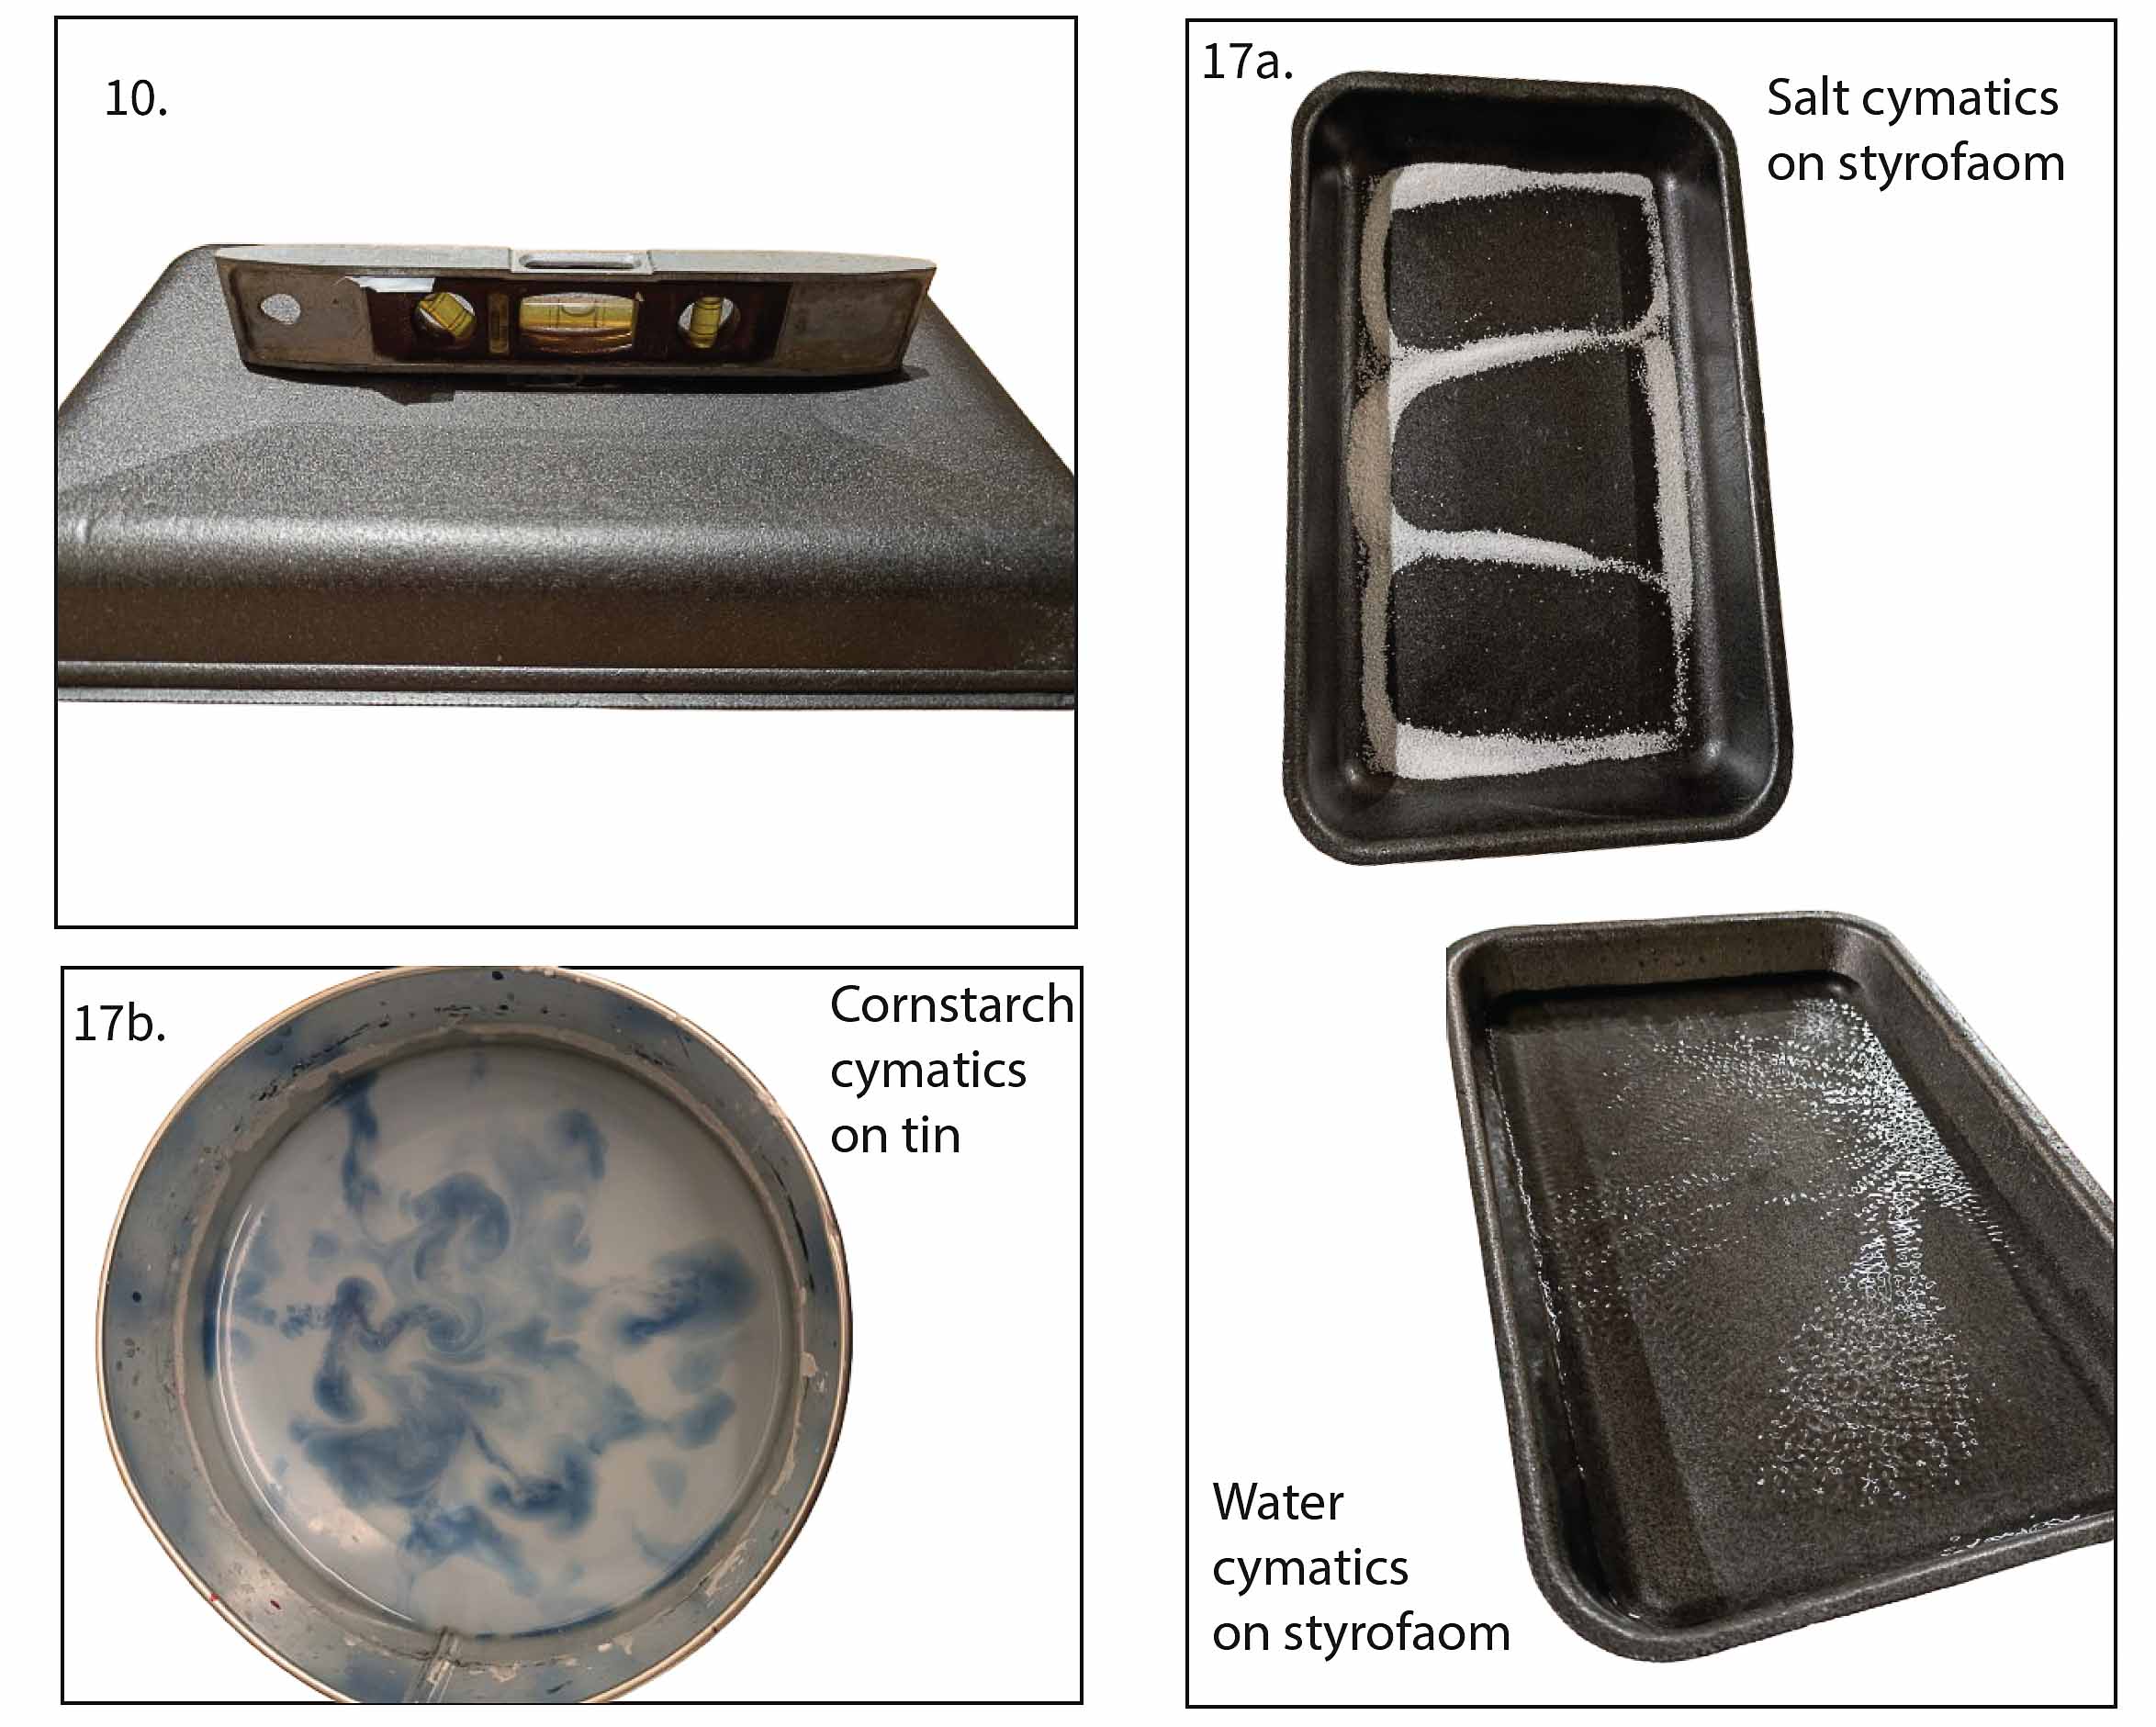
I will be making my own cymatics rig. There is a very simple version I have seen done with a speaker, a bottle cap to block water from entering the cone, and a petri dish. I may try this for early experiments if it seems worthwhile. See it below:
📱 YouTube Shorts — Cymatics Experiment
Below is one tutorial on making an even bigger cymatics tray. I may opt for an aluminum tray as I have seen in other tutorials. However I'm going to consider 3d printing this one.
Visualize Sound Using Water (Cymatics)
I may also follow this process which doesn't involve 3d printing at all:
Exploring Cymatics - DIY First Attempt
Support Needed
Because I have never worked with cymatics, I'd love tips on building the rig, and someone to ask electrical questions to should they arise. Any guidance on the best methods of generating the cymatics would also be helpful.
I'd also love to know any tips for the optimal kombucha and mycellium leather processes as this will be new to me too.
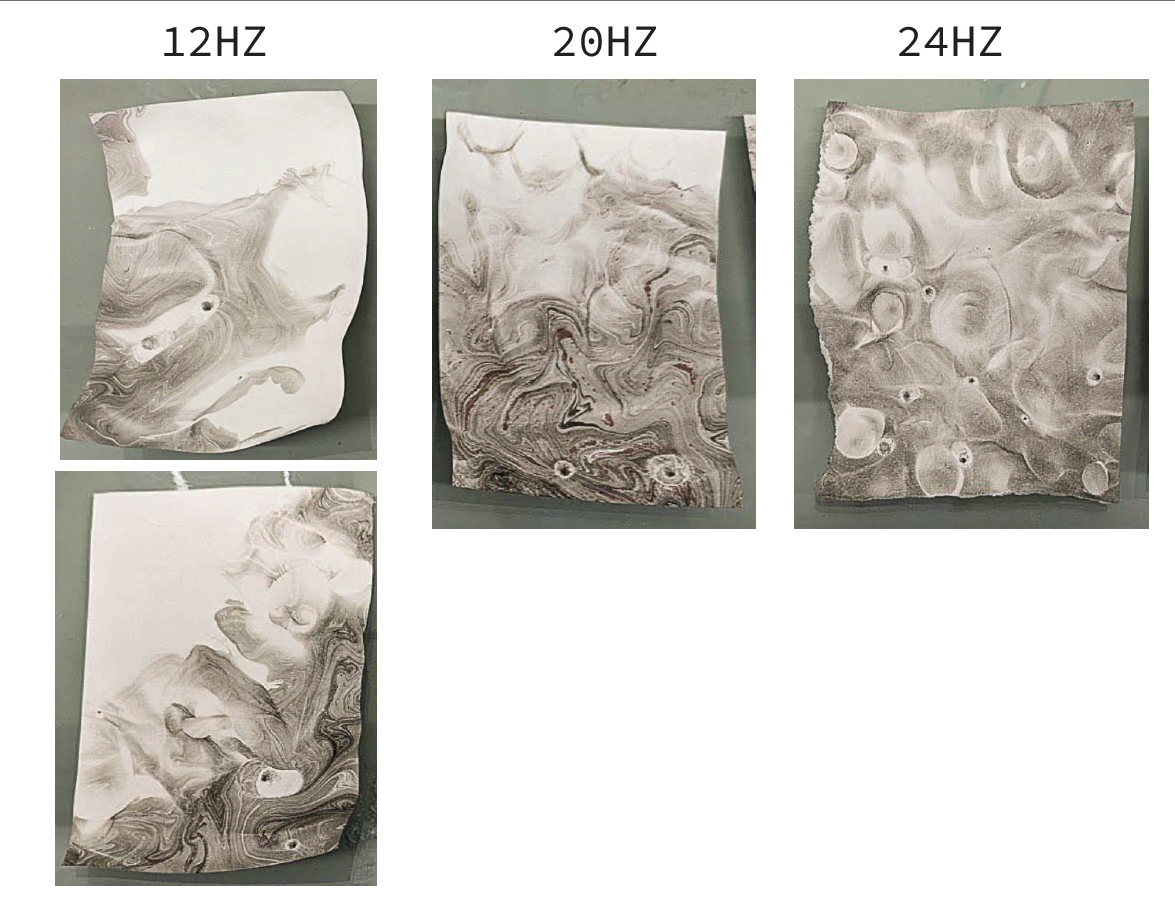
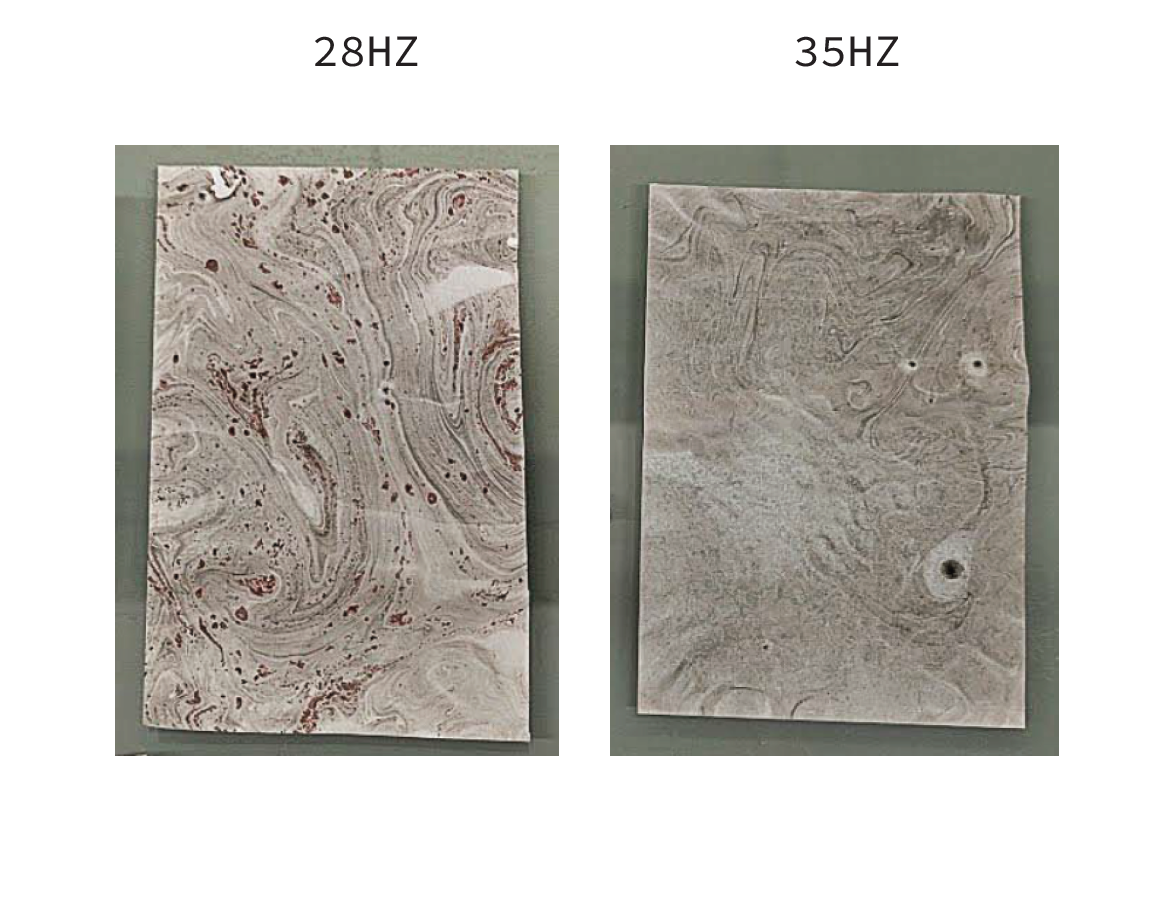
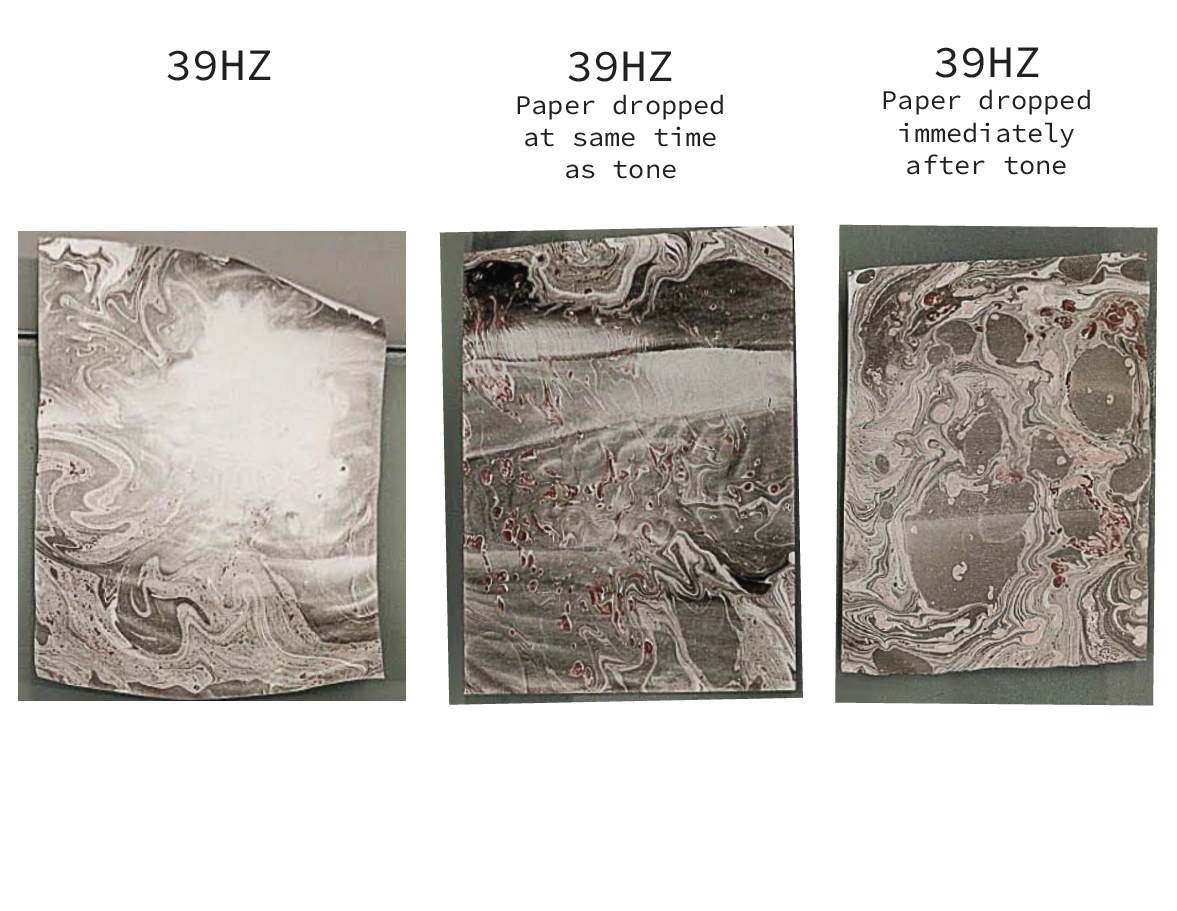
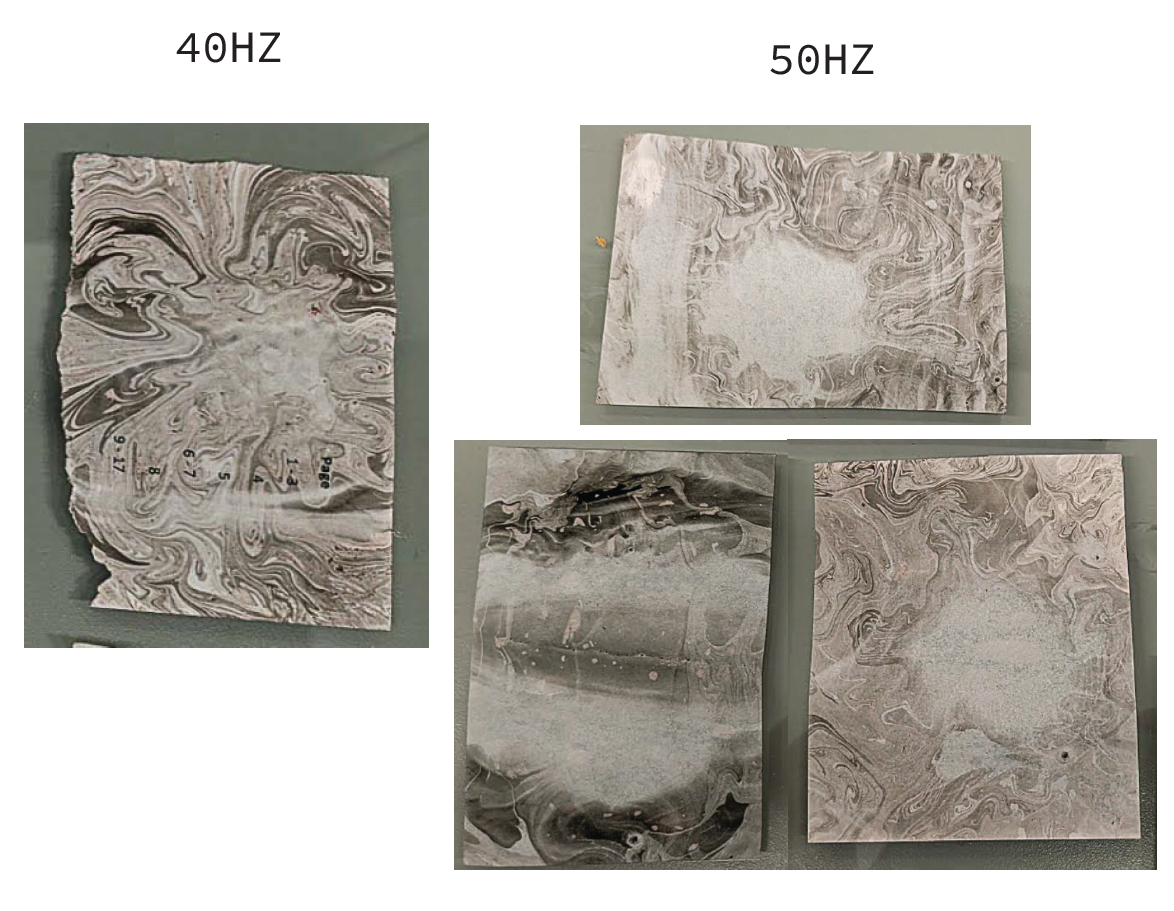
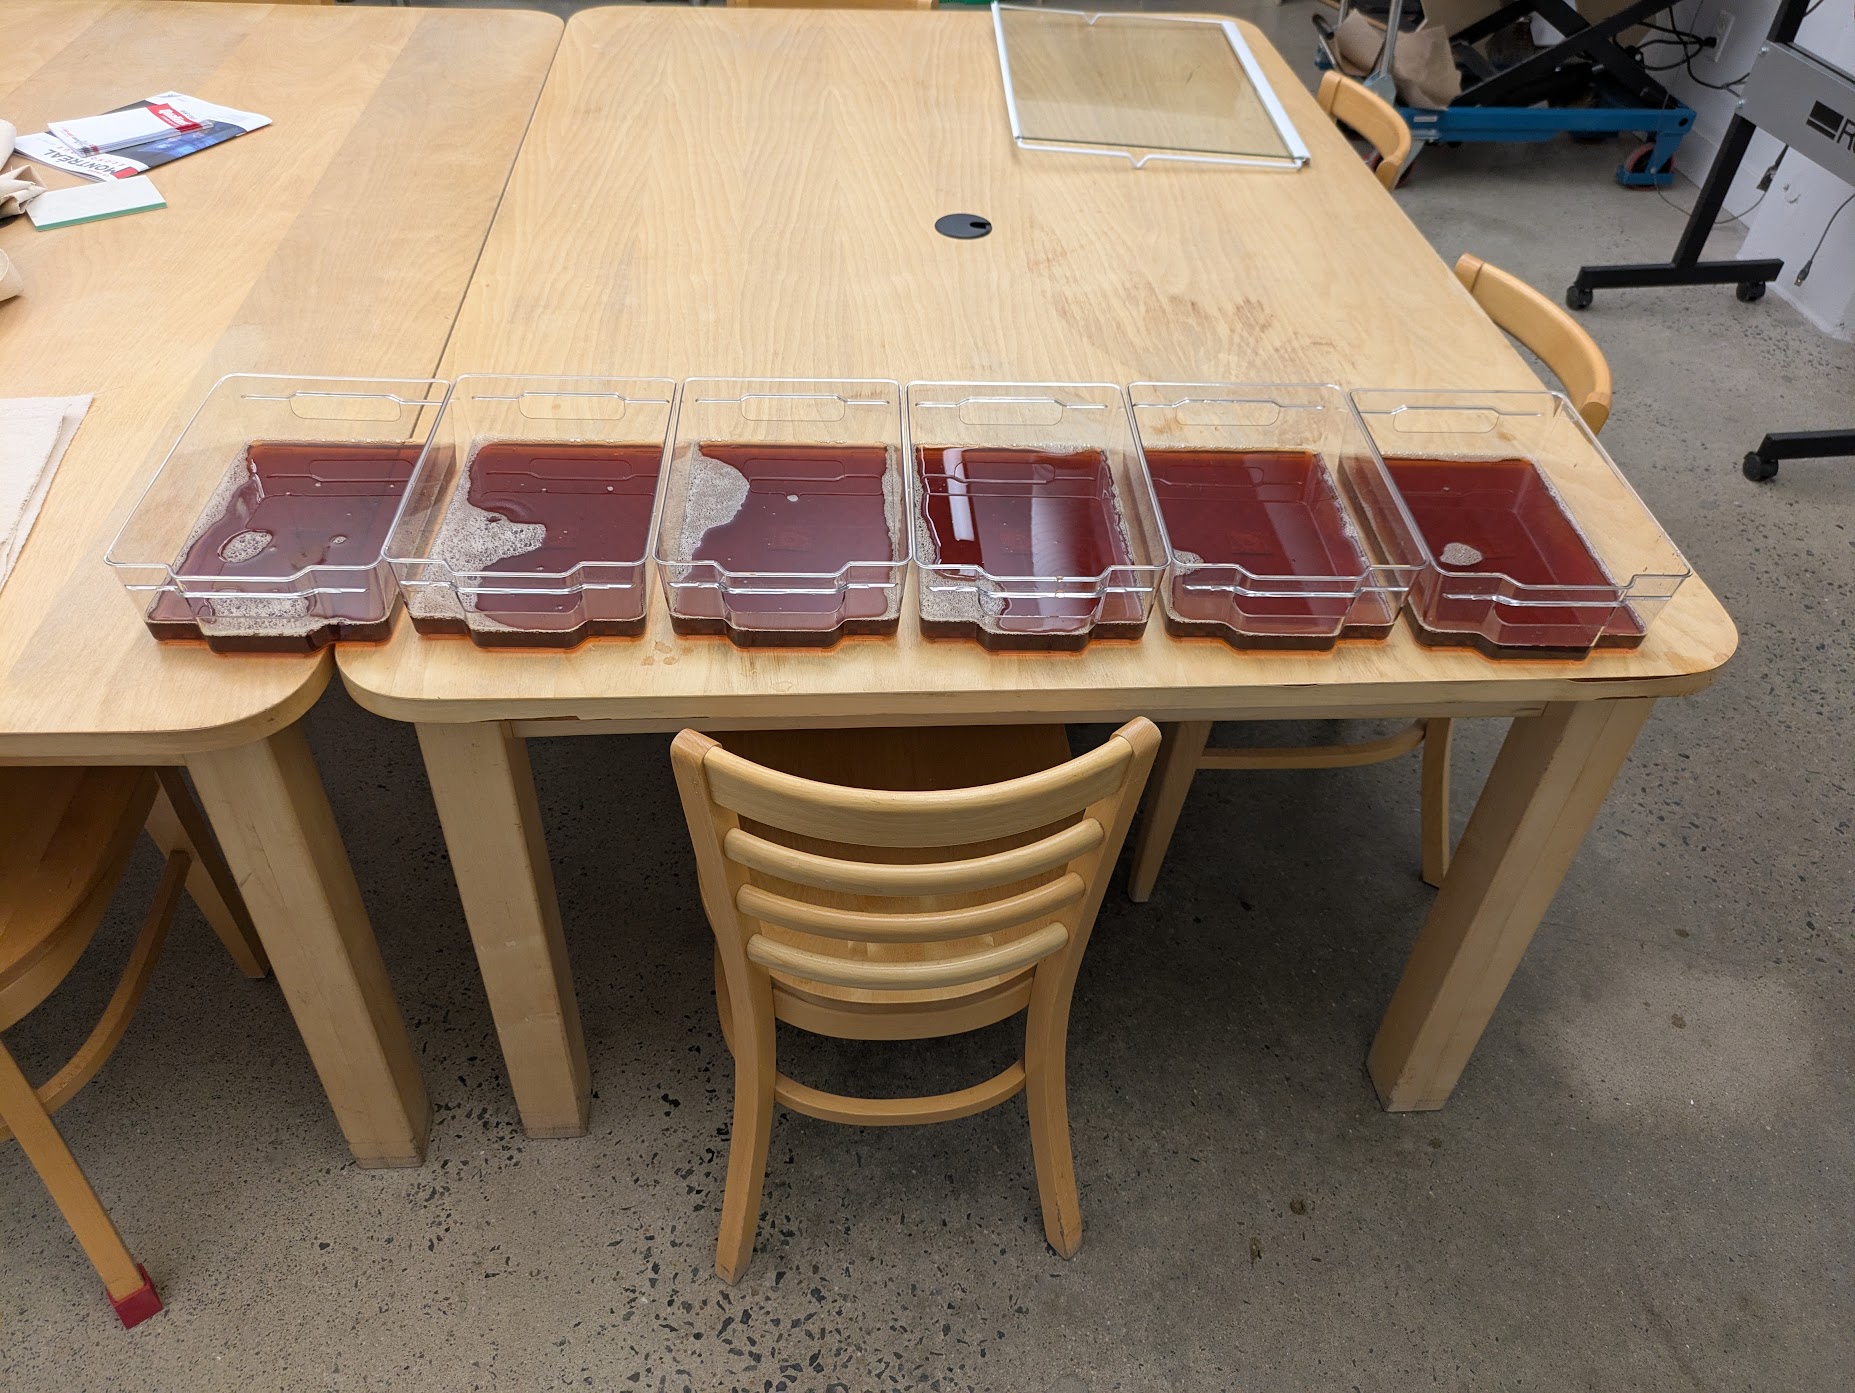
Cymatics Hertz Comparison
The following tones were captured on printer paper using sumi-ink and porphyry pigment. No alum was used for the tests as printer paper catches the ink nicely without pre-treatment.
The lower tones produced wide waves. The higher tones produced tighter waves. Where the movement was most vigorous, the paint was pushed away leaving "empty areas".
The vigorousness of the wave is also impacted by the volume the tone is played at, as much as the tone itself.

How-Tos & Tutorials
Marbling Process
Model Pigment Marbling Recipe:
After much trial and error, the following recipe proved to be the best starting point for every plant and mineral colour I tried. After this, they were each adjusted “to taste” based on how they reacted to the carageenan bath.
Hydration:
| Ingredient | Amount |
|---|---|
| Pigment | 2.05g |
| Hot water | 0.75ml |
- Make a “crater” shape and add a few drops of water in the middle to hydrate the pigment. Mix until fully wet.
Mulling:
| Ingredient | Amount |
|---|---|
| Water | 10ml |
| Gum Arabic | 2 drops |
-
Once hydrated, add more water for spreading.
-
Then add binder such as gum arabic.
-
Mull the pigment with a glass muller on a glass plate in a figure-eight pattern until smooth and fully blended. It should be the consistency of “mayo” or gouache.
Marbling Prep:
| Ingredient | Amount |
|---|---|
| Ox Gall | 2.05g |
| Water | 2 drops |
-
Collect a “cherry-pit” sized amount of pigment and place in an airtight glass jar.
-
separate the rest of the remaining uncollected pigment into separate small jars the same way.
-
In the jar you will use first, now add 2 drops ox gall and 2 drops water.
-
Mix with a paint brush. You're ready to test it out.
Careageenan Bath
I used the Jaquard brand of caregeenan. There are different types of carageen so if you use another brand look for Lambda carageenan. As per the package intructions I started with this recipe below:
-
Basic ratio: 4 teaspoons (roughly 19g) of carageen powder per 1 gallon of water (3.79L).
-
Slowly add carageenan to warm water in a big jug or bucket. Mix with an immersion blender or hand mix vigorously and pour into a regular blender to mix futher until fully combined.
-
Pour mixture back into big jug / bucket and let solution sit for up to 12 hours (or at least 1 hour) until all the bubbles are gone.
Waterproof Cymatics Rig How-To:
This is the instructions for my preferred cymatics rig set up. It's essential to be super careful with this setup. Zero liquid should come in contact with any of your electronic components. Always keep everything unplugged until you know your carageenan tray is secure and will not tip over. Also keep all electronic parts away from where the tray could accidentally spill.
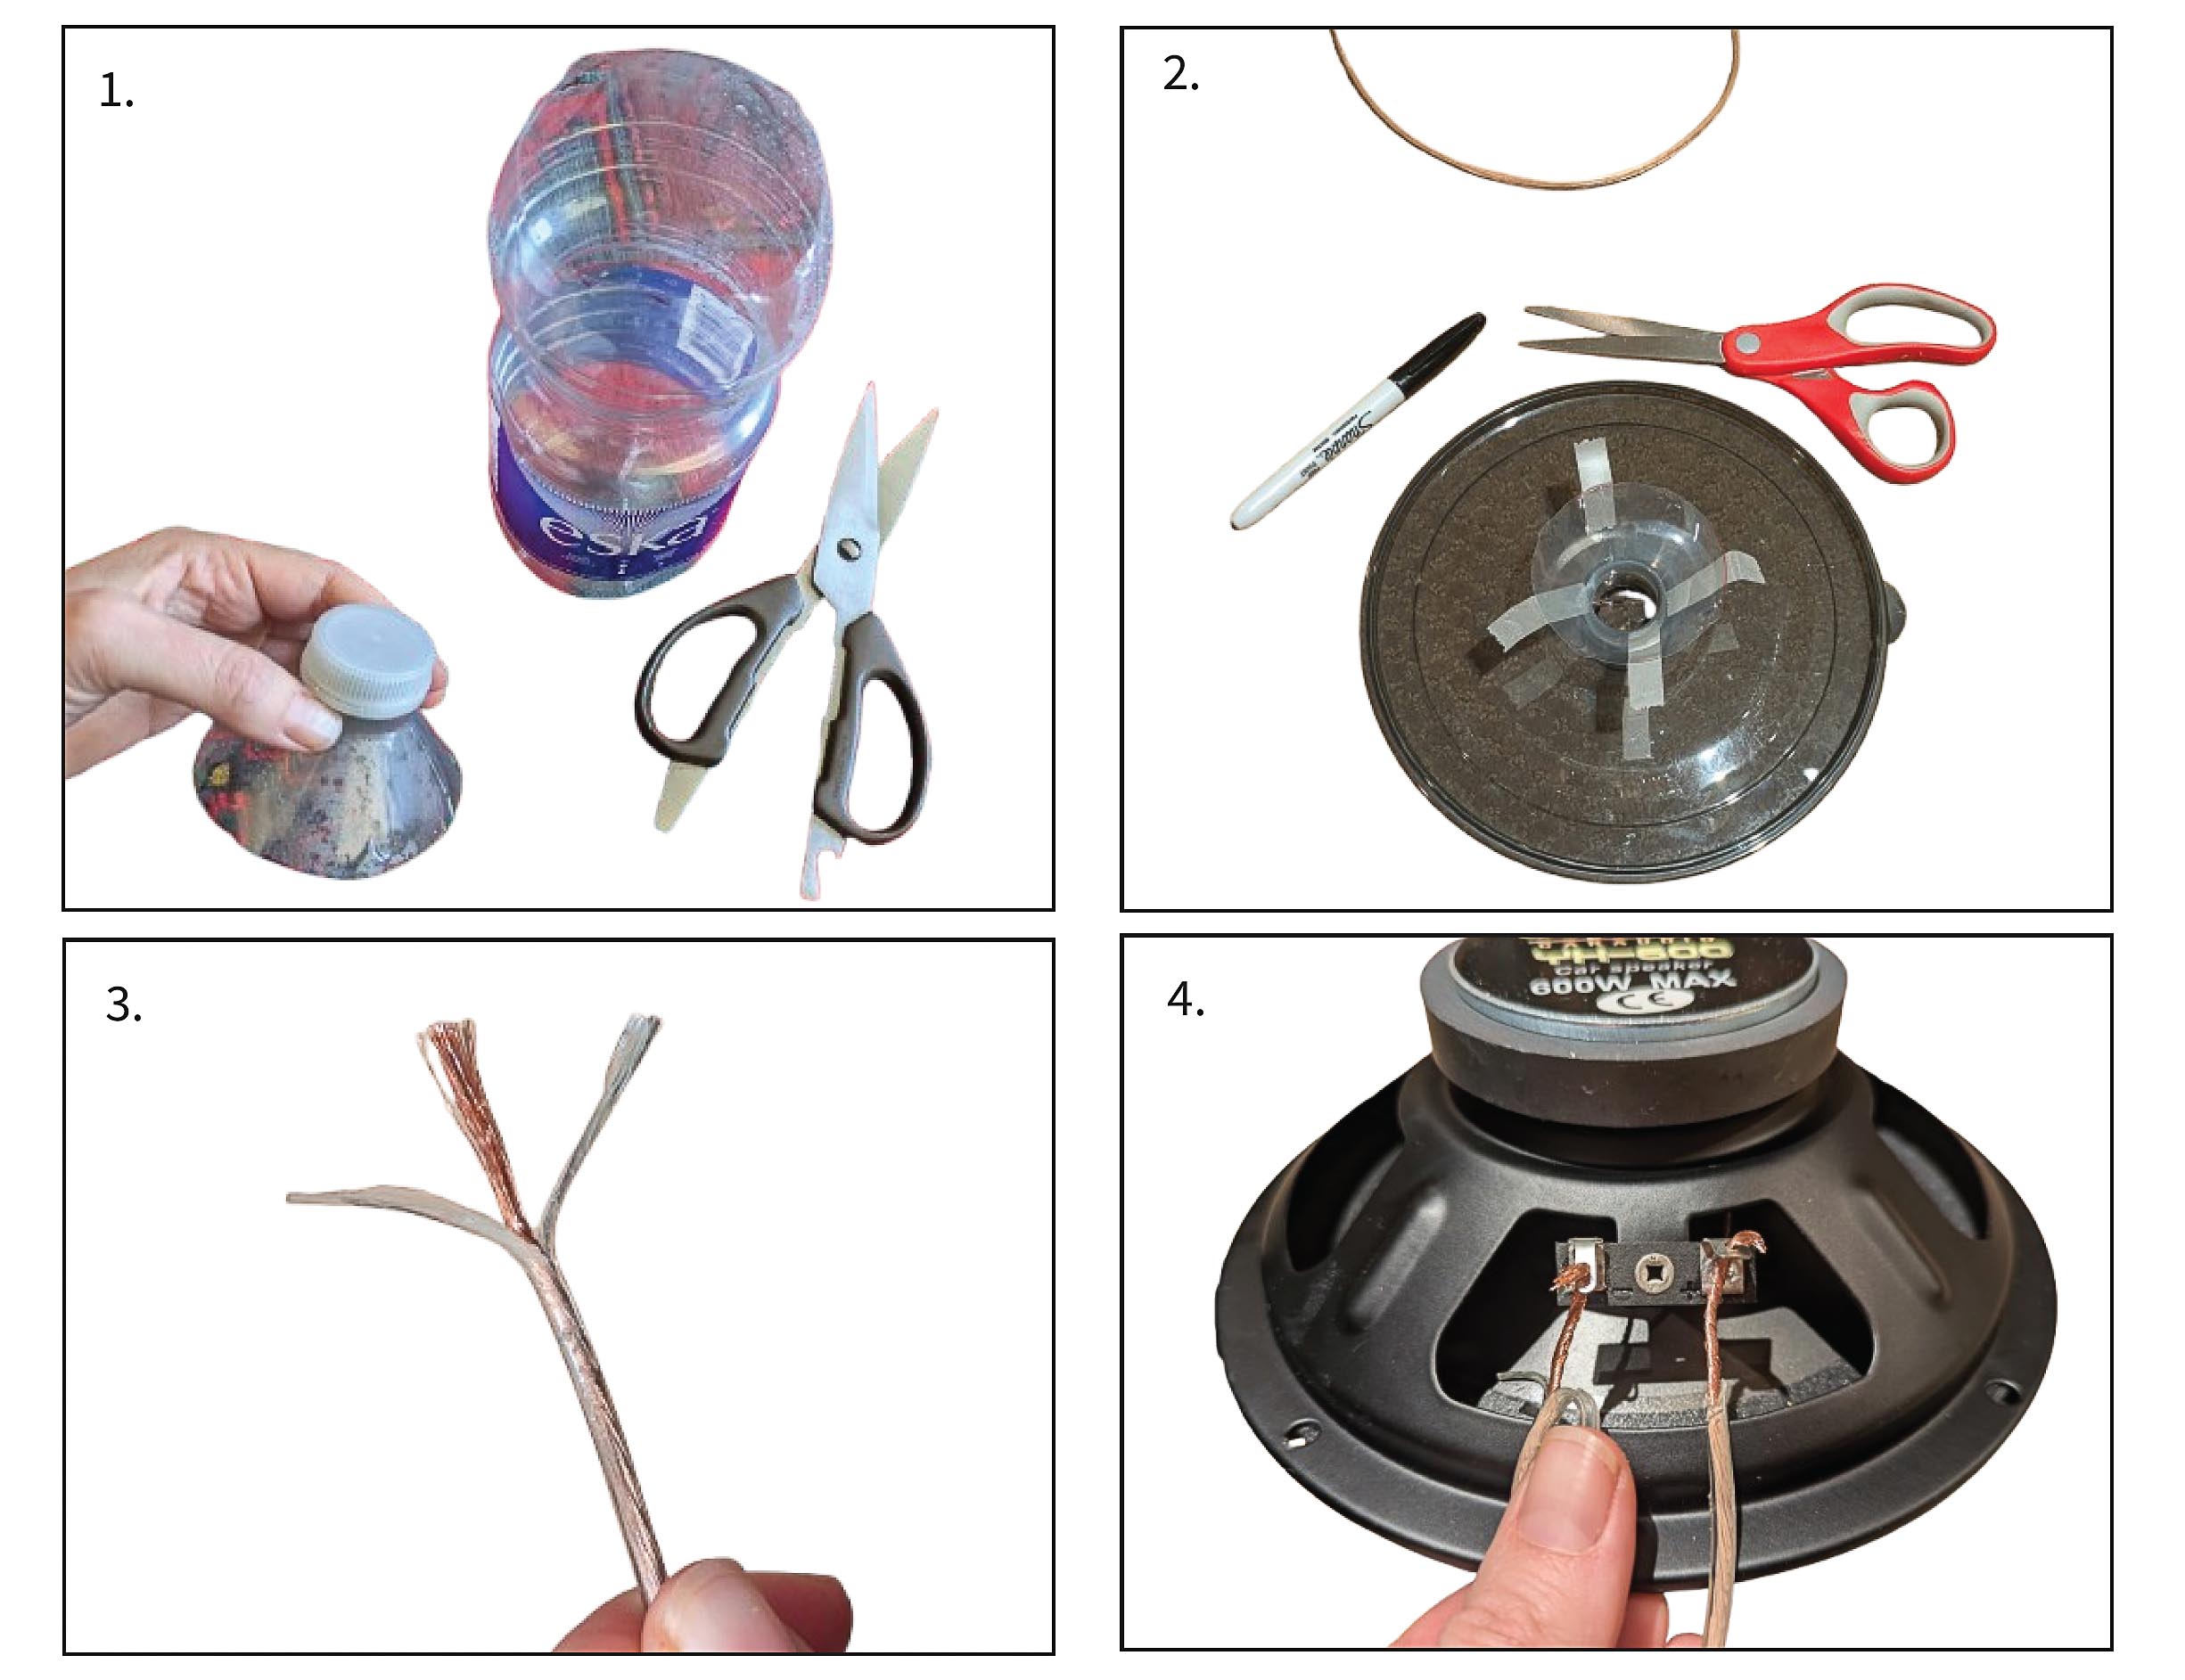
Supplies:
-
Cut the top off a plastic bottle. Keep the lid aside.
-
Cut a hole in the lid of your container. The bottle top will feed through this.
-
Carefully strip back the plastic covering on your speaker wire.
-
Solder the negative an positive speaker channels to the speaker respectively.
-
Drill a small hole (for your wires) in the side of your plastic container.
-
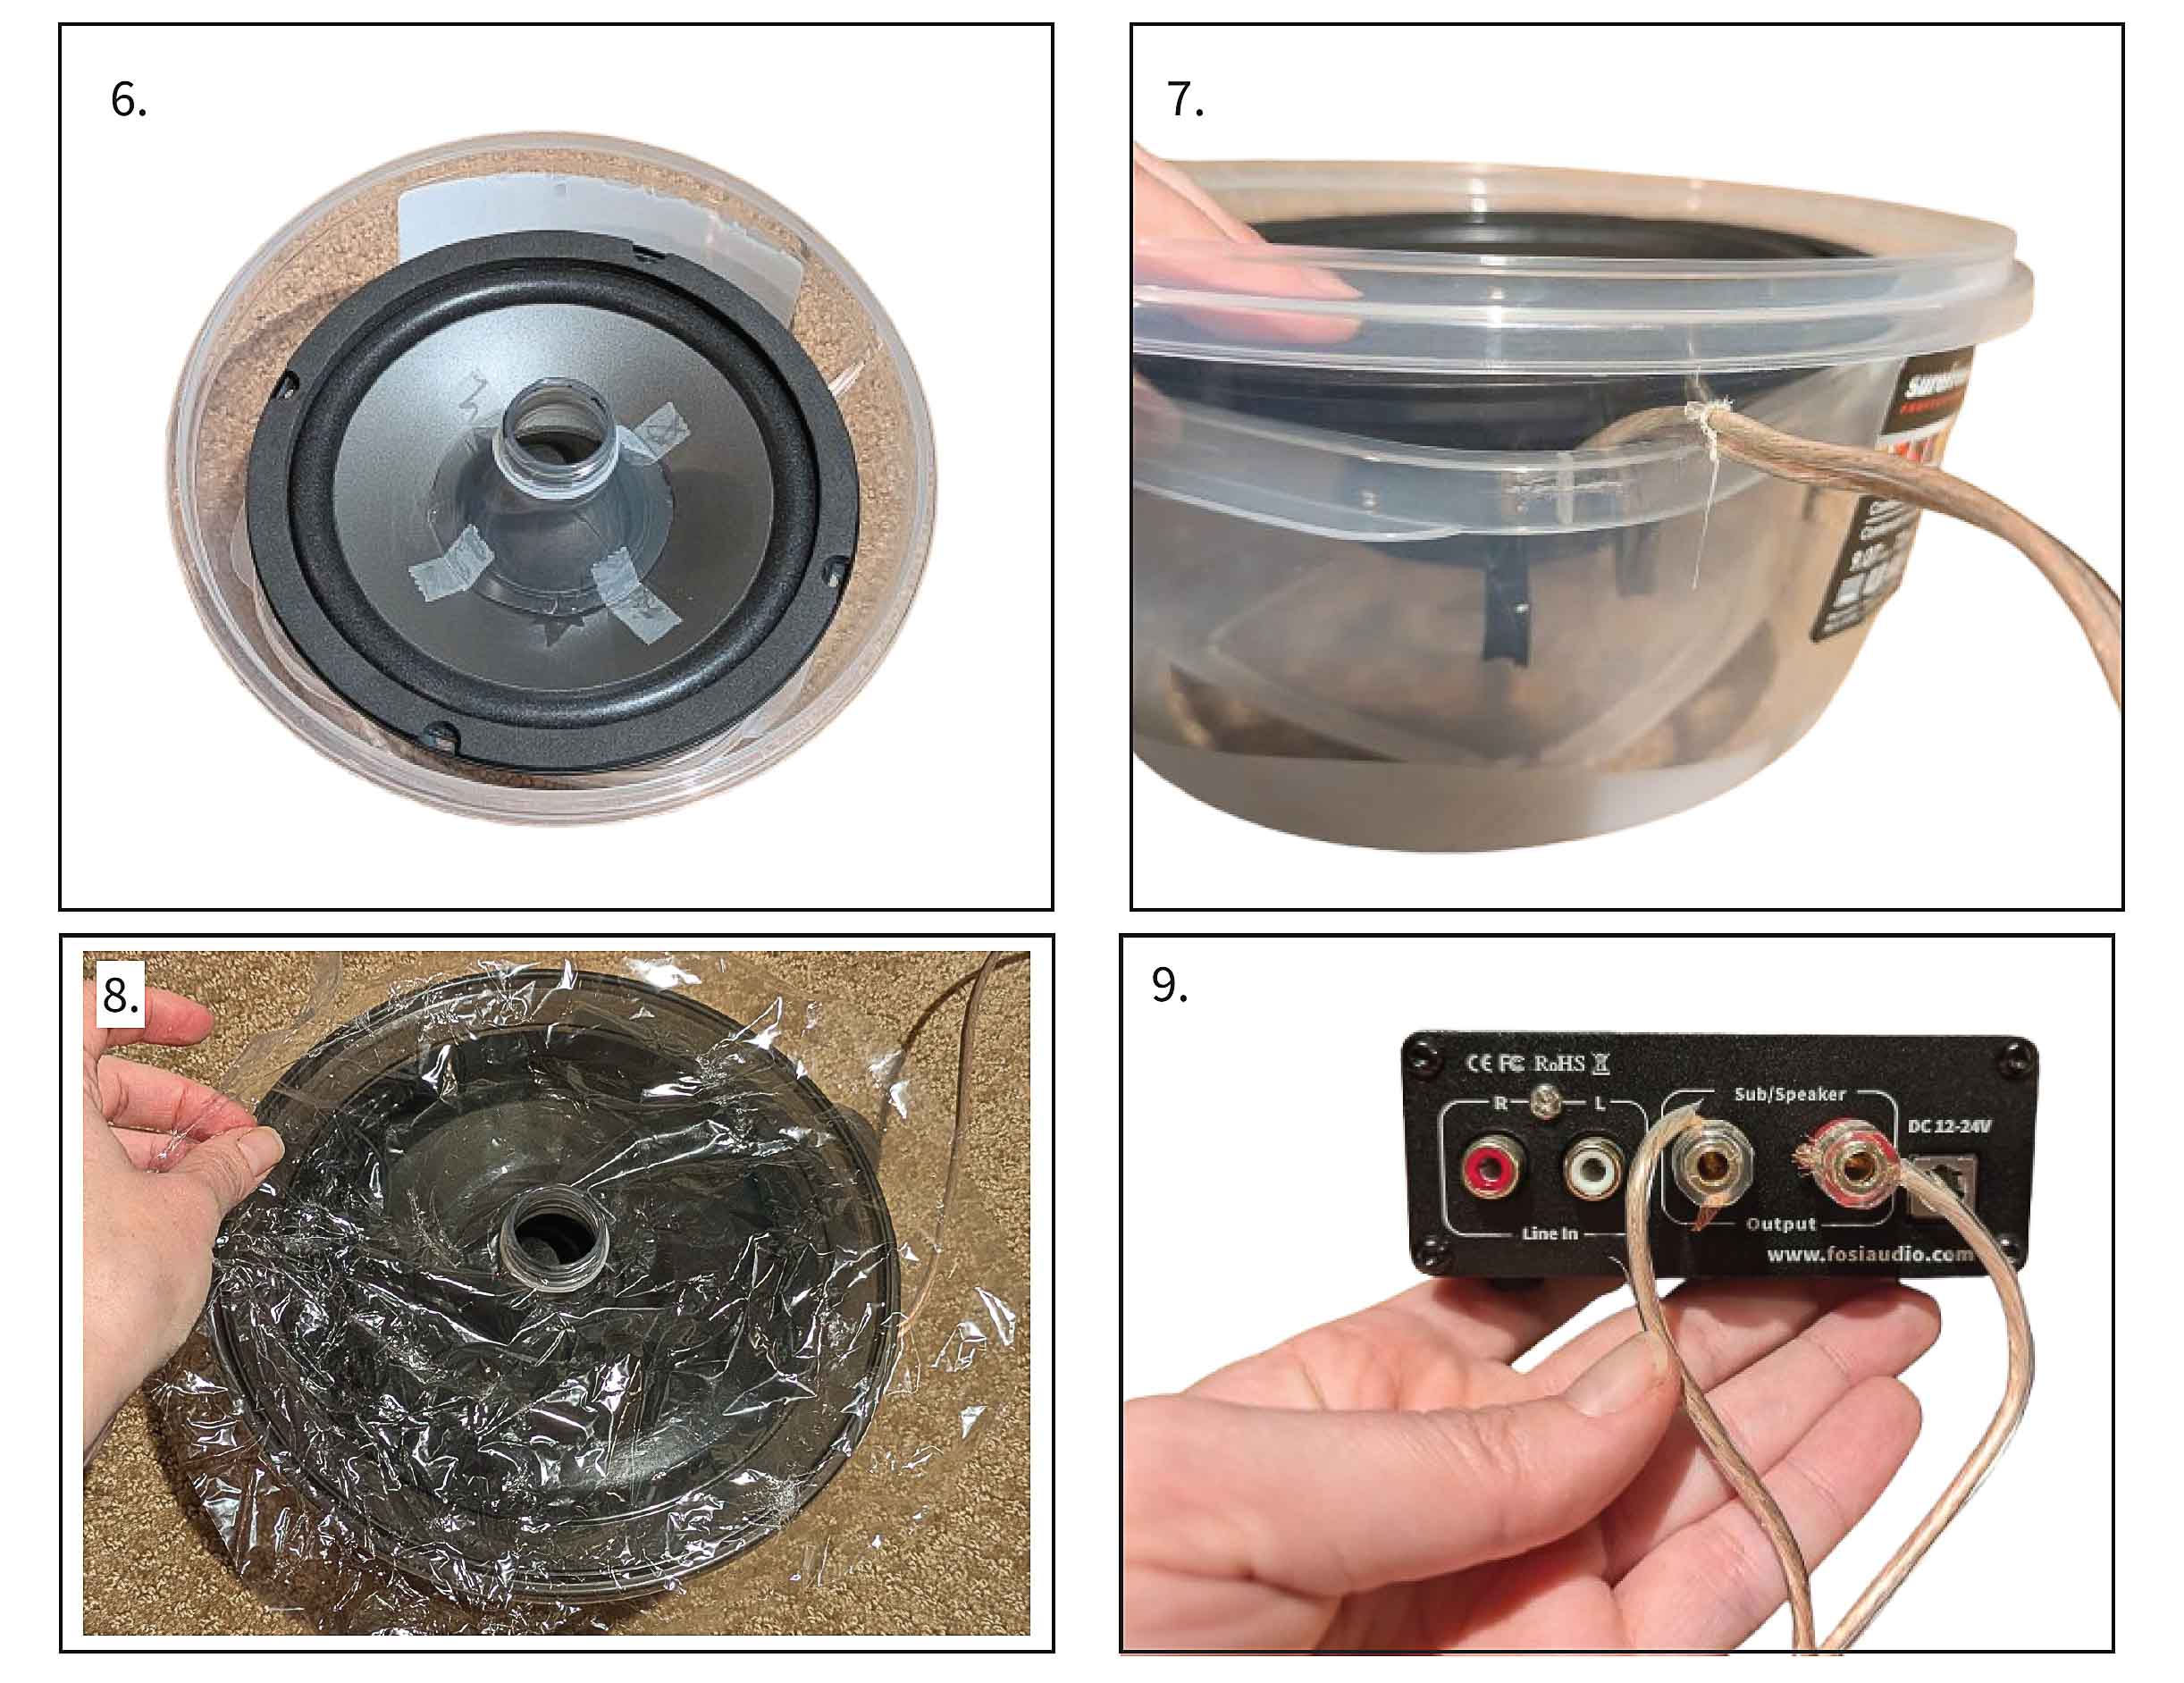
Position the speaker in your container. Glue the bottle base to the cone of your speaker (only the part that pulses). This can cause it to degrade over time which is why it's good to use cheap speakers. I used tape in my first iteration, seen here but it was not stable enough.
-
Run your cables through the drilled hole. (Here a second container is seen inside the first which I used to stabilize the speaker and make it sit snug, but it is optional. It didn't help that much.)
-
Cut a hole in the center of a plastic sheet. The hole should be slighlty smaller than the bottle top base for extra water-tightness. Drape it over the protruding base and container.
-
Now attach your cables to the amp ( keep it switched off)
-
Glue the bottle cap to the bottom of your tray. Make sure it is dead centre and level! This is essential. (If you have multiple bottles you can put caps on different trays and swap them out. Different tray sizes and materials have different optimal resonant frequencies).
-
Now you can screw your tray on the bottle top securing it to the rig.
-
Add additional "liquid catch" containers on the sides of your tray. Once you start filling it with liquid it can easily spill. Also plan to use a bigger screw lid / base combo to stabilize a bigger tray (an old peanut butter jar etc...).
-
Fill your tray with carageenan slowly. It should be just enough to float the paint but not so heavy that it tips the tray or weighs down the speaker cone.
-
using an RCA cable connect your phone to the amplifier. Pull up an online tone generator. What I used is listed at the end of the tutorial.
-
Start at a frequency around 20hz. It will be faint. Move up from here.
-
Keep the volume of your phone consistent and only adjust the volume on your amp or vice versa. Start at low volume and gradually turn the volume up.
-
Now you can play with different frequencies.
Marbling with Silk:
Mordant:
-
I mordanted my silk with %15 of the dry Weight of Fibre using aluminum sulfate.
-
pre-soak your silk in regular water at room temperature before adding to your pot with the proportioned alum.
-
Let it heat up slowly, and keep it just below a boil so as not to shock the fabric. Keep it evenly submerged for 1 hour. Then let it cool slowly in the pot until room temperature and hang to dry.
Marbling
-
Once your fabric is dry, cut it to the size you want to work with. Alternatively you can leave it as a longer piece and carefully dip only the desired sections.
-
Dip your paint bush in your pigment and tap it agains another wooden dowl so it "spackles" on the surface of the carageenan bath.
-
Play your desired frequency and observe how the pigment moves around the waves to decide which part of the path you'd like to focus on for dipping your silk.
-
with your pigment on the bath and the tone running, hold your silk by its two outer edges. The middle should droop like a U-shape.
-
Slowly dip your silk, from the centre of the U-shape out, eventually dropping the sides of the fabric ( or as much as you want to dip).
-
Leave it on the bath for a few seconds until all desired surface area of silk is in contact with the bath.
-
Remove silk gently and flip promptly, pattern side up and set it on a designated space to dry flat. (I recommend waiting to rinse it with water until the pigment is fully dry. This prevents excessive colour bleeding.)
-
Also try to quickly stop your tone. Speakers and transducers can wear out quickly so you want the tone to play only for as long as it needs to.
Kombucha Leather Recipe:

| Ingredient | Amount |
|---|---|
| Vinegar | 10 ml |
| Sugar | 70g |
| Tea | 700ml |
| Kombucha mother | One portion cut from mother |
| Starter liquid | 3 spoonfuls |
Full disclosure my self grown kombucha leather was mouldy when I uncovered it. I'm not sure if this was because it had not been adequatley covered or if it was contaminated at the start. My recipe may yield the same results, so be wary of this
Steps:
-
Mix vinegar tea and sugar in a pot and bring to a low simmer. Let cool.
-
When sugar disolves and tea is room temperature (20-30 degrees celcius), transfer to a glass or plastic container.
-
Add liquid starter and a piece of kombucha mother (reserve some for other batches if desired).
-
Mix gently with non metal spoon. Kombucha will change colour where it contacts metal so be wary of this.
-
Place clean muslin cover over container and tape down. In theory this keeps things breathable but prevents mould from forming.
-
Put container in dark place with a temperature of around 25 degrees celcius for at least two weeks.
-
After waiting period, remove kombucha from container and gently wash with non abrasive soap, using gloves. The concentrate is like vinegar and acid burns are possible from the concentrated liquid. (Also wear clothes you don't care about. Liquid splashes can leave a funny smell.)
-
Lay washed kombucha flat on a sheet of MDF.
-
Rub glycerin on kombucha sample to ensure it stays pliable once the trapped liquid evaporates. The more glycerin used the more pliable it will be. Too much will make it sticky. Too little and it will be prone to snapping. I applied mine without measurements but you can try different ratios.
-
Wait one week, or until excess liquid in kombucha evaporates.
-
Peel off kombuhca leather slowly. Now you can make something!