13. Skin Electronics
Materials
| Qty | Description | Price | Link | Notes |
|---|---|---|---|---|
| 1 | Adafruit Gemma M0 | $ 9.95 | https://www.adafruit.com/product/3501 | |
| 2 | Adafruit Neopixels Flora RGB Smart Neopixel - Pack of 4 | $ 7.95 | https://www.adafruit.com/product/1260 | This project uses 5 pixels |
| 1 | Lithium Ion Polymer Battery | $ 6.95 | https://www.adafruit.com/product/1370 | 3.7V 150mAh |
| 1 | Enameled copper wire | $ 11.70 | https://www.amazon.com/gp/product/B00UWCXRK6/ref=ppx_yo_dt_b_search_asin_title?ie=UTF8&th=1 | |
| 1 | Ecoflex 00-30 - Super-Soft, Cure Silicone Rubber | $ 36.47 | https://www.amazon.com/gp/product/B00CA5VY3U/ref=ppx_yo_dt_b_search_asin_title?ie=UTF8&psc=1 | |
| 1 | Felt scrap from previous project | $ 0.00 | Recycle a scrap from somewhere else! :) | |
| 1 | Hair clip | $ 0.00 | I recycled this from a wig |
Code
I got the code from a capacitive touch pendant project on the Adafruit Blog. This code uses the Gemma M0s capacitive touch ability to shift the color of the LEDs when touched.
// SPDX-FileCopyrightText: 2018 Erin St. Blaine for Adafruit Industries
//
// SPDX-License-Identifier: MIT

// Code by Erin St. Blaine for Adafruit Industries
// Color Touch Pendant Tutorial: https://learn.adafruit.com/color-touch-pendant-necklace/introduction
// Two neopixel rings connected on pin 1 will cycle through gradient colors when the pendant is touched.  For Gemma M0.

#include "Adafruit_FreeTouch.h"
#include "FastLED.h"

#define CAPTOUCH_PIN 0  //capacitive touch pin
#define NEOPIXEL_PIN 1  //neopixel  pin
#define NUM_LEDS    5  //how many pixels total

#define LED_TYPE    WS2812
#define COLOR_ORDER GRB
CRGB leds[NUM_LEDS];   //LED array

// These variables will affect the way the gradient animation looks.  Feel free to mess with them.
int SPEEDO = 20;
int STEPS = 50;
int HUE = 0;
int SATURATION = 255;
int COLORCHANGE = 100;
int BRIGHTNESS = 120;

// Calibrating your capacitive touch sensitivity: Change this variable to something between your capacitive touch serial readouts for on and off
int touch = 700;

long oldState = 0;

// set up capacitive touch button using the FreeTouch library
Adafruit_FreeTouch qt_1 = Adafruit_FreeTouch(CAPTOUCH_PIN, OVERSAMPLE_4, RESISTOR_50K, FREQ_MODE_NONE);


TBlendType    currentBlending;
CRGBPalette16 currentPalette;


void setup() {
  Serial.begin(115200);

  if (! qt_1.begin())
   Serial.println("Failed to begin qt on pin A1");
   FastLED.addLeds<WS2812, NEOPIXEL_PIN, COLOR_ORDER>(leds, NUM_LEDS);  // Set up neopixels with FastLED
   FastLED.setBrightness(BRIGHTNESS); // set global brightness
   FastLED.setMaxPowerInVoltsAndMilliamps(3,350);  //Constrain FastLED's power usage
}

void loop() {

  Serial.print(qt_1.measure());
  Serial.write(' ');
  checkpress();   //check to see if the button's been pressed
  //delay(20);
}

void checkpress() {

// Get current button state.

    long newState =  qt_1.measure();
    Serial.println(qt_1.measure());
   if (newState > touch && oldState < touch) {
    // Short delay to debounce button.
    delay(500);
    // Check if button is still low after debounce.
    long newState =  qt_1.measure(); }


  if (newState > touch ) {
     HUE=HUE+COLORCHANGE;  // change the hue by a specified amount each time the cap touch pad is activated
  if (HUE > 255){
    HUE=0;}
   Gradient();
    }
//  if (HUE==250) {
//    dark();
//  }
    else {
      Gradient();

    }


  // Set the last button state to the old state.
  oldState = newState;

}


// GRADIENT --------------------------------------------------------------
void Gradient()
{
  SetupGradientPalette();

  static uint8_t startIndex = 0;
  startIndex = startIndex - 1;  // motion speed

  FillLEDsFromPaletteColors( startIndex);
  FastLED.show();
  FastLED.delay(SPEEDO);
}

// adjust hue, saturation and brightness values here to make a pleasing gradient

void SetupGradientPalette()
{
  CRGB light = CHSV( HUE + 25, SATURATION - 20, BRIGHTNESS);
  CRGB lightmed = CHSV (HUE + 15, SATURATION - 10, BRIGHTNESS-50);
  CRGB medium = CHSV ( HUE + 10, SATURATION - 15, BRIGHTNESS);
  CRGB dark  = CHSV( HUE, SATURATION, BRIGHTNESS);
  CRGB black = CHSV (HUE, SATURATION, 0);

  currentPalette = CRGBPalette16(
    black,  light,  light,  light,
    lightmed, lightmed, lightmed,  medium,
    medium,  medium,  medium,  dark,
    dark, dark, dark,  black );
}

void FillLEDsFromPaletteColors( uint8_t colorIndex)
{
  uint8_t brightness = BRIGHTNESS;

  for( int i = 0; i < NUM_LEDS; i++) {
    leds[i] = ColorFromPalette( currentPalette, colorIndex, brightness, currentBlending);
    colorIndex += STEPS;
  }
}

void dark()
{
  for(int i = 0; i < NUM_LEDS; i++) {
  leds[i] = CRGB::Black;
  FastLED.show();
  delay(20);
}
}
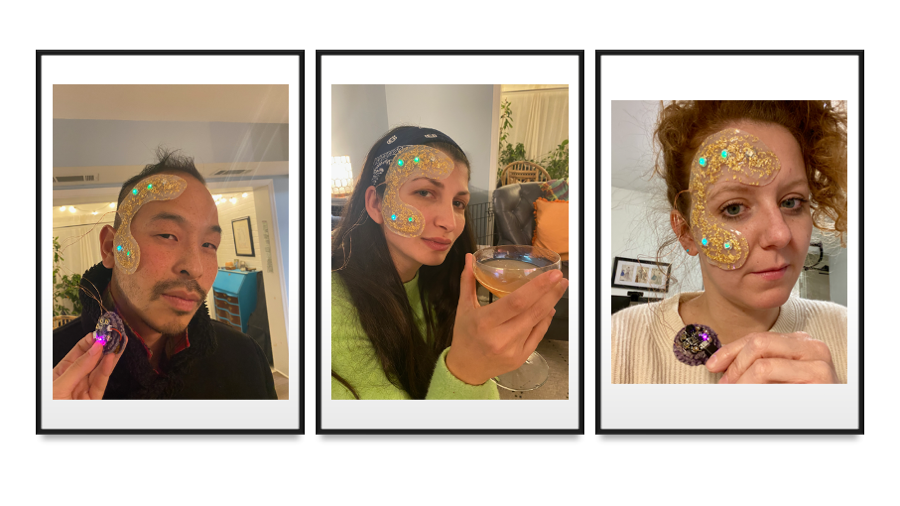
Assembly
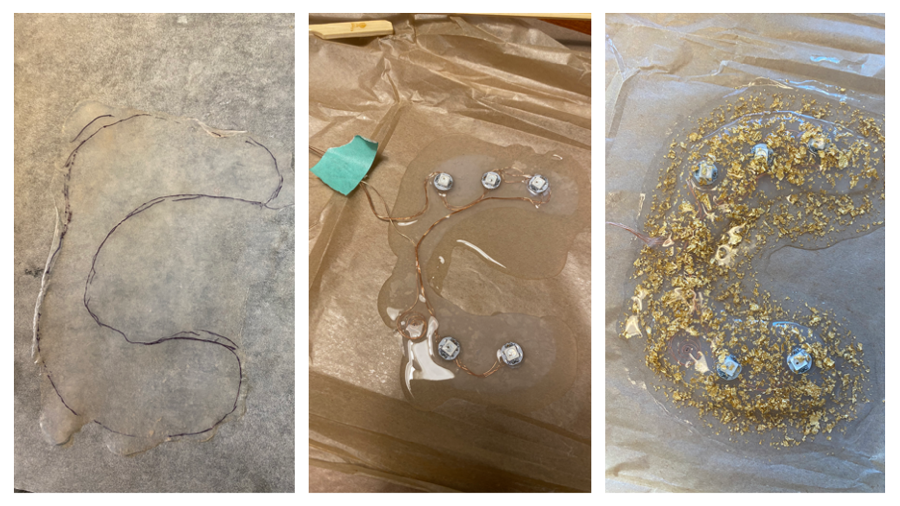
For this project I made a silicone prosthetic with embedded LEDs that fit on one side of the face. To start I poured a thin base layer of silicone on a piece of wax paper. Once it cured I placed it on my face to trace the rough shape of the prosthetic. I cut out the silicone and returned it to the wax paper. Then I soldered five RGB LED Neopixels together with enameled copper wire. I also added a strip of copper (sanded bare of enamel) to use as a button. The LEDs were placed in the silicone base layer and temporarily glued in place. I poured a few more thin layers of silicone over the LEDs and led each cure in between. For the last layer I added crushed gold leaf.
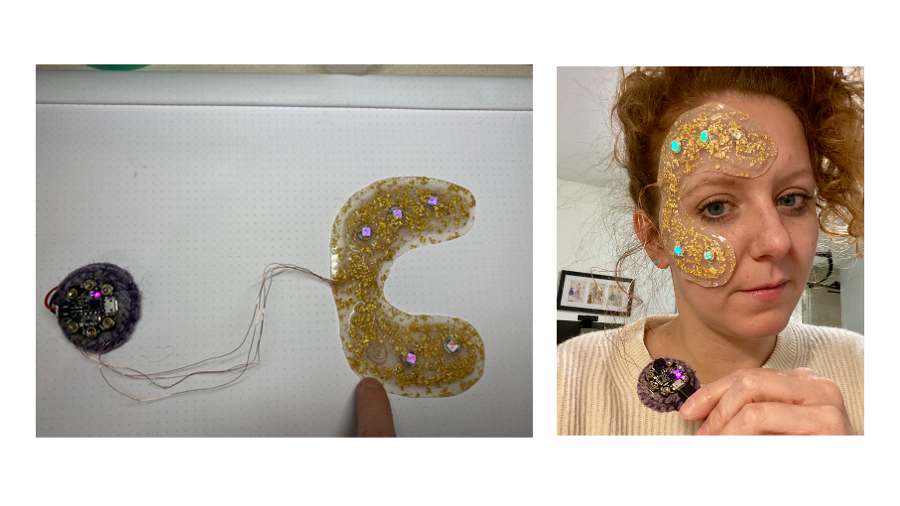
After the last layer cured I soldered the LED strip to the GEMMA microcontroller. I also sondered the “button” to one of the capacitive touch pins. I loaded the code and tested the speed and animation variables to get the look I wanted. Lastly I sewed a little felt case for a battery and microcontroller that could be placed in my hair with a clip. The silicone piece was applied to the face with prosthetic glue.