V.E-TEXTILES
ASSIGNMENT
- Build at least one digital and one analogue soft sensors, using different materials and techniques.
- Document the sensor project as well as the readings got using the AnalogRead of Arduino
- Integrate the two soft sensors into one or two textile swatches using hard soft connections
- Document the circuit and it’s schematic
- Document your swatches
- Upload a small video of the swatches functioning
- EXTRA POINT Integrate the swatch into a project
5. E-textiles
An electronic textile (E-textile) is a type of fabric that contains electronic elements. In general, the development of electronic textiles supports the idea of wearable computing, or electronic devices worked into garment designs (The way to do so is by using a circuit). A circuit is a path for transmitting electric current, and an electrical current is created when a steam of electrons are moving, for this you will need a source, and it can be either a battery or a generator. Electrons will always want to move from greater to less electrical energy, another way to say it and see it is that it will move from power to ground or from positive (+) to negative (-). (Clockwise)
DEFINITIONS
- Voltage is the pressure or force between two points. It is measured in volts (V), (USB cable is 5 Volts, a car battery is 12 Volts, the electric plugs on the wall are 230 Volts). When two objects have a difference in voltage, we can say that their electrons will try to jump from one another creating a current flow, to balance out the situation and become stable.
- Current is the rate at which charge is flowing.(u=Amperes, repesented with "I") There are two types of curents: AC which is alternate current and DC which is direct current.
- Resistance is a material's tendency to resist the flow of charge (Ohm). For example, if electricity wants to move in a material like wood, it will have a very high resistance because wood is not as very conductive material, whereas metal will have a low resistance, since it is a very conductive material. Resistance is represented with "R".
-> if we add copper the electricity will go faster -> shortcircuit (before connecting anything we need to know the volatge -> multimiter)
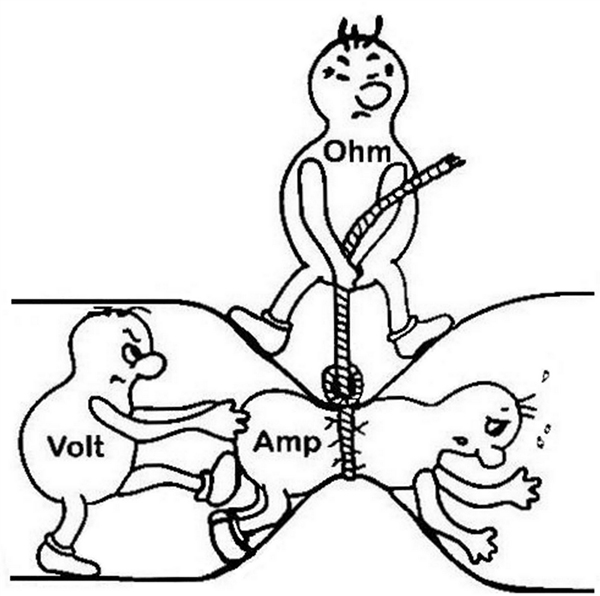 V = I x R.
So, when we talk about these values, we're really describing the movement of charge, and thus, the behavior of electrons. A circuit is a closed loop that allows charge to move from one place to another. Components in the circuit allow us to control this charge and use it to do work. * All electrical energy in the circuit must be used (otherwise it will dissipate as heat and damage your components) * Electrical energy always follows the path of least resistance to ground.
DC (DIRECT CURRENT) (goes one way) ALTERNATIVE CURRENT (AC) (goes back and forth)???
CONDUCTIVE MATERIALS
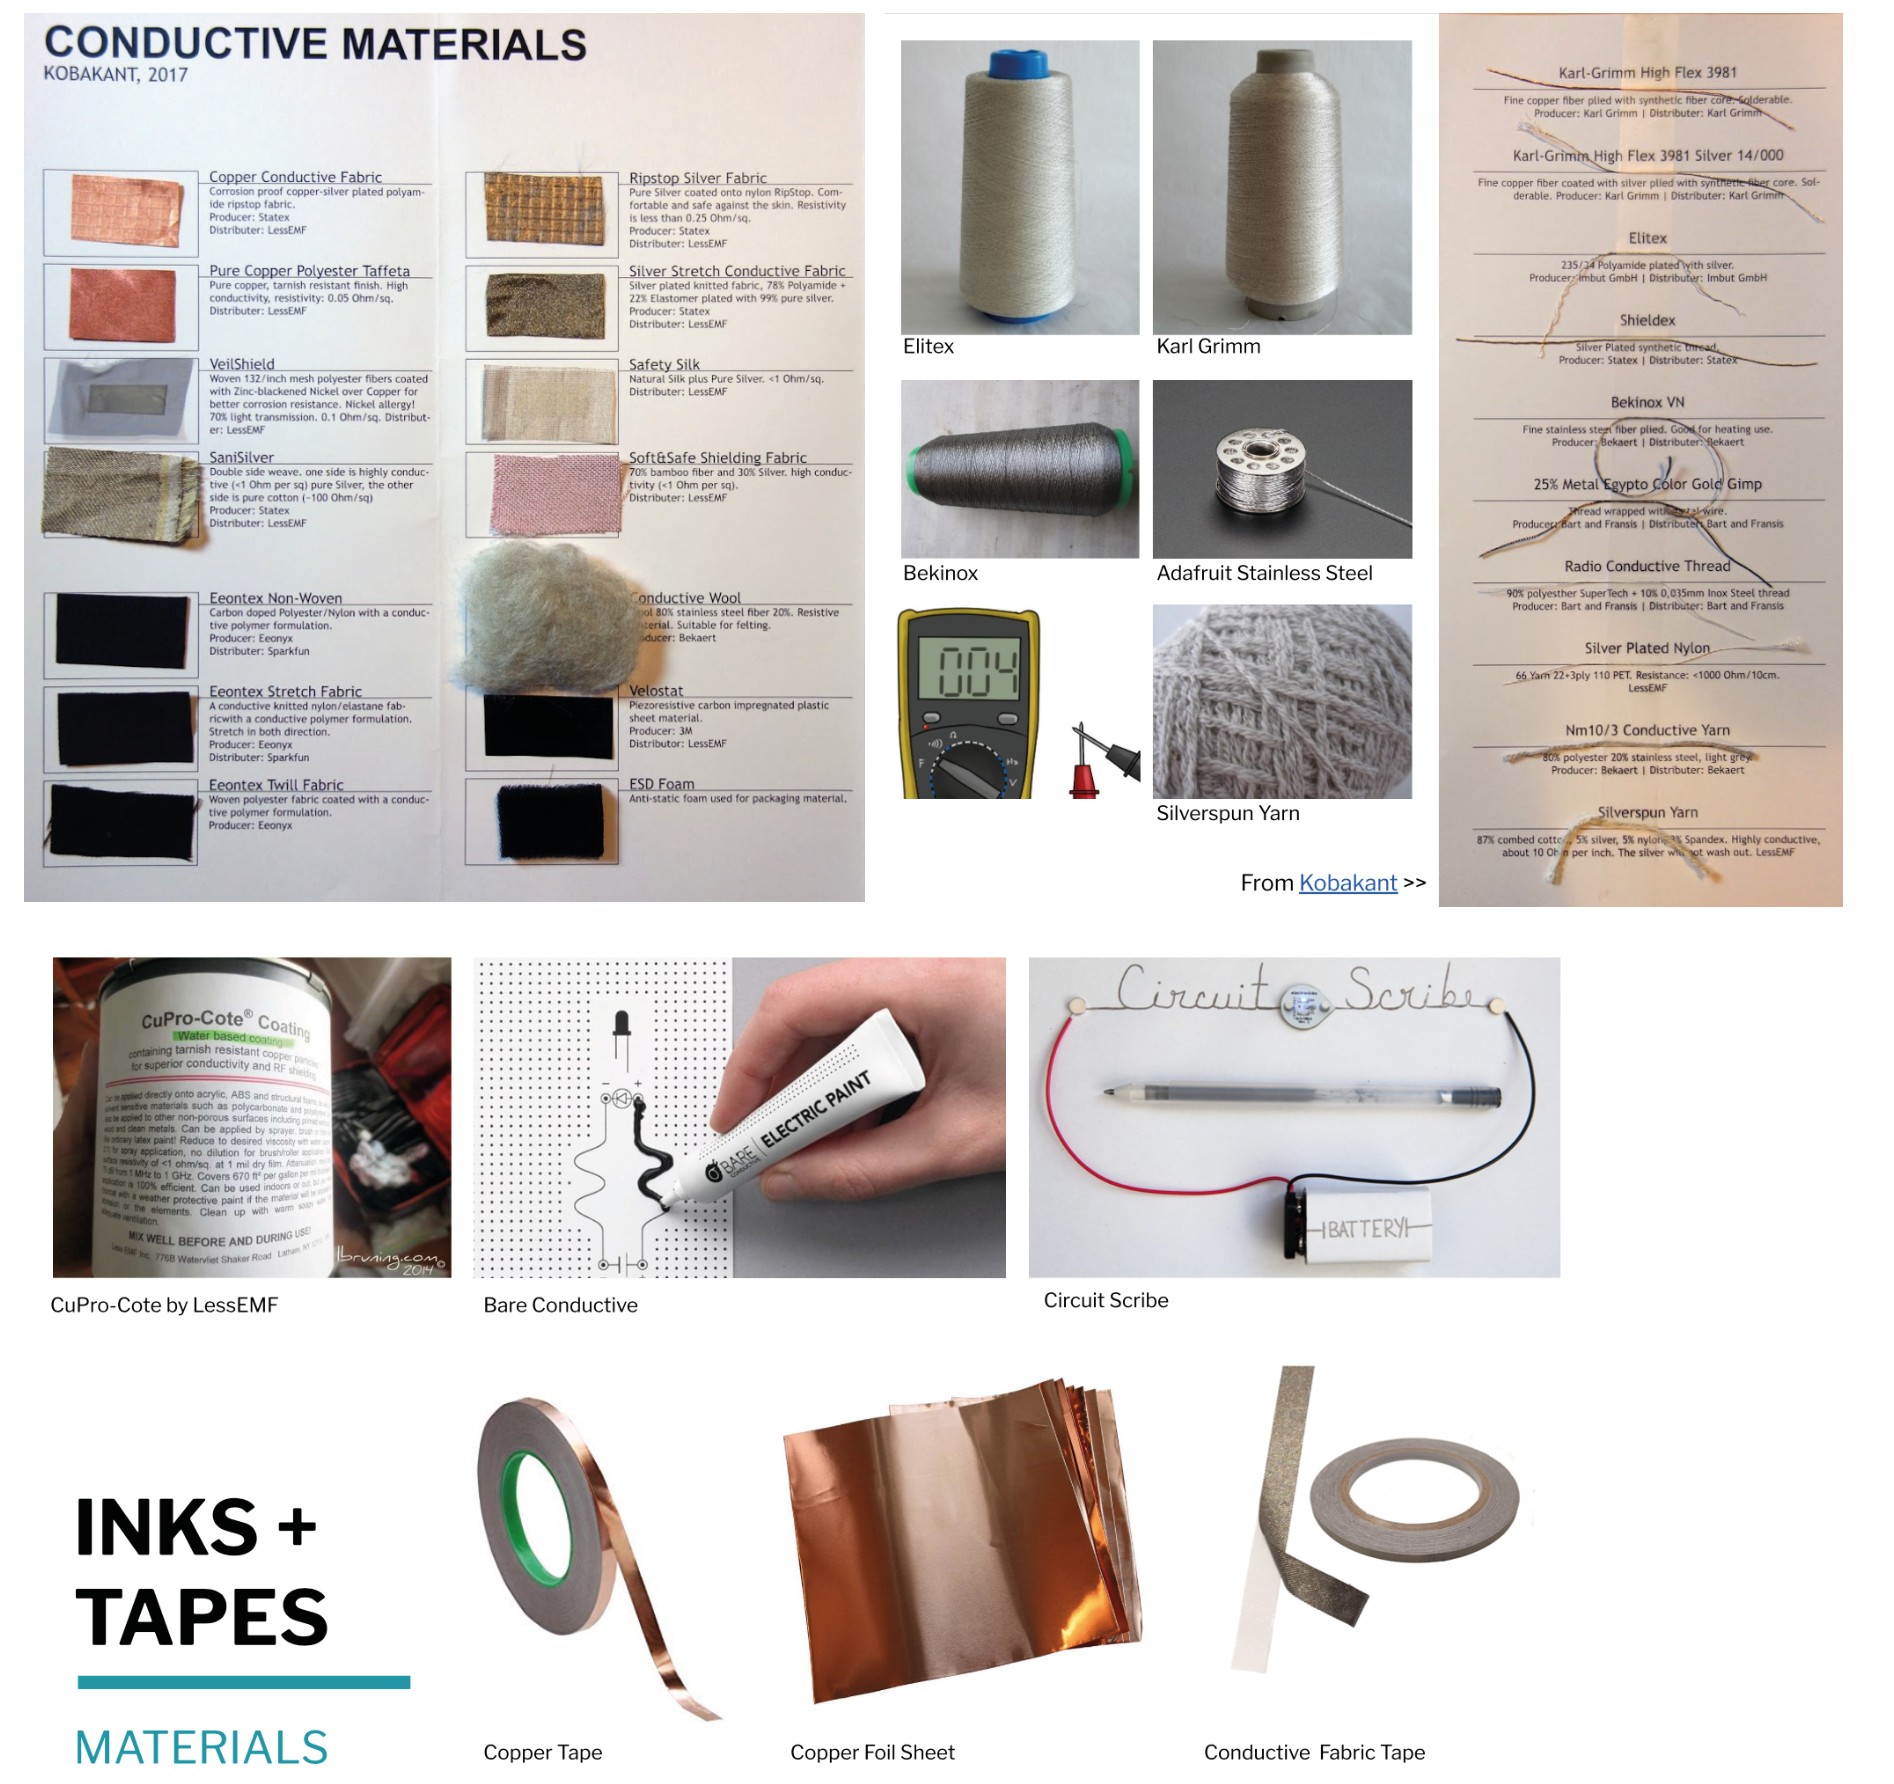
- Properties to consider
- Resistance - Solderability - Thickness - Susbtarte + productive process.
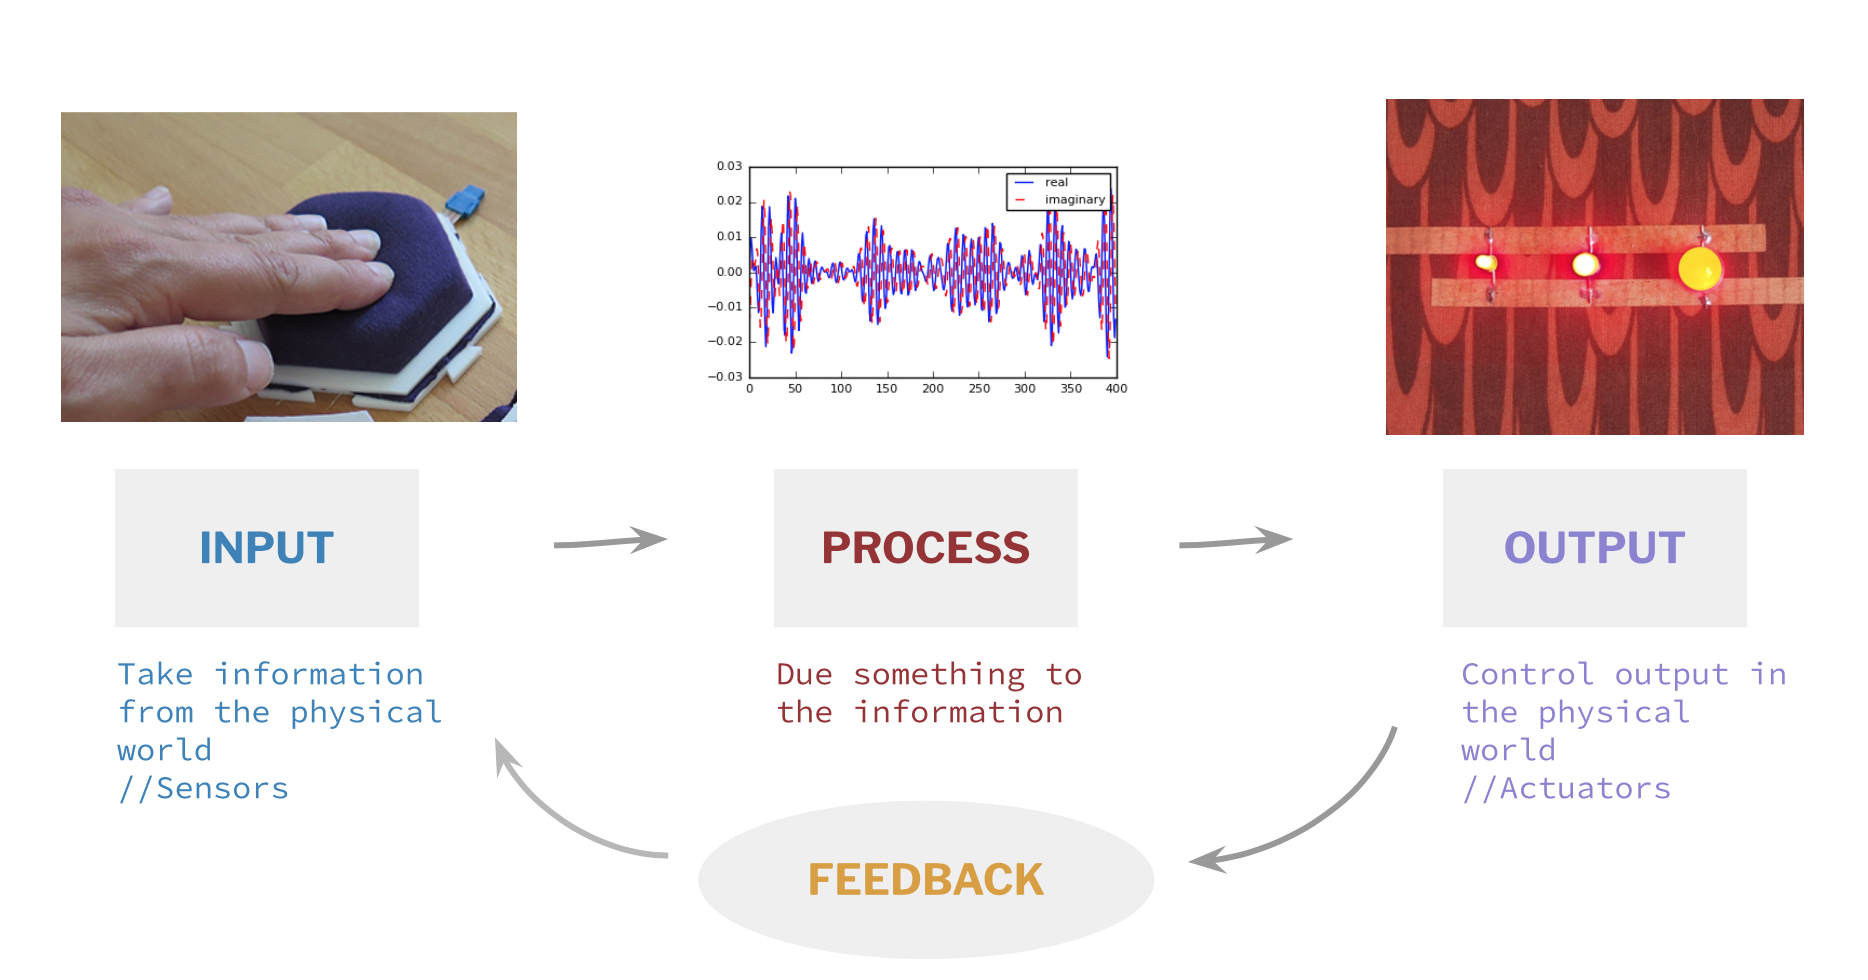
SENSORS
The Digital type works with with switches, these represent a break in a circuit and there are types of switches:
Momentary: best known as push buttons. They stay open as long as you hold the two pieces of conductive fabric sandwoched between a piece of foam, which will have small cutouts where the two pieces can touch. Toggle: Two pieces of conductive material that stay together. They are open in one position and closed in other. (snaps and zippers). Tilt: A conductive bead or pompon makes contact with conductive fabric patches based on its position. Stroke: Close the circuit by pressing conductive materials into contact.
The Analog type works with sensors (also variable resistors), they use resistance to get a broader. range of values. More currrent will allow to change the brightness of an LED, frequency of sound, or the speed or a motor. Resistance can be changed in 3 ways: Distance, resistance increases over distance, 4/5 ohms, limit is 2 ft Contact: some materials are pressure sensitive, will decrease in resistance when pressure is applied to them, so it means it will allow more electrical energy through. Surface area: increasing the size of the area for electricity to flow will decrease the resistance.
These are a few materials you can use if you want to design an analog sensor: 1. Velostat, which is non stretchy 1. EeonTex, resists between 10 OHMS to 10,000 ohms 1. Polysense, best for pressure sensors.
Pressure: Use this to track pressure or weight on an interface or object. Bend: Decreases when bent and more contact is made better for measuring joint movement. Is better if you use conductive thread and not conductive fabric. Potentiometer: Adjust resistance by connecting conductive and resistive material through a wiper (electrical contact which moves across a surface) at different pointsin the circuit. The further away, the more resistance. Stretch: The more a resistive material is stretched, the more its resistance will decrease because it has more surface area to cover. Accelerometic: The weight at the end pulls and stretches the crochet or knitted structure as it gets accelerated.
MICROCONTROLLERS
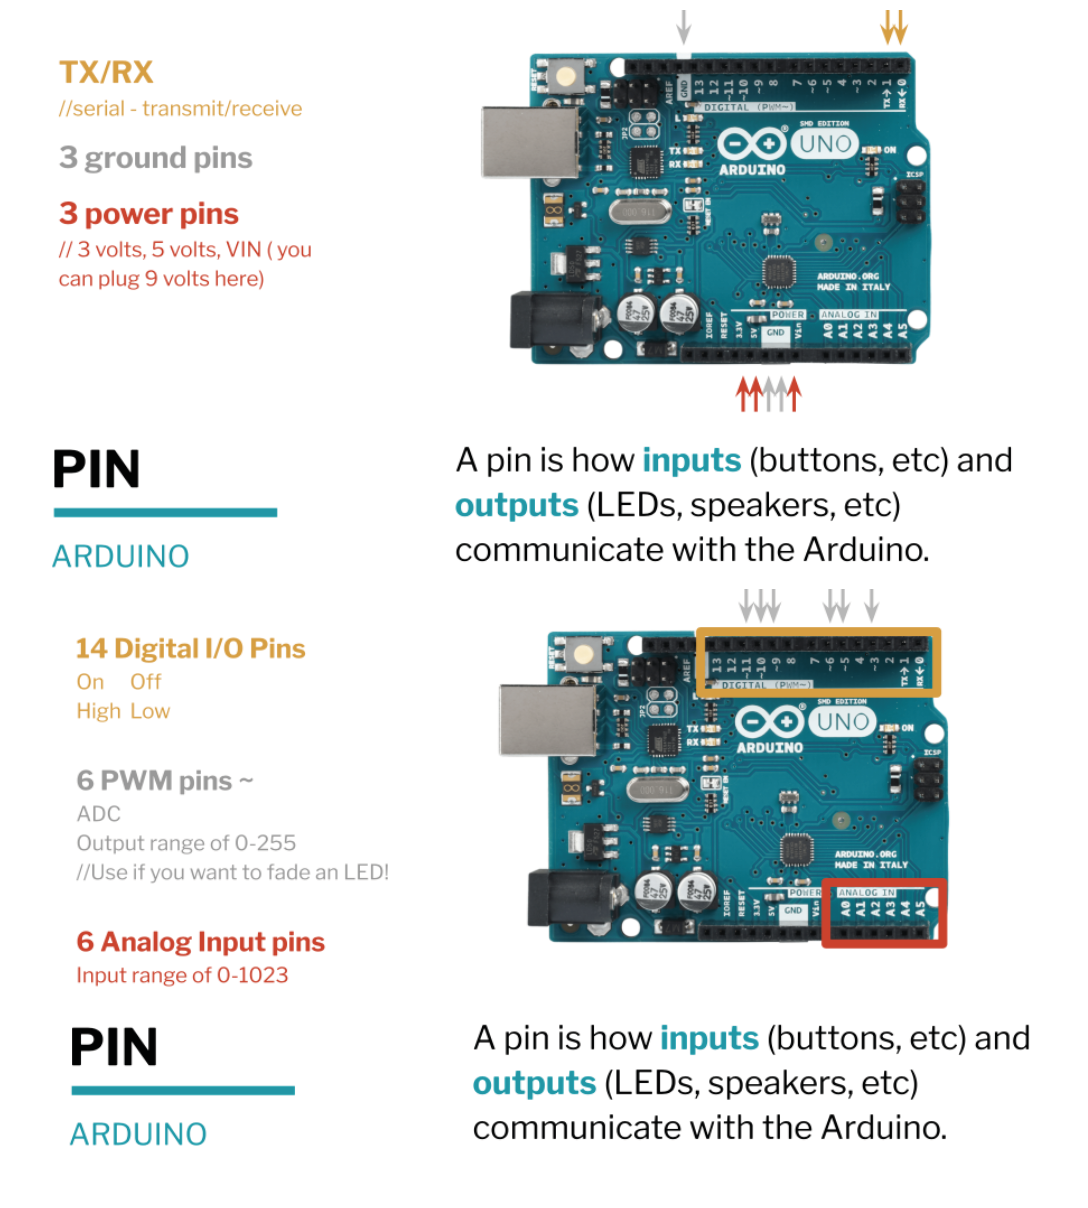
ARDUINO
CONCEPTS - Open source: - Copyright - Copyleft
Arduino speed 9600bps minimum ARDINO MICROCHIP COMPONENTS (digital pins and analog pins (the information only goes one way))
TOOLS
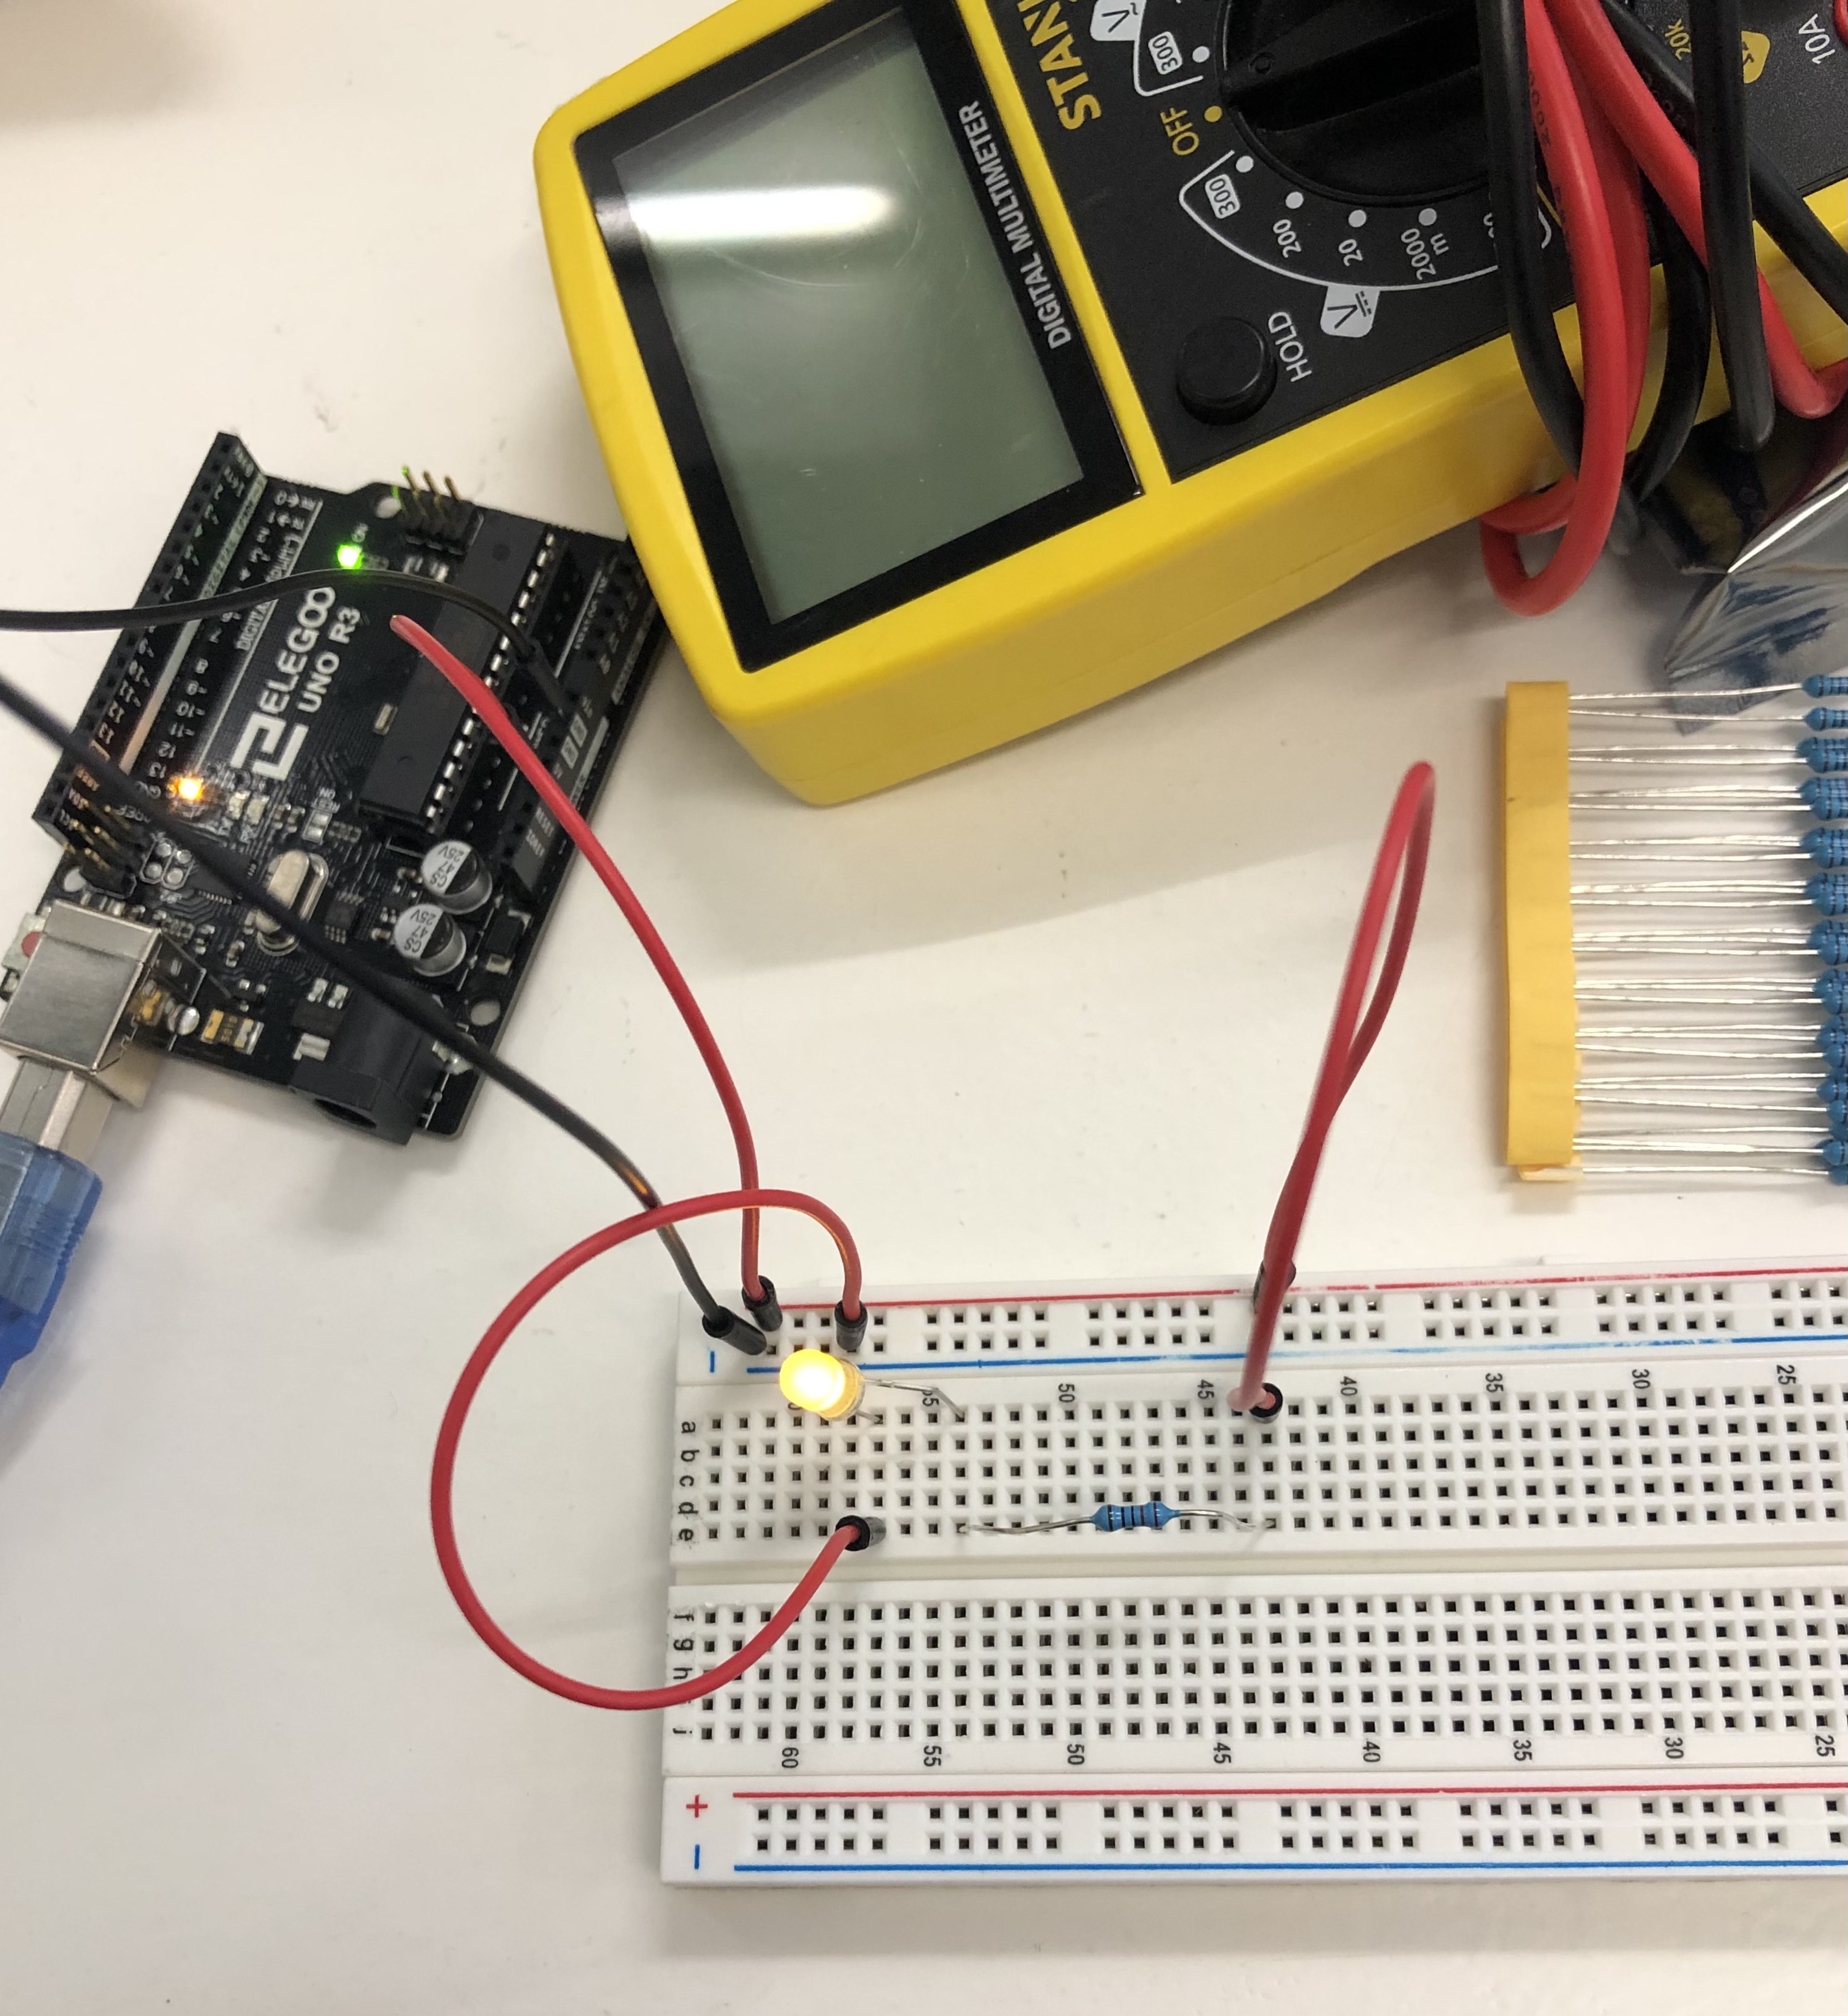
 A breadboard is physical suppor tool for making temporary circuits and prototyping.
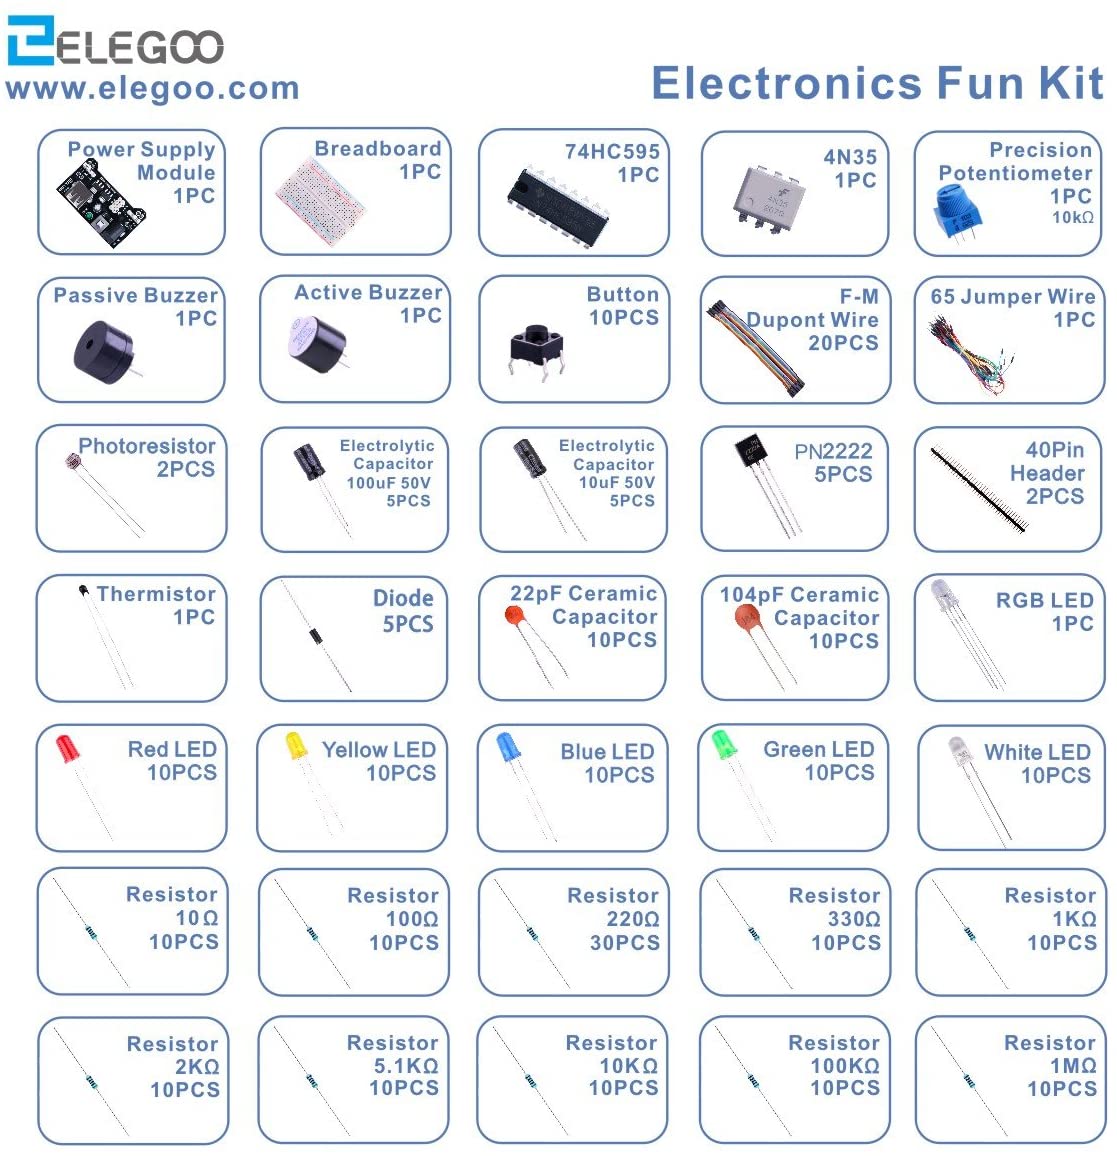
Explain components que vienen en la caja
A breadboard is physical suppor tool for making temporary circuits and prototyping.
Explain components que vienen en la caja
TRANSITORS
it´s an automatic switch
Combinational circuit (it´s a circuit with only one purpose - (input and output), needs to be connected, no memory ) vs sequential circuits (it changes over time, it depends on the information u give it)
Default code in arduino
void setup() {
  // put your setup code here, to run once:

}

void loop() {
  // put your main code here, to run repeatedly:

}
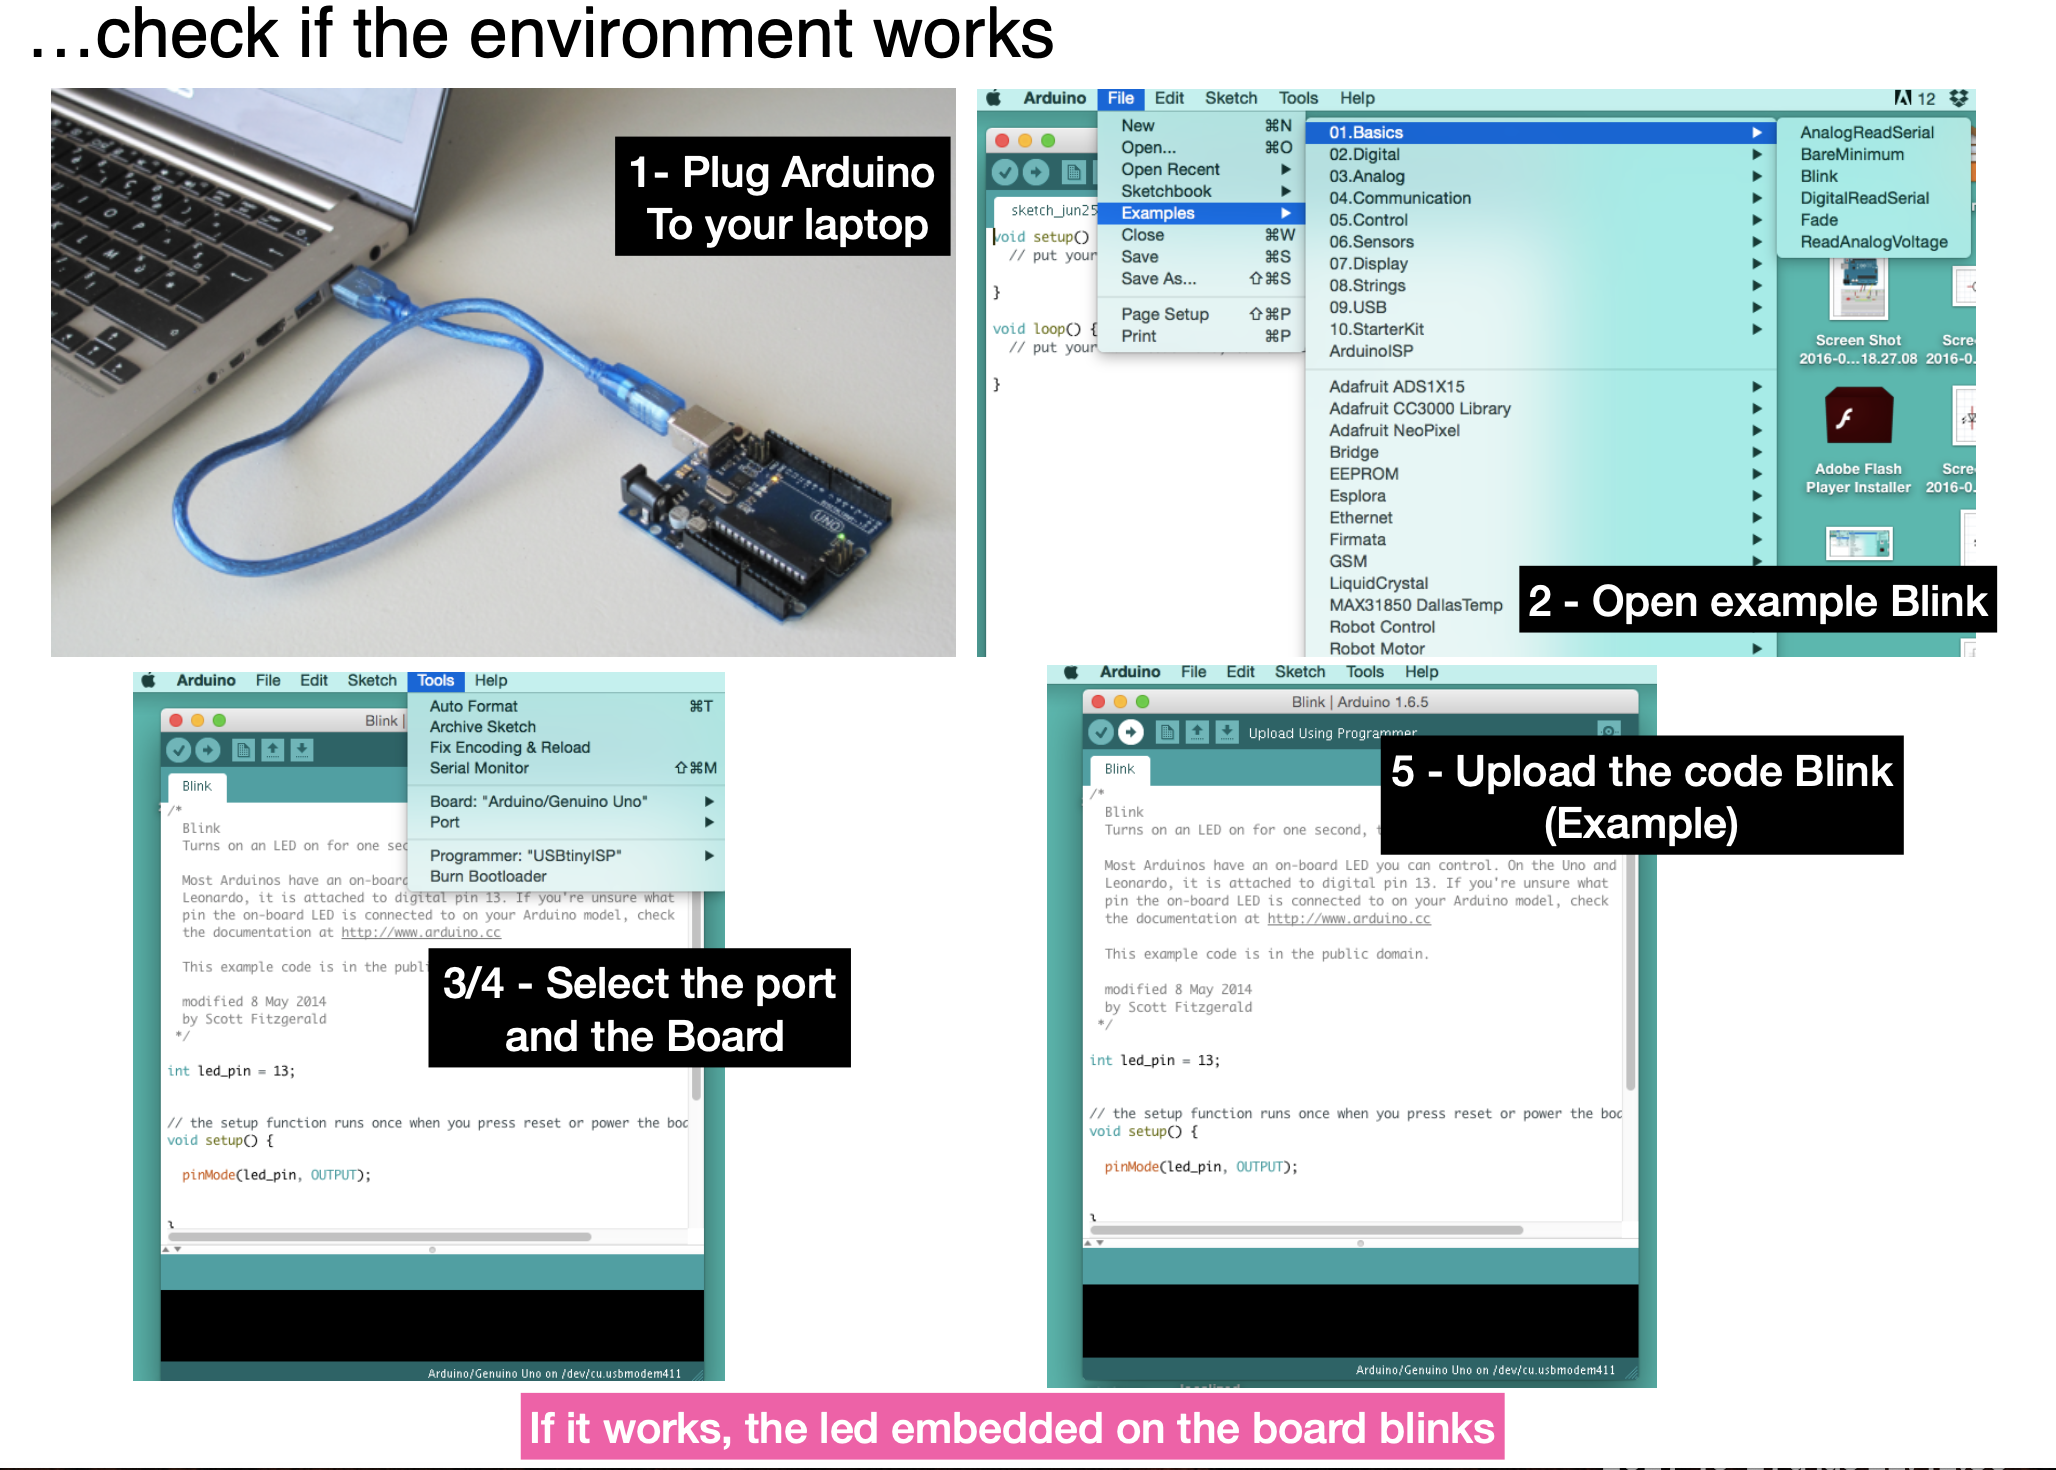
Turning on and off a LED Arduino Default Example
// the setup function runs once when you press reset or power the board
void setup() {
  // initialize digital pin LED_BUILTIN as an output.
  pinMode(LED_BUILTIN, OUTPUT);
}

// the loop function runs over and over again forever
void loop() {
  digitalWrite(LED_BUILTIN, HIGH);   // turn the LED on (HIGH is the voltage level)
  delay(1000);                       // wait for a second
  digitalWrite(LED_BUILTIN, LOW);    // turn the LED off by making the voltage LOW
  delay(1000);                       // wait for a second
}
Practice 1
void setup() {
  pinMode(13, OUTPUT);               // initialize digital pin 13 as an output.
}

void loop() {
  digitalWrite(13, HIGH);            // turn the LED on (HIGH is the voltage level)
  delay(1000);                       // wait for a second or 1000 milliseconds
  digitalWrite(13, LOW);    // turn the LED off by making the voltage LOW
  delay(1000);                       // wait for a second
}
Compile (tick sign) checks if the code is correct
how to apply that with the breadboard
Turning on and off a LED final Practice 2
int lecture;
int Button=5;
int LED = 13;

void setup () {
  pinMode (Button,INPUT);
  pinMode (LED, OUTPUT);
  Serial.begin(9600); // indicates we are sending information from arduino to the screen. Defines the baud rate (number of bits sent per second, the speed and amount of info we want to send)
}
void loop () {
  lecture = digitalRead(Button);

  if (lecture == HIGH){
    digitalWrite(LED,LOW);
  }
  else {
    digitalWrite (LED, HIGH);
  }

  // We could have avoided the if and else if we just defined lecture as a boolean (true or false, 1 or 0) and wrote digitalWrite(LED,!lecture);

  Serial.println(lecture); //prints on the serial monitor screen the values at the speed of 9600 bites per second. The values will be printed in different lines in the serial monitor or plotted in the serial plot.
  delay (200);
}
PWM (FADE LED) ANALOG SENSOR
int lecture;
int LED = 6;
int mapping;

void setup() {
  // put your setup code here, to run once:
  pinMode(A1, INPUT);
  pinMode(LED, OUTPUT);
  Serial.begin(9600);
}

void loop() {
  // put your main code here, to run repeatedly:
  lecture = analogRead(A1);
  mapping = map(lecture,300,1023,0,255);
  analogWrite(LED,mapping);
  Serial.println (lecture);
  delay(100);
}
PROTOTIPE CODE DIGITAL
int lecture;
int LED = 6;


void setup() {
  // put your setup code here, to run once:
  pinMode(A1, INPUT);
  pinMode(LED, OUTPUT);
  Serial.begin(9600);

}

void loop() {
  // put your main code here, to run repeatedly:
  lecture = analogRead(A1);
if (lecture <= 500 ) { digitalWrite(6,LOW) ; }
else { digitalWrite(6,HIGH) ;}
  Serial.println (lecture);
  delay(100);
}
PROTOTIPE CODE ANALOG
int lecture;
int LED = 6;
int mapping;


void setup() {
  // put your setup code here, to run once:
  pinMode(A1, INPUT);
  pinMode(LED, OUTPUT);
  Serial.begin(9600);

}

void loop() {
  // put your main code here, to run repeatedly:
  lecture = analogRead(A1);
  mapping = map(lecture,300,1023,0,255);
  analogWrite(LED,mapping);
  Serial.println (lecture);
  delay(100);
}