10. Wearables
ASSIGNMENT
Document the concept, sketches, references also to artistic and scientific publications Create a swatch using an ATtiny with one input and one output, using hard-soft connection solutions and battery Create 2 actuator swatches. Test them with the Arduino or ATtiny. Learn how to program and ATTiny , add the libraries and links used for the code Document the schematic and the programming code, the libraries added and the power requirements Upload a small video of your object working EXTRA POINT Integrate it to a project
Research
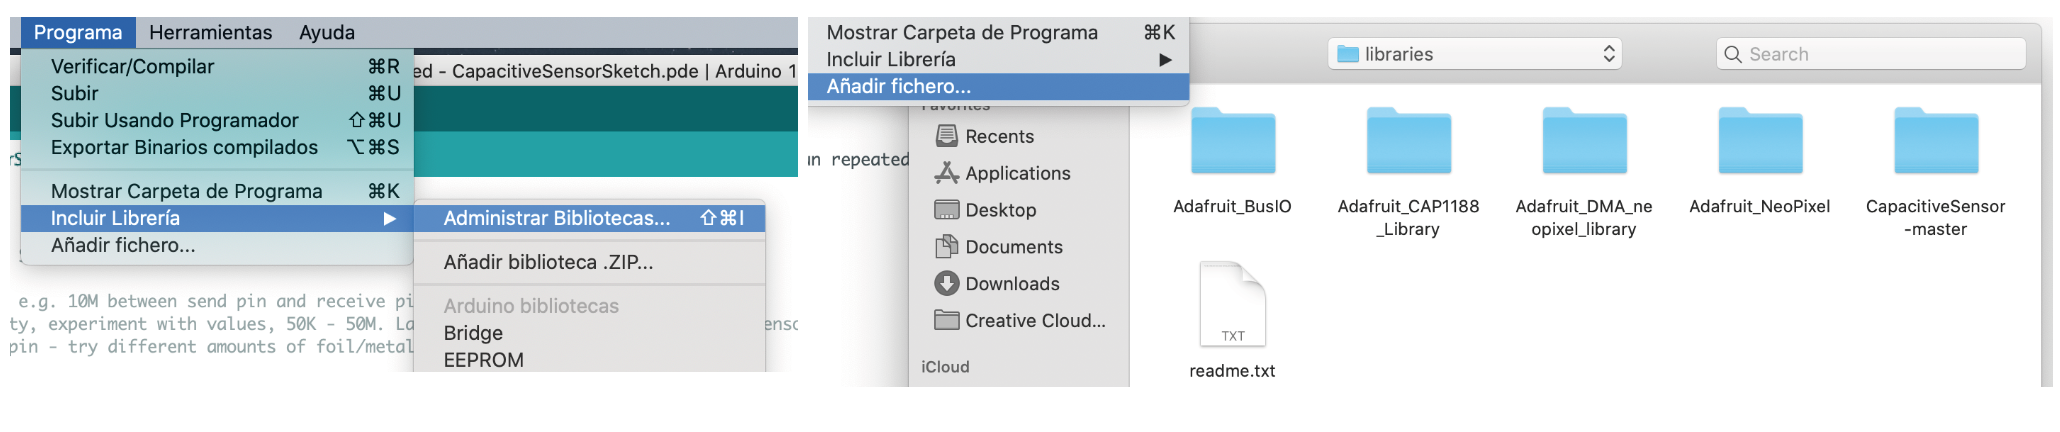
HOW TO INSTALL LIBRARIES INTO AURDUINO?
TRANSISTOR SETUP
Pic
we use the transistor as an electrical switch, by applying a small amount of voltage to the gate using the Arduino, current can flow between the drain and the source. We had to solder the corners because the glue wasn’t allowing for the current to pass from one copper tape to another.
Thermochromic ink
- Inks that change state in the presence of heat.
- Once they reach a temperature the inks become colorless
- Pigments can be with different substrates like paint,glue, Polymorph,etc.
- You can control this change by using body heat, a hair dryer or heat generated by electricity (by running current through a heating element).
- You can combine different colours to crate different effects
- Tracing paper reacts more quickly than canvas
- You want your conductive material to have just the right amount of resistamce. Too high and it won´t change, too low and you might create a short circuit.
- Heating takes a lot of current and Arduino pins cannot provide the power we need to warm a heating component. We can´t draw motr than 40mA from a pin. So we have to construct a circuit that would let us use a secondary power source. Thanks to transistors, we can do this.
Trnsistor needed ; N-Channel MOSFET (we use the transistor as an electrical switch, by applying a small amount of voltage to the gate using the Arduino, current can flow between the drain and the source.

Speakers
ELECTROMAGNENTS the tihgter the coil, the stronger the magnetic field, the lauder it'll get.
Motion
SMA´s are metals than change shape when they are heated to a certain temp. They behave like regular metals when cool and return to present shape when heated. For this we use ####flexanol (untrained flexanol will contract 10% of its length when the heat is applied and trained flexinol also contracts by 10% but has been trained into a shape through a heating process, so when heated it will return to the shape it was trained to.
PROGRAMMING
Arduino programming language can be divided in three main parts: functions, values (variables and constants), and structure. Functions (Boolean means; tru or False (1 or 0) When we have two equals == it means we are comparing)
digitalRead()
Reads the value from a specified digital pin, either HIGH or LOW.

int ledPin = 13;  // LED connected to digital pin 13
int inPin = 7;    // pushbutton connected to digital pin 7
int val = 0;      // variable to store the read value

void setup() {
  pinMode(ledPin, OUTPUT);  // sets the digital pin 13 as output
  pinMode(inPin, INPUT);    // sets the digital pin 7 as input
}

void loop() {
  val = digitalRead(inPin);   // read the input pin
  digitalWrite(ledPin, val);  // sets the LED to the button's value
}
-
digitalWrite() Write a HIGH or a LOW value to a digital pin.
-
Capacitors It acts like a battery (it stores a bit of battery) paralel adds current sirial adds voltage
- TOUCH SENSOR capcity sensors; plants, mushrooms, fabric...
- POWER LOAD According to the Arduino application, a Power loads is an output that can’t be supplied by the Arduino I/O pin.
- The max current that a 10 pin Arduino can source is 20 mA.
- Even without a multimeter you are able to test the energy of your loads. You can calculate the resistivity using the multimeter and then calculate the conditions for your device in which it will operate in. This can be done by powering the device with something other than an Arduino.
CIRCUIT THERMOCHROMIC INK & SMA
CODE;
// the setup function runs once when you press reset or power the board
void setup() {
  // initialize digital pin LED_BUILTIN as an output.
  pinMode(13, OUTPUT);
  pinMode(3, INPUT);
}

// the loop function runs over and over again forever
void loop() {
  if (digitalRead(3) == LOW){
    digitalWrite(13, HIGH);
  }
  else {
    digitalWrite(13, LOW);
  }
  delay(5 00);                       // wait for a second
}