5. E-textiles
References & Inspiration
Wearables
LEDs + Optic Fiber JellyFish dress
Dress that becomes more or less transparent based on interactions https://www.studioroosegaarde.net/project/intimacy
https://behnazfarahi.com/bodyscape/ https://behnazfarahi.com/Iridescence/ https://behnazfarahi.com/opale/ https://behnazfarahi.com/ruff/
Sense-Roid: hug yourself https://www.novriki.com/sense-roid-en/
Hug shirt: https://cutecircuit.com/hugshirt/
Imogen Heap gloves https://mimugloves.com/
Traces
get types of traces from slides
Conductive thread: Handmade stitches, Machine embroidery
Conductive inks made by Lauriane and Amandine and Laora: https://zoeey.notion.site/Conductible-Inks-4d0df4c01e364a5e9a72b6c89b5fc38c
Knitting with conductive yarn
Conductive fabric
Continuity Tester
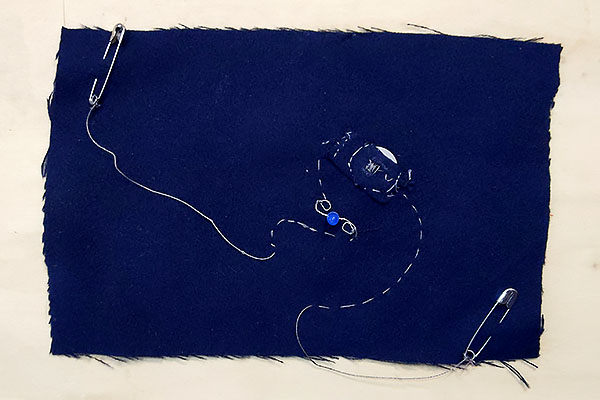
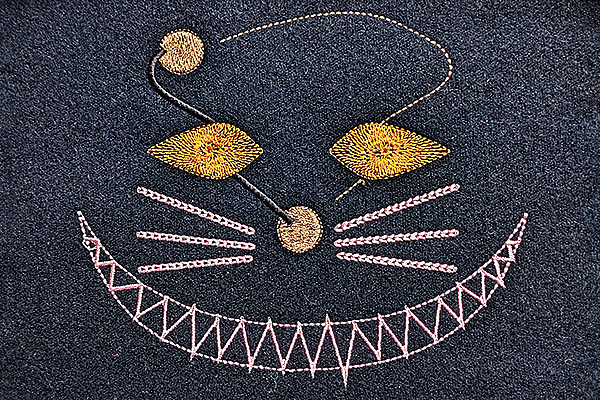
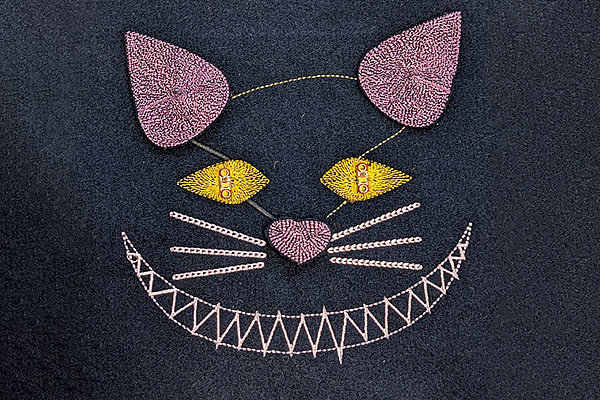
Machine embroidery
Used LED sequins
Switches
Binary Get screenshots from class video
http://thesoftcircuiteer.net/projects/soft-switches/
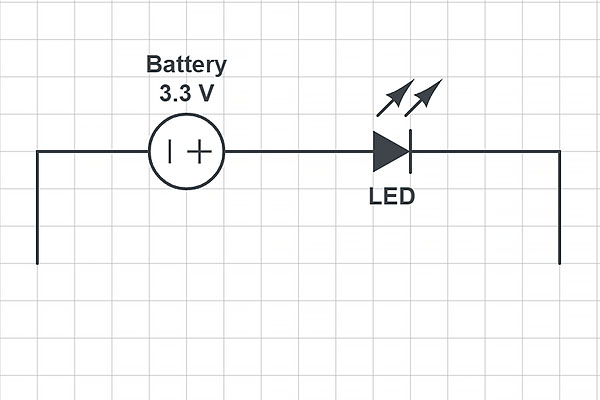
Soft Switch
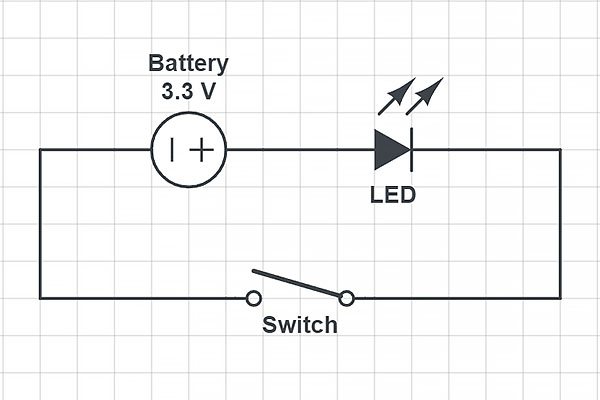
Switch I made:
Circuit with LED on/off
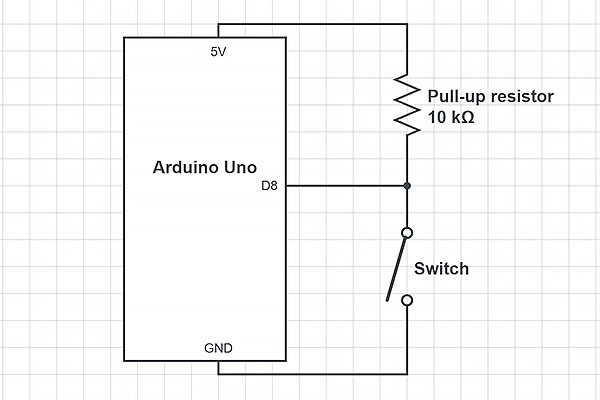
Using a switch with Arduino
To use switches with Arduino, we need additional resistors.
Digital sensor : use a pull-up resistor around 10 kΩ
Code
/*Emma Pareschi - Fabricademy 2022/2023
 * we read the value of a digital sensor connected to pin digital_sensor_pin and
 * we print it on the Serial Monitor
 */

int digital_sensor_pin = 8;     //change the pin, where the sensor is connected
int digital_sensor_value = 0;   //variable in which we save the sensor voltage

void setup() {
  // put your setup code here, to run once:

  //pinMode(digital_sensor_pin, INPUT);
  pinMode(digital_sensor_pin, INPUT); //define the pin as INPUT PULLUP
  Serial.begin(9600); //open communication

}

void loop() {
  // put your main code here, to run repeatedly:
  // digitalRead(pin);
  digital_sensor_value = digitalRead(digital_sensor_pin); // read the sensor

  Serial.print("the status of the sensor is: ");
  Serial.println(digital_sensor_value); //print the value
  delay(100);

}
Sensors
Analog
Lisa's soft sensors: http://thesoftcircuiteer.net/projects/soft-sensors/
Soft sensors are particularly interesting to me, because they go beyound simply sewing an electrical circuit on top of fabric. They use the properties of the fabric itself as part of the design and offer new modes of interaction: bending, squeezing, stretching...
Soft sensor
Sensor I made:
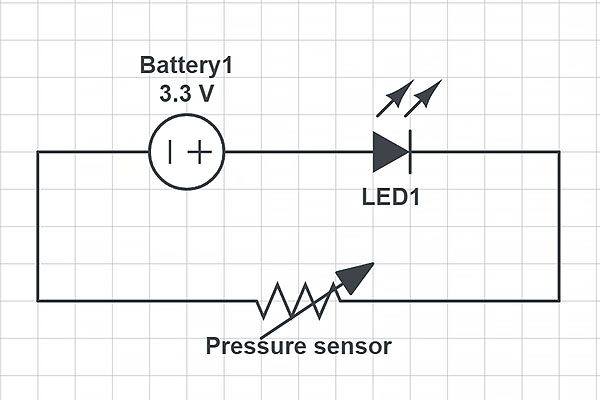
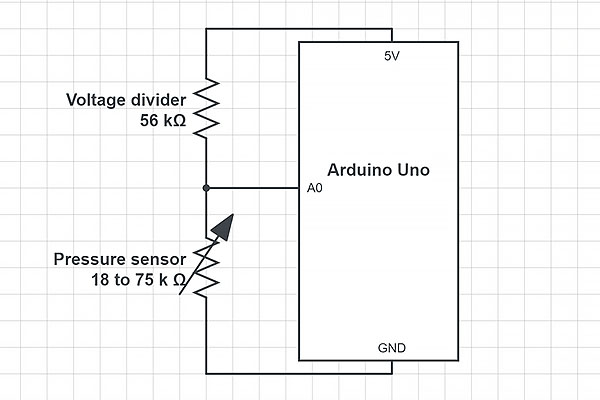
Using a pressure sensor with Arduino
For analog sensor you also need an additional resistor, here as a voltage divider
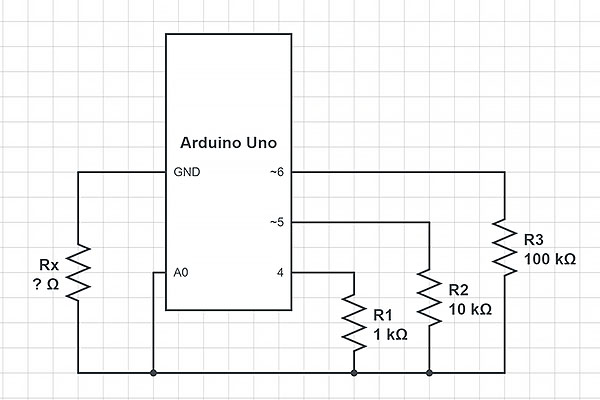
I didn't have a multimeter so I made a Arduino ohmmeter https://electropeak.com/learn/make-a-digital-multimeter-with-arduino/
Code
/*
  Ohmmeter with Arduino - Automatic range
  modified on 21 Jul 2019
  by Saeed Hosseini @ Electropeak
  Home
*/
const int OhmMeter = 0;
const int R3 = 6;
const int R2 = 5;
const int R1 = 4;
float R = 0.00;
void calculate_resistor() {
  float v_ref = 4.94;
  float r1 = 0.00;
  float r_ref1 = 1000.00;
  float adc_value1 = 0.00;
  float voltage1 = 0.00;
  float r2 = 0.00;
  float r_ref2 = 10000.00;
  float adc_value2 = 0.00;
  float voltage2 = 0.00;
  float r3 = 0.00;
  float r_ref3 = 100000.00;
  float adc_value3 = 0.00;
  float voltage3 = 0.00;
  pinMode(R1, OUTPUT);
  pinMode(R2, INPUT);
  pinMode(R3, INPUT);
  digitalWrite(R1, HIGH);
  for (int i = 0; i < 20 ; i++)
  {
    adc_value1 = adc_value1 + analogRead(OhmMeter);
    delay(3);
  }

  adc_value1 = adc_value1 / 20;

  if (adc_value1 < 1022.90)
  {
    voltage1 = ((adc_value1 * v_ref) / 1024);
    r1 = (voltage1 * r_ref1) / (v_ref - voltage1);
  }
  pinMode(R1, INPUT);
  pinMode(R2, OUTPUT);
  pinMode(R3, INPUT);
  digitalWrite(R2, HIGH);
  for (int i = 0; i < 20 ; i++)
  {
    adc_value2 = adc_value2 + analogRead(OhmMeter);
    delay(3);
  }
  adc_value2 = adc_value2 / 20;
  if (adc_value2 < 1022.90)
  {
    voltage2 = ((adc_value2 * v_ref) / 1024);

    r2 = (voltage2 * r_ref2) / (v_ref - voltage2);
  }
  pinMode(R1, INPUT);
  pinMode(R2, INPUT);
  pinMode(R3, OUTPUT);
  digitalWrite(R3, HIGH);
  for (int i = 0; i < 20 ; i++)
  {
    adc_value3 = adc_value3 + analogRead(OhmMeter);
    delay(3);
  }
  adc_value3 = adc_value3 / 20;
  if (adc_value3 < 1022.90)
  {
    voltage3 = ((adc_value3 * v_ref) / 1024);
    r3 = (voltage3 * r_ref3) / (v_ref - voltage2);
  }
  r1 = r1 / 1000;

  r2 = r2 / 1000;

  r3 = r3 / 1000;
  if (r1 < 2 && r2 < 101 && r3 < 1001) R = r1*1000;
  else if (r1 > 2 && r2 < 101 && r3 < 1001) R = r2;
  else if (r1 > 2 && r2 > 101 && r3 < 2000) R = r3;
  else R = 0.00;
  Serial.print("R = ");

  Serial.println(R, 2);
}
void setup() {

  Serial.begin(9600);
}
void loop() {
  calculate_resistor();
  Serial.println("_________________________________________");

  delay(2500);
}
I tried it on a 10 kΩ resistor and got readings around 9.89 / 9.90.
I then tried it on the analog sensor: - min resistance value: 18 kΩ - max resistance value: 75 kΩ
The average resistance value is 46.5 kΩ. The closest resistor I had on hand was 56 kΩ.
Code
/* Emma Pareschi - Fabricademy 2022/2023
 * with this sketch we read the analog sensor connected to pin analog_sensor_pin
 */

int analog_sensor_pin = A0;   //change the pin, where the sensor is connected?
int analog_sensor_value = 0;

void setup() {
  // put your setup code here, to run once:
  pinMode(analog_sensor_pin, INPUT);
  Serial.begin(9600);

}

void loop() {
  // put your main code here, to run repeatedly:
  analog_sensor_value = analogRead(analog_sensor_pin); //read the Voltage of the pin sensor

  Serial.println(analog_sensor_value); // print the value on the Serial monitor
  delay(100);

}
Tried Analog reading
Analog values read on the Serial Monitor: between 200 (when pressed) and 1000 (when not pressed).
I also tried with a 10kOHM and a 100kOHM and got a similar range.
Max number is 1024 (5V) and 0 (0V) so 200/1000 is a good range!
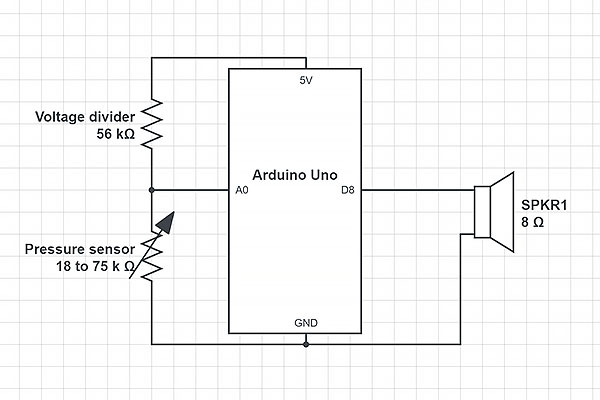
Code
const int ANALOG_SENSOR_PIN = A0;
const int ANALOG_SENSOR_MIN = 200;
const int ANALOG_SENSOR_THRESHOLD = 750;
const int SPEAKER_PIN = 8;

int analog_sensor_value = 0;


void setup() {
  pinMode(ANALOG_SENSOR_PIN, INPUT);
  Serial.begin(9600);

}

void loop() {

  analog_sensor_value = analogRead(ANALOG_SENSOR_PIN);
  Serial.println(analog_sensor_value);

  if (analog_sensor_value<ANALOG_SENSOR_THRESHOLD)
  {
    analog_sensor_value = map(analog_sensor_value, ANALOG_SENSOR_MIN, ANALOG_SENSOR_THRESHOLD, 5000, 200);
    tone(SPEAKER_PIN, analog_sensor_value, 200);
  }

  delay(50);

}
Sound sensitive headband
Flora
Used Neopixels